Home » Posts tagged 'vitelity' (Page 2)

Tag Archives: vitelity

The Most Versatile VoIP Provider: FREE PORTING

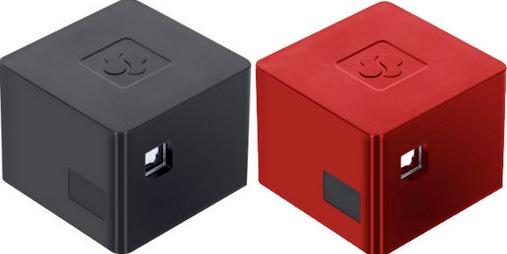
Hardware Device of the Year: Meet the CuBox-i with Incredible PBX for Ubuntu

It’s been many years since we’ve written back-to-back articles about the same device. That should tell you how really special the CuBox-i is. After two weeks of 14-hour days developing the new Incredible PBX platform for CuBox, we are thrilled to crown this jewel as Nerd Vittles Hardware Device of the Year. Flawless design, incredible performance, tiny size, feature-rich components, minimal power consumption, and completely silent operation are merely the tip of the iceberg with this 2x2x2 cubic zircon. On the $130 CuBox-i4PRO, there’s a Quad Core processor, 2 gigs of RAM, a 10/100/1000 Ethernet port, a 1080p HDMI port, two powered USB 2 ports, an eSATA II port for an external drive, a realtime clock with backup battery, an Optical S/PDIF Audio Out port, a microSD port, an infrared receiver and transmitter, WiFi 11n, and Bluetooth plus a power adapter to match either American or European power sources. Whew! And here’s the best part. Everything works while squeezed in a tiny case that’s a third the size of Rubic’s Cube.

A SOHO Swiss Army Knife That Fits in Your Cupholder: Voice, Fax, SMS, TTS, Email, PBX, Incredible!

Did we mention it’s a near perfect VoIP platform for any home office or small business? Well, it is. And everything we’ve learned about Asterisk® and FreePBX® and Internet security over the past decade is rolled into today’s release of our crown jewel edition of Incredible PBX™ for the CuBox. First, you’ll need to purchase one and we strongly recommend the CuBox-i4PRO with its Quad Core ARM processor and built-in WiFi and Bluetooth. In the U.S, there’s NewEgg or NewEgg (10% off on i4PRO with promo code SW829NE10 = $117 until 9/4). In the U.K, there’s NewIT. For everyone else, you can buy directly from SolidRun, the creator.

Before we dive into Incredible PBX, we want to express our deepest appreciation to Zhando and Josh North of PIAF Forum fame. Zhando’s pioneering efforts with Ubuntu and Incredible PBX on the CuBox platform and Josh North’s morphing of Incredible Fax for deployment with Ubuntu paved the way for everything you’re about to read. It reinforces the spectacular results which can be achieved in the open source community when a talented group of even a few folks put their heads together. The Ubuntu developers and the tens of thousands of open source contributors from around the world also deserve a well-earned tip of the hat for producing a Linux platform that is rock-solid reliable and incredibly versatile. Nearly 1,000 open source packages are included in the latest Incredible PBX build. Click on the link to view the package list in PDF format and prepare to be amazed. We couldn’t have done it without all of you!

Introducing Incredible PBX 11.12.0 for the CuBox-i4PRO

If you’re new to Asterisk and the world of VoIP telephony, let us take a moment and explain how Incredible PBX fits into the puzzle. For lack of a better term, Incredible PBX on the CuBox platform is a turnkey aggregation in a bootable image that is based upon a superset of Ubuntu 14 packages plus Asterisk, the FreePBX GUI, and a sizable collection of applications for the Asterisk platform. You download a tarball, decompress it, write the image file to a microSD card, insert the card into your CuBox-i, and presto! You’ve got a turnkey PBX. Add credentials for a trunk or two to make and receive calls, connect some phones, and your whole office will come alive with a versatile PBX platform that used to cost organizations hundreds of thousands of dollars. What’s included in Incredible PBX? Glad you asked. Here’s a 3-minute video showcasing a few of our favorite Incredible PBX text-to-speech applications:


The Incredible PBX 11 Inventory. Here’s the current feature set on the CuBox platform. It’s the most robust ever! In addition to its superset of nearly 1,000 Ubuntu 14 packages, Asterisk 11, and FreePBX 2.11 with Apache, SendMail, MySQL, PHP, phpMyAdmin, Fail2Ban, WebMin, and the IPtables Linux firewall, check out these additions:

A Few Words About Security. Thanks to its Zero Internet Footprint™ design, Incredible PBX is different. It remains the most secure Asterisk-based PBX around. What this means is Incredible PBX has been engineered to sit anywhere, either behind a NAT-based, hardware firewall or directly on the Internet. No device other than those on your private LAN, a few of the major (trusted) SIP providers around the world, and those that you authorize on your WhiteList can even see your server. Additional IP addresses can be added to the WhiteList in three ways:

  1. An administrator registers new IP addresses using add-ip or add-fqdn from the Linux CLI
  2. A remote user sends the (correct) randomized PortKnock code assigned to your CuBox
  3. A remote user dials in from a standard telephone to register a new remote IP address

Read about this $100,000 VoIP phone bill, and you’ll better appreciate why WhiteList-based server security has become absolutely essential. WhiteList Security means only those devices with a registered IP address in your WhiteList can get to your server’s resources. To the NSA and everyone else, your server doesn’t even show up on the radar. Their only way to contact you is a POTS telephone using your published phone number. Our complete tutorial on Travelin’ Man 3 is available here. With Incredible PBX for CuBox, it’s installed and preconfigured.

Installing Incredible PBX 11.12.0 on the CuBox-i

There are five simple steps to get Incredible PBX up and running on your CuBox:

  1. Purchase a storage device
  2. Download Incredible PBX image
  3. Untar the image on your desktop
  4. Burn the image to a microSD card
  5. Insert microSD card in CuBox and boot

Choosing a Storage Platform. Unless you plan to run your server with an external eSATA hard drive (CuBox-i4PRO tutorial here), the first step is to purchase a suitable microSD card. We recommend at least a 32GB Class 10 card from Transcend, SanDisk, or Kingston. All of them are under $20 on Amazon and most include free 2-day shipping for Prime customers. If using an eSATA drive, you still need a microSD card to boot up, but any 4GB or 8GB card will suffice.1

Downloading Incredible PBX for CuBox. From your favorite desktop computer, download the latest build of Incredible PBX from SourceForge. Depending upon your network connection and the SourceForge mirror, it can take awhile. It’s a whopping 1.3GB!

Untarring Incredible PBX for CuBox. Depending upon your desktop platform, untarring incrediblepbx.4.cubox.U14.latest.tar.gz is as simple as double-clicking on it in the Downloads folder (on a Mac). On the Windows platform, here are 3 utilities that will do the job. On a Linux desktop, open a Terminal window and…

tar zxvf incrediblepbx.4.cubox.U14.latest.tar.gz

Burning the Incredible PBX image to microSD. Once you’ve untarred the file, you’ll find two scripts that make burning the image to a microSD card simple if you’re on a Mac or Linux desktop. On a Windows machine, it’s a little more complicated. Most SD cards come preformatted with a DOS partition so your Windows machine should recognize the microSD card when it’s inserted. If not, format the card using a utility such as SD Card Formatter. Next, you’ll need Win32 Disk Imager to burn cubox.img to your card. Once the image has been transferred, gracefully unmount the card from your desktop, and then remove the card from the SD card adapter.

Booting Incredible PBX on the CuBox. Insert the microSD card (electronics side up) into your CuBox-i. Then apply power to the CuBox after connecting a USB keyboard, HDMI monitor, and Ethernet cable to a network with Internet connectivity that can also hand out DHCP addresses. Log into Incredible PBX as root with cubox as your password. Your SSH credentials, Asterisk DUNDI secrets, logs, and network connection options will be initialized and then your server will reboot. You may need to hit the Enter key once or twice during the SSH credentials initialization to move things along. And, with some SD cards, you may find yourself waiting an eternity for the promised reboot. After seeing the "rebooting" message, count to ten. If your server still hasn’t rebooted, remove and reapply power. This quirk goes away after the first reboot.

After the reboot, log in again as root with password: cubox. Your firewall setup will be initialized to lock down your whitelist to your server’s public and private IP addresses AND the IP address of the machine from which you’re logging in. All of your FreePBX passwords will be randomized and your secret PortKnocker codes will be generated. The whole process only takes a few seconds.

When the second pass configuration is complete, you will be greeted by a welcoming message. STOP and read it. It has loads of important information about your server’s configuration and your next steps. Press ENTER to review status:

The Next 10 Steps. Before you do anything else, complete the following steps. It only takes a minute to secure and properly configure your server:

  1. Change your root password: passwd
  2. Change your FreePBX admin password: /root/admin-pw-change
  3. Set your correct time zone: /root/timezone-setup
  4. Expand partition to match microSD card size: /root/resize-partition
  5. Add any desired IP addresses to WhiteList: /root/add-ip
  6. Put PortKnocker credentials in a safe place: cat /root/knock.FAQ
  7. Change AvantFax admin password: /root/avantfax-pw-change
  8. Set Email Address for Incoming Faxes: /root/avantfax-email-dest
  9. Check status to be sure everything is working: status
  10. If using an eSATA external drive, do the migration drill (note the free disk space in status above)

A Few Important Tips. Every operating system and service provider has their quirks. Ask Bill Gates! Ubuntu and especially Comcast are no different. Fortunately, with Ubuntu, it’s a very short list.

1. Use the following commands (only!) to shutdown and restart your server: halt and reboot. These commands are reworked in Incredible PBX to gracefully shutdown important services so that files don’t get damaged. Please use them!

2. If you ever want to move your server to a different network, complete these three simple steps before you leave your existing network. This will trigger a new Phase I update (outlined above) and set the default network back to wired eth0 using DHCP the next time you boot your server.

touch /etc/update_hostconfig
/root/enable-eth0-only
# press Ctrl-C when prompted to reboot. then type:
halt

3. You really do need email connectivity to get the most out of Incredible PBX. It’s the way you receive important notifications from FreePBX, and it’s also how faxes and voicemail messages are delivered. From the Linux CLI, test your server to be sure you can send emails reliably:

echo "test" | mail -s testmessage yourname@gmail.com

After checking your spam folder, if you really didn’t get the email, it may be that your service provider is blocking downstream SMTP traffic. You can use your provider’s SMTP server as a smarthost to send out mail with SendMail. Just edit /etc/mail/sendmail.cf, search for DS, and add the provider’s SMTP server address immediately after it (no spaces!), e.g. DSsmtp.comcast.net or DSsmtp.knology.net. Then restart SendMail: service sendmail restart.

Once you’ve logged into FreePBX below, be sure to set your default email address in the right margin of Admin -> Module Admin and save your entry. This will assure receipt of timely notifications of FreePBX updates for your server.

4. If you’re sure you’ll never need remote access in an emergency, you can disable PortKnocker at startup and save about 5% of your processing cycles. Our complete PortKnocker tutorial is available here. To disable startup on boot, issue the following command from the Linux CLI:

update-rc.d -f knockd disable

5. The same applies to WebMin. We actually introduced one of the first tutorials for WebMin… over 9 years ago. A word to the wise: WebMin is a terrific tool for looking at stuff about your system. But be very careful making system changes with WebMin. You usually will break some of the customized settings in Incredible PBX. This is particularly true in the case of the IPtables firewall. To access WebMin, use a browser and the actual IP address of your server to go to: https://12.34.56.78:9001. Log in as root with your root password. To disable automatic startup of WebMin on boot:

update-rc.d -f webmin disable

Setting Up WiFi with the CuBox-i4PRO

This may sound simple now, but two weeks ago it was quite a different story. For those with a CuBox-i4Pro, WiFi is built into the hardware. The trick was getting it to work. Well, with Incredible PBX, it does. In the /root folder, you’ll find several self-explanatory scripts to do the heavy lifting for you. For options 2 and 3, you’ll need the SSID of the WiFi network you’ll be using as well as the SSID password.

  1. enable-eth0-only (the default setting)
  2. enable-wifi-eth0 (enables both but eth0 works with Asterisk)
  3. enable-wifi-only (runs your server purely on WiFi)

Getting Started with VoIP and FreePBX

Up to now, all of your time has been spent using the Linux CLI. That will be a rarity once you get this far. Henceforth, 90% of your time setting up Incredible PBX will be done using the FreePBX GUI and your favorite web browser. To access it, just point to the IP address of your server. status will tell you the address if you’ve forgotten it. The main control panel looks like this:

As configured, the default user account for both FreePBX and AvantFax administration is admin. The passwords are whatever you set in steps #2 and #7 above. As configured, email delivery of faxes with AvantFax is automatic so no further setup is required other than setting a delivery mechanism for faxes within FreePBX.

For those new to Asterisk and FreePBX, here’s a brief primer on what needs to happen before you can make and receive calls. If you have an existing Google Voice account or a smartphone that’s less than 2 years old, lucky you. This gets you a phone number for your PBX so people can call you. And it provides a vehicle to place calls to plain old telephones at little or no cost.

If you don’t have a Google Voice account or a shiny new smartphone, then you will need to purchase a SIP trunk from one of the numerous vendors around the world. Our favorite (because they provide terrific service at a modest price AND provide financial support to the Nerd Vittles, PBX in a Flash, and Incredible PBX projects) is Vitelity. Their special rates and a link for a discount are included at the end of today’s article.

Unlike POTS phone service from Ma Bell, the SIP World is a little different. First, you don’t need to put all your eggs in one basket. A trunk that gets you a phone number for incoming calls need not be with the same vendor that provides a trunk to place outbound calls. In fact, you may want multiple trunks for outbound calls just to have some redundancy. A list of our favorites in the U.S. and Canada is available on the PIAF Forum. Of course, there also are providers that offer all-you-can-eat calling plans. Two of our favorites are Vestalink and Future-Nine.

You’ll also need a softphone or SIP phone to actually place and receive calls. YATE makes a free softphone for PCs, Macs, and Linux machines so download your favorite and install it on your desktop.

Phones connect to extensions in FreePBX to work with Incredible PBX. Extensions talk to trunks (like Google Voice) to make and receive calls. FreePBX uses outbound routes to direct outgoing calls from extensions to trunks, and FreePBX uses inbound routes to route incoming calls from trunks to extensions to make your phones ring. In a nutshell, that’s how a PBX works.

There are lots of bells and whistles that you can explore down the road including voicemail, conferencing, IVRs, autoattendants, paging, intercoms, CallerID lookups, announcements, DISA, call parking and pickup, queues, ring groups, and on and on. And then there’s all of the Incredible PBX applications which are covered separately in this Nerd Vittles article. Once you’re comfortable with one server, you or your company will want some more. This Nerd Vittles article will walk you through interconnecting them into a seamless mesh network so that you can call from one office to another transparently. Yes, those articles were written for the Raspberry Pi. But the beauty of Incredible PBX is that it runs identically on virtually every server platform.

Here’s our 10-Step Checklist to Getting Started with FreePBX:

1. Setting Up Google Voice. If you want free calling in the U.S. and Canada, then you’ll need an existing Google Voice account that includes the Google Chat feature. You’ll need one dedicated to Incredible PBX, or it won’t work. Log out after setting up the new Google Voice account! Also note that Google Voice may cease to function at any time after May 15, 2014. You can read all about it here.

  • Log into existing Google Voice account
  • Enable Google Chat as Phone Destination
  • Configure Google Voice Calls Settings:
    • Call ScreeningOFF
    • Call PresentationOFF
    • Caller ID (In)Display Caller’s Number
    • Caller ID (Out)Don’t Change Anything
    • Do Not DisturbOFF
    • Call Options (Enable Recording)OFF
    • Global Spam FilteringON

  • Place test call in and out using GMail Call Phone
  • Log out of your Google Voice account

2. Activating a Google Voice Trunk. To create a Trunk in FreePBX to handle calls to and from Google Voice, you’ll need three pieces of information from the Google Voice account you set up above: the 10-digit Google Voice phone number, your Google Voice account name, and your Google Voice password. Choose Connectivity -> Google Voice (Motif) from the FreePBX GUI. The following form will appear:

Fill in the blanks with your information and check only the top 2 boxes. If your Google Voice account name ends in @gmail.com, leave that out. Otherwise, include the full email address. Then click Submit Changes and Apply Config.

There’s one more step or your Google Voice account won’t work reliably with Incredible PBX! From the Linux command prompt while logged into your server as root, restart Asterisk: amportal restart

3. Setting a Destination for Incoming Calls and Managing Faxes. Now that you’ve created your Google Voice Trunk, we need to tell FreePBX how to process inbound calls when someone dials your Google Voice number. There are any number of choices. You could simply ring an extension. Or you could ring multiple extensions by first creating a Ring Group which is just a list of extension numbers. Or you could direct incoming calls to an Interactive Voice Response (IVR) system. By default, Incredible PBX is configured to route all incoming calls to extension 701. You can change the setting whenever you like by choosing Connectivity -> Inbound Routes -> Default. In the Set Destination section of the form, change the target destination from the pull-down lists.

If you want your default inbound route to also handle incoming faxes, then go to the Fax Detect section of the Default inbound route. Change Detect Faxes to Yes. Change Fax Detection Type to SIP. Leave the Detection Time setting at 4. And change the Fax Destination to Custom Destinations: Fax (Hylafax). To Send Faxes, open AvantFax in FreePBX’s Other pulldown menu.

Always click Submit and then click Apply Config to save new settings in FreePBX.

4. Activating a Smartphone Trunk Using Bluetooth. One of the more exotic features of Incredible PBX on the CuBox platform is the ability to add your smartphone as an Asterisk trunk using Bluetooth. We’ve written a short recipe to get things working. So have a look at our Bluetooth tutorial and see if you’re up for the challenge. Moral of the story: the newer the cellphone, the better.

The LG G3 is the best of the lot, at least of the numerous cellphones we tested. Even better is an LG G3 paired with StraightTalk’s (AT&T-hosted) unlimited talk, text, and data plan for $45 a month. With Samsung smartphones older than a Galaxy S4, don’t waste your time. Ditto with Apple iPhones other than perhaps the very latest. Our iPhone 4S failed miserably. We gave up on Apple phones after that. Someday I’ll test my daughter’s 5c and report back.

5. Activating Additional Trunks with FreePBX. As we mentioned, there are lots of SIP providers to choose from. Once you have signed up for service, configuring the trunk is easy. Here is a quick Cheat Sheet courtesy of Kristian Hare, who translated our original setups into a spreadsheet. Just click on the image below to open it in a new window. Then click on the redisplayed image to enlarge it. The left and right cursor keys will move you around in the image. Click on the image again to shrink it.

6. Changing Extension Passwords. From the main FreePBX GUI, choose Applications -> Extensions. Then click on 701 in the Extension List on the right side of your display. You’ll see a form that looks like this:

For now, we only need to make a few changes. First, you need a very secure password for both the extension itself and your voicemail account for this extension. The extension secret needs to be a combination of letters and numbers. The Voicemail Password needs to be all numbers, preferably six or more. Replace the existing password entries with your own (very secure) entries. You also need to lock down this extension so that it is only accessible from devices on your private LAN. You do that with the deny and permit entries which currently are filled with zeroes. Leave the deny entry the way it is which tells Incredible PBX to block everybody except those allowed in the permit entry below. For the permit, we need the first three octets of your private LAN address, e.g. if your LAN is 192.168.0.something then the permit entry will be 192.168.0.0/255.255.255.0.

Finally, you need to plug in your actual email address in the Voicemail section so that voicemails can be delivered to you when someone leaves a message. You can also include a pager email address if you want a text message alert with incoming voicemails. If you want the voicemails to automatically be deleted from the server after they are emailed to you (a good idea considering the disk storage limitations of your microSD card), change the Delete Voicemail option from No to Yes. That’s it. Now save your settings by clicking the Submit button. Then reload the dialplan by clicking on the red prompt when it appears.

In case you’re curious, unless you’ve chosen to automatically delete voicemails after emailing them, you can retrieve your voicemails by dialing *98701 from any extension on your phone system. You’ll be prompted to enter the voicemail password you set up. In addition to managing your voicemails, you’ll also be given the opportunity to either return the call to the number of the person that called or to transfer the voicemail to another extension’s voicemail box. And you can always leave a voicemail for someone by dialing their extension number preceded by an asterisk, e.g. *701 would let someone leave you a voicemail without actually calling you.

7. Eliminating Audio and DTMF Problems. You can avoid one-way audio on calls and touchtones that don’t work with these simple settings in FreePBX: Settings -> Asterisk SIP Settings. Just plug in your public IP address and your private IP subnet. Then set ULAW as the only Audio Codec.

8. Configuring Your YATE Softphone. As we mentioned, the easiest way to get started with Incredible PBX is to set up a free YATE softphone on your Desktop computer. Versions are available at no cost for Macs, PCs, and Linux machines. Just download the appropriate one and install it from this link. Once installed, it’s a simple matter to plug in your extension 701 credentials and start making calls. Run the application and choose Settings -> Accounts and click the New button. Fill in the blanks using the IP address of Incredible PBX, 701 for your account name, and whatever password you created for the extension. Click OK.

Once you are registered to extension 701, close the Account window. Then click on YATE’s Telephony Tab and place your first call. It’s that easy!

9. Configuring CallerID Superfecta. In order to match names with phone numbers, Incredible PBX includes a FreePBX application named CallerID Superfecta. Out of the box, Incredible PBX will work fine if you remember to activate CallerID Superfecta whenever you create a new Inbound Route. The CNAM entries also will be displayed in your CDR reports. For those not in the United States, you may prefer to use a lookup source for your numbers other than the ones preconfigured in CallerID Superfecta. You will find all of the available modules on the POSSA GitHub site. Just download the ones desired into /var/www/html/admin/superfecta/sources and then activate the desired sources in Admin -> CID Superfecta -> Default. You can test your results and the performance using the Debug facility that’s built into the module.

10. Adding Speech Recognition for Incredible Applications. We used to include Google’s Speech-to-Text service in Incredible PBX builds. Unfortunately, Google has changed the rules a bit. Assuming your server still meets the "personal and development" standard, you can obtain an API key from Google and reactivate speech-to-text functionality for many of the Incredible PBX applications including Weather Reports by City (949), AsteriDex Voice Dialing by Name (411), SMS Dictator (767), and Wolfram Alpha for Asterisk (4747). To activate the STT service, just complete the steps in our tutorial. Then sign up for a Wolfram Alpha App ID (tutorial here), and run the following install scripts:

/root/wolfram/wolframalpha-oneclick.sh
/root/smsdictator/sms-dictator.sh

Enabling SAMBA Windows Networking with Ubuntu

It only takes a minute to enable SAMBA Windows Networking on your CuBox. We’ve reproduced our quick tutorial to show you how. Just follow the steps below to interconnect Incredible PBX with all the other computers on your LAN.

apt-get -y install samba samba-common python-glade2 system-config-samba
cd /etc/samba
mv smb.conf smb.orig.conf
wget http://incrediblepbx.com/samba-ubuntu.tar.gz
tar zxvf samba-ubuntu.tar.gz
rm *.tar.gz
sed -i '/# End of Trusted Provider Section/r '/etc/samba/smb.iptables'' /etc/iptables/rules.v4
iptables-restart
service smbd restart
service nmbd restart
sed -i 's|/usr/local/sbin/amportal restart|service smbd restart\\nservice nmbd restart\\n/usr/local/sbin/amportal restart|' /etc/rc.local
# set up root password for SAMBA access with full RW privileges
smbpasswd -a root

Incredible Backup and Restore

Once you have everything configured, it’s time to take a snapshot of your system and store it in a safe place. The new Incredible Backup lets you do that. From the Linux CLI, login as root and run: /root/incrediblebackup. The backup image will be saved to the /tmp folder and can be copied to a different server easily. To restore the backup to another system, you simply bring the other system up to the same version of Asterisk (11) and FreePBX (2.11), and then run /root/incrediblerestore with your backed up image. It’s the cheapest insurance you can buy! For detailed instructions on restoring backups, see this thread on the PIAF Forum.


Don’t forget to List Yourself in Directory Assistance so everyone can find you by dialing 411. And add your new number to the Do Not Call Registry to block telemarketing calls. Or just call 888-382-1222 from your new number.

Originally published: Monday, September 1, 2014


Support Issues. With any application as sophisticated as this one, you’re bound to have questions. Blog comments are a terrible place to handle support issues although we welcome general comments about our articles and software. If you have particular support issues, we encourage you to get actively involved in the PBX in a Flash Forums. It’s the best Asterisk tech support site in the business, and it’s all free! Please have a look and post your support questions there. Our forum is extremely friendly and is supported by literally hundreds of Asterisk gurus.


Need help with Asterisk? Visit the PBX in a Flash Forum.


Special Thanks to Our Generous Sponsors


FULL DISCLOSURE: ClearlyIP, Skyetel, Vitelity, DigitalOcean, Vultr, VoIP.ms, 3CX, Sangoma, TelecomsXchange and VitalPBX have provided financial support to Nerd Vittles and our open source projects through advertising, referral revenue, and/or merchandise. As an Amazon Associate and Best Buy Affiliate, we also earn from qualifying purchases. We’ve chosen these providers not the other way around. Our decisions are based upon their corporate reputation and the quality of their offerings and pricing. Our recommendations regarding technology are reached without regard to financial compensation except in situations in which comparable products at comparable pricing are available from multiple sources. In this limited case, we support our sponsors because our sponsors support us.

BOGO Bonaza: Enjoy state-of-the-art VoIP service with a $10 credit and half-price SIP service on up to $500 of Skyetel trunking with free number porting when you fund your Skyetel account. No limits on number of simultaneous calls. Quadruple data center redundancy. $25 monthly minimum spend required. Tutorial and sign up details are here.

The lynchpin of Incredible PBX 2020 and beyond is ClearlyIP components which bring management of FreePBX modules and SIP phone integration to a level never before available with any other Asterisk distribution. And now you can configure and reconfigure your new Incredible PBX phones from the convenience of the Incredible PBX GUI.

VitalPBX is perhaps the fastest-growing PBX offering based upon Asterisk with an installed presence in more than 100 countries worldwide. VitalPBX has generously provided a customized White Label version of Incredible PBX tailored for use with all Incredible PBX and VitalPBX custom applications. Follow this link for a free test drive!
 

Special Thanks to Vitelity. Vitelity is now Voyant Communications and has halted new registrations for the time being. Our special thanks to Vitelity for their unwavering financial support over many years and to the many Nerd Vittles readers who continue to enjoy the benefits of their service offerings. We will keep everyone posted on further developments.


Some Recent Nerd Vittles Articles of Interest…

  1. Some of our links refer users to Amazon or other service providers when we find their prices are competitive for the recommended products. Nerd Vittles receives a small referral fee from these providers to help cover the costs of our blog. We never recommend particular products solely to generate commissions. However, when pricing is comparable or availability is favorable, we support these providers because they support us. []

Incredible PBX 1.8: New OpenVZ and Cloud Editions

Another exciting week in the Asterisk® community with the introduction of Asterisk 1.8.2 last Friday. It's now the official PIAF-Purple payload so you can simply download the current ISO to take it for a spin. Most of the pesky bugs in Asterisk 1.8.0 and 1.8.1 now have been addressed. Let us know if you find some new ones.

While the Asterisk Dev Team has been hard at work on Asterisk 1.8.2, we've turned our attention to the cloud and VoIP virtualization. We have three new products to introduce today. The first lets you install PIAF-Purple with Asterisk 1.8.2 using a new OpenVZ template. The second lets you run Incredible PBX 1.8 as a virtual machine using the new PIAF-Purple 1.8.2 OpenVZ template. Finally, we'll show you how to run Incredible PBX 1.8 in the cloud with hosted VoIP service from RentPBX.com for $15 a month with a free local phone number and free Google Voice calling in the U.S. and Canada. So let's get started.

Using the OpenVZ PIAF-Purple Template. If you haven't heard of OpenVZ templates before, you've missed one of the real technological breakthroughs of the last decade. Rather than wading through the usual 30-minute ISO installation drill, with an OpenVZ template, all of the work is done for you. And it's quick. You can build a dozen PIAF-Purple systems using an OpenVZ template in about 15 minutes with a per system cost of less than $50. See Comment #2 below for an extra special Dell half-price server deal this week. And it's incredibly easy to then tie all of these systems together using either SIP or IAX trunks. Just follow our previous tutorial. For resellers and developers that want to try various Asterisk configurations before implementation and for trainers and others that want to host dedicated Asterisk systems for customers, the OpenVZ platform is a perfect fit. Read our original two-part article to get up to speed on Proxmox, virtualization, and IPtables with OpenVZ. Then continue on here.

Thanks to Darrell Dillman (aka dad311 on the PIAF Forums), there already is a 64-bit OpenVZ template of PIAF-Purple with Asterisk 1.8.2. Just download the template to your Desktop and then, using the Proxmox console, choose Appliance Templates, Upload File to upload the OpenVZ template into your Proxmox server platform. Once installed, you can build Asterisk 1.8.2 virtual machines to your heart's content... in less than a minute apiece. Just choose Virtual Machine, Create to create a new virtual machine using the OpenVZ template you just uploaded. In the Configuration section, choose OpenVZ for the Type and pick your new OpenVZ template from the pulldown list. Fill in a Host Name, Disk Space maximum (in GB), and (root) Password. The other defaults should be fine. In the Network section of the form, change to the Bridged Ethernet (veth) option which means the VM will obtain its IP address from your DHCP server. Make sure your DNS settings are correct for your LAN. Here's how a typical OpenVZ creation form will look:

Once the image is created, start up the virtual machine, wait about 70 seconds for the system to load, and then click on Open VNC Console. Asterisk will be loaded and running. You can verify this on the status display. You can safely ignore the status messages pertaining to IPtables assuming iptables -nL shows that IPtables is functioning properly. With the exception of text-to-speech (TTS), you now have a PIAF-Purple base platform running Asterisk 1.8.2 and FreePBX 2.8. Be sure you always run it behind a hardware-based firewall with no port exposure to the Internet.

Before you do anything else, run passwd-master to secure the passwords for FreePBX GUI access to your system. Don't forget!

If you're planning to install Incredible PBX below or if you don't need text-to-speech on your system, you can skip this next step which gets 64-bit TTS installed. Otherwise, here are the commands to get it working:

cd /root
./install-flite

Note to Our Pioneers. To those that tested the new OpenVZ template this past week, THANK YOU! Be advised that we now have incorporated several of the recommended tweaks which were documented in the PIAF Forums. The install procedure outlined above explains the new behavior of the slightly improved OpenVZ template which now is available for download. We recommend you switch.

Asterisk CLI Change. Finally, just a heads up that (once again) the Asterisk Dev Team appears to have changed the default behavior of the Asterisk CLI. With Asterisk 1.8.2, if you make outbound calls after loading the CLI, you will notice that call progress no longer appears in the CLI. To restore the standard behavior (since Moses), issue the following command: core set verbose 3. 🙄


Installing Incredible PBX on OpenVZ Systems. We won't repeat the entire Incredible PBX article here. If you want the background on the product, read the latest article. To get everything working with an OpenVZ system, there are only three steps:

1. Set Up Your Google Voice Account
2. Run the Incredible PBX VM Installer
3. Configure a Softphone

Configuring Google Voice. You'll need a dedicated Google Voice account to support The Incredible PBX. The more obscure the username (with some embedded numbers), the better off you will be. This will keep folks from bombarding you with unsolicited Gtalk chat messages, and who knows what nefarious scheme will be discovered using Google messaging six months from now. So why take the chance. Keep this account a secret!

We've tested this extensively using an existing Gmail account, and inbound calling is just not reliable. The reason seems to be that Google always chooses Gmail chat as the inbound call destination if there are multiple registrations from the same IP address. So, be reasonable. Do it our way! Set up a dedicated Gmail and Google Voice account, and use it exclusively with The Incredible PBX. Google Voice no longer is by invitation only so, if you're in the U.S. or have a friend that is, head over to the Google Voice site and register. If you're living on another continent, see MisterQ's posting for some tips on getting set up.

You must choose a telephone number (aka DID) for your new account, or Google Voice calling will not work... in either direction. Google used to permit outbound Gtalk calls using a fake CallerID, but that obviously led to abuse so it's over! You also have to tie your Google Voice account to at least one working phone number as part of the initial setup process. Your cellphone number will work just fine. Don't skip this step either. Just enter the provided 2-digit confirmation code when you tell Google to place the test call to the phone number you entered. Once the number is registered, you can disable it if you'd like in Settings, Voice Setting, Phones. But...

IMPORTANT: Be sure to enable the Google Chat option as one of your phone destinations in Settings, Voice Setting, Phones. That's the destination we need for The Incredible PBX to work its magic! Otherwise, all inbound and outbound calls will fail. If you don't see this option, you may need to call up Gmail and enable Google Chat there first. Then go back to the Google Voice Settings.

While you're still in Google Voice Settings, click on the Calls tab. Make sure your settings match these:

  • Call Screening - OFF
  • Call Presentation - OFF
  • Caller ID (In) - Display Caller's Number
  • Caller ID (Out) - Don't Change Anything
  • Do Not Disturb - OFF

Click Save Changes once you adjust your settings. Under the Voicemail tab, plug in your email address so you get notified of new voicemails. Down the road, receipt of a Google Voice voicemail will be a big hint that something has come unglued on your PBX.

Running The Incredible PBX Installer. Log into your server as root and issue the following commands to set up The Incredible PBX:

cd /root
rm incrediblepbx18-vm.x
wget http://incrediblepbx.com/incrediblepbx18-vm.x
chmod +x incredible*
./incrediblepbx18-vm.x
passwd-master

When The Incredible PBX install begins, you'll be prompted for the following:

Google Voice Account Name
Google Voice Password
Google Voice 10-digit Phone Number
Gmail Notification Address
FreePBX maint Password

The Google Voice Account Name is the Gmail address for your new dedicated account, e.g. joeschmo@gmail.com. Don't forget @gmail.com! The Google Voice Password is the password for this dedicated account. The Google Voice Phone Number is the 10-digit DID for this dedicated account. We need this if we ever need to go back to the return call methodology for outbound calling. For now, it's not necessary. But who knows what the future holds. 🙄 The Gmail Notification Address is the email address where you wish to receive alerts when incoming and outgoing Google Voice calls are placed using The Incredible PBX. And your FreePBX maint Password is the password you'll use to access FreePBX. You'll actually set it by running passwd-master after The Incredible PBX completes. We need this password to properly configure the CallerID Superfecta for you. By the way, none of this confidential information ever leaves your machine... just in case you were wondering.

Now have another 5-minute cup of coffee, and consider a modest donation to Nerd Vittles... for all of our hard work. 😉 You'll find a link at the top of the page. While you're waiting (and so you don't forget), go ahead and configure your hardware-based firewall to support Google Voice. See the next section for what's required. Without completing this firewall configuration step, no calls will work! When the installer finishes, READ THE SCREEN just for grins.

Here's a short video demonstration of the original Incredible PBX installer process. It still works just about the same way except there's no longer a second step to get things working.

One final word of caution is in order regardless of your choice of providers: Do NOT use special characters in any provider passwords, or nothing will work!

Before you do anything else, run passwd-master again to resecure the passwords for FreePBX GUI access to your system. Don't forget!

Firewall Configuration. We hope you've taken our advice and installed a hardware-based firewall in front of The Incredible PBX. It's your phone bill. You'll need to make one adjustment on the firewall. Map UDP 5222 traffic to the internal IP address of The Incredible PBX. This is the port that Google Voice uses for phone calls and Google chat. You can decipher the IP address of your server by logging into the server as root and typing status.

Extension Password Discovery. If you're too lazy to look up your extension 701 password using the FreePBX GUI, you can log into your server as root and issue the following command to obtain the password for extension 701 which we'll need to configure your softphone or color videophone in the next step:

mysql -uroot -ppassw0rd -e"select id,data from asterisk.sip where id='701' and keyword='secret'"

The result will look something like the following where 701 is the extension and 18016 is the randomly-generated extension password exclusively for your Incredible PBX:

+-----+-------+
id         data
+-----+-------+
701      18016
+-----+-------+

Configuring a SIP Phone. There are hundreds of terrific SIP telephones and softphones for Asterisk-based systems. Once you get things humming along, you'll want a real SIP telephone such as the $50 Nortel color videophone we've recommended above. You'll also find lots of additional recommendations on Nerd Vittles and in the PBX in a Flash Forum. If you're like us, we want to make damn sure this stuff works before you shell out any money. So, for today, let's download a terrific (free) softphone to get you started. We recommend X-Lite because there are versions for Windows, Mac, and Linux. So download your favorite from this link. Install and run X-Lite on your Desktop. At the top of the phone, click on the Down Arrow and choose SIP Account Settings, Add. Enter the following information using your actual password for extension 701 and the actual IP address of your Incredible PBX server instead of 192.168.0.251. Click OK when finished. Your softphone should now show: Available.

Incredible PBX Test Flight. The proof is in the pudding as they say. So let's try two simple tests. First, let's place an outbound call. Using the softphone, dial your 10-digit cellphone number. Google Voice should transparently connect you. Answer the call and make sure you can send and receive voice on both phones. Second, from another phone, call the Google Voice number that you've dedicated to The Incredible PBX. Your softphone should begin ringing shortly. If not, make certain you are not logged into Google Chat on a Gmail account with these same credentials. If everything is working, congratulations!

Here's a brief video demonstration showing how to set up a softphone to use with your Incredible PBX, and it also walks you through several of the dozens of Asterisk applications included in your system.

Solving One-Way Audio Problems. If you experience one-way audio on some of your phone calls, you may need to adjust the settings in /etc/asterisk/sip_custom.conf. Just uncomment the first two lines by removing the semicolons. Then replace 173.15.238.123 with your public IP address, and replace 192.168.0.0 with the subnet address of your private network. There are similar settings in gtalk.conf that can be activated although we've never had to use them. In fact, we've never had to use any of these settings. After making these changes, save the file(s) and restart Asterisk: amportal restart.


Running Incredible PBX in the Cloud. We've saved the best for last today. For many folks, you may want to experiment with VoIP technology without making a hardware investment and without having to master the intricacies of managing your own server and network. That's what Cloud Computing is all about. And we've searched far and wide to find you the perfect platform. As with many of you, one of our top priorities is always cost. While many providers were willing to provide Nerd Vittles with a few sheckles for pitching their product, only one stepped forward with a price point that we think is irresistible. And, for the record, we waived any compensation other than a few test accounts to get things working properly, so that all of the savings could be passed on to you! So here's the deal. $15 a month gets you your own PIAF-Purple server in the cloud at RentPBX.com. Just use this coupon code: BACK10, pick an east coast or west coast server to host your new system, choose the PIAF-Purple 1.7.5.5.4 install option, set up a username and very secure password, and you're off to the races. Once your account is established, here's the 5-minute procedure to install the special RentPBX-edition of Incredible PBX to begin making free calls in the U.S. and Canada through Google Voice.

Begin by Configuring Google Voice as outlined above. Then log into your RentPBX account using SSH and the port assigned to your account. For Windows users, download Putty from here. The SSH command will look something like this:

ssh -p 21422 root@209.249.149.108

Issue the following commands to download and run The Incredible PBX installer for RentPBX:

cd /root
wget http://incrediblepbx.com/incrediblepbx18-rentpbx.x
chmod +x incrediblepbx18-rentpbx.x
./incrediblepbx18-rentpbx.x
passwd-master

Now just follow along in the Incredible PBX virtual machine tutorial which we've included above. Remember that your new Incredible PBX is sitting directly on the Internet! So don't forget to run passwd-master when you finish the install, or your system is vulnerable. Ours was attacked within minutes!

Securing Your RentPBX Server. With the exception of our WhiteList application, everything is working on your RentPBX server. While we continue to work on the WhiteList component (reread this section of the article in a week or so to get the latest updates), you need to secure your system to avoid endless hack attempts on your SIP resources. Here's how. First, write down the IP addresses of your RentPBX server and your home network. Second, print out your existing IPtables configuration. The file to print is /etc/sysconfig/iptables. Third, make a backup copy of the file. While logged into your server with SSH, the easiest way is like this:

cd /etc/sysconfig
cp iptables iptables.bak

Now we need to edit the iptables file itself: nano -w iptables. Then search for the line that contains 5060: Ctrl-W, 5060, Enter. At the beginning of this line, add # to comment out the line. With the cursor still on this line, press Ctrl-K then Ctrl-U twice. This will duplicate the line. Move to the second commented line and remove #. Use the right cursor to move across the line to --dport. Then insert the following using the IP address of your RentPBX server, e.g.

-s 229.149.129.248

Be sure there's at least one space before and after the new text. Now duplicate that line with Ctrl-K and Ctrl-U twice. Change the IP address on the second line to the public IP address of your home or office network. Repeat this process for every IP address where you intend to use a SIP phone connected to your RentPBX server. Make additional entries for your SIP providers as well. If you want to sleep better, you can make similar changes to the SSH port entry to restrict it to your home/office IP address. It's the line immediately above the 5060 entry. Ditto for port 80 which is web access. Be very careful here. A typo will lock you out of your own server! When you're finished, save the changes: Ctrl-X, Y, Enter. Then restart IPtables: service iptables restart.

As always, we strongly recommend that you not put all of your VoIP eggs in one basket. Google Voice does go down from time to time. Vitelity is a perfect complement because the costs are low and you only pay for the service you use. A discount sign up link is below. And Vitelity has contributed generously to both the Nerd Vittles and PBX in a Flash projects. So please support them. Enjoy!

Originally published: Monday, January 17, 2011


Need help with Asterisk? Visit the PBX in a Flash Forum.
Or Try the New, Free PBX in a Flash Conference Bridge.


whos.amung.us If you're wondering what your fellow man is reading on Nerd Vittles these days, wonder no more. Visit our new whos.amung.us statistical web site and check out what's happening. It's a terrific resource both for us and for you.


Special Thanks to Our Generous Sponsors


FULL DISCLOSURE: ClearlyIP, Skyetel, Vitelity, DigitalOcean, Vultr, VoIP.ms, 3CX, Sangoma, TelecomsXchange and VitalPBX have provided financial support to Nerd Vittles and our open source projects through advertising, referral revenue, and/or merchandise. As an Amazon Associate and Best Buy Affiliate, we also earn from qualifying purchases. We’ve chosen these providers not the other way around. Our decisions are based upon their corporate reputation and the quality of their offerings and pricing. Our recommendations regarding technology are reached without regard to financial compensation except in situations in which comparable products at comparable pricing are available from multiple sources. In this limited case, we support our sponsors because our sponsors support us.

BOGO Bonaza: Enjoy state-of-the-art VoIP service with a $10 credit and half-price SIP service on up to $500 of Skyetel trunking with free number porting when you fund your Skyetel account. No limits on number of simultaneous calls. Quadruple data center redundancy. $25 monthly minimum spend required. Tutorial and sign up details are here.

The lynchpin of Incredible PBX 2020 and beyond is ClearlyIP components which bring management of FreePBX modules and SIP phone integration to a level never before available with any other Asterisk distribution. And now you can configure and reconfigure your new Incredible PBX phones from the convenience of the Incredible PBX GUI.

VitalPBX is perhaps the fastest-growing PBX offering based upon Asterisk with an installed presence in more than 100 countries worldwide. VitalPBX has generously provided a customized White Label version of Incredible PBX tailored for use with all Incredible PBX and VitalPBX custom applications. Follow this link for a free test drive!
 

Special Thanks to Vitelity. Vitelity is now Voyant Communications and has halted new registrations for the time being. Our special thanks to Vitelity for their unwavering financial support over many years and to the many Nerd Vittles readers who continue to enjoy the benefits of their service offerings. We will keep everyone posted on further developments.


Some Recent Nerd Vittles Articles of Interest...

The Ultimate Asterisk Telephony Appliance

gPC miniWe’ve been quietly waiting for Everex to finally get its act together and deliver the Ultimate Asterisk® Telephony Appliance for SOHO users and organizations. Truth be told, it’s the reason we shelved our original VPN in a Flash desktop unit from last August. Thanks to NewEgg, it’s now available and it’s dirt cheap… if you hurry. Would you believe $339 for the gPC mini ET2400. And with this coupon link, you can knock off another $11 and some change. Just sign up for a free eBates account and follow the eBates link to NewEgg to save 2% on your total order plus another $5 for signing up. We, of course, get five dollars wealthier in the process as well.

In addition to a fantastic-looking, small-footprint mini knockoff of your favorite fruit-inspired hardware, here’s what $339 buys you if you act quickly:

  • 2.0GHz Intel® Pentium® Dual-Core Mobile Processor T2450
  • 2MB L2 Cache
  • 160GB SATA Hard Drive
  • 2GB DDR2 667 SDRAM
  • Slot-In DVD-ROM/DVD-RAM/DVD±RW Drive (Double Layer support)
  • Intel® Graphics Media Accelerator GMA950
  • Realtek ALC268 High-Definition Audio
  • 10/100/1000 Ethernet Port
  • 802.11 b/g Wireless LAN
  • Bluetooth Wireless
  • DVI-I Port with DVI to VGA/D-sub Adapter
  • S-Video Port
  • IEEE 1394 Firewire Port
  • (4) USB 2.0 Ports
  • 4-in1 Media Card Reader (SD, MMC, MS, MS Pro)
  • Headphone/Line-Out Port
  • Microphone/Line-In Port
  • Windows Vista Home Premium (for your nearest trash can)

gPC miniYes, you won’t be needing Windows for your new Ultimate Asterisk Telephony Appliance. Very shortly, Nerd Vittles will introduce its turnkey USB flash installer which brings you every Asterisk bell and whistle on the planet in under 15 minutes. We had hoped to introduce the new flash drives this week to celebrate the beginning of Nerd Vittles Fifth Year. But the pricing on 8GB flash drives that provide the compatibility we need to facilitate duplication just weren’t there so we’ll just wait a few weeks until they are. In the meantime, you can order up your new system and enjoy Windows at its very worst for a week or two while realizing a substantial $150 savings on your system. Enjoy!


Want a Bootable PBX in a Flash Drive? Our bootable USB flash installer for PBX in a Flash will provide all of the goodies in the VPN in a Flash system featured last month on Nerd Vittles. You can build a complete turnkey system using almost any current generation PC with a SATA drive and our flash installer in less than 15 minutes!

If you’d like to put your name in the hat for a chance to win a free one delivered to your door, just post a comment below with your best PBX in a Flash story.1

Be sure to include your real email address which will not be posted. The winner will be chosen by drawing an email address out of a hat (the old fashioned way!) from all of the comments posted over the next couple weeks. All of the individuals whose comments were used in today’s story will automatically be included in the drawing as well. Good luck to everyone and Happy New Year!!


Special Thanks to Our Generous Sponsors


FULL DISCLOSURE: ClearlyIP, Skyetel, Vitelity, DigitalOcean, Vultr, VoIP.ms, 3CX, Sangoma, TelecomsXchange and VitalPBX have provided financial support to Nerd Vittles and our open source projects through advertising, referral revenue, and/or merchandise. As an Amazon Associate and Best Buy Affiliate, we also earn from qualifying purchases. We’ve chosen these providers not the other way around. Our decisions are based upon their corporate reputation and the quality of their offerings and pricing. Our recommendations regarding technology are reached without regard to financial compensation except in situations in which comparable products at comparable pricing are available from multiple sources. In this limited case, we support our sponsors because our sponsors support us.

BOGO Bonaza: Enjoy state-of-the-art VoIP service with a $10 credit and half-price SIP service on up to $500 of Skyetel trunking with free number porting when you fund your Skyetel account. No limits on number of simultaneous calls. Quadruple data center redundancy. $25 monthly minimum spend required. Tutorial and sign up details are here.

The lynchpin of Incredible PBX 2020 and beyond is ClearlyIP components which bring management of FreePBX modules and SIP phone integration to a level never before available with any other Asterisk distribution. And now you can configure and reconfigure your new Incredible PBX phones from the convenience of the Incredible PBX GUI.

VitalPBX is perhaps the fastest-growing PBX offering based upon Asterisk with an installed presence in more than 100 countries worldwide. VitalPBX has generously provided a customized White Label version of Incredible PBX tailored for use with all Incredible PBX and VitalPBX custom applications. Follow this link for a free test drive!
 

Special Thanks to Vitelity. Vitelity is now Voyant Communications and has halted new registrations for the time being. Our special thanks to Vitelity for their unwavering financial support over many years and to the many Nerd Vittles readers who continue to enjoy the benefits of their service offerings. We will keep everyone posted on further developments.


Some Recent Nerd Vittles Articles of Interest…

  1. This offer does not extend to those in jurisdictions in which our offer or your participation may be regulated or prohibited by statute or regulation. []

Free At Last: The Emancipation of the Apple TV

We’ve never quite forgiven Apple1 for bricking some of the original iPhones because some owners chose to jailbreak their private property to learn how it worked or to add additional functionality. It may turn out to be Steve Jobs’ billion dollar blunder! The stunt was especially egregious when one considers that both the iPhone and much of Mac OS X are based upon open source software for which Apple didn’t pay a nickel. Apple certainly added a pretty wrapper, but the internals of both the iPhone and Mac OS X contain loads of pure open source code including dozens of Mach 3.0 and FreeBSD 5 applications. Destroying people’s cellular phones for accessing soft- ware that was licensed to Apple as open source code just doesn’t pass the smell test.

Courtesy of Apple, Inc.

Thus it was with mixed emotions that we unwrapped our Apple TV during Christmas 2007. Like the iPhone, it was locked up tighter than a drum even though the internals of the product read like a Who’s Who of the Open Source Movement: awk, bzip, cut, grep, find, ftp, finger, gzip, more, nano, openssl, perl, sed, tail, tar, touch, uname, whois, zip, and on and on. In fact, Mac OS X arguably is a better Linux than Linux. Suffice it to say, we read numerous articles outlining the lengths to which some talented users were going to unlock their Apple TVs. The process required disassembly of the unit, removal of the hard disk, and then a tedious unlocking scenario that was akin to breaking into Fort Knox. We chose to leave our Apple TV in its shrink wrap.

So what’s wrong with the Apple TV? Well, nothing… if you don’t mind paying Apple over and over again to reacquire media content which you already have licensed and if you don’t mind jumping through the iTunes hoops to transfer that content to a device which is perfectly capable of being self-sufficient. Let’s see. $1.99 to watch a TV show or play a music video that’s already sitting on your TIVO machine or that’s already freely (and legally) available from numerous sources on the Internet. Apple has added YouTube access, but the design really limits you to the most popular content. That makes it unsuitable (or worse) for anyone under the age of 13… or over the age of about 25. 🙄

Fast forward to 2009, and we decided it was time to take another look at the Apple TV landscape. WOW! What a difference a year makes. You now can create a bootable USB flash drive in a couple minutes, plug it into your Apple TV, and have a perfectly functioning, (true) open source appliance with DIVX and AVI support in less than 15 minutes. The FrontRow-enhanced Apple TV provides access to virtually all media content in every format imaginable with incredibly slick user interfaces thanks to the XBMC Media Center, Boxee Social Media Center, Nito TV, and Hulu. Most were originally designed for Microsoft’s Xbox. Uploads and downloads of media content can be performed using either your Apple TV controller and a television, or a web browser, or SAMBA networking, or SSH. So thanks to a resourceful bunch of talented, open source developers, we finally have an Apple TV worth owning that also happens to be fun to use. Incidentally, this whole metamorphosis can be accomplished without damaging the Apple TV’s existing user interface or its out-of-the-box functionality… at least until the next update from Apple. 🙂
So proceed at your own risk!

Freeing Your Apple TV. Since October, 2008, the emancipation of the Apple TV has become a simple, 5-minute exercise. What you’ll need to get started is an Apple TV2 with version 2 software, a 1GB USB Flash Drive, and ATVUSB-creator which is free. The drill here is to create a bootable flash drive that can be used to reboot the Apple TV and transform its closed and proprietary shell into an open source platform. The preferred machine for creating your bootable flash drive is a Mac running Tiger or Leopard although a Windows XP/Vista solution is also available now. The only precaution we would add is to unplug all of the USB drives connected to your PC before creating the bootable flash drive. Then you won’t accidentally reformat the wrong USB drive. The one-minute CNET tutorial is here. A better one is here.

Once you have your bootable USB flash drive in hand, unplug your Apple TV and plug the USB drive into the unit. Now connect your Apple TV to a television. Power up your Apple TV and marvel at the installation process which takes under a minute. Whatever you do, don’t boot your Apple TV with the flash drive more than once! When the install completes, you should see a message indicating that your Apple TV can be accessed with SSH within a few minutes at frontrow@appletv.local. The password is frontrow. The IP address for your Apple TV also can be used for SSH access as well. Remove the flash drive and reboot. You’ll see a new menu option for XBMC/Boxee. Just follow the menu items to install both applications. After another reboot, you’ll be all set. Click on the CNET video above to watch a demo.

After installing the apps, launch and then configure XBMC. If you get an error that reads "Cannot launch XBMC/Boxee from path," it means you forgot to install the software through your TV menu. If you enable the web interface, you’ll be able to go to any browser on your LAN and manage XBMC through the following link using the IP address of your Apple TV: http://192.168.0.180:8080. For complete documentation, check out the XBMC Wiki.


Before you can use Boxee, you’ll need to visit their web site and sign up for an account. A tutorial on the application is available at UberGizmo. As luck would have it, this application only became publicly available in Alpha last week so we’re just in time. Don’t sweat the Alpha status too much, it previously ran on the XBox platform as well as Windows, Macs, and Linux. There’s social networking support via Twitter, FriendFeed, Tumblr, and NetFlix. While it’s running on your Apple TV, you can access the interface remotely with a browser from anywhere on your LAN at http://ipaddress:8800 assuming you have enabled the web server interface.

Hulu is another terrific resource for movies, TV shows and music videos. It is available through Boxee. There are a few ads but not many. For a lot of the movies, you’ll also need to set yourself up an account there and configure your uncrippled Apple TV accordingly.

But What About Asterisk®? We knew someone would ask. Sure. An Asterisk for Mac solution should work on the Apple TV if you don’t plan to use it as a media center. For best results, compile everything on a separate Tiger Mac, and then move it over. Keep in mind that the device is limited to 256MB of RAM so simultaneously using the Apple TV as both an Asterisk PBX and a media center more than likely will cause unacceptable performance degradation in both your phone calls and your music and video streams. Someday perhaps we’ll give it a try. In the meantime, enjoy your new open source media center!


Want a Bootable PBX in a Flash Drive? Next week to celebrate the beginning of Nerd Vittles’ Fifth Year, we’ll be introducing our bootable USB flash installer for PBX in a Flash with all of the goodies in the VPN in a Flash system featured a few weeks ago on Nerd Vittles. You can build a complete turnkey system using almost any current generation PC with a SATA drive and our flash installer in less than 15 minutes!

If you’d like to put your name in the hat for a chance to win a free one delivered to your door, just post a comment at this link with your best PBX in a Flash story.3

Be sure to include your real email address which will not be posted. The winner will be chosen by drawing an email address out of a hat (the old fashioned way!) from all of the comments posted over the next couple weeks. Good luck to everyone!


Special Thanks to Our Generous Sponsors


FULL DISCLOSURE: ClearlyIP, Skyetel, Vitelity, DigitalOcean, Vultr, VoIP.ms, 3CX, Sangoma, TelecomsXchange and VitalPBX have provided financial support to Nerd Vittles and our open source projects through advertising, referral revenue, and/or merchandise. As an Amazon Associate and Best Buy Affiliate, we also earn from qualifying purchases. We’ve chosen these providers not the other way around. Our decisions are based upon their corporate reputation and the quality of their offerings and pricing. Our recommendations regarding technology are reached without regard to financial compensation except in situations in which comparable products at comparable pricing are available from multiple sources. In this limited case, we support our sponsors because our sponsors support us.

BOGO Bonaza: Enjoy state-of-the-art VoIP service with a $10 credit and half-price SIP service on up to $500 of Skyetel trunking with free number porting when you fund your Skyetel account. No limits on number of simultaneous calls. Quadruple data center redundancy. $25 monthly minimum spend required. Tutorial and sign up details are here.

The lynchpin of Incredible PBX 2020 and beyond is ClearlyIP components which bring management of FreePBX modules and SIP phone integration to a level never before available with any other Asterisk distribution. And now you can configure and reconfigure your new Incredible PBX phones from the convenience of the Incredible PBX GUI.

VitalPBX is perhaps the fastest-growing PBX offering based upon Asterisk with an installed presence in more than 100 countries worldwide. VitalPBX has generously provided a customized White Label version of Incredible PBX tailored for use with all Incredible PBX and VitalPBX custom applications. Follow this link for a free test drive!
 

Special Thanks to Vitelity. Vitelity is now Voyant Communications and has halted new registrations for the time being. Our special thanks to Vitelity for their unwavering financial support over many years and to the many Nerd Vittles readers who continue to enjoy the benefits of their service offerings. We will keep everyone posted on further developments.


Some Recent Nerd Vittles Articles of Interest…

  1. Disgruntled customers reportedly have filed over a billion dollars’ worth of lawsuits over their bricked iPhones claiming Apple did it intentionally. Great PR move there, Steve! []
  2. The Apple TV actually runs a modified version of Tiger (aka Mac OS X 10.4). []
  3. This offer does not extend to those in jurisdictions in which our offer or your participation may be regulated or prohibited by statute or regulation. []

What PBX in a Flash Brings to the Asterisk Table

As 2008 comes to a close, PBX in a Flash celebrates its First Anniversary and continues to be the only Asterisk® distro that offers users a choice of Asterisk 1.4 or 1.6 in either 32-bit or 64-bit flavors. In addition, you can choose our Lean, Mean Asterisk Machine or a preconfigured turnkey implementation with every VoIP bell and whistle on the planet. It’s all about choice and flexibility, and we offer both. For a preview of coming attractions, see the end of this article or take a look at the screen capture below. But today we hand over the editorial reins to some of our PBX in a Flash users to express in their own words why they chose PBX in a Flash and what their return on investment has been. We think you’ll be surprised by some of the responses. We certainly were.

You Never Know How Things Will Work Out

During the time of PBXIAF 1.0, I had been working with Trixbox for about 6 months. By the time PBXIAF 1.1 came out, I had learned enough about the way Trixbox can’t be updated to develop a healthy appreciation for the PBXIAF “compile on site, update as prudent” approach.

I happen to be a techno-nut -– but that notwithstanding, our small business was experiencing telephonic growing pains. After 7 years in business, an opportunity to expand our private label help desk product was easily ready to overrun the terrible copper lines we had for telephone service.

Since it was obvious VoIP was the only way to go – we began to explore what was out there. Vonage was riding high, Packet8 and many other competitors all got us around the limited copper into the office, each one we looked at had their own special quirks. All of them were using analog telephone adapters (ATAs) and either regular or slightly customized Analog phones.

We began a year of exploration that started with the BigGreenBox – hoping to learn enough about VoIP and this strange creature called FreePBX to be able to use it. But, with time marching on, Packet8’s Virtual Office product was selected, and put into use in a 10-phone system.

Although pretty much always under development, the web application that was provided was a little twisted, but worked once you got over its way of looking at call flow – rudimentary ring groups could be arranged in such a way as to simulate queues provided nor more than 8-10 callers were on hold. And so it went for a good year. We definitely used all our creativity to connect various IVR’s ($15/month each) to give the caller a good experience, but we were already clearly operating at the very limits of flexibility and capacity for the Packet8 system.

The average telephone bill during this period was approximately $380 per month (about 1/3 of what copper lines had cost) and almost nothing in hardware ($1,000 in proprietary telephones and ATAs).

Then the balance was broken when Packet8 rather arbitrarily stopped supporting a type of IVR transfer that was crucial to our work flow. At the same moment, the unthinkable happened. The help desk grew a little more. Less flexibility + even more demands for non-achievable call flow changes was the death knell for Packet8 at our office.

During this same time we had deployed several ISOs of the GreenBox in the lab and with field technicians….Several ISO’s! In a very short time. So many ISO’s, so fast – and a complete reinstall to go with each one. Yikes. It had become apparent to me that my career would suddenly change from network engineering to “PBX Upgrade and Reconfigure Monkey” if we deployed that distribution. Also – the forums were unproductive and negative much of the time. There are ways to disagree and still remain civil. Then, I rediscovered Nerd Vittles. This was about the time PBXIAF 1.1 was released.

The difference in the environment and team spirit – even when disagreements occurred – is very palatable. The community is full of people who are so wonderfully giving of their experience. The difference in the distributions – well- they can be summed up in about 6 words. Ward Mundy, Tom King, and Joe Roper.

This trio has brought together a remarkable set of skills and disciplines that produced a really, really good distribution, not solely RPM-based so knuckleheads like me can follow simpler instructions. [Asterisk code is] updated and compiled right on the box – and fully scripted. Security flaws get fixed in hours – sometimes minutes (when they find them – there’s been so FEW), not DAYS like the other guys. And all of it is based on FreePBX, arguably the most evolved UI for managing Asterisk.

Together – they got stability, reliability, and repeatability, and decorated it with enough solid features and functions to be a platform whose feature-function-benefit points are all top notch. Linux, Asterisk, Mysql, Apache, Text to Speech (2 different flavors), Voice Reminders, Wake Up Calls, Weather Reports, Tide Reports, Email by Phone, Headline News by Phone, and scripts that make it all go together just the way it needs to be: “stable and reliable”.

PBX In a Flash is a gift – an opportunity for our technical staff to learn a new area of our field, with the camaraderie of some genuine experts in the arena. We are 8 people, doing the work of 12 – just like a million small businesses. As an old network guy – learning a new skill has been tremendously exhilarating. And this technology is so flexible that I’m continually exhilarated learning new things… and for a long time to come! The professional growth has been great for all of us.

Now, the money. Way back up in the top of this [post], I told you the phone bill with Packet8 was on a good month $380 with barely the [functionality] needed to do our professional best.

Today, thanks to PBXIAF, we run 6 queues every day, with tremendous customer and client satisfaction. We use every part of the system to provide our customers with the best telephone interaction experience they could get anywhere. While handling about 10% more traffic, and with far superior call handling and work flow support, our average phone bill is $120 month.

Here’s the good part. With the $260 a month being saved, the company was able to afford to bring in group medical insurance for all our employees. How’s that for positively impacting 8 people every single day of their lives?

Ward, Tom, Joe – I could never have done it without you.

–tshif

And then there was this testimonial from a venue that all of us are thinking about these days:

Our small public middle school in Washington, DC has to make every penny count. I’m in charge of our technology and its meager budget. This past summer we moved to a new and bigger building and needed to migrate our phone system. We had an existing NEC Aspire system with 15 extensions that worked just fine – nothing fancy – and it hooked up to a single POTS line.

At the new building we needed to double the size to 30 extensions. As the Aspire system used VOIP, it should just be a matter of buying the handsets and a little labor to configure them. Right? [Wrong!] $17,000 is what they wanted to hook up the existing equipment that we moved over and add the 15 new extensions. My response: "Hell no!"

I’d wanted an excuse to setup an Asterisk server for a while, but I had heard how complicated it was. School was close to opening. I had a lot of other things to take care of. And I needed a solution that would most likely work the first time. I found PiaF then read up on the wiki and Nerd Vittles. I ordered a set of Aastra 57i’s and a used Dell PowerEdge 2650. We decided to go "pure VOIP" for flexibility and signed up with Vitelity.com.

I followed the great step-by-step directions for PiaF. I wanted to set mine up inside a Virtual Machine which added some complexity, but I found lots of helpful users in the forums that had documented their experiences before me.

Now we’re 5 months in. The system has more capabilities than our old NECs. The sound quality is better, and it’s easier to use. I had some problems with my server crashing, but I was able to rebuild it on different hardware and transfer our entire configuration in about an hour. Now everything is great. I love that we’re implementing more open source tools, open standards, and aren’t limited to vendor BS when we’re ready to expand. Other schools thought we were "crazy" to setup our own system. Now they want all the details to try and do it themselves.

The best part, of course, is that our whole setup was under $7K. That’s a $10,000 savings. To translate that with regards to the school, that savings allowed us to buy and set up four desktop machines in each of ten classrooms. Now THAT is making a difference.

Thanks to the PiaF team and community!

–jcasimir

And then there’s this one:

TODAY I TOOK CONTROL OF MY VOIP…..

I’ve been a happy VOIP user for 4 years running on Vonage. Even got my son hooked up on Vonage while he was in the Army stationed in Japan. But, when the lawsuits loomed over Vonage’s head, I started looking for something else, and I found Nerd Vittles. WOW! Being kind of a gadget junkie to start with and always looking for something interesting to do with my PCs, I started with Trixbox from Ward’s "build" and fumbled along. When PIAF came along I naturally followed.

I have two important successes that have made me love this VOIP/PIAF stuff.

1) When my grandson was diagnosed with a heart condition my daughter and her husband were stuck in hospital emergency rooms for hours at a time. Being about 500 miles from both our family and the other grandparents, they had a very difficult time getting news out to us since hospitals usually restrict the use of cell phones and don’t allow long distance calls from their phones. That only leaves (yuck!) pay phones. In just a few minutes time, I was able to buy a local DID to the hospital and connect it to my PIAF. I then set up an IVR that gave them access to a DISA. That way they could call us using a local number or call through the DISA to contact the other grandparents. Keeping everyone informed really eases your mind when the grandkids are ill!

2) When I got tired of my wife continuing to ask me for phone numbers when calling our family and friends, I finally decided to set up an IVR for her. So far, both of our kids’ home and cell numbers (as well as my cell number) have kept her happy. When she asks for more I’ll just add them. So far the "Wife Acceptance Factor" is high and I’m having great fun. Hanging up on recognized telemarketers is great, the Callerid Superfecta works great, and I like getting the Weather Forecast from Allison.

The port from Vonage was completed today. I’m using Future-Nine as my primary provider. So, like I said, today is the day I took control of my VOIP.

–jeffmac

And, speaking of role reversal…

PIAF to the Rescue!!

Here is a twist for you.

First, the problem:

My company has a ShoreTel system in place, 48 extensions. They have 2 PRI’s bonded together with dynamic channel allocation. Eight channels are dedicated to the phones, the rest to the Internet. When we have more calls than 8, the system robs channels from the Internet, up to 23 channels max, and returns them as the call volume drops. This all works well.

Monday, a pole a few blocks from our office had the transformer catch fire, and the provider’s equipment was affected. We lost both Internet and phones for several hours. Much of our business is time critical. With no incoming phone calls and no email, we almost lost out on a chance to bid on a VERY large deal. Fortunately, the customer knew the L.A. branch number and after being unable to get in touch with us, he called L.A.

Anyway, now it is critical to management that this NEVER happen again.

The Solution:

Tuesday: I studied the issue and wrote a proposal.

Wednesday: I fired up a PIAF box, established a 10 channel SIP trunk group to the ShoreTel system, and got everything setup for intersystem routing, etc.

Thursday: I am picking up a pay-as-you-go service with 10 channels from a VOIP provider with a single DID and setting our Telco service for failover/rollover to the VOIP DID. I am then ordering a second Internet circuit, 2meg x 2meg, to bring in the SIP trunks from the provider. As soon as that is done, I will dual-home the mail server so that we can get and send email via both Internet providers.

The End Result:

If the primary connection fails, phone service rolls over to the DID from the VOIP provider, rolls into PIAF, and cross trunks to the ShoreTel – AUTOMATICALLY!! Email switches to the secondary MX record and keeps right on rolling. One change in the firewall for the public NAT address and gateway and Internet [and phone service] is back up and running.

THANK YOU Ward, Tom, Joe and gang for making this possible.

–Greg Keys

And, last but not least…

You made my Grandma Cry!

My wife and I are currently living in Germany, and we’ve been using a Skype-In number so our friends and family can call us. For my wife it is important that the solution just works like a regular phone and so I had setup a Siemens M34 to interface with our DECT phone and it worked, mostly, for a few days until the entire system needed to be restarted. For most of our family, this solution works. But my grandmother is living in a different area code and can’t afford to call us as often as she would like.

I stumbled upon the PBX in a Flash project a few weeks ago and, after I found two old Grandstream GXP-2000 in the company junk closet (we are an Internet startup – someone is always buying new toys), I installed PiaF 1.2 using VMWare. I set up a Vitelity DID, the CallerID Superfecta, the Callerid Creep Detector, experimented with ring groups, routing, IVRs and was so impressed that I knew our Skype-solution days were numbered.

Last night, I took the plunge, reformatted the Skype system, and deployed PiaF 1.3. The install was so fast and painless. I copied the old configuration information into the new system. And, my new PBX was up and running in under and hour.

I had so much time left on my hands that I figured I might as well experiment. I followed another Nerd Vittles tutorial and created a few cell phone extensions for my family back in the states. I went to Vitelity and purchased another DID. I recorded a quick message, setup an IVR, and a new corresponding route. That’s when the fun started.

I called my grandmother and told her: "Grandma, we’ve got a new telephone number. Will you please call me right back at…". She was a little surprised when I told her that the number was now going to be a local call for her. The real surprise came when she called the number and heard, "Hi Grandma, welcome to your phone system. For Martin and Ashlee, please press 1, for Rachel please press 2,…". By the time she pressed 1 and Asterisk was ringing our home ring group, she was in tears.

We talked for quite a while about our lives, the Olympics, the hurricane, and everything else. This morning when I got up, I checked the call logs and saw that she had systematically called every single IVR point after we got off the phone.

I didn’t deploy PiaF as a mission-critical business application yesterday–though that day will come for me, but I did what the open-source Internet ideology is all about in my mind. I used the knowledge and experience others have gifted the community to create a solution that fit my situation.

Thanks Again, PiaF Team, from the bottom of my heart!

–Martin Modahl

For those of you that still need a New Year’s Resolution, we hope our fans have given you some ideas. And, when my wife again asks why I continue to work for 5¢ an hour, I’ve got something great for her to read.

Thanks, everybody. You’ve made it all worthwhile.


Want a Bootable PBX in a Flash Drive? Early in 2009 to celebrate the beginning of Nerd Vittles’ Fifth Year, we’ll be introducing our bootable USB flash installer for PBX in a Flash with all of the goodies in the VPN in a Flash system featured a few weeks ago on Nerd Vittles. You can build a complete turnkey system using almost any current generation PC with a SATA drive and our flash installer in less than 15 minutes!

If you’d like to put your name in the hat for a chance to win a free one delivered to your door, just post a comment below with your best PBX in a Flash story.1

Be sure to include your real email address which will not be posted. The winner will be chosen by drawing an email address out of a hat (the old fashioned way!) from all of the comments posted over the next couple weeks. All of the individuals whose comments were used in today’s story will automatically be included in the drawing as well. Good luck to everyone and Happy New Year!!


Nerd Vittles Fan Club Map. We hope you’ll take a second and add yourself to our Frappr World Map. In making your entry, you can choose an icon: guy, gal, nerd, or geek. For those that don’t know the difference in the last two, here’s the best definition we’ve found: "a nerd is very similar to a geek, but with more RAM and a faster modem." We’re always looking for the best BBQ joints on the planet. So, if you know of one, add it to the map while you’re visiting.


Special Thanks to Our Generous Sponsors


FULL DISCLOSURE: ClearlyIP, Skyetel, Vitelity, DigitalOcean, Vultr, VoIP.ms, 3CX, Sangoma, TelecomsXchange and VitalPBX have provided financial support to Nerd Vittles and our open source projects through advertising, referral revenue, and/or merchandise. As an Amazon Associate and Best Buy Affiliate, we also earn from qualifying purchases. We’ve chosen these providers not the other way around. Our decisions are based upon their corporate reputation and the quality of their offerings and pricing. Our recommendations regarding technology are reached without regard to financial compensation except in situations in which comparable products at comparable pricing are available from multiple sources. In this limited case, we support our sponsors because our sponsors support us.

BOGO Bonaza: Enjoy state-of-the-art VoIP service with a $10 credit and half-price SIP service on up to $500 of Skyetel trunking with free number porting when you fund your Skyetel account. No limits on number of simultaneous calls. Quadruple data center redundancy. $25 monthly minimum spend required. Tutorial and sign up details are here.

The lynchpin of Incredible PBX 2020 and beyond is ClearlyIP components which bring management of FreePBX modules and SIP phone integration to a level never before available with any other Asterisk distribution. And now you can configure and reconfigure your new Incredible PBX phones from the convenience of the Incredible PBX GUI.

VitalPBX is perhaps the fastest-growing PBX offering based upon Asterisk with an installed presence in more than 100 countries worldwide. VitalPBX has generously provided a customized White Label version of Incredible PBX tailored for use with all Incredible PBX and VitalPBX custom applications. Follow this link for a free test drive!
 

Special Thanks to Vitelity. Vitelity is now Voyant Communications and has halted new registrations for the time being. Our special thanks to Vitelity for their unwavering financial support over many years and to the many Nerd Vittles readers who continue to enjoy the benefits of their service offerings. We will keep everyone posted on further developments.


Some Recent Nerd Vittles Articles of Interest…

  1. This offer does not extend to those in jurisdictions in which our offer or your participation may be regulated or prohibited by statute or regulation. []

Another Dell with Asterisk, Dude: Introducing the Orgasmatron III for Dell’s New PowerEdge T100

Dell finally kissed its SC440 server goodbye last week so we've been scrambling for a replacement VoIP candidate for Asterisk® that has performance sufficient to serve as a 50 to 100-user small business PBX without breaking the bank. It turns out Dell's PowerEdge T100 introduced in September is strikingly similar to the SC440 both in performance, design, and even price, but it scales a bit better. If it walks like a duck, quacks like a duck, and is priced like chicken feed, that's good enough for us.

In early December, we got our first new T100: a Dual Core Intel® Pentium®E2180, 2.0GHz processor with 1MB Cache, an 800MHz FSB, two 80GB 7.2K RPM Serial ATA 3Gbps 3.5-in Cabled Hard Drives connected to the onboard SATA controller, 512MB of 667MHz DDR2 RAM, a DVD-ROM Drive, and an On-Board Single Gigabit Network Adapter for $299. Sound familiar? It should. The T100 special pricing was virtually identical to the $299 special on the SC440 except Dell now has thrown in a DVD-ROM drive in lieu of the SC440's CD-ROM drive. For $19 more, you can bring the system up to 2GB of RAM which is an excellent idea. If you missed out, don't fret. There will be another deal in a week or two. Even the regular pricing on this unit with a Celeron 1.8GHz processor, 2 gigs of RAM, and two 80GB drives is only $339. And international pricing is equally competitive. We haven't yet seen the $199 single-drive U.S. price that appeared regularly with the SC440, but it shouldn't be too long given the current economy.

As for scaling, if you're interested in a growth path, you'll love the T100 compared to the SC440. It supports numerous processors up to the Quad Core Xeon 2.83GHz with 2x6M Cache and 1333MHz FSB as well as two one-terabyte SATA drives (just don't buy them from Dell 😯 ). And, unlike the SC440, the T100 accepts up to 8GB of RAM. So the remaining question: "Will the SC440 Orgasmatron II build work with the T100?" And the answer is "sort of." But have no fear, we've put Humpty back together again and have added even more bells and whistles to the new Orgasmatron III custom-designed for the T100 today. It now includes your own, free and private Hamachi VPN cloud for up to 16 computers.

To get email alerts when the T100 again goes on sale, go to techbargains.com. Then click on Send Email Deal Alert and fill out the form entering T100 as your search term. Be sure to confirm the alert by replying to the email.

If you want a cash rebate on your Dell purchase, use our eBates link to Dell or click on the coupon image in the right column of this article. It takes less than 30 seconds to sign up, and you get $5 (and so do we!) plus you receive 2% cash back on your Dell small business purchases which can be deposited directly into your PayPal account.

We expect these units will follow in the footsteps of their SC440 cousin and go on sale roughly every two weeks... so be ready! The T100 also is good news for our international friends because Dell now markets this machine virtually everywhere in the world at very competitive prices. It's selling for 40% off in the U.K. and 299€ in many European countries as we speak.

For long-time readers, you already know that we've identified what we believe to be the perfect Asterisk SIP phone, the Aastra 57i. But both of our previously anointed small business/home servers on which to run a production Asterisk system for 50-100 employees, the Everex gPC2 (aka "The WalMart Special") and the Dell SC440, are no more. So this build brings us current with Dell's very latest offering in the low-cost, high-performance server category and builds on the SC440 tradition of providing a quantum leap in performance and reliability compared with traditional home PCs. The ISO images you'll be downloading were captured as a backup on the flash drive of our new T100 lab machine. You can expect at least twice the performance on the PowerEdge T100 compared to the WalMart Special. Today's Orgasmatron III Build provides a preconfigured T100 installation on a 2-disk ISO image backup of the whole system using Mondo. And, NO, it won't work with any other hardware! Once you download the ISO images and burn your CDs, it's a 15-minute No-Brainer to install the entire image onto your own T100. Wait to install any add-on cards until after you complete the Orgasmatron install. You must have a T100 configured as above, or this Mondo restore may not work. So accept no substitutes, or you may end up with an Electronic Brick instead of an Orgasmatron.

We've preconfigured some extensions on your new system as well as outbound and incoming trunks from some terrific providers including our second homegrown entry for VoIP terminations. Joe Roper and his business partner in Spain now offer a terrific IAX VoIP termination service. You can choose penny a minute service in the U.S. and most of Canada, or you can opt for premium VoIP service at about 2¢ a minute in the U.S. International rates also are VERY reasonable! You literally can sign up for service, plug in your phones, and have a system in full operation in under an hour.

If you've missed our previous Orgasmatron articles, suffice it to say this is the Ultimate Kitchen Sink for Asterisk. From the time you insert the CD 'til you have a functioning Asterisk PBX with all the bells and whistles imaginable... just 15 minutes! In fact, it will take less time to create your new system than it will take you to finish reading this article. Please do BOTH! The Orgasmatron III includes PBX in a Flash 1.3 in all its glory including Asterisk 1.4.21.2 running under CentOS 5.2 with a version of Zaptel that actually works with legacy cards, plus the newly released FreePBX 2.5, a full-function fax server, a full-disk backup and restore solution (that actually works!), the latest Hamachi VPN software, every imaginable Nerd Vittles text-to-speech application for Asterisk, and so much more. Complete documentation for the TTS apps is available here.

  • Inbound and Outbound VoIP Faxing Using nvFax... finally!
  • FONmail for Asterisk to send voice messages to any email address on the planet
  • AsteriDex RoboDialer and Telephone Directory
  • Telephone Reminders with Support for Recurring Reminders and Web-based TTS Reminder Messages
  • NewsClips for Asterisk featuring Dozens of Yahoo News Feeds (TTS)
  • Weather Reports by Airport Code (TTS)
  • Weather Reports by ZIP Code (TTS)
  • Worldwide Weather Forecasts (TTS)
  • xTide for Asterisk (TTS)
  • MailCall for Asterisk: Get Your Email By Telephone (TTS)
  • TeleYapper 4.0 Message Broadcasting System
  • CallWho for Phone Lookup and Dialing of Entries in the AsteriDex Database (TTS)
  • TFTP Server with preconfigured setups for 10 Aastra 57i SIP telephones

In addition, you get dozens of preconfigured telephony applications and functions that would take even an expert the better part of a year or two to build independently. And, unlike all of the other distributions, we build Asterisk from source so it's simple to modify and upgrade whenever you feel the need. Here's a short list of what you have to look forward to:

  • Stealth AutoAttendant with Welcome and Application IVRs
  • Key Telephone Support Using Park and Parking Lot
  • Intercom/Paging Support
  • Bluetooth Proximity Detection with Automatic Call Forwarding to Cell Phone
  • DISA
  • Blacklisting with Web and Telephony Interfaces
  • CallerID Name Lookups from Numerous Providers
  • Weekly Automated System Backups to a Flash Drive
  • One Touch Day/Night Service
  • Music on Hold
  • Voicemail with Email Delivery of Messages and Pager Notification
  • Voicemail Blasting
  • Cell Phone Direct Dial
  • Call Forward: All, Busy, No Answer
  • Call Waiting
  • Call Pickup
  • Zap Barge
  • Call Transfer: Attended and Blind
  • Dictation Service with Email Delivery
  • Do Not Disturb
  • Gabcast
  • Phonebook Dial by Name
  • Speed Dial
  • Flite Text to Speech (TTS)
  • Windows Networking with SAMBA
  • Linux Firewall and Fail2Ban with SSH, HTTP, and SIP/IAX login protection
  • PBX in a Flash Software Update Service To Keep Your System Current
  • One-Click Cepstral TTS Install with Allison... Just Type install-cepstral

Prerequisites. As mentioned, you'll need a T100 configured with the specs outlined above including the 2GB RAM upgrade. We also recommend an 8GB USB flash drive on which to store automatic weekly backups of your new system. Just plug it into your new machine, and follow the simple steps below to activate Mondo. Every Sunday night, you'll get a new backup in ISO format on your flash drive. If something goes wrong on your system, copy the ISOs to CDs and reboot with Disk 1. It doesn't get any easier than that. And you can always check on the latest backup by issuing the command: usbcheck

Pay to Play. Greed has finally set in at Nerd Vittles. After all, Christmas is just around the corner! The download of this two-disk ISO image will set you back a whopping $10. In addition to covering the bandwidth and storage costs for the builds themselves, it also seems only fair that those using the builds help cover the hardware costs associated with these technology refreshes. When you compare our pricing to the Lime Green PBX offering from Dell... well, you don't really wanna know! There's one other little difference. Once you download our image from DreamHost, you are more than welcome to pass it along to as many of your friends and business acquaintances as you like. You can even do it electronically through the DreamHost Files Forever program. And, if you're inclined to host this image for your fellow man at no cost, be our guest... and thank you!

Bottom line: With a little patience waiting on Dell's next special, for about $300 and some lunch money, you'll have the slickest, newest, fastest, most reliable PBX and fax machine on the planet with rock-solid weekly backups and, of course, the availability of our one-of-a-kind PBX in a Flash Software Update Service! In fact, this may very well be The PerfectPBX™ even if we do say so.

Getting Started. Once you have your T100 in hand, take it out of the box, plug it into your LAN with DHCP and DNS support and Internet connectivity. You'll need a USB keyboard for typing temporarily. We also strongly recommend that you always keep your system running behind a NAT-based firewall/router. We strongly recommend the dirt-cheap dLink WBR-2310 WiFi router which handles NAT issues with VoIP masterfully. Don't redirect any ports to the machine and don't turn the PC on just yet.

Download the two ISO images for the T100 from here. Unzip the file and create two CDs from the ISO images. If you don't know how to create a CD from an ISO image, read that section from our previous article. In fact, read the whole article. It'll help you immensely down the road.

Once you've created your two CDs, turn on the T100 and quickly insert Disk 1 into the DVD drive and close the drive. When prompted, press F11 to choose the boot device and select the DVD-ROM drive. You'll note that the default T100 setup now apparently looks for a network boot device so you'll need to do a little BIOS reconfiguring, but you can do that at your convenience. F2 gets you into the T100 BIOS setup. Then choose Integrated Devices and, using the space bar, change Embedded Gb NIC from Enabled with PXE to simply Enabled. Press the escape key twice and then choose Save and Exit.

For now, choose the DVD-ROM drive as the boot device and proceed with the Mondo restore. If you don't see a Mondo Rescue screen within a minute or less, turn the machine off and then back on again. At the Mondo Rescue main screen, type nuke and press the Enter key. This will erase, repartition, and reformat your hard disk in case you didn't know. This is normal. If you get any kind of errors about incorrect drive or partition names and you really do have a T100, ignore them. Otherwise, halt the install by pressing CTL-ALT-DEL and remove the CD. You'll need to install PBX in a Flash using our standard ISO which is available here. Otherwise, go have a cup of coffee and come back in about 10 minutes. You'll be prompted to insert Disk 2 and press Enter to finish the install. When the second CD finishes, eject it and wait for the prompt. Then type "exit" and press Enter. Your T100 will reboot, and you're ready to go.

After the reboot finishes, type root at the login prompt for your username and password for your password. The IP address assigned by your DHCP server should appear on the status screen. Write it down. If there is no IP address, your machine does not have network connectivity or access to a DHCP server with an available IP address. Correct the problem and reboot.

Securing Passwords. We're going to change five passwords now. For the time being (until you've done some reading), think up one really difficult password (that you won't forget) and use it for all five passwords. At the root@pbx:~ $ command prompt, type the following commands and type in your new password when prompted. Don't forget your password or you'll get to put in your two CDs and start over.

passwd
passwd-maint
passwd-wwwadmin
passwd-meetme
/usr/libexec/webmin/changepass.pl /etc/webmin root yournewpasswordhere

Now, using a web browser, go to the IP address of your new PBX in a Flash server. Click the Admin tab, the password is password. Then choose the FreePBX Administration button. Log in as maint with your new maint password. Before you do anything else, change ALL of the 10 extension passwords to something very secure... as if your phone bill depended upon it! Click Setup, Extensions and then choose each extension, modify BOTH the device secret and Voicemail Password, and click Submit. When you finish all the extensions, then reload the dialplan to save your changes. Finally, change your DISA password to something very, very secure: Setup, DISA, DISAmain, PIN. Reload your dialplan once again to save your changes.

Regardless of what you may read elsewhere, the Orgasmatron III has all the very latest security patches as of today. If you want more security, take our advice and add a hardware-based firewall/router between your Internet connection and your new Orgasmatron III and don't expose port 80 (the web interface) to the Internet!

Permanently Setting the IP Address. There are different schools of thought on whether to use a fixed or dynamic IP address. Most hardware-based routers support DHCP IP address reservations. The simplest way to permanently secure the existing IP address for your server is to reserve it on your router. If you'd prefer to assign your own IP address, we have included the deprecated netconfig utility which can be run after logging into your server as root. Sometimes you will need to run it once, enter your settings, reboot, and then repeat the drill. Then you should be all set. Either way, you need a permanent IP address for your machine when all is said and done. Once you have a permanent IP address, hop on over to dyndns.org and sign up for your own fully-qualified domain name (FQDN), e.g. mypbx.dyndns.org. You're going to need it for a whole host of things with your new PBX, and dyndns.org is about the easiest way to do it. Once you have your FQDN and DynDNS username and password, log in as root and edit: /etc/ddclient/ddclient.conf. Search (Ctl-W) for ***. Fill in your username and password and uncomment those two lines. Then search for *** again, uncomment the next three lines and fill in your fully-qualified domain name. Save the file and service ddclient restart. To make sure everything worked, issue the following command: ddclient -force. Assuming there are no errors, issue the following command to start ddclient each time your server reboots: /sbin/chkconfig --add ddclient. Now the IP address of your Asterisk server will always resolve to your FQDN from DynDNS. And anyone can call you via SIP for free using the following SIP URI: mothership@yourFQDN.dyndns.org. You can take this a step further and sign up for a free incoming phone number at ipkall.com. For your account type, choose SIP. For your SIP phone number, enter: mothership. For your SIP proxy, enter the fully-qualified domain name (FQDN) for your server, e.g. mypbx.dyndns.org. Choose a password and enter your real email address, and they will beam you a Washington state phone number within a day or so. You can't beat the price!

Getting Phones to Work Reliably. If you or the the person at the other end of your calls only hears half the conversation or if your calls get abruptly disconnected after a few minutes, it's probably because you forgot to add IP addresses to tell SIP how to communicate with your Asterisk server sitting behind a firewall. Edit /etc/asterisk/sip_custom.conf and add an entry for your external IP address and also for your local (internal) subnet where Asterisk resides. Then restart Asterisk: amportal restart.

externip=68.28.142.83
localnet=192.168.0.0/255.255.255.0

If you have a dynamic IP address and you set up ddclient above with your fully-qualified domain name, we've created a little script to keep these entries up to date automatically. Just edit the following file:

/var/lib/asterisk/agi-bin/ip.sh

Fill in the correct entries for your fqdn and localnet. Then uncomment the last line in /etc/crontab which runs ip.sh once every 5 minutes.

Adding Plain Old Phones. Before your new PBX will be of much use, you're going to need something to make and receive calls, i.e. a telephone. For today, you've got several choices: a POTS phone, a softphone, or a SIP phone (highly recommended). Option #1 and the best home solution is to use a Plain Old Telephone or your favorite cordless phone set (with 8-10 extensions) if you purchase a little device (the size of a pack of cigs) known as an SPA-2102. It's under $70. Be sure you specify that you want an unlocked device, meaning it doesn't force you to use a particular service provider. Once you get it, plug the device into your LAN, and then plug your phone instrument into the SPA-2102. Note that this adapter supports two-line cordless phones! Your router will hand out a private IP address for the SPA-2102 to talk on your network. You'll need the IP address of the SPA-2102 in order to configure it to work with Asterisk. After you connect the device to your network and a phone to the device, pick up the phone and dial ****. At the voice prompt, dial 110#. The device will tell you its DHCP-assigned IP address. Write it down and then access the configuration utility by pointing your web browser to that IP address.

Once the configuration utility displays in your web browser, click Admin Login and then Advanced in the upper right corner of the web page. When the page reloads, click the Line1 tab and then repeat this drill for the Line2 tab if you want to connect the device to two extensions on your Asterisk system. Scroll down the screen to the Proxy field in the Proxy and Registration section of the form. Type in the private IP address of your Asterisk system which you wrote down previously. Be sure the Register field is set to Yes and then move to the Subscriber Information section of the form. Assuming you're using the preconfigured extensions starting with 701, do the following. Enter House Phone as the Display Name. Enter 701 as the User ID. Enter your actual password for this extension in the Password field, and set Use Auth ID to No. Click the Submit All Changes button and wait for your Sipura to reset. In the Line 1 Status section of the Info tab, your device should show that it's Registered. You're done. Now repeat the drill for Line2 using extension 702. Pick up a phone and dial 1234# to test out BOTH extensions.

Downloading a Free Softphone. Unless you already have an IP phone, the easiest way to get started and make sure everything is working is to install an IP softphone. You can download a softphone for Windows, Mac, or Linux from CounterPath. Or download the pulver.Communicator. Here's another great SIP/IAX softphone for all platforms that's great, too, and it requires no installation: Zoiper 2.0 (formerly IDEfisk). All are free! Just install and then configure with the IP address of your PBX in a Flash server. For username and password, use one of the extension numbers and passwords which you set up with FreePBX. Once you make a few test calls, don't waste any more time. Buy a decent SIP telephone. We think the best phone out there is the Aastra 57i for under $200. Another $100 buys you the Aastra 57i CT with a cordless DECT phone.


Configuring Aastra 57i SIP Phones. Your new system comes preconfigured to automatically configure up to 15 Aastra 57i phones. Plug each phone into your network and wait for it to boot. Once it boots, press the Option button, then Phone Status (3), then IP & MAC Address (1). Write down each phone's IP address and MAC address. Then press Done to exit from the menus.

Next, we need to tell your phone to use your new Asterisk server as the TFTP server to obtain its setup. Press the Option button again, then Admin Menu (5). Type 22222 for the admin password and press Enter. Then choose Config Server (1), then TFTP Settings (2), then Primary TFTP (1), enter the IP address of your new server, and press Done a half dozen times.

Log back into your server as root. Switch to the TFTP directory: cd /tftpboot. You'll notice that there are config files for up to 15 phones. Simply choose the extension number you wish to use for each phone AND rename each file (filenames are 701.cfg to 715.cfg) to the MAC address of each phone.cfg. Do NOT use hyphens or colons in the MAC address. Edit each of the .cfg files and replace the SIP line1 password with the new password you created for the extension using FreePBX. One final step and you'll be ready to load up your phones. We need to set the correct IP address to tell each phone where your server is located. So... issue the following command using the IP address of your new server instead of 192.168.0.123. Leave the rest of the command as it is!

sed -i 's|192.168.0.0|192.168.0.123|g' /tftpboot/aastra.cfg

Now restart each phone by pressing the Option button and then Restart Phone (6) and then the Restart button. Once the phone reboots, you can make a test call by dialing 1-2-3-4. You can get the latest news by dialing 5-1-1. Or get a weather forecast by airport code (6-1-1) or zip code (Z-I-P).

A Word About Ports. For the techies out there that want to configure remote telephones or link to a server in another town, you'll need to know the ports to remap to your new server from your firewall. Here's a list of the ports available and used by PBX in a Flash. We don't recommend exposing UDP 5038 which is used to communicate with Asterisk via the Asterisk Manager.

TCP 80 - HTTP (needed to access the web sites on your server from the Net)
TCP 22 - SSH (needed if you want remote SSH access)
TCP 9001 - WebMin (needed if you want remote WebMin access... not recommended!!!)
UDP 10000-62000 - RTP (needed for SIP communications)
UDP 5004-5037 - SIP (ditto)
UDP 5039-5082 - SIP (ditto)
UDP 4569 - IAX2 (needed for IAX connection between Asterisk servers)

Setting Up Trunks for Outgoing and Incoming Calls. If you want to communicate with the rest of the telephones in the world, then you'll need a way to route outbound calls (terminations) to their destination. And you'll need a phone number (DIDs) so that folks can call you. Unlike the Ma Bell world, you need not rely upon the same provider for both. And nothing prevents you from having multiple outbound and incoming trunks to your new PBX. At a minimum, however, you do need one outbound trunk and one inbound phone number unless you're merely planning to talk to other extensions set up on your system. We've actually put all the hooks in place to make it easy for you to interconnect to other Asterisk servers, but we'll save that for another day. For today, we want to get you a functioning system so that you can place outbound calls to anywhere in the world and can receive incoming calls from anywhere in the world.

For outbound calling, we recommend you establish accounts with several providers. We've included the necessary setups for Joe Roper's new service for PBX in a Flash as well as Vitelity and AOL. To register for the service, just visit the web site and register. To sign up to the service in the USA and be charged in US Dollars, please sign up here. To sign up for the European Service and be charged in Euros, sign up here.

In addition to being one of the least expensive providers, there's also the premium service option. You can prefix any number with 000 to try it out. Give it a try. We think you'll be pleased with the service AND the pricing. DIDs for inbound service are not yet available, but Vitelity has lots of them, and there's a link below to get you started.

Vitelity: One of the Best Providers on the Planet. If you're seeking the best flexibility in choosing an area code and phone number plus reasonable entry level pricing plus high quality calls, then Vitelity is a winner. Vitelity provides Tier A DID inbound service in over 3,000 rate centers throughout the US and Canada. And, when you use our special link to sign up, the Nerd Vittles and PBX in a Flash projects get a few shekels down the road while you get an incredible signup deal as well. The going rate for Vitelity's DID service is $7.95 a month which includes up to 4,000 incoming minutes on two simultaneous channels with terminations priced at 1.45¢ per minute. For PBX in a Flash users, sign up now, and you can purchase a Tier A DID with unlimited incoming calls for just $3.99 a month and you get a free hour of outbound calling to test out their call quality. To check availability of local numbers and tiers of service from Vitelity, click here. Do not use this link to order your DIDs, or you won't get the special pricing! After the free hour of outbound calling, Vitelity's rate is just 1.44¢ per minute for outbound calls in the U.S. You can't beat the price (except with us) and the call quality is excellent as well. We've tried just about everybody.

To sweeten the pot a bit more, we've preconfigured both inbound and outbound Vitelity trunks for you. For the vitel-inbound trunk, all you'll need to do is plug in your username, password, and host assigned by Vitelity and adjust the registration string to match your assigned username and password. In FreePBX, click Setup, Trunks, SIP/vitel-inbound and make the changes. Then adjust the vitel-outbound trunk to reflect your actual username in the fromuser and username entries, your real password in the secret entry, and the correct host provided by Vitelity for your outbound calls, and you're all set. In FreePBX, click Setup, Trunks, SIP/vitel-outbound and make the changes. The same setup drill will get you going the the PIAF VoIP service as well.

To test things out, pick up a phone configured on your system and dial an area code and number of someone in the United States or Canada. Now get someone to call you using your new number. Presto! You have inbound and outbound phone service. And, if you'd like to see just how good SIP service can be, pick up a phone on your system and dial D-E-M-O. This will connect you to the PBX in a Flash hosted demo applications server at Aretta Communications.

An Alternate Outbound Calling Solution. As we said, it costs you almost nothing to add an alternate outbound calling solution to your new system. As luck would have it, adding a third outbound calling provider is now a breeze because AOL just entered the SIP terminations market with a product called AIM Call Out. We wrote about it recently, and you can read the article here. All you need is an AOL or AIM account name and $5 to get you started. The system you've just installed is preconfigured to use AIM Call Out. All you have to do is plug in your username and password, and you can immediately make calls to anywhere in the United States for under 2¢ per minute. Adding international calling is as easy as inserting the correct dial string. If you never use it, it doesn't cost you a dime. So $5 is mighty cheap insurance in our book.

First things first. Sign up for the service at this link. Your username will look something like this: johndoe@aim.com. You also will be assigned a password. Using your web browser, open FreePBX by pointing to the IP address of your new server and choosing Administration, then FreePBX. Type in admin as your username and the password you assigned to your system. From the main FreePBX menu, choose Setup, Trunks, and click on SIP/AIM in the far right column. Scroll down to the Peer Details section of the form and replace yourAIMpassword with your new password. Then replace yourAIMaccountname with your actual AIM account name. Now click the Submit Changes button and then Apply Configuration Changes and Continue with Reload.

Setting Up an Alternate DID for Incoming Calls. You also may want to consider a second phone number where people can call you. For example, if Grandma and Grandpa happen to be in another state and still have an old fashioned telephone, you might consider adding an additional DID to your system in their area code. They then can make a local call to reach you by dialing the local DID. On the les.net pay-as-you-go plan, it costs less than a dollar a month plus a penny a minute for the calls. Money well spent if we do say so... and you'll sleep better.

If this setup looks a bit complicated, don't be intimidated. Remember, we're connecting your PBX to the rest of the world so people can call you! With les.net, you have a choice of rate plans for most DIDs. You either can pay $3.99 a month for unlimited inbound calls with two concurrent channels or 99¢ per month and 1.1¢ per minute with four concurrent channels. Just visit their site and click Signup to register. Once you are registered, click Login and then Order DIDs. Pick a phone number. Then click Peers/Trunks and Create New Peer. Write down the Peer Name as you will need it in a minute to set up your connection. Choose SIP for Peer Technology, RFC2833 for DTMF Mode, G.711 for Codecs, Registration for Peer Type, enter the public IP address of your server for Peer Address, make up a secure password and write it down also, specify an Outbound CallerID for your calls, and check the 10-digit dialing box. Leave voicemail unchecked since you'll handle this on your end. Save your changes.

Now choose Your DIDs and click on the one you just ordered. We now need to tie the phone number to the Peer setup you just created above. Click on the DID and select the Route to Peer which you just created. Check the Send DID Prefix box and leave everything else blank. Click Save Changes and you're finished at the les.net end. Now let's set up your inbound DID trunk in Asterisk using FreePBX.

Log into FreePBX using a web browser. Click Setup, Trunks and then Add SIP Trunk. Fill in the CallerID and then drop down to the Outgoing Settings section of the form. For Trunk Name, use the Peer Name that you created above and wrote down. It ought to look something like this: 1092832198. For Peer Details, enter the following using the Peer Name and Password you assigned at les.net:

canreinvite=no
context=from-trunk
fromuser=1092832198
host=did.voip.les.net
insecure=port,invite
nat=yes
secret=yourpassword
type=peer
username=1092832198

For Incoming Settings, use from-pstn for the User Context and enter the following User Details:

canreinvite=no
context=from-pstn
dtmfmode=rfc2833
insecure=port,invite
nat=yes
type=user

For the registration string, enter a string like the following using your Peer Name and Password:

1092832198:yourpassword@did.voip.les.net/1092832198

Now click the Submit Changes button and then Apply Configuration Changes and Continue with Reload.

Choosing a VoIP Provider That Supports Faxing. We've included a reliable fax solution in this build. You can review the details in this Nerd Vittles article. To test your machine, you can connect a real fax machine to one of the extensions using an SPA-2102. Then send a fax to extension 329 (F-A-X). But first you must configure your email address in two places using FreePBX: Setup, General Settings, Email address to have faxes emailed to AND Setup, Inbound Routes, any DID / any CID, fax Email. Once you've saved your settings, send the fax and see if it's delivered to your email address. If it works reliably, then the fax and email applications on your machine are configured correctly. Unfortunately, that's only half the battle. To receive faxes from outside your system, you'll also need a DID from a provider that supports faxing. And then it's still only about a 90% proposition... on a good day. We've tested this with many, many VoIP providers. Some work. Many don't. Some, such as Vitelity, offer a faxing service for a fee. Guess what? Their regular VoIP setup doesn't support faxing. Our old friends at Telasip.com still support faxing. We've also had good luck with Future-Nine and Teliax. You can read our fax dissertation here for more details. With the exception of the trunk setup covered in the article, all of the remaining setup steps already have been completed on your new server!

Interconnecting Two Asterisk Servers. We've preconfigured this build to support an IAX interconnect to a second PBX in a Flash system. The trunk setup for the second machine to match the setup on this build can be printed out. The filename is /root/MainPeerTrunkSetup.gif.

Choosing a Preferred Provider. Finally, you'll need to decide whether to use PIAF-USA or AOL or Vitelity as your primary terminations provider. HINT: Joe's new service is the cheapest! So we've set things up this way. This is handled in FreePBX in the Outbound Routes tab under the Default entry. You can adjust easily these in any way you like by adding trunks or moving entries up and down the list to change their priority. Just be sure to leave ENUM at the top of the list since ENUM calls are always free. If a free call isn't possible, your server will automatically drop down to the next trunk in the priority list. Don't add Vitelity to the list unless you have actually created a Vitelity account since they handle unsuccessful connections in a non-standard way which will cause FreePBX not to drop down to the next trunk to attempt a connection.

Activating the Stealth AutoAttendant for Inbound Calls. By default, all incoming calls are routed to the Day/Night Code 1 context which allows you to toggle calls between a Day setting and a Night setting by pressing *281. The Day setting for Code 1 is set to our Stealth Autoattendant which plays a brief greeting during which you can choose other options or direct dial extensions on your system before the call is passed to Ring Group 700. To change the options, edit MainIVR.

Activating Mondo Backups. We would be remiss if we didn't mention what a fantastic open source product Mondo Rescue is. It's the sole reason that today's build was possible. Our special thanks go to the development team: Bruno Cornec, Andree Leidenfrost, and Hugo Rabson. It is the first (and only) backup software for Linux builds that actually works reliably. The best way to prove that for yourself is to download the Orgasmatron III and try it for yourself. It has much more flexibility than what you will experience, but that would take another dozen pages to explain. We'll save that for another day. In the meantime, if you'd like more information, visit the Mondo Rescue web site.

WARNINGS: If you update the version of Mondo shipped with this distribution to the current version using either yum or a standalone RPM, you will break your backup system. The advantage of the newer version is that it can create bootable flash drives with your backup image. The disadvantage is that the restore process croaks and locks up your machine. So don't update for the time being. We'll let you know when it's safe to upgrade.

Particularly if you have more than one drive in your system, be aware that the device name for your USB flash drive may differ from the setting of /dev/sdb1 that is preconfigured in this backup. This depends upon the number of internal hard disks and the Dude that built your Dell.

To safely activate backups on a stock T100 configured as we've outlined above, here are the mandatory steps:

1. Format every USB stick you plan to use for backups. Insert the USB flash drive into the right USB slot on the front of your Dell T100. Log into your server as root and type: /root/usbformat.sh. Your USB flash drive is now formatted. Repeat the process for any additional USB flash drives. WARNING: Do not use this script if you have added additional drives on your system as it may inadvertently reformat the wrong drive! The script assumes you have one or two internal SATA drives and one USB stick inserted in the right USB slot on the front of your Dell T100.

2. Assign the proper device name to Mondo and activate it: With a formatted USB flash drive in place, log into your server as root and type: /root/usbdevice.sh. You're all set. A backup will be made each Sunday night. If no flash drive is present, the backup will be saved in /etc/usbmondo.

3. Run a test backup: With a USB flash drive in place, log in as root, and type: /etc/cron.weekly/disk-backup.cron. To be sure it worked, see #4.

4. Check the contents of your USB stick regularly! Plug it into the front right USB port, log in as root, and type usbcheck. It's a good practice to check this on Mondays to be sure you got a fresh backup on Sunday night!!

Other Backup Options. Of course, there are some other backup options. FreePBX is preconfigured to make an automatic backup of your FreePBX data once a week. This is controlled by the settings in Tools, Backup and Restore, WeeklyBackup. It currently is set to make a backup every Wednesday morning. You also may want to consider off-site backups. Amazon's S3 service is preconfigured including all necessary software and scripts. All you need is an account and password. For detailed instructions, see this Nerd Vittles' article.

Installing Cepstral on Your New Server. If you want real text-to-speech with Allison's familiar voice, then you'll need to buy Cepstral. It's dirt cheap for single, non-commercial use. To install it, run install-cepstral from the command prompt while logged in as root. At one point you'll be asked whether to create a missing directory for the Cepstral installation. Be sure to type y at the prompt rather than just pressing the Enter key. Instructions for registering your copy of Cepstral are displayed when the install completes. For complete documentation, read our previous tutorial.

Creating Your Own Hamachi VPN Network. We've saved the best for last today. This latest Orgasmatron III build includes the Hamachi VPN network software. All you have to do is initialize it. Once configured, you can add as many as 16 computers (including Windows, Mac, and Linux machines) to your own private virtual private network. Communications between all of your systems then will be encrypted by simply connecting to the other systems using their VPN network addresses (5.x.x.x). For complete setup instructions, take a look at our VPN in a Flash knol on Google. The entire setup takes less than 5 minutes.

News Flash: As we put this article to bed last night, we tried one final experiment. We took the bootable USB flash drive from our VPN in a Flash build for the Aspire One NetBook that was featured last week and plugged it into the Dell T100. Guess what, Dude? Twelve minutes later we had a perfect clone of the Aspire One build on our new Dell T100. So, if you're looking for a state-of-the-art operating system with a fantastic GUI interface to pair up with Asterisk and PBX in a Flash, we may have another surprise for you to ring in the new year with your new T100. And it should work splendidly on the older SC440 as well as other machines with any industry-standard SATA drive. For 2009, PBX in a Flash perhaps should be renamed PBX on a Flash. Imagine carrying a full-featured, preconfigured PBX around on your keychain. Now that should impress even your nerdiest friends. There still are a few kinks with the latest version of Mondo which have forced us to build our own custom patches to get a successful restore, but we're oh so close... Stay tuned!


Special Thanks. As another year comes to a close, we want to take a moment to thank all of you for reading Nerd Vittles. About 50,000 folks from 137 countries around the globe read Nerd Vittles every week. The Nerd Vittles Official Flag above shows all of your home towns. Incidentally, the countries are ordered by the number of actual visitors from each country.

Where To Go From Here. We've covered a good bit of territory today. When you're ready, move on to the second part of this article at the link below. In the meantime, you have a new phone system that works. And there are a number of PDF documents in the /root folder on your new system which are worth a read. Better yet, you can browse through all of the documentation which is available for PBX in a Flash by going here. You also can dial D-E-M-O on your new system and see just how powerful direct SIP connections can be to other Asterisk hosts (in this case, ours!)... at no cost. Finally, you can log into your server and type help-pbx for access to a treasure trove of additional features. Enjoy and have a Merry Christmas!

Continue reading Part II...


Special Thanks to Our Generous Sponsors


FULL DISCLOSURE: ClearlyIP, Skyetel, Vitelity, DigitalOcean, Vultr, VoIP.ms, 3CX, Sangoma, TelecomsXchange and VitalPBX have provided financial support to Nerd Vittles and our open source projects through advertising, referral revenue, and/or merchandise. As an Amazon Associate and Best Buy Affiliate, we also earn from qualifying purchases. We’ve chosen these providers not the other way around. Our decisions are based upon their corporate reputation and the quality of their offerings and pricing. Our recommendations regarding technology are reached without regard to financial compensation except in situations in which comparable products at comparable pricing are available from multiple sources. In this limited case, we support our sponsors because our sponsors support us.

BOGO Bonaza: Enjoy state-of-the-art VoIP service with a $10 credit and half-price SIP service on up to $500 of Skyetel trunking with free number porting when you fund your Skyetel account. No limits on number of simultaneous calls. Quadruple data center redundancy. $25 monthly minimum spend required. Tutorial and sign up details are here.

The lynchpin of Incredible PBX 2020 and beyond is ClearlyIP components which bring management of FreePBX modules and SIP phone integration to a level never before available with any other Asterisk distribution. And now you can configure and reconfigure your new Incredible PBX phones from the convenience of the Incredible PBX GUI.

VitalPBX is perhaps the fastest-growing PBX offering based upon Asterisk with an installed presence in more than 100 countries worldwide. VitalPBX has generously provided a customized White Label version of Incredible PBX tailored for use with all Incredible PBX and VitalPBX custom applications. Follow this link for a free test drive!
 

Special Thanks to Vitelity. Vitelity is now Voyant Communications and has halted new registrations for the time being. Our special thanks to Vitelity for their unwavering financial support over many years and to the many Nerd Vittles readers who continue to enjoy the benefits of their service offerings. We will keep everyone posted on further developments.


Some Recent Nerd Vittles Articles of Interest...

Introducing VPN in a Flash: The $499 Mobile Telephony Appliance with Asterisk

Aspire OneWe’ve spent a lot of time designing turnkey Asterisk®-based systems from the early Asterisk at Home days until the latest Orgasmatron Builds1 for PBX in a Flash. So, trust us! Nothing comes close to the new VPN in a Flash Mobile Telephony Appliance. Having endured more than a decade of preparations for national emergencies, we are well aware of the need for well-designed telephony systems which can be deployed on a moment’s notice anywhere. We also appreciate the need for a versatile, portable communications appliance which can be toted from hotel room to hotel room providing secure VoIP communications back to the mothership. And we fully grasp the need of thousands of businesses to transparently deploy remote communications devices at far away places but in a way that they still can be supported from home base. With all that in mind, Tom King and I have spent the last several months designing this VoIP telephony appliance. Now let us introduce you to the new world2 of VPN in a Flash.

Aspire OneUntil six months ago, the hardware simply wasn’t available to provide the GUI performance necessary to create such a portable appliance. But the Intel Atom® processor changed all of that. And now Acer has stepped up with an almost perfect mobile implementation of the Atom motherboard in the Aspire One® Netbook. Weighing in at just over two pounds, it’s totally portable but also a powerhouse. And it’s quiet.

On the software side, the stars all lined up when Fedora® introduced Fedora 10 last week, an almost perfect rendition of the Linux® operating system with every imaginable bell and whistle including a low-overhead KDE® GUI that rivals the very best of Windows® and Mac OS X®. Our challenge was to put all the pieces together and add the very best of the Asterisk® telephony world to the mix. And, of course, we wanted to accomplish all of this while staying true to our open source roots. We think this Fedora Remix3 meets that goal in spades! You certainly could build your own system from the ground up, and we would encourage you to download Fedora 10 and do that when you have a few months of free time on your hands. The new Fedora 10 build is a perfect platform for Asterisk and the latest state-of-the-art hardware. In the meantime, our rendition which configures everything to better support Asterisk in a mobile telephony environment should save you about 500 man-hours. Try it. You’ll see. 😉

Aspire One Desktop

We also wanted the new system design to include every imaginable communications bell and whistle on the planet including a flexible, turnkey virtual private network implementation, transparent support for wired and wireless networks, a built-in preconfigured softphone which is ready for business, and all of the Nerd Vittles utilities and FreePBX® functionality that has made PBX in a Flash such a hit.

Finally, a new Mondo backup script has been included that lets you clone your entire system to a $20 bootable USB flash drive for incredibly easy system recovery in the event of a hardware catastrophe. And the 2008 introductory price for these built-to-order systems: just $499 plus shipping to US-48 destinations. And there’s loads of documentation, too. With a little luck, a self-installing, bootable flash drive appliance for our friends outside of the United States should be available by early next year.


About the Face Lift. Well, it’s been a painful few days at Nerd Vittles Headquarters. Our former hosting provider, BlueHost, apparently hired a new recruit that deemed our CPU utilization unworthy… in the middle of the night last Thursday. He promptly shut down our site. For any of you considering shared hosting, this is one of the dirty little secrets of the industry. They may promise you unlimited disk storage and unlimited bandwidth, but they don’t really mean it. I’m reminded of Mark Twain’s old adage about bankers: "Bankers are the folks that hand you an umbrella when the sun is shining and want it back the minute it starts to rain." Internet hosting providers have some of the same gene pool unfortunately.

The sad part of the story is that BlueHost is one of the better providers in the United States, and we, in fact, have recommended them. Hundreds of our readers took us up on our BlueHost recommendation. It gets even worse. We provided free Asterisk support to the BlueHost folks about a year ago when they were attempting to reconfigure their queues. We even brought in a local consultant in their area to assist. Do you think we even got a return call from our fair-weather friends when we were trying to figure out why our site suddenly became a problem? Our site utilization has been fairly steady for more than two years! Suffice it to say, the phone never rang. But that’s all history now. Nerd Vittles has moved to our new high-performance server at WestNIC that also hosts the PBX in a Flash Forum, and we’re happy to be there.

Nothing’s ever simple, of course. WestNIC employs PHP5 while BlueHost still was using PHP4. Even though cPanel made the server transition easy, our particular version of the WordPress blogging software was more than a little long in the tooth. Everything at first appeared to work fine. But it turned out that you could no longer read individual posts. Call us picky but that was a deal breaker. What to do? Suffice it to say that 17 version upgrades later, we’re now current. The only fatality was a few recent comments which got deleted by operator error… mine. 🙄

All good blogs deserve a facelift at least once every five years, don’t you think? Well, we’re about a month shy of our Fifth Anniversary, but it was worth the effort. And the performance boost is nothing short of amazing. We hope you agree. Enjoy!


Special Thanks to Our Generous Sponsors


FULL DISCLOSURE: ClearlyIP, Skyetel, Vitelity, DigitalOcean, Vultr, VoIP.ms, 3CX, Sangoma, TelecomsXchange and VitalPBX have provided financial support to Nerd Vittles and our open source projects through advertising, referral revenue, and/or merchandise. As an Amazon Associate and Best Buy Affiliate, we also earn from qualifying purchases. We’ve chosen these providers not the other way around. Our decisions are based upon their corporate reputation and the quality of their offerings and pricing. Our recommendations regarding technology are reached without regard to financial compensation except in situations in which comparable products at comparable pricing are available from multiple sources. In this limited case, we support our sponsors because our sponsors support us.

BOGO Bonaza: Enjoy state-of-the-art VoIP service with a $10 credit and half-price SIP service on up to $500 of Skyetel trunking with free number porting when you fund your Skyetel account. No limits on number of simultaneous calls. Quadruple data center redundancy. $25 monthly minimum spend required. Tutorial and sign up details are here.

The lynchpin of Incredible PBX 2020 and beyond is ClearlyIP components which bring management of FreePBX modules and SIP phone integration to a level never before available with any other Asterisk distribution. And now you can configure and reconfigure your new Incredible PBX phones from the convenience of the Incredible PBX GUI.

VitalPBX is perhaps the fastest-growing PBX offering based upon Asterisk with an installed presence in more than 100 countries worldwide. VitalPBX has generously provided a customized White Label version of Incredible PBX tailored for use with all Incredible PBX and VitalPBX custom applications. Follow this link for a free test drive!
 

Special Thanks to Vitelity. Vitelity is now Voyant Communications and has halted new registrations for the time being. Our special thanks to Vitelity for their unwavering financial support over many years and to the many Nerd Vittles readers who continue to enjoy the benefits of their service offerings. We will keep everyone posted on further developments.


Some Recent Nerd Vittles Articles of Interest…

  1. If you don’t know what an Orgasmatron Build is, use the search function at the top of this page. []
  2. And speaking of new worlds, lawyers love footnotes so you’d better get used to these little numbers. 🙂 We’ll break you in easy today. There are just a few of them. []
  3. Fedora and the Infinity design logo are trademarks of Red Hat, Inc. Asterisk is a registered trademark of Digium, Inc. All other trademarks and registered trademarks are property of their respective owners. This software aggregation is neither provided nor supported by the Fedora Project and contains non-Fedora and modified Fedora content. Official Fedora software is available through the Fedora Project website. []

The Lean, Mean Asterisk Machine: And Now It’s a Fax Machine

Hard to believe it’s been a year since PBX in a Flash hit the street, but today’s the Big Day! So Happy Birthday to us. With an estimated 100,000 downloads worldwide and over a million RSS feeds to our Kennonsoft User Interface each month, you might be wondering what keeps us going with all the reported venture capital behind Big Orange and Lime Green. Well, we’re glad you asked. Truth be told, it’s the cushy offices (in our kitchens) and the endless flow of generous contributions from grateful users. Heh, heh! Seriously, there are some real reasons that account for the popularity of PBX in a Flash. Bottom Line: It Just Works! And here’s a representative sample of other feedback from our fans:

  • Currency – The PBX in a Flash distribution is always up to date. Our separate payload file makes it easy. No one else has anything close. So their builds are almost always long in the tooth.
  • Upgradability – Unlike the competition, you don’t have to start all over each time a new version of Asterisk® or Linux hits the street. We’ll have more to say about our new SUSHI (Software Update Service – Hyperlinked, Interactive) in coming weeks.
  • FlexibilityPBX in a Flash remains the only distribution that builds Asterisk from source. Even Digium®’s own distribution now uses RPMs. When you add new hardware or upgrade the Linux kernel to plug a security vulnerability, you’ll understand why this is critically important.
  • SupportPBX in a Flash has the best support group in the business. It’s called the PBX in a Flash Forum, and it’s free. Unlike the competition, you don’t have to pay to get help on basic technical issues with our product. And you don’t normally wait more than an hour or two for a response. That’s what Open Source is all about!
  • Security – We take security seriously. It’s our number one priority. When there’s a known problem, we don’t hide it or ignore it. We fix it right now. And the RSS Feed that’s part of our KennonSoft User Interface lets you know about it immediately. You can make your own comparisons and draw your own conclusions with regard to the other distributions.
  • No Slimeware – We’re up front about the way we operate and why. We don’t create backdoors or Trojan Horses in our distribution that phone home for any reason. We notify users of issues through an RSS Feed. We believe it’s up to you, not Big Brother, to decide whether to protect your own system. As permitted by the GPL, we do encrypt some of our freeware installation scripts because of the conduct of some in this business that pass off the work product of others as their own.
  • No Bugs – People chuckled when we began a year ago with this mantra because of the experience we all had in days of old. We still believe it and do our best to keep the PBX in a Flash distribution bug free. If you don’t believe it, visit our forums and then visit the others. Some bugs obviously are beyond our control, but we do endeavor to steer users toward stable versions of open source products that can be used reliably in almost any business environment.

So there’s a quick update on how we’re doing and why we do things the way we do. Unlike a year ago, there are lots of choices now in the marketplace. If you’re still on the fence, the nice part of the open source movement is that it doesn’t cost you anything to try several flavors and make your own decision. Ultimately, we think you’ll choose PBX in a Flash for all of the reasons we’ve mentioned.

2011 Update: This article has been updated to support Asterisk 1.8 using HylaFax, AvantFax, and IAXmodem. Click here for the latest article.

Welcome Back Faxing. That brings us to today’s topic: adding a fax machine to your PBX in a Flash system. With all the distributions, there have been numerous fax options. And the one word that describes most of them is P-A-I-N-F-U-L. We’ve been searching for a way to return to the good ol’ Asterisk@Home days with NVfax. It just worked. Well, today it works again with PBX in a Flash and Asterisk 1.4. And, yes, it should work on the other distributions as well. I’ve had mixed emotions about whether to protect the install script, but I’ve chosen to release it in unencrypted format because I think we all can benefit from the contributions of others while still giving credit to those that contribute. And, yes, I know there’s a difference of opinion about this… for some very good reasons. But the Nerd Vittles contribution to VoIP technology has always been distribution agnostic, and we’ve decided to keep it that way. We’re equally delighted that Philippe Lindheimer has left the hooks in FreePBX to support NVfax so, once you complete this install, you can manage incoming fax calls from the comfort of the FreePBX user interface… even in distributions which no longer call it FreePBX. Ever wonder why these folks didn’t also rename Asterisk while they were in the lobotomy business?

How It Works. There are two pieces to the new faxing mechanism. For inbound faxing, you simply set FreePBX to use NVfax to listen for a fax tone on inbound trunks. We’ve found that 5 is the magic number for detecting a fax tone on most inbound calls. YMMV! You also can dial local extension 329 (F-A-X) and the extension will listen for an incoming fax. In either instance, if a fax tone is detected, the call is routed to a fax context that converts the incoming fax to a PDF document which is then sent to your email address specified in your Fax Handling setup for each Inbound Route on your system. The correct answers for Fax Handling are Fax Extension: System, Fax Email: any email address that works, Fax Detection Type: NVFax, and Pause After Answer: 5. Don’t forget to also enter the Fax Machine Settings under the Setup->General Settings tab in FreePBX. For outbound faxing, we can’t recall this ever working with NVfax, but it does now. Here’s how to set things up. Create a PDF document of anything you wish to send by fax. Name the document so that it corresponds with the phone number of the fax destination, e.g. 6789991234.pdf would mean you plan to send the PDF document to a fax device at the following phone number: 678-999-1234. Now place the document in the /tmp directory on your server. Next, pick up a phone on your system and dial 32948 (F-A-X-I-T). When prompted for the destination fax phone number, key in 6789991234. Once you receive an acknowledgment that your fax has been sent, hang up. It doesn’t get much easier than that.

Prerequisites. Well, there are lots of them. But a stock installation of Asterisk with CentOS works great so long as you also have outbound emailing working and you’ve installed a text-to-speech engine. Either Flite or Cepstral works just fine. All of the bundled distributions should suffice. We actually only use TTS to generate the voice prompts for the outbound faxing so, if you don’t need that functionality, no TTS engine is required. If you need help with outbound emailing, see our PBX in a Flash knol. There also are setup instructions for Gmail and Comcast in the PBX in a Flash forum.

Installing the Fax Software. We’ve written a script which handles all of the heavy lifting for you. Just log into your server as root and issue the following commands:

cd /root
wget http://pbxinaflash.net/source/fax/fax.pbx
chmod +x fax.pbx
./fax.pbx

In less than a minute, you should be all set.

Configuring the Fax Software. First, edit the [faxit] context in /etc/asterisk/extensions_custom.conf to plug in your actual fax number to be displayed on outbound faxes. It should be the 17th line up from the bottom of the file. Save your changes and reload Asterisk: amportal restart. Now load FreePBX using your favorite browser and make the Fax Machine entries in Setup->General Settings. Remember that your return email address must match your server domain name that you set up in /etc/hosts to get outbound email flowing, e.g. pbx.dyndns.org. Next, for each of your Inbound Routes in which you wish to enable fax detection, edit the entry and fill in the Fax Handling options we previously mentioned. To repeat, the correct answers are Fax Extension: System, Fax Email: any email address that works, Fax Detection Type: NVFax, and Pause After Answer: 5. Finally, add Misc Destinations for Fax (329) and FaxIt (32948). Reload your dialplan, and you should be ready to go.

Testing Things Out. The easiest way to assure that your system is properly configured is to attach a real fax machine to an FXS device on your system. Then send a fax to extension 329 (F-A-X). You should receive the fax via email shortly thereafter. That’s only half the battle unfortunately. If you want to receive faxes from outside your PBX, you also need to find a VoIP provider that properly supports faxing. Suffice it to say, all VoIP providers are not created equal when it comes to fax support. Our Best of Nerd Vittles article on faxing will provide some suggestions as well as a few tips and tricks. If you have a standard POTS line connected to an FXO device on your Asterisk server, that’s an even better option. Just make certain that fax detection is enabled on the inbound route for that line.

Don’t be misled by the brevity of this article. It in no way is a measure of the effort that it’s taken to make NVfax work again. One way that you can show your appreciation for the good deeds of others is through the Donate link at the top of our page. There’s no obligation, of course, but it does keep the Little Mrs. from regularly asking, "Tell me again why you do this?" Enjoy and thanks in advance.


Getting Started with PBX in a Flash. There’s a great deal of literature on PBX in a Flash that is yours for the taking. But we wanted to mention a terrific new series of articles in Mark Berry’s blog that are especially well suited for those just learning about VoIP. Have a look. We think you’ll agree.


Special Thanks to Our Generous Sponsors


FULL DISCLOSURE: ClearlyIP, Skyetel, Vitelity, DigitalOcean, Vultr, VoIP.ms, 3CX, Sangoma, TelecomsXchange and VitalPBX have provided financial support to Nerd Vittles and our open source projects through advertising, referral revenue, and/or merchandise. As an Amazon Associate and Best Buy Affiliate, we also earn from qualifying purchases. We’ve chosen these providers not the other way around. Our decisions are based upon their corporate reputation and the quality of their offerings and pricing. Our recommendations regarding technology are reached without regard to financial compensation except in situations in which comparable products at comparable pricing are available from multiple sources. In this limited case, we support our sponsors because our sponsors support us.

BOGO Bonaza: Enjoy state-of-the-art VoIP service with a $10 credit and half-price SIP service on up to $500 of Skyetel trunking with free number porting when you fund your Skyetel account. No limits on number of simultaneous calls. Quadruple data center redundancy. $25 monthly minimum spend required. Tutorial and sign up details are here.

The lynchpin of Incredible PBX 2020 and beyond is ClearlyIP components which bring management of FreePBX modules and SIP phone integration to a level never before available with any other Asterisk distribution. And now you can configure and reconfigure your new Incredible PBX phones from the convenience of the Incredible PBX GUI.

VitalPBX is perhaps the fastest-growing PBX offering based upon Asterisk with an installed presence in more than 100 countries worldwide. VitalPBX has generously provided a customized White Label version of Incredible PBX tailored for use with all Incredible PBX and VitalPBX custom applications. Follow this link for a free test drive!
 

Special Thanks to Vitelity. Vitelity is now Voyant Communications and has halted new registrations for the time being. Our special thanks to Vitelity for their unwavering financial support over many years and to the many Nerd Vittles readers who continue to enjoy the benefits of their service offerings. We will keep everyone posted on further developments.


Some Recent Nerd Vittles Articles of Interest…