Home » Search results for 'web sites 101' (Page 2)
Search Results for: web sites 101
HOW-TO Bonanza: 50 Great Summertime Projects for You & Your Mac mini
Well, it’s that time of the year again. The Nerd Vittles staff will be taking a breather for a bit to recharge our batteries. But, in the finest college tradition, we’re leaving you lots of homework. Here’s a listing of what we’ve built thus far in our Mac mini ISP-In-A-Box project. So, while we’re taking it easy, pick out a few projects you haven’t tried and knock yourself out. Any Mac running at least Mac OS X v10.3 aka Panther is a suitable candidate for these projects. Many also have been tested with Tiger. Visit Tiger Vittles for the Tiger update notes to many of these tutorials. Also be sure to check out our WHERE-TO Bonanza: 50 Great Summertime Web Sites for You & Your Mac mini.
And here are some of our other tutorials to keep you and your Mac mini busy:
And finally we and our friends at MacSurfer and Engadget and Gizmodo and MacOSXhints and MacDevCenter and Entropy. Give ’em a whirl!
Last but not least, for PC users thinking about making the Switch to a Mac, read our article and this one. Then buy David Pogue’s book, and you’ll have everything you need. It really is a No Brainer!
We’ve gotten lots of terrific feedback and some great tips from many of you since we first began putting this list together in early spring, but we’d love to hear from the shy types as well. What did you like? What can we improve? What can we cover which would be of interest to you in the coming months? If you have a favorite open source application or a must-have tool that we’ve overlooked thus far, don’t be timid. Drop us a note or just leave a comment below. We do this for fun, not as a business fortunately, but we strongly believe that Apple should be doing something similar as part of their business plan. We, their loyal customers, deserve nothing less. Thanks for visiting NerdVittles.com. And do tell your friends about us. Finally, take a look at our Tiger Vittles site for the latest happenings with Mac OS X Tiger.
Who Is This Guy? Ward Mundy, the author of the ISP-In-A-Box series, is a retired attorney who spent more than 30 years providing legal and technology assistance to the federal courts in the United States.
Happy Fourth: Our Gift to You — 17+ Years of Nerd Vittles
- $300 Chromebook Faceoff: ARM vs. x86? Which Is Better?
- Introducing Incredible PBX 2022 for the Raspberry Pi
- Oracle Cloud: Grab a Free Incredible PBX Cloud Server for Life
- Systems Integration and Public Participation with FreePBX
- A Walk on the Wild Side: Meet Incredible PBX for MX Linux
- Deal of the Year: OBi2182 Color WiFi Phones now $59.99
- Interconnecting Asterisk Servers with PJsip and OpenVPN
- Migrating Incredible PBX 2022 to a PUBLIC-Facing Cloud PBX
- It’s Debian 11, Asterisk 19, & FreePBX 16: Come And Get It
- 5 Minute Wonder: Incredible PBX 2022 in Cloud for $25/Yr.
- Deploying a Non-Google SMTP RelayHost with Asterisk
- One-Minute Wonder: It’s Incredible PBX 2022 for VirtualBox
- Oh My God, It’s Omicron!
- Santa’s Surprise: Free Faxing Returns for FreePBX 16
- The $10,000 Hoax: Meet Tesla’s Full Self-Driving Vehicle
- Call By Name for Asterisk with IBM Voice Recognition Returns
- An Electronics Home Makeover for the 21st Century
- Some Further Thoughts & Solutions Regarding DDoS Attacks
- Is SIP Trunking Safe & Reliable in the DDoS World?
- DEAL OF THE DAY: OBi2182 Color WiFi Phones now $69.98
- Unified Communications: Adding SMS to the Asterisk Toolkit
- Meet RackNerd: The Best VoIP Cloud Bargain on the Planet
- Morphing Incredible PBX into a PUBLIC-Facing Cloud PBX
- Amazon’s Alexa Now Available for Incredible PBX
- Blink Cameras: The Travelin’ Man’s Dream Come True
- Moving from Incredible PBX 2020 to 2021 on the Raspberry Pi
- Adding the Linux XFCE GUI to Incredible PBX 2021
- Virtual Paradise: It’s Incredible PBX 2021 for VMware
- Housekeeping 101: Managing Your Asterisk Backups and Logs
- Taming the Condo Call Box with a Raspberry Pi & Asterisk
- SPAM Blocker & CNAM Cornucopia for Incredible PBX 2021
- Verizon 5G Service for $25/month with Unlimited Everything
- Review: The 2021 Cadillac Escalade – Everything a Tesla Isn’t
- Our Best VoIP Cloud Platform Recommendations for 2021
- Happy New Year: Introducing Incredible PBX 2021 for Debian
- Capitalism 101: IBM Castrates CentOS to "Improve" RHEL
- Cyber Monday 2020: TV Deals You Can’t & Shouldn’t Refuse
- Revolutionary: Incredible PBX & Fax 2020 for Raspberry Pi
- Turbocharge Your Raspberry Pi 4 with a $45 Bootable SSD
- Groundwire for Android & iOS: The Best $10 You’ll Ever Spend
- Linphone Rocks: Free SIP Calling to Anybody, Anywhere
- Oldie But Goodie: VoIP.ms, The Most Versatile VoIP Provider
- Clearly Anywhere: The Ultimate Mobile User VoIP Companion
- Frozen in Time: Sangoma at a Crossroads or the Cliff
- Android Alert: Unmasking Your Hidden SIP Phone
- Finding the Perfect Laptop: Meet the System76 Lemur Pro
- Harnessing the Cloud to Start An Incredible PBX Business
- Last Chance to Jump onto Incredible PBX Cellular Bandwagon
- Vonage Roars into the Asterisk World with Nexmo
- OSS End Point Manager Returns for Incredible PBX 2020
- Turning Incredible PBX into a Lean, Mean Asterisk Machine
- Free IBM Voicemail Transcription with Incredible PBX 2020
- ClearlyIP Introduces New Features for Incredible PBX Phones
- BulkVS: A Bargain SIP Provider for Incredible PBX Platforms
- Election Protection: Deploying Lenny to Block Robocalls
- Interconnect Incredible PBX 2020 to the Asterisk Mothership
- Coping with Coronavirus: Working from Home with Asterisk
- Travelin’ Man 3: A Plug-and-Play Firewall for Incredible PBX
- Future-Proofing FreePBX Distro with Incredible PBX Skin
- Sangoma Developments Affecting All FreePBX Users
- Sangoma’s New FreePBX Gotchas With Module Signatures
- Return of Free Voicemail Transcription & Voice Dialing
- 2019 Technology RoundUp: What’s Hot and What’s Not
- Black Friday/Cyber Monday & Beyond: Incredible PBX 2020
- Skyetel SMS Smorgasbord for Incredible PBX with VitalPBX
- Going Public with Incredible PBX 16 and VitalPBX 2.3.8
- Desktop Dream Machine: Incredible PBX 16-15 for VirtualBox
- Honeymoon Time: Meet Incredible PBX 16-15.2 for CentOS 7
- Mastering the Incredible PBX 16-15 Feature Set with Raspbian
- Icing on the Cake for Incredible PBX 16-15 and Raspberry Pi
- Back to School: It’s Incredible PBX 16-15 for the Raspberry Pi
- Enchilada Amore: It’s Incredible PBX 16-15 for CentOS 7
- Lessons Learned: Circling Back for a Second Look at OpenSIPS
- Safely Deploying Incredible PBX on the Wide Open Internet
- Best of Both Worlds: Safely Marrying Asterisk to OpenSIPS
- F-O-R-K? A Few Thoughts on the Sangoma Employee Exodus
- Spring Is Sprung: Taking Incredible PBX to the Google Cloud
- Cell Phone Tips for Spring Break and International Travel
- Yowza! A Fault-Tolerant Incredible PBX Platform for $1/Mo.
- In Search of a Better Mousetrap: Meet Incredible PBX 13-13.10
- Now Serving: The Incredible PBX 13-13 Whole Enchilada
- Keep On Trunkin’: Free International VoIP Calling Returns
- Big Kahuna: 70 New FreePBX GPL Modules for Incredible PBX
- UC on Steroids: Incredible PBX for Issabel Joins the Cloud
- SIP Happens! Deploying a Publicly-Accessible Asterisk PBX – replaced
- Celebrating 2019: Return of the One-Minute Desktop PBX
- Spam Phone Call Blocker and CNAM Caching for FreePBX
- R.I.P. GVSIP: A Final Farewell to Google Voice
- Road Warrior’s Advice: Before You Buy a Tesla…
- FusionPBX on Steroids: Text-to-Speech Apps Have Arrived
- Creating Free IBM Voice Prompts for FusionPBX/FreeSWITCH
- Double-NAT Blues: Tackling Asterisk’s Thorniest Problems
- One Minute Cloud VPS: Meet Incredible PBX for HiFormance
- VoIP 101: Developing a Cost-Effective SIP Strategy
- Dare to Compare: The Best (free) VoIP Offerings for 2018
- Cloud 9: Free Incredible PBX in the Cloud Hosting until 2019
- Autonomous Cars: Move Over Tesla, Here Comes Everybody
- VoiceMail Transcription for VitalPBX Using IBM Watson STT
- Incredible PBX in the Cloud: A $10/Year VoIP Cloud Platform
- VitalPBX in the Cloud: Providers, Backups, & Airtight Security
- 300 New Wholesale Providers Make Asterisk Shine
- Revolutionary VoIP: The Best (free) PBX Ever from 3CX
- Rolling Your Own: Building a Custom ISO with Incredible PBX
- Beginner’s Navigation Guide to VoIP PBXs and Nerd Vittles
- November 24, 2017: A Black Friday to Remember
- Sneak Peek: Incredible PBX with FreePBX 13 GPL Modules
- Game Changer: Hooking Up Facebook with Incredible PBX
- Twofer Tuesday: Incredible PBX 13 to the Rescue
- RTPbleed Security Alert: Asterisk Calls Can Be Intercepted
- Another Perfect Pair: Flawless VoIP with Wazo and 3CX
- Almost Free: Professional Grade TTS Comes to Issabel 4
- Leap Into Summer: Introducing Incredible PBX for Issabel
- Independence Day for Elastix 4: Introducing Issabel 4
- 3CX in the Cloud: 8 Great Ways to Secure Your Server
- Postfix + Gmail: A Pain-Free SMTP Relay for Wazo PBX
- Choosing the Best (free) PBX for SOHO Deployments
- Paradise Found: Amazon’s Polly TTS Meets Incredible PBX
- IBM’s Speech Recognition Engine Comes to Asterisk
- Cellphone Hell: 2017 Minefield Navigation Guide
- Chasing Rainbows: The VoIP in the Cloud Trifecta
- VoIPtopia 2017: Choosing the Best, Free VoIP Platform
- If It Walks Like a Duck and Quacks Like a Duck, Guess What?
- Siriously: It’s Wolfram Alpha for XiVO and Wazo
- 2016, The Year of VoIP Choice: Meet Wazo and XiVO 16.15
- VoIPtopia: Google Services with Incredible PBX and PIAF5
- XiVO Nirvana: Cloud Hosting with SIP Service for 15¢ a Day
- Type It or Say It: Asterisk SMS Messaging Returns with Incredible PBX for XiVO
- Integrating SIP URIs into XiVO for Free Worldwide Calling
- Never Miss a Meeting: Google Calendar Alerts for XiVO
- Raspberry Pi One-Minute Wonder: A Turnkey and Truly Incredible PBX for XiVO
- VirtualBox Magic: A Turnkey PBX in 5 Minutes Flat with XiVO
- Google Voice with OAuth 2 Comes to Incredible PBX for XiVO
- Take the XiVO Plunge: 4 Months of Free Cloud Hosting
- Security 101: A Fresh Look at Incredible PBX Security Audit Methodology
- Tempus Fugit: Introducing Incredible PBX Alarm Clock for Asterisk and XiVO
- As Easy As 1-2-3: Introducing Incredible PBX Telephone Reminders for XiVO
- 2016: The Year of the May Bromance with XiVO, Asterisk 13, and the GPL
- Sleep Well: Create a $10.50 Incredible Backup Server in the Cloud with WebDAV
- No Brainer: Free Cell Service, Free Texting, Free Data Plan + Free SIP Trunk
- Taking a Fresh Look at the Asterisk, FreePBX, and Incredible PBX Security Models
- TrueCNAM: A Breath of Fresh Air for CNAM Lookups and CallerID Superfecta
- Smartphone Trifecta: 2016’s Very Best Cellphones with Two Awesome Surprises
- Four Months in Paradise: Free International VoIP Calling From Your Cellphone
- Mobile WiFi Shootout: Torture Testing the Best WiFi HotSpots for Your Vehicle
- I Have A Dream: Free Cellular Service with Integrated Remote SIP Connectivity
- Just in Time for Santa: Return of The Glory Days with Skype Connect for Asterisk?
- FCC and Asterisk Now Provide The Tools Needed to Put an End to Robocalls
- Asterisk Server Troubleshooting: Finding and Fixing Bugs & Gremlins in Your PBX
- Why Reinvent the Wheel: Incredible PBX GUI Application User’s Guide
- Firewalls 101: Why Every Asterisk Server Should Have a Functioning Firewall
- Decisions, Decisions: Choosing the SOHO Asterisk Platform That’s Best For You
- 60 Seconds to Real Independence: Incredible PBX GUI Comes to VirtualBox
- Keeping It Real: Holey Socks! It’s the Missing FreePBX GPL Source Code, Or Is It?
- Freedom and the FreePBX Cloud: Is an Apple-like Ecosystem GPL-Compliant?
- View from the Trenches: A Fresh Look at VoIP Project Development in the Cloud
- Wear Something Green for May Day: The Schmoozification of Sangoma
- Gotcha-Free PBX: GIT-R-Done with Incredible PBX for Asterisk-GUI (CentOS)
- SOHO Delight: Introducing the Ultimate Asterisk Appliance for Under $30
- Where to Begin: A Comparison of Open Source Features in Asterisk Aggregations
- We Have a Dream, Too: The Return of (Gotcha-free) Open Source GPL Software
- 30 Minutes to Paradise: Incredible PBX for Ubuntu 14.04 is Ready for Primetime
- Midnight Madness: Introducing Incredible PBX 12 with Asterisk 12 and FreePBX
- Zero Day Vulnerability Protection and More: Introducing Cover Your Asterisk
- Hold On to Your Wallet: Another Huge VoIP Phone Bill May Be Lurking
- Hardware Device of the Year: Meet the CuBox-i with Incredible PBX for Ubuntu
- Commented on Where are people getting the Lenny sound prompts for his voice?
- Pioneers, Start Your Engines: Introducing Incredible PBX for CuBox-i with Ubuntu
- State of the Art: The New Incredible PBX Security Model for Asterisk
- Knock Three Times: Pain-Free Remote Access to Your Asterisk or Linux Server
- Top 3 Asterisk Security Tips for 2014: WhiteLists, WhiteLists, and WhiteLists
- FMC: The Future of Telephony with Vitelity’s vMobile and Asterisk in the Cloud
- Beware the Ides of May: It’s Hammertime for Google Voice
- 4 Months in Paradise: The Return of Free International VoIP Calling
- BYOB: Easy Peasy PIAF-Green with Asterisk 11.8.1 and ‘Genuine’ CentOS 6.5
- Closing the Book on CentOS: Introducing PBX in a Flash 3 with PIAF 3.0.6.5 OS
- Crippleware: Is Red Hat Rewriting the GPL and the Future of Open Source?
- Don’t Hurry: A First Look at Google Glass with Google Glass Frame
- Putting the Genie Back in the Bottle: More RedHat Legal Shenanigans with CentOS
- Obivoice = OBi Heaven: Dumping Google Voice for Less Than 10¢ a Day
- netTALK to the Rescue: Dumping Google Voice for Less Than 10¢ a Day
- IVR 101: Six Quick Steps to Building Incredible IVRs for Asterisk with FreePBX
- Two Thumbs Up: A New Flash Drive Installer for PBX in a Flash 2.0.6.4.5
- Adventures in Twitterland: You Can’t Make This Stuff Up
- AstriCon 10: WOW! What a Coming Out Party for Asterisk 12!
- Finally a 100% Portable PBX: Introducing GoIP, a SIP-GSM Gateway for Asterisk
- Fall Festivus: Asterisk Text-to-Speech Roundup with a Baker’s Dozen New Voices
- Newbie’s SIP Navigation Guide for Asterisk: Is It Safe?
- Practicing Safe SIP: Adding SIP URI and Free DID Connectivity to Asterisk
- 2013 Greatest Hits: Lenny Returns for an Encore Performance
- Programmer’s Paradise: Introducing the VoIP Phone of the Year, Yealink’s T46G
- Triple Treat: Some Asterisk Utilities to Brighten Your Summer
- Amerika the Beautiful: An Insider’s View of What Went Wrong and How To Fix It
- Here We Go Again: Getting Ready for the Next Google Voice Train Wreck
- WebRTC: Asterisk Joins the Brave New World of Real Time Communications
- Allison Smith: State of the IVR Address
- What’s As Good As a $35 Raspberry Pi? How About 35 Free Incredible PBX Apps
- Time to Celebrate: Incredible PBX for Raspberry Pi Turns 21
- SMS Dictator 2.0: Send SMS Messages Using Your Phonebook with Google Voice
- GV Call Notifier: Send Jabber and SMS Alerts for Incoming Asterisk Calls
- Straight Talk: Keep AT&T Humming While Chopping Your Cellphone Bill in Half
- YATE in a Flash: Rolling Your Own SIP to Google Voice Gateway for Asterisk
- VPN in a Flash Reborn: Meet the Dedicated Server Edition in PIAF 2.0.6.2.4
- 5-Minute VoIP: Deploying a SIP to Google Voice Gateway
- Eating Our Own Dog Food: And It Tastes Pretty Good
- Googlicious: News, Weather, Stocks & Dictionary for Asterisk
- Good Morning: Hotel-Style Wake Up Calls Return to Asterisk
- PIAF 2.0.6.2.3: It’s PIAF-Brown with Certified Asterisk
- PBX in a Flash 2: One Incredible VoIP Platform
- Thumbs Up: A New Flash Drive Installer for PIAF2 + CentOS6
- Bluetooth Proximity Detection for Automatic Call Forwarding
- Speech-to-Text Directory Assistance Comes to Asterisk
- Open Source Development and the Patent Trolls
- Picking the Best (and worst) Cellphone and Provider for 2012
- 11/11/11: To Celebrate Nerd New Year’s, Please Welcome…
- 7 Steps to Skytopia: Pain-Free Calls with Skype and Asterisk
- 3 Steps to VoIP Nirvana: It’s Incredible PBX 2.0
- How Good Can a $298 Android Tablet Be?
- Welcome to Frontier Days
- Installing OS X Lion: The Short List of Gotcha’s
- Sorry Apple: The Google Lion No Longer Sleeps
- Coming to a Cloud Near You: Incredible PBX in the Cloud
- Introducing: New PBX in a Flash Installer for USB Flash Drives
- Skype + Asterisk (still) = Beautiful Music + Free Phone Calls
- Dear Digium: It’s Time to Start Eating Your Own Dog Food
- FreePBX Backdoor Passwords Pose Asterisk Security Threat
- Home Run: Asterisk Baseball Scores & Schedules with Gtalk
- Worldwide Weather Forecasts with Asterisk and Google Talk
- Tips, Tricks & Apps to Get the Most Out of Your iPad 2
- Motorola Xoom: A Disappointing Introduction to Android 3.0
- 2011 VoIP Device of the Year: Obihai OBi110 for Google Voice
- Samsung Galaxy Tab: The Good, The Bad, and The Ugly
- Avoiding a $100,000 Phone Bill: VoIP WhiteList for IPtables
- 2010 Bargain of the Year: Nortel 1535 Color SIP Videophone
- Donate Now To Claim Your $299 Web Appointment System
- TweedleD Back From the Dead Using Twitter OAuth
- Orgasmatron 5.2: The Secure Swiss Army Knife for Asterisk
- Apple’s iPad: A Home Run for Education
- Tweet2Dial: SMS Messaging with Google Voice and Twitter
- CallerID Superfecta 2.2.2: International CNAM Directories
- Surfing the Google Wave
- Tweaking Asterisk for Free Google Voice Calling
- New, Free Hospitality Management System for Asterisk
- Strike 3 for the Amazon Kindle Project
- Whole House iPod + $5/mo. Gets You Every Song on the Planet
- Asterize Your Data: Taming ODBC with Asterisk
- Googlified Messaging Returns: The Gizmo-Asterisk Marriage
- Remotely Managing Your Asterisk Server with WebDAV
- What PBX in a Flash Brings to the Asterisk Table
- Using Asterisk and Gizmo5 to Transform Nokia N95 Cellphone into Free SIP Phone
- Add SUSHI to Your Asterisk Server for Rock-Solid, Secure VoIP Telephony
- Statistically Speaking: AWstats Meets Asterisk and PBX in a Flash
- Roll Tide: Let Allison and Asterisk Plan Your Next Surfin’ Safari
- Text-to-Speech Bonanza with Cepstral and Asterisk 1.4
- Allison’s Text-to-Speech Trifecta: Cepstral, Asterisk 1.4 or 1.6, and FreePBX 2.4
- Build a $199 Turnkey (Green!) Asterisk 1.4 System in Less Than An Hour
- 100 Great Halftime Projects For You & Your Asterisk IP PBX
- Ho, Ho, Ho: Some Asterisk Stocking Stuffers from Santa
- Week #2: PBX in a Flash … The Lean, Mean Asterisk Machine
- Announcing PBX-in-a-Flash: A New Asterisk Platform for Everyman… and Woman!
- Managing Your Cellphone Calls with Asterisk or MagicJack
- magicJack: Could It Be the Asterisk Killer?
- Proximity Detection Perfection: Bluetooth + Asterisk + iPhone
- iPhone: The Perfect Asterisk Companion
- Your Choice: iPhone + AT&T or A New Car
- Broadband for Asterisk: Now Just $10 a Month… NOT!
- March Madness: Another Asterisk Security Hole in TrixBox Systems
- Fixing the Asterisk Security Hole in TrixBox Systems
- Click2Dial for Every(Asterisk)man… and Woman
- Weather, Weather Everywhere: Finally, Worldwide Weather Forecasts
- Hacker’s Dream Machine: Introducing the Best Gadget of the Year
- New Year’s Roundup: Pick-of-the-Litter VoIP Providers for Asterisk
- PBX-in-a-Flash: HOW-TO NerdVittlize Your TrixBox 1.2.3 Asterisk PBX
- FON.com WiFi Router Giveaway for $5 Ends Wednesday
- Tricking Out Your TrixBox
- Get Your News By Telephone: Introducing NewsClips for Asterisk
- VoipDiscount.com: Free Asterisk Calling Returns to the VoIP Wild West
- Upgrading Asterisk@Home 2.7 to Asterisk 1.2.6: Here’s How
- Follow-Me Roaming: Integrating Mobile Phones Into Your Dialplan
- Manly Man Alert: A Valentine’s "Gift With A Plug" That Won’t Get You Killed
- 50 Great Halftime Projects Using Your Free Asterisk@Home PBX
- ISP-In-A-Box: The $500 Mac mini (Create Your Own Planet … Really!)
- Backups and Redundancy with Asterisk
- Internet Telephony Shootout II: Finding the Best International VoIP Providers
- Quick & Easy: Configuring Remote Phone Access to an Asterisk PBX
- Phone Home Revisited: Getting Remote Dialtone With Asterisk — Three Great Solutions
- Securing Your Asterisk@Home PBX: Here’s How
- Save Millions on VoIP Costs: Here’s How
- HOW-TO Bonanza: 50 Great Summertime Projects for You & Your Mac mini
- Turbocharging Your Asterisk@Home PBX
- Tips & Tricks to Turbocharge Your Asterisk@Home PBX
- WHERE-TO Bonanza: 50 Great Summertime Web Sites for You & Your Mac mini
- Mac OS X Tiger Backups: The Good, The Bad, and The Ugly
- iTunes Bait and Switch: Say It Ain’t So, Steve
- RSS Made Really, Really Simple
- Ultimate Computer Telephony Server: The $500 Mac mini
- Turn Your Mac Mini Into A Media Center
- Blogging with Style
- ATTN: Bankers — Here’s An Idea
- PC Killer: The $500 Mac mini
- Web Hosting (Is Not) For Dummies
- palmOne’s Treo 650 Smartphone
Originally published: Monday, July 4, 2022
Need help with Asterisk? Visit the VoIP-info Forum.
Special Thanks to Our Generous Sponsors
FULL DISCLOSURE: ClearlyIP, Skyetel, Vitelity, DigitalOcean, Vultr, VoIP.ms, 3CX, Sangoma, TelecomsXchange and VitalPBX have provided financial support to Nerd Vittles and our open source projects through advertising, referral revenue, and/or merchandise. As an Amazon Associate and Best Buy Affiliate, we also earn from qualifying purchases. We’ve chosen these providers not the other way around. Our decisions are based upon their corporate reputation and the quality of their offerings and pricing. Our recommendations regarding technology are reached without regard to financial compensation except in situations in which comparable products at comparable pricing are available from multiple sources. In this limited case, we support our sponsors because our sponsors support us.
BOGO Bonaza: Enjoy state-of-the-art VoIP service with a $10 credit and half-price SIP service on up to $500 of Skyetel trunking with free number porting when you fund your Skyetel account. No limits on number of simultaneous calls. Quadruple data center redundancy. $25 monthly minimum spend required. Tutorial and sign up details are here.
The lynchpin of Incredible PBX 2020 and beyond is ClearlyIP components which bring management of FreePBX modules and SIP phone integration to a level never before available with any other Asterisk distribution. And now you can configure and reconfigure your new Incredible PBX phones from the convenience of the Incredible PBX GUI.
VitalPBX is perhaps the fastest-growing PBX offering based upon Asterisk with an installed presence in more than 100 countries worldwide. VitalPBX has generously provided a customized White Label version of Incredible PBX tailored for use with all Incredible PBX and VitalPBX custom applications. Follow this link for a free test drive!
Special Thanks to Vitelity. Vitelity is now Voyant Communications and has halted new registrations for the time being. Our special thanks to Vitelity for their unwavering financial support over many years and to the many Nerd Vittles readers who continue to enjoy the benefits of their service offerings. We will keep everyone posted on further developments.
Vonage Roars into the Asterisk World with Nexmo
We’re a bit late to the Nexmo® party. For those unfamiliar with the company, Nexmo was one of the leading communications platform-as-a-service (CPaaS) companies prior to their acquisition by Vonage® four years ago. Perhaps because of the Vonage name, Nexmo never appeared on our Asterisk® radar. This ZDnet article will get you up to speed. Suffice it to say, Nexmo has one of the best APIs in the VoIP business, and their pricing is reasonable. A DID offering multiple call paths will only set you back $1 a month with incoming calls costing $0.0049/minute with per second billing. Outbound U.S. calls are $0.0139/minute. Sending SMS messages using your DID costs $0.0068 per message while incoming messages are $0.0062. While barely scratching the surface of the Nexmo offerings, our goal today is to show you how to deploy a Nexmo trunk in IncrediblePBX® 2020 that provides voice and SMS.
As we have mentioned many times, one of the real beauties of VoIP is not having to put all your eggs in one basket like in the old MaBell days. Other than $1 a month for a DID, there are no other costs associated with a Nexmo account if you don’t use it AND your first $10 of usage is free. It also provides a terrific failover option from one of our two favorite providers: Skyetel and ClearlyIP.
Overview. There are eleven pieces to put in place to get inbound and outbound calls and SMS messages flowing. First, on the Nexmo site, (1) you’ll need to set up an account and (2) order a DID. HINT: When you search for numbers, be sure to use the 1 prefix to search for U.S. numbers by area code. Once the DID number has been activated, edit Your Number and (3) enter a web address to deliver incoming SMS messages to your PBX and (4) enter a SIP URI to send incoming calls to your PBX. (5) You’ll also need to make note of your API credentials and DID number which you will need in setting up the trunk and scripts on your PBX.
Second, on the PBX side, (1) you’ll need to whitelist several IP addresses for Nexmo in your firewall settings, (2) create a PJsip trunk with your Nexmo credentials and 11-digit CallerID number, (3) create an Outbound Route to send calls to Nexmo, (4) create an Inbound Route to accept calls from your Nexmo DID, (5) add a from-internal-custom dialplan rule to allow from-sip-external calls from Nexmo, and (6) install and configure our scripts to process SMS messages. This requires that outbound email is functional on your PBX.
SMS Messaging is a little different on every platform. The way we implemented it with Nexmo goes like this. Incoming SMS messages can be delivered either to an email address of your choice. Or, if your cellphone provider supports it, you can direct the emails to an address that your provider offers to process incoming messages and deliver by SMS to your cellphone:
- AT&T: phonenumber@txt.att.net
- Sprint: phonenumber@messaging.sprintpcs.com
- T-Mobile: phonenumber@tmomail.net
- Verizon: phonenumber@vtext.com or phonenumber@vzwpix.com
- Virgin Mobile: phonenumber@vmobl.com
Keep in mind that you can’t reply to a delivered email message and expect it to reach the sender. Outbound SMS messages with Nexmo must be generated either with a web browser pointed to the SMS directory on your PBX or from the Linux command line of your server. If the incoming SMS messages are redirected to SMS on your cellphone, you can click on the ORIGIN link and send an SMS reply, but it will have the number of your cellphone, not your Nexmo number. We’ll cover the syntax for these options once we get all the pieces in place.
Configuring SendMail with Incredible PBX 2020
Before we get too far along, let’s make sure you can send emails from your PBX. In order to receive SMS messages by email delivery, outbound mail functionality from your server obviously is required. If you’ve deployed your server in your home, your Internet Service Provider probably blocks downstream mail servers such as Incredible PBX from sending mail. This is done to reduce SPAM. In this case, you will need to configure SendMail using either your ISP or Gmail as an SMTP Relay Host. NOTE: If you are using a Gmail account with 2-step verification enabled, you MUST use a Gmail App Key instead of your Gmail account password. You also must enable Less Secure Apps access to the Gmail account. Here are the steps using a Gmail account:
cd /etc/mail yum -y install sendmail-cf hostname -f > genericsdomain touch genericstable cd /usr/bin rm -f makemap ln -s ../sbin/makemap.sendmail makemap cd /etc/mail makemap -r hash genericstable.db < genericstable mv sendmail.mc sendmail.mc.original wget http://incrediblepbx.com/sendmail.mc.gmail cp sendmail.mc.gmail sendmail.mc mkdir -p auth chmod 700 auth cd auth echo AuthInfo:smtp.gmail.com \\"U:smmsp\\" \\"I:user_id\\" \\"P:password\\" \\"M:PLAIN\\" > client-info echo AuthInfo:smtp.gmail.com:587 \\"U:smmsp\\" \\"I:user_id\\" \\"P:password\\" \\"M:PLAIN\\" >> client-info echo AuthInfo:smtp.gmail.com:465 \\"U:smmsp\\" \\"I:user_id\\" \\"P:password\\" \\"M:PLAIN\\" >> client-info # Stop here and edit client-info (nano -w client-info) in all three lines. # Replace user_id with your gMail account name without @gmail.com # Replace password with your real gMail password OR # use your Gmail App Key if 2-step verification is enabled # Be sure to replace the double-quotes shown above if they don't appear in the file!!! # Save your changes (Ctrl-X, Y, then Enter) chmod 600 client-info makemap -r hash client-info.db < client-info cd .. make systemctl restart sendmail
If your server is hosted in the cloud and your provider does not block TCP port 25, then you can send mail without using a SmartHost; however, your server's hostname must actually be real or downstream mail servers will reject your mail. You can set your server's hostname like this: hostname myserver.myhost.com. This is usually sufficient; however, it's a good idea to also add the hostname in /etc/hostname and in /etc/hosts as the first entry on 127.0.0.1 line:
127.0.0.1 myserver.myhost.com pbx.local localhost localhost.localdomain
Next, test outbound mail using this command with your actual email address:
echo "test" | mail -s testmessage yourname@youremaildomain.com
Configuring Nexmo for Use with Incredible PBX
NOTE: For ease of reference in the examples, we'll use 8005551212 to represent your 10-digit DID number, 18005551212 to represent your 11-digit DID number, and 22.33.44.55 to represent the public IP address of your PBX. You'll obviously need to replace these entries.
1. To get started, open Nexmo.com with a web browser and click on Try It Free. No credit card is required to use your $10 credit.
2. Next, purchase a DID to use with your PBX. Login to your Nexmo account, and click # Numbers then Buy Numbers. For Features, choose SMS & Voice. For Type, leave it set to Mobile. For Number, choose Starts With and enter 1800 replacing 800 with your desired area code. Don't forget the 1. When we opened our account, it already had a DID chosen. You can either use that one to experiment, or delete it and choose your own.
3. Click # Numbers then Your Numbers and click on the pencil icon to the right of your DID to edit the DID settings. Under SMS, enter a Webhook URL that looks like this using the public IP address of your PBX: http://22.33.44.55/sms.
4. Under Voice, choose Forward to SIP and enter a SIP URI in this format using your 10-digit DID (not eleven digits here!) and the public IP address of your PBX: 8005551212@22.33.44.55. Then click SAVE.
5. Navigate to Settings under your Account Name and write down your API Key and Secret as well as your purchased DID Number.
Configuring Incredible PBX for Use with Nexmo
1. Incredible PBX includes a whitelist as part of its Travelin' Man 3 firewall design. Begin by editing iptables-custom in /usr/local/sbin. Search for: # custom rules go below here. Below that line, insert the following, save the file, and restart IPtables: iptables-restsrt
# // New entry for Nexmo /usr/sbin/iptables -I INPUT -s api.nexmo.com -j ACCEPT /usr/sbin/iptables -I INPUT -s 169.63.86.0/24 -j ACCEPT /usr/sbin/iptables -I INPUT -p udp -m udp -s 5.10.112.121 --dport 5060:5069 -j ACCEPT /usr/sbin/iptables -I INPUT -p udp -m udp -s 5.10.112.122 --dport 5060:5069 -j ACCEPT /usr/sbin/iptables -I INPUT -p udp -m udp -s 69.59.247.1 --dport 5060:5069 -j ACCEPT /usr/sbin/iptables -I INPUT -p udp -m udp -s 69.59.247.2 --dport 5060:5069 -j ACCEPT /usr/sbin/iptables -I INPUT -p udp -m udp -s 69.59.247.3 --dport 5060:5069 -j ACCEPT /usr/sbin/iptables -I INPUT -p udp -m udp -s 69.59.247.4 --dport 5060:5069 -j ACCEPT /usr/sbin/iptables -I INPUT -p udp -m udp -s 69.59.248.2 --dport 5060:5069 -j ACCEPT /usr/sbin/iptables -I INPUT -p udp -m udp -s 69.59.248.3 --dport 5060:5069 -j ACCEPT /usr/sbin/iptables -I INPUT -p udp -m udp -s 69.59.248.4 --dport 5060:5069 -j ACCEPT /usr/sbin/iptables -I INPUT -p udp -m udp -s 69.59.248.9 --dport 5060:5069 -j ACCEPT /usr/sbin/iptables -I INPUT -p udp -m udp -s 69.59.249.1 --dport 5060:5069 -j ACCEPT /usr/sbin/iptables -I INPUT -p udp -m udp -s 69.59.249.2 --dport 5060:5069 -j ACCEPT /usr/sbin/iptables -I INPUT -p udp -m udp -s 69.59.249.3 --dport 5060:5069 -j ACCEPT /usr/sbin/iptables -I INPUT -p udp -m udp -s 69.59.249.4 --dport 5060:5069 -j ACCEPT /usr/sbin/iptables -I INPUT -p udp -m udp -s 69.59.250.1 --dport 5060:5069 -j ACCEPT /usr/sbin/iptables -I INPUT -p udp -m udp -s 69.59.250.2 --dport 5060:5069 -j ACCEPT /usr/sbin/iptables -I INPUT -p udp -m udp -s 69.59.250.3 --dport 5060:5069 -j ACCEPT /usr/sbin/iptables -I INPUT -p udp -m udp -s 69.59.250.4 --dport 5060:5069 -j ACCEPT /usr/sbin/iptables -I INPUT -p udp -m udp -s 69.59.251.1 --dport 5060:5069 -j ACCEPT /usr/sbin/iptables -I INPUT -p udp -m udp -s 69.59.251.2 --dport 5060:5069 -j ACCEPT /usr/sbin/iptables -I INPUT -p udp -m udp -s 69.59.251.3 --dport 5060:5069 -j ACCEPT /usr/sbin/iptables -I INPUT -p udp -m udp -s 69.59.251.4 --dport 5060:5069 -j ACCEPT /usr/sbin/iptables -I INPUT -p udp -m udp -s 119.81.44.6 --dport 5060:5069 -j ACCEPT /usr/sbin/iptables -I INPUT -p udp -m udp -s 119.81.44.7 --dport 5060:5069 -j ACCEPT /usr/sbin/iptables -I INPUT -p udp -m udp -s 168.100.88.1 --dport 5060:5069 -j ACCEPT /usr/sbin/iptables -I INPUT -p udp -m udp -s 168.100.88.2 --dport 5060:5069 -j ACCEPT /usr/sbin/iptables -I INPUT -p udp -m udp -s 168.100.88.3 --dport 5060:5069 -j ACCEPT /usr/sbin/iptables -I INPUT -p udp -m udp -s 168.100.88.4 --dport 5060:5069 -j ACCEPT /usr/sbin/iptables -I INPUT -p udp -m udp -s 169.48.36.56 --dport 5060:5069 -j ACCEPT /usr/sbin/iptables -I INPUT -p udp -m udp -s 169.48.36.66 --dport 5060:5069 -j ACCEPT /usr/sbin/iptables -I INPUT -p udp -m udp -s 169.55.62.70 --dport 5060:5069 -j ACCEPT /usr/sbin/iptables -I INPUT -p udp -m udp -s 169.55.62.215 --dport 5060:5069 -j ACCEPT /usr/sbin/iptables -I INPUT -p udp -m udp -s 169.60.141.29 --dport 5060:5069 -j ACCEPT /usr/sbin/iptables -I INPUT -p udp -m udp -s 169.60.141.30 --dport 5060:5069 -j ACCEPT /usr/sbin/iptables -I INPUT -p udp -m udp -s 216.147.0.1 --dport 5060:5069 -j ACCEPT /usr/sbin/iptables -I INPUT -p udp -m udp -s 216.147.0.2 --dport 5060:5069 -j ACCEPT /usr/sbin/iptables -I INPUT -p udp -m udp -s 216.147.1.1 --dport 5060:5069 -j ACCEPT /usr/sbin/iptables -I INPUT -p udp -m udp -s 216.147.1.2 --dport 5060:5069 -j ACCEPT /usr/sbin/iptables -I INPUT -p udp -m udp -s 216.147.2.1 --dport 5060:5069 -j ACCEPT /usr/sbin/iptables -I INPUT -p udp -m udp -s 216.147.2.2 --dport 5060:5069 -j ACCEPT /usr/sbin/iptables -I INPUT -p udp -m udp -s 216.147.3.1 --dport 5060:5069 -j ACCEPT /usr/sbin/iptables -I INPUT -p udp -m udp -s 216.147.3.2 --dport 5060:5069 -j ACCEPT /usr/sbin/iptables -I INPUT -p udp -m udp -s 216.147.4.1 --dport 5060:5069 -j ACCEPT /usr/sbin/iptables -I INPUT -p udp -m udp -s 216.147.4.2 --dport 5060:5069 -j ACCEPT /usr/sbin/iptables -I INPUT -p udp -m udp -s 216.147.5.1 --dport 5060:5069 -j ACCEPT /usr/sbin/iptables -I INPUT -p udp -m udp -s 216.147.5.2 --dport 5060:5069 -j ACCEPT /usr/sbin/iptables -I INPUT -p udp -m udp -s 216.147.62.4 --dport 5060:5069 -j ACCEPT /usr/sbin/iptables -I INPUT -p udp -m udp -s 216.147.62.5 --dport 5060:5069 -j ACCEPT /usr/sbin/iptables -I INPUT -p udp -m udp -s 216.147.63.4 --dport 5060:5069 -j ACCEPT /usr/sbin/iptables -I INPUT -p udp -m udp -s 216.147.63.5 --dport 5060:5069 -j ACCEPT /usr/sbin/iptables -I INPUT -p udp -m udp -s 216.147.63.38 --dport 5060:5069 -j ACCEPT /usr/sbin/iptables -I INPUT -p udp -m udp -s 216.147.63.39 --dport 5060:5069 -j ACCEPT /usr/sbin/iptables -I INPUT -p udp -m udp -s 216.147.63.100 --dport 5060:5069 -j ACCEPT /usr/sbin/iptables -I INPUT -p udp -m udp -s 216.147.63.101 --dport 5060:5069 -j ACCEPT /usr/sbin/iptables -I INPUT -p udp -m udp -s 216.147.63.116 --dport 5060:5069 -j ACCEPT /usr/sbin/iptables -I INPUT -p udp -m udp -s 216.147.63.117 --dport 5060:5069 -j ACCEPT # // End entry for Nexmo
2. Login to FreePBX as admin and navigate to Connectivity -> Trunks -> Add PJsip Trunk.
In General tab, enter Trunk Name: nexmo. Enter Outbound CallerID: your 11-digit Nexmo DID. If you forget the 1 or if your CallerID number doesn't match your Nexmo DID number, outbound calls will be delivered as Anonymous. No CallerID spoofing with Nexmo.
In PJSIP Settings under the General tab, enter your API Key as Username, your API Secret as Secret, Outbound as Authentication, sip.nexmo.com as SIP Server, 5060 as SIP Port, and from-pstn-e164-us as Context. Retain the other defaults.
In PJSIP Settings under the Advanced tab, enter YES for Send LineIn Registration, and 5.10.112.121, 5.10.112.122, 119.81.44.6,119.81.44.7,169.60.141.29,169.60.141.30 for Match.
In PJSIP Settings under the Codecs tab, select ULAW and ALAW. Then click Submit and Reload the Dialplan when prompted. Verify registration: pjsip show registrations
3. Create an Outbound Route under Connectivity. Name the route: Nexmo. For Trunk Sequence, choose nexmo. Create two Dial Patterns: one for NXXNXXXXXX with a prefix of 1 and one for 1NXXNXXXXXX. Click Submit and Reload Dialplan when prompted.
4. Create an Inbound Route under Connectivity with a Description of Nexmo Vonage, a DID Number consisting of your 10-digit DID, and a Destination of your choice for the incoming calls. Click Submit and Reload Dialplan when prompted.
5. Anonymous SIP access typically is blocked with Incredible PBX. Because of the way Nexmo delivers incoming calls, we need to make an adjustment to allow SIR URI access from Nexmo. Edit extensions_custom.conf in /etc/asterisk and scroll to the bottom of the file. Insert the following lines replacing 8005551212 with your actual 10-digit DID. Then SAVE the file and reload your dialplan: asterisk -rx "dialplan reload"
[from-sip-external](+) exten => 8005551212,1,Goto(from-trunk,${DID},1)
6. In FreePBX Settings -> SIP Settings, change the RTP Port Range to 10000-50000.
7. The only remaining piece is to install the scripts to manage SMS Messaging with Nexmo. While logged into your server as root, issue these commands to install all of the components:
# CentOS 6 requires minimum PHP 5.6 with remi.repo enabled # Prerequisites already are in place with Incredible PBX 2020 # On CentOS platforms, use the next command: yum -y install composer # On Raspbian platforms, use the next command: apt-get -y install composer # the remaining commands work on all platforms composer require nexmo/client composer require slim/slim:^3.8 cd /var/www/html wget http://incrediblepbx.com/nexmo-sms.tar.gz tar zxvf nexmo-sms.tar.gz rm -f nexmo-sms.tar.gz cd sms nano -w config.inc.php
When the editor opens, insert your Nexmo API key, secret, and 11-digit DID number. For your email address, you have a choice of using a traditional email address which will cause incoming SMS messages to be delivered to your email account. Or you can use an email address that maps to SMS messaging on your cellphone as explained above. In the HEADER field, insert your 11-digit DID number once again leaving @noreply.nexmo.com unchanged. Save the file: Ctrl-X, Y, then ENTER. Done!
Taking SMS Messaging for a Spin with Nexmo
To try things out, first send an SMS message from some device to your Nexmo DID number. You should receive a copy of the message in your email or as an SMS message on your smartphone if you elected to set that up.
Next, using a browser with WhiteList privileges to your PBX, send an SMS message to some SMS number using the following syntax where 22.33.44.55 is the PBX public IP address:
http://22.33.44.55/sms/sendsms.php/?SENDTO=18431234567&MSG="Test message."
Finally, after logging into your server as root, send another SMS message to some destination using the following syntax:
php /var/www/html/sms/sendsms.php 18431234567 "Test message."
Originally published: Monday, June 15, 2020 Updated: Sunday, October 30, 2022
Need help with Asterisk? Visit the VoIP-info Forum.
Special Thanks to Our Generous Sponsors
FULL DISCLOSURE: ClearlyIP, Skyetel, Vitelity, DigitalOcean, Vultr, VoIP.ms, 3CX, Sangoma, TelecomsXchange and VitalPBX have provided financial support to Nerd Vittles and our open source projects through advertising, referral revenue, and/or merchandise. As an Amazon Associate and Best Buy Affiliate, we also earn from qualifying purchases. We’ve chosen these providers not the other way around. Our decisions are based upon their corporate reputation and the quality of their offerings and pricing. Our recommendations regarding technology are reached without regard to financial compensation except in situations in which comparable products at comparable pricing are available from multiple sources. In this limited case, we support our sponsors because our sponsors support us.
BOGO Bonaza: Enjoy state-of-the-art VoIP service with a $10 credit and half-price SIP service on up to $500 of Skyetel trunking with free number porting when you fund your Skyetel account. No limits on number of simultaneous calls. Quadruple data center redundancy. $25 monthly minimum spend required. Tutorial and sign up details are here.
The lynchpin of Incredible PBX 2020 and beyond is ClearlyIP components which bring management of FreePBX modules and SIP phone integration to a level never before available with any other Asterisk distribution. And now you can configure and reconfigure your new Incredible PBX phones from the convenience of the Incredible PBX GUI.
VitalPBX is perhaps the fastest-growing PBX offering based upon Asterisk with an installed presence in more than 100 countries worldwide. VitalPBX has generously provided a customized White Label version of Incredible PBX tailored for use with all Incredible PBX and VitalPBX custom applications. Follow this link for a free test drive!
Special Thanks to Vitelity. Vitelity is now Voyant Communications and has halted new registrations for the time being. Our special thanks to Vitelity for their unwavering financial support over many years and to the many Nerd Vittles readers who continue to enjoy the benefits of their service offerings. We will keep everyone posted on further developments.
The Big 30: Incredible PBX 2020 Application User’s Guide
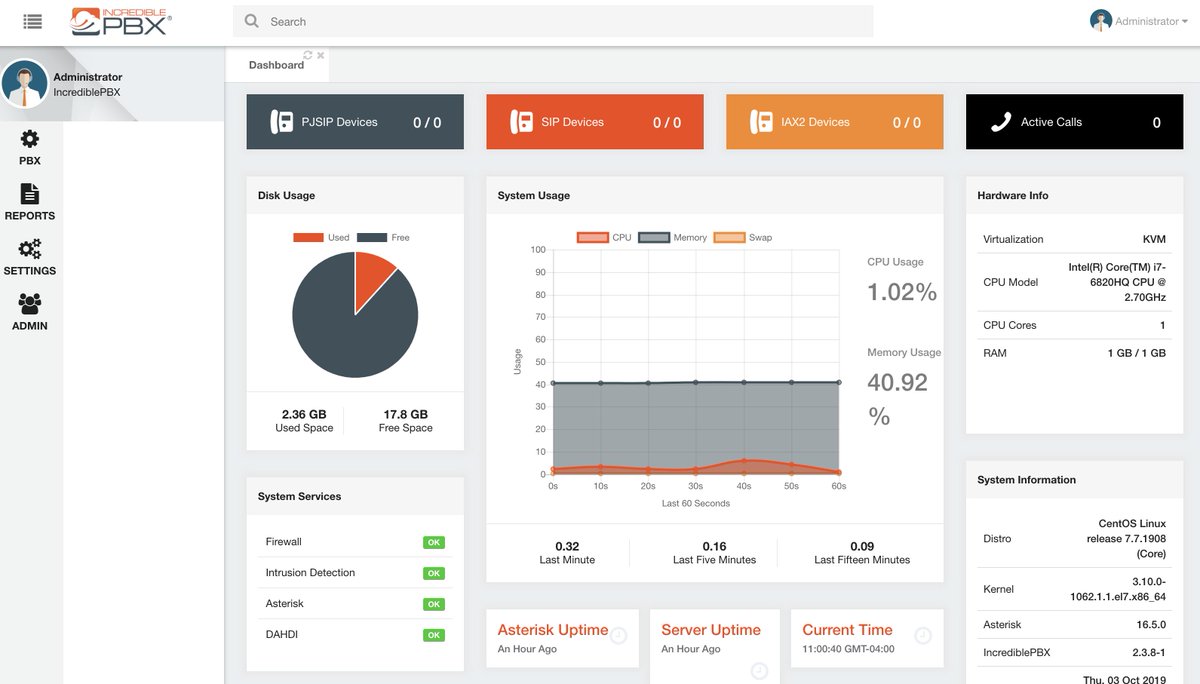
For those just beginning the Incredible PBX® 2020 adventure, start here for CentOS 7 or here for the Raspberry Pi. Once your system is up and running, you’ll be ready to kick the tires. And today we’ll cover 30 applications for Asterisk® and FreePBX® that are included in the latest and greatest Incredible PBX server. Now that you have some time on your hands, continue learning about this powerful platform by reading this documentation. If you still have questions, post them on the PIAF Forum for some quick and friendly assistance.
Here’s a Table of Contents to the Incredible PBX 2020 Applications with hotlinks. Enjoy!
- Checking System Status
- Enabling Speech Recognition for Asterisk
- Wolfram Alpha for Siri-like queries by phone*
- Automatic Update Utility
- Resetting Incredible PBX Passwords
- Apache Authentication for Apps
- IPtables Firewall WhiteList
- PortKnocker Remote Access
- Travelin’ Man 4 Remote Access by Phone
- Conference Bridge
- CallerID Name (CNAM) Lookups
- Faxing with Incredible PBX
- Voicemail 101 with Incredible PBX
- Email Delivery of MP3 Voicemails
- Reconfiguring SendMail for SmartHosts
- SMS Messaging with VoIP.ms
- SIP URI Calling with Speed Dials
- IVR Demo of Incredible PBX Applications*
- Backup and Restore Options
- AsteriDex – The Poor Man’s Rolodex®
- Voice Dialing with AsteriDex*
- Speed Dialing with AsteriDex
- Scheduling Reminders by Phone or Web
- DISA Access with Incredible PBX
- Yahoo! News Headlines
- Weather Forecasts with Incredible PBX*
- ODBC Application Support
- Today in History
- Time of Day
- WebMin
* Requires Voice Recognition implementation. See #2 above.
1. Checking Current Status of Incredible PBX
There are several ways to check the status of your server. First, log into your server as root and type: pbxstatus
. You can even add the default phone number for your server by inserting it in /etc/pbx/.phone.
The second option is to use a browser to access your server. Choose the Incredible PBX Admin option after pointing a browser to the IP address of your server:
Once you log in with your admin password, the Dashboard of your server will display the status of trunks, users, and active calls on your server. In addition, you can review the latest news and security alerts from the RSS Feeds of Nerd Vittles, Incredible PBX, FreePBX, and Asterisk. For additional status information, choose Reports:Asterisk Info.
2. Adding Speech Recognition to Asterisk
We no longer recommend Google Speech Recognition because of the licensing issues and Google’s propensity to break things regularly. Instead, we recommend IBM’s Speech Recognition and TTS engines. For most users, there will be no cost. And the services are second to none. For a complete installation and setup tutorial, see our tutorial. Once speech recognition is enabled, the Incredible PBX 2020 feature set grows exponentially. You’ll have access to the Voice Dialer for AsteriDex as well as SMS Voice Messaging and Wolfram Alpha for a Siri-like encyclopedia.
3. Using Wolfram Alpha with Incredible PBX
Ever wished your Asterisk server could harness the power of a 10,000 CPU Supercomputer to answer virtually any question you can dream up about the world we live in? Well, so long as it’s for non-commercial use, today’s your lucky day. Apple demonstrated with Siri™ just how amazing this technology can be by coupling Wolfram Alpha® to a speech-to-text engine on the iPhone. Now you can do much the same thing using voice recognition with Incredible PBX 2020.
Before using Wolfram Alpha from any phone connected to your PBX, you first must configure it by obtaining and adding a Wolfram Alpha application ID to Incredible PBX. Here are the simple steps:
1. Obtain your free Wolfram Alpha APP-ID here.
2. Log into your server as root and issue the following command:
nano -w /var/lib/asterisk/agi-bin/wolfram.sh
3. When the nano editor opens, insert your IBM STT and Wolfram APP-ID credentials in the spaces provided. Then save the file.
To use Wolfram Alpha, dial 4747 (that’s S-I-R-I backwards) from any extension.
Here are some sample queries to get you started:
Weather in Charleston South Carolina
Weather forecast for Washington D.C.
Next solar eclipse
Otis Redding
Define politician
Who won the 1969 Superbowl? (Broadway Joe)
What planes are flying overhead now?
Ham and cheese sandwich (nutritional information)
Holidays 2015 (summary of all holidays for 2015 with dates and DOW)
Medical University of South Carolina (history of MUSC)
Star Trek (show history, air dates, number of episodes, and more)
Apollo 11 (everything you ever wanted to know)
Cheapest Toaster (brand and price)
Battle of Gettysburg (sad day 🙂 )
Daylight Savings Time 2015 (date ranges and how to set your clocks)
Tablets by Samsung (pricing, models, and specs)
Doughnut (you don’t wanna know)
Snickers bar (ditto)
Weather (local weather at your server’s location)
4. Automatic Update Utility for Incredible PBX
A key security component of Incredible PBX is its Automatic Update Utility. Each time you log into your server as root, the Automatic Update Utility is run. It installs the latest fixes and security patches for your server. Don’t disable it! In fact, don’t delete anything from the /root folder. You’ll need all of it sooner or later.
We recommend you log into your server as root at least once a week to keep your server current. Ditto for the web interface to Incredible PBX. Insofar as security is concerned, we make a best effort to keep the components of Incredible PBX up to date. The Linux operating system was installed by you before the Incredible PBX install began. That’s a nice way of saying Linux security is primarily your responsibility. When an egregious Linux vulnerability comes along that we know about, we will try to notify you of the issue on the PIAF Forum and on the RSS Feed that is part of the Incredible PBX GUI. Check the RSS Feeds at least once a week as well. As a condition of use of the free Incredible PBX product, you accepted ultimate responsibility for the security and reliability of your server. Be SAFE!
5. Resetting Incredible PBX Passwords
Yes. It happens to all of us. We forget our passwords. Incredible PBX includes a convenient utility that lets you reset many of the passwords associated with Incredible PBX. Just log into your server as root and issue the command: /root/update-passwords
To reset Incredible PBX GUI admin password, issue command: /root/admin-pw-change
To reset Apache admin password, issue command: /root/apache-pw-change
. Apache credentials control access to the web interface of Telephone Reminders and AsteriDex from within the web GUI.
To reset the AvantFax admin password which is accessible within the Incredible PBX GUI, issue the following command: /root/avantfax-pw-change
6. Apache Authentication with Incredible PBX
With the exception of the Admin GUI and WebMin, all web-based applications included in Incredible PBX require successful Apache authentication to gain access. When you installed Incredible PBX, you should have created an admin account for Apache. If not, issue the following command using a secure password after logging in as root:
htpasswd -cb /etc/pbx/wwwpasswd admin newpassword
With the exception of AsteriDex and Reminders, you gain access to other Incredible PBX applications with the admin Apache account. For the remaining apps, you may wish to (but don’t have to) assign different account names and passwords to various departments in your organization. To set up these accounts, use the syntax above substituting the name of the department for "admin" and the department password for "newpassword."
7. Managing the IPtables Linux Firewall
As installed, Incredible PBX includes a preconfigured, locked-down Linux firewall that restricts incoming IPv6 traffic to localhost and, via a Travelin’ Man 3 WhiteList application, limits incoming IPv4 traffic to your server’s public and private IP addresses, your desktop computer’s IP address (that was used for the install), private LAN and NeoRouter VPN traffic, and a collection of our favorite VoIP providers. You can WhiteList additional IP addresses for additional providers or for SIP and IAX phones located outside your firewall. The following firewall management scripts are accessible from the /root directory:
- ./add-ip — WhiteList an additional IP address or IP address range (CIDR)
- ./add-fqdn — WhiteList a site using a fully-qualified domain name (FQDN)
- ./del-acct — Remove previously designated entry from the WhiteList
- ./ipchecker — Check whether specified FQDNs have changed & update IPtables
- iptables-restart — Used exclusively to restart IPtables and test for failed FQDNs
- iptables -nL — Check the current status of your IPtables firewall
On CentOS platforms, IPtables can be manually configured (if you know what you’re doing) by editing iptables and ip6tables in /etc/sysconfig. On the Raspberry Pi, the rules are stored in /etc/iptables/rules.v4. Additional IPtables rules are included and managed in /usr/local/sbin/iptables-custom. All FQDN entries must be entered in iptables-custom. The reason is because a failed FQDN entry in the main IPtables config file will cause the firewall to fail on startup. Also, NEVER use traditional iptables commands such as iptables save to update your IPtables configuration, or you will permanently delete all of your FQDN entries! Instead, use the provided utilities to whitelist additional sites and then restart IPtables using iptables-restart. This protects the FQDN entries in your setup while also checking for invalid FQDN entries and removing them temporarily so that IPtables will successfully restart. If you use service iptables restart to restart IPtables and there happens to be an FQDN entry for a host that is either down or has disappeared, IPtables will fail to restart and your server will be left with NO firewall protection! Using the traditional IPtables mechanisms also will disable Fail2Ban and the rules in iptables-custom will never be loaded. Incredible PBX periodically checks for changed FQDN entries using the ipchecker script as configured in /etc/crontab.
If you elect to integrate Facebook into your Incredible PBX setup, you will need to manually uncomment the last 3 lines in /usr/local/sbin/iptables-custom in order to whitelist the Facebook servers. Then restart the firewall: iptables-restart
WARNING: By default, Incredible PBX whitelists all of the non-routable LAN subnets including 10.0.0.0/8, 172.16.0.0/12, and 192.168.0.0/16. If you elect to install Incredible PBX in the Cloud, be advised that some cloud platforms including Amazon treat the 172.16.0.0/12 subnet as routable IP addresses. This means that anyone in the Amazon Cloud (including the bad guys) will have direct access to your server. While they still need a password or vulnerability to gain access, it nevertheless exposes your server to needless hacking attempts. We strongly recommend that you comment out the 172.16.0.0/12 entry in /usr/local/sbin/iptables-custom if you intend to deploy your server in the Amazon Cloud. Then restart the firewall: iptables-restart
8. PortKnocker Remote Access
IPtables is a powerful firewall that keeps the bad guys out. It also will keep legitimate users (including you) from gaining remote access to your server unless you had the forethought to WhiteList your remote IP address before you left on that family vacation. Unfortunately, you don’t always know your IP address in advance. And dynamic IP addresses assigned with hotel WiFi frequently change. To address this problem, Incredible PBX includes a preconfigured PortKnocker utility. This lets you send three secret "knocks" on random TCP ports to your server to tell it to let you in either temporarily (until IPtables is restarted) or permanently.
To reconfigure PortKnocker to permanently whitelist IP addresses from which you issue a successful knock, login as root and issue the command: iptables-knock activate
For PortKnocker to work, you obviously need to know the secret knocks. You’ll find them in /root/knock.FAQ. Record them in your wallet or inside your suitcase for that rainy day! There are PortKnocker apps for almost all smartphones as well as for Windows, Mac, and Linux computers. Install your favorite AND test access before you leave town. You can change the ports by editing /etc/knockd.conf. Then restart PortKnocker: service knockd restart
Finally, be aware that PortKnocker does not need any special access to your server to work; however, if your server is behind a hardware-based firewall, then you must map the three PortKnocker TCP ports to the private IP address of your server, or the knocks obviously will never get delivered to your server.
If you installed Incredible PBX 2020 on a cloud platform, then your server may use a network port other than eth0. Typically, it’s venet0:0 on OpenVZ servers. You can decipher the name of your network port for your public IP address by issuing the command: ifconfig. In this case, the CentOS config file needs to be modified and then PortKnocker needs to be restarted. Edit /etc/sysconfig/knockd and insert the following: OPTIONS="-i venet0:0"
. Restart PortKnocker with the command: service knockd restart
Review our PortKnocker tutorial for additional configuration tips.
9. Travelin’ Man 4 Remote Access (dial TM4)
In addition to PortKnocker, Incredible PBX also includes a telephone-based solution to temporarily gain remote access to your server. This does require a bit of preplanning since you must create account credentials for the person to whom you wish to give remote access via a phone call. The complete tutorial for Travelin’ Man 4 is available on the PIAF Forum. All of the pieces already are in place on your server so skip down to the Configuration & Operation sections for details on implementation.
10. Using the Conference Bridge (dial CONF)
A turnkey Conference Bridge is included in Incredible PBX 2020. A conference bridge allows a group of people to participate in a joint phone call. Typically, participants dial into a virtual meeting room from their own phone. This virtual meeting room supports dozens or even hundreds of participants depending upon server capacity.
You do not need a timing source for conferencing with Incredible PBX 2020! Old-style Asterisk Conference Rooms which required a timing source are disabled.
To access the Conference Bridge, dial C-O-N-F (2663) from any phone connected to your server. Remote users can be added to a conference by providing a DID that points to an IVR which includes Conference Bridge access. Once connected to the conference bridge, a caller is prompted for the Conference Bridge PIN and his or her name. The user and admin access PINs are randomly generated when you install Incredible PBX. You can decipher or modify the user and admin passwords to access the Conference Bridge in the Incredible PBX GUI: Applications:Conferences. Then edit 2663 and review or change the User and Admin PINs.
11. CallerID Name (CNAM) Lookups
By default, Incredible PBX is configured to automatically provide OpenCNAM CallerID name lookups for the first ten calls received each hour. These lookups are only from cached entries in the OpenCNAM database; however, you can enable the commercial lookup service if desired. The cost is four tenths of a cent per successful query.
To enable the OpenCNAM Professional Tier, set up an account at OpenCNAM.com. Once you’ve obtained your credentials, edit the OpenCNAM entry in Admin:CID Superfecta:Default. You may also wish to enable AsteriDex lookups and move the scheme to the top of your list of lookup schemes.
To activate CallerID Superfecta for incoming calls, edit each of your Inbound Routes and Enable Superfecta Lookup with the Default Scheme in the Other tab.
12. Faxing with Incredible PBX 2020
If you can press the ENTER key 25 times, you are fully capable of installing Incredible Fax on your new server. On the latest Raspberry Pi builds of Incredible PBX 2020, Incredible Fax is preinstalled. On other platforms, log into your server as root and run /root/incrediblefax2020.sh. Provide an email address for delivery of incoming faxes and press ENTER each time you are prompted to make a selection. Once you reboot your server, you’re all set. As part of the install, you provided an email address for delivery of incoming faxes. That’s all the setup that is required to have incoming faxes sent to most of your DIDs delivered via SendMail in PDF format. The best way to figure out whether a particular provider supports fax technology on their DIDs is to send a test fax to yourself. FaxZERO lets you send 5 free (in the U.S. only) faxes of up to 3 pages every day. Give it a whirl.
You also can send faxes using standard document types with the AvantFax web application. Log into AvantFax from the main Incredible PBX GUI by clicking on the AvantFax icon. The default credentials are admin:password. Choose the Send a Fax option from the main menu, fill in the blanks, and attach your document. AvantFax uses the default dialplan so use the prefix desired to send the fax using your preferred provider.
With the latest release of Incredible PBX 2020, fax recognition is supported on incoming calls. Edit each of your Inbound Routes and enable Detect Faxes with Detection Type=SIP, Fax Ring=Yes, Fax Detection Time=4, and Fax Destination=Custom Destination:Fax (HylaFax) in the Fax tab.
On the Raspberry Pi platform, you can change the destination email address for incoming faxes by issuing the command: /root/avantfax-email-change.
Copies of all incoming faxes also are available for retrieval within AvantFax.
13. Voicemail 101 for Incredible PBX 2020
Voicemail functionality is enabled on an extension-by-extension basis as part of the extension setup under the Voicemail tab. Once enabled, you can set up your mailbox and retrieve your messages by dialing *97 from the mailbox extension, or dial *98 to retrieve messages from any extension. Shortcut dialing is also supported, e.g. *98707 would retrieve messages for extension 707. You can leave a message for or forward calls to any extension’s mailbox without actually calling the extension. Just prepend * to any extension number before dialing, e.g. *701. A number of the system settings for voicemail can be tweaked under the Voicemail tab as well. For example, you can automatically delete voicemails once they have been delivered by email. Voicemail Blasting to multiple mailboxes is also supported. Just choose this option under the Applications tab and follow your nose.
14. Email Delivery of MP3 Voicemails
Speaking of email delivery, your voicemails also can be delivered to any email address of your choosing. For every extension under the Voicemail tab for the Extension, simply add an Email Address and enable the Email Attachment. With Incredible PBX 2020, the voicemail message will be attached to the email in MP3 format so it’s suitable for playback with most email clients on desktop PCs, Macs, and smartphones. Be advised that some Internet service providers (such as Comcast) block downstream SMTP servers. You can check whether your outbound email is flowing by issuing the command mailq from the Linux command line. Issuing the command mail will tell you whether outgoing emails are bouncing. You can test sending an email by issuing the following command using your destination email address:
echo "test" | mail -s testmessage your-name@your-email-provider.com
If you find outbound mail is accumulating, add your ISP’s SMTP server address as a SmartHost for SendMail as documented in the next section.
15. Reconfiguring SendMail for a SmartHost
Many residential Internet service providers block downstream SMTP servers such as the SendMail server running with Incredible PBX 2020. If you’re sending emails but they never arrive and you’ve checked your SPAM folder, then chances are your ISP is the culprit. The simple solution is to add your ISP’s SMTP server as a SmartHost for SendMail. This means outbound emails will be forwarded to your ISP for actual email transmission over the Internet. Here’s how. On CentOS platforms, edit /etc/mail/sendmail.cf and search for DS. Immediately after DS, add the FQDN of your ISP’s SMTP server, e.g. DSsmtp.comcrap.net (no spaces!). Save the file and then restart SendMail: service sendmail restart. Your email and voicemail messages with attachments should begin flowing without further delay.
On Raspberry Pi platforms, here’s how to set it up using a Gmail account without two-step authentication. Log into your server as root and run dpkg-reconfigure exim4-config. Choose "mail sent by smarthost; received via SMTP or fetchmail." Accept all the defaults until you get to Outgoing Smarthost prompt. Enter: smtp.gmail.com::587. At the following prompts, choose NO, NO, mbox, and NO. When the setup completes, edit /etc/exim4/passwd.client and insert the following line using your Gmail AcctName and AcctPW. NOTE: If you are using a Gmail account with 2-step verification enabled, you MUST use a Gmail App Key instead of your Gmail account password. You also must enable Less Secure Apps access to your Gmail account.
smtp.gmail.com:AcctName@gmail.com:AcctPW
Save the file and then issue the following commands to complete the setup:
update-exim4.conf systemctl restart exim4 exim4 -qff
Now send yourself a test email message to make sure things are working properly:
echo "test" | mail -s testmessage yourname@yourmailprovider.com
16. SMS Messaging with VoIP.ms
Incredible PBX 2020 supports SMS messaging through VoIP.ms if you have an account and an SMS-enabled DID. See the VoIP.ms wiki for setup info on the VoIP.ms side.
To install the VoIP.ms SMS scripts, follow these steps:
cd /root mkdir sms-voip.ms cd sms-voip.ms wget http://incrediblepbx.com/voipms-SMS.tar.gz tar zxvf voipms-SMS.tar.gz
Edit voipms-sms.php and insert your VoIP.ms number that supports SMS messaging (no spoofing allowed!):
$SMSsender="8005551212";
Edit class.voipms.php and insert your VoIP.ms API credentials:
/*******************************************\ * VoIPms - API Credentials \*******************************************/ var $api_username = 'yourname@youremail.com'; var $api_password = 'yourpassword';
Send an SMS message through VoIP.ms with the following command where smsnumber is the 10-digit number of the SMS recipient and "sms message" is the text message surrounded by quotes:
/root/sms-voip.ms/voipms-sms.php smsnumber "sms message"
NOTE: VoIP.ms has indicated that sooner or later there will be a penny per message charge for SMS messages; however, as of today, they’re still free.
17. SIP URI Calling with Incredible PBX
With one line of dialplan code, you can add Speed Dials for free SIP URI calling worldwide. The dialplan code is stored in the [CallingRule_SIP_URI] context in extensions_custom.conf. Just clone one of the existing entries, designate an extension to dial to connect to the SIP URI, and enter the SIP URI for the destination. Numerous SIP providers support assignment of SIP URI’s to DIDs for unlimited free calling from anywhere in the world. Here’s a sample using a speed dial code of 53669 that connects you to SIP URI 2233435945@sip2sip.info: exten = 53669,1,Dial(SIP/2233435945@sip2sip.info)
18. IVR Demo of Incredible PBX Apps
The easiest way to try out a number of the Incredible PBX applications is to take the IVR Demo for a spin. Just pick up any phone on a CentOS-based platform and dial 3366 (D-E-M-O). The sample code for the IVR is available for review and modification in the IVR section of the GUI. There’s also a sample Stealth AutoAttendant. This plays a brief greeting and then rings an extension or ring group. During the greeting, you could configure the application to allow button presses to branch to other applications on your PBX, hence the Stealth name since the codes are not disclosed to callers.
On the Raspberry Pi platform, our detailed tutorial will walk you through setting up the Demo IVR application.
19. Backup & Restore with Incredible PBX
Incredible Backup and Restore scripts are provided in the /root folder. In addition, the FreePBX GUI also provides Backup and Restore utilities under the Admin tab. If backups are important to you, we strongly recommend you consider a $3/month cloud server at Vultr using our referral code. For an additional 20% per month (60 cents), you get weekly image backups of your server that can be restored with a couple of button clicks. It’s the cheapest insurance you can buy for your PBX!
20. AsteriDex – The Poor Man’s Rolodex
AsteriDex is a web-based phonebook application for Incredible PBX. You can access it from the main web menu. Scripts are also available to import your contacts from Outlook and Google Contacts.
21. Voice Dialing with AsteriDex (dial 411)
If you have voice recognition enabled on your server, you can call anyone in your AsteriDex database by dialing 411.
22. Speed Dialing with AsteriDex (dial 000+)
For those without voice recognition, Incredible PBX 2020 includes two speed dialing utilities. The first is accessed by dialing 412. Then enter any 3-digit dialcode from your AsteriDex database to complete the call. If you’d prefer to skip the intermediate step, dial 000 + the 3-digit speed dial code desired. The call will be placed immediately using your default outbound routes.
For a complete listing of your AsteriDex dial codes, execute this query:
mysql -u root -ppassw0rd asteridex -e "select name,dialcode from user1 order by name"
To automatically generate the 3-digit speed dial codes for everyone in your AsteriDex database using the first three letters of each name, run the following script from your web browser: http://your-server-ip/asteridex4/dialcode.php.
23. Telephone Reminders (dial 123)
Incredible PBX 2020 includes a sophisticated reminders system that lets you schedule individual or recurring reminders using your phone by dialing 123 or a web browser. A complete tutorial is available here. For phone reminders, a password is required to access the reminder system. Typically, these reminders set up a return call at a scheduled time that then plays back either a recorded message or a TTS message generated from the text you entered in the browser application. Incredible PBX also includes a new addition that lets you schedule web reminders that are delivered by email or SMS message.
24. DISA Access with Incredible PBX 2020
Direct Inward System Access (aka DISA) is one of the great PBX inventions of the last 50 years. It’s also one of the most dangerous. It lets someone connect to your PBX and obtain dial tone to place an outbound call using your trunks… on your nickel. Typically, it is offered as an option with an IVR or AutoAttendant. The DISA extension is not preconfigured with Incredible PBX; however, you can easily set it up in the GUI by choosing Applications:DISA. Make up a very secure PIN before exposing DISA access to the outside world. It’s your phone bill.
25. Yahoo! News (Dial 951)
Yahoo! news headlines are available by dialing 951. The news option also is included in the sample IVR application.
26. Weather Forecasts by Phone (dial 947)
You can obtain a current weather forecast for most zip codes by dialing 947 (Z-I-P) and entering the 5-digit zip code.
27. ODBC Application Support for Asterisk
If you’ve recently logged into your server as root, Automatic Update #4 added ODBC/MySQL application support for Asterisk. You can try out a few sample applications that are included to get you started. Dial 222 and enter 12345 for the employee number. This retrieves an employee name from the MySQL timeclock database using Asterisk. Dial 223 to retrieve an AsteriDex name and phone number by entering the 3-character dialcode. You then have the option of placing the call by pressing 1. Once you have created accounts for Travelin’ Man 4, you can dial 864 (T-M-4) to WhiteList an IP address for that account after entering the account number and matching PIN. Use the * key for periods in the IP address.
28. Today in History (Dial T-O-D-A-Y)
It’s always interesting to find out what happened Today in History. And Incredible PBX now delivers it by phone. Just dial 86329 (T-O-D-A-Y) for a walk down memory lane.
29. Time of Day
Speaking of yesteryear, if you grew up dialing TI-4-1212 for the time of day, Ma Bell may have discontinued the service, but we haven’t. Now you can do it on your very own PBX.
If you want your users to be able to dial in for the time directly by dialing extension, here’s how. In the GUI, choose Admin:Custom Destinations:Add Destination. Set up a Time of Day description with a target of new-time,s,1 and save your entry. Now Enable an Application:Misc Application:Add Application with a Feature Code of 8463, Time of Day description, and point it to Custom Destination:Time of Day. Save your entry and then dial 8463 (T-I-M-E) for the Time of Day.
30. WebMin: The Linux Swiss Army Knife
There is no finer Linux application than WebMin. There is no more dangerous Linux application than WebMin. You’ve been warned. We heartily recommend WebMin as a tool to LOOK at your server’s settings. We strongly discourage changing anything in WebMin unless you totally know what you are doing. This is especially true with management of Linux applications that make up the core of Incredible PBX: the Linux kernel, SendMail, IPtables, Apache, MySQL, PHP, and…
To access WebMin on the CentOS platform, visit the following link with a web browser using the actual IP address of your server: https://ip-address:9001/. The username is root. The password is your root password. WebMin has root privileges to your server. Reread paragraph 1 and act accordingly.
Due to space and performance constraints, WebMin is no longer installed by default on the Raspberry Pi platform. To install WebMin, follow these steps after logging into your Raspberry Pi as root:
cd /root apt-get update apt-get install python perl openssl libnet-ssleay-perl apt-get install libauthen-pam-perl libio-pty-perl libpam-runtime wget http://prdownloads.sourceforge.net/webadmin/webmin_1.941_all.deb dpkg --install webmin_1.941_all.deb
For an exhaustive tutorial on WebMin, download The Book of WebMin by Joe Cooper. For a more recent commercial offering, take a look at Michal Karzyński’s WebMin Administrator’s Cookbook.
Originally published: Monday, April 13, 2020
Need help with Asterisk? Visit the VoIP-info Forum.
Special Thanks to Our Generous Sponsors
FULL DISCLOSURE: ClearlyIP, Skyetel, Vitelity, DigitalOcean, Vultr, VoIP.ms, 3CX, Sangoma, TelecomsXchange and VitalPBX have provided financial support to Nerd Vittles and our open source projects through advertising, referral revenue, and/or merchandise. As an Amazon Associate and Best Buy Affiliate, we also earn from qualifying purchases. We’ve chosen these providers not the other way around. Our decisions are based upon their corporate reputation and the quality of their offerings and pricing. Our recommendations regarding technology are reached without regard to financial compensation except in situations in which comparable products at comparable pricing are available from multiple sources. In this limited case, we support our sponsors because our sponsors support us.
BOGO Bonaza: Enjoy state-of-the-art VoIP service with a $10 credit and half-price SIP service on up to $500 of Skyetel trunking with free number porting when you fund your Skyetel account. No limits on number of simultaneous calls. Quadruple data center redundancy. $25 monthly minimum spend required. Tutorial and sign up details are here.
The lynchpin of Incredible PBX 2020 and beyond is ClearlyIP components which bring management of FreePBX modules and SIP phone integration to a level never before available with any other Asterisk distribution. And now you can configure and reconfigure your new Incredible PBX phones from the convenience of the Incredible PBX GUI.
VitalPBX is perhaps the fastest-growing PBX offering based upon Asterisk with an installed presence in more than 100 countries worldwide. VitalPBX has generously provided a customized White Label version of Incredible PBX tailored for use with all Incredible PBX and VitalPBX custom applications. Follow this link for a free test drive!
Special Thanks to Vitelity. Vitelity is now Voyant Communications and has halted new registrations for the time being. Our special thanks to Vitelity for their unwavering financial support over many years and to the many Nerd Vittles readers who continue to enjoy the benefits of their service offerings. We will keep everyone posted on further developments.
Future-Proofing FreePBX Distro with Incredible PBX Skin
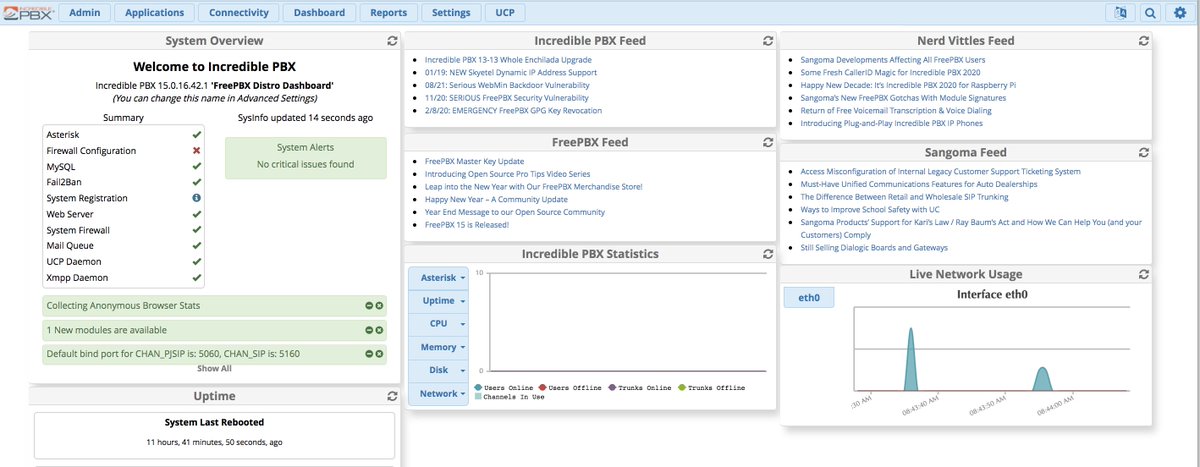
If you’ve been following along on Sangoma’s FreePBX® power grab and are waiting for the next shoe to drop on the PBX that your users depend upon to conduct business and make emergency calls, we now have a non-intrusive solution for those on the FreePBX Distro platform. By installing the Incredible PBX branding module and updating to the patched Framework module on your PBX, you can insulate yourself from future Sangoma surprises including potential ramifications arising from revocation of the original FreePBX signing key.
NOTE: THIS IS NOT A FORK OF THE FREEPBX PROJECT. IT IS AN EMERGENCY PATCH TO NEUTRALIZE THE DAMAGE POSED BY SANGOMA’S PUBLIC THREAT TO DISRUPT THE COMMUNICATIONS SERVICES OF APPROPRIATELY LICENSED INCREDIBLE PBX 2020 TRUNKING PLATFORMS ON MONDAY, FEBRUARY 17, 2020. See 18 U.S.C. 1030(a)(7).
The Incredible PBX branding module is owned by Clearly IP and, with their permission, it is being offered at no cost for use on FreePBX Distro platforms pursuant to the terms of the AGPLv3 license. What does it do? In a nutshell, it gets you out from under the yoke of Sangoma for module administration and unauthorized tampering with your PBX.
Here are the specifics on what deployment of the Incredible PBX branding module will do:
- Rebrands FreePBX with Incredible PBX logos and artwork.
- Adds Incredible PBX and Nerd Vittles RSS Feeds to the FreePBX Dashboard.
- Disables the flow of proprietary info about your phones, trunks, and usage to Sangoma.
- Offers multiple module repository setups (soon) for sites with varying technical skillsets.
- Links Incredible PBX to ClearlyIP stores for Trunking and Incredible Phone purchases.
- Supports multiple GPG key signatures including the original FreePBX GPG key.
- Connects Module Admin to ClearlyIP Module Repos for future FreePBX updates.
As if the last few weeks haven’t provided enough reasons for any administrator to separate their PBX from the whims of Sangoma, here are some other factors which, we believe, make this migration compelling:
- Future-proofs your PBX from future Sangoma surprises that may damage your PBX.
- Provides a more redundant repository platform unlike Sangoma’s fragile repository.
- Provides instant access to all ClearlyIP-developed modules moving forward.
- Provides instant access to all existing and future FreePBX module releases.
- Addition of future Incredible PBX components is exclusively on an opt-in basis.
- Provides access to ClearlyIP Trunking module with integrated SMS and Kari’s Law 911.
- Provides access to Incredible IP Phone store for plug-and-play SIP telephones.
- Provides a revenue stream for Incredible PBX and ClearlyIP future development.
Deploying the Incredible PBX Branding Module
This deployment guide assumes you have a functioning FreePBX Distro platform with FreePBX 15, Linux 7.x, and Asterisk 16. If not, start here. Otherwise, login to the FreePBX web GUI as an administrator and perform the following steps:
- Make a Backup (Admin • Backup & Restore • Add Backup)
- Download the Incredible PBX Module to your Desktop PC
- Install the Module (Admin • Module Admin • Upload Module from Hard Disk)
- Update the patched Framework Module (Admin • Module Admin • Check Online)
- Install Clearly Devices and Trunking Module, if desired
- Verify all is well by viewing FreePBX Dashboard (see screenshot above)
Originally published: Tuesday, February 11, 2020
Need help with Asterisk? Visit the VoIP-info Forum.
Special Thanks to Our Generous Sponsors
FULL DISCLOSURE: ClearlyIP, Skyetel, Vitelity, DigitalOcean, Vultr, VoIP.ms, 3CX, Sangoma, TelecomsXchange and VitalPBX have provided financial support to Nerd Vittles and our open source projects through advertising, referral revenue, and/or merchandise. As an Amazon Associate and Best Buy Affiliate, we also earn from qualifying purchases. We’ve chosen these providers not the other way around. Our decisions are based upon their corporate reputation and the quality of their offerings and pricing. Our recommendations regarding technology are reached without regard to financial compensation except in situations in which comparable products at comparable pricing are available from multiple sources. In this limited case, we support our sponsors because our sponsors support us.
BOGO Bonaza: Enjoy state-of-the-art VoIP service with a $10 credit and half-price SIP service on up to $500 of Skyetel trunking with free number porting when you fund your Skyetel account. No limits on number of simultaneous calls. Quadruple data center redundancy. $25 monthly minimum spend required. Tutorial and sign up details are here.
The lynchpin of Incredible PBX 2020 and beyond is ClearlyIP components which bring management of FreePBX modules and SIP phone integration to a level never before available with any other Asterisk distribution. And now you can configure and reconfigure your new Incredible PBX phones from the convenience of the Incredible PBX GUI.
VitalPBX is perhaps the fastest-growing PBX offering based upon Asterisk with an installed presence in more than 100 countries worldwide. VitalPBX has generously provided a customized White Label version of Incredible PBX tailored for use with all Incredible PBX and VitalPBX custom applications. Follow this link for a free test drive!
Special Thanks to Vitelity. Vitelity is now Voyant Communications and has halted new registrations for the time being. Our special thanks to Vitelity for their unwavering financial support over many years and to the many Nerd Vittles readers who continue to enjoy the benefits of their service offerings. We will keep everyone posted on further developments.
Going Public with Incredible PBX 16 and VitalPBX 2.3.8
As part of our ongoing development efforts, we maintain about a dozen honeypot servers across the U.S. and Canada to monitor the latest adventures of the bad guys. Security becomes especially important for those wishing to live on the bleeding edge and deploy a cloud-based, public-facing VoIP server. Today we want to walk you through our latest suggestions to set up and secure a VitalPBX platform using just the built-in FirewallD, IPset, and Fail2Ban components. If you opt to deploy VitalPBX in the Cloud, a KVM-based VPS is absolutely essential in order to take advantage of the security mechanisms we will introduce today.
Here are 6 Key Security Features in today’s public design:
- SIP Registration Lockdown by FQDN
- Extension Lockdown by IP Address
- Trunk Provider Lockdown by IP Address
- Web Access Lockdown by WhiteList
- Disguised Ports for SIP and SSH Access
- 100,000+ VOIP Blacklist for FirewallD
Is it 100% safe? Nothing ever is. That’s what backups are for. 😉
FYI: The CentOS folks reintroduced a previous FirewallD bug on October 22 which (again) broke new VitalPBX installs. On October 23, the VitalPBX developers fixed the bug (again). There should be no problems with new installs. For previous installs, see this thread on the PIAF Forum for the fix.
Taking Incredible PBX with VitalPBX to the Cloud
Because Incredible PBX with VitalPBX 2.3.8 was originally distributed as an ISO, getting it installed in the cloud was a challenge. A few cloud providers let you bring your own ISO to install on their VPS platforms, but it was still a tedious process. So today we’re pleased to introduce a new install script that can be run on any CentOS 7 platform.
We have a few cloud providers that we recommend without reservation. Both Vultr and Digital Ocean provide referral credits to Nerd Vittles to support our VoIP project development efforts. We’ve used both of them for many years with no problems. Either of the platforms works well using the $5 a month option in your choice of cities. Just be sure to choose the CentOS 7 platform, not CentOS 8. For an extra buck, you can add automatic backups.
Our favorite bargain is now CrownCloud in Los Angeles. For $25 a year, they offer a KVM VPS that is ideal as a VoIP platform. And the offering includes a free snapshot image as well. As you might imagine, it’s very popular and goes Out of Stock from time to time so check back often. For our international friends, CrownCloud offers similar platforms at the same price point in both Germany and the Netherlands.
Installing Incredible PBX with VitalPBX on CentOS 7
Once your CentOS 7 platform is up and running, here’s how to install Incredible PBX for VitalPBX. Log into your server as root using SSH or Putty. Then issue these commands:
cd /root passwd yum -y install net-tools wget nano tar wget http://incrediblepbx.com/incrediblepbx.sh chmod +x incrediblepbx.sh ./incrediblepbx.sh
Incredible PBX Cloud Setup Recipe for VitalPBX
We think the easiest way to configure your new VitalPBX platform is to follow the simple steps outlined below. This will avoid your having to jump back and forth between tutorials to get all the pieces in place. When you’re finished, you’ll have a secure VitalPBX cloud platform. Don’t be intimidated by the number of steps. If you can handle slice-and-bake cookies, you can do this!
1. Point your browser to the IP address of your server. You’ll be prompted to set a password for admin access to the GUI. Fill in the blanks to proceed. Should you ever forget your admin password, here’s how as root user to force a reset on your next login from a browser:
mysql ombutel -e 'update ombu_settings set value = "yes" where name = "reset_pwd"'
2. Register your server when prompted. The VitalPBX Dashboard will appear.
3. Decipher the public IP address of your desktop machine and any other PCs that will be used to manage your server.
4. From the VitalPBX Dashboard, navigate to Admin:Security:Firewall:WhiteList. Enter each of your IP addresses from step #3 and click Save button.
5. From the VitalPBX Dashboard, navigate to Admin:Security:Intrusion Detection:WhiteList. Enter each of your IP addresses from step #3 and click Save button.
6. Modify the default SSH port by logging in to your server as root and issuing the following commands using the year you were born in the first line replacing 2000:
sed -i 's|#Port 22|Port 2000|' /etc/ssh/sshd_config systemctl restart sshd
7. From the VitalPBX Dashboard, navigate to Admin:Security:Firewall:Services. Change the SIP port to 5080 or some other port number not in the 5060-5065 range. Change the SSH port to a 4-digit number matching the year you were born. Click Save button. Monitor your SSH log for attempted breaches and change your port if necessary:
cat /var/log/secure | grep password
8. Verify that you can log back into your server with SSH using the new SSH port number you assigned in step #6: ssh -p 2000 root@server-IP-address
9. From the VitalPBX Dashboard, navigate to Admin:Security:Firewall:Rules. Delete the HTTP and HTTPS items by clicking the Trash icon beside each entry. In the GENERAL tab, set Block ICMP Requests to YES. Click Save button. This blocks web access to everyone except those you’ve whitelisted in step #4 above. If you ever lock yourself out of web access, login to your server as shown in step #8 and temporarily whitelist the public IP address desired. This gets removed automatically the next time you save your Firewall settings from within the VitalPBX GUI.
iptables -A vpbx_white_list -s 12.34.56.78 -j ACCEPT
10. Before we get too far along, let’s put another layer of security in place for your new server. We’re going to add the VoIP Blacklist which blocks about 100,000 bad guys from around the globe. We’ll also add a cron job to update the blacklist every night. Log back into your server as root and issue these commands to put the pieces in place and enable the VoIP Blacklist.
TIP: The cron job below is scheduled to run at 20 minutes after 3 a.m. Change the time to something else so we don’t all bombard the VoIP Blacklist site for downloads at exactly the same time every night.
cd /etc wget http://incrediblepbx.com/voipbl-firewalld.tar.gz tar zxvf voipbl-firewalld.tar.gz rm -f voipbl-firewalld.tar.gz echo "20 3 * * * root /etc/update-voipbl.sh >/dev/null 2>&1" >> /etc/crontab /etc/update-voipbl.sh
11. From the VitalPBX Dashboard, navigate to Admin:Add-Ons:Add-Ons. Click Check Online button. Click Install button beside Custom Contexts. Click Install button beside Phonebooks. Click Install button beside Domotic.
12. From the VitalPBX Dashboard, navigate to Settings:Tech Settings:SIP Settings.
a. In the GENERAL tab, set the Bind Address port to 5080 or whatever port you chose in step #7 above. This is the port number together with the FQDN of your PBX (set in the next step) that any SIP phone will need to successfully register to an extension.
b. In the SECURITY tab, set Allow Guest to NO, set Auto-Domain to NO, set Allow External Domains to NO, and enter a fully-qualified domain name (FQDN) pointing to the IP address of your server in the Domain field. We cannot stress enough how important this FQDN is to the security of your cloud-based server. It limits SIP registrations to this FQDN only, and all SIP registration attempts by IP address are automatically blocked. Don’t skip this step!
c. In the NETWORK tab, enter the IP address of your server in External Address. Click the ADD button in the Local Networks section and enter the private IP addresses associated with your LAN and VPN, e.g. 192.168.0.0/255.255.0.0 and 10.0.0.0/255.240.0.0. Change NAT to Force,Comedia if your server is behind a NAT-based router.
d. In the CODECS tab, enable ULAW, ALAW, G722, and G729.
e. In the OTHERS tab, set SRV LOOKUPS to Yes. Click SAVE button.
13. From the VitalPBX Dashboard, navigate to Settings:Tech Settings:Profiles. Click Show All Profiles bar and choose Default PJSIP Profile. In the GENERAL tab, set the following entries to YES: Force rport, Rewrite Contact, Direct Media, RTP Symmetric, and Send Diversion Header. Click UPDATE button.
14. From the VitalPBX Dashboard, navigate to PBX:Applications:Parking. Click Show All Parking Profiles bar and choose Default. Change Code from 700 to 7000 and click Update button. This changes your Parking Lot extensions to the 7000 range so that 700 range can be used for Extensions, just like other versions of Incredible PBX.
15. Log out of your Dashboard and then log back in so that the menus get refreshed with the Custom Contexts addition.
16. From the VitalPBX Dashboard, navigate to PBX:Applications:Custom Contexts. Create the new sample IVR context with the following entries. Then click Save button.
- Description: IncrediblePBX
- Context: incrediblepbx
- Extension: s
- Priority: 1
- Destination: Terminate Call -> Hangup
17. From the VitalPBX Dashboard, navigate to PBX:Applications:Custom Applications. Create the custom application for the sample IVR and Save it.
- Code: 3366
- Name: DEMO
- Enabled: YES
- Destination: Custom Contexts -> IncrediblePBX
18. From the VitalPBX Dashboard, navigate to PBX:Applications:Conferences. Create the new sample conference application and Save it.
- Code: 2663
- Description: CONF
- Music on Hold When Empty: YES
- User Count: YES
- Announce Join/Leave: YES
- Announce Only User: YES
- User PIN: 1234
- Leader PIN: 4321
- Drop Silence: YES
19. If you didn’t read last week’s article on Custom Contexts, now would be a good time to do so. Here are the commands to put all those pieces in place on your new cloud-based server:
cd / yum -y install dialog wget nano tar mailx cp -p /etc/crontab /etc/crontab.bak wget http://incrediblepbx.com/incrediblepbx-vitalpbx.tar.gz tar zxvf incrediblepbx-vitalpbx.tar.gz rm -f incrediblepbx-vitalpbx.tar.gz chown asterisk:asterisk /var/lib/asterisk cd /etc/asterisk/ombutel echo "[cos-all-custom](+)" >> extensions__80-custom.conf echo "exten => 412,1,NoOp(Voice Dialer)" >> extensions__80-custom.conf echo " same => n,Answer" >> extensions__80-custom.conf echo " same => n,Goto(incrediblepbx,1,1)" >> extensions__80-custom.conf echo " same => n,Hangup()" >> extensions__80-custom.conf echo "" >> extensions__80-custom.conf echo "exten => 951,1,NoOp(News)" >> extensions__80-custom.conf echo " same => n,Answer" >> extensions__80-custom.conf echo " same => n,Goto(incrediblepbx,5,1)" >> extensions__80-custom.conf echo " same => n,Hangup()" >> extensions__80-custom.conf echo "" >> extensions__80-custom.conf echo "exten => 947,1,NoOp(Weather by ZIP)" >> extensions__80-custom.conf echo " same => n,Answer" >> extensions__80-custom.conf echo " same => n,Goto(incrediblepbx,6,1)" >> extensions__80-custom.conf echo " same => n,Hangup()" >> extensions__80-custom.conf echo "" >> extensions__80-custom.conf echo "exten => 3172,1,NoOp(DISA Voice Dialer)" >> extensions__80-custom.conf echo " same => n,Answer" >> extensions__80-custom.conf echo " same => n,Goto(incrediblepbx,9,1)" >> extensions__80-custom.conf echo " same => n,Hangup()" >> extensions__80-custom.conf echo "" >> extensions__80-custom.conf echo "exten => 4747,1,NoOp(Wolfram Alpha)" >> extensions__80-custom.conf echo " same => n,Answer" >> extensions__80-custom.conf echo " same => n,Goto(incrediblepbx,3,1)" >> extensions__80-custom.conf echo " same => n,Hangup()" >> extensions__80-custom.conf echo "" >> extensions__80-custom.conf echo "exten => 8463,1,NoOp(Time of Day)" >> extensions__80-custom.conf echo " same => n,Answer" >> extensions__80-custom.conf echo " same => n,Goto(incrediblepbx,*,1)" >> extensions__80-custom.conf echo " same => n,Hangup()" >> extensions__80-custom.conf echo "" >> extensions__80-custom.conf echo "exten => 53669,1,NoOp(Lenny)" >> extensions__80-custom.conf echo " same => n,Answer" >> extensions__80-custom.conf echo " same => n,Goto(incrediblepbx,53669,1)" >> extensions__80-custom.conf echo " same => n,Hangup()" >> extensions__80-custom.conf echo "" >> extensions__80-custom.conf echo "exten => 86329,1,NoOp(Today in History)" >> extensions__80-custom.conf echo " same => n,Answer" >> extensions__80-custom.conf echo " same => n,Goto(incrediblepbx,7,1)" >> extensions__80-custom.conf echo " same => n,Hangup()" >> extensions__80-custom.conf echo "" >> extensions__80-custom.conf systemctl restart asterisk chown asterisk:asterisk /var/lib/asterisk chown asterisk:apache /var/lib/asterisk/agi-bin
20. Create new Extensions for your PBX by navigating to PBX:Extensions:Extensions. You only need to fill in the Extension, Name, and Email Address fields. We recommend extension numbers beginning with 701. If the extension will be used from a phone behind a NAT-based router, change the NAT entry to Force,Comedia. If the phone associated with the extension has a static IP address, enter it in the Permit field for an extra layer of security. In the VOICEMAIL tab, you will note that voicemail is enabled by default with a password matching the extension number. This forces the user to set the voicemail password the first time they access voicemail with their phone. We recommend the YES setting for Attach Voicemail, Ask Password, Say CID, Say Duration, and Envelope. Then press SAVE.
21. Once you have created your extensions, you can create Ring Groups to assign multiple extensions and external numbers to a designated number which will ring all of the extensions and external numbers in the ring group either simultaneously or serially. Navigate to PBX:Call Center:Ring Groups to set this up.
22. Trunk Setup. While we don’t recommend it, if you just want to play around with some toll-free calls using option 1 in the DEMO IVR to see how everything works, here’s a simple trunk setup to get you started. First, navigate to Settings:Telephony:Channel Groups and save a group named Default with no entries. Then navigate to PBX:External:Trunks:CUSTOM. Create TollFree trunk with this Dial String: SIP/1${EXTEN}@ovh.starcompartners.com. No other entries are required. Click SAVE and reload your dialplan. Finally, create an Outbound Route for these calls in PBX:External:Outbound Routes like this:
- Description: TollFree
- Trunks: TollFree
- Dial Pattern: Pattern=NXXNXXXXXX
Save your settings and reload the dialplan. You now can skip down to step #25. NOTE: You will not be able to receive outside calls or make calls to numbers other than toll-free ones.
Our preference is that you use our Platinum Provider, Skyetel, for your default trunk and DID because they offer quadruple redundancy so you never miss a call. Sign up for Skyetel service and take advantage of the Nerd Vittles specials which include a $10 credit to kick the tires. First, complete the Prequalification Form here. You then will be provided a link to the Skyetel site to complete your registration. Once you have registered on the Skyetel site and your account has been activated, open a support ticket and request the $10 credit for your account by referencing the Nerd Vittles special offer. Once you are satisfied with the service, fund your account as desired, and Skyetel will match your deposit of up to $250 simply by opening another ticket. That gets you up to $500 of half-price calling. You can also port in your DIDs at no cost for 60 days after funding your account. Credit is limited to one per person/company/address/location. Effective 10/1/2023, $25/month minimum spend required.
We don’t recommend trunk registrations with a publicly exposed server because it creates a potential attack vector for intruders and any intrusion would be undetectable from the PBX since the attacker could make unauthorized calls after registering directly with your SIP provider. For this reason, Skyetel does not use SIP registrations to make connections to your PBX. Instead, Skyetel utilizes Endpoint Groups to identify which servers can communicate with the Skyetel service. An Endpoint Group consists of a Name, an IP address, a UDP or TCP port for the connection, and a numerical Priority for the group. For incoming calls destined to your PBX, DIDs are associated with an Endpoint Group to route the calls to your PBX. For outgoing calls from your PBX, a matching Endpoint Group is required to authorize outbound calls through the Skyetel network. Thus, the first step in configuring the Skyetel side for use with your PBX is to set up an Endpoint Group. Here’s a typical setup for Incredible PBX 16 for VitalPBX:
- Name: IncrediblePBX
- Priority: 1
- IP Address: IncrediblePBX-Public-IP-Address
- Port: 5062
- Protocol: UDP
- Description: my.incrediblepbx.com
To receive incoming PSTN calls, you’ll need at least one DID. On the Skyetel site, you acquire DIDs under the Phone Numbers tab. You have the option of Porting in Existing Numbers (free for the first 60 days after you sign up for service and fund your account) or purchasing new ones under the Buy Phone Numbers menu option.
Once you have acquired one or more DIDs, navigate to the Local Numbers or Toll Free Numbers tab and specify the desired SIP Format and Endpoint Group for each DID. Add SMS/MMS and E911 support, if desired. Call Forwarding and Failover are also supported. That completes the VoIP setup on the Skyetel side. System Status is always available here.
If you’d like additional details on why we recommend Skyetel, see this Nerd Vittles article.
On the VitalPBX side, we need to add a new Skyetel trunk. Navigate to PBX:External:Trunks:PJSIP. The VitalPBX Trunk setup should look like the following for Skyetel. If you’d like to cut-and-paste the entries for the Match field, here you go:
52.41.52.34,52.8.201.128,52.60.138.31,50.17.48.216,35.156.192.164
[popup url="https://pbs.twimg.com/media/EGDhgsXWsAIbmw1?format=jpg&name=medium" width="1200″ height="700″][/popup]
In Admin:Security:Firewall:WHITELIST, you’ll need to individually Add the five Skyetel IP addresses used in the Match field above and then SAVE your firewall settings.
Finally in PBX:Incoming Calls:CID Modifiers, add a new entry for Skyetel with Skip/Length = 2/10 and Save your settings.
23. Before your PBX can receive calls, you’ll need at least one Inbound Route. This tells the PBX how to route calls from one or more phone numbers (DIDs) that you own to a destination on your PBX, e.g. an extension, a ring group, an IVR, or custom context. Navigate to PBX:External:Inbound Routes to get started. Let’s set up a default inbound route for all the DIDs you have acquired from Skyetel in step #22. Fill in the fields shown below. Then SAVE.
- Routing Method: Default
- Description: Default Skyetel
- DID Pattern: [leave blank for ALL DIDs]
- CallerID Modifier: Skyetel
- Inbound Destination: Custom Contexts -> IncrediblePBX
24. Before you can make outbound calls from extensions on your PBX, you’ll need at least one Outbound Route. This tells the PBX which provider to use to complete calls dialed with a certain sequence of numbers. For example, you probably would want 10-digit numbers routed to Skyetel. And, if users dial 1 and then a 10-digit number, you’d probably want those calls routed to Skyetel as well. To create this outbound route, navigate to PBX:External:Outbound Routes. Fill in the fields shown below. Click ADD to add a second Dial Pattern. Click SAVE and Reload Dialplan when finished.
NOTE: While you can "spoof" any CallerID number here, it is only legal to assign CallerID numbers that you actually own. Most carriers do not forward CallerID names to destinations regardless of what you enter here. The CallerID name and number will be shown in your CDR logs: Reports:CDR Reports:CDR.
- Description: Skyetel-OUT
- Trunks: Skyetel
- Outbound CID: [Your Name and CallerID Number]
- Overwrite CID: YES
- Dial Pattern: Prepend=1 Pattern=NXXNXXXXXX
- Dial Pattern: Pattern=1NXXNXXXXXX
25. For the time being, we strongly recommend disabling IPv6 simply because we don’t have the necessary confidence that all of the security mechanisms are in place for IPv6. Here’s how on the CentOS 7 platform:
echo "net.ipv6.conf.all.disable_ipv6 = 1" >> /etc/sysctl.conf echo "net.ipv6.conf.default.disable_ipv6 = 1" >> /etc/sysctl.conf sysctl -p sed -i 's|#AddressFamily any|AddressFamily inet|' /etc/ssh/sshd_config systemctl restart sshd sed -i 's|inet_protocols = all|inet_protocols = ipv4|' /etc/postfix/main.cf systemctl restart postfix
26. Outbound email functionality is essential on your PBX. You’ll need it to be alerted to potential issues with VitalPBX, and you’ll need it for delivery of voicemail messages to users. There are a couple ways to implement it, and both are easy. If you want to use the native capabilities of Postfix to send the emails assuming your provider is not blocking outbound SMTP mail from downstream servers, then follow these steps:
- Insert your FQDN from step #12b into /etc/hosts immediately after 127.0.0.1
- Replace the contents of /etc/hostname with the same FQDN
- Issue the following command using your actual FQDN: hostname FQDN
- Sending yourself an email: echo "test" | mail -s test you@your-domain.com
If you don’t receive the test email message, then the easiest solution is to configure PostFix as an SMTP Relay using a Gmail account. You can do this easily from within the VitalPBX GUI. Navigate to Admin:System Settings:Email Settings and click the External Mail Server tab. Be sure that Gmail is selected and enter your Gmail name and password in the fields provided. Save your settings and send yourself an email using the field provided.
27. Once you get outbound email flowing, jump down to the next section and obtain IBM TTS and STT passwords. Now set up Voicemail Transcription with Email Message Delivery:
a. After logging into your VitalPBX server as root using SSH/Putty:
cd /tmp mkdir sendmail cd sendmail wget http://incrediblepbx.com/sendmailibm-vitalpbx.tar.gz tar zxvf sendmailibm-vitalpbx.tar.gz rm -f sendmailibm-vitalpbx.tar.gz mv usr/sbin/sendmailibm /usr/sbin cd /etc/asterisk/ombutel echo "[general](+)" > voicemail__60-1-transcript.conf echo "; format=wav|wav49|gsm" >> voicemail__60-1-transcript.conf echo "mailcmd=/usr/sbin/sendmailibm" >> voicemail__60-1-transcript.conf chown apache:apache voicemail__60-1-transcript.conf rm -rf /tmp/sendmail
b. Restart Asterisk core services: asterisk -rx "core reload"
c. Edit /usr/sbin/sendmailibm and insert your IBM Watson STT APIkey on line 23. Change the language on line 31 if you don’t want en-US. Then save the file.
d. Log back into the VitalPBX GUI and configure the extensions desired for email delivery of voicemail. For each extension in PBX:Extensions:General, enter an Email Address for delivery of voicemails. In PBX:Extensions:Voicemail, verify the VM settings from step #20.
28. We hesitate to even mention (free) Festival TTS as a text-to-speech alternative because it is so bad compared to IBM TTS. But for those that like always free, here’s how to install it. Once installed, you can issue Festival commands in your dialplan using the keyword Festival followed by the text to be spoken in parentheses.
yum -y install festival echo "[general]" > /etc/asterisk/festival.conf asterisk -rx "dialplan reload" festival_server & systemctl restart asterisk echo "/usr/bin/festival_server &" >> /etc/rc.d/rc.local
29. If you’d like to test the performance of your cloud-based server, here’s how to deploy and run SpeedTest:
cd /root wget -O speedtest-cli https://raw.githubusercontent.com/sivel/speedtest-cli/master/speedtest.py chmod +x speedtest-cli /root/speedtest-cli
30. Associating CallerID Names (CNAM) with inbound calls for display on SIP phones and in the CDR logs is an often-requested PBX feature. There are a few ways to do it. First, for less than a penny a call, you can activate the feature with your DIDs in the Skyetel Dashboard. Or, for about half the cost, you can acquire an OpenCNAM account and activate it in VitalPBX by navigating to PBX:Incoming Calls:CID Lookup. Choose OpenCNAM as the Source and enter your credentials. Then SAVE your settings and reload the dialplan. Then, for each of your Inbound Routes, add OpenCNAM as the CID Lookup source and Update your configuration.
31. Unless you want a full-time job monitoring the size of your logs, remove the fail2ban Asterisk log which grows every 5 seconds. Navigate to Settings:PBX Settings:Log Files and click the Trash icon beside fail2ban. It’s probably a good idea to turn OFF the Notice option for the full log while you’re at it. Then SAVE your changes.
32. Before you do anything else, navigate to Admin:Admin:Backup & Restore, configure and run a Full Backup, and then download the file and keep it in a safe place. Be advised that Backup/Restore doesn’t restore Add-Ons, /var/lib/asterisk/agi-bin, custom contexts (extensions__80*.conf) in /etc/asterisk/ombutel, custom MySQL databases (mysqldump -u root yourDB > yourDB.sql), custom and lenny sound directories in /var/lib/asterisk/sounds, phpMyAdmin, /usr/local/sbin, and /etc/crontab.
Obtaining IBM Watson TTS and STT Credentials
Incredible PBX uses IBM Watson® for TTS and STT support. This Nerd Vittles tutorial will walk you through getting your IBM account set up and obtaining both your TTS and STT credentials. Be sure to write down BOTH sets of credentials which you’ll need in a minute. For home and SOHO use, IBM access and services generally is FREE even though you must provide a credit card when signing up. Details are provided when you sign up. If you ever forget your passwords, you can retrieve them by navigating to Resource List:Services:TTS or STT:View Full Details:Show Credentials.
Obtaining Wolfram Alpha Credentials
When people ask what exactly Wolfram Alpha is, our favorite answer was provided by Ed Borasky.
It’s an almanac driven by a supercomputer.
That’s an understatement. It’s a bit like calling Google Search a topic index. Unlike Google which provides links to web sites that can provide answers to queries, Wolfram Alpha provides specific and detailed answers to almost any question. Here are a few examples (with descriptions of the functionality) to help you wrap your head around the breadth of information. For a complete list of what’s available, visit Wolfram Alpha’s Examples by Topic. Type a sample query here. Some of our favorites include:
Weather in Charleston South Carolina
Weather forecast for Washington D.C.
Next solar eclipse
Otis Redding
Define politician
Who won the 1969 Superbowl? (Broadway Joe)
What planes are flying overhead now? (flying over your server’s location)
Ham and cheese sandwich (nutritional information)
Holidays 2012 (summary of all holidays for 2012 with dates and DOW)
Medical University of South Carolina (history of MUSC)
Star Trek (show history, air dates, number of episodes, and more)
Apollo 11 (everything you ever wanted to know)
Cheapest Toaster (brand and price)
Battle of Gettysburg (sad day 🙂 )
Daylight Savings Time 2012 (date ranges and how to set your clocks)
Tablets by Motorola (pricing, models, and specs from Best Buy)
Doughnut (you don’t wanna know)
Snickers bar (ditto)
Weather (local weather at your server’s location)
Before you can actually use our TTS implementation of Wolfram Alpha, you’ll need to obtain a free Wolfram Alpha account. As you can imagine, there have to be some rules when you’re using someone else’s supercomputer for free. So here’s the deal. It’s free for non-commercial, personal use once you sign up for an account. But you’re limited to 2,000 queries a month which works out to almost 70 queries a day. Every query requires your personal application ID, and that’s how Wolfram Alpha keeps track of your queries. Considering the price, we think you’ll find the query limitation generous compared to other web resources.
To get started, sign up for a free Wolfram Alpha API account. Just provide your email address and set up a password. It takes less than a minute. Log into your account and click on Get An App ID. Make up a name for your application and write down (and keep secret) your APP-ID code. That’s all there is to getting set up with Wolfram Alpha. If you want to explore costs for commercial use, there are links to let you get more information.
Configuring Your Incredible PBX Credentials
In addition to your Wolfram Alpha APPID, there are two sets of IBM credentials to plug into the Asterisk AGI scripts. Keep in mind that there are different passwords for the IBM Watson TTS and STT services. The TTS credentials will look like the following: $IBM_password. The STT credentials look like this: $API_PASSWORD. Don’t mix them up. The username for both TTS and STT is now the single word: apikey
All of the scripts requiring credentials are located in /var/lib/asterisk/agi-bin so switch to that directory after logging into your server as root. Edit each of the following files and insert your TTS credentials in the variables already provided: nv-today2.php, ibmtts.php, and ibmtts2.php. Edit each of the following files and insert your STT credentials in the variables already provided: getquery.sh, getnumber.sh, and getnumber2.sh. Finally, edit 4747 and insert your Wolfram Alpha APPID.
If you ever want to learn how to develop applications for Asterisk, these scripts coupled with the dialplan code included in /etc/asterisk/ombutel/extensions__80-1-incrediblepbx.conf will point you in the right direction with easy to follow examples.
Managing the AsteriDex SQLite3 Database
We’ve alluded to the AsteriDex database in a couple of VitalPBX articles but never mentioned how to access it. Using a browser, point it to http://server-ip/asteridex4
. You can add, edit, display, and delete entries from there. Before you can make changes in the database, issue the following command after logging into your server as root:
chown asterisk:apache /var/lib/asterisk/agi-bin
Taking Incredible PBX for a Test Drive
You can take Incredible PBX for VitalPBX on a test drive in two ways. You can call our server, and then you can try things out on your own server and compare the results. Call our IVR by dialing 1-843-606-0555. For our international friends, you can use the following SIP URI for a free call: 10159591015959@atlanta.voip.ms. For tips on setting up your own secure, hybrid SIP URI with VitalPBX, see our original tutorial. The FreePBX® setup is virtually identical except for the location of the custom SIP setting for match_auth_username=yes. On a VitalPBX server, you will enter it here: Settings:Technology Settings:SIP Settings:CUSTOM.
With Allison’s Demo IVR, you can choose from the following options:
- 0. Chat with Operator — connects to extension 701
- 1. AsteriDex Voice Dialer (412) – say "Delta Airlines" or "American Airlines" to connect
- 2. Conferencing (2663) – log in using 1234 as the conference PIN
- 3. Wolfram Alpha Almanac (4747) – say "What planes are flying overhead now?"
- 4. Lenny (53669) – The Telemarketer’s Worst Nightmare
- 5. Today’s News Headlines (951) — courtesy of Yahoo! News
- 6. Weather by ZIP Code (947) – enter any 5-digit ZIP code for today’s weather
- 7. Today in History (86329) — courtesy of OnThisDay.com
- 8. Call Extension 701 — on your local PBX
- 9. DISA Voice Dialer (3172) — say any 10-digit number to be connected
- *. Current TIME and Date (8463) — courtesy of VitalPBX
CAUTION: We have intentionally disabled outbound calls using Option #9 and redirected callers to Lenny. The reason is that an unscrupulous caller could easily run up your phone bill by entering a number with expensive destination charges. If you wish to enable the feature, despite the risks, you can edit extensions__80-1-incrediblepbx.conf and make the change.
You can call your own IVR in a few ways. From an internal VitalPBX phone, dial D-E-M-O (2663) to be connected. Or simply dial the number of the DID you routed to the Incredible PBX Custom Context. Local users can also dial the individual feature codes shown in parentheses above. Be sure that you heed AND test the CAUTION documented above.
Originally published: Monday, October 21, 2019
Got Friends? 7 Countries Have Never Visited Nerd Vittles. 2018 Is Calling! https://t.co/wMfmlhAr16 #asterisk #freepbx #wazo #issabel #IncrediblePBX #3CX pic.twitter.com/kAmAEnwVIw
— Ward Mundy (@NerdUno) January 9, 2018
Need help with Asterisk? Visit the VoIP-info Forum.
Special Thanks to Our Generous Sponsors
FULL DISCLOSURE: ClearlyIP, Skyetel, Vitelity, DigitalOcean, Vultr, VoIP.ms, 3CX, Sangoma, TelecomsXchange and VitalPBX have provided financial support to Nerd Vittles and our open source projects through advertising, referral revenue, and/or merchandise. As an Amazon Associate and Best Buy Affiliate, we also earn from qualifying purchases. We’ve chosen these providers not the other way around. Our decisions are based upon their corporate reputation and the quality of their offerings and pricing. Our recommendations regarding technology are reached without regard to financial compensation except in situations in which comparable products at comparable pricing are available from multiple sources. In this limited case, we support our sponsors because our sponsors support us.
BOGO Bonaza: Enjoy state-of-the-art VoIP service with a $10 credit and half-price SIP service on up to $500 of Skyetel trunking with free number porting when you fund your Skyetel account. No limits on number of simultaneous calls. Quadruple data center redundancy. $25 monthly minimum spend required. Tutorial and sign up details are here.
The lynchpin of Incredible PBX 2020 and beyond is ClearlyIP components which bring management of FreePBX modules and SIP phone integration to a level never before available with any other Asterisk distribution. And now you can configure and reconfigure your new Incredible PBX phones from the convenience of the Incredible PBX GUI.
VitalPBX is perhaps the fastest-growing PBX offering based upon Asterisk with an installed presence in more than 100 countries worldwide. VitalPBX has generously provided a customized White Label version of Incredible PBX tailored for use with all Incredible PBX and VitalPBX custom applications. Follow this link for a free test drive!
Special Thanks to Vitelity. Vitelity is now Voyant Communications and has halted new registrations for the time being. Our special thanks to Vitelity for their unwavering financial support over many years and to the many Nerd Vittles readers who continue to enjoy the benefits of their service offerings. We will keep everyone posted on further developments.
Introducing Incredible PBX Custom Contexts for VitalPBX
Last week we introduced Incredible PBX for VitalPBX 2.3.8 to the Asterisk® community. And today we’re pleased to present the first of many Incredible PBX® add-ons, Allison’s DEMO IVR featuring text-to-speech and voice recognition utilities that take your Asterisk PBX to a whole new level. When we’re finished, you’ll have Headlines News, Weather Reports, Today in History, Wolfram Alpha, Voice Recognition apps to call people in your AsteriDex phonebook and to call anyone else by simply speaking the number to dial, and good ol’ Lenny, the Telemarketer’s Worst Nightmare. We’ll utilize a single custom context to harness the power of 11 Asterisk utilities using an easily configurable Interactive Voice Response (IVR) interface. Last week, VitalPBX released a new Custom Contexts module that has no limitations on the number of contexts you can create for free. But, for today, we’ll do it the old-fashioned way just to demonstrate what’s possible. And it’s pure GPL code.
Prerequisites. Before deploying the Incredible PBX components, you’ll need to install VitalPBX on a platform of your choice behind a hardware-based firewall. You’ll need to add an extension 701 where you can receive calls on a softphone or SIP phone, and you’ll need at least one SIP trunk to make and receive calls from those not connected to your PBX. The Outbound Route for this trunk must support 10 and 11-digit calls in the following formats: NXXNXXXXXX and 1NXXNXXXXXX. You’ll also need to install the Custom Contexts add-on to VitalPBX and then configure the (free) Custom Context for use by the Incredible PBX add-ons. The Inbound Route for at least one of your trunks must send calls to this new Incredible PBX Custom Context. Our previous tutorial will walk you through the setup steps for all of this.
In the VitalPBX GUI, navigate to PBX:Applications:Custom Applications and add a new 3366 (D-E-M-O) application for the Incredible PBX Demo IVR. Make it look like the following. Save your entries and Reload your dialplan when you’re finished.
In the VitalPBX GUI, navigate to PBX:Applications:Conference and add a 2663 (C-O-N-F) conference that looks like the following using PINs of your choice for participants and the conference leader. Save your entries and Reload your dialplan when you’re finished.
Finally, navigate to Settings:Technology Settings:SIP Settings:OTHERS and set SRV Lookups to YES. Save your settings and reload the dialplan.
Obtaining IBM Watson TTS and STT Credentials
Incredible PBX uses IBM Watson® for TTS and STT support. This Nerd Vittles tutorial will walk you through getting your IBM account set up and obtaining both your TTS and STT credentials. Be sure to write down BOTH sets of credentials which you’ll need in a minute. For home and SOHO use, IBM access and services generally is FREE even though you must provide a credit card when signing up. Details are provided when you sign up. If you ever forget your passwords, you can retrieve them by navigating to Watson:ExistingServices:TTS or STT:View Full Details:Show Credentials.
Obtaining Wolfram Alpha Credentials
When people ask what exactly Wolfram Alpha is, our favorite answer was provided by Ed Borasky.
It’s an almanac driven by a supercomputer.
That’s an understatement. It’s a bit like calling Google Search a topic index. Unlike Google which provides links to web sites that can provide answers to queries, Wolfram Alpha provides specific and detailed answers to almost any question. Here are a few examples (with descriptions of the functionality) to help you wrap your head around the breadth of information. For a complete list of what’s available, visit Wolfram Alpha’s Examples by Topic. Type a sample query here. Some of our favorites include:
Weather in Charleston South Carolina
Weather forecast for Washington D.C.
Next solar eclipse
Otis Redding
Define politician
Who won the 1969 Superbowl? (Broadway Joe)
What planes are flying overhead now? (flying over your server’s location)
Ham and cheese sandwich (nutritional information)
Holidays 2012 (summary of all holidays for 2012 with dates and DOW)
Medical University of South Carolina (history of MUSC)
Star Trek (show history, air dates, number of episodes, and more)
Apollo 11 (everything you ever wanted to know)
Cheapest Toaster (brand and price)
Battle of Gettysburg (sad day 🙂 )
Daylight Savings Time 2012 (date ranges and how to set your clocks)
Tablets by Motorola (pricing, models, and specs from Best Buy)
Doughnut (you don’t wanna know)
Snickers bar (ditto)
Weather (local weather at your server’s location)
Before you can actually use our TTS implementation of Wolfram Alpha, you’ll need to obtain a free Wolfram Alpha account. As you can imagine, there have to be some rules when you’re using someone else’s supercomputer for free. So here’s the deal. It’s free for non-commercial, personal use once you sign up for an account. But you’re limited to 2,000 queries a month which works out to almost 70 queries a day. Every query requires your personal application ID, and that’s how Wolfram Alpha keeps track of your queries. Considering the price, we think you’ll find the query limitation generous compared to other web resources.
To get started, sign up for a free Wolfram Alpha API account. Just provide your email address and set up a password. It takes less than a minute. Log into your account and click on Get An App ID. Make up a name for your application and write down (and keep secret) your APP-ID code. That’s all there is to getting set up with Wolfram Alpha. If you want to explore costs for commercial use, there are links to let you get more information.
Installing Incredible PBX Components
To install the Incredible PBX components on your VitalPBX server, login to your server as root and issue the following commands:
# on VitalPBX 3.x servers only, issue next 2 commands: ln -s /etc/asterisk/vitalpbx /etc/asterisk/ombutel ln -s /usr/share/vitalpbx /usr/share/ombutel cd / yum -y install dialog wget nano tar mailx cp -p /etc/crontab /etc/crontab.bak wget http://incrediblepbx.com/incrediblepbx-vitalpbx.tar.gz tar zxvf incrediblepbx-vitalpbx.tar.gz rm -f incrediblepbx-vitalpbx.tar.gz chown asterisk:asterisk /var/lib/asterisk chown asterisk:apache /var/lib/asterisk/agi-bin /etc/init.d/asterisk restart
The GPL3 license for all of the Incredible PBX components is available for review in /root/COPYING.
Configuring Your Incredible PBX Credentials
In addition to your Wolfram Alpha APPID, there are two sets of IBM credentials to plug into the Asterisk AGI scripts. Keep in mind that there are different passwords for the IBM Watson TTS and STT services. The TTS credentials will look like the following: $IBM_password. The STT credentials look like this: $API_PASSWORD. Don’t mix them up. The username for both TTS and STT is now the single word: apikey
All of the scripts requiring credentials are located in /var/lib/asterisk/agi-bin so switch to that directory after logging into your server as root. Edit each of the following files and insert your TTS credentials in the variables already provided: nv-today2.php, ibmtts.php, and ibmtts2.php. Edit each of the following files and insert your STT credentials in the variables already provided: getquery.sh, getnumber.sh, and getnumber2.sh. Finally, edit 4747 and insert your Wolfram Alpha APPID.
If you ever want to learn how to develop applications for Asterisk, these scripts coupled with the dialplan code included in /etc/asterisk/ombutel/extensions__80-1-incrediblepbx.conf will point you in the right direction with easy to follow examples.
Using Asteridex with VitalPBX
AsteriDex is a web-based dialer and address book application for Asterisk and VitalPBX. It lets you store and manage phone numbers of all your friends and business associates in an easy-to-use SQLite3 database. You simply call up the application with your favorite web browser: http://vitalpbx-ip-address/asteridex4/. When you click on a contact that you wish to call, AsteriDex first calls you at extension 701, and then AsteriDex connects you to your contact through another outbound call made using your default outbound trunk that supports numbers in the 1NXXNXXXXXX format.
Before AsteriDex Click-to-Call will work, you must authorize AsteriDex to access Asterisk from your browser. After logging into your server as root, edit the following file in /etc/asterisk/ombutel: manager__50-ombutel-user.conf. For each browser IP address you wish to authorize, add an entry like the following immediately below the existing permit entry in the file. Then reload the Asterisk dialplan: asterisk -rx "dialplan reload"
permit=12.34.56.78 permit=192.168.0.0/255.255.255.0
Taking Incredible PBX for a Test Drive
You can take Incredible PBX for VitalPBX on a test drive in two ways. You can call our server, and then you can try things out on your own server and compare the results. Call our IVR by dialing 1-843-606-0555. For our international friends, you can use the following SIP URI for a free call: 10159591015959@atlanta.voip.ms. For tips on setting up your own secure, hybrid SIP URI with VitalPBX, see our original tutorial. The FreePBX® setup is virtually identical except for the location of the custom SIP setting for match_auth_username=yes. On a VitalPBX server, you will enter it here: Settings:Technology Settings:SIP Settings:CUSTOM.
With Allison’s Demo IVR, you can choose from the following options:
- 0. Chat with Operator — connects to extension 701
- 1. AsteriDex Voice Dialer – say "Delta Airlines" or "American Airlines" to connect
- 2. Conferencing – log in using 1234 as the conference PIN
- 3. Wolfram Alpha Almanac – say "What planes are flying overhead now?"
- 4. Lenny – The Telemarketer’s Worst Nightmare
- 5. Today’s News Headlines — courtesy of Yahoo! News
- 6. Weather by ZIP Code – enter any 5-digit ZIP code for today’s weather
- 7. Today in History — courtesy of OnThisDay.com
- 8. Chat with Nerd Uno — courtesy of SIP URI connection to 3CX iPhone Client
- 9. DISA Voice Dialer — say any 10-digit number to be connected
- *. Current Date and Time — courtesy of VitalPBX
CAUTION: We have intentionally disabled outbound calls using Option #9 and redirected callers to Lenny. The reason is that an unscrupulous caller could easily run up your phone bill by entering a number with expensive destination charges. If you wish to enable the feature, despite the risks, you can edit extensions__80-1-incrediblepbx.conf and make the change.
You can call your own IVR in two ways. From an internal VitalPBX phone, dial D-E-M-O (2663) to be connected. Or simply dial the number of the DID you routed to the Incredible PBX Custom Context. Either way, you should be connected to the Incredible PBX IVR running on your VitalPBX server. Be sure that you heed AND test the CAUTION documented above.
Using Incredible PBX Features Independently of IVR
Now that we have some of the Incredible PBX applications in place using the IVR, there may be situations in which you want callers to be able to access the individual components without navigating through the IVR. For example, you may want to let users contact LENNY (53669) directly. There are three steps to do this: (1) add a new Custom Context for the feature desired, (2) add a new Custom Application with the number to associate with the application, and (3) add a snippet of dialplan code to extensions__80-custom.conf redirecting the Custom Context to the matching IVR priority. Then reload Asterisk dialplan.
For the new Lenny Custom Context, here are the entries:
Description: Lenny Context: lenny Extension: s Priority: 1 Destination: Terminate Call -> Hangup
For the new Lenny Custom Application, here are the entries:
Code: 53669 Name: Lenny Enabled: Yes Destination: Custom Contexts -> Lenny
In /etc/asterisk/ombutel/extensions__80-custom.conf, add the following dialplan code and reload the Asterisk dialplan: asterisk -rx "dialplan reload"
[lenny] exten => s,1,NoOp(Lenny) same => n,Answer same => n,Goto(incrediblepbx,53669,1)
Let’s walk through one more example to be sure you get the hang of it. To mimic the News Headlines (951) setup on other Incredible PBX platforms, here are the steps:
For the News Custom Context, here are the entries:
Description: News Context: news Extension: s Priority: 1 Destination: Terminate Call -> Hangup
For the News Custom Application, here are the entries:
Code: 951 Name: News Enabled: Yes Destination: Custom Contexts -> News
In /etc/asterisk/ombutel/extensions__80-custom.conf, add the following dialplan code and reload the Asterisk dialplan: asterisk -rx "dialplan reload"
[news] exten => s,1,NoOp(News) same => n,Answer same => n,Goto(incrediblepbx,5,1)
Coming Events. We still plan to address security for those that want to deploy this terrific platform in the cloud. And we’re already working on a new version of CallerID Superfecta for VitalPBX that will let you use OpenCNAM to associate names with CallerID numbers. You can follow our progress and offer suggestions on the PIAF Forum.
Originally published: Monday, October 14, 2019
Got Friends? 7 Countries Have Never Visited Nerd Vittles. 2018 Is Calling! https://t.co/wMfmlhAr16 #asterisk #freepbx #wazo #issabel #IncrediblePBX #3CX pic.twitter.com/kAmAEnwVIw
— Ward Mundy (@NerdUno) January 9, 2018
Need help with Asterisk? Visit the VoIP-info Forum.
Special Thanks to Our Generous Sponsors
FULL DISCLOSURE: ClearlyIP, Skyetel, Vitelity, DigitalOcean, Vultr, VoIP.ms, 3CX, Sangoma, TelecomsXchange and VitalPBX have provided financial support to Nerd Vittles and our open source projects through advertising, referral revenue, and/or merchandise. As an Amazon Associate and Best Buy Affiliate, we also earn from qualifying purchases. We’ve chosen these providers not the other way around. Our decisions are based upon their corporate reputation and the quality of their offerings and pricing. Our recommendations regarding technology are reached without regard to financial compensation except in situations in which comparable products at comparable pricing are available from multiple sources. In this limited case, we support our sponsors because our sponsors support us.
BOGO Bonaza: Enjoy state-of-the-art VoIP service with a $10 credit and half-price SIP service on up to $500 of Skyetel trunking with free number porting when you fund your Skyetel account. No limits on number of simultaneous calls. Quadruple data center redundancy. $25 monthly minimum spend required. Tutorial and sign up details are here.
The lynchpin of Incredible PBX 2020 and beyond is ClearlyIP components which bring management of FreePBX modules and SIP phone integration to a level never before available with any other Asterisk distribution. And now you can configure and reconfigure your new Incredible PBX phones from the convenience of the Incredible PBX GUI.
VitalPBX is perhaps the fastest-growing PBX offering based upon Asterisk with an installed presence in more than 100 countries worldwide. VitalPBX has generously provided a customized White Label version of Incredible PBX tailored for use with all Incredible PBX and VitalPBX custom applications. Follow this link for a free test drive!
Special Thanks to Vitelity. Vitelity is now Voyant Communications and has halted new registrations for the time being. Our special thanks to Vitelity for their unwavering financial support over many years and to the many Nerd Vittles readers who continue to enjoy the benefits of their service offerings. We will keep everyone posted on further developments.
Keep On Trunkin’: Free International VoIP Calling Returns
Today we’re taking a fresh look at the international calling marketplace by updating the best VoIP deals available. FreeVoipDeal once again takes the prize with the best selection of "free" international calling destinations at the lowest prices. Below we’ll provide a quick tutorial to transform your Incredible PBX server into an international calling platform at minimal cost.
Here’s How It Works. For every 10 euros ($10.72) you deposit into your account, you’ll get 300 minutes a week of free calls to a specific list of countries for 120 days. After you exhaust your free minutes, calls to the "free" countries revert to their standard VoIP rates. You can also call anywhere else in the world at very reasonable per minute rates that compare favorably with other SIP providers around the world. The beauty of a PBX and SIP trunks is you can mix and match as many providers as you like to take advantage of favorable calling rates to multiple countries. We’ll walk you through the FreeVoipDeal trunk setup below.
Betamax 101. There are a few things you need to know about the so-called Betamax VoIP services up front. Most importantly, they change rates and free countries more frequently than college kids change partners. The calling rate to some country from some Betamax provider changes almost every day because Betamax has dozens of companies offering similar services with differing rates and freebies. Here’s an very old spreadsheet that will give you a good idea of what you’re up against. Don’t depend upon it for the current rates. You’ll need to visit the actual site(s) for their current rate tables or visit this site (not) maintained by Betamax for a country-by-country comparison by provider. That’s another way of saying DON’T BLAME US IF YOUR 3-HOUR CALL TO ANTARCTICA CHANGED FROM 20¢ PER MINUTE TO $1 PER MINUTE OVERNIGHT. IT PROBABLY WON’T, BUT IT MIGHT.
One other word of warning. Some Betamax sites (marked with a red asterisk in the Betamax country table) such as powervoip.com have good calling rates, but they tack on a 3.9¢ connection fee to every call. If you make lengthy calls, it’s not a big deal. If you make numerous short calls, it drives your discount calling rates through the roof. Before making a lengthy call to a remote destination, spend the two minutes it takes to look up the current rate on the actual Betamax web site and take a snapshot of the page for your records. Here’s another tip. If you make frequent calls to Antarctica, spend a little time doing your homework. Review the latest Betamax spreadsheet to track down the cheapest rates. Then double-check the actual sites for the current rates. There’s a $100+ difference in the cost of a 3-hour call at €.20/minute from some Betamax sites versus the €.70/minute rate at some other Betamax sites. THIS OFTEN CHANGES! HINT: Don’t use FreeVoipDeal for Antarctica.
Today we’ll be focusing on the company we’ve tracked for many years, FreeVoipDeal.com. Except for the domain name, the setup with other Betamax providers is similar but not identical. And, of course, you’ll have to kick in another deposit to make free calls from each site. The length of the Freebie period also may vary so read the terms carefully. FreeVoipDeal actually hasn’t changed much since our first visit about five years ago. In fact, we still had most of our ten euro credit so we could play all we wanted even though the calls were no longer free since our four month window has long since expired.
Here’s the February 23, 2019 Freebie list by country. Don’t depend upon it! Check their actual web site or the Betamax country summary for current freebies and current rates. Here’s a great trick to remember. When you visit the FreeVoipDeal Rate Table, click on the Out of Minutes tab for a quick listing of all the Free Calling Countries as well as the rates once you’ve used up your four months or 300 weekly minutes of free calls. With few exceptions, most of the "free countries" still have a rate of 1.1¢ per minute even after you run out of minutes.
How Free International Calling Works
Placing international calls through FreeVoipDeal can be done in a number of ways. That’s the real beauty of a PBX. First, you can either load an app to make the calls if your smartphone or PC supports it. With Incredible PBX, you can use a SIP phone to dial a FreeVoipDeal number directly through your PBX, or you can dial a DISA access number or SIP URI from anywhere to connect to your PBX and then enter your DISA password after which you will get a second dial tone to place an international call using your FreeVoipDeal trunk. The beauty of the DISA approach is you can call into your PBX from any telephone to place free or dirt cheap international calls.
Using Incredible PBX 13 and DISA for Calling
On the Incredible PBX platform, you can use the DISA application to provide secondary dialtone for processing international calls. A phone number and trunk will receive incoming calls bound for DISA from your cellphone. An inbound route will only forward incoming calls to DISA that match your cellphone number. A secondary trunk from FreeVoipDeal or other providers will be used to process outgoing international calls that are dialed using DISA. We’ll create an outbound route or rule for every country to which you want to authorize international calling. Each of these outbound routes will point to the least expensive (or free) trunk to complete the call. In the VoIP world, you actually could have dozens of outbound trunks that handle international calls based upon the country codes of each international call. This lets you take advantage of the best calling rates for each country. We will block international calls to country codes not specifically authorized.
Just to restate the obvious, a misconfigured DISA application that allows the world to make international calls on your nickel can get expensive quickly. We’ll protect today’s DISA setup for Incredible PBX with three layers of protection. First, we’ll require that the CallerID of the incoming call match your cellphone number. While this isn’t failsafe since CallerID numbers can be spoofed, it does reduce the risk considerably. Second, to make DISA calls, you’ll have to know the incoming phone number or SIP URI managing DISA on your PBX. And third, you’ll have to enter the correct DISA PIN before being prompted for an international number to dial. Without all three, nobody gets to make an international call on your nickel. Just remember, compromising DISA on your PBX is just as risky as handing out your credit card to a stranger so follow the setup steps below carefully. And then TEST, TEST, TEST to make sure strangers can’t access your DISA setup. We’ll show you how.
Here’s an overview of the DISA setup drill once you have Incredible PBX running. We’ll walk through each of the six steps below. Don’t get frustrated. There are a number of steps, but none of them are difficult. Just pretend you’re baking cookies and don’t skip any steps.
- Set Up Your Trunk to Process Incoming DISA Calls
- Set Up Your Trunk(s) to Process Outgoing International Calls
- Configure DISA with a Very Secure Password
- Configure an Inbound Route to Limit Incoming DISA Calls to Your Cellphone #
- Configure an Outbound Route for Each International Country Code
- Test, Test, Test
1. Setting Up Incoming DISA Call Trunk
Before you can make calls to your PBX, it’ll need a phone number (known affectionately as a DID). As installed, Incredible PBX includes preconfigured SIP trunks from about a dozen SIP providers. All you’ll need is credentials from the company you wish to use. You can obtain a free DID here. To obtain your own SIP URI, read our tutorial.
2. Trunk Setup for International Calling
We’re going to walk you through setting up a trunk with FreeVoipDeal to handle free international calls to certain countries documented above. This may not be the best fit for you depending upon the international destinations you wish to call. Figure that out first! Then adjust the trunk settings below to match each SIP provider trunk you wish to create. There’s no limit to the number you can have. And, with most of these providers, you pay by the minute for international calls anyway so there is no harm in configuring multiple trunks to take advantage of the best rates calling the countries of your choice. The same applies to all-you-can-eat and "free" trunks except there are varying fees for using the services so you’re probably not going to want a dozen of them even if some of the calls are free after making a periodic deposit. Start with the pink and green entries on the old spreadsheet we referenced for the cheapest historical rates and then visit the actual sites and read the fine print.
To add new trunks to Incredible PBX, use a browser to access the IP address of your server. Login with the default username of admin and the password that you set when your install completed. You can change it with the admin-pw-change script in /root. Once the dashboard appears, click the Connectivity tab and choose Trunks -> Add SIP (chan_sip) Trunk.
For Trunk Name, enter FreeVoipDeal. In the Dialed Number Manipulation Rules section, add a rule for each country code you wish to activate. You can decipher the Country Code for any country at this link. For example, for the United Kingdom, you’d enter a rule like this where 44 is the Country Code and each X represents a required digit in the local area code and phone number. The trailing period means the number includes one or more additional digits. NOTE: DISA calls will not have to be prefixed with 011 to place international calls. Just enter the country code and number to be called. And, we are told that only 441, 442, and perhaps 443 calls to the U.K. are free since those are the designated landline prefixes.
If there are other countries, you wish to support with this trunk provider, you’d click Add More Dial Pattern Fields and insert an additional rule for each country following the example above. If you’ll be using this trunk to make calls in the U.S. and Canada as well, the correct Match Pattern is 1NXXNXXXXXX, and calls will need to be dialed with the 1 to avoid conflicts with international dialing.
Next, we need to enter the Outgoing Settings. For the Trunk Name, enter freevoipdeal. Clear out the entries in Peer Details section and enter the following using your actual FreeVoipDeal credentials for yourusername and yourpassword:
authuser=yourusername username=yourusername secret=yourpassword type=peer qualify=yes nat=yes insecure=port,invite host=sip.freevoipdeal.com fromdomain=sip.freevoipdeal.com dtmfmode=auto disallow=all canreinvite=no allow=alaw&ulaw
Finally, clear out the default entries in User Details and click the Submit Changes button and then red Apply Config button to save your new trunk.
Spoofing Your CallerID. When setting up your FreeVoipDeal account, you can set up one or more numbers to use as your CallerID number on FreeVoipDeal calls. You simply verify the number with a code sent by SMS or phone call from their service. Once you’ve gone through the verification procedure, you can spoof the outbound CallerID on FreeVoipDeal calls using your actual cellphone number. Just add the following entries to your Trunk settings replacing 9991234567 with your cellphone number. Special thanks to @hillclimber on the PIAF Forum for the tip.
fromuser=0019991234567 sendrpid=yes
3. Configuring DISA for International Calling
In the Incredible PBX GUI, we’ll set up DISA by clicking the Applications tab and choosing DISA. Add your new DISA configuration by following this sample. Use a VERY secure password. It’s your phone bill. Once you’ve finished, click the Submit Changes button and then the Apply Config button to save your new DISA setup.
4. Inbound Routing of DISA Calls
Here’s where we lock down your setup so that Incredible PBX only accepts DISA calls from your cellphone number. If you want to allow additional people to use your DISA setup or if you have multiple cellphones, then simply create multiple inbound routes with the 10-digit numbers of each phone to be supported.
In the Incredible PBX GUI, we’ll set up a new Inbound Route by clicking the Connectivity tab and choosing Inbound Routes. If you plan to support multiple phones, then create multiple inbound routes and give each of them a unique Description and CallerID Number that matches the phone number of the cellphone to be supported. Be sure to check the CID Priority Route checkbox and set the correct Destination for your incoming calls. Just fill in the blanks appropriately using this template as a guide. Once you’ve finished, click the Submit button and then the Apply Config button to save your new Inbound Route.
5. Outbound Routing by Country Code
The DISA application is going to obtain the phone number to be dialed and will pass that to the Outbound Routes module. The job of the Outbound Routes module is to examine the phone number passed to it from DISA to figure out which trunk to use to make the outbound call. It then will pass the call to the appropriate trunk which sends the outgoing call on its way to the destination.
For each Dialed Number Manipulation Rule in every Trunk that you set up in Step #2 above, you’ll need a matching Outbound Route if your PBX is used to place calls using multiple trunks. If you’re only using one provider for all of your outbound calls, then we can use a more generic Outbound Route. It’s always a good idea to create the one-to-one match between Outbound Routes and Trunks to make certain that outbound calls are sent to the correct Trunk for processing. So let’s do that using the U.K. trunk we created above.
In the Incredible PBX GUI, we’ll set up a new Outbound Route by clicking the Connectivity tab and choosing Outbound Routes. When the template appears, notice in the far right column that there’s a listing of all your existing Outbound Routes. Calls are actually processed sequentially using the order that these Outbound Routes appear in the list. If there’s no number match in the top route, processing drops to the next route in the list until there is a match AND a successful connection. You can adjust the sequence by dragging the Outbound Routes to a different position in the priority list.
It’s important to use specificity in your Outbound Routes (especially with International calling) to make certain that a call isn’t inadvertently processed by some other trunk. The easiest way to do this is to require the Outbound Route Match Pattern for U.K. calls to be at least 11 digits, e.g. 44XXXXXXXX. (the trailing period is important in that it requires at least one more digit for a match). And we can force a Hangup if the FreeVoipDeal trunk is not available for some reason by adjusting the Destination on Congestion setting. This keeps the call routing from dropping down to the next available Outbound Route in the list if FreeVoipDeal happens to be off-line at some point. So our Outbound Route for U.K. calls should look something like this:
The final step is to move the new Outbound Route for U.K. calls to the top of the Outbound Routes listing in the right column to assure that it is processed first. Once you’ve done that, click the Submit Changes button and then the Apply Config button to save your new Outbound Route AND the adjusted Outbound Route Priority List.
Another alternative in creating Outbound Routes is to use a Dial Prefix that never matches a real phone number to direct calls to a particular trunk. For example, you might use *8 as a dial prefix for FreeVoipDeal calls. By placing *8 in the Prefix column of the Dial Pattern, it will get stripped off before the number is actually passed to the FreeVoipDeal trunk for processing. We actually prefer this setup because it adds an additional layer of security for international calls. If someone were to break into your DISA application by knowing your cellphone number AND your DID AND your DISA password, it’s unlikely they’d also know to prefix outgoing international calls with some arbitrary dial prefix. Just don’t use *8 in case they’re a Nerd Vittles reader. 😉
6. Test, Test, Test!
The easiest way to test the new setup is to place a couple of calls and to watch the Asterisk CLI (asterisk -rvvvvvvvvvv) and see how the calls are processed and who answers at the other end. Then you can apologize for reaching the wrong number.
You can make up your own test methodology, but here’s one that works for us. There are several tests you need to make. First, call your Incredible PBX DID from your authorized cellphone and enter a correct DISA password to see if you get dial tone to make an international call. Then repeat the drill with an invalid password and make sure you don’t get a dial tone. Next, call your Incredible PBX DID from a phone other than your authorized cellphone. You should not get a prompt for a DISA password. Finally, we use the first three digits of a U.K. number to identify a matching NANPA area code. Then, we find hotels in the two matching cities. For example, one might attempt to call a hotel in Bath, England (44 1… ……) and a hotel in Bermuda (441-…-….). The U.K. call should go through, and the Bermuda call should fail. If you pass all three tests with flying colors, you’re good to go.
Using FreeVoipDeal’s MobileVoIP App
FreeVoipDeal also offers a MobileVoIP app that can be used directly on your smartphone (Android, iOS, and Windows phone versions available) using any Wi-Fi, UMTS, 4G/LTE, 3G, GPRS or EDGE connection. The drawback is the lack of the three extra layers of security protection that Incredible PBX using DISA offers. MobileVOIP lets you log in with your registered Betamax credentials and offers the option to use your existing VoIP credit from your smartphone. The downside is that anyone with the app and your credentials can call anywhere and talk for as long as they like on your nickel using any of your registered CallerIDs. You’ve been warned. For more information or to download the app for your mobile device, go here. Remember to dial the "+1″ country code prefix for U.S./Canada calls.
Originally published: Monday, April 24, 2017 Updated: Monday, February 25, 2019
Support Issues. With any application as sophisticated as this one, you’re bound to have questions. Blog comments are a terrible place to handle support issues although we welcome general comments about our articles and software. If you have particular support issues, we encourage you to get actively involved in the PBX in a Flash Forums. It’s the best Asterisk tech support site in the business, and it’s all free! Please have a look and post your support questions there. Unlike some forums, ours is extremely friendly and is supported by literally hundreds of Asterisk gurus and thousands of users just like you. You won’t have to wait long for an answer to your question.
Need help with Asterisk? Visit the VoIP-info Forum.
Special Thanks to Our Generous Sponsors
FULL DISCLOSURE: ClearlyIP, Skyetel, Vitelity, DigitalOcean, Vultr, VoIP.ms, 3CX, Sangoma, TelecomsXchange and VitalPBX have provided financial support to Nerd Vittles and our open source projects through advertising, referral revenue, and/or merchandise. As an Amazon Associate and Best Buy Affiliate, we also earn from qualifying purchases. We’ve chosen these providers not the other way around. Our decisions are based upon their corporate reputation and the quality of their offerings and pricing. Our recommendations regarding technology are reached without regard to financial compensation except in situations in which comparable products at comparable pricing are available from multiple sources. In this limited case, we support our sponsors because our sponsors support us.
BOGO Bonaza: Enjoy state-of-the-art VoIP service with a $10 credit and half-price SIP service on up to $500 of Skyetel trunking with free number porting when you fund your Skyetel account. No limits on number of simultaneous calls. Quadruple data center redundancy. $25 monthly minimum spend required. Tutorial and sign up details are here.
The lynchpin of Incredible PBX 2020 and beyond is ClearlyIP components which bring management of FreePBX modules and SIP phone integration to a level never before available with any other Asterisk distribution. And now you can configure and reconfigure your new Incredible PBX phones from the convenience of the Incredible PBX GUI.
VitalPBX is perhaps the fastest-growing PBX offering based upon Asterisk with an installed presence in more than 100 countries worldwide. VitalPBX has generously provided a customized White Label version of Incredible PBX tailored for use with all Incredible PBX and VitalPBX custom applications. Follow this link for a free test drive!
Special Thanks to Vitelity. Vitelity is now Voyant Communications and has halted new registrations for the time being. Our special thanks to Vitelity for their unwavering financial support over many years and to the many Nerd Vittles readers who continue to enjoy the benefits of their service offerings. We will keep everyone posted on further developments.
Some Recent Nerd Vittles Articles of Interest…