Home » Posts tagged 'vpn'

Tag Archives: vpn

The Most Versatile VoIP Provider: FREE PORTING

The Ultimate LTE Modem Router: Introducing Cudy LT500D


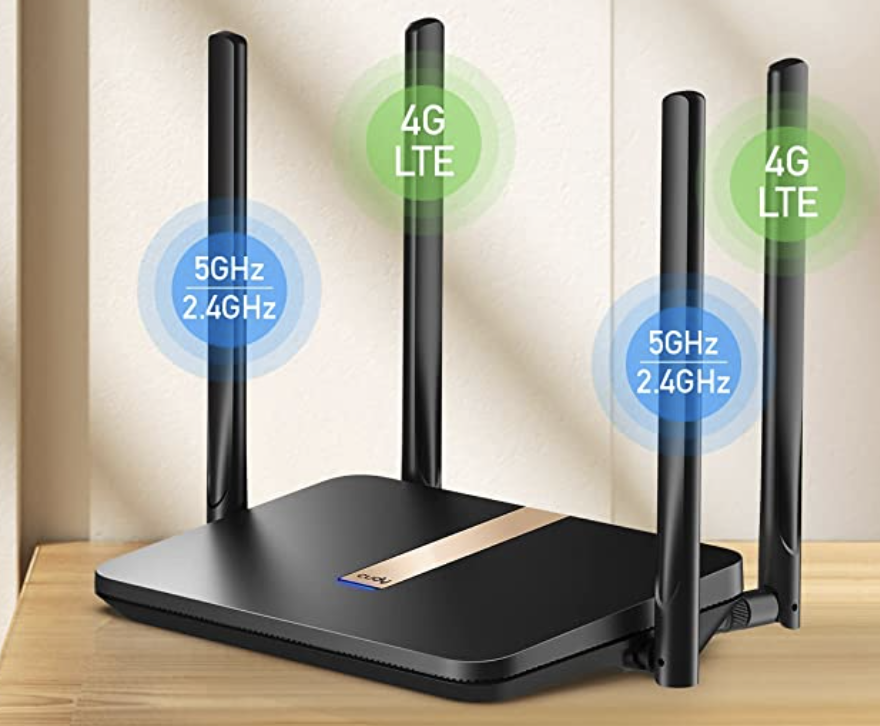
It’s hard to get too excited when talking about routers, but the Cudy LT500D is something special. That’s because it’s not just a router. It’s also a 4G LTE modem. That means, when you snap in a SIM card from your favorite cellular provider, it becomes an always-available Internet connection regardless of where you happen to be. Yes, you can get too far out in the wilderness and lose connectivity. But the router requires an electric outlet to work so in virtually all environments with AT&T or T-Mobile access, you’re covered. Whether it’s camping out or a mountain cabin or a beach house, the LT500D is a winner. It provides instant WiFi connectivity to the Internet for your entire family. You also can send and receive SMS messages using the web interface. And there’s an awesome bonus. If you currently have Comcast or Spectrum service which regularly goes out to lunch, the Cudy LT500D is a perfect complement. Why? Because it can be configured as an automatic failover during outages.

After updating the firmware, we tested the router with SIM cards from BoostMobile and T-Mobile. Setup took less than a minute. Simply activate your SIM card in a cell phone, and then pop the card into the LT500D. It automatically configures the router to support your carrier of choice. After a reboot, you simply access the LT500D dashboard by using a browser to connect to 192.168.10.1. You can also configure an OpenVPN client connection on the router and provide VPN access to anyone that makes a WiFi connection to the router.


Choosing a cellphone plan for your router is perhaps the trickiest deployment component. Most providers don’t like devices that let multiple people share a SIM card. The best deal we could find was this current BoostMobile 5GB data plan which costs just $5 a month for the first three months. After that, you can search for another deal, or you can be clever and buy several SIM cards from BoostMobile and register down the road with a different email address. You might also consider MintMobile which sells an introductory unlimited data, 3-month plan for $15 a month. With unlimited plans, some have suggested that you may need to make your router look more like a cellphone to avoid service interruption. We don’t traffic in details for flying under the radar, but Google is your friend.


What we will share is how to configure your router as an OpenVPN client which then gives all of your WiFI users access to all of the OpenVPN clients in your virtual private network. First, create and download an OpenVPN configuration file (cudy.ovpn) from your OpenVPN server. Then, on the Cudy router, choose the General Settings menu and click on the VPN icon. Activate the Enable and Site-to-Site tabs. For the Default Rule, choose Allow All Devices. For the VPN Subnet, choose Remote Subnet. Click Edit Item and add an Allow Listed Only Rule for 10.8.0.0/255.255.255.0. Click Save. For the OpenVPN Config File, click Browse and select the cudy.ovpn file downloaded from your OpenVPN server. It will automatically fill in your OpenVPN server’s FQDN. Now click Save & Apply to bring your OpenVPN client on line. You can test things by logging in via WiFi from a PC and using a browser to access one of the 10.8.0 addresses on your virtual private network.


In conclusion, this is one of the best routers we have ever tested or used. The Advanced Settings Dashboard is in a league of its own. At $129, the Cudy LT500D is a steal. Using our referral link helps pay the bills at Nerd Vittles. Enjoy!

Originally published: Monday, June 19, 2023


Need help with Asterisk? Visit the VoIP-info Forum.


Special Thanks to Our Generous Sponsors


FULL DISCLOSURE: ClearlyIP, Skyetel, Vitelity, DigitalOcean, Vultr, VoIP.ms, 3CX, Sangoma, TelecomsXchange and VitalPBX have provided financial support to Nerd Vittles and our open source projects through advertising, referral revenue, and/or merchandise. As an Amazon Associate and Best Buy Affiliate, we also earn from qualifying purchases. We’ve chosen these providers not the other way around. Our decisions are based upon their corporate reputation and the quality of their offerings and pricing. Our recommendations regarding technology are reached without regard to financial compensation except in situations in which comparable products at comparable pricing are available from multiple sources. In this limited case, we support our sponsors because our sponsors support us.

BOGO Bonaza: Enjoy state-of-the-art VoIP service with a $10 credit and half-price SIP service on up to $500 of Skyetel trunking with free number porting when you fund your Skyetel account. No limits on number of simultaneous calls. Quadruple data center redundancy. $25 monthly minimum spend required. Tutorial and sign up details are here.

The lynchpin of Incredible PBX 2020 and beyond is ClearlyIP components which bring management of FreePBX modules and SIP phone integration to a level never before available with any other Asterisk distribution. And now you can configure and reconfigure your new Incredible PBX phones from the convenience of the Incredible PBX GUI.

VitalPBX is perhaps the fastest-growing PBX offering based upon Asterisk with an installed presence in more than 100 countries worldwide. VitalPBX has generously provided a customized White Label version of Incredible PBX tailored for use with all Incredible PBX and VitalPBX custom applications. Follow this link for a free test drive!
 

Special Thanks to Vitelity. Vitelity is now Voyant Communications and has halted new registrations for the time being. Our special thanks to Vitelity for their unwavering financial support over many years and to the many Nerd Vittles readers who continue to enjoy the benefits of their service offerings. We will keep everyone posted on further developments.


Interconnecting Asterisk Servers with PJsip and OpenVPN


It’s been several years since we discussed interconnecting Asterisk® servers so today we want to do a version refresh using PJsip Trunking. We also want to show you how easy it is to secure the communications path by setting up the trunks using OpenVPN connections. When we’re finished, you’ll have a FREE way to call between sites using FreePBX® Outbound Routes. Because Incredible PBX comes preconfigured with all the components you’ll need, we’ll use that platform to further simplify the deployment. We’ll be interconnecting two Asterisk servers today, but you can use the same methodology to connect numerous sites.

Deploying OpenVPN with Asterisk Servers

To begin, you’ll want to get all of the sites configured with a virtual private network using OpenVPN. Our tutorial will walk you through the process. Keep in mind that all current releases of Incredible PBX are preconfigured to let you drop in your OpenVPN client credentials by naming them incrediblepbx.ovpn and copying the file into the /etc directory. Rebooting your server will bring up the virtual private network with a 10.8.0.x IP address.

Configuring PJsip Trunks on Your Asterisk Servers

If you remember yesteryear’s knuckle drill configuring SIP or IAX trunks for Asterisk connectivity, you’re in for a pleasant surprise using PJsip trunking with FreePBX. Using the GUI, create a new PJsip trunk for every site to which you want to establish a connection. A similar PJsip trunk must be created on the other site as well. If you’re just interconnecting two servers, then using the City locations for the Trunk Names will suffice. But, if there are more than two servers, specify unique names for each end of every PJsip connection, e.g.

NewYork1 <-> London1
NewYork2 <-> Washington1
NewYork3 <-> Miami1
London2 <-> Washington2
London3 <-> Miami2
Washington3 <-> Miami3

For today, we’ll interconnect a server in New York and London, but we’ll plan for the future and use London1 for the Trunk Name on the New York server and NewYork1 for the Trunk Name on the London server.

Let’s begin by configuring the London1 trunk on the New York server. After entering the London1 Trunk Name in the General tab, click on the pjsip Settings tab. In the General tab, leave the defaults in the first four fields. Then change the Registration field to None. For the SIP Server field, enter the OpenVPN IP address of the London server, e.g. 10.8.0.2. Because we’re using Incredible PBX, the PJsip port is 5061 so enter that in the SIP Server Port field. If you’re using a different flavor of FreePBX, enter the appropriate port number for PJsip on your platform. Next, click on the Advanced tab and enter the London server’s OpenVPN address in the Match (Permit) field, e.g. 10.8.0.2. In the Codecs tab, make note of the enabled codecs and make certain that the entries match on all of your servers. Click the Submit button to save your settings and then reload your dialplan.

Now let’s configure the NewYork1 trunk on the London server. After entering the NewYork1 Trunk Name in the General tab, click on the pjsip Settings tab. In the General tab, leave the defaults in the first four fields. Then change the Registration field to None. For the SIP Server field, enter the OpenVPN IP address of the New York server, e.g. 10.8.0.1. Because we’re using Incredible PBX, the PJsip port is 5061 so enter that in the SIP Server Port field. If you’re using a different flavor of FreePBX, enter the appropriate port number for PJsip on your platform. Next, click on the Advanced tab and enter the New York server’s OpenVPN address in the Match (Permit) field, e.g. 10.8.0.1. In the Codecs tab, make certain that the entries match those on your New York server. Click the Submit button to save your settings and then reload your dialplan. Here’s how it looks in the FreePBX GUI:


Use Outbound Routes to Interconnect Extensions

To keep things simple, let’s assume both your New York and London servers have extensions 701-705. To call an extension on the other server, we will simply dial 9 and then the 3-digit extension, e.g. dialing 9701 on the New York server will ring 701 on the London server and dialing 9701 on the London server will ring 701 on the New York server.

Create an Outbound Route on the New York server called London specifying London1 for the Trunk Sequence in the Route Settings tab. In the Dial Patterns tab, enter 9 in the Prefix field and XXX for the Match Pattern. Click Submit to save your settings and then reload dialplan.


Create an Outbound Route on the London server called New York specifying NewYork1 for the Trunk Sequence in the Route Settings tab. In the Dial Patterns tab, enter 9 in the Prefix field and XXX for the Match Pattern. Click Submit to save your settings and then reload dialplan.

If you’re interconnecting more than two sites, then you probably will want to designate a specific Prefix for every City so that users can travel between sites and use the same methodology to reach the same extensions from every location.

You can test things out using softphones by registering 701 to an extension in New York and another to the 701 extension in London. Now you can place secure and FREE calls between the sites by dialing 9701 from each softphone. Enjoy!

Originally published: Monday, May 2, 2022


Need help with Asterisk? Visit the VoIP-info Forum.


Special Thanks to Our Generous Sponsors


FULL DISCLOSURE: ClearlyIP, Skyetel, Vitelity, DigitalOcean, Vultr, VoIP.ms, 3CX, Sangoma, TelecomsXchange and VitalPBX have provided financial support to Nerd Vittles and our open source projects through advertising, referral revenue, and/or merchandise. As an Amazon Associate and Best Buy Affiliate, we also earn from qualifying purchases. We’ve chosen these providers not the other way around. Our decisions are based upon their corporate reputation and the quality of their offerings and pricing. Our recommendations regarding technology are reached without regard to financial compensation except in situations in which comparable products at comparable pricing are available from multiple sources. In this limited case, we support our sponsors because our sponsors support us.

BOGO Bonaza: Enjoy state-of-the-art VoIP service with a $10 credit and half-price SIP service on up to $500 of Skyetel trunking with free number porting when you fund your Skyetel account. No limits on number of simultaneous calls. Quadruple data center redundancy. $25 monthly minimum spend required. Tutorial and sign up details are here.

The lynchpin of Incredible PBX 2020 and beyond is ClearlyIP components which bring management of FreePBX modules and SIP phone integration to a level never before available with any other Asterisk distribution. And now you can configure and reconfigure your new Incredible PBX phones from the convenience of the Incredible PBX GUI.

VitalPBX is perhaps the fastest-growing PBX offering based upon Asterisk with an installed presence in more than 100 countries worldwide. VitalPBX has generously provided a customized White Label version of Incredible PBX tailored for use with all Incredible PBX and VitalPBX custom applications. Follow this link for a free test drive!
 

Special Thanks to Vitelity. Vitelity is now Voyant Communications and has halted new registrations for the time being. Our special thanks to Vitelity for their unwavering financial support over many years and to the many Nerd Vittles readers who continue to enjoy the benefits of their service offerings. We will keep everyone posted on further developments.


5 Minute Wonder: Incredible PBX 2022 in Cloud for $25/Yr.


We’ve been building turnkey Incredible PBX® servers for virtual machine platforms for many years. Because the servers are built from images, typical install times have been 5 minutes or less with Proxmox, VirtualBox, and VMware ESXi. But the missing piece has been a similar image install on a true cloud-based platform. This limitation was primarily due to the fact that we don’t own or control the available cloud platforms which typically limit image installs to operating systems such as CentOS, Debian, Ubuntu, and Windows. However, CrownCloud was good enough to add our Incredible PBX 2021 Debian image and the Incredible PBX 2020 CentOS 7 image to their portfolio. And, today, we have more good news. CrownCloud has now added the Incredible PBX 2022 image for Rocky 8 as well.

These 5-minute turnkey installs of Incredible PBX 2020 for CentOS 7, Incredible PBX 2021 for Debian 10, and now Incredible PBX 2022 for Rocky 8 are being offered at the jaw-dropping price of $25 a year. The monthly cost is cheaper than a cup of coffee at Starbucks, and you’ll have a fully-functioning, production-ready KVM platform including a free snapshot with 1GB RAM, 20GB SSD storage, and 1TB of monthly bandwidth in your choice of server locations including Los Angeles and Atlanta in the United States as well as Germany and the Netherlands in Europe. And, unlike all of the other Asterisk® aggregations, Incredible PBX still provides a source code-based platform that can be tailored to meet any special requirements your organization may need.

We don’t make a nickel on these offerings so consider this our special thanks to all of our loyal fans.

Here are the links to sign up for the service and take advantage of these Incredible PBX deals:

When you sign up for the service, choose any traditional OS for the base install. Once it’s on line, go into CrownPanel and choose Reinstall. Then select Incredible PBX 2022 for Rocky from the Application Images pulldown as your new install. In less than 5 minutes, your server will be ready for you to login. Be sure to use SSH and NOT the VNC utility included in CrownPanel. This will assure that your desktop machine’s IP address gets whitelisted in the Incredible PBX firewall. Otherwise, you won’t be able to SSH into your server from your desktop. Once you login, the Incredible PBX configurator will prompt you to set passwords for root login, admin login to FreePBX, and admin login credentials for Apache to access AsteriDex and Reminders. Add a trunk provider (Skyetel is preconfigured and enabled by default) and a softphone or Incredible PBX SIP phone, and your PBX is fully operational. Check out the CrownCloud Wiki.


Planning Ahead for That Rainy Day

One of our favorite features of Crown Cloud is the free snapshot (a.k.a. backup) at no additional charge. We recommend you take snapshots regularly as you make major changes in your server’s configuration. In this way, if something comes unglued, you can easily restore the snapshot and never miss a beat. You’ll find the Remote Snapshot option in your CrownPanel menu.

Configuring Skyetel for Incredible PBX

If you’ve decided to go with Skyetel, here’s the drill. Sign up for Skyetel service and take advantage of the Nerd Vittles specials. First, complete the Prequalification Form here. You then will be provided a link to the Skyetel site to complete your registration. Once you have registered on the Skyetel site and your account has been activated, open a support ticket and request the $10 credit for your account by referencing the Nerd Vittles special offer. Once you are satisfied with the service, fund your account as desired, and Skyetel will match your deposit of up to $250 simply by opening another ticket. That gets you up to $500 of half-price calling. Credit is limited to one per person/company/address/location. Effective 10/1/2023, $25/month minimum spend required.

Skyetel does not require SIP registrations to make connections to your PBX. Instead, Skyetel can use Endpoint Groups to identify which servers can communicate with the Skyetel service. An Endpoint Group consists of a Name, an IP address, a UDP or TCP port for the connection, and a numerical Priority for the group. For incoming calls destined to your PBX, DIDs are associated with an Endpoint Group to route the calls to your PBX. For outgoing calls from your PBX, a matching Endpoint Group is required to authorize outbound calls through the Skyetel network. Thus, the first step in configuring the Skyetel side for use with your PBX is to set up an Endpoint Group. Here’s a typical setup for Incredible PBX:

  • Name: MyPBX
  • Priority: 1
  • IP Address: PBX-Public-IP-Address
  • Port: 5060
  • Protocol: UDP
  • Description: my.incrediblepbx.com

To receive incoming PSTN calls, you’ll need at least one DID. On the Skyetel site, you acquire DIDs under the Phone Numbers tab. You have the option of Porting in Existing Numbers (free for the first 60 days after you sign up for service) or purchasing new ones under the Buy Phone Numbers menu option.

Once you have acquired one or more DIDs, navigate to the Local Numbers or Toll Free Numbers tab and specify the desired SIP Format and Endpoint Group for each DID. Add SMS/MMS and E911 support, if desired. Call Forwarding and Failover are also supported. That completes the VoIP setup on the Skyetel side. System Status is always available here. Everything is already in place on the Incredible PBX 2022 side of the house so you can start making and receiving calls immediately.

Configuring ClearlyIP SIP Trunking

For the tightest integration with FreePBX, no SIP provider holds a candle to Incredible PBX SIP Trunking with ClearlyIP. The reason is fairly obvious. The ClearlyIP folks were the original developers of FreePBX. In addition to all of the traditional SIP trunking services, you also get CNAM support and state-of-the-art E911 service which can be deployed in full compliance with Kari’s Law and the Ray Baum Act. If you’re a system integrator and don’t know about your financial liability for failure to comply with the new rules, it’s time to do some reading.

Configuring VoIP.ms for Incredible PBX

To sign up for VoIP.ms service, may we suggest you use our signup link so that Nerd Vittles gets a referral credit for your signup. Once your account is set up, you’ll need to set up a SIP SubAccount and, for Authentication Type, choose Static IP Authentication and enter your Incredible PBX server’s public IP address. For Transport, choose UDP. For Device Type, choose Asterisk, IP PBX, Gateway or VoIP Switch. Order a DID in their web panel, and then point the DID to the SubAccount you just created. Be sure to specify atlanta1.voip.ms as the POP from which to receive incoming calls. In the Incredible PBX GUI, be sure to enable the VoIP.ms trunk.

Configuring Anveo Direct for Incredible PBX

To sign up for Anveo Direct service, sign up on their web site and then login. After adding funds to your account, purchase a DID under Inbound Service -> Order DID. Next, choose Configure Destination SIP Trunk. Give the Trunk a name. For the Primary SIP URI, enter $[E164]$@server-IP-address. For Call Options, select your new DID from the list. You also must whitelist your public IP address under Outbound Service -> Configure. Create a new Call Termination Trunk and name it to match your server. For Dialing Prefix, choose six alphanumeric characters beginning with a zero. In Authorized IP Addresses, enter the public IP address of your server. Set an appropriate rate cap. We like $0.01 per minute to be safe. Set a concurrent calls limit. We like 2. For the Call Routing Method, choose Least Cost unless you’re feeling extravagant. For Routes/Carriers, choose Standard Routes. Write down your Dialing Prefix and then click the Save button.

Before you can make outbound calls through Anveo Direct from your PBX, you first must configure the Dialing Prefix that you wrote down in the previous step. Log into the GUI as admin using a web browser and edit the Anveo-Out trunk in Connectivity -> Trunks. Enable the Trunk. Then click on the custom-Settings tab and replace anveo-pin with your actual Dialing Prefix. Click Submit and Apply Config to complete the setup. In the Incredible PBX GUI, be sure to enable all of the remaining Anveo trunks.

By default, incoming Anveo Direct calls will be processed by the Default inbound route on your PBX. If you wish to redirect incoming Anveo Direct calls using DID-specific inbound routes, then you’ve got a bit more work to do. In addition to creating the inbound route using the 11-digit Anveo Direct DID, enter the following commands after logging into your server as root using SSH/Putty:

cd /etc/asterisk
echo "[from-anveo]" >> extensions_custom.conf
echo "exten => _.,1,Ringing" >> extensions_custom.conf
echo "exten => _.,n,Goto(from-trunk,\\${SIP_HEADER(X-anveo-e164)},1)" >> extensions_custom.conf
asterisk -rx "dialplan reload"

Configuring a SIP Phone for Incredible PBX 2022

We’re in the home stretch now. You can connect virtually any kind of telephone to your new PBX. Plain Old Phones require an analog telephone adapter (ATA) which is a standalone SIP device such as ObiHai’s OBi100 or OBi110 (if you have a phone line from Ma Bell to hook up as well). SIP phones can be connected directly so long as they have an IP address. We obviously recommend the Incredible PBX IP phones from ClearlyIP which are the most versatile.

If you’ve been keeping up with recent Nerd Vittles developments, then you already know that we have just introduced a new Cellular Phone which connects directly to your PBX and serves as a perfect remote extension and traveling companion. You can read all about it here.

Software devices such as the YateClient softphone are another option for desktop machines. We’ll start with a free one today so you can begin making calls. You can find dozens of recommendations for hardware-based SIP phones both on Nerd Vittles and the VoIP-Info.org Forum when you’re ready to get serious about VoIP telephony.

We recommend YateClient for Windows which is free. Download it from here. Run YateClient once you’ve installed it and enter the credentials for the 701 extension on Incredible PBX. You can find them by running /root/show-passwords. You’ll need the IP address of your server plus your extension 701 password. In the YateClient, fill in the blanks using the IP address of your Server plus :5061 for the PJsip 701 extension, 701 for your Username, and whatever Password was assigned to the extension when you installed Incredible PBX. Click OK to save your entries.

Once you are registered to extension 701, close the Account window. Then click on YATE’s Telephony Tab and place some test calls to the numerous apps that are preconfigured on Incredible PBX. Dial a few of these to get started:

DEMO - Apps Demo
123 - Reminders
947 - Weather by ZIP Code
951 - Yahoo News
TODAY - Today in History
LENNY - The Telemarketer's Worst Nightmare

If you are a Mac user, another great no-frills softphone is Telephone. Just download and install it from the Mac App Store. For Android users, check out the terrific new VitalPBX Communicator. Works flawlessly with Incredible PBX.

For smartphone solutions, visit the Incredible PBX Wiki for our softphone recommendations.

Configuring SendMail with Incredible PBX

In order to receive voicemails by email delivery, outbound mail functionality from your server obviously is required. We strongly recommend configuring SendMail using either your ISP or Gmail as an SMTP Relay Host. NOTE: If you are using a Gmail account with 2-step verification enabled, you MUST use a Gmail App Key instead of your Gmail account password. You also must enable Less Secure Apps access to the Gmail account.

Configuring a Gmail account with Incredible PBX 2022 is as simple as entering your Gmail credentials. Just run this script: /root/enable-gmail-smarthost-for-sendmail.

Here are the steps using a Gmail account with Incredible PBX 2020:

cd /etc/mail
yum -y install sendmail-cf
hostname -f > genericsdomain
touch genericstable
cd /usr/bin
rm -f makemap
ln -s ../sbin/makemap.sendmail makemap
cd /etc/mail
makemap -r hash genericstable.db < genericstable
mv sendmail.mc sendmail.mc.original
wget http://incrediblepbx.com/sendmail.mc.gmail
cp sendmail.mc.gmail sendmail.mc
mkdir -p auth
chmod 700 auth
cd auth
echo AuthInfo:smtp.gmail.com \\"U:smmsp\\" \\"I:user_id\\" \\"P:password\\" \\"M:PLAIN\\" > client-info
echo AuthInfo:smtp.gmail.com:587 \\"U:smmsp\\" \\"I:user_id\\" \\"P:password\\" \\"M:PLAIN\\" >> client-info
echo AuthInfo:smtp.gmail.com:465 \\"U:smmsp\\" \\"I:user_id\\" \\"P:password\\" \\"M:PLAIN\\" >> client-info
# Stop here and edit client-info (nano -w client-info) in all three lines.
# Replace  user_id with your gMail account name without @gmail.com
# Replace password with your real gMail password OR
#  use your Gmail App Key if 2-step verification is enabled
# Be sure to replace the double-quotes shown above if they don't appear in the file!!!
# Save your changes (Ctrl-X, Y, then Enter)
chmod 600 client-info
makemap -r hash client-info.db < client-info
cd ..
make
systemctl restart sendmail

Even though these servers are hosted in the cloud, we still recommend using a SmartHost to minimize email delivery problems.

Test outbound mail using this command with your actual email address:

echo "test" | mail -s testmessage yourname@youremaildomain.com

On some implementations, you may notice in the FreePBX GUI that the mail queue has failed. Here's the fix:

chmod 777 /var/spool/mqueue
service sendmail restart

Once you are sure your emails are being delivered reliably, here's a sample GUI voicemail configuration for an extension:


Be advised that Google has hinted that the Gmail Smarthost landscape may be changing. See our recent article for a simple SmartHost alternative.

Incredible PBX Administration

We've eased the pain of administering your new PBX with a collection of scripts which you will find in the /root folder after logging in with SSH or Putty. Here's a quick summary of what each of the scripts does.

add-fqdn is used to whitelist a fully-qualified domain name in the firewall. Because Incredible PBX blocks all traffic from IP addresses that are not whitelisted, this is what you use to authorize an external user for your PBX. The advantage of an FQDN is that you can use a dynamic DNS service to automatically update the IP address associated with an FQDN so that you never lose connectivity.

add-ip is used to whitelist a public IP address in the firewall. See the add-fqdn explanation as to why this matters.

del-acct is used to remove an IP address or FQDN from the firewall's whitelist.

admin-pw-change is used to set the admin password for access to the FreePBX/Incredible PBX web GUI using a browser pointed to the local IP address of your server.

apache-pw-change is used to set the admin password for access to Apache/Incredible PBX apps including AsteriDex and Reminders. This provides a password layer of protection for access to these applications.

reset-conference-pins is a script that automatically and randomly resets the user and admin pins for access to the preconfigured conferencing application. Dial C-O-N-F from any registered SIP phone to connect to the conference.

reset-extension-passwords is a script that automatically and randomly resets ALL of the SIP passwords for extensions 702-705. Be careful using this one, or you may disable existing registered phones and cause Fail2Ban to blacklist the IP addresses of those users. HINT: You can place a call to the Ring Group associated with all five extensions by dialing 777.

reset-reminders-pin is a script that automatically and randomly resets the pin required to access the Telephone Reminders application by dialing 123. It's important to protect this application because a nefarious user could set up a reminder to call a number anywhere in the world assuming your SIP provider's account was configured to allow such calls.

show-feature-codes is a cheat sheet for all of the feature codes which can be dialed from any registered SIP phone. It documents how powerful a platform Incredible PBX actually is. A similar listing is available in the GUI at Admin -> Feature Codes.

show-passwords is a script that displays most of the passwords associated with Incredible PBX. This includes SIP extension passwords, voicemail pins, conference pins, telephone reminders pin, and your Anveo Direct outbound calling pin (if configured). Note that voicemail pins are configured by the user of a SIP extension the first time the user accesses the voicemail system by dialing *97.

ssh-regen.sh allows you to reset the SSH keys for your server for added security.

update-IncrediblePBX is the Automatic Update Utility which checks for server updates from incrediblepbx.com every time you log into your server as root using SSH or Putty. Do NOT disable it as it is used to load important fixes and security updates when necessary. We recommend logging into your server at least once a week.

pbxstatus (shown above) displays status of all major components of Incredible PBX.

Forwarding Calls to Your Cellphone. Keep in mind that inbound calls to your DIDs automatically ring all five SIP extensions, 701-705. The easiest way to also ring your cellphone is to set one of these five extensions to forward incoming calls to your cellphone. After logging into your PBX as root, issue the following command to forward calls from extension 705 to your cellphone: asterisk -rx "database put CF 705 6781234567"

To remove call forwarding: asterisk -rx "database del CF 705"

Keeping FreePBX 15 Modules Current

We strongly recommend that you periodically update all of your FreePBX modules to eliminate bugs and to reduce security vulnerabilities. From the Linux CLI, log into your server as root and issue the following commands:

rm -f /tmp/*
fwconsole ma upgradeall
fwconsole reload
/root/sig-fix
/root/sig-fix

Where To Go From Here

Complete documentation on the ClearlyIP Devices Module is available here.

Complete documentation on the FreePBX GPL Modules is available here.

Complete documentation on the Incredible PBX additions is available here.

An introduction to configuring extensions, trunks, and routes is available here.

Free voicemail transcription with email delivery. Tutorial available here.

Setting Up a VPN for Your PBX: OpenVPN or NeoRouter
 

Originally published: Monday, March 28, 2022


Need help with Asterisk? Visit the VoIP-info Forum.


Special Thanks to Our Generous Sponsors


FULL DISCLOSURE: ClearlyIP, Skyetel, Vitelity, DigitalOcean, Vultr, VoIP.ms, 3CX, Sangoma, TelecomsXchange and VitalPBX have provided financial support to Nerd Vittles and our open source projects through advertising, referral revenue, and/or merchandise. As an Amazon Associate and Best Buy Affiliate, we also earn from qualifying purchases. We’ve chosen these providers not the other way around. Our decisions are based upon their corporate reputation and the quality of their offerings and pricing. Our recommendations regarding technology are reached without regard to financial compensation except in situations in which comparable products at comparable pricing are available from multiple sources. In this limited case, we support our sponsors because our sponsors support us.

BOGO Bonaza: Enjoy state-of-the-art VoIP service with a $10 credit and half-price SIP service on up to $500 of Skyetel trunking with free number porting when you fund your Skyetel account. No limits on number of simultaneous calls. Quadruple data center redundancy. $25 monthly minimum spend required. Tutorial and sign up details are here.

The lynchpin of Incredible PBX 2020 and beyond is ClearlyIP components which bring management of FreePBX modules and SIP phone integration to a level never before available with any other Asterisk distribution. And now you can configure and reconfigure your new Incredible PBX phones from the convenience of the Incredible PBX GUI.

VitalPBX is perhaps the fastest-growing PBX offering based upon Asterisk with an installed presence in more than 100 countries worldwide. VitalPBX has generously provided a customized White Label version of Incredible PBX tailored for use with all Incredible PBX and VitalPBX custom applications. Follow this link for a free test drive!
 

Special Thanks to Vitelity. Vitelity is now Voyant Communications and has halted new registrations for the time being. Our special thanks to Vitelity for their unwavering financial support over many years and to the many Nerd Vittles readers who continue to enjoy the benefits of their service offerings. We will keep everyone posted on further developments.


Migrating Incredible PBX 2021 to a PUBLIC Facing Cloud PBX


Today we want to again enhance the migration of Incredible PBX 2021 into a PUBLIC-facing Cloud PBX. What that means is authorized users can connect a SIP phone to the PBX regardless of where the user might be located without worries about an ever-changing dynamic IP address and the requirement to whitelist the new IP address. A PUBLIC-facing PBX also provides free SIP URI connectivity to users of your PBX by anyone from anywhere in the world. In other words, it’s similar to the way you could connect to any Ma Bell telephone in the world simply by knowing the number to dial. The difference, of course, is SIP URI connectivity is free while there were often staggering long distance charges for remote connectivity in the Ma Bell days. Fifty years ago it was not uncommon for a college boy to spend $200 a month calling his college sweetheart less than 200 miles away in the same state. Ask me how I know.

Why is this such a big deal? The short answer is security and your phone bill. You don’t want bad guys on the other side of the globe attempting to register a SIP phone to your PBX so that they can use your trunks to make free phone calls on your nickel. You also don’t want anybody and everybody calling your users by simply guessing the IP address of your PBX. So today’s new design combines several security mechanisms to make a PUBLIC-facing PBX safe and secure. First, we will block all SIP connectivity to your PBX by IP address. Second, we will identify 30,000+ known SIP bad guys and block their access to your PBX entirely. Third, we will only permit SSH access to your PBX using public key authentication instead of traditional username/password authentication. Fourth, we will only permit web access to the Incredible PBX portal from whitelisted IP addresses and OpenVPN private addresses. We haven’t mentioned the elephant in the room, Distributed Denial of Service (DDoS) attacks, but today’s methodology reduces the risk considerably since your PBX cannot be ping’d, and all IP address access is blocked at the Linux kernel level.

Prerequisites. To put all these safeguards in place, you’ll need a cloud-based Incredible PBX 2021 KVM platform running Debian 10. Install the latest Incredible PBX 2021 platform using our tutorial. Next, you’ll need these items:

  1. Public IP Address of your server
  2. Obscure FQDN linked to this public IP address
  3. Random SSH port with registered public keys for SSH access
  4. List of SIP extensions to enable for SIP URI access
  5. IP Addresses to WhiteList for Access to the Web GUI

1. Deciphering Public IP Address of Your PBX

After logging into your PBX as root, you can execute pbxstatus to decipher the public IP address of the PBX. Or issue the command: wget -q -O - ipinfo.io/ip

2. Obtaining an FQDN for Your PBX

Security through obscurity provides the critical layer of protection for your server so choose an FQDN carefully. sip.yourname.com provides little protection while f246g.yourname.com pretty much assures that nobody is going to guess your domain name. This is particularly important with SIP registrations because registered extensions on your PBX can obviously make phone calls that cost you money. If you don’t have your own domain, you can always obtain a free hostname from a service such as NoIP.com.

3. Securing SSH Access to Your PBX

Whatever you do, don’t leave SSH access via port 22 exposed on your PBX. In the time it took to create a new PBX on CloudAtCost, there were over 400 attempted logins to the default SSH port of the new server. The simplest (but least secure) method to avoid these script kiddie attacks is to change the port number for SSH access to your server. We suggest using the year you were born as the port number because it’s easy to remember. Edit /etc/ssh/sshd_config and uncomment the Port line replacing 22 with the port number you chose. Then restart SSH: systemctl restart sshd.

The preferable solution to secure SSH is to create and use SSH keys for access and set PasswordAuthentication no on the last line of /etc/ssh/sshd_config. Digital Ocean has an excellent tutorial to walk you through the setup process.

4. Choosing Extensions for SIP URI Public Access

With today’s PUBLIC design, exposing an extension for PUBLIC access means anyone in the world that knows the FQDN of your server and the extension number can do two things using any SIP client: (1) they can call you and (2) they can attempt to register to that extension and make calls on your trunks AND your nickel. So only expose extensions for public access if there is a need to connect or call from remote locations. For extensions you decide to expose, make certain that the passwords for these extensions are extremely secure, lengthy, and use numbers with both UPPER and lower case letters. Never use default extension passwords!

5. Whitelisting IP Addresses for Public Web Access

Without enumerating IP addresses for public web access, you won’t be able to connect to the web GUI of your PBX. Down the road, if you wish to add additional IP addresses, you can use /root/add-ip to add them via SSH.

Deploying New PUBLIC Firewall

To get started, log into your server as root and issue the following commands:

cd /tmp
wget http://incrediblepbx.com/newpublic.tar.gz
tar zxvf newpublic.tar.gz
rm -f newpublic.tar.gz

Next, edit /tmp/iptables.base and change the highlighted entries:


Change port 22 in the dport entry to the SSH port number you chose in Step 3, above.

Change 8.8.8.8, 8.8.4.4., and 1.1.1.1 to actual public IP addresses of desktop machines you wish to use to access the web GUI of your PBX. If you don’t need three entries, comment out the other entries with # at the beginning of each line.

Replace your-servers-IP-address with the actual IP address of your PBX from Step 1, above.

Save the file.

On the Debian platform, issue the following commands:

cd /etc/iptables
cp /tmp/iptables.base .
mv rules.v4 rules.v4.orig
cp iptables.base rules.v4

Using Incredible PBX PUBLIC with Asterisk

The first line of defense with this PUBLIC implementation is your FQDN. Second is the IPtables firewall setup above. And third is the Asterisk® extensions configuration in extensions_override_freepbx.conf. Here’s how to configure it. Edit /tmp/extensions_override_freepbx.base and change the highlighted entries:


If there are phone numbers assigned to your PBX that you want processed according to your Inbound Routing rules, duplicate the first highlighted line above and, for each trunk, replace 8881234567 with your actual DID numbers.

In exten => _.,1 line, replace your-servers-IP-address with the actual IP address of your PBX from Step 1, above.

In exten => _.,10 line, replace your-servers-FQDN with the actual FQDN assigned to your PBX from Step 2, above.

Scroll down in the file to the following section:


Comment out undesired default extensions. Place a semicolon at the beginning of the lines.

For any extensions you wish to add, insert a new line in the following format replacing both 7000 entries with the desired extension number:

exten => 7000,13,Dial(local/7000@from-internal)

Save the file and then execute the following commands to complete the PUBLIC setup:

cd /etc/asterisk
cp /tmp/extensions_override_freepbx.base .
mv extensions_override_freepbx.conf extensions_override_freepbx.orig
cp extensions_override_freepbx.base extensions_override_freepbx.conf
fwconsole restart
asterisk -rx "dialplan reload"
iptables-restart
sed -i 's|-A INPUT|-I INPUT|' /root/add-ip
sed -i 's|-A INPUT|-I INPUT|' /root/add-fqdn
sed -i 's|for |PUB |' /usr/local/sbin/pbxstatus

Adding IPSET Protections to Incredible PBX

We’re not the biggest fans of blacklists because the bad guys spend a lot of time trying to corrupt them by inserting valid IP addresses of sites such as DNS servers in the lists to wreak havoc. Having said that, there are two blacklists that are carefully monitored on a daily basis, and both provide additional protection for your PBX by weeding out access by 30,000+ potential bad guys. The oldest of these is VoIP Blacklist. And the new kid on the block is APIBAN from LOD.com and Fred Posner. We’ve simplified the setup process for use with Incredible PBX 2021. To get started, obtain an APIBAN API key here. Then issue the following commands to put all the pieces in place on your server:


apt --fix-broken install -y
apt install ipset iptables netfilter-persistent ipset-persistent iptables-persistent -y
cd /usr/local/sbin
wget http://incrediblepbx.com/incrediblepbx-ipsets.tar.gz
tar zxvf incrediblepbx-ipsets.tar.gz
rm -f incrediblepbx-ipsets.tar.gz

Next, edit /usr/local/sbin/apiban-init and insert your APIkey.

Finally, issue the following command to reload the firewall: iptables-restart

Verifying Firewall Setup of Incredible PBX

Let’s make certain that everything got installed correctly. Begin by issuing this command: iptables -nL

Scroll toward the top of the list, and you should see two entries for the voipbl and apiban ipsets indicating that entries in those lists will be dropped by the firewall.


Next, verify that the voipbl and apiban ipsets are populated. The first two commands below will list all of the blocked IP addresses. And the next two commands will provide a count of the dropped IP addresses.

ipset list voipbl
ipset list apiban
ipset list voipbl | wc -l
ipset list apiban | wc -l

Finally, you can refresh the ipsets with the following two commands:

voipbl-init
apiban-init

Rebooting or restarting the firewall with iptables-restart also refreshes the ipset listings.


Calling an Incredible PBX PUBLIC Extension

Any extensions that you have whitelisted in the blue section above can be called from anywhere using any SIP client. Simply enter the SIP URI for the extension in the following format: SIP/extension@your-servers-FQDN

CAUTION: If a caller attempts to call any extension on your PUBLIC server from an extension on another Asterisk server to which the caller is registered, the call will fail if there is a matching extension number on the PUBLIC server and the two servers are not registered to each other. So remember to use unique extension numbers on your PUBLIC server if you expect callers from other Asterisk servers.

Registering Incredible PBX PUBLIC Extension

If you wish to login to a whitelisted extension using a SIP client, enter the extension and password of the extension. For the server address, enter the FQDN of your server. If it’s a PJsip extension, add :5061 to the end of the FQDN.

Originally published: Thursday, November 11, 2021


Need help with Asterisk? Visit the VoIP-info Forum.


Special Thanks to Our Generous Sponsors


FULL DISCLOSURE: ClearlyIP, Skyetel, Vitelity, DigitalOcean, Vultr, VoIP.ms, 3CX, Sangoma, TelecomsXchange and VitalPBX have provided financial support to Nerd Vittles and our open source projects through advertising, referral revenue, and/or merchandise. As an Amazon Associate and Best Buy Affiliate, we also earn from qualifying purchases. We’ve chosen these providers not the other way around. Our decisions are based upon their corporate reputation and the quality of their offerings and pricing. Our recommendations regarding technology are reached without regard to financial compensation except in situations in which comparable products at comparable pricing are available from multiple sources. In this limited case, we support our sponsors because our sponsors support us.

BOGO Bonaza: Enjoy state-of-the-art VoIP service with a $10 credit and half-price SIP service on up to $500 of Skyetel trunking with free number porting when you fund your Skyetel account. No limits on number of simultaneous calls. Quadruple data center redundancy. $25 monthly minimum spend required. Tutorial and sign up details are here.

The lynchpin of Incredible PBX 2020 and beyond is ClearlyIP components which bring management of FreePBX modules and SIP phone integration to a level never before available with any other Asterisk distribution. And now you can configure and reconfigure your new Incredible PBX phones from the convenience of the Incredible PBX GUI.

VitalPBX is perhaps the fastest-growing PBX offering based upon Asterisk with an installed presence in more than 100 countries worldwide. VitalPBX has generously provided a customized White Label version of Incredible PBX tailored for use with all Incredible PBX and VitalPBX custom applications. Follow this link for a free test drive!
 

Special Thanks to Vitelity. Vitelity is now Voyant Communications and has halted new registrations for the time being. Our special thanks to Vitelity for their unwavering financial support over many years and to the many Nerd Vittles readers who continue to enjoy the benefits of their service offerings. We will keep everyone posted on further developments.


Morphing Incredible PBX into a PUBLIC-Facing Cloud PBX


We’ve previously documented how to change Incredible PBX 2021 and Incredible PBX 2020 into PUBLIC-facing PBXs. What that means is that authorized users could still connect to your PBX regardless of where they may be located without having to worry about whitelisting IP addresses. To suggest that the procedure was convoluted is a bit of an understatement. So today we offer a simplified solution that you can deploy in a couple of minutes. It lacks some of the safeguards of the earlier releases, but it remains secure so long as you don’t employ a readily decipherable FQDN for your PBX. The idea here is to block communications access to your PBX using its public IP address and allow access by those that know the fully-qualified domain name (FQDN) of your PBX. You can also restrict the extensions that are accessible. And SSH access to your PBX will be protected by assigning a random port number or by requiring public key authentication for access.

Prerequisites. To get started, you’ll obviously need a cloud-based Incredible PBX 2020 or 2021 platform running CentOS 7, Debian 10, or Raspbian. Next, you’ll need these items:

  1. Public IP Address of your server
  2. FQDN linked to the public IP address
  3. Random SSH port for SSH access to PBX
  4. List of secure extensions to enable for SIP URI access
  5. IP Addresses to WhiteList for Access to the Web GUI

1. Deciphering Public IP Address of Your PBX

After logging into your PBX as root, you can execute pbxstatus to decipher the public IP address of the PBX.

2. Obtaining an FQDN for Your PBX

Security through obscurity provides the critical layer of protection for your server so choose an FQDN carefully. sip.yourname.com provides little protection while f246g.yourname.com pretty much assures that nobody is going to guess your domain name. This is particularly important with SIP registrations because registered extensions on your PBX can obviously make phone calls that cost you money. If you don’t have your own domain, you can always obtain a free hostname from a service such as NoIP.com.

3. Securing SSH Access to Your PBX

Whatever you do, don’t leave SSH access via port 22 exposed on your PBX. In the time it took to create a new PBX on CloudAtCost, there were over 400 attempted logins to the default SSH port of the new server. The simplest (but least secure) method to avoid these script kiddie attacks is to change the port number for SSH access to your server. We suggest using the year you were born as the port number because it’s easy to remember. Edit /etc/ssh/sshd_config and uncomment the Port line replacing 22 with the port number you chose. Then restart SSH: systemctl restart sshd.

The preferable solution to secure SSH is to create and use SSH keys for access and set PasswordAuthentication no in /etc/ssh/sshd_config. Digital Ocean has an excellent tutorial to walk you through the setup process.

4. Choosing Extensions for SIP URI Public Access

With today’s PUBLIC design, exposing an extension for PUBLIC access means anyone in the world that knows the FQDN of your server and the extension number can do two things using any SIP client: (1) they can call you and (2) they can attempt to register to that extension and make calls on your trunks AND your nickel. So only expose extensions for public access if there is a need to connect or call from remote locations. For extensions you decide to expose, make certain that the passwords for these extensions are extremely secure, lengthy, and use numbers with both UPPER and lower case letters. Never use default extension passwords!

5. Whitelisting IP Addresses for Public Web Access

Without enumerating IP addresses for public web access, you won’t be able to connect to the web GUI of your PBX. Down the road, if you wish to add additional IP addresses, you can use /root/add-ip to add them via SSH.

Deploying New PUBLIC Firewall

To get started, log into your server as root and issue the following commands:

cd /tmp
wget http://incrediblepbx.com/newpublic.tar.gz
tar zxvf newpublic.tar.gz
rm -f newpublic.tar.gz

Next, edit /tmp/iptables.base and change the highlighted entries:


Change port 22 in the dport entry to the SSH port number you chose in Step 3, above.

Change 8.8.8.8, 8.8.4.4., and 1.1.1.1 to actual public IP addresses of desktop machines you wish to use to access the web GUI of your PBX. If you don’t need three entries, comment out the other entries with # at the beginning of each line.

Replace your-servers-IP-address with the actual IP address of your PBX from Step 1, above.

Save the file.

On Debian and Raspbian platforms, issue the following commands:

cd /etc/iptables
cp /tmp/iptables.base .
mv rules.v4 rules.v4.orig
cp iptables.base rules.v4

On CentOS platforms, issue the following commands:

cd /etc/sysconfig
cp /tmp/iptables.base .
mv iptables iptables.orig
cp iptables.base iptables

Using Incredible PBX PUBLIC with Asterisk

The first line of defense with this PUBLIC implementation is your FQDN. Second is the IPtables firewall setup above. And third is the Asterisk® extensions configuration in extensions_override_freepbx.conf. Here’s how to configure it. Edit /tmp/extensions_override_freepbx.base and change the highlighted entries:


If there are phone numbers assigned to your PBX that you want processed according to your Inbound Routing rules, duplicate the first highlighted line above and, for each trunk, replace 8881234567 with your actual DID numbers.

In exten => _.,1 line, replace your-servers-IP-address with the actual IP address of your PBX from Step 1, above.

In exten => _.,10 line, replace your-servers-FQDN with the actual FQDN assigned to your PBX from Step 2, above.

Scroll down in the file to the following section:


Comment out undesired default extensions. Place a semicolon at the beginning of the lines.

For any extensions you wish to add, insert a new line in the following format replacing both 7000 entries with the desired extension number:

exten => 7000,13,Dial(local/7000@from-internal)

Save the file and then execute the following commands to complete the PUBLIC setup:

cd /etc/asterisk
cp /tmp/extensions_override_freepbx.base .
mv extensions_override_freepbx.conf extensions_override_freepbx.orig
cp extensions_override_freepbx.base extensions_override_freepbx.conf
fwconsole restart
asterisk -rx "dialplan reload"
iptables-restart
sed -i 's|-A INPUT|-I INPUT|' /root/add-ip
sed -i 's|-A INPUT|-I INPUT|' /root/add-fqdn

Calling an Incredible PBX PUBLIC Extension

Any extensions that you have whitelisted in the blue section above can be called from anywhere using any SIP client. Simply enter the SIP URI for the extension in the following format: SIP/extension@your-servers-FQDN

CAUTION: If a caller attempts to call any extension on your PUBLIC server from an extension on another Asterisk server to which the caller is registered, the call will fail if there is a matching extension number on the PUBLIC server and the two servers are not registered to each other. So remember to use unique extension numbers on your PUBLIC server if you expect callers from other Asterisk servers.

Registering Incredible PBX PUBLIC Extension

If you wish to login to a whitelisted extension using a SIP client, enter the extension and password of the extension. For the server address, enter the FQDN of your server. If it’s a PJsip extension, add :5061 to the end of the FQDN.

Switching Back to Incredible PBX Default

Should you change your mind and decide to switch back to the default Incredible PBX setup, it’s simple to do so. Here are the steps.

sed -i 's|Port|#Port|' /etc/ssh/sshd_config
cd /etc/asterisk
cp -p extensions_override_freepbx.orig extensions_override_freepbx.conf
cd /root
cd /etc/sysconfig
cp -p iptables.orig iptables
cd /root
cd /etc/iptables
cp -p rules.v4.orig rules.v4
asterisk -rx "dialplan reload"
iptables-restart
systemctl restart sshd

Originally published: Monday, August 16, 2021


Need help with Asterisk? Visit the VoIP-info Forum.


Special Thanks to Our Generous Sponsors


FULL DISCLOSURE: ClearlyIP, Skyetel, Vitelity, DigitalOcean, Vultr, VoIP.ms, 3CX, Sangoma, TelecomsXchange and VitalPBX have provided financial support to Nerd Vittles and our open source projects through advertising, referral revenue, and/or merchandise. As an Amazon Associate and Best Buy Affiliate, we also earn from qualifying purchases. We’ve chosen these providers not the other way around. Our decisions are based upon their corporate reputation and the quality of their offerings and pricing. Our recommendations regarding technology are reached without regard to financial compensation except in situations in which comparable products at comparable pricing are available from multiple sources. In this limited case, we support our sponsors because our sponsors support us.

BOGO Bonaza: Enjoy state-of-the-art VoIP service with a $10 credit and half-price SIP service on up to $500 of Skyetel trunking with free number porting when you fund your Skyetel account. No limits on number of simultaneous calls. Quadruple data center redundancy. $25 monthly minimum spend required. Tutorial and sign up details are here.

The lynchpin of Incredible PBX 2020 and beyond is ClearlyIP components which bring management of FreePBX modules and SIP phone integration to a level never before available with any other Asterisk distribution. And now you can configure and reconfigure your new Incredible PBX phones from the convenience of the Incredible PBX GUI.

VitalPBX is perhaps the fastest-growing PBX offering based upon Asterisk with an installed presence in more than 100 countries worldwide. VitalPBX has generously provided a customized White Label version of Incredible PBX tailored for use with all Incredible PBX and VitalPBX custom applications. Follow this link for a free test drive!
 

Special Thanks to Vitelity. Vitelity is now Voyant Communications and has halted new registrations for the time being. Our special thanks to Vitelity for their unwavering financial support over many years and to the many Nerd Vittles readers who continue to enjoy the benefits of their service offerings. We will keep everyone posted on further developments.


A New Day: Introducing Incredible PBX 2021 for Ubuntu 20.04

We’ve completed the rollout of Incredible PBX 2021 for Debian 10 and, thanks to the terrific work of @jaminmc, today we’re pleased to introduce Incredible PBX 2021 for Ubuntu 20.04 LTS with its ten-year life cycle.

In addition to @jaminmc, we also want to offer our special thanks to the many talented individuals on the VoIP-Info.org Forum who work through the growing pains of these new releases to bring you open source products at zero cost. Come join the party!

If you’re using on-premise hardware, begin by downloading the ISO image of Ubuntu 20.04 for amd64. Follow our previous tutorials for tips on installation with VirtualBox or VMware ESXi. If you’d prefer to experiment in the cloud for about a penny an hour, open an account at Vultr or Digital Ocean using our referral links that support the Nerd Vittles project. You’ll also get some free credit to try out the service. Then create a new $5/month Ubuntu 20.04, 64-bit instance in your favorite city. Want some cheaper KVM cloud alternatives? Visit the Incredible PBX Wiki.

If your PBX is sitting behind a NAT-based router, you’ll need to redirect incoming UDP 5060-5061 and UDP 10000-20000 traffic to the private IP address of your server. This is required for all of the SIP providers included in the Incredible PBX 2021 build. Otherwise, all inbound calls will fail.

Installing Incredible PBX 2021 on Ubuntu 20.04 Server

Once your Ubuntu 20.04 platform is up and running, login as root using SSH or Putty. If you wish to use the default Asterisk 18 platform, issue the commands below to kick off the install. If you’d prefer to stick with Asterisk 16 for the time being and perhaps upgrade to Asterisk 18 later with the included upgrade script, then edit the script once you download it and change 18 to 16 in line 34 of the script before executing it.

wget http://incrediblepbx.com/IncrediblePBX2021-U.sh
chmod +x IncrediblePBX2021-U.sh
./IncrediblePBX2021-U.sh

At about 5 minutes into the install procedure, you’ll be prompted for your telephone country code. It’s 1 for Canada and the United States. Once the installation completes, reboot and you should be good to go.

Next Steps with Incredible PBX 2021

Before you can manage your PBX through a web browser, you first will need to set the admin passwords for FreePBX, Apache web apps such as Reminders and AsteriDex, and AvantFax (if you are using Incredible Fax). These all can be set by logging into your server as root and issuing the following commands: admin-pw-change, apache-pw-change, and avantfax-pw-change. The AvantFax password can also be reset with a browser by first logging in as admin with a password of password.

Outbound mail functionality needs to be working so that you can receive voicemail messages and faxes by email. To prevent SPAM, most ISPs and ITSPs block messages from downstream mail servers. That would be you. The easiest way to resolve this is to configure SendMail using Gmail as an SMTP Smarthost. You obviously need a Gmail account to implement this and, if you have turned on two-factor authentication for your Gmail account, you also will need to obtain an App password for your Gmail account, and use that in lieu of your regular Gmail password when configuring SendMail. With your Gmail username and password in hand, log into your server as root and run: /root/enable-gmail-smarthost-for-sendmail.

If your Incredible PBX 2021 is hosted with a cloud provider, be advised that many providers do not include a swap file as part of their offering. FreePBX requires a swap file. To add one, issue this command after logging into your server as root: /root/create-swapfile-DO.

To correctly set the time on your PBX, run: /root/timezone-setup.

By default, the voicemail password for each of the configured extensions (701-705) is set to the extension number. This means the user will be prompted to set a voicemail password on the first login to voicemail for each extension. A phone must be registered to the actual extension to access its voicemail account. For example, once a phone is registered to extension 701, the voicemail setup can be accessed by dialing *98701.

If you want to send and receive faxes with Incredible PBX 2021, download the new Incredible Fax 2021 for Ubuntu script, make it executable (chmod +x incred*), and then run the following script while logged into your server as root: /root/incrediblefax2021-ubuntu20.04.sh. When prompted, accept all the defaults. Once the HylaFax and AvantFax components are installed, reboot your server. To send faxes, click on the AvantFax tab in the FreePBX GUI and enter your login credentials (default: admin/password). To receive incoming faxes once you have configured a trunk and DID for your PBX, login to the FreePBX GUI as admin. Navigate to Connectivity -> Inbound Routes. For each of your DIDs on which you wish to receive faxes, select the inbound route and click the Fax tab. Review the Default Inbound Route Fax settings for proper setup.

Overview of the Initial Asterisk Setup Process

For those new to PBXs, here’s a two paragraph summary of how Voice over IP (VoIP) works. Phones connected to your PBX are registered with Extensions so that they can make and receive calls. When a PBX user picks up a phone and dials a number, an Outbound Route tells the PBX which Trunk to use to place the call based upon established dialing rules. Unless the dialed number is a local extension, a Trunk registered with some service provider accepts the call, and the PBX sends the call to that provider. The provider then routes the call to its destination where the recipient’s phone rings to announce the incoming call. When the recipient picks up the phone, the conversation begins.

Looking at things from the other end, when a caller somewhere in the world wishes to reach you, the caller picks up a telephone and dials a number known as a DID that is assigned to you by a provider with whom you have established service. When the provider receives the call to your DID, it routes the call to your PBX based upon destination information you established with the provider. Your PBX receives the call with information identifying the DID of the call as well as the CallerID name and number of the caller. An Inbound Route on your PBX then determines where to send the call based upon that DID and CallerID information. Typically, a call is routed to an Extension, a group of Extensions known as a Ring Group, or an IVR or AutoAttendant giving the caller choices on routing the call to the desired destination. Once the call is routed to an Extension, the PBX rings the phone registered to that Extension. When you pick up the phone, the conversation begins.

Configuring Trunks with Incredible PBX GUI

Perhaps the most difficult component to configure in the PBX is the Trunk. Almost every provider has a different way of doing things. We’ve taken some of the torture out of the exercise by providing a script which will configure settings for dozens of providers in seconds. Once installed, all you need to do is edit the desired Trunk (Connectivity:Trunks), change the Disable Trunk entry to No, and insert your credentials in both the PEER Details and Registration string of the SIP Settings Outgoing and Incoming tabs. Skyetel is enabled by default and needs no setup on the PBX side.

Configuring Skyetel for Incredible PBX 2021

If you’ve decided to go with Skyetel, here’s the drill. Sign up for Skyetel service and take advantage of the Nerd Vittles specials. First, complete the Prequalification Form here. You then will be provided a link to the Skyetel site to complete your registration. Once you have registered on the Skyetel site and your account has been activated, open a support ticket and request the $10 credit for your account by referencing the Nerd Vittles special offer. Once you are satisfied with the service, fund your account as desired, and Skyetel will match your deposit of up to $250 simply by opening another ticket. That gets you up to $500 of half-price calling. Credit is limited to one per person/company/address/location. Effective 10/1/2023, $25/month minimum spend required.

Skyetel does not use SIP registrations to make connections to your PBX. Instead, Skyetel utilizes Endpoint Groups to identify which servers can communicate with the Skyetel service. An Endpoint Group consists of a Name, an IP address, a UDP or TCP port for the connection, and a numerical Priority for the group. For incoming calls destined to your PBX, DIDs are associated with an Endpoint Group to route the calls to your PBX. For outgoing calls from your PBX, a matching Endpoint Group is required to authorize outbound calls through the Skyetel network. Thus, the first step in configuring the Skyetel side for use with your PBX is to set up an Endpoint Group. Here’s a typical setup for Incredible PBX 2021:

  • Name: MyPBX
  • Priority: 1
  • IP Address: PBX-Public-IP-Address
  • Port: 5060
  • Protocol: UDP
  • Description: my.incrediblepbx.com

To receive incoming PSTN calls, you’ll need at least one DID. On the Skyetel site, you acquire DIDs under the Phone Numbers tab. You have the option of Porting in Existing Numbers (free for the first 60 days after you sign up for service) or purchasing new ones under the Buy Phone Numbers menu option.

Once you have acquired one or more DIDs, navigate to the Local Numbers or Toll Free Numbers tab and specify the desired SIP Format and Endpoint Group for each DID. Add SMS/MMS and E911 support, if desired. Call Forwarding and Failover are also supported. That completes the VoIP setup on the Skyetel side. System Status is always available here.

Configuring VoIP.ms for Incredible PBX 2021

To sign up for VoIP.ms service, may we suggest you use our signup link so that Nerd Vittles gets a referral credit for your signup. Once your account is set up, you’ll need to set up a SIP SubAccount and, for Authentication Type, choose Static IP Authentication and enter your Incredible PBX 2021 server’s public IP address. For Transport, choose UDP. For Device Type, choose Asterisk, IP PBX, Gateway or VoIP Switch. Order a DID in their web panel, and then point the DID to the SubAccount you just created. Be sure to specify atlanta1.voip.ms as the POP from which to receive incoming calls. In the Incredible PBX GUI, be sure to enable the VoIP.ms trunk.

Configuring V1VoIP for Incredible PBX 2021

To sign up for V1VoIP service, sign up on their web site. Then login to your account and order a DID under the DIDs tab. Once the DID has been assigned, choose View DIDs and click on the Forwarding button beside your DID. For Option #1, choose Forward to IP Address/PBX. For the Forwarding Address, enter the public IP address of your server. For the T/O (timeout) value, set it to 2o seconds. Then click the Update button. Under the Termination tab, create a new Endpoint with the public IP address of your server so that you can place outbound calls through V1VoIP. In the Incredible PBX GUI, be sure to enable all of the V1VoIP trunks.

Configuring Anveo Direct for Incredible PBX 2021

To sign up for Anveo Direct service, sign up on their web site and then login. After adding funds to your account, purchase a DID under Inbound Service -> Order DID. Next, choose Configure Destination SIP Trunk. Give the Trunk a name. For the Primary SIP URI, enter $[E164]$@server-IP-address. For Call Options, select your new DID from the list. You also must whitelist your public IP address under Outbound Service -> Configure. Create a new Call Termination Trunk and name it to match your server. For Dialing Prefix, choose six alphanumeric characters beginning with a zero. In Authorized IP Addresses, enter the public IP address of your server. Set an appropriate rate cap. We like $0.01 per minute to be safe. Set a concurrent calls limit. We like 2. For the Call Routing Method, choose Least Cost unless you’re feeling extravagant. For Routes/Carriers, choose Standard Routes. Write down your Dialing Prefix and then click the Save button.

Before you can make outbound calls through Anveo Direct from your PBX, you first must configure the Dialing Prefix that you wrote down in the previous step. Log into the GUI as admin using a web browser and edit the Anveo-Out trunk in Connectivity -> Trunks. Enable the Trunk. Then click on the custom-Settings tab and replace anveo-pin with your actual Dialing Prefix. Click Submit and Apply Config to complete the setup. In the Incredible PBX GUI, be sure to enable all of the remaining Anveo trunks.

By default, incoming Anveo Direct calls will be processed by the Default inbound route on your PBX. If you wish to redirect incoming Anveo Direct calls using DID-specific inbound routes, then you’ve got a bit more work to do. In addition to creating the inbound route using the 11-digit Anveo Direct DID, enter the following commands after logging into your server as root using SSH/Putty:

cd /etc/asterisk
echo "[from-anveo]" >> extensions_custom.conf
echo "exten => _.,1,Ringing" >> extensions_custom.conf
echo "exten => _.,n,Goto(from-trunk,\\${SIP_HEADER(X-anveo-e164)},1)" >> extensions_custom.conf
asterisk -rx "dialplan reload"

Configuring Extensions with Incredible PBX GUI

Extensions are created using the Incredible PBX GUI: Applications:Extensions. Many SIP phones expect extensions to communicate on UDP port 5060. If this is the case with your SIP phone or softphone, then always create Chan_SIP extensions which communicate on UDP 5060. If your SIP phone or softphone provide port flexibility, then you have a choice in the type of SIP extension to create: Chan_SIP or the more versatile PJSIP (UDP 5061). Just remember to always configure SIP extensions with NAT Mode=YES in the Advanced tab. If your VoIP phones or softphones support IAX connectivity, you may wish to consider IAX extensions which avoid NAT problems.

When you create a new Extension, a new entry is automatically created in the PBX Internal Directory. If you wish to allow individual users to manage their extensions or use the WebRTC softphone, then you will also have to create a (very) secure password for User Control Panel (UCP) access. Choose Admin:User Management and click on the key icon of the desired extension to assign a password for UCP and WebRTC access.

Configuring a Desktop Softphone for Incredible PBX

We’re in the home stretch now. You can connect virtually any kind of telephone to your new PBX. Plain Old Phones require an analog telephone adapter (ATA) which can be a separate board in your computer from a company such as Digium. Or it can be a standalone SIP device such as ObiHai’s OBi100 or OBi110 (if you have a phone line from Ma Bell to hook up as well). SIP phones can be connected directly so long as they have an IP address. These could be hardware devices or software devices such as the YateClient softphone. We’ll start with a free one today so you can begin making calls. You can find dozens of recommendations for hardware-based SIP phones both on Nerd Vittles and the PIAF Forum when you’re ready to get serious about VoIP telephony.

We recommend YateClient for Windows which is free. Download it from here. Run YateClient once you’ve installed it and enter the credentials for the 701 extension on Incredible PBX. You can find them by running /root/show-passwords. You’ll need the IP address of your server plus your extension 701 password. In the YateClient, fill in the blanks using the IP address of your Server, 701 for your Username, and whatever Password was assigned to the extension when you installed Incredible PBX. Click OK to save your entries.

Once you are registered to extension 701, close the Account window. Then click on YATE’s Telephony Tab and place some test calls to the numerous apps that are preconfigured on Incredible PBX. Dial a few of these to get started:

DEMO - Apps Demo
123 - Reminders
947 - Weather by ZIP Code
951 - Yahoo News
TODAY - Today in History
LENNY - The Telemarketer's Worst Nightmare

If you are a Mac user, another great no-frills softphone is Telephone. Just download and install it from the Mac App Store. For Android users, check out the terrific new VitalPBX Communicator. Works flawlessly with Incredible PBX.

Configuring a Softphone Extension on a Smartphone

Adding an Incredible PBX extension to your smartphone gets a little trickier. Whether you’re an iPhone or Android lover, all smartphones use batteries, and you don’t want to drain your battery by running a softphone as a foreground app all the time. Fortunately, you now have some choices in softphones engineered to work without draining your battery. While they all cost money, it’s not much money. We’ve written about all the choices, and you’ll find the links in our Softphone Provider Recommendations on the new Incredible PBX Wiki.

With PJsip extensions, you’re not limited to a single phone connection at a time, and we’ve preconfigured extension 701 to support five simultaneous connections. The setup on the softphone side is simple. For the server, enter the actual IP address of your PBX in the following format: 22.33.44.55:5061. Then enter 701 for the username and enter the password assigned to the 701 extension on your PBX. When an incoming call arrives, all the phones registered to extension 701 will ring simultaneously. Simply answer the call on the phone that is most convenient.

Configuring Outbound Routes in Incredible PBX GUI

Outbound Routes serve a couple of purposes. First, they assure that calls placed by users of your PBX are routed out through an appropriate trunk to reach their destination in the least costly manner. Second, they serve as a security mechanism by either blocking or restricting certain calls by requiring a PIN to complete the calls. Never authorize recurring charges on credit cards registered with your VoIP providers and, if possible, place pricing limits on calls with your providers. If a bad guy were to break into your PBX, you don’t want to give the intruder a blank check to make unauthorized calls. And you certainly don’t want to join the $100,000 Phone Bill Club.

To create outbound routes in the Incredible PBX GUI, navigate to Connectivity:Outbound Routes and click Add Outbound Route. In the Route Settings tab, give the Outbound Route a name and choose one or more trunks to use for the outbound calls. In the Dial Patterns tab, specify the dial strings that must be matched to use this Outbound Route. NXXNXXXXXX would require only 10-digit numbers with the first and fourth digits being a number between 2 and 9. Note that Outbound Routes are searched from the top entry to the bottom until there is a match. Make certain that you order your routes correctly and then place test calls watching the Asterisk CLI to make sure the calls are routed as you intended.

Configuring Inbound Routes in Incredible PBX GUI

Inbound Routes, as the name implies, are used to direct incoming calls to a specific destination. That destination could be an extension, a ring group, an IVR or AutoAttendant, or even a conference or DISA extension to place outbound calls (hopefully with a very secure password). Inbound Routes can be identified by DID, CallerID number, or both. To create Inbound Routes, choose Connectivity:Inbound Routes and then click Add Inbound Route. Provide at least a Description for the route, a DID to be matched, and the Destination for the incoming calls that match. If you only want certain callers to be able to reach certain extensions, add a CallerID number to your matching criteria. You can add Call Recording and CallerID CNAM Lookups under the Other tab.

Audio Issues with Incredible PBX 2021

If you experience one-way or no audio on some calls, add your external IP address and LAN subnet in the GUI by navigating to Settings -> Asterisk SIP Settings. In the NAT Settings section, click Detect Network Settings. Click Submit and Apply Settings to save your changes.

Security Considerations with Incredible PBX 2021

Incredible PBX 2021 includes a rock-solid firewall that limits access to preferred providers and individuals whose IP addresses you have whitelisted. Unfortunately, this may not insulate your server from FreePBX 15 irregularities if, in fact, Sangoma’s signing key was compromised in the October 2020 Ransomware Attack. Sangoma either doesn’t know or isn’t telling. Keep in mind that Sangoma didn’t mention the October breach either until someone else exposed it. Sangoma’s latest press release is available here.

The good news is Incredible PBX 2020 and 2021 platforms include a unique ClearlyIP feature that lets us manage which modules and versions can be installed. It works exactly like what ClearlyIP has documented in their must-read blog post, and we’ve built a locked version that rolls back all of the modules to dates before the Sangoma breach. The good news is, with Incredible PBX, you don’t have to jump through all the hoops covered in the ClearlyIP article to fully insulate your server from the Ransomware breach. We’ve done the work for you.

For those with mission-critical platforms, we’d recommend immediate implementation of what follows. For everyone else, it’s your choice whether to wait and see if there is a breach of the signing certificate with malicious modules. If you opt to wait and see, MAKE FREQUENT BACKUPS.

Here’s how to roll back all of your modules to dates before the breach. Login to the FreePBX GUI as admin and navigate to Settings > Advanced Settings. Drop down to the Lock Version field and change 15.19.11.001 to 15.19.11.003. Save your changes and reload your dialplan. Then use Module Admin to roll back any installed modules that are newer than the safe versions shown.

Our extra special thanks goes to Tony Lewis and the ClearlyIP team for providing this invaluable resource. Somehow we knew it would come in handy sooner or later. Unfortunately, that day has come.

Adding Incredible PBX 2021 to an OpenVPN Network

We previously have documented the procedure for creating an OpenVPN server as well as OpenVPN client templates (.ovpn). If you need a refresher, the tutorial is here. To add your Incredible PBX 2021 server to an existing OpenVPN network, begin by creating an incrediblepbx2021.ovpn template on your OpenVPN server. Be sure to comment out or delete the setenv line in the template. Then copy this template to /etc on your Incredible PBX 2021 server. Next, issue the following commands to put the remaining pieces in place:

cp -p /root/openvpn-start /etc/.
echo "[Unit]
Description=openvpn2021
ConditionPathExists=/etc/openvpn-start
After=rclocal.service
[Service]
Type=forking
ExecStart=/etc/openvpn-start /etc/incrediblepbx2021.ovpn
TimeoutSec=0
StandardOutput=tty
RemainAfterExit=yes
PermissionsStartOnly=true
SysVStartPriority=99
[Install]
WantedBy=multi-user.target" > /etc/systemd/system/openvpn2021.service

Finally, enable the new openvpn2021.service and reboot your server. The OpenVPN IP address should now appear on the LAN line in pbxstatus:

systemctl enable openvpn2021.service
reboot

Incredible PBX 2021 Administration

We’ve eased the pain of administering your new PBX with a collection of scripts which you will find in the /root folder after logging in with SSH or Putty. Here’s a quick summary of what each of the scripts does.

add-fqdn is used to whitelist a fully-qualified domain name in the firewall. Because Incredible PBX 2021 blocks all traffic from IP addresses that are not whitelisted, this is what you use to authorize an external user for your PBX. The advantage of an FQDN is that you can use a dynamic DNS service to automatically update the IP address associated with an FQDN so that you never lose connectivity.

add-ip is used to whitelist a public IP address in the firewall. See the add-fqdn explanation as to why this matters.

del-acct is used to remove an IP address or FQDN from the firewall’s whitelist.

admin-pw-change is used to set the admin password for access to the FreePBX/Incredible PBX web GUI using a browser pointed to the local IP address of your server.

apache-pw-change is used to set the admin password for access to Apache/Incredible PBX apps including AsteriDex and Reminders. This provides a password layer of protection for access to these applications.

avantfax-email-change is used to change the destination email address for incoming faxes.

avantfax-pw-change is used to change your admin password for the AvantFax web console.

iaxmodem-restart is used to restart the modems used to send and deliver faxes. The pbxstatus display will tell you whether the IAXmodems are down.

incrediblebackup2021 makes a backup of critical components on your PBX to a tarball saved in /backup. This should be copied to safe location off-site for a rainy day.

incrediblerestore2021 restores a backup file which has been copied to the /backup folder.

ipchecker is a script which deciphers the public IP addresses associated with whitelisted FQDNs created with add-fqdn on your server. If any of the addresses have changed, the firewall is restarted after updating the IP addresses. By default, it is executed every 10 minutes by /etc/crontab.

licenses.sh displays the license associated with each of the FreePBX modules on your server.

logos-b-gone removes proprietary artwork from your PBX and is no longer necessary with the included IncrediblePBX FreePBX module.

mime-construct is a command-line utility to send emails with attachments.

neorouter-login is a script to add your PBX to a NeoRouter VPN. Tutorial here.

odbc-gen.sh is a script that was run to generate the ODBC settings for Asterisk. Do NOT use it.

openvpn-start is a script to add your PBX to an existing OpenVPN network using an .ovpn config file. Tutorial here.

pbxstatus displays status of all major components of Incredible PBX 2021.

pptp-install is a script to create a PPTP network connection for your PBX. Tutorial here.

purge-cdr-cel-records removes all CDR and CEL records from the MySQL database.

reset-conference-pins is a script that automatically and randomly resets the user and admin pins for access to the preconfigured conferencing application. Dial C-O-N-F from any registered SIP phone to connect to the conference.

reset-extension-passwords is a script that automatically and randomly resets ALL of the SIP passwords for extensions 701-705. Be careful using this one, or you may disable existing registered phones and cause Fail2Ban to blacklist the IP addresses of those users. HINT: You can place a call to the Ring Group associated with all five extensions by dialing 777.

reset-reminders-pin is a script that automatically and randomly resets the pin required to access the Telephone Reminders application by dialing 123. It’s important to protect this application because a nefarious user could set up a reminder to call a number anywhere in the world assuming your SIP provider’s account was configured to allow such calls.

show-feature-codes is a cheat sheet for all of the feature codes which can be dialed from any registered SIP phone. It documents how powerful a platform Incredible PBX 2021 actually is. A similar listing is available in the GUI at Admin -> Feature Codes.

show-passwords is a script that displays most of the passwords associated with Incredible PBX 2021. This includes SIP extension passwords, voicemail pins, conference pins, telephone reminders pin, and your Anveo Direct outbound calling pin (if configured). Note that voicemail pins are configured by the user of a SIP extension the first time the user accesses the voicemail system by dialing *97.

sig-fix disables Module Signature Checking in the FreePBX GUI. This should not be necessary unless you have added or edited FreePBX Modules with missing module signatures.

sms-skyetel is a script to send SMS messages using a Skyetel trunk.

sms-voip.ms is a script to send SMS messages using a VoIP.ms trunk.

sms-blast, sms-blaster, and sms-dictator are scripts for message blasting. Tutorial here.

switch-to-php5.6 is a script to disable PHP 7.3 and set PHP 5.6 as the default version for your PBX. PHP 5.6 is required to use AvantFax. It is the default configuration for Incredible PBX 2021. The current default PHP version is displayed in the Apache listing of pbxstatus.

switch-to-php7.3 is a script to disable PHP 5.6 and set PHP 7.3 as the default version for your PBX. You cannot use AvantFax when PHP 7.3 is the default.

timezone-setup is a script to set the timezone for your PBX.

update-IncrediblePBX is a script that runs the Automatic Update Utility whenever you login to your server as root. These updates typically resolve bugs and security issues with your PBX. Do NOT remove it.

upgrade-asterisk16 is a script that runs on Asterisk 16 platforms to upgrade your PBX to the latest release of Asterisk 16.

upgrade-asterisk18 is a script that runs on both Asterisk 16 and 18 platforms to upgrade your PBX to the latest release of Asterisk 18.

wolfram is a script to deploy Wolfram Alpha on your PBX. Tutorial here.

Forwarding Calls to Your Cellphone. Keep in mind that inbound calls to your DIDs automatically ring all five SIP extensions, 701-705. The easiest way to also ring your cellphone is to set one of these five extensions to forward incoming calls to your cellphone. After logging into your PBX as root, issue the following command to forward calls from extension 705 to your cellphone: asterisk -rx "database put CF 705 6781234567"

To remove call forwarding: asterisk -rx "database del CF 705"

Keeping FreePBX 15 Modules Current

We strongly recommend that you periodically update all of your FreePBX modules to eliminate bugs and to reduce security vulnerabilities. From the Linux CLI, log into your server as root and issue the following commands:

rm -f /tmp/*
fwconsole ma upgradeall
fwconsole reload
/root/sig-fix
systemctl restart apache2
/root/sig-fix


Originally published: Tuesday, January 26, 2021


Need help with Asterisk? Visit the VoIP-info Forum.


Special Thanks to Our Generous Sponsors


FULL DISCLOSURE: ClearlyIP, Skyetel, Vitelity, DigitalOcean, Vultr, VoIP.ms, 3CX, Sangoma, TelecomsXchange and VitalPBX have provided financial support to Nerd Vittles and our open source projects through advertising, referral revenue, and/or merchandise. As an Amazon Associate and Best Buy Affiliate, we also earn from qualifying purchases. We’ve chosen these providers not the other way around. Our decisions are based upon their corporate reputation and the quality of their offerings and pricing. Our recommendations regarding technology are reached without regard to financial compensation except in situations in which comparable products at comparable pricing are available from multiple sources. In this limited case, we support our sponsors because our sponsors support us.

BOGO Bonaza: Enjoy state-of-the-art VoIP service with a $10 credit and half-price SIP service on up to $500 of Skyetel trunking with free number porting when you fund your Skyetel account. No limits on number of simultaneous calls. Quadruple data center redundancy. $25 monthly minimum spend required. Tutorial and sign up details are here.

The lynchpin of Incredible PBX 2020 and beyond is ClearlyIP components which bring management of FreePBX modules and SIP phone integration to a level never before available with any other Asterisk distribution. And now you can configure and reconfigure your new Incredible PBX phones from the convenience of the Incredible PBX GUI.

VitalPBX is perhaps the fastest-growing PBX offering based upon Asterisk with an installed presence in more than 100 countries worldwide. VitalPBX has generously provided a customized White Label version of Incredible PBX tailored for use with all Incredible PBX and VitalPBX custom applications. Follow this link for a free test drive!
 

Special Thanks to Vitelity. Vitelity is now Voyant Communications and has halted new registrations for the time being. Our special thanks to Vitelity for their unwavering financial support over many years and to the many Nerd Vittles readers who continue to enjoy the benefits of their service offerings. We will keep everyone posted on further developments.


5 Minutes to Paradise: Incredible PBX in the Cloud for $25/Yr.


We’ve been building turnkey Incredible PBX® servers for virtual machine platforms for many years. Because the servers are built from images, typical install times have been 5 minutes or less with Proxmox, VirtualBox, and VMware ESXi. But the missing piece has always been a similar image install on a true cloud-based platform. This limitation was primarily due to the fact that we don’t own or control the available cloud platforms which typically limit image installs to operating systems such as CentOS, Debian, Ubuntu, and Windows.

Today we have more very good news. Our favorite low-cost hosting provider, Crown Cloud,1 has agreed to offer 5-minute turnkey installs of Incredible PBX 2020 for CentOS and Incredible PBX 2021 for Debian at a jaw-dropping $25 a year. You’ll have a fully-functioning, production-ready KVM platform including a free snapshot with 1GB RAM, 20GB SSD storage, and 1TB of monthly bandwidth in your choice of server locations including Los Angeles and Atlanta in the United States as well as Germany and the Netherlands in Europe. And, unlike all of the other Asterisk® aggregations, Incredible PBX still provides a source code-based platform that can be tailored to meet any special requirements you may need.

We don’t make a nickel on this deal so consider this our special thanks to all of our loyal fans.

Here are the links to sign up for the service and take advantage of these Incredible PBX deals:

UPDATE: 2GB/40GB KVM plans have now been released.

When you sign up for the service, choose any operating system as your default install. Then open a support ticket and request either the Incredible PBX 2020 for CentOS image or the Incredible PBX 2021 for Debian image be added into your template list of available operating systems. Once your server comes on line, open your CrownPanel and choose Reinstall and select Incredible PBX from either the available CentOS or Debian options. In less than 5 minutes, your server will be ready for you to login. Be sure to use SSH and NOT the VNC utility included in CrownPanel. This will assure that your desktop machine’s IP address gets whitelisted in the Incredible PBX firewall. Once you login, the Incredible PBX configurator will prompt you to set passwords for root login, admin login to FreePBX, and admin login credentials for Apache to access AsteriDex and Reminders. After a reboot to initialize your SSH keys, you’ll be ready to go. Add a trunk provider and a softphone, or Incredible PBX SIP phone, or GTI cell phone, and your PBX is fully operational. Check out the CrownCloud Wiki.


Planning Ahead for That Rainy Day

One of our favorite features of Crown Cloud is the free snapshot (a.k.a. backup) at no additional charge. We recommend you take snapshots regularly as you make major changes in your server’s configuration. In this way, if something comes unglued, you can easily restore the snapshot and never miss a beat. You’ll find the Remote Snapshot option in your CrownPanel menu.

Configuring Skyetel for Incredible PBX

If you’ve decided to go with Skyetel, here’s the drill. Sign up for Skyetel service and take advantage of the Nerd Vittles specials. First, complete the Prequalification Form here. You then will be provided a link to the Skyetel site to complete your registration. Once you have registered on the Skyetel site and your account has been activated, open a support ticket and request the $10 credit for your account by referencing the Nerd Vittles special offer. Once you are satisfied with the service, fund your account as desired, and Skyetel will match your deposit of up to $250 simply by opening another ticket. That gets you up to $500 of half-price calling. Credit is limited to one per person/company/address/location. Effective 10/1/2023, $25/month minimum spend required.

Skyetel does not require SIP registrations to make connections to your PBX. Instead, Skyetel can use Endpoint Groups to identify which servers can communicate with the Skyetel service. An Endpoint Group consists of a Name, an IP address, a UDP or TCP port for the connection, and a numerical Priority for the group. For incoming calls destined to your PBX, DIDs are associated with an Endpoint Group to route the calls to your PBX. For outgoing calls from your PBX, a matching Endpoint Group is required to authorize outbound calls through the Skyetel network. Thus, the first step in configuring the Skyetel side for use with your PBX is to set up an Endpoint Group. Here’s a typical setup for Incredible PBX:

  • Name: MyPBX
  • Priority: 1
  • IP Address: PBX-Public-IP-Address
  • Port: 5060
  • Protocol: UDP
  • Description: my.incrediblepbx.com

To receive incoming PSTN calls, you’ll need at least one DID. On the Skyetel site, you acquire DIDs under the Phone Numbers tab. You have the option of Porting in Existing Numbers (free for the first 60 days after you sign up for service) or purchasing new ones under the Buy Phone Numbers menu option.

Once you have acquired one or more DIDs, navigate to the Local Numbers or Toll Free Numbers tab and specify the desired SIP Format and Endpoint Group for each DID. Add SMS/MMS and E911 support, if desired. Call Forwarding and Failover are also supported. That completes the VoIP setup on the Skyetel side. System Status is always available here.

Configuring ClearlyIP SIP Trunking

For the tightest integration with FreePBX, no SIP provider holds a candle to Incredible PBX SIP Trunking with ClearlyIP. The reason is fairly obvious. The ClearlyIP folks were the original developers of FreePBX. In addition to all of the traditional SIP trunking services, you also get CNAM support and state-of-the-art E911 service which can be deployed in full compliance with Kari’s Law and the Ray Baum Act. If you’re a system integrator and don’t know about your financial liability for failure to comply with the new rules, it’s time to do some reading.

Configuring VoIP.ms for Incredible PBX

To sign up for VoIP.ms service, may we suggest you use our signup link so that Nerd Vittles gets a referral credit for your signup. Once your account is set up, you’ll need to set up a SIP SubAccount and, for Authentication Type, choose Static IP Authentication and enter your Incredible PBX server’s public IP address. For Transport, choose UDP. For Device Type, choose Asterisk, IP PBX, Gateway or VoIP Switch. Order a DID in their web panel, and then point the DID to the SubAccount you just created. Be sure to specify atlanta1.voip.ms as the POP from which to receive incoming calls. In the Incredible PBX GUI, be sure to enable the VoIP.ms trunk.

Configuring V1VoIP for Incredible PBX

To sign up for V1VoIP service, sign up on their web site. Then login to your account and order a DID under the DIDs tab. Once the DID has been assigned, choose View DIDs and click on the Forwarding button beside your DID. For Option #1, choose Forward to IP Address/PBX. For the Forwarding Address, enter the public IP address of your server. For the T/O (timeout) value, set it to 2o seconds. Then click the Update button. Under the Termination tab, create a new Endpoint with the public IP address of your server so that you can place outbound calls through V1VoIP. In the Incredible PBX GUI, be sure to enable all of the V1VoIP trunks.

Configuring Anveo Direct for Incredible PBX

To sign up for Anveo Direct service, sign up on their web site and then login. After adding funds to your account, purchase a DID under Inbound Service -> Order DID. Next, choose Configure Destination SIP Trunk. Give the Trunk a name. For the Primary SIP URI, enter $[E164]$@server-IP-address. For Call Options, select your new DID from the list. You also must whitelist your public IP address under Outbound Service -> Configure. Create a new Call Termination Trunk and name it to match your server. For Dialing Prefix, choose six alphanumeric characters beginning with a zero. In Authorized IP Addresses, enter the public IP address of your server. Set an appropriate rate cap. We like $0.01 per minute to be safe. Set a concurrent calls limit. We like 2. For the Call Routing Method, choose Least Cost unless you’re feeling extravagant. For Routes/Carriers, choose Standard Routes. Write down your Dialing Prefix and then click the Save button.

Before you can make outbound calls through Anveo Direct from your PBX, you first must configure the Dialing Prefix that you wrote down in the previous step. Log into the GUI as admin using a web browser and edit the Anveo-Out trunk in Connectivity -> Trunks. Enable the Trunk. Then click on the custom-Settings tab and replace anveo-pin with your actual Dialing Prefix. Click Submit and Apply Config to complete the setup. In the Incredible PBX GUI, be sure to enable all of the remaining Anveo trunks.

By default, incoming Anveo Direct calls will be processed by the Default inbound route on your PBX. If you wish to redirect incoming Anveo Direct calls using DID-specific inbound routes, then you’ve got a bit more work to do. In addition to creating the inbound route using the 11-digit Anveo Direct DID, enter the following commands after logging into your server as root using SSH/Putty:

cd /etc/asterisk
echo "[from-anveo]" >> extensions_custom.conf
echo "exten => _.,1,Ringing" >> extensions_custom.conf
echo "exten => _.,n,Goto(from-trunk,\\${SIP_HEADER(X-anveo-e164)},1)" >> extensions_custom.conf
asterisk -rx "dialplan reload"

Configuring a SIP Phone for Incredible PBX

We’re in the home stretch now. You can connect virtually any kind of telephone to your new PBX. Plain Old Phones require an analog telephone adapter (ATA) which is a standalone SIP device such as ObiHai’s OBi100 or OBi110 (if you have a phone line from Ma Bell to hook up as well). SIP phones can be connected directly so long as they have an IP address. We obviously recommend the Incredible PBX IP phones from ClearlyIP which are the most versatile.

If you’ve been keeping up with recent Nerd Vittles developments, then you already know that we have just introduced a new Cellular Phone which connects directly to your PBX and serves as a perfect remote extension and traveling companion. You can read all about it here.

Software devices such as the YateClient softphone are another option for desktop machines. We’ll start with a free one today so you can begin making calls. You can find dozens of recommendations for hardware-based SIP phones both on Nerd Vittles and the VoIP-Info.org Forum when you’re ready to get serious about VoIP telephony.

We recommend YateClient for Windows which is free. Download it from here. Run YateClient once you’ve installed it and enter the credentials for the 701 extension on Incredible PBX. You can find them by running /root/show-passwords. You’ll need the IP address of your server plus your extension 701 password. In the YateClient, fill in the blanks using the IP address of your Server, 701 for your Username, and whatever Password was assigned to the extension when you installed Incredible PBX. Click OK to save your entries.

Once you are registered to extension 701, close the Account window. Then click on YATE’s Telephony Tab and place some test calls to the numerous apps that are preconfigured on Incredible PBX. Dial a few of these to get started:

DEMO - Apps Demo
123 - Reminders
947 - Weather by ZIP Code
951 - Yahoo News
TODAY - Today in History
LENNY - The Telemarketer's Worst Nightmare

If you are a Mac user, another great no-frills softphone is Telephone. Just download and install it from the Mac App Store. For Android users, check out the terrific new VitalPBX Communicator. Works flawlessly with Incredible PBX.

For smartphone solutions, visit the Incredible PBX Wiki for our softphone recommendations.

Configuring SendMail with Incredible PBX

In order to receive voicemails by email delivery, outbound mail functionality from your server obviously is required. We strongly recommend configuring SendMail using either your ISP or Gmail as an SMTP Relay Host. NOTE: If you are using a Gmail account with 2-step verification enabled, you MUST use a Gmail App Key instead of your Gmail account password. You also must enable Less Secure Apps access to the Gmail account.

Configuring a Gmail account with Incredible PBX 2021 is as simple as entering your Gmail credentials. Just run this script: /root/enable-gmail-smarthost-for-sendmail.

Here are the steps using a Gmail account with Incredible PBX 2020:

cd /etc/mail
yum -y install sendmail-cf
hostname -f > genericsdomain
touch genericstable
cd /usr/bin
rm -f makemap
ln -s ../sbin/makemap.sendmail makemap
cd /etc/mail
makemap -r hash genericstable.db < genericstable
mv sendmail.mc sendmail.mc.original
wget http://incrediblepbx.com/sendmail.mc.gmail
cp sendmail.mc.gmail sendmail.mc
mkdir -p auth
chmod 700 auth
cd auth
echo AuthInfo:smtp.gmail.com \\"U:smmsp\\" \\"I:user_id\\" \\"P:password\\" \\"M:PLAIN\\" > client-info
echo AuthInfo:smtp.gmail.com:587 \\"U:smmsp\\" \\"I:user_id\\" \\"P:password\\" \\"M:PLAIN\\" >> client-info
echo AuthInfo:smtp.gmail.com:465 \\"U:smmsp\\" \\"I:user_id\\" \\"P:password\\" \\"M:PLAIN\\" >> client-info
# Stop here and edit client-info (nano -w client-info) in all three lines.
# Replace  user_id with your gMail account name without @gmail.com
# Replace password with your real gMail password OR
#  use your Gmail App Key if 2-step verification is enabled
# Be sure to replace the double-quotes shown above if they don't appear in the file!!!
# Save your changes (Ctrl-X, Y, then Enter)
chmod 600 client-info
makemap -r hash client-info.db < client-info
cd ..
make
systemctl restart sendmail

Even though these servers are hosted in the cloud, we still recommend using a SmartHost to minimize email delivery problems.

Test outbound mail using this command with your actual email address:

echo "test" | mail -s testmessage yourname@youremaildomain.com

On some implementations, you may notice in the FreePBX GUI that the mail queue has failed. Here's the fix:

chmod 777 /var/spool/mqueue
service sendmail restart

Once you are sure your emails are being delivered reliably, here's a sample GUI voicemail configuration for an extension:


Incredible PBX Administration

We've eased the pain of administering your new PBX with a collection of scripts which you will find in the /root folder after logging in with SSH or Putty. Here's a quick summary of what each of the scripts does.

add-fqdn is used to whitelist a fully-qualified domain name in the firewall. Because Incredible PBX blocks all traffic from IP addresses that are not whitelisted, this is what you use to authorize an external user for your PBX. The advantage of an FQDN is that you can use a dynamic DNS service to automatically update the IP address associated with an FQDN so that you never lose connectivity.

add-ip is used to whitelist a public IP address in the firewall. See the add-fqdn explanation as to why this matters.

del-acct is used to remove an IP address or FQDN from the firewall's whitelist.

admin-pw-change is used to set the admin password for access to the FreePBX/Incredible PBX web GUI using a browser pointed to the local IP address of your server.

apache-pw-change is used to set the admin password for access to Apache/Incredible PBX apps including AsteriDex and Reminders. This provides a password layer of protection for access to these applications.

reset-conference-pins is a script that automatically and randomly resets the user and admin pins for access to the preconfigured conferencing application. Dial C-O-N-F from any registered SIP phone to connect to the conference.

reset-extension-passwords is a script that automatically and randomly resets ALL of the SIP passwords for extensions 701-705. Be careful using this one, or you may disable existing registered phones and cause Fail2Ban to blacklist the IP addresses of those users. HINT: You can place a call to the Ring Group associated with all five extensions by dialing 777.

reset-reminders-pin is a script that automatically and randomly resets the pin required to access the Telephone Reminders application by dialing 123. It's important to protect this application because a nefarious user could set up a reminder to call a number anywhere in the world assuming your SIP provider's account was configured to allow such calls.

show-feature-codes is a cheat sheet for all of the feature codes which can be dialed from any registered SIP phone. It documents how powerful a platform Incredible PBX actually is. A similar listing is available in the GUI at Admin -> Feature Codes.

show-passwords is a script that displays most of the passwords associated with Incredible PBX. This includes SIP extension passwords, voicemail pins, conference pins, telephone reminders pin, and your Anveo Direct outbound calling pin (if configured). Note that voicemail pins are configured by the user of a SIP extension the first time the user accesses the voicemail system by dialing *97.

update-asterisk16 is a script that updates your server to the very latest release of Asterisk 16. You can run it periodically to keep your server up to date with the latest and greatest features.

update-IncrediblePBX is the Automatic Update Utility which checks for server updates from incrediblepbx.com every time you log into your server as root using SSH or Putty. Do NOT disable it as it is used to load important fixes and security updates when necessary. We recommend logging into your server at least once a week.

pbxstatus (shown above) displays status of all major components of Incredible PBX.

Forwarding Calls to Your Cellphone. Keep in mind that inbound calls to your DIDs automatically ring all five SIP extensions, 701-705. The easiest way to also ring your cellphone is to set one of these five extensions to forward incoming calls to your cellphone. After logging into your PBX as root, issue the following command to forward calls from extension 705 to your cellphone: asterisk -rx "database put CF 705 6781234567"

To remove call forwarding: asterisk -rx "database del CF 705"

Getting Started with Incredible Fax

Believe it or not, there still are lots of folks that use faxes in their everyday lives. If you're one of them, Incredible PBX has your back. With Incredible PBX 2021, Incredible Fax is already installed. Simply set your email address for delivery of your faxes in PDF format, and you're all set: /root/avantfax-email-change. With Incredible PBX 2020, begin by logging into your server as root and running incrediblefax2020.sh to install HylaFax and AvantFax on your server. You'll be prompted a dozen or more times for information. Answer no to the secure fax question. For the rest of the prompts, just press ENTER to accept the default entries. Rebooting your server is required when the install finishes.

Once your server is back on line, there will be a new AvantFax tab in the GUI. The default credentials are admin:password. After you enter the username and password, you will be prompted to change your admin password. The old password is still password. Then enter your desired password twice and save the setting. The AvantFax dashboard then will display. If nothing has come unglued, you should see four green Idle icons:


You can Send Faxes from within AvantFax by choosing the Send Fax tab, or you can use one of many HylaFax clients. Google is your friend.

Keeping FreePBX 15 Modules Current

We strongly recommend that you periodically update all of your FreePBX modules to eliminate bugs and to reduce security vulnerabilities. From the Linux CLI, log into your server as root and issue the following commands:

rm -f /tmp/*
fwconsole ma upgradeall
fwconsole reload
/root/sig-fix
systemctl restart apache2
/root/sig-fix

Where To Go From Here

For a limited time, check out Lenny on our Atlanta demo server by dialing 404-999-0010.

Complete documentation on the ClearlyIP Devices Module is available here.

Complete documentation on the FreePBX GPL Modules is available here.

Complete documentation on the Incredible PBX additions is available here.

An introduction to configuring extensions, trunks, and routes is available here.

Free voicemail transcription with email delivery. Tutorial available here.

Setting Up a VPN for Your PBX: OpenVPN or NeoRouter
 

Originally published: Monday, July 6, 2020  Updated: Saturday, January 16, 2021


Need help with Asterisk? Visit the VoIP-info Forum.


Special Thanks to Our Generous Sponsors


FULL DISCLOSURE: ClearlyIP, Skyetel, Vitelity, DigitalOcean, Vultr, VoIP.ms, 3CX, Sangoma, TelecomsXchange and VitalPBX have provided financial support to Nerd Vittles and our open source projects through advertising, referral revenue, and/or merchandise. As an Amazon Associate and Best Buy Affiliate, we also earn from qualifying purchases. We’ve chosen these providers not the other way around. Our decisions are based upon their corporate reputation and the quality of their offerings and pricing. Our recommendations regarding technology are reached without regard to financial compensation except in situations in which comparable products at comparable pricing are available from multiple sources. In this limited case, we support our sponsors because our sponsors support us.

BOGO Bonaza: Enjoy state-of-the-art VoIP service with a $10 credit and half-price SIP service on up to $500 of Skyetel trunking with free number porting when you fund your Skyetel account. No limits on number of simultaneous calls. Quadruple data center redundancy. $25 monthly minimum spend required. Tutorial and sign up details are here.

The lynchpin of Incredible PBX 2020 and beyond is ClearlyIP components which bring management of FreePBX modules and SIP phone integration to a level never before available with any other Asterisk distribution. And now you can configure and reconfigure your new Incredible PBX phones from the convenience of the Incredible PBX GUI.

VitalPBX is perhaps the fastest-growing PBX offering based upon Asterisk with an installed presence in more than 100 countries worldwide. VitalPBX has generously provided a customized White Label version of Incredible PBX tailored for use with all Incredible PBX and VitalPBX custom applications. Follow this link for a free test drive!
 

Special Thanks to Vitelity. Vitelity is now Voyant Communications and has halted new registrations for the time being. Our special thanks to Vitelity for their unwavering financial support over many years and to the many Nerd Vittles readers who continue to enjoy the benefits of their service offerings. We will keep everyone posted on further developments.


  1. It has been reported that Norton AntiVirus currently gives a security alert on the Crown Cloud web site. Don't be alarmed. It's a false positive. []

Happy New Year: Introducing Incredible PBX 2021 for Debian

Shifting gears is never easy, and sometimes it takes ill-advised corporate blunders to move the needle. But IBM®’s decimation of the CentOS project last month coupled with the Sangoma® Ransomware fiasco were just the motivation we needed to shift into overdrive and explore alternatives for the Incredible PBX® 2021 project. After six beta releases, we are delighted to introduce Incredible PBX 2021 with ClearlyIP’s FreePBX® 15 module protection and your choice of either Asterisk® 16 or the Asterisk 18 LTS release.

Before we get started, we want to offer our special thanks to the many talented individuals on the VoIP-Info.org Forum and the ClearlyIP development team who helped to bring this open source product to fruition. Keep in mind that it was produced during this holiday season without missing a beat and in spite of 2020’s Covid-19 pandemic and the Sangoma® infamous security breach, the handling of which was so bad that we can’t muster enough tact to write about it. With Incredible PBX 2021, Sangoma Ransomware protection is available.


Setting Up a Debian Platform for Incredible PBX 2021

If you’re using on-premise hardware, begin by downloading the netinst ISO image of Debian 10 for amd64. Follow our previous tutorials for tips on installation with VirtualBox or VMware ESXi. If you’d prefer to experiment in the cloud for about a penny an hour, open an account at Vultr or Digital Ocean using our referral links that support the Nerd Vittles project. You’ll also get some free credit to try out the service. Then create a new $5/month Debian 10, 64-bit instance in your favorite city.

If you’re using other cloud platforms with a Debian 10 offering, we strongly recommend a KVM platform. Also be advised that all Debian 10 releases are not equal. So be sure to upgrade to the latest Debian 10 release before you proceed. Here are the steps:

apt-get update --allow-releaseinfo-change
apt-get upgrade
# GRUB prompt: install to /dev/vda
#  SSH prompt: keep local version
reboot

If your PBX is sitting behind a NAT-based router, you’ll need to redirect incoming UDP 5060-5061 and UDP 10000-20000 traffic to the private IP address of your server. This is required for all of the SIP providers included in the Incredible PBX 2021 build. Otherwise, all inbound calls will fail.

Installing Incredible PBX 2021 on Debian 10 Server

Once your Debian 10 platform is up and running, login as root using SSH or Putty. If you wish to use the default Asterisk 18 platform, issue the commands below to kick off the install. If you’d prefer to stick with Asterisk 16 for the time being and perhaps upgrade to Asterisk 18 later with the included upgrade script, then edit the script once you download it and change 18 to 16 in line 34 of the script before executing it.

wget http://incrediblepbx.com/IncrediblePBX2021.sh
chmod +x IncrediblePBX2021.sh
./IncrediblePBX2021.sh

At about 5 minutes into the install procedure, you’ll be prompted for your telephone country code. It’s 1 for Canada and the United States. Just before the install completes, you’ll be prompted to save your default IPtables setup. Once the installation completes, reboot and you should be good to go.

After you log back in following a reboot, check the version of Debian 10 in the pbxstatus display. If it’s less than 10.7, issue the following commands to bring your server up to Debian 10.10 or later, not Debian 11. Do NOT do this before the base install is finished, or Asterisk may fail to install properly.

apt-get update
apt-get upgrade -y

Next Steps with Incredible PBX 2021

Before you can manage your PBX through a web browser, you first will need to set the admin passwords for FreePBX, Apache web apps such as Reminders and AsteriDex, and AvantFax (if you are using Incredible Fax). These all can be set by logging into your server as root and issuing the following commands: admin-pw-change, apache-pw-change, and avantfax-pw-change. The AvantFax password can also be reset with a browser by first logging in as admin with a password of password.

Outbound mail functionality needs to be working so that you can receive voicemail messages and faxes by email. To prevent SPAM, most ISPs and ITSPs block messages from downstream mail servers. That would be you. The easiest way to resolve this is to configure SendMail using Gmail as an SMTP Smarthost. You obviously need a Gmail account to implement this and, if you have turned on two-factor authentication for your Gmail account, you also will need to obtain an App password for your Gmail account, and use that in lieu of your regular Gmail password when configuring SendMail. With your Gmail username and password in hand, log into your server as root and run: /root/enable-gmail-smarthost-for-sendmail.

If your Incredible PBX 2021 is hosted with a cloud provider, be advised that many providers do not include a swap file as part of their offering. FreePBX requires a swap file. To add one, issue this command after logging into your server as root: /root/create-swapfile-DO.

To correctly set the time on your PBX, run: /root/timezone-setup.

By default, the voicemail password for each of the configured extensions (701-705) is set to the extension number. This means the user will be prompted to set a voicemail password on the first login to voicemail for each extension. A phone must be registered to the actual extension to access its voicemail account. For example, once a phone is registered to extension 701, the voicemail setup can be accessed by dialing *98701.

If you want to send and receive faxes with Incredible PBX 2021, run the following script while logged into your server as root: /root/incrediblefax2020-debian10.sh. When prompted, accept all the defaults. Once the HylaFax and AvantFax components are installed, reboot your server. To send faxes, click on the AvantFax tab in the FreePBX GUI and enter your login credentials (default: admin/password). To receive incoming faxes once you have configured a trunk and DID for your PBX, login to the FreePBX GUI as admin. Navigate to Connectivity -> Inbound Routes. For each of your DIDs on which you wish to receive faxes, select the inbound route and click the Fax tab. Review the Default Inbound Route Fax settings for proper setup.

NOTE: If you get a database error when you attempt to access AvantFax from a web browser, log into your server as root and reinstall the AvantFax database: ./avantfax-db-replace.

Overview of the Initial Asterisk Setup Process

For those new to PBXs, here’s a two paragraph summary of how Voice over IP (VoIP) works. Phones connected to your PBX are registered with Extensions so that they can make and receive calls. When a PBX user picks up a phone and dials a number, an Outbound Route tells the PBX which Trunk to use to place the call based upon established dialing rules. Unless the dialed number is a local extension, a Trunk registered with some service provider accepts the call, and the PBX sends the call to that provider. The provider then routes the call to its destination where the recipient’s phone rings to announce the incoming call. When the recipient picks up the phone, the conversation begins.

Looking at things from the other end, when a caller somewhere in the world wishes to reach you, the caller picks up a telephone and dials a number known as a DID that is assigned to you by a provider with whom you have established service. When the provider receives the call to your DID, it routes the call to your PBX based upon destination information you established with the provider. Your PBX receives the call with information identifying the DID of the call as well as the CallerID name and number of the caller. An Inbound Route on your PBX then determines where to send the call based upon that DID and CallerID information. Typically, a call is routed to an Extension, a group of Extensions known as a Ring Group, or an IVR or AutoAttendant giving the caller choices on routing the call to the desired destination. Once the call is routed to an Extension, the PBX rings the phone registered to that Extension. When you pick up the phone, the conversation begins.

Configuring Trunks with Incredible PBX GUI

Perhaps the most difficult component to configure in the PBX is the Trunk. Almost every provider has a different way of doing things. We’ve taken some of the torture out of the exercise by providing a script which will configure settings for dozens of providers in seconds. Once installed, all you need to do is edit the desired Trunk (Connectivity:Trunks), change the Disable Trunk entry to No, and insert your credentials in both the PEER Details and Registration string of the SIP Settings Outgoing and Incoming tabs. Skyetel is enabled by default and needs no setup on the PBX side.

Configuring Skyetel for Incredible PBX 2021

If you’ve decided to go with Skyetel, here’s the drill. Sign up for Skyetel service and take advantage of the Nerd Vittles specials. First, complete the Prequalification Form here. You then will be provided a link to the Skyetel site to complete your registration. Once you have registered on the Skyetel site and your account has been activated, open a support ticket and request the $10 credit for your account by referencing the Nerd Vittles special offer. Once you are satisfied with the service, fund your account as desired, and Skyetel will match your deposit of up to $250 simply by opening another ticket. That gets you up to $500 of half-price calling. Credit is limited to one per person/company/address/location. Effective 10/1/2023, $25/month minimum spend required.

Skyetel does not use SIP registrations to make connections to your PBX. Instead, Skyetel utilizes Endpoint Groups to identify which servers can communicate with the Skyetel service. An Endpoint Group consists of a Name, an IP address, a UDP or TCP port for the connection, and a numerical Priority for the group. For incoming calls destined to your PBX, DIDs are associated with an Endpoint Group to route the calls to your PBX. For outgoing calls from your PBX, a matching Endpoint Group is required to authorize outbound calls through the Skyetel network. Thus, the first step in configuring the Skyetel side for use with your PBX is to set up an Endpoint Group. Here’s a typical setup for Incredible PBX 2021:

  • Name: MyPBX
  • Priority: 1
  • IP Address: PBX-Public-IP-Address
  • Port: 5060
  • Protocol: UDP
  • Description: my.incrediblepbx.com

To receive incoming PSTN calls, you’ll need at least one DID. On the Skyetel site, you acquire DIDs under the Phone Numbers tab. You have the option of Porting in Existing Numbers (free for the first 60 days after you sign up for service) or purchasing new ones under the Buy Phone Numbers menu option.

Once you have acquired one or more DIDs, navigate to the Local Numbers or Toll Free Numbers tab and specify the desired SIP Format and Endpoint Group for each DID. Add SMS/MMS and E911 support, if desired. Call Forwarding and Failover are also supported. That completes the VoIP setup on the Skyetel side. System Status is always available here.

Configuring VoIP.ms for Incredible PBX 2021

To sign up for VoIP.ms service, may we suggest you use our signup link so that Nerd Vittles gets a referral credit for your signup. Once your account is set up, you’ll need to set up a SIP SubAccount and, for Authentication Type, choose Static IP Authentication and enter your Incredible PBX 2021 server’s public IP address. For Transport, choose UDP. For Device Type, choose Asterisk, IP PBX, Gateway or VoIP Switch. Order a DID in their web panel, and then point the DID to the SubAccount you just created. Be sure to specify atlanta1.voip.ms as the POP from which to receive incoming calls. In the Incredible PBX GUI, be sure to enable the VoIP.ms trunk.

Configuring V1VoIP for Incredible PBX 2021

To sign up for V1VoIP service, sign up on their web site. Then login to your account and order a DID under the DIDs tab. Once the DID has been assigned, choose View DIDs and click on the Forwarding button beside your DID. For Option #1, choose Forward to IP Address/PBX. For the Forwarding Address, enter the public IP address of your server. For the T/O (timeout) value, set it to 2o seconds. Then click the Update button. Under the Termination tab, create a new Endpoint with the public IP address of your server so that you can place outbound calls through V1VoIP. In the Incredible PBX GUI, be sure to enable all of the V1VoIP trunks.

Configuring Anveo Direct for Incredible PBX 2021

To sign up for Anveo Direct service, sign up on their web site and then login. After adding funds to your account, purchase a DID under Inbound Service -> Order DID. Next, choose Configure Destination SIP Trunk. Give the Trunk a name. For the Primary SIP URI, enter $[E164]$@server-IP-address. For Call Options, select your new DID from the list. You also must whitelist your public IP address under Outbound Service -> Configure. Create a new Call Termination Trunk and name it to match your server. For Dialing Prefix, choose six alphanumeric characters beginning with a zero. In Authorized IP Addresses, enter the public IP address of your server. Set an appropriate rate cap. We like $0.01 per minute to be safe. Set a concurrent calls limit. We like 2. For the Call Routing Method, choose Least Cost unless you’re feeling extravagant. For Routes/Carriers, choose Standard Routes. Write down your Dialing Prefix and then click the Save button.

Before you can make outbound calls through Anveo Direct from your PBX, you first must configure the Dialing Prefix that you wrote down in the previous step. Log into the GUI as admin using a web browser and edit the Anveo-Out trunk in Connectivity -> Trunks. Enable the Trunk. Then click on the custom-Settings tab and replace anveo-pin with your actual Dialing Prefix. Click Submit and Apply Config to complete the setup. In the Incredible PBX GUI, be sure to enable all of the remaining Anveo trunks.

By default, incoming Anveo Direct calls will be processed by the Default inbound route on your PBX. If you wish to redirect incoming Anveo Direct calls using DID-specific inbound routes, then you’ve got a bit more work to do. In addition to creating the inbound route using the 11-digit Anveo Direct DID, enter the following commands after logging into your server as root using SSH/Putty:

cd /etc/asterisk
echo "[from-anveo]" >> extensions_custom.conf
echo "exten => _.,1,Ringing" >> extensions_custom.conf
echo "exten => _.,n,Goto(from-trunk,\\${SIP_HEADER(X-anveo-e164)},1)" >> extensions_custom.conf
asterisk -rx "dialplan reload"

Configuring Extensions with Incredible PBX GUI

Extensions are created using the Incredible PBX GUI: Applications:Extensions. Many SIP phones expect extensions to communicate on UDP port 5060. If this is the case with your SIP phone or softphone, then always create Chan_SIP extensions which communicate on UDP 5060. If your SIP phone or softphone provide port flexibility, then you have a choice in the type of SIP extension to create: Chan_SIP or the more versatile PJSIP (UDP 5061). Just remember to always configure SIP extensions with NAT Mode=YES in the Advanced tab. If your VoIP phones or softphones support IAX connectivity, you may wish to consider IAX extensions which avoid NAT problems.

When you create a new Extension, a new entry is automatically created in the PBX Internal Directory. If you wish to allow individual users to manage their extensions or use the WebRTC softphone, then you will also have to create a (very) secure password for User Control Panel (UCP) access. Choose Admin:User Management and click on the key icon of the desired extension to assign a password for UCP and WebRTC access.

Configuring a Desktop Softphone for Incredible PBX

We’re in the home stretch now. You can connect virtually any kind of telephone to your new PBX. Plain Old Phones require an analog telephone adapter (ATA) which can be a separate board in your computer from a company such as Digium. Or it can be a standalone SIP device such as ObiHai’s OBi100 or OBi110 (if you have a phone line from Ma Bell to hook up as well). SIP phones can be connected directly so long as they have an IP address. These could be hardware devices or software devices such as the YateClient softphone. We’ll start with a free one today so you can begin making calls. You can find dozens of recommendations for hardware-based SIP phones both on Nerd Vittles and the PIAF Forum when you’re ready to get serious about VoIP telephony.

We recommend YateClient for Windows which is free. Download it from here. Run YateClient once you’ve installed it and enter the credentials for the 701 extension on Incredible PBX. You can find them by running /root/show-passwords. You’ll need the IP address of your server plus your extension 701 password. In the YateClient, fill in the blanks using the IP address of your Server, 701 for your Username, and whatever Password was assigned to the extension when you installed Incredible PBX. Click OK to save your entries.

Once you are registered to extension 701, close the Account window. Then click on YATE’s Telephony Tab and place some test calls to the numerous apps that are preconfigured on Incredible PBX. Dial a few of these to get started:

DEMO - Apps Demo
123 - Reminders
947 - Weather by ZIP Code
951 - Yahoo News
TODAY - Today in History
LENNY - The Telemarketer's Worst Nightmare

If you are a Mac user, another great no-frills softphone is Telephone. Just download and install it from the Mac App Store. For Android users, check out the terrific new VitalPBX Communicator. Works flawlessly with Incredible PBX.

Configuring a Softphone Extension on a Smartphone

Adding an Incredible PBX extension to your smartphone gets a little trickier. Whether you’re an iPhone or Android lover, all smartphones use batteries, and you don’t want to drain your battery by running a softphone as a foreground app all the time. Fortunately, you now have some choices in softphones engineered to work without draining your battery. While they all cost money, it’s not much money. We’ve written about all the choices, and you’ll find the links in our Softphone Provider Recommendations on the new Incredible PBX Wiki.

With PJsip extensions, you’re not limited to a single phone connection at a time, and we’ve preconfigured extension 701 to support five simultaneous connections. The setup on the softphone side is simple. For the server, enter the actual IP address of your PBX in the following format: 22.33.44.55:5061. Then enter 701 for the username and enter the password assigned to the 701 extension on your PBX. When an incoming call arrives, all the phones registered to extension 701 will ring simultaneously. Simply answer the call on the phone that is most convenient.

Configuring Outbound Routes in Incredible PBX GUI

Outbound Routes serve a couple of purposes. First, they assure that calls placed by users of your PBX are routed out through an appropriate trunk to reach their destination in the least costly manner. Second, they serve as a security mechanism by either blocking or restricting certain calls by requiring a PIN to complete the calls. Never authorize recurring charges on credit cards registered with your VoIP providers and, if possible, place pricing limits on calls with your providers. If a bad guy were to break into your PBX, you don’t want to give the intruder a blank check to make unauthorized calls. And you certainly don’t want to join the $100,000 Phone Bill Club.

To create outbound routes in the Incredible PBX GUI, navigate to Connectivity:Outbound Routes and click Add Outbound Route. In the Route Settings tab, give the Outbound Route a name and choose one or more trunks to use for the outbound calls. In the Dial Patterns tab, specify the dial strings that must be matched to use this Outbound Route. NXXNXXXXXX would require only 10-digit numbers with the first and fourth digits being a number between 2 and 9. Note that Outbound Routes are searched from the top entry to the bottom until there is a match. Make certain that you order your routes correctly and then place test calls watching the Asterisk CLI to make sure the calls are routed as you intended.

Configuring Inbound Routes in Incredible PBX GUI

Inbound Routes, as the name implies, are used to direct incoming calls to a specific destination. That destination could be an extension, a ring group, an IVR or AutoAttendant, or even a conference or DISA extension to place outbound calls (hopefully with a very secure password). Inbound Routes can be identified by DID, CallerID number, or both. To create Inbound Routes, choose Connectivity:Inbound Routes and then click Add Inbound Route. Provide at least a Description for the route, a DID to be matched, and the Destination for the incoming calls that match. If you only want certain callers to be able to reach certain extensions, add a CallerID number to your matching criteria. You can add Call Recording and CallerID CNAM Lookups under the Other tab.

Audio Issues with Incredible PBX 2021

If you experience one-way or no audio on some calls, add your external IP address and LAN subnet in the GUI by navigating to Settings -> Asterisk SIP Settings. In the NAT Settings section, click Detect Network Settings. Click Submit and Apply Settings to save your changes.

Security Considerations with Incredible PBX 2021

Incredible PBX 2021 includes a rock-solid firewall that limits access to preferred providers and individuals whose IP addresses you have whitelisted. Unfortunately, this may not insulate your server from FreePBX 15 irregularities if, in fact, Sangoma’s signing key was compromised in the October 2020 Ransomware Attack. Sangoma either doesn’t know or isn’t telling. Keep in mind that Sangoma didn’t mention the October breach either until someone else exposed it. Sangoma’s latest press release is available here.

The good news is Incredible PBX 2020 and 2021 platforms include a unique ClearlyIP feature that lets us manage which modules and versions can be installed. It works exactly like what ClearlyIP has documented in their must-read blog post, and we’ve built a locked version that rolls back all of the modules to dates before the Sangoma breach. The good news is, with Incredible PBX, you don’t have to jump through all the hoops covered in the ClearlyIP article to fully insulate your server from the Ransomware breach. We’ve done the work for you.

For those with mission-critical platforms, we’d recommend immediate implementation of what follows. For everyone else, it’s your choice whether to wait and see if there is a breach of the signing certificate with malicious modules. If you opt to wait and see, MAKE FREQUENT BACKUPS.

Here’s how to roll back all of your modules to dates before the breach. Login to the FreePBX GUI as admin and navigate to Settings > Advanced Settings. Drop down to the Lock Version field and change 15.19.11.001 to 15.19.11.003. Save your changes and reload your dialplan. Then use Module Admin to roll back any installed modules that are newer than the safe versions shown.

Our extra special thanks goes to Tony Lewis and the ClearlyIP team for providing this invaluable resource. Somehow we knew it would come in handy sooner or later. Unfortunately, that day has come.

Adding Incredible PBX 2021 to an OpenVPN Network

We previously have documented the procedure for creating an OpenVPN server as well as OpenVPN client templates (.ovpn). If you need a refresher, the tutorial is here. To add your Incredible PBX 2021 server to an existing OpenVPN network, begin by creating an incrediblepbx2021.ovpn template on your OpenVPN server. Be sure to comment out or delete the setenv line in the template. Then copy this template to /etc on your Incredible PBX 2021 server. Next, issue the following commands to put the remaining pieces in place:

cp -p /root/openvpn-start /etc/.
echo "[Unit]
Description=openvpn2021
ConditionPathExists=/etc/openvpn-start
After=rclocal.service
[Service]
Type=forking
ExecStart=/etc/openvpn-start /etc/incrediblepbx2021.ovpn
TimeoutSec=0
StandardOutput=tty
RemainAfterExit=yes
PermissionsStartOnly=true
SysVStartPriority=99
[Install]
WantedBy=multi-user.target" > /etc/systemd/system/openvpn2021.service

Finally, enable the new openvpn2021.service and reboot your server. The OpenVPN IP address should now appear on the LAN line in pbxstatus:

systemctl enable openvpn2021.service
reboot

Incredible PBX 2021 Administration

We’ve eased the pain of administering your new PBX with a collection of scripts which you will find in the /root folder after logging in with SSH or Putty. Here’s a quick summary of what each of the scripts does.

add-fqdn is used to whitelist a fully-qualified domain name in the firewall. Because Incredible PBX 2021 blocks all traffic from IP addresses that are not whitelisted, this is what you use to authorize an external user for your PBX. The advantage of an FQDN is that you can use a dynamic DNS service to automatically update the IP address associated with an FQDN so that you never lose connectivity.

add-ip is used to whitelist a public IP address in the firewall. See the add-fqdn explanation as to why this matters.

del-acct is used to remove an IP address or FQDN from the firewall’s whitelist.

admin-pw-change is used to set the admin password for access to the FreePBX/Incredible PBX web GUI using a browser pointed to the local IP address of your server.

apache-pw-change is used to set the admin password for access to Apache/Incredible PBX apps including AsteriDex and Reminders. This provides a password layer of protection for access to these applications.

avantfax-email-change is used to change the destination email address for incoming faxes.

avantfax-pw-change is used to change your admin password for the AvantFax web console.

iaxmodem-restart is used to restart the modems used to send and deliver faxes. The pbxstatus display will tell you whether the IAXmodems are down.

incrediblebackup2021 makes a backup of critical components on your PBX to a tarball saved in /backup. This should be copied to safe location off-site for a rainy day.

incrediblerestore2021 restores a backup file which has been copied to the /backup folder.

ipchecker is a script which deciphers the public IP addresses associated with whitelisted FQDNs created with add-fqdn on your server. If any of the addresses have changed, the firewall is restarted after updating the IP addresses. By default, it is executed every 10 minutes by /etc/crontab.

licenses.sh displays the license associated with each of the FreePBX modules on your server.

logos-b-gone removes proprietary artwork from your PBX and is no longer necessary with the included IncrediblePBX FreePBX module.

mime-construct is a command-line utility to send emails with attachments.

neorouter-login is a script to add your PBX to a NeoRouter VPN. Tutorial here.

odbc-gen.sh is a script that was run to generate the ODBC settings for Asterisk. Do NOT use it.

openvpn-start is a script to add your PBX to an existing OpenVPN network using an .ovpn config file. Tutorial here.

pbxstatus displays status of all major components of Incredible PBX 2021.

pptp-install is a script to create a PPTP network connection for your PBX. Tutorial here.

purge-cdr-cel-records removes all CDR and CEL records from the MySQL database.

reset-conference-pins is a script that automatically and randomly resets the user and admin pins for access to the preconfigured conferencing application. Dial C-O-N-F from any registered SIP phone to connect to the conference.

reset-extension-passwords is a script that automatically and randomly resets ALL of the SIP passwords for extensions 701-705. Be careful using this one, or you may disable existing registered phones and cause Fail2Ban to blacklist the IP addresses of those users. HINT: You can place a call to the Ring Group associated with all five extensions by dialing 777.

reset-reminders-pin is a script that automatically and randomly resets the pin required to access the Telephone Reminders application by dialing 123. It’s important to protect this application because a nefarious user could set up a reminder to call a number anywhere in the world assuming your SIP provider’s account was configured to allow such calls.

show-feature-codes is a cheat sheet for all of the feature codes which can be dialed from any registered SIP phone. It documents how powerful a platform Incredible PBX 2021 actually is. A similar listing is available in the GUI at Admin -> Feature Codes.

show-passwords is a script that displays most of the passwords associated with Incredible PBX 2021. This includes SIP extension passwords, voicemail pins, conference pins, telephone reminders pin, and your Anveo Direct outbound calling pin (if configured). Note that voicemail pins are configured by the user of a SIP extension the first time the user accesses the voicemail system by dialing *97.

sig-fix disables Module Signature Checking in the FreePBX GUI. This should not be necessary unless you have added or edited FreePBX Modules with missing module signatures.

sms-skyetel is a script to send SMS messages using a Skyetel trunk.

sms-voip.ms is a script to send SMS messages using a VoIP.ms trunk.

sms-blast, sms-blaster, and sms-dictator are scripts for message blasting. Tutorial here.

switch-to-php5.6 is a script to disable PHP 7.3 and set PHP 5.6 as the default version for your PBX. PHP 5.6 is required to use AvantFax. It is the default configuration for Incredible PBX 2021. The current default PHP version is displayed in the Apache listing of pbxstatus.

switch-to-php7.3 is a script to disable PHP 5.6 and set PHP 7.3 as the default version for your PBX. You cannot use AvantFax when PHP 7.3 is the default.

timezone-setup is a script to set the timezone for your PBX.

update-IncrediblePBX is a script that runs the Automatic Update Utility whenever you login to your server as root. These updates typically resolve bugs and security issues with your PBX. Do NOT remove it.

upgrade-asterisk16 is a script that runs on Asterisk 16 platforms to upgrade your PBX to the latest release of Asterisk 16.

upgrade-asterisk18 is a script that runs on both Asterisk 16 and 18 platforms to upgrade your PBX to the latest release of Asterisk 18.

wolfram is a script to deploy Wolfram Alpha on your PBX. Tutorial here.

Forwarding Calls to Your Cellphone. Keep in mind that inbound calls to your DIDs automatically ring all five SIP extensions, 701-705. The easiest way to also ring your cellphone is to set one of these five extensions to forward incoming calls to your cellphone. After logging into your PBX as root, issue the following command to forward calls from extension 705 to your cellphone: asterisk -rx "database put CF 705 6781234567"

To remove call forwarding: asterisk -rx "database del CF 705"

Keeping FreePBX 15 Modules Current

We strongly recommend that you periodically update all of your FreePBX modules to eliminate bugs and to reduce security vulnerabilities. From the Linux CLI, log into your server as root and issue the following commands:

rm -rf /tmp/*
fwconsole ma upgradeall
fwconsole reload
/root/sig-fix
systemctl restart apache2
/root/sig-fix

Ready to turn Incredible PBX 2021 into a PUBLIC-Facing PBX? Here’s how.


Originally published: Friday, January 1, 2021


Need help with Asterisk? Visit the VoIP-info Forum.


Special Thanks to Our Generous Sponsors


FULL DISCLOSURE: ClearlyIP, Skyetel, Vitelity, DigitalOcean, Vultr, VoIP.ms, 3CX, Sangoma, TelecomsXchange and VitalPBX have provided financial support to Nerd Vittles and our open source projects through advertising, referral revenue, and/or merchandise. As an Amazon Associate and Best Buy Affiliate, we also earn from qualifying purchases. We’ve chosen these providers not the other way around. Our decisions are based upon their corporate reputation and the quality of their offerings and pricing. Our recommendations regarding technology are reached without regard to financial compensation except in situations in which comparable products at comparable pricing are available from multiple sources. In this limited case, we support our sponsors because our sponsors support us.

BOGO Bonaza: Enjoy state-of-the-art VoIP service with a $10 credit and half-price SIP service on up to $500 of Skyetel trunking with free number porting when you fund your Skyetel account. No limits on number of simultaneous calls. Quadruple data center redundancy. $25 monthly minimum spend required. Tutorial and sign up details are here.

The lynchpin of Incredible PBX 2020 and beyond is ClearlyIP components which bring management of FreePBX modules and SIP phone integration to a level never before available with any other Asterisk distribution. And now you can configure and reconfigure your new Incredible PBX phones from the convenience of the Incredible PBX GUI.

VitalPBX is perhaps the fastest-growing PBX offering based upon Asterisk with an installed presence in more than 100 countries worldwide. VitalPBX has generously provided a customized White Label version of Incredible PBX tailored for use with all Incredible PBX and VitalPBX custom applications. Follow this link for a free test drive!
 

Special Thanks to Vitelity. Vitelity is now Voyant Communications and has halted new registrations for the time being. Our special thanks to Vitelity for their unwavering financial support over many years and to the many Nerd Vittles readers who continue to enjoy the benefits of their service offerings. We will keep everyone posted on further developments.