

It’s been several years since we discussed interconnecting Asterisk® servers so today we want to do a version refresh using PJsip Trunking. We also want to show you how easy it is to secure the communications path by setting up the trunks using OpenVPN connections. When we’re finished, you’ll have a FREE way to call between sites using FreePBX® Outbound Routes. Because Incredible PBX comes preconfigured with all the components you’ll need, we’ll use that platform to further simplify the deployment. We’ll be interconnecting two Asterisk servers today, but you can use the same methodology to connect numerous sites.
Deploying OpenVPN with Asterisk Servers
To begin, you’ll want to get all of the sites configured with a virtual private network using OpenVPN. Our tutorial will walk you through the process. Keep in mind that all current releases of Incredible PBX are preconfigured to let you drop in your OpenVPN client credentials by naming them incrediblepbx.ovpn and copying the file into the /etc directory. Rebooting your server will bring up the virtual private network with a 10.8.0.x IP address.
Configuring PJsip Trunks on Your Asterisk Servers
If you remember yesteryear’s knuckle drill configuring SIP or IAX trunks for Asterisk connectivity, you’re in for a pleasant surprise using PJsip trunking with FreePBX. Using the GUI, create a new PJsip trunk for every site to which you want to establish a connection. A similar PJsip trunk must be created on the other site as well. If you’re just interconnecting two servers, then using the City locations for the Trunk Names will suffice. But, if there are more than two servers, specify unique names for each end of every PJsip connection, e.g.
NewYork1 <-> London1
NewYork2 <-> Washington1
NewYork3 <-> Miami1
London2 <-> Washington2
London3 <-> Miami2
Washington3 <-> Miami3
For today, we’ll interconnect a server in New York and London, but we’ll plan for the future and use London1 for the Trunk Name on the New York server and NewYork1 for the Trunk Name on the London server.
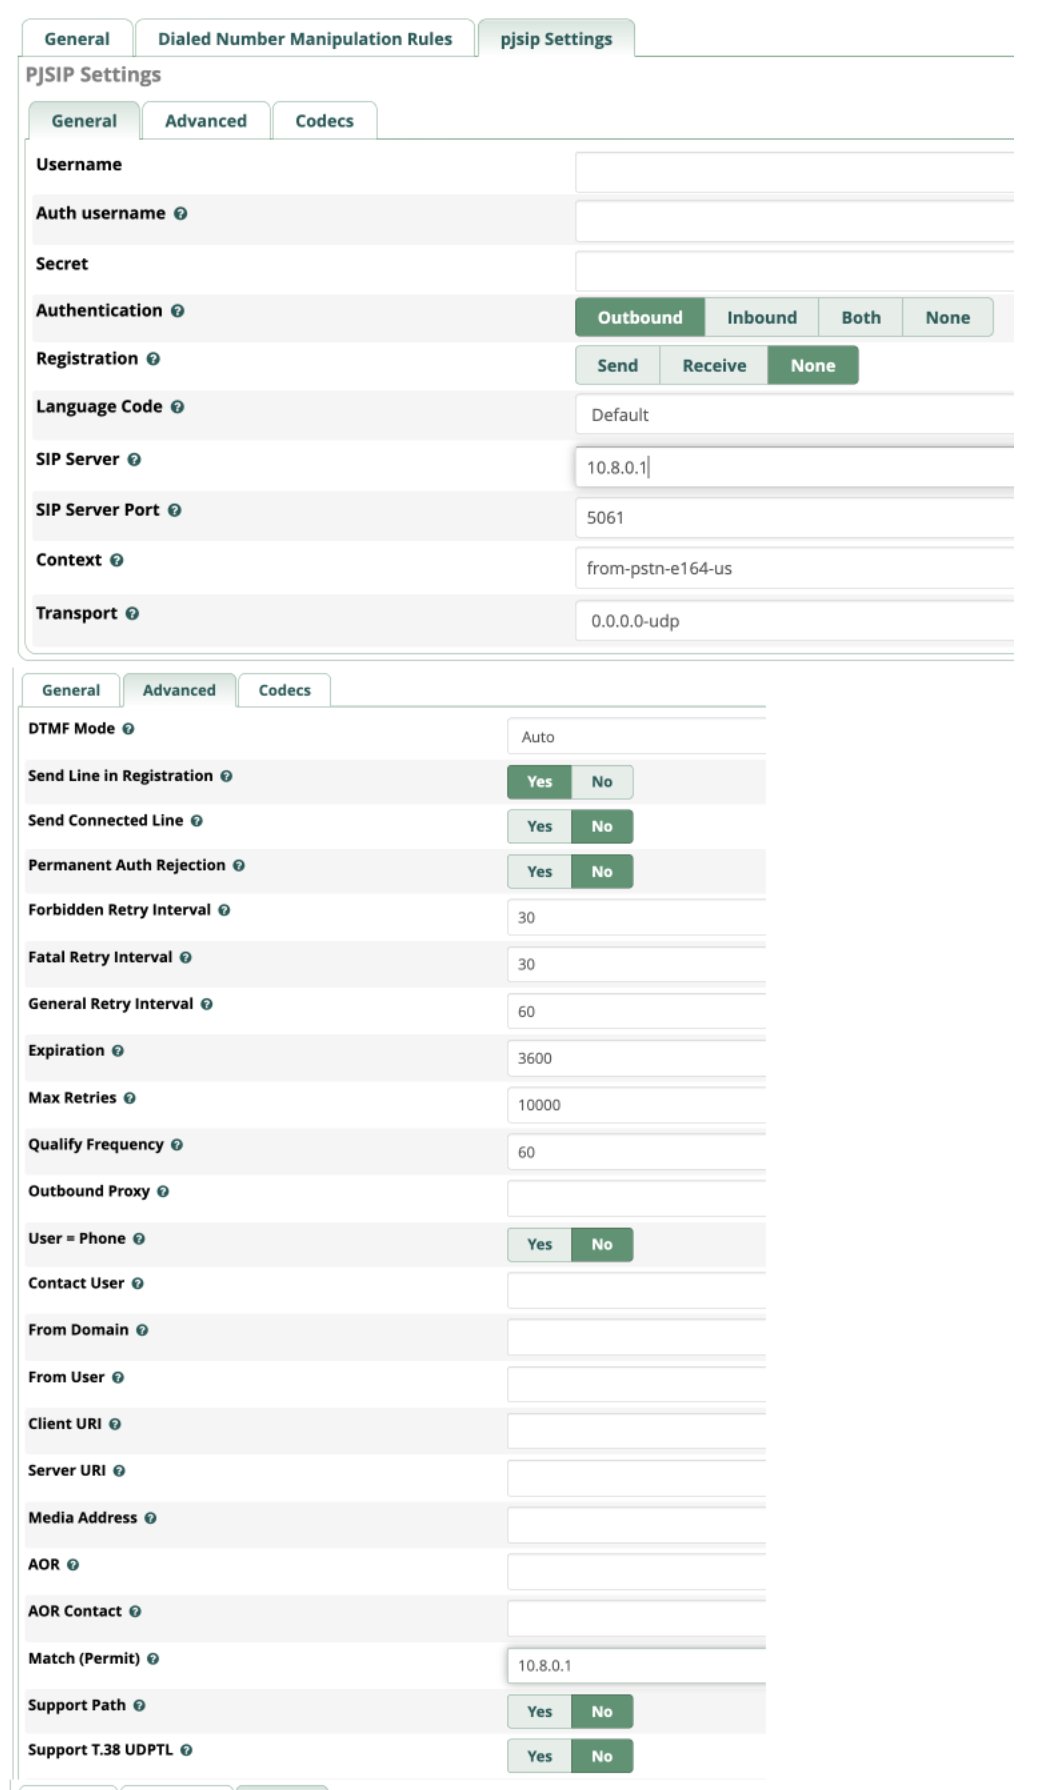
Let’s begin by configuring the London1 trunk on the New York server. After entering the London1 Trunk Name in the General tab, click on the pjsip Settings tab. In the General tab, leave the defaults in the first four fields. Then change the Registration field to None. For the SIP Server field, enter the OpenVPN IP address of the London server, e.g. 10.8.0.2. Because we’re using Incredible PBX, the PJsip port is 5061 so enter that in the SIP Server Port field. If you’re using a different flavor of FreePBX, enter the appropriate port number for PJsip on your platform. Next, click on the Advanced tab and enter the London server’s OpenVPN address in the Match (Permit) field, e.g. 10.8.0.2. In the Codecs tab, make note of the enabled codecs and make certain that the entries match on all of your servers. Click the Submit button to save your settings and then reload your dialplan.
Now let’s configure the NewYork1 trunk on the London server. After entering the NewYork1 Trunk Name in the General tab, click on the pjsip Settings tab. In the General tab, leave the defaults in the first four fields. Then change the Registration field to None. For the SIP Server field, enter the OpenVPN IP address of the New York server, e.g. 10.8.0.1. Because we’re using Incredible PBX, the PJsip port is 5061 so enter that in the SIP Server Port field. If you’re using a different flavor of FreePBX, enter the appropriate port number for PJsip on your platform. Next, click on the Advanced tab and enter the New York server’s OpenVPN address in the Match (Permit) field, e.g. 10.8.0.1. In the Codecs tab, make certain that the entries match those on your New York server. Click the Submit button to save your settings and then reload your dialplan. Here’s how it looks in the FreePBX GUI:
Use Outbound Routes to Interconnect Extensions
To keep things simple, let’s assume both your New York and London servers have extensions 701-705. To call an extension on the other server, we will simply dial 9 and then the 3-digit extension, e.g. dialing 9701 on the New York server will ring 701 on the London server and dialing 9701 on the London server will ring 701 on the New York server.
Create an Outbound Route on the New York server called London specifying London1 for the Trunk Sequence in the Route Settings tab. In the Dial Patterns tab, enter 9 in the Prefix field and XXX for the Match Pattern. Click Submit to save your settings and then reload dialplan.

Create an Outbound Route on the London server called New York specifying NewYork1 for the Trunk Sequence in the Route Settings tab. In the Dial Patterns tab, enter 9 in the Prefix field and XXX for the Match Pattern. Click Submit to save your settings and then reload dialplan.
If you’re interconnecting more than two sites, then you probably will want to designate a specific Prefix for every City so that users can travel between sites and use the same methodology to reach the same extensions from every location.
You can test things out using softphones by registering 701 to an extension in New York and another to the 701 extension in London. Now you can place secure and FREE calls between the sites by dialing 9701 from each softphone. Enjoy!
Originally published: Monday, May 2, 2022
Need help with Asterisk? Visit the VoIP-info Forum.
Special Thanks to Our Generous Sponsors
FULL DISCLOSURE: ClearlyIP, Skyetel, Vitelity, DigitalOcean, Vultr, VoIP.ms, 3CX, Sangoma, TelecomsXchange and VitalPBX have provided financial support to Nerd Vittles and our open source projects through advertising, referral revenue, and/or merchandise. As an Amazon Associate and Best Buy Affiliate, we also earn from qualifying purchases. We’ve chosen these providers not the other way around. Our decisions are based upon their corporate reputation and the quality of their offerings and pricing. Our recommendations regarding technology are reached without regard to financial compensation except in situations in which comparable products at comparable pricing are available from multiple sources. In this limited case, we support our sponsors because our sponsors support us.
BOGO Bonaza: Enjoy state-of-the-art VoIP service with a $10 credit and half-price SIP service on up to $500 of Skyetel trunking with free number porting when you fund your Skyetel account. No limits on number of simultaneous calls. Quadruple data center redundancy. $25 monthly minimum spend required. Tutorial and sign up details are here.
The lynchpin of Incredible PBX 2020 and beyond is ClearlyIP components which bring management of FreePBX modules and SIP phone integration to a level never before available with any other Asterisk distribution. And now you can configure and reconfigure your new Incredible PBX phones from the convenience of the Incredible PBX GUI.
VitalPBX is perhaps the fastest-growing PBX offering based upon Asterisk with an installed presence in more than 100 countries worldwide. VitalPBX has generously provided a customized White Label version of Incredible PBX tailored for use with all Incredible PBX and VitalPBX custom applications. Follow this link for a free test drive!
Special Thanks to Vitelity. Vitelity is now Voyant Communications and has halted new registrations for the time being. Our special thanks to Vitelity for their unwavering financial support over many years and to the many Nerd Vittles readers who continue to enjoy the benefits of their service offerings. We will keep everyone posted on further developments.
I’ve enjoyed your tutorials and used them to solve a challenge or two. Just saying thanks, and sending a PayPal donation.
This looks almost as easy as setting up IAX trunks. Are IAX trunks considered EOL now that Pjsip is around?
[WM: IAX2 is still available if you prefer to use it.]