

Vitelity for many years has been a Platinum Sponsor of Nerd Vittles open source projects so, yes, we’re biased. But, if high quality SIP calling is your primary criteria in choosing a SIP provider, you can’t do better than Vitelity. Their service is not free and, yes, you get what you pay for. Vitelity has extremely reasonable rates and offers Nerd Vittles readers an incredible deal on SIP trunks for incoming calls.
You can purchase a Tier A DID with unlimited incoming calls and four simultaneous channels for just $3.99 a month. To check availability of local numbers and tiers of service from Vitelity, click here. NOTE: You can only use the Nerd Vittles sign-up link to order your DIDs, or you won’t get the special pricing! Vitelity’s rate is just 1.44¢ per minute for outbound calls in the U.S. There is a $35 prepay when you sign up. This covers future usage. Any balance is refundable if you decide to discontinue service with Vitelity.
Setting Up a SIP Trunk at Vitelity
1. Sign up for a Vitelity account and order a DID.
2. Login to your Vitelity account.
3. Select My Products & Services:Sub Accounts and create a new subaccount to use with Wazo. Take note of the Register Server and Outbound Server for your subaccount. You’ll need them to create your Wazo trunks!
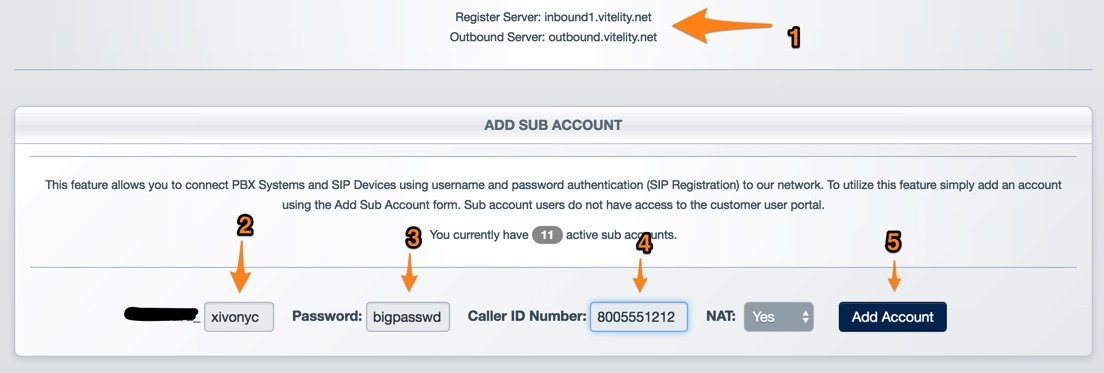
4. Be sure to set the CallerID number for your trunk. This is the number that will be passed to Wazo when incoming calls arrive from your Vitelity trunk. It’s also the number that will be displayed when you place outbound calls using your Vitelity trunk. You must own the CallerID number that you assign to your trunk!
5. If you have multiple Wazo servers, click on the SERVERFAIL option in the Action pulldown once your subaccount has been created. This will let you forward the calls to a secondary server when your primary server goes down.
6. Select My Products & Services:My Numbers:All Voice and configure your Vitelity DID. For the Routing Method, choose SIP Server. Select the subaccount you just created as the Destination for the calls from this DID.

7. Save your settings and log out of your Vitelity account.
Setting Up a Vitelity SIP Trunk on Wazo for Incoming Calls
SIP trunks are different than traditional Ma Bell phone lines. With SIP trunks, you need not use the same provider to process incoming and outgoing calls. With some SIP providers, both incoming and outgoing calls are managed on the same server. With Vitelity, they are not. What this means is a separate trunk setup is required for incoming AND outgoing calls. For an incoming trunk, you must first obtain a DID from Vitelity as documented above. To place outgoing calls with Vitelity, all you need is a subaccount with credentials. You do NOT need a DID.
In the Wazo GUI, create a new Vitelity SIP Trunk by choosing IPBX:Trunk Management:SIP Protocol. Click on + Add to open a new template.
In the General tab, change the Inbound FQDN to match the Register Server assigned to your account (see above). Enter your credentials and DID for your Vitelity subaccount:
In the Register tab, make it look like the following using your credentials and your assigned Register Server:
In the Signaling tab, set DTMF, Monitoring, and Codec:
In the Advanced tab, set Insecure=ALL, Port=5060, and From field-User to your subaccount name:
SAVE your Trunk settings.
Your Incoming Vitelity Trunk should now be registered. You can check it on the Asterisk CLI: sip show registry.
Wazo will not actually route incoming calls from Vitelity to a destination until you configure an incoming route in IPBX:Call Management:Incoming Calls. Until the incoming route is configured, Wazo will deliver a BUSY call indication to those calling your DID. Incoming call routing is covered in a separate tutorial.
Setting Up a Vitelity SIP Trunk on Wazo for Outgoing Calls
In the Wazo GUI, create a new Vitelity SIP Trunk by choosing IPBX:Trunk Management:SIP Protocol. Click on + Add to open a new template.
In the General tab, change the Static Outbound FQDN to match the Outbound Server for your Vitelity subaccount. Context should work fine with Outcalls (to-extern) if your setup doesn’t allow the Default entry. NAT may need to be changed to Yes depending upon where your server sits. Try both. One will work, and one won’t.
Leave Register tab entries blank. You don’t need a trunk registration to make outbound calls with Vitelity.
The Signaling tab should be cloned as shown below:
Clone the Advanced tab as shown below except From field-User entry below should be your Vitelity subaccount name:
Wazo will not actually process outgoing calls through this Vitelity trunk until you configure an outgoing route in IPBX:Call Management:Outgoing Calls. Outgoing call routing is covered in a separate tutorial.