

Last week we introduced the all-new, API-driven Admin User Interface for Wazo 17.07. But pretty pictures are only the icing on the cake. It’s what’s under the hood that really matters. And today we want to walk you through the new IVR User Interface with Incredible PBX for Wazo. The Wazo developers heard from many of you that were missing the GUI-driven IVR tools available in other products. And we’re pleased to tell you it’s another Home Run for Wazo. The UI is well-documented, easy to use, and incredibly simple to implement.
We should mention that our focus today is on the mechanics of using the new Wazo IVR Builder. We won’t be covering how to design a good IVR. If you want some great examples of poor IVR design, look no further than the main number of your favorite cellular or cable provider. Insofar as good design tips go, you can’t do better than learning from the master, Allison Smith. Here’s a link to her previous articles on Nerd Vittles.
We’re assuming you followed last week’s tutorial and added the basic components for the Admin user interface after using your browser to login to https://IPaddress/admin/. If not, start there and install the following plugins to begin: Users, Extensions, Contexts, and Devices. Next, add the plugins for Incalls, Outcalls, Trunks, and IVR. The whole setup procedure takes less than a minute. When you’re finished, your Navigation Sidebar should look like what’s shown above.
You’re obviously going to need a SIP or Google Voice trunk to handle incoming IVR calls so start there if you haven’t already set up at least one trunk that can be dedicated to your IVR. For the time being, add an Inbound Route for the Trunk that points to an extension.
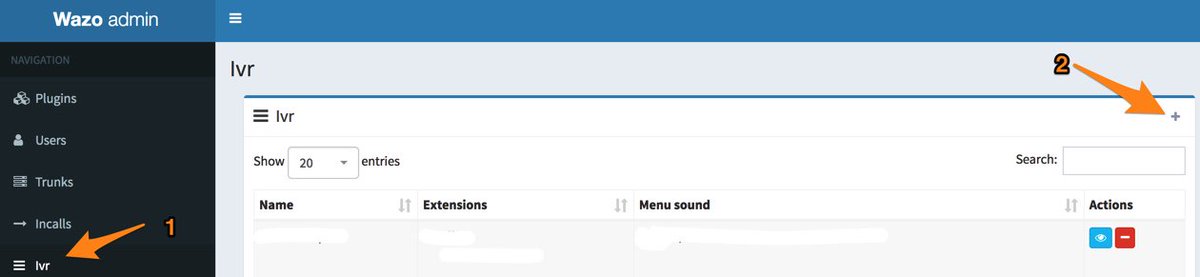
Now we’re ready to create your first IVR using the new IVR template in the Admin UI. Using your web browser, log back in to https://IPaddress/admin/ and (1) click IVR in the Navigation bar. Then (2) click + Add to create a new IVR.
Since the pieces already are in place for the hard-coded Demo IVR that comes with Incredible PBX for Wazo, let’s use those components to demonstrate how easy it is to build your own IVR with the new GUI. As you can see from the completed form below, there are two main sections in setting up an IVR. There are some basic settings that handle answering the call, playing the welcome message, and managing error conditions. Then there are IVR options that correspond to the Digit pressed by the caller using a touchtone phone. Each of these options has a destination. Currently, the available options include playing a sound file, ringing an extension, running custom dialplan code, or hanging up a call. There also is the ability to nest IVRs. Once you have built the secondary IVRs, the options list will also include an IVR option.
Since our sample IVR uses custom contexts for each of the Incredible PBX applications, we’ll rely heavily on the Custom option to route calls to extensions that were created when these applications were installed: Call by Name (411), Join Conference (2663), Lenny (53669), Yahoo News (951), and Weather Forecasts by ZIP Code (947). We’ll also show you how to direct a call to an extension using the default WebRTC extension (701). To get things going, simply copy the entries shown below and then Save/Update the template. The Wazo syntax to call a Custom destination looks like this: Dial(Local/951@default).

Before you attempt to build your own IVR, keep in mind that you’ll need at least a greeting message that tells callers which buttons to press. This file should be placed in /var/lib/xivo/sounds/playback. You can also use any of the default sound recordings found in /usr/share/asterisk/sounds/en for error messages and retry alerts.
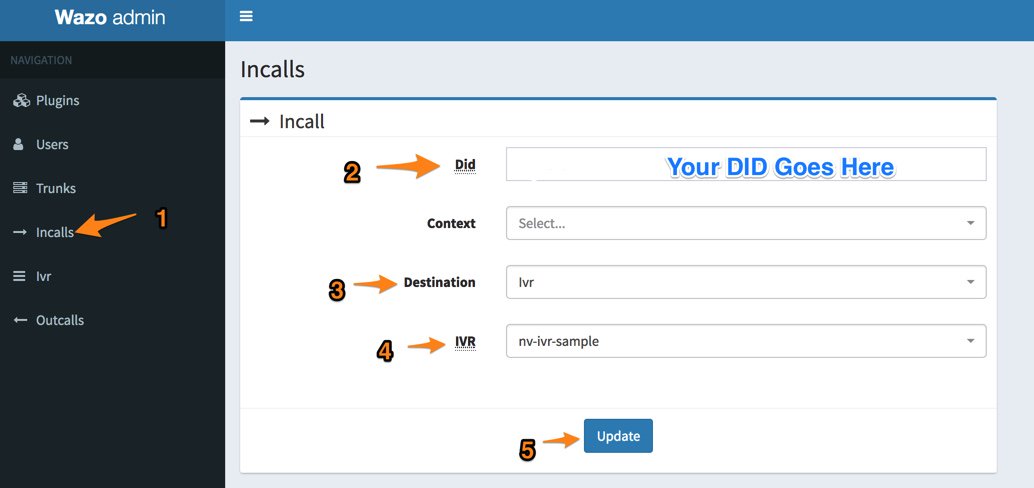
Once you have your IVR built, the last step is to adjust an incoming route for one of your DIDs so that it points to your newly created IVR. We do this using the Incalls option in the Navigation bar. If you’re adjusting an existing inbound route, just call it up and make the changes as shown below:
You’re good to go now. Call your DID from another phone and try out your first custom IVR.
Enjoy!
Published: Monday, May 22, 2017
 Support Issues. With any application as sophisticated as this one, you’re bound to have questions. Blog comments are a difficult place to address support issues although we welcome general comments about our articles and software. If you have particular support issues, we encourage you to get actively involved in the PBX in a Flash Forum. It’s the best Asterisk tech support site in the business, and it’s all free! Please have a look and post your support questions there. Unlike some forums, the PIAF Forum is extremely friendly and is supported by literally hundreds of Asterisk gurus and thousands of users just like you. You won’t have to wait long for an answer to your question.

Need help with Asterisk? Visit the PBX in a Flash Forum.
Special Thanks to Our Generous Sponsors
FULL DISCLOSURE: ClearlyIP, Skyetel, Vitelity, DigitalOcean, Vultr, VoIP.ms, 3CX, Sangoma, TelecomsXchange and VitalPBX have provided financial support to Nerd Vittles and our open source projects through advertising, referral revenue, and/or merchandise. As an Amazon Associate and Best Buy Affiliate, we also earn from qualifying purchases. We’ve chosen these providers not the other way around. Our decisions are based upon their corporate reputation and the quality of their offerings and pricing. Our recommendations regarding technology are reached without regard to financial compensation except in situations in which comparable products at comparable pricing are available from multiple sources. In this limited case, we support our sponsors because our sponsors support us.
 BOGO Bonaza: Enjoy state-of-the-art VoIP service with a $10 credit and half-price SIP service on up to $500 of Skyetel trunking with free number porting when you fund your Skyetel account. No limits on number of simultaneous calls. Quadruple data center redundancy. $25 monthly minimum spend required. Tutorial and sign up details are here.
![]() The lynchpin of Incredible PBX 2020 and beyond is ClearlyIP components which bring management of FreePBX modules and SIP phone integration to a level never before available with any other Asterisk distribution. And now you can configure and reconfigure your new Incredible PBX phones from the convenience of the Incredible PBX GUI.
The lynchpin of Incredible PBX 2020 and beyond is ClearlyIP components which bring management of FreePBX modules and SIP phone integration to a level never before available with any other Asterisk distribution. And now you can configure and reconfigure your new Incredible PBX phones from the convenience of the Incredible PBX GUI.
 VitalPBX is perhaps the fastest-growing PBX offering based upon Asterisk with an installed presence in more than 100 countries worldwide. VitalPBX has generously provided a customized White Label version of Incredible PBX tailored for use with all Incredible PBX and VitalPBX custom applications. Follow this link for a free test drive!
 Special Thanks to Vitelity. Vitelity is now Voyant Communications and has halted new registrations for the time being. Our special thanks to Vitelity for their unwavering financial support over many years and to the many Nerd Vittles readers who continue to enjoy the benefits of their service offerings. We will keep everyone posted on further developments.
Some Recent Nerd Vittles Articles of Interest…


