

For those that are new to the VoIP community, we feel your pain. What was once an easily attainable and affordable hardware solution with the Raspberry Pi is now a knuckle drill due to supply chain issues. And we appreciate that not everyone is ready to make the leap to the Cloud even though $25 a year is difficult to pass up. So today we’ll share our recent discovery of a hardware platform for your home or office that’s about the size of a drink coaster with performance that is perfectly suited for Incredible PBX platforms with dozens of users.
Meet the $79 Beelink T5 Pro Mini PC featuring an Intel N3350 processor with 4 Gigs of RAM and 64 Gigs of eMMC storage. The Mini PC has dual HDMI 4K display ports as well as Gigabit Ethernet, WiFi, and Bluetooth support. Amazon delivers the device in days, not months. Converting it’s default Windows 10 setup into a powerful Ubuntu 22.04 platform is a walk in the park.
TIP: Using our Amazon referral links helps fund Nerd Vittles reviews.
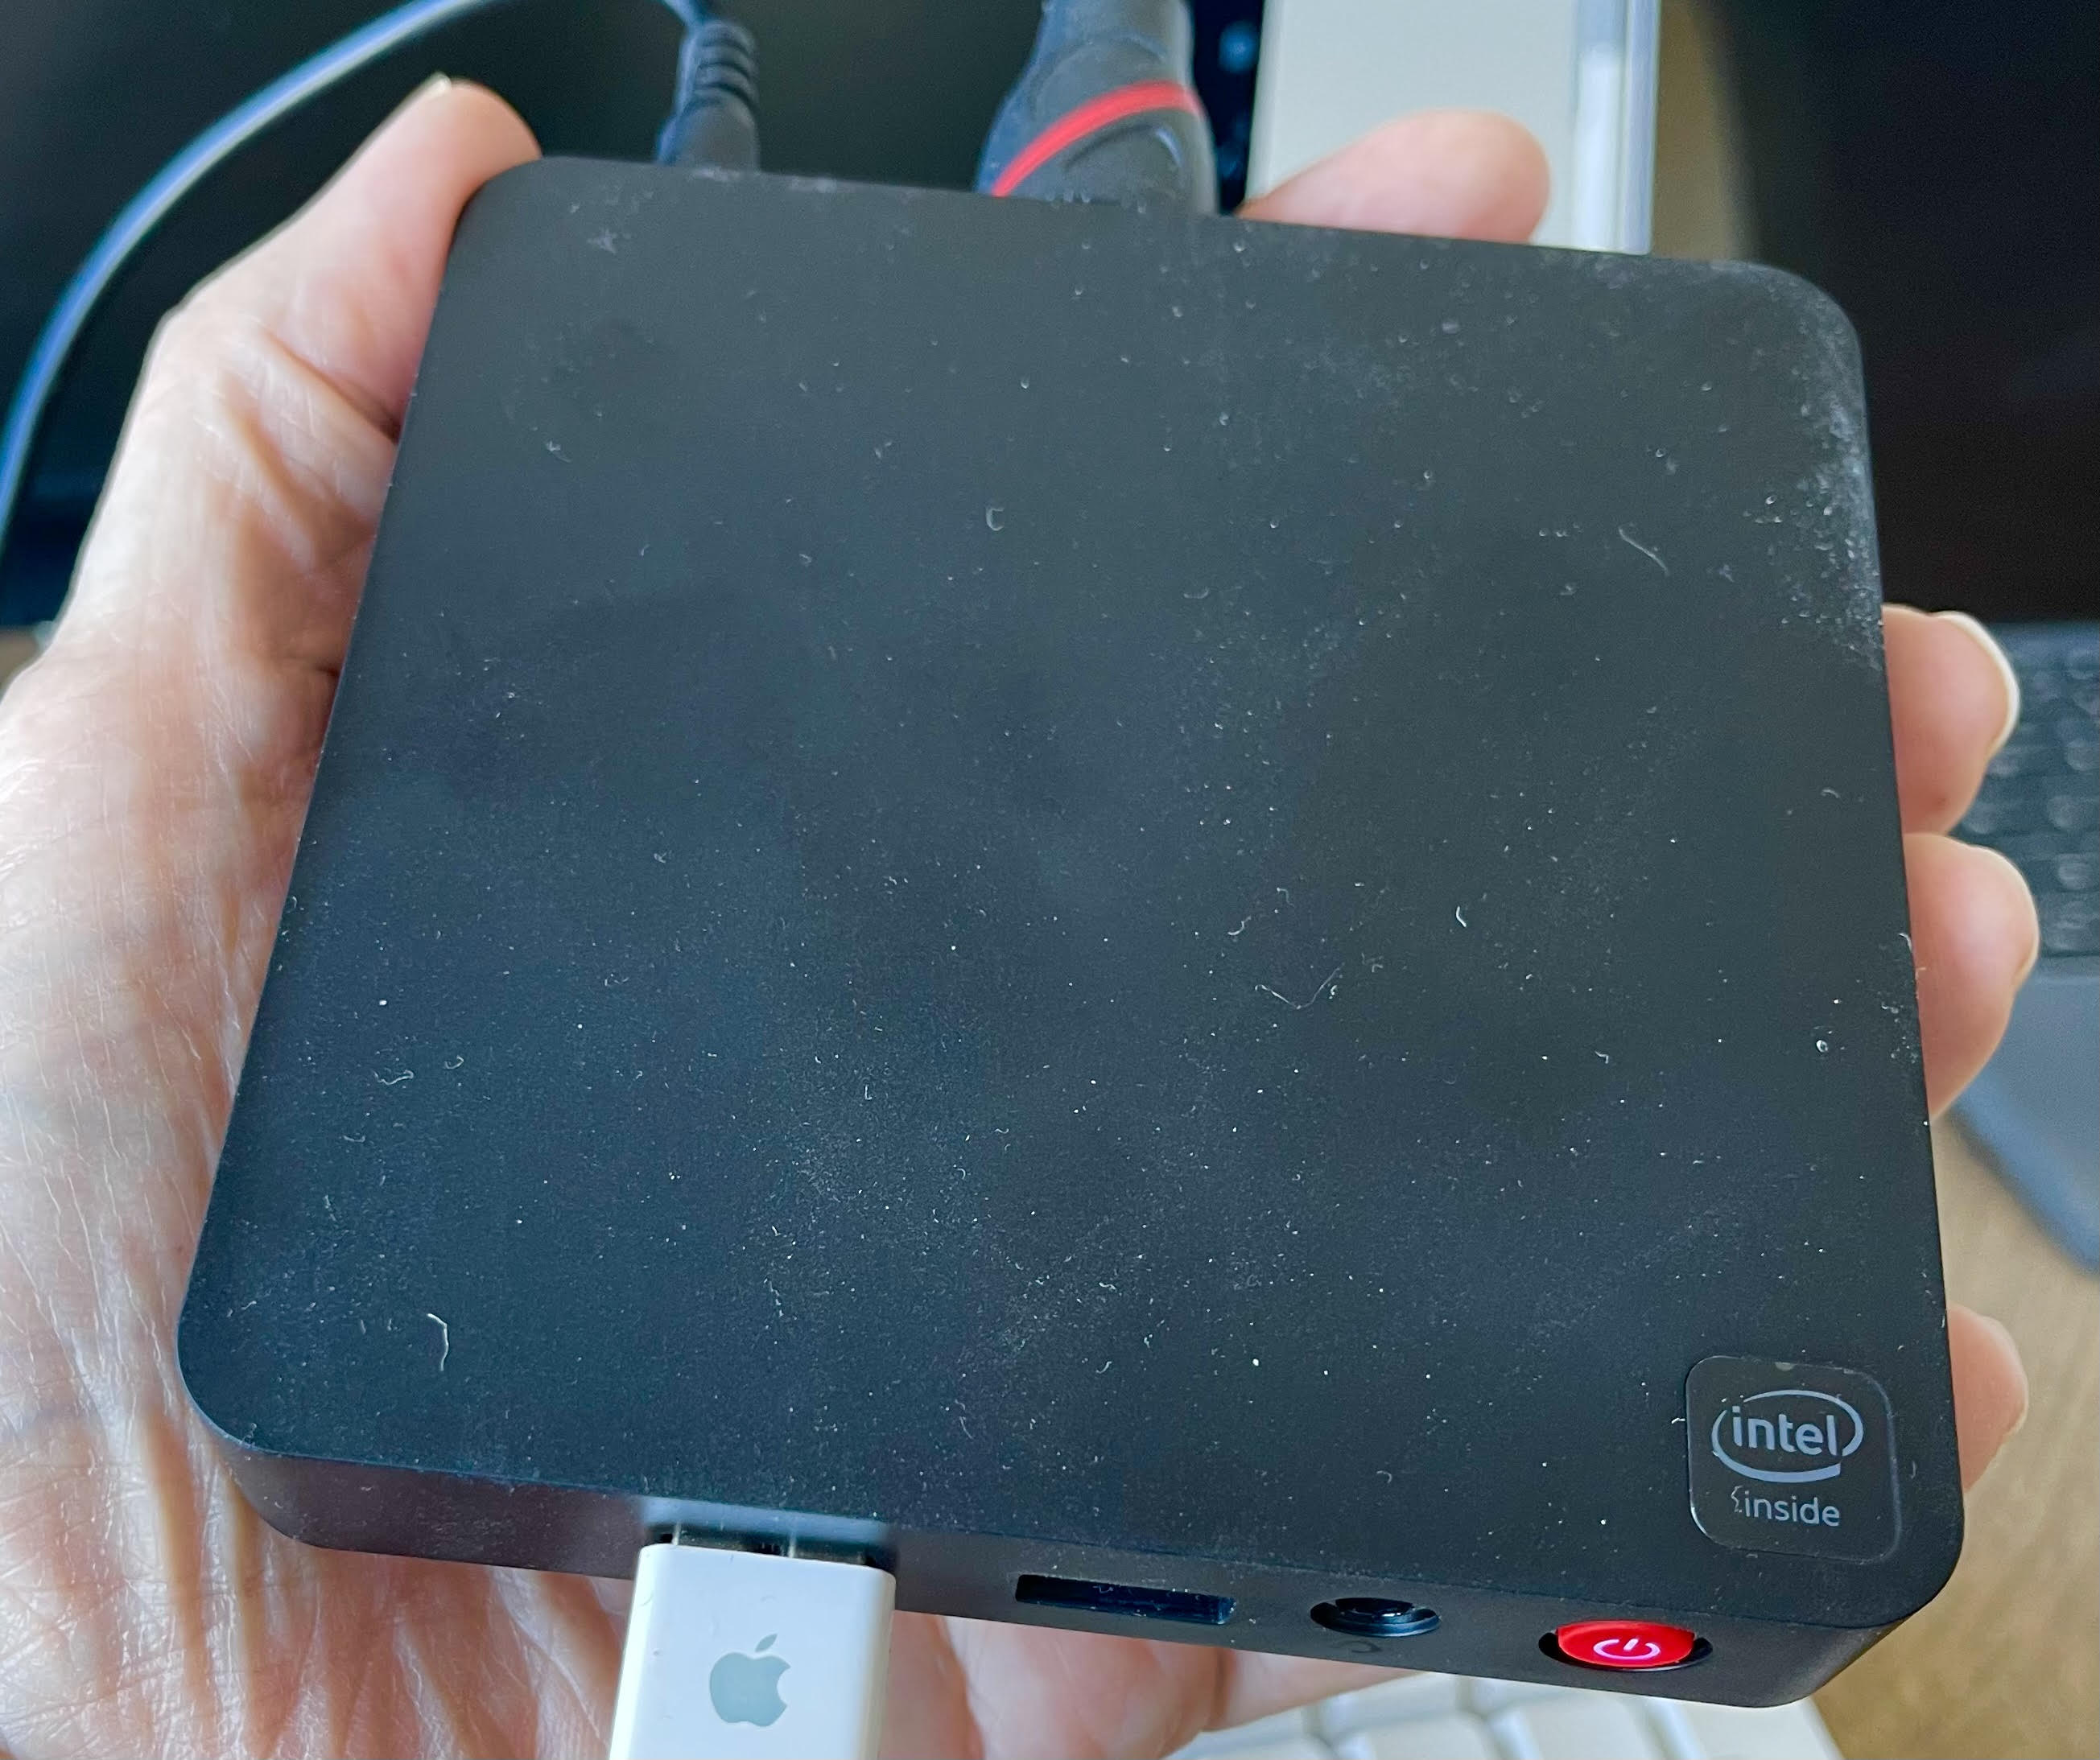
While photos don’t do it justice, this shot of the Mini PC resting in my hand will give you a good idea of its dimensions. While a fan is its only moving part, I’ve never heard it. And the case has remained at room temperature throughout our testing. Installing Incredible PBX is a two-step process: (1) switching the machine to an Ubuntu 22.04 platform and (2) running the Incredible PBX 2027 Ubuntu installer. So let’s get started.
Creating an Ubuntu 22.04 USB Flash Drive
You’ll need a 2 Gig or larger USB flash drive on which to load the Ubuntu 22.04 Live Server ISO. You can download the ISO image from our Incredible PBX repo. If you’re unfamiliar with burning an ISO image to a USB flash drive, here’s a tutorial (one of many) that will walk you through the process on a Windows or Mac desktop. For Mac lovers, our personal favorite app is Balena Etcher. Once you have your USB drive ready to go, place it on the table until you adjust the BIOS settings below.
Adjusting the Mini PC BIOS Settings
Begin by plugging in a USB keyboard and HDMI monitor of your choice. Then power up the device using the included power adapter. Immediately hold down the ESC key to adjust the BIOS settings. In the Advanced tab, select S5 RTC Wake Settings and set Wake System to Dynamic Time. Press ESC. In Network Stack Configuration, set IPv4 PXE Support to Enabled. Press ESC. In CSM Configuration, set Boot Option Filter to UEFI and Legacy. Set Network to UEFI, Storage to UEFI, Video to Legacy, and Other PCI Devices to Legacy. Press ESC. In USB Configuration, set Legacy USB Support to Enabled. Press ESC. In the Boot tab, set Boot Option #1 to USB Device, Boot Option #2 to CD/DVD, and Boot Option #3 to Hard Disk. Press ESC. In the Save & Exit tab, choose Save Changes and Exit. Before pressing ENTER, insert your Ubuntu flash drive in the remaining USB port on the Mini PC.
Installing Ubuntu 22.04 on the Mini PC
Your Mini PC should now boot into the Ubuntu installer on your flash drive. Begin the install and select the option to install a Minimal Server Platform. Then you’ll need to create a temporary user as part of the install. During the Networking phase of the install, make sure to enable WiFi if your Mini PC is not connected with an Ethernet cable. Set your SSID and WiFi password at the prompts. Enable installation of SSH and no additional components. When the install finishes, reboot your Mini PC after removing the USB flash drive.
After reboot, login as the new user you created during the install and issue these commands:
# set root password
sudo passwd root
exit
# log back in as root
# delete temporary user
userdel -r temp-user-name
# decipher server IP address and write it down
ip a
apt install nano -y
While still logged in as root from the console, adjust the SSH configuration so that you can login from desktop machine via SSH. Open SSH config file: nano -w /etc/ssh/sshd_config
# change the following entries as shown here:
  PermitRootLogin yes
  PasswordAuthentication yes
# save the file and restart SSH
# Ctrl-X, Y, and press ENTER key
systemctl restart ssh
Finally, issue the following commands to avoid the 2-minute delay on bootup:
systemctl disable systemd-networkd-wait-online.service
systemctl mask systemd-networkd-wait-online.service
reboot
Installing SAMBA on Ubuntu 22.04
For SAMBA networking, follow this tutorial to get a SAMBA server installed on your machine.
Installing Incredible PBX 2027 for Ubuntu 22.04
It’s important to complete the Incredible PBX install from a desktop machine rather than from the console to assure that your desktop machine gets whitelisted in the Incredible PBX firewall. After the reboot, login from your desktop using SSH or Putty from the Terminal window:
ssh root@your-server-IP-address
Now you’re ready to begin the Incredible PBX install:
apt install wget tar nano -y
wget http://incrediblepbx.com/IncrediblePBX2027-U.sh
chmod +x IncrediblePBX2027-U.sh
./IncrediblePBX2027-U.sh
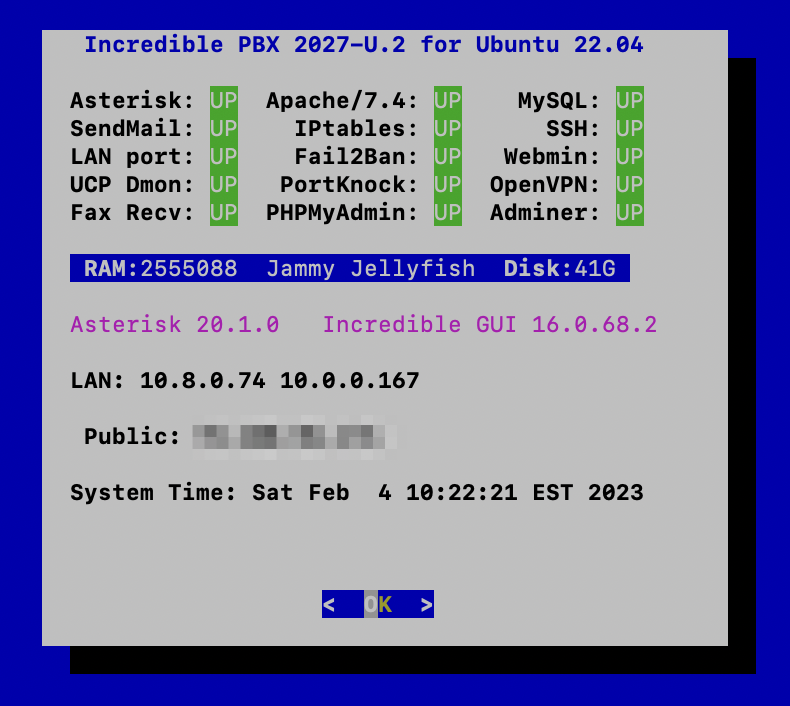
When the install completes, continue your Incredible PBX adventure by following the steps in our Incredible PBX 2027 for Ubuntu 22.04 tutorial.
Originally published: Monday, February 6, 2023

Need help with Asterisk? Visit the VoIP-info Forum.
Special Thanks to Our Generous Sponsors
FULL DISCLOSURE: ClearlyIP, Skyetel, Vitelity, DigitalOcean, Vultr, VoIP.ms, 3CX, Sangoma, TelecomsXchange and VitalPBX have provided financial support to Nerd Vittles and our open source projects through advertising, referral revenue, and/or merchandise. As an Amazon Associate and Best Buy Affiliate, we also earn from qualifying purchases. We’ve chosen these providers not the other way around. Our decisions are based upon their corporate reputation and the quality of their offerings and pricing. Our recommendations regarding technology are reached without regard to financial compensation except in situations in which comparable products at comparable pricing are available from multiple sources. In this limited case, we support our sponsors because our sponsors support us.
 BOGO Bonaza: Enjoy state-of-the-art VoIP service with a $10 credit and half-price SIP service on up to $500 of Skyetel trunking with free number porting when you fund your Skyetel account. No limits on number of simultaneous calls. Quadruple data center redundancy. $25 monthly minimum spend required. Tutorial and sign up details are here.
![]() The lynchpin of Incredible PBX 2020 and beyond is ClearlyIP components which bring management of FreePBX modules and SIP phone integration to a level never before available with any other Asterisk distribution. And now you can configure and reconfigure your new Incredible PBX phones from the convenience of the Incredible PBX GUI.
The lynchpin of Incredible PBX 2020 and beyond is ClearlyIP components which bring management of FreePBX modules and SIP phone integration to a level never before available with any other Asterisk distribution. And now you can configure and reconfigure your new Incredible PBX phones from the convenience of the Incredible PBX GUI.
 VitalPBX is perhaps the fastest-growing PBX offering based upon Asterisk with an installed presence in more than 100 countries worldwide. VitalPBX has generously provided a customized White Label version of Incredible PBX tailored for use with all Incredible PBX and VitalPBX custom applications. Follow this link for a free test drive!
 Special Thanks to Vitelity. Vitelity is now Voyant Communications and has halted new registrations for the time being. Our special thanks to Vitelity for their unwavering financial support over many years and to the many Nerd Vittles readers who continue to enjoy the benefits of their service offerings. We will keep everyone posted on further developments.


