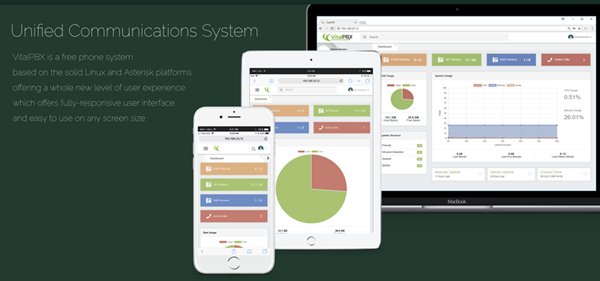
Home » Incredible PBX (Page 26)

Category Archives: Incredible PBX

The Most Versatile VoIP Provider: FREE PORTING

Rolling Your Own: Building a Custom ISO with Incredible PBX

blank

We walked through the RedHat ISO creation procedure a couple years ago, but we wanted to revisit the issue using the 64-bit Scientific Linux 6.9 platform for those that want a current ISO image with Asterisk® 13 LTS. We recommend setting up your build environment on a VirtualBox virtual machine. Then you’ll have something to store away on your desktop computer in the event you ever want to create more customized ISOs. For today, you’ll need the 64-bit SL 6.9 DVD 1 ISO and the Nerd Vittles build environment and scripts. Should you ever decide to create all of the pieces from scratch, we’d recommend you begin with a careful review of Jason Priebe’s tutorial on Smorgasbork. But we’ll save you several hours of pain by providing the build environment and tools used to create the new Incredible PBX 13-13 ISO.

Getting Started. Begin by installing VirtualBox on your desktop computer. Then download the 64-bit SL 6.9 DVD 1 ISO. We chose Scientific Linux instead of CentOS or another RedHat derivative to minimize issues with copyrights and trademarks. Scientific Linux was partially developed with U.S. government employees and funding which imposes clear boundaries on attempts to limit redistribution of open source, GPL packages and packaging. Since we are merely adjusting the collection of GPL components in the ISO build and then adding our own GPL-licensed installation scripts in the kickstart files, the ISO is as close to worry-free as one can get in the litigious world in which we find ourselves.

Once you have created a virtual machine for Scientific Linux 6.9 and specified SL 6.9 DVD 1 ISO as your Virtual Drive in the Storage:Empty tree, start your VM and walk through the basic SL 6.9 install specifying a Minimal Install as your platform of choice. When the install finishes, reboot your server and login as root using SSH or Putty. Issue the following commands to add a few missing packages which we will need down the road:

cd /root
yum -y install net-tools nano wget tar
wget http://download.fedoraproject.org/pub/epel/6/x86_64/epel-release-6-8.noarch.rpm
rpm -Uvh epel-release-6-8.noarch.rpm

While it’s not normally good practice to build ISO images as the root user, we’ll do it anyway since we’ve built a virtual machine that will be dedicated exclusively to building ISO images. In the /root folder, the directory structure for our build environment will look like this:

/root
 -kickstart_build
  --isolinux
  --Packages  
  --repodata
  --images
    ---pxeboot 

Typically, most of the kickstart_build environment is populated from the isolinux directory on SL 6.9 disc 1. Then kickstart customizations are added to isolinux and the RPM packages to be loaded as part of the initial install are added to Packages. Finally, each of the kickstart files includes an opening install script, followed by a %packages section listing all of the main RPMs to be loaded (not the dependencies), followed by a %post section which specifies what tasks to complete once all of the RPM packages have been installed.

Our goodie bag for today sets all of this up for you. In addition, it adds a script (add-packages-tmp) which downloads all of the packages for the ISO as well as any required package dependencies. There’s also a text file (add-packages-kickstart) that lists all of the main packages that are going into the ISO build. This list will be used to populate the %packages section of each of the kickstart files (ks*.cfg) in isolinux. For the Incredible PBX 13-13 ISO, we’ve already moved the list of RPMs into each of the kickstart files so all you have to do is run /root/add-packages-tmp to download the RPMs and move them into place. Finally, there’s a script (create-ISO-new) in the /root folder that will actually generate the Incredible PBX 13-13 ISO file. Once it completes its tasks, the ISO file can be found in /root/kickstart_build.

Now let’s put the build environment and the Incredible PBX 13-13 ISO components into place and create our first ISO. While logged into your server as root, issue the following commands. NOTE: Over 1,000 packages make up the Incredible PBX 13-13 ISO so the add-packages-tmp script takes a good long while to run since each RPM has to be downloaded and moved into place in our build environment.

cd /root
wget http://incrediblepbx.com/create-ISO-6.9.tar.gz
tar zxvf create-ISO-6.9.tar.gz
./add-packages-tmp
./create-ISO-new
ls /root/kickstart_build/*.iso

To add your own RPMs to an ISO, simply edit add-packages-tmp and add each new RPM in two places, in the reinstall AND the install sections of the script. This assures that RPMs will be added whether they already exist on your virtual machine or not. For each new RPM you add, be sure to also add an entry in add-packages-kickstart. We prefer to keep the packages alphabetical which makes it easier to make changes down the road. Finally, cut and paste the add-packages-kickstart list into the %packages section of each of your kickstart files in kickstart_build/isolinux/ks*.cfg. The isolinux.cfg file is where you set up the install menu for the ISO and specify the names of the kickstart files to associate with each menu selection. Once you’ve customized things, simply rerun add-packages-tmp and create-ISO-new to generate a new ISO. Enjoy!

Published: Monday, January 29, 2018


blank

NEW YEAR’S TREAT: If you could use one or more free DIDs in the U.S. with unlimited inbound calls and unlimited simultaneous channels, then today’s your lucky day. TelecomsXChange and Bluebird Communications have a few hundred thousand DIDs to give away so you better hurry. You have your choice of DID locations including New York, New Jersey, California, Texas, and Iowa. The DIDs support Voice, Fax, Video, and even Text Messaging (by request). The only requirement at your end is a dedicated IP address for your VoIP server. Once you receive your welcome email with your number, be sure to whitelist the provider’s IP address in your firewall. For Incredible PBX servers, use add-ip to whitelist the UDP SIP port, 5060, using the IP address provided in your welcoming email.

Here’s the link to order your DIDs.

Your DID Trunk Setup in your favorite GUI should look like this:

Trunk Name: IPC
Peer Details:
type=friend
qualify=yes
host={IP address provided in welcome email}
context=from-trunk

Your Inbound Route should specify the 10-digit DID. Enjoy!


blank
Need help with Asterisk? Visit the PBX in a Flash Forum.


Special Thanks to Our Generous Sponsors


FULL DISCLOSURE: ClearlyIP, Skyetel, Vitelity, DigitalOcean, Vultr, VoIP.ms, 3CX, Sangoma, TelecomsXchange and VitalPBX have provided financial support to Nerd Vittles and our open source projects through advertising, referral revenue, and/or merchandise. As an Amazon Associate and Best Buy Affiliate, we also earn from qualifying purchases. We’ve chosen these providers not the other way around. Our decisions are based upon their corporate reputation and the quality of their offerings and pricing. Our recommendations regarding technology are reached without regard to financial compensation except in situations in which comparable products at comparable pricing are available from multiple sources. In this limited case, we support our sponsors because our sponsors support us.

blankBOGO Bonaza: Enjoy state-of-the-art VoIP service with a $10 credit and half-price SIP service on up to $500 of Skyetel trunking with free number porting when you fund your Skyetel account. No limits on number of simultaneous calls. Quadruple data center redundancy. $25 monthly minimum spend required. Tutorial and sign up details are here.

blankThe lynchpin of Incredible PBX 2020 and beyond is ClearlyIP components which bring management of FreePBX modules and SIP phone integration to a level never before available with any other Asterisk distribution. And now you can configure and reconfigure your new Incredible PBX phones from the convenience of the Incredible PBX GUI.

blankVitalPBX is perhaps the fastest-growing PBX offering based upon Asterisk with an installed presence in more than 100 countries worldwide. VitalPBX has generously provided a customized White Label version of Incredible PBX tailored for use with all Incredible PBX and VitalPBX custom applications. Follow this link for a free test drive!
 

blankSpecial Thanks to Vitelity. Vitelity is now Voyant Communications and has halted new registrations for the time being. Our special thanks to Vitelity for their unwavering financial support over many years and to the many Nerd Vittles readers who continue to enjoy the benefits of their service offerings. We will keep everyone posted on further developments.


Some Recent Nerd Vittles Articles of Interest…

Incredible PBX Backup & Restore for Cloud-Based Servers

blank

One of the perplexing realities with VoIP-based servers is how few people actually back up their systems. For anyone who has ventured into the IT world over the past 40 years, there’s one maxim worth remembering: "It’s not a question of whether your server will fail. It’s only a question of when." Incredible PBX® always has provided a backup mechanism in standalone servers to recover from disasters. But then cloud-based computing came along. Two of our favorite providers, Digital Ocean and Vultr, offer a backup snapshot option for 20% of the monthly cost of your platform. But many others do not. And snapshots in the same facility only insulate you from catastrophic failures that don’t take down the entire facility. Think: DNS, bombs, floods, earthquakes, hurricanes, and disgruntled employees.

We obviously can’t solve all of the world’s problems. But what we can do is provide a generic backup mechanism that will work with most cloud implementations of Incredible PBX. It allows you to make a complete backup of your server, copy the image off site, and restore it at another cloud location or by deploying a virtual machine in your home or office with VirtualBox®. Today we’ll show you how.

blank

Methodology. We’re assuming you are using the latest Incredible PBX 13-13 platform with either CentOS® or Scientific Linux™ 6 or 7 running Asterisk® 13. We’re also assuming your primary server is cloud-based. Your backup server can be cloud-based or a virtual machine running under VirtualBox on a desktop PC. The trick is to build the backup platform at or near the creation time of your primary server so that both are using nearly identical Linux components, the same version of Asterisk, the same version of Incredible PBX, and the same versions of the 1,000+ packages that comprise an Incredible PBX VoIP platform. This is easy at the time you create your primary server. It’s much more difficult 5 or 10 years down the road. So don’t be a procrastinator. Build your backup platform. And do it now! In the case of VirtualBox, you can create the virtual machine and turn it off until that rainy day occurs. It won’t cost you a dime other than a little disk storage space.

Overview. Here are the 5 Steps to put your backup implementation plan into place:

  1. Build & Configure Incredible PBX 13-13 Primary Server in the Cloud
  2. Build Barebones Incredible PBX 13-13 Server at Secondary Site
  3. Make a Backup of Your Primary Server Every Week
  4. Copy Weekly Backup Image to One or More Off-Site Locations
  5. Periodically Test Restoring Backup to Secondary Server

1. Build & Configure Primary Server

We’ve covered the procedure for building an Incredible PBX 13-13 server starting from a CentOS platform or from the Incredible PBX 13-13 ISO. We continue to recommend the CentOS or Scientific Linux 6.9 platform. Whether to create a Lean, Mean implementation or the Whole Enchilada is your call to make. Configure your Extensions, Trunks, and Routes, and you’re ready for business.

2. Build a Barebones Secondary Server

The hardest part of Step #2 is deciding where to build your secondary Incredible PBX 13-13 server. It doesn’t need to be in the cloud unless you prefer that option. Part of this decision may turn on how many servers you actually support. If you have a dozen primary servers, then it probably makes sense to add #13 as your backup server. Then it will be available in case of a failure of any of the other servers. Just make sure it’s in a location 1,000+ miles away from the primary server which should provide ample protection from North Korea’s Rocket Man. You can install the Lean, Mean version of Incredible PBX 13-13 with no additional configuration. Make sure the version of CentOS or Scientific Linux matches your primary server. As noted, VirtualBox is a perfectly adequate backup platform.

3. Make a Weekly Backup of Primary Server

We’re offering the following script for your use pursuant to the GPL2 license. By using the script at no cost, you agree to assume all risks and absolve us from any liability regarding bugs, performance, or any other failure in the code. If that’s acceptable to you, copy the commands below and create a backup-full script in the /root folder of your primary server. After saving the script, make it executable: chmod +x backup-full.

#!/bin/bash
# backup-full for Incredible PBX, Copyright (c) 2008-2018, Ward Mundy & Associates, LLC
# Licensed pursuant to GPL2. See /root/COPYING on any Incredible PBX server for details
amportal stop
service mysqld stop
service httpd stop
service sendmail stop
cd /
tar -cf /tmp/backup.tar /bin /etc /home /lib /lib64 /media /mnt /opt /root /sbin /usr /var
service sendmail start
service httpd start
service mysqld start
amportal start
tar --delete -f /tmp/backup.tar etc/udev/rules.d
tar --delete -f /tmp/backup.tar etc/sysconfig/network-scripts
tar --delete -f /tmp/backup.tar var/lib/dhclient
tar --delete -f /tmp/backup.tar etc/fstab
tar --delete -f /tmp/backup.tar etc/resolv.conf
tar --delete -f /tmp/backup.tar etc/hosts
tar --delete -f /tmp/backup.tar etc/hostname
gzip /tmp/backup.tar
echo "Your backup is available: /tmp/backup.tar.gz"
echo "Copy it and test it in a safe place OFF SITE"
echo " "


To run the script, execute the following command: /root/backup-full

We recommend running the backup-full script during hours when your PBX is not in active use since Asterisk and other services typically are shut down for 5-10 minutes. Depending upon the size and performance of your server, the backup typically takes 15-20 minutes. Once the backup script finishes, copy /tmp/backup.tar.gz to a safe place away from the primary server every week. You can automate the backup and the copying procedure with a cron job if desired. If your primary PBX doesn’t change regularly, alter the backup schedule.

UPDATE: As many of you appreciate, VMware platforms are a very different beast. The same is true of some cloud platforms which don’t play nicely with full backups from other environments. The telltale sign is abrupt reboots when you attempt to login to the web GUI using a browser. If you will be backing up FROM or restoring TO a VMware virtual machine or some other incompatible platform, here’s a workaround. The backup methodology needs to be adjusted to collect all of your PBX configuration data without messing with the underlying operating system configuration. This is similar to the original Incredible Backup methodology. You may also find it handy whenever you have a backup cloud server that is similarly configured to your main cloud server.

First, you need to assure that your versions of the major components are the same on both your primary and backup server. As noted before, the easiest way to do this is to build the two platforms simultaneously. If you plan to use either the Full Enchilada or Incredible Fax add-ons on your primary server, then they also need to be installed and configured on your backup server. Once the two servers are operational, you can shut down the backup server for the time being. Then make your customizations on the primary server and make a backup. The backup script above will work with the exception of the tar command line which should be replaced with the following (as a single line command):

tar -cf /tmp/backup.tar /var/www /var/lib/mysql /var/lib/asterisk /root /etc/asterisk /etc/crontab /etc/pbx /var/spool/asterisk /etc/freepbx.conf /etc/amportal.conf

The restore scenario outlined below will be the same for VMware-style backups except your passwords on the restored platform will be your original backup server passwords with the exception of your FreePBX® GUI and Apache web passwords which will be inherited from the primary server at the time of the backup image.

4. Copy Backup Image to Off-Site Location(s)

Once the backup script finishes, copy /tmp/backup.tar.gz to a safe place away from the primary server every week. You can automate the backup and the copying procedure with a cron job if desired. If your primary PBX doesn’t change regularly, alter the backup schedule.

5. How to Restore Backup to Secondary Server

Before patting yourself on the back from having made a successful backup, let’s try restoring it to your secondary server to be sure everything still works. Here are a couple of tips before we get started. First, in the event of an actual emergency, you will find recovery is simplified if you use fully-qualified domain names in registering extensions to your primary server. In this way, you can simply alter the IP address of the FQDN in your DNS server to point to the backup server without having to reconfigure every extension on your PBX. Second, trunks that are registered from your primary PBX will automatically be registered from your secondary PBX when you bring it on line. For that reason, test your secondary server during non-working hours and always be sure to shut down Asterisk on the primary server (amportal stop) before bringing up your secondary server. Finally, trunks that are supported by IP address configuration rather than registration will need to be manually reconfigured with the secondary IP address before they will be available for use.

We’re offering the following script for your use pursuant to the GPL2 license. By using the script at no cost, you agree to assume all risks and absolve us from any liability regarding bugs, performance, or any other failure in the code. If that’s acceptable to you, copy the commands below and create a restore-full script in the /root folder of your backup server(s). After saving the script, make it executable: chmod +x restore-full.

#!/bin/bash
# restore-full for Incredible PBX, Copyright (c) 2008-2018, Ward Mundy & Associates, LLC
# Licensed pursuant to GPL2. See /root/COPYING on any Incredible PBX server for details
amportal stop
service mysqld stop
service httpd stop
service sendmail stop
chattr +i /etc/resolv.conf
cd /
tar zxvf /tmp/backup.tar.gz
echo "Shut off Asterisk on primary server now."
read -p "Press any key to continue with reboot..."
reboot

To restore the backup, begin by copying the backup.tar.gz file to /tmp on your backup server. Then run the script you created above: /root/restore-full.

Once the restore is completed, your server will reboot. Log back in using the credentials from your primary server and make sure everything is working.

NOTE: If your primary server is using eth0 for its Ethernet connection and your backup server is using venet0, then you’ll need to modify /etc/sysconfig/knockd and then restart PortKnocker on the backup platform: service knockd restart. The command to add looks like this:

OPTIONS="-i venet0:0"

If you’re backing up from a venet0 platform and restoring to an eth0 platform, then you’d need to reverse the process by removing the above entry from /etc/sysconfig/knockd and restarting PortKnocker. Enjoy!

Published: Tuesday, January 23, 2018


blank

NEW YEAR’S TREAT: If you could use one or more free DIDs in the U.S. with unlimited inbound calls and unlimited simultaneous channels, then today’s your lucky day. TelecomsXChange and Bluebird Communications have a few hundred thousand DIDs to give away so you better hurry. You have your choice of DID locations including New York, New Jersey, California, Texas, and Iowa. The DIDs support Voice, Fax, Video, and even Text Messaging (by request). The only requirement at your end is a dedicated IP address for your VoIP server. Once you receive your welcome email with your number, be sure to whitelist the provider’s IP address in your firewall. For Incredible PBX servers, use add-ip to whitelist the UDP SIP port, 5060, using the IP address provided in your welcoming email.

Here’s the link to order your DIDs.

Your DID Trunk Setup in your favorite GUI should look like this:

Trunk Name: IPC
Peer Details:
type=friend
qualify=yes
host={IP address provided in welcome email}
context=from-trunk

Your Inbound Route should specify the 10-digit DID. Enjoy!


blank
Need help with Asterisk? Visit the PBX in a Flash Forum.


Special Thanks to Our Generous Sponsors


FULL DISCLOSURE: ClearlyIP, Skyetel, Vitelity, DigitalOcean, Vultr, VoIP.ms, 3CX, Sangoma, TelecomsXchange and VitalPBX have provided financial support to Nerd Vittles and our open source projects through advertising, referral revenue, and/or merchandise. As an Amazon Associate and Best Buy Affiliate, we also earn from qualifying purchases. We’ve chosen these providers not the other way around. Our decisions are based upon their corporate reputation and the quality of their offerings and pricing. Our recommendations regarding technology are reached without regard to financial compensation except in situations in which comparable products at comparable pricing are available from multiple sources. In this limited case, we support our sponsors because our sponsors support us.

blankBOGO Bonaza: Enjoy state-of-the-art VoIP service with a $10 credit and half-price SIP service on up to $500 of Skyetel trunking with free number porting when you fund your Skyetel account. No limits on number of simultaneous calls. Quadruple data center redundancy. $25 monthly minimum spend required. Tutorial and sign up details are here.

blankThe lynchpin of Incredible PBX 2020 and beyond is ClearlyIP components which bring management of FreePBX modules and SIP phone integration to a level never before available with any other Asterisk distribution. And now you can configure and reconfigure your new Incredible PBX phones from the convenience of the Incredible PBX GUI.

blankVitalPBX is perhaps the fastest-growing PBX offering based upon Asterisk with an installed presence in more than 100 countries worldwide. VitalPBX has generously provided a customized White Label version of Incredible PBX tailored for use with all Incredible PBX and VitalPBX custom applications. Follow this link for a free test drive!
 

blankSpecial Thanks to Vitelity. Vitelity is now Voyant Communications and has halted new registrations for the time being. Our special thanks to Vitelity for their unwavering financial support over many years and to the many Nerd Vittles readers who continue to enjoy the benefits of their service offerings. We will keep everyone posted on further developments.


Some Recent Nerd Vittles Articles of Interest…

Happy New ISO: Incredible PBX 13-13 ISO Is Here

blank

We’re pleased to introduce the new, 64-bit Incredible PBX 13-13 ISO featuring the latest release of Asterisk® 13 and your favorite FreePBX® 13 GPL modules. Like its predecessor, it’s 100% open source and GPL code. The new Incredible PBX 13-13 ISO can be burned to either a DVD-ROM or a 1GB or larger USB flash drive using a Mac, a Windows PC, or almost any Linux machine. And, unlike some other distros, you’re more than welcome to share our code and the ISO with all of your friends and business associates. In fact, next week we’re releasing the new Incredible PBX build platform for those of you that want to roll your own ISO. Share your enhancements and tweaks or make a customized ISO for just your company and pass it around. We’d be delighted. And our previous tutorial will even show you how to set up and maintain your own Cloud Repository for Incredible PBX.

July 20 NEWS FLASH: Google now has discontinued support of their XMPP interface to Google Voice so the latest CentOS/SL versions of Incredible PBX 13-13 (including the Incredible PBX ISO) now incorporate NAF’s GVSIP interface to Google Voice. You can read all about it here. What has changed is you now add Google Voice trunks from the command line by running /root/gvsip-naf/install-gvsip. You can delete trunks by running /root/gvsip-naf/del-trunk. Once one or more trunks have been added, they are numbered GVSIP1 through GVSIPn. Using the GUI, you then add an Outbound Route and an Inbound Route for each trunk. You’ll need both your Google Voice 10-digit phone number and a Refresh Token to add a new trunk. This article will be updated in coming days to incorporate all of the latest changes which are documented in the referenced GVSIP tutorial.

blank

Introducing the Incredible PBX 13-13 ISO

Overview. The Incredible PBX installation process couldn’t be easier. Download IncrediblePBX13-13.iso from SourceForge. Burn the ISO to a DVD-ROM or USB thumb drive. Four different methods are outlined below. There’s lots of great hardware for about $200. Or, if you have an old PC lying around, that’ll work, too. Boot up the dedicated machine on which you want to install Incredible PBX. Choose whether you prefer the Incredible PBX Whole Enchilada with 31+ applications for Asterisk or the Lean & Mean version which is pure Asterisk compiled on the fly from source. Press the ENTER key. Choose your time zone, create a really secure root password, and have a coffee break. When Scientific Linux 6.9 has been installed, your server will reboot. Accept the Incredible PBX license agreement and press the ENTER key. Go to lunch and, when you return, you should be good to go. Finish reading this tutorial to add the finishing touches and secure your server. Then read the Incredible PBX Application User’s Guide to learn all about the dozens of FREE applications for Asterisk® that are included in the Enchilada build. DONE!

Let us take a moment to explain the Incredible PBX installation process using this ISO. We don’t hide stuff in our ISO or play games with your security. We don’t give ourselves or our application any secret permissions. There are just two steps to an Incredible PBX ISO install. When the install begins, it loads pure Scientific Linux 6.9 onto your server,1 not some homegrown concoction using proprietary repositories. Your server then reboots. After restarting, the very latest copy of the Incredible PBX 13-13 installer is downloaded and run (see the actual source code of the script below). You’ll find the source code for the Incredible PBX installer in your /root directory after the install is completed: IncrediblePBX-13-13R.sh. You’ll also find some other helpful scripts in /root including the optional (free) Incredible Fax installer. If you ever have a question about what was installed on your server, feel free to examine the source code of our installers or post a note on the PIAF Forum. It’s unencrypted GPL2 code. You’re free to use it, enhance it, and share it.

%post
###############################################################
#
# Post Script - this script runs on Incredible PBX server
# immediately after Scientific Linux 6.9 install finishes
#
###############################################################
/usr/sbin/ntpdate -su pool.ntp.org
rpm -e readahead
/bin/sed -i 's|rhgb quiet||' /boot/grub/grub.conf
/bin/echo "/tmp/firstboot" >> /etc/rc.d/rc.local
/bin/echo "#!/bin/bash" > /tmp/firstboot
/bin/echo " " >> /tmp/firstboot
/bin/echo "/etc/init.d/network restart" >> /tmp/firstboot
/bin/echo "wait" >> /tmp/firstboot
/bin/echo "export PATH=/usr/local/sbin:/usr/local/bin:/sbin:/bin:/usr/sbin:/usr/bin" >> /tmp/firstboot
/bin/echo "cd /root" >> /tmp/firstboot
/bin/echo "/usr/bin/wget http://incrediblepbx.com/favicon.ico" >> /tmp/firstboot
/bin/echo "if [ ! -f favicon.ico ]; then" >> /tmp/firstboot
/bin/echo " /bin/echo ' '" >> /tmp/firstboot
/bin/echo " /bin/echo 'WARNING: Network may be down. Download failed.'" >> /tmp/firstboot
/bin/echo " if [ ! -f /tmp/firstboot.msg ]; then" >> /tmp/firstboot
/bin/echo "  /bin/rpm -e NetworkManager" >> /tmp/firstboot
/bin/echo "  /bin/echo nameserver 8.8.8.8 >> /etc/resolv.conf" >> /tmp/firstboot
/bin/echo "  /bin/echo nameserver 8.8.4.4 >> /etc/resolv.conf" >> /tmp/firstboot
/bin/echo "  /bin/touch /tmp/firstboot.msg" >> /tmp/firstboot
/bin/echo "  /bin/echo 'Fix applied. Rebooting. One moment please...'" >> /tmp/firstboot
/bin/echo "  /usr/bin/reboot" >> /tmp/firstboot
/bin/echo "  exit" >> /tmp/firstboot
/bin/echo " fi" >> /tmp/firstboot
/bin/echo " echo 'We are going to exit now. What to do next:'" >> /tmp/firstboot
/bin/echo " echo ' '" >> /tmp/firstboot
/bin/echo " echo '**** WRITE THESE NEXT 6 STEPS DOWN... ****'" >> /tmp/firstboot
/bin/echo " echo ' '" >> /tmp/firstboot
/bin/echo " echo '1. Log into your server as root.'" >> /tmp/firstboot
/bin/echo " echo '2. Try this command: ping -c 1 incrediblepbx.com'" >> /tmp/firstboot
/bin/echo " echo '3. If it fails, fix your network and repeat ping test.'" >> /tmp/firstboot
/bin/echo " echo '     HINT: Before retest, try this: ifup eth0'" >> /tmp/firstboot
/bin/echo " echo '4. If it still fails: yum install NetworkManager. Then repeat ping test.'" >> /tmp/firstboot
/bin/echo " echo '5. When ping is successful, you may proceed.'" >> /tmp/firstboot
/bin/echo " echo '6. To continue install, run: /tmp/firstboot'" >> /tmp/firstboot
/bin/echo " echo ' '" >> /tmp/firstboot
/bin/echo " read -p 'Press RETURN key now to exit and login.'" >> /tmp/firstboot
/bin/echo " exit" >> /tmp/firstboot
/bin/echo "fi" >> /tmp/firstboot
/bin/echo "cd /root" >> /tmp/firstboot
/bin/echo "sed -i 's|NO_DM |NO_DM rhgb quiet|' /boot/grub/grub.conf" >> /tmp/firstboot
/bin/echo "/bin/touch incrediblepbx-install-log.txt" >> /tmp/firstboot
/bin/echo "/bin/touch oauth" >> /tmp/firstboot
/bin/echo "/usr/bin/wget http://incrediblepbx.com/incrediblepbx-13-13-LEAN.tar.gz" >> /tmp/firstboot
/bin/echo "/bin/tar zxvf incrediblepbx-13-13-LEAN.tar.gz" >> /tmp/firstboot
/bin/echo "/bin/rm -f incrediblepbx-13-13-LEAN.tar.gz" >> /tmp/firstboot
/bin/echo "sed -i '/firstboot/d' /etc/rc.d/rc.local" >> /tmp/firstboot
/bin/echo "./Inc*" >> /tmp/firstboot
/bin/echo "./Enc*" >> /tmp/firstboot
/bin/chmod +x /tmp/firstboot
eject
%end

Incredible PBX 13-13 ISO Installation Guide

Downloading the Incredible PBX 13-13 ISO. On the machine you’ll be using to create your installation media, download IncrediblePBX13-13.iso from SourceForge.

Burning a DVD-ROM from the ISO. If your server platform doesn’t have USB support, then burn the ISO to a DVD using a Mac or Windows machine.

Creating a USB Flash Drive Installer. If your server platform has USB ports, you have three ways to move the Incredible PBX 13-13 ISO to a 1GB or larger flash drive. You can use a Windows PC, a Mac, or a Linux machine to create the USB thumb drive installer.

blank

Creating a USB Flash Drive Installer with a Windows PC. In order to create a USB thumb drive using an ISO image, you’ll first need to install Rufus. It’s free. Once you’ve installed it, insert a blank USB thumb drive and run Rufus. Make your settings look like what’s shown above. Be very careful in choosing your Device. You don’t want to accidentally erase the wrong drive on your Windows machine. The correct choice is the USB thumb drive you just inserted. Don’t guess!! Step 2 is choosing the IncrediblePBX13-13.iso file that you downloaded from SourceForge. Step 3 is clicking Start. The ISOHybrid Window will be presented. Step 4 is changing the default setting to "Write in DD image mode." Step 5 is pressing OK. In a few minutes, your ISO image transfer to the USB flash drive will be finished. Give it 15 seconds just to be safe. Then remove the USB thumb drive and you’re ready to begin the install on your dedicated Incredible PBX server.

Creating a USB Flash Drive Installer with a Mac. To create a USB thumb drive using an ISO image on a Mac, first insert the USB thumb drive and partition it with a single MS-DOS partition using Disk Utility. Next, open a Terminal window and issue the command: diskutil list. Review the device names and find the one that matches the size of your thumb drive. It will be something like /dev/disk9. Again, be careful. You don’t want to accidentally erase the wrong drive on your Mac! Next, change to the directory into which you downloaded IncrediblePBX13-13.iso, e.g. cd Desktop. Now issue the following commands substituting the actual device name for /dev/disk9 below:

diskutil unmountDisk /dev/disk9
sudo dd if=IncrediblePBX13-13.iso bs=1m of=/dev/disk9
sudo sync
diskutil eject /dev/disk9

When the install completes, remove the USB thumb drive and you’re ready to begin the install on your dedicated Incredible PBX server. NOTE: There will be no feedback during the dd step above. It can take 15 minutes or more depending upon the horsepower of your Mac. Be patient!

Creating a USB Flash Drive Installer on a Linux machine. To create a USB thumb drive using an ISO image on a Linux machine, first log into your server as root. Insert a blank USB thumb drive. From the CLI, decipher the device name of your thumb drive: fdisk -l. The device name will be something like /dev/sdb. Be careful. You don’t want to accidentally erase the wrong drive on your Linux server! Change to the directory into which you downloaded IncrediblePBX13-13.iso, e.g. cd /root. To transfer the ISO to your thumb drive, issue the following commands replacing /dev/sdb with the actual device name for your thumb drive in lines 1 and 3 below:

dd if=IncrediblePBX13-13.iso bs=4M of=/dev/sdb
sync
udisks --detach /dev/sdb

When the install completes, remove the USB thumb drive and you’re ready to begin the install on your dedicated Incredible PBX server. NOTE: There will be no feedback during the dd step above. It can take 5 to 15 minutes depending upon the horsepower of your Linux machine.

Kicking Off the Incredible PBX 13-13 Install. Now we’re ready to install Incredible PBX 13-13 on your dedicated server platform. Simply insert the DVD-ROM or USB thumb drive in your server-to-be and boot. During the POST boot process, press the function key that displays a Boot Device Menu and choose your DVD-ROM drive or USB device. When the Incredible PBX 13-13 installation menu displays, choose the Default Install for Full Enchilada and press ENTER. Choose your time zone, create a really secure root password, and have a coffee break. When Scientific Linux 6.9 has been installed, your server will reboot. Accept the Incredible PBX license agreement and press the ENTER key. Go to lunch and, when you return, you should be good to go. When the installation finishes, reboot your server and log in as root to apply the last minute updates for Incredible PBX.

blank

To complete the install, perform the following from the Linux CLI while logged in as root:

  • Change your passwords: /root/update-passwords
  • Set your correct time zone: /root/timezone-setup
  • Add WhiteList entries to firewall if needed: /root/add-ip or /root/add-fqdn
  • Store PortKnocker credentials in a safe place: cat /root/knock.FAQ
  • *** THE REMAINING FEATURES ARE OPTIONAL ADDITIONS ***
  • Login to your NeoRouter VPN server: /root/nrclientcmd
  • To enable free faxing: /root/incrediblefax13.sh
  • Set admin password for AvantFax: /root/avantfax-pw-change
  • To enable PPTP VPN: /root/pptp-install

Managing Incredible PBX with a Browser

Most of your time initially configuring and managing your server will be spent using the web-based tools provided with Incredible PBX. Using any modern browser, go to the IP address of your server as shown in the status display above. This will bring up the login screen for the PBX Admin GUI. The default username is admin and the password is what you set during the final installation steps above. Once the Incredible PBX GUI appears, edit extension 701 so you can figure out (or change) the randomized passwords that were set up for your 701 extension and voicemail account: Applications -> Extensions -> 701. If you’re behind a hardware-based firewall, verify the NAT setting is set to YES.

Setting Up a Soft Phone for Incredible PBX

Now you’re ready to set up a telephone so that you can play with Incredible PBX. We recommend YateClient which is free. Download it from here. Run YateClient once you’ve installed it and enter the credentials for the 701 extension on Incredible PBX. You’ll need the IP address of your server plus your extension 701 password. Choose Settings -> Accounts and click the New button. Fill in the blanks using the IP address of your server, 701 for your account name, and whatever password you created for the extension. Click OK.

blank

Once you are registered to extension 701, close the Account window. Then click on YATE’s Telephony Tab and place some test calls to the numerous apps that are preconfigured on Incredible PBX. Dial a few of these to get started:


DEMO - Allison's IVR Demo
947 - Weather by ZIP Code
951 - Yahoo News
*61 - Time of Day
*68 - Wakeup Call
TODAY - Today in History

Now you’re ready to connect to the telephones in the rest of the world. If you live in the U.S., the easiest way (at least for now) is to set up a free Google Voice account. Your server is automatically configured for OAUTH authentication. The Incredible PBX 13-13 tutorial will walk you through the Google Voice setup procedure. The PIAF Forum includes dozens of recommendations to get you started.

blank

Troubleshooting Audio and DTMF Problems

You can avoid one-way audio on calls and touchtones that don’t work with these simple settings in the GUI: Settings -> Asterisk SIP Settings. Just plug in your public IP address and your private IP subnet. Then set ULAW as the only Audio Codec.

blank

A Few Words About Our Security Model

Incredible PBX for Scientific Linux joins our previous builds as our most secure turnkey PBX implementation. As configured, it is protected by both Fail2Ban and a hardened configuration of the IPtables Linux firewall. The latest release also includes Port Knocker for simple, secure access from any remote computer or smartphone. You can get up to speed on how the technology works by reading the Nerd Vittles tutorial. Your Port Knocker credentials are stored in /root/knock.FAQ together with activation instructions for your server and mobile devices. The NeoRouter VPN client also is included for rock-solid, secure connectivity to remote users. Read our previous tutorial for setup instructions. As configured, nobody can access your PBX without blank your credentials AND blank an IP address that is either on your private network or that matches the IP address of your server or the PC from which you installed Incredible PBX. You can whitelist additional IP addresses by running the command-line utility /root/add-ip. You can remove whitelisted IP addresses by running /root/del-acct. Incredible PBX is preconfigured to let you connect to many of the leading SIP hosting providers without additional firewall tweaking. We always recommend you also add an extra layer of protection by running your server behind a hardware-based firewall with no Internet port exposure, but that’s your call. And it’s your phone bill. 😉

The IPtables firewall is a complex piece of software. If you need assistance with configuring it, visit the PIAF Forum for some friendly assistance.

Incredible PBX Automatic Update Utility

Every time you log into your server as root, Incredible PBX will ping the IncrediblePBX.com web site to determine whether one or more updates are available to bring your server up to current specs. We recommend you log in at least once a week just in case some new security vulnerability should come along. We originally had planned to make our fortune off update fees, but we changed our mind. So… ignore the language in some earlier builds, contributions to our projects are PURELY VOLUNTARY. No one will be breaking down your door for a donation.

We also encourage you to sign up for an account on the PIAF Forum and join the discussion. In addition to providing first-class, free support, we think you’ll enjoy the camaraderie.

Incredible PBX Wholesale Providers Access

Nerd Vittles has negotiated a special offer that gives you instant access to 300+ wholesale carriers around the globe. In lieu of paying the $650 annual fee for the service, a 13% wholesale surcharge is assessed to cover operational costs of TelecomsXchange. In addition, TelecomsXchange has generously offered to contribute a portion of the surcharge to support the Incredible PBX open source project. See this Nerd Vittles tutorial for installation instructions and signup details.

Incredible PBX Application Users Guide

Your next stop ought to be learning about the three dozen applications included in Incredible PBX. We’ve put together this tutorial to get you started. There’s also a great tutorial to walk you through initial configuration of extensions, trunks, and routes. Enjoy!

Originally published: Monday, January 8, 2018


blankSupport Issues. With any application as sophisticated as this one, you’re bound to have questions. Blog comments are a terrible place to handle support issues although we welcome general comments about our articles and software. If you have particular support issues, we encourage you to get actively involved in the PBX in a Flash Forums. It’s the best Asterisk tech support site in the business, and it’s all free! Please have a look and post your support questions there. Unlike some forums, ours is extremely friendly and is supported by literally hundreds of Asterisk gurus and thousands of users just like you. You won’t have to wait long for an answer to your question.


blank

NEW YEAR’S TREAT: If you could use one or more free DIDs in the U.S. with unlimited inbound calls and unlimited simultaneous channels, then today’s your lucky day. TelecomsXChange and Bluebird Communications have a few hundred thousand DIDs to give away so you better hurry. You have your choice of DID locations including New York, New Jersey, California, Texas, and Iowa. The DIDs support Voice, Fax, Video, and even Text Messaging (by request). The only requirement at your end is a dedicated IP address for your VoIP server. Once you receive your welcome email with your number, be sure to whitelist the provider’s IP address in your firewall. For Incredible PBX servers, use add-ip to whitelist the UDP SIP port, 5060, using the IP address provided in your welcoming email.

Here’s the link to order your DIDs.

Your DID Trunk Setup in your favorite GUI should look like this:

Trunk Name: IPC
Peer Details:
type=friend
qualify=yes
host={IP address provided in welcome email}
context=from-trunk

Your Inbound Route should specify the 11-digit DID beginning with a 1. Enjoy!


Special Thanks to Our Generous Sponsors


FULL DISCLOSURE: ClearlyIP, Skyetel, Vitelity, DigitalOcean, Vultr, VoIP.ms, 3CX, Sangoma, TelecomsXchange and VitalPBX have provided financial support to Nerd Vittles and our open source projects through advertising, referral revenue, and/or merchandise. As an Amazon Associate and Best Buy Affiliate, we also earn from qualifying purchases. We’ve chosen these providers not the other way around. Our decisions are based upon their corporate reputation and the quality of their offerings and pricing. Our recommendations regarding technology are reached without regard to financial compensation except in situations in which comparable products at comparable pricing are available from multiple sources. In this limited case, we support our sponsors because our sponsors support us.

blankBOGO Bonaza: Enjoy state-of-the-art VoIP service with a $10 credit and half-price SIP service on up to $500 of Skyetel trunking with free number porting when you fund your Skyetel account. No limits on number of simultaneous calls. Quadruple data center redundancy. $25 monthly minimum spend required. Tutorial and sign up details are here.

blankThe lynchpin of Incredible PBX 2020 and beyond is ClearlyIP components which bring management of FreePBX modules and SIP phone integration to a level never before available with any other Asterisk distribution. And now you can configure and reconfigure your new Incredible PBX phones from the convenience of the Incredible PBX GUI.

blankVitalPBX is perhaps the fastest-growing PBX offering based upon Asterisk with an installed presence in more than 100 countries worldwide. VitalPBX has generously provided a customized White Label version of Incredible PBX tailored for use with all Incredible PBX and VitalPBX custom applications. Follow this link for a free test drive!
 

blankSpecial Thanks to Vitelity. Vitelity is now Voyant Communications and has halted new registrations for the time being. Our special thanks to Vitelity for their unwavering financial support over many years and to the many Nerd Vittles readers who continue to enjoy the benefits of their service offerings. We will keep everyone posted on further developments.


Some Recent Nerd Vittles Articles of Interest…

  1. If you’re wondering what packages are installed with Scientific Linux, come back next week and download the entire Incredible PBX ISO build environment. The 1,000+ packages installed on your server are included in the build platform itself. Feel free to add to them or change them to your heart’s content. We don’t have a million dollar staff. That’s why we depend upon folks like you to offer suggestions and enhancements. In short, we treat Incredible PBX like a real open source project. Come join the fun! []

Beginner’s Navigation Guide to VoIP PBXs and Nerd Vittles

blank

Here at Nerd Vittles, we cover a lot of VoIP territory over the course of a year. To kick off the new year, we thought it might be helpful for those just beginning their VoIP adventure to sketch out the VoIP lay of the land for you. We’re assuming that you came to our site because you wanted a VoIP solution that gives you something to play with and to learn from. That’s not for everybody, and there are less flexible, turnkey VoIP solutions that function pretty much like a toaster. At the top of that short list would be the Ooma Telo and OBi200. Both offer (almost) free calling in the U.S. and Canada.

Keep in mind that all of us started as beginners so there’s no reason to be intimidated if you choose to deploy your own PBX. We’ve gotten a dozen years of enjoyment out of our adventures with VoIP telephony, and there’s no reason you can’t do the same. Let’s begin.

Choosing a Hardware Platform for Your VoIP PBX

First, you’ll need to choose a platform for your VoIP-based PBX: dedicated hardware, virtual machine, or cloud-based PBX. In no small part, this choice depends upon the target audience for your PBX. If it’s for home use or a SOHO business, a $35 Raspberry Pi may suffice. On the other hand, if your PBX will be supporting more than a dozen users or more than a handful of simultaneous calls, we’d look elsewhere. Many of Intel’s Atom-based PCs work very well. And a VirtualBox virtual PBX running atop an iMac or beefy Dell PC can support dozens of users if you have the necessary Internet bandwidth to handle your call volume. Cloud-based servers come in all shapes and sizes as well. As prices have plummeted, cloud solutions have become our favorite. For $3 to $6 a month, you now can host your PBX in the cloud with automatic image backups of your entire server every week. If you’re willing to forfeit backups, here is a cloud solution that will only set you back about a dollar a month. If your server is primarily for business use, we strongly recommend our Platinum Sponsor, RentPBX, that offers dozens of VoIP choices for $14.99 a month with coupon code: NOGOTCHAS.

Choosing the Best PBX to Meet Your Requirements

Once you’ve nailed down your hardware platform, the next step is choosing an operating system and PBX to support your individual requirements. As you might have guessed, there are dozens from which to choose. In both the open source and commercial PBX world, most systems require a specific version of Linux so your operating system choice typically is dependent upon the PBX you choose. In the open source world, the PBX learning curve is often related to the feature set being offered. More sophisticated feature sets typically have a steeper learning curve. If you’re just getting started with VoIP and you want a platform for learning, experimenting, or home use, you can’t beat Incredible PBX 13-13 Whole Enchilada. It was designed by us to be a turnkey PBX for first-time users with rock-solid security and all of the features you will ever need. It includes 31 applications for Asterisk® that cover every imaginable function that can be performed with a telephone including faxing, voice dialing, SMS messaging, wakeup calls and telephone reminders, free calling, conferencing, text-to-speech applications such as News Headlines and Weather Forecasts, Wolfram Alpha for Siri-like queries, plus all the usual PBX features: blacklists, call forwarding, call waiting, call transfer, call parking, call recording, intercom, voicemail including voicemail transcription with email delivery, IVRs, paging, AutoAttendants, DISA, and many more.

If you’re an experienced Asterisk developer that just wants a lean PBX where you can customize it to meet individual customer’s requirements, then Incredible PBX 13-13 Lean should be just the ticket. All of its components are configurable including Asterisk which can be recompiled from the included source code.

At the sophisticated end of the spectrum is Incredible PBX for Wazo which is based upon the Wazo PBX, an Asterisk 15 realtime implementation with full support for High Availability redundancy, multi-party videoconferencing, WebRTC, and automatic nightly backups. It includes API libraries from which you literally can build your own customized PBX from the ground up. The Incredible PBX feature set provides a platform with virtually identical applications to those found in Incredible PBX 13-13.

Sandwiched in between Incredible PBX 13-13 and Incredible PBX for Wazo is Incredible PBX 13 for Issabel. Issabel is an enhanced fork of the previous Elastix 4.0 PBX. The 2018 release includes Asterisk 13, the LTS version of the Asterisk platform. With the new Incredible PBX 13 add-on, you get the best of all worlds with Google Voice support and dozens of applications for Asterisk. Issabel provides a Unified Communications platform that is second to none in the open source world.

Thus far, all of our recommendations have been to open source, GPL-licensed PBX platforms. But you’d be making a mistake to limit your search for business telephony platforms to open source offerings. Our corporate sponsor, 3CX, offers a full year of their commercial PBX running in the Google Cloud at no cost. It’s incredibly simple to install and configure. And the beauty of the 3CX commercial platform is it can scale to any size as your business grows. And the 3CX feature set can be expanded geometrically as your business requirements mature. We added free text-to-speech applications for News and Weather reports just last week. Our favorite open source deployment strategy is to install a 3CX PBX alongside Incredible PBX which yields literally the best of both worlds. The 3CX clients for Windows and Macs, Android, and iOS make VoIP telephony available from anywhere with a couple of button clicks, and 3CX users experience none of the traditional communications problems that invariably crop up on platforms deployed by novice VoIP users running Asterisk.

Getting Started with Extensions, Trunks, and Routes

The Big 3 when it comes to PBX configuration are extensions, trunks, and routes. Extensions carry calls between phones on the PBX and other phones either inside or outside your home or office. Trunks actually provide the links between your PBX and the outside telephony world. Inbound routes tell your PBX where to send incoming calls while Outbound routes tell your PBX which trunk to use when calls are made to numbers outside your PBX. We’ve covered this in more detail including dozens of trunk setups in this Nerd Vittles tutorial.

Making Free U.S./Canada Calls within the United States

There are three ways to make free calls using your PBX. If you’re in the United States, you can use Google Voice to make free calls to the U.S. and Canada if your PBX supports Google Voice trunks, e.g. Incredible PBX 13-13 Whole Enchilada and Incredible PBX for Issabel. An alternative, if your PBX does not directly support Google Voice trunks, e.g. Incredible PBX for Wazo and 3CX, is to use the Simonics SIP to Google Voice Gateway service. For Nerd Vittles users, there is a one-time $4.99 signup fee with no additional charges ever. Whether you live in the U.S or not, all the PBXs we’ve covered today can make free SIP calls to anyone in the world that has a SIP URI address and a SIP phone. Most SIP softphones are free.

Mastering the Incredible PBX Feature Set

Incredible PBX 13-13 Application User’s Guide

Configuring the Travelin’ Man 3 Firewall

All Incredible PBX servers include a firewall that is configured automatically as part of the installation process. On the 3CX platform, you’ll need to add the Travelin’ Man 3 firewall after installing your 3CX PBX. Here’s how:

3CX in the Cloud: 8 Great Ways to Secure Your Server

Configuring a Firewall WhiteList:

WhiteListing Users with Travelin’ Man 3 and IPtables Firewall

Learning to Build Effective IVRs

Interactive Voice Response (IVR) systems and AutoAttendants are the bread-and-butter applications for businesses. If you’ve ever called a business and actually spoken to a live person without encountering an IVR, lucky you! But, believe it or not, IVRs can actually be a useful tool including our Stealth AutoAttendant which lets you intercept incoming calls with a greeting which provides a slight delay to allow the caller (or you) to reroute the call to a specific destination before the default destination kicks in. Nerd Vittles and the Incredible PBX offerings provide all of the tools you’ll need to build any type of IVR imaginable. Mastering Allison Smith’s Top 15 is an excellent starting point.

Harnessing Nerd Vittles Resources

Google is your friend when it comes to finding tutorials of interest in the VoIP world. To narrow searches to just Nerd Vittles, use the following syntax:

stealth autoattendant site:nerdvittles.com

And the Nerd Vittles site itself provides several powerful ways to drill down into topics of interest. In the upper right column of any article, you’ll find a search function which will return a list of matching articles to peruse. At the bottom of every article, check out the all-new Articles of Interest section of Nerd Vittles arranged by topic. Also in the right column of Nerd Vittles, you’ll find a listing of Categories with Nerd Vittles articles conveniently grouped by topic. And, finally, you can quickly jump to the lead article on every major Incredible PBX implementation in the color-coded tabs labeled: GPL VOIP SOLUTIONS FOR ALL.

Happy New Year!

blank

Originally published: Monday, January 1, 2018


blankSupport Issues. With any application as sophisticated as a VoIP PBX, you’re bound to have questions. Blog comments are a terrible place to handle support issues although we welcome general comments about our articles and software. If you have particular support issues, we encourage you to get actively involved in the PBX in a Flash Forums. It’s the best Asterisk tech support site in the business, and it’s all free! Please have a look and post your support questions there. Unlike some forums, ours is extremely friendly and is supported by literally hundreds of Asterisk and 3CX gurus and thousands of users just like you. You won’t have to wait long for an answer to your question.


blank

NEW YEAR’S TREAT: If you could use one or more free DIDs in the U.S. with unlimited inbound calls and unlimited simultaneous channels, then today’s your lucky day. TelecomsXChange and Bluebird Communications have a few hundred thousand DIDs to give away so you better hurry. You have your choice of DID locations including New York, New Jersey, California, Texas, and Iowa. The DIDs support Voice, Fax, Video, and even Text Messaging (by request). The only requirement at your end is a dedicated IP address for your VoIP server. Once you receive your welcome email with your number, be sure to whitelist the provider’s IP address in your firewall. For Incredible PBX servers, use add-ip to whitelist the UDP SIP port, 5060, using the IP address provided in your welcoming email.

Here’s the link to order your DIDs.

Your DID Trunk Setup in your favorite GUI should look like this:

Trunk Name: IPC
Peer Details:
type=friend
qualify=yes
host={IP address provided in welcome email}
context=from-trunk

Your Inbound Route should specify the 11-digit DID beginning with a 1. Enjoy!


blank
Need help with Asterisk or 3CX? Visit the PBX in a Flash Forum.


Special Thanks to Our Generous Sponsors


FULL DISCLOSURE: ClearlyIP, Skyetel, Vitelity, DigitalOcean, Vultr, VoIP.ms, 3CX, Sangoma, TelecomsXchange and VitalPBX have provided financial support to Nerd Vittles and our open source projects through advertising, referral revenue, and/or merchandise. As an Amazon Associate and Best Buy Affiliate, we also earn from qualifying purchases. We’ve chosen these providers not the other way around. Our decisions are based upon their corporate reputation and the quality of their offerings and pricing. Our recommendations regarding technology are reached without regard to financial compensation except in situations in which comparable products at comparable pricing are available from multiple sources. In this limited case, we support our sponsors because our sponsors support us.

blankBOGO Bonaza: Enjoy state-of-the-art VoIP service with a $10 credit and half-price SIP service on up to $500 of Skyetel trunking with free number porting when you fund your Skyetel account. No limits on number of simultaneous calls. Quadruple data center redundancy. $25 monthly minimum spend required. Tutorial and sign up details are here.

blankThe lynchpin of Incredible PBX 2020 and beyond is ClearlyIP components which bring management of FreePBX modules and SIP phone integration to a level never before available with any other Asterisk distribution. And now you can configure and reconfigure your new Incredible PBX phones from the convenience of the Incredible PBX GUI.

blankVitalPBX is perhaps the fastest-growing PBX offering based upon Asterisk with an installed presence in more than 100 countries worldwide. VitalPBX has generously provided a customized White Label version of Incredible PBX tailored for use with all Incredible PBX and VitalPBX custom applications. Follow this link for a free test drive!
 

blankSpecial Thanks to Vitelity. Vitelity is now Voyant Communications and has halted new registrations for the time being. Our special thanks to Vitelity for their unwavering financial support over many years and to the many Nerd Vittles readers who continue to enjoy the benefits of their service offerings. We will keep everyone posted on further developments.


Some Recent Nerd Vittles Articles of Interest…

Creating Free IBM Voice Prompts for Asterisk and 3CX

blank

We frequently receive requests asking how best to create custom voice prompts to use with Asterisk® or 3CX® PBXs. Of course, our first recommendation is to always direct folks to Allison Smith whose voice prompts for Asterisk are legendary. But, for those on a tight budget, recordings by a professional voice talent may not be a viable option. So, today, in the Christmas spirit, we want to deliver the next best thing with synthesized voice prompts that are second to none. For regular readers of Nerd Vittles, you’re already aware of our enthusiasm for IBM’s new TTS offerings. You can try them out for yourself by clicking View Demo here. Or you can sample the Weather Report for 3CX that we uploaded to SoundCloud:


[soundcloud url="https://api.soundcloud.com/tracks/364353344″ params="auto_play=false&hide_related=false&show_comments=true&show_user=true&show_reposts=false&visual=true" width="80%" height="350″ iframe="true" /]

Cost issues aside, other users may need voice prompts for VoIP applications that require a language other than English. With IBM’s TTS offerings, you have quite a selection of voices and languages from which to choose:

blank

We already have delivered adaptations of some of our News and Weather TTS applications for both Asterisk and 3CX platforms. But there are other occasions where you may want to build interactive IVRs or custom applications that require custom voice prompts to obtain information from callers such as requests for a name, a phone number, a part number, a location, a department, or many other pieces of data that are used to formulate data base queries. And now there’s a simple, professional, and free way to create these voice prompts using IBM’s TTS platform and Incredible PBX® 13-13. The first million characters of TTS synthesis and the resultant voice files are free every month. That will be more than ample for almost all of our users. To get started, you’ll need to set up a free account with IBM Bluemix and install Incredible PBX 13-13 on a platform of your choice: a dedicated server, a virtual machine on your desktop PC using VirtualBox, or a cloud-based server.

Getting Started with IBM Bluemix TTS Service

NOV. 1 UPDATE: IBM has moved the goal posts effective December 1, 2018:

blank

You can start your free, 30-day trial of IBM Bluemix services without providing a credit card. Just sign up here. Once your account is activated, here’s how to obtain credentials for the TTS service to use with Incredible PBX 13-13. Start by logging in to your IBM Bluemix account. Once you’re logged in, click on your account name (1) in the upper right corner of your web page to reveal the pull-down to select your Region, Organization, and Space. Follow the blue links at the bottom of the pull-down menu to create an Organization and Space for TTS.


blank

Next, click the Menu icon which is displayed as three horizontal bars on the left side of the web page. Choose Watson. Click Create Watson Service and select Text to Speech from the applications listing. Watson will generate a new TTS service template and display it. Make certain that your Region, Organization, and Space are shown correctly. Then verify that the Standard Pricing Plan is selected. When everything is correct, click the Create button.

When your Text to Speech application displays, click Service Credentials and then click New Credential (+). When the Add New Credential dialog appears, leave the default settings as they are and click Add. Your Credentials Listing then will appear. Click View Credentials beside the new entry you just created. Write down your URL, username, and password. You’ll need these later to configure the IBM Bluemix TTS service. Logout of the IBM Cloud by clicking on the little face in the upper right corner of your browser window and choose Log Out. Confirm that you do, indeed, wish to log out.

Getting Started with Incredible PBX 13-13

We won’t repeat the tutorial that walks you through installation of Incredible PBX 13-13. Just follow the steps outlined here. Once your server is up and running, log into your server as root using SSH or Putty. We need to add MP3 support to the SOX application before we can create voice prompts reliably with IBM’s Bluemix TTS service. Here’s how:

yum -y remove sox
yum -y install libmad libmad-devel libid3tag libid3tag-devel lame lame-devel flac-devel
cd /usr/src
wget https://sourceforge.net/projects/sox/files/sox/14.4.2/sox-14.4.2.tar.gz
tar zxvf sox-14.4.2.tar.gz
rm -f sox-14.4.2.tar.gz
cd sox*
./configure
make -s
make install
ldconfig
ln -s /usr/local/bin/sox /usr/bin/sox

Installing the Voice Prompts Script for TTS

Now we’re ready to install the Nerd Vittles Voice Prompts script that we’ll use to actually create the custom voice prompts. While you’re still logged into your server as root with SSH or Putty, issue the following commands:

cd /root
wget http://incrediblepbx.com/ibmprompt.tar.gz
tar zxvf ibmprompt.tar.gz
rm -f ibmprompt.tar.gz

Adding Your Credentials to the Script

Using your favorite editor, it’s time to add your IBM TTS credentials to the Voice Prompt script: nano -w ibmprompt.php. Simply replace the x’s in $IBM_username and $IBM_password with your credentials from above. If you prefer a different voice for your voice prompts, update the $IBM_voice option using the examples shown below. For example, for the Brazilian Portuguese voice, use $IBM_voice = "pt-BR_IsabelaVoice". Verify that the $IBM_url matches what was provided with your credentials. Once you’ve updated the entries, save the file: Ctrl-X, Y, and ENTER.

blank

Taking Voice Prompts Script for a Test Drive

Now we’re ready to try thing out. The syntax while logged into the /root folder looks like this. If creating a prompt in a different language, text should be in native language, not English.

./ibmprompt.php "Text of your voice prompt"

Once the voice prompt is generated, you’ll find voiceprompt.wav in the /root folder. You can rename it and move it to a suitable location to meet your requirements. Enjoy!

Originally published: Wednesday, December 27, 2017


blankSupport Issues. With any application as sophisticated as this one, you’re bound to have questions. Blog comments are a terrible place to handle support issues although we welcome general comments about our articles and software. If you have particular support issues, we encourage you to get actively involved in the PBX in a Flash Forums. It’s the best Asterisk tech support site in the business, and it’s all free! Please have a look and post your support questions there. Unlike some forums, ours is extremely friendly and is supported by literally hundreds of Asterisk and 3CX gurus and thousands of users just like you. You won’t have to wait long for an answer to your question.


blank
Need help with Asterisk or 3CX? Visit the PBX in a Flash Forum.


Special Thanks to Our Generous Sponsors


FULL DISCLOSURE: ClearlyIP, Skyetel, Vitelity, DigitalOcean, Vultr, VoIP.ms, 3CX, Sangoma, TelecomsXchange and VitalPBX have provided financial support to Nerd Vittles and our open source projects through advertising, referral revenue, and/or merchandise. As an Amazon Associate and Best Buy Affiliate, we also earn from qualifying purchases. We’ve chosen these providers not the other way around. Our decisions are based upon their corporate reputation and the quality of their offerings and pricing. Our recommendations regarding technology are reached without regard to financial compensation except in situations in which comparable products at comparable pricing are available from multiple sources. In this limited case, we support our sponsors because our sponsors support us.

blankBOGO Bonaza: Enjoy state-of-the-art VoIP service with a $10 credit and half-price SIP service on up to $500 of Skyetel trunking with free number porting when you fund your Skyetel account. No limits on number of simultaneous calls. Quadruple data center redundancy. $25 monthly minimum spend required. Tutorial and sign up details are here.

blankThe lynchpin of Incredible PBX 2020 and beyond is ClearlyIP components which bring management of FreePBX modules and SIP phone integration to a level never before available with any other Asterisk distribution. And now you can configure and reconfigure your new Incredible PBX phones from the convenience of the Incredible PBX GUI.

blankVitalPBX is perhaps the fastest-growing PBX offering based upon Asterisk with an installed presence in more than 100 countries worldwide. VitalPBX has generously provided a customized White Label version of Incredible PBX tailored for use with all Incredible PBX and VitalPBX custom applications. Follow this link for a free test drive!
 

blankSpecial Thanks to Vitelity. Vitelity is now Voyant Communications and has halted new registrations for the time being. Our special thanks to Vitelity for their unwavering financial support over many years and to the many Nerd Vittles readers who continue to enjoy the benefits of their service offerings. We will keep everyone posted on further developments.


Some Recent Nerd Vittles Articles of Interest…

Free Calling Returns with Incredible PBX 15 for Wazo


blank

Since we began our XiVO/Wazo adventure 18 months ago, the most requested feature has been direct support for Google Voice with OAuth 2 authentication. For those in the United States, it remains the cheapest VoIP solution on the planet with unlimited free calls in the U.S. and Canada. When Wazo migrated to Asterisk® 15, the Asterisk platform natively supported Google Voice, but there was no direct support in either Wazo or Incredible PBX. Instead, over the past couple months, we’ve had Google Voice functionality through Simonics SIP to Google Voice Gateway. Well, today’s a new day. We’re pleased to announce Google Voice is back!

Overview. If you’re new to Google Voice, here’s how the installation scenario goes. First, you set up a Gmail account at gmail.com. Next, you create a Google Voice account. Then, you configure Google Voice for use with Asterisk®. Next, you obtain your Google Voice OAuth 2 Refresh Token which becomes your password to use in configuring Google Voice on the Wazo platform. Next, using SSH or Putty, you log into your Wazo server as root and run the add-gvtrunk script to get your Google Voice credentials set up in Wazo. Finally, you log into the Wazo GUI with a browser and set up a custom trunk as well as an outgoing and incoming route for Google Voice calls. To add more Google Voice trunks, you simply repeat the drill. You now should have a perfectly functioning, free VoIP platform compliments of Google and Sylvain Boily and his development team. Start by deploying Incredible PBX 15 for Wazo.

Configuring Google Voice for Wazo

If you’re one of the five people on Earth that does not yet have a Gmail account, start there. Once you’ve set up your Gmail account and logged in, open a new browser tab to access the Google Voice site. Accept the Google Terms and Privacy Policy. Then choose a new Phone Number in your favorite area code. NOTE: Before Google will assign you a number, you must enter an existing U.S. phone number to verify your identity and location as well as to use for initially forwarding calls. Once your account is set up, you will get an email asking that you verify your email address.

Google continues to tighten up on obtaining more than one Google Voice number from the same computer or the same IP address. If this is a problem for you, here’s a workaround. From your smartphone, install the Google Voice app from iPhone App Store or Google’s Play Store. Then open the app and login to your new Google account. Choose your new Google Voice number when prompted and provide a cell number with SMS as your callback number for verification. Once the number is verified, log out of Google Voice. Do NOT make any calls. Now head back to your PC’s browser and login to http://google.com/voice. You will be presented with the new Google Voice interface which does not include the Google Chat option. But fear not. At least for now there’s still a way to get there. After you have set up your new phone number and opened the Google Voice interface, click on the 3 vertical dots in the left sidebar (it’s labeled More). When it opens, click Legacy Google Voice in the sidebar. That will return you to the old UI. Now click on the Gear icon (upper right) and choose Settings. Make sure the Google Chat option is selected and disable forwarding calls to whatever default phone number you set up.

Next, click on the Calls tab. Make sure your settings match these:

  • Call ScreeningOFF
  • Call PresentationOFF
  • Caller ID (In)Display Caller’s Number
  • Caller ID (Out)Don’t Change Anything
  • Do Not DisturbOFF
  • Call Options (Enable Recording)OFF
  • Global Spam FilteringON

Under the Voicemail tab, plug in your email address so you get notified of new voicemails. Then click Save Settings. Down the road, receipt of a Google Voice voicemail will be a big hint that something has come unglued on your PBX.

One final word of caution is in order regardless of your choice of providers: Do NOT use special characters in your Google Voice password, and don’t enable two-step authentication.

Now it’s time to obtain your OAuth 2 credentials. Even though it’s a bit more work on the front end, the good news is you won’t have to worry about your Google Voice trunks failing when Google phases out plain-text passwords. The other good news is you won’t be passing your plain-text Google Voice credentials across the Internet for everyone in the world to see.

Obtaining Your Google Voice OAuth 2 Credentials

While you’re still logged into your Google Voice account, you need to obtain a refresh_token which is what you’ll use instead of a password when setting up your Google Voice account with XiVO. Here’s how.

1. Be sure you are still logged into your Google Voice account. If not, log back in at https://voice.google.com.

2. In a separate browser tab, go to the Google OAUTH Playground using your browser while still logged into your Google Voice account.

3. Once logged in to Google OAUTH Playground, click on the Gear icon in upper right corner (as shown below).

blank

  3a. Check the box: Use your own OAuth credentials

  3b. Enter Incredible PBX OAuth Client ID:

466295438629-prpknsovs0b8gjfcrs0sn04s9hgn8j3d.apps.googleusercontent.com

  3c. Enter Incredible PBX OAuth Client secret: 4ewzJaCx275clcT4i4Hfxqo2

  3d. Click Close

4. Click Step 1: Select and Authorize APIs (as shown below)

blank

  4a. In OAUTH Scope field, enter: https://www.googleapis.com/auth/googletalk

  4b. Click Authorize APIs (blue) button.

With a recent Google change, you then will be prompted to choose your Google account again. Click on the same account name that you logged into in Step #1. You then will be prompted whether to allow Google to view and send Chat messages. Click Allow.

5. Click Step 2: Exchange authorization code for tokens

  5a. Click Exchange authorization code for tokens (blue) button

  5b. When the tokens have been generated, Step 2 will close.

6. Reopen Step 2 and copy your Refresh_Token. This is the "password" you will need to enter (together with your Gmail account name and 10-digit GV phone number) when you add your GV trunk with the add-gvtrunk script. Store this refresh_token in a safe place. Google doesn’t permanently store it!

7. Authorization tokens NEVER expire! If you ever need to remove your authorization tokens, go here and delete Incredible PBX Google Voice OAUTH entry by clicking on it and choosing DELETE option.

Switch back to your Gmail account and click on the Phone icon at the bottom of the window to place one test call. Once you successfully place a call, you can log out of Google Voice and Gmail.

Yes, this is a convoluted process. Setting up a secure computing environment often is. Just follow the steps and don’t skip any. It’s easy once you get the hang of it. And you’ll sleep better.

Downloading and Installing Google Voice with OAuth 2

Installs of Incredible PBX 15 for Wazo beginning December 7 already have the necessary components in place to support Google Voice. If you have an earlier installation of Incredible PBX 15 for Wazo, you can easily upgrade your server to support Google Voice. Simply log into your server’s Linux CLI as root using SSH or Putty and issue the following commands:

cd /root
wget http://incrediblepbx.com/gvtrunk15.tar.gz
tar zxvf gvtrunk15.tar.gz
rm -f gvtrunk15.tar.gz

If you’re upgrading Wazo from a release before 17.15, you can follow the usual upgrade steps after first removing your existing Google Voice trunks from the configuration. Start by copying your Google Voice credentials from /etc/asterisk/oauth_xmpp.conf. Next, delete the following file: /etc/asterisk/extensions_extra.d/gv.conf. Then perform the upgrade:

cd /root
cp -pr /etc/postfix /root
cp -p /etc/nginx/sites-enabled/xivo /root
echo "noload => res_xmpp_oauth.so" >> /etc/asterisk/modules.conf
xivo-dist wazo-17.17
apt-get update
/etc/init.d/netfilter-persistent stop
wazo-upgrade
iptables-restart
# put the Incredible PBX web add-ons back in place
cd /
wget http://incrediblepbx.com/incredible-nginx.tar.gz
tar zxvf incredible-nginx.tar.gz
rm -f incredible-nginx.tar.gz
ln -s /etc/nginx/locations/https-available/01_incrediblepbx /etc/nginx/locations/https-enabled/.
cd /etc/nginx
wget http://incrediblepbx.com/nginx-config.tar.gz
tar zxvf nginx-config.tar.gz
rm -f /etc/nginx/sites-enabled/default
cp -p /root/xivo /etc/nginx/sites-enabled
/etc/init.d/nginx restart
cp -pr /root/postfix /etc
/etc/init.d/postfix restart
sed -i 's|fr|us|' /etc/asterisk/indications.d/99-general.conf
/etc/init.d/asterisk restart

Initial Google Voice OAuth Trunk Setup with Wazo

Now it’s time to create your Google Voice OAuth 2 trunk to use with Wazo. Log back into the Linux CLI as root. Be sure you have your 10-digit Google Voice phone number, your Google account name without @gmail.com, and your Refresh Token from the previous step. Then run the script to add your Google Voice trunk:

cd /root
./add-gvtrunk

Plug in your Google Voice phone number, your account name (without @gmail.com), and refresh token when prompted. Check your work carefully. When the install finishes, fire up your favorite browser to finish the setup using the settings displayed in the Linux CLI.

Configuring Wazo for Google Voice OAuth

From a browser pointed to your server’s IP address, log in to Wazo as root with your GUI password.

Choose Services.IPBX.Trunk Management.Customized. Click on + Add to create a new custom trunk. Configure the trunk using the settings provided in the previous step. Click the Save button when finished. The Trunk Name will be your actual gmailname (without @gmail.com). Interface will be Motif/gmailname (using your actual Gmail name). Interface suffix will be @voice.google.com. And the Context will be Outcalls (to-extern).

blank

Next, choose Services.IPBX.Call Management.Incoming Calls. Click on + Add to create a new inbound route for your Google Voice DID. This is where you tell Wazo how to route calls placed to your Google Voice number. For your DID, enter your 10-digit Google Voice number. For the Context, choose Incalls (from-extern). Then choose from the pick lists to select a Destination and Redirect option for the incoming calls. It could be an extension, a ring group, a conference room, or an IVR. Click Save when you’re finished.

blank

Finally, choose Services.IPBX.Call Management.Outgoing Calls. Click on + Add to create a new outbound route. Under the General tab, configure the route as shown below using a Name of out_gmailname (using your actual Gmail name). The Context should be Outcalls (to-extern). The Preprocess subroutine should be subr-gv-outcall. And the desired Custom Trunk should be dragged left to the selected column:

blank

Under the Exten tab, add the desired 10-digit Exten string that users will dial to place a call through the Google Voice trunk. Trim off any prefix (such as 9) that you assigned to the dial string using the Stripnum setting. Then click the Save button.

For example, for a first trunk, you might choose NXXNXXXXXX as the Exten with a Stripnum of 0. This would tell Wazo to route all 10-digit calls to this Custom GV Trunk. For a second Google Voice trunk, you might choose 9NXXNXXXXXX with a Stripnum of 1. This would tell Wazo to route 11-digit calls with a 9 prefix to this Custom Trunk AND to strip off the first digit (9) before sending the 10-digit call to Google Voice.

blank

SMS Messaging with Google Voice

Incredible PBX implementations include a separate Python-based component called pygooglevoice that allows SMS messaging using a Google Voice account. You’ll find the SMS Dictator and SMS message blasting scripts in the /root folder of your server. Be advised that the gvoice script used to send these SMS messages does NOT use OAuth 2 authentication and requires your traditional Google Voice account name and password. Because it uses plain text, you probably will experience failures using gvoice unless your PBX is housed on the same server from which you traditionally access this account. The workaround is to do the following immediately before attempting to use SMS messaging with Google Voice. Using a browser, log into the Gmail account that corresponds to the account you plan to use for SMS messaging. In a separate tab of your browser while still logged into Gmail, go to the following link and enable Less Secure Apps for this account. In a third tab, go to the following link and activate the Google Reset Procedure. Now, from the Linux CLI on your PBX, attempt to login to gvoice using your Gmail account name including @gmail.com AND your plain-text Gmail password. If it succeeds, you’re good to go and can now use the SMS messaging tools. Type quit to exit from gvoice. Google normally follows up insecure access attempts with an email requesting that you confirm this is a "safe IP address" for your account. If you fail to respond to that email, you probably will need to repeat this exercise every time you attempt to use SMS messaging.

Taking Google Voice for a Test Drive

That completes the Google Voice setup. You now should be able to place a call using your Google Voice trunk by dialing any 10-digit number. And calls placed to your Google Voice number should ring at the inbound destination you chose above.

If you have additional Google Voice trunks, simply run /root/add-gvtrunk again and insert the new credentials.

If you ever need to delete a Google Voice account, just run /root/del-gvtrunk with the name of the Google Voice trunk to delete. Enjoy your free phone service!

Originally published: Monday, December 11, 2016


blankSupport Issues. With any application as sophisticated as this one, you’re bound to have questions. Blog comments are a terrible place to handle support issues although we welcome general comments about our articles and software. If you have particular support issues, we encourage you to get actively involved in the PBX in a Flash Forums. It’s the best Asterisk tech support site in the business, and it’s all free! Please have a look and post your support questions there. Unlike some forums, ours is extremely friendly and is supported by literally hundreds of Asterisk and Wazo gurus and thousands of users just like you. You won’t have to wait long for an answer to your question.


blank
Need help with Asterisk or Wazo? Visit the PBX in a Flash Forum.


Special Thanks to Our Generous Sponsors


FULL DISCLOSURE: ClearlyIP, Skyetel, Vitelity, DigitalOcean, Vultr, VoIP.ms, 3CX, Sangoma, TelecomsXchange and VitalPBX have provided financial support to Nerd Vittles and our open source projects through advertising, referral revenue, and/or merchandise. As an Amazon Associate and Best Buy Affiliate, we also earn from qualifying purchases. We’ve chosen these providers not the other way around. Our decisions are based upon their corporate reputation and the quality of their offerings and pricing. Our recommendations regarding technology are reached without regard to financial compensation except in situations in which comparable products at comparable pricing are available from multiple sources. In this limited case, we support our sponsors because our sponsors support us.

blankBOGO Bonaza: Enjoy state-of-the-art VoIP service with a $10 credit and half-price SIP service on up to $500 of Skyetel trunking with free number porting when you fund your Skyetel account. No limits on number of simultaneous calls. Quadruple data center redundancy. $25 monthly minimum spend required. Tutorial and sign up details are here.

blankThe lynchpin of Incredible PBX 2020 and beyond is ClearlyIP components which bring management of FreePBX modules and SIP phone integration to a level never before available with any other Asterisk distribution. And now you can configure and reconfigure your new Incredible PBX phones from the convenience of the Incredible PBX GUI.

blankVitalPBX is perhaps the fastest-growing PBX offering based upon Asterisk with an installed presence in more than 100 countries worldwide. VitalPBX has generously provided a customized White Label version of Incredible PBX tailored for use with all Incredible PBX and VitalPBX custom applications. Follow this link for a free test drive!
 

blankSpecial Thanks to Vitelity. Vitelity is now Voyant Communications and has halted new registrations for the time being. Our special thanks to Vitelity for their unwavering financial support over many years and to the many Nerd Vittles readers who continue to enjoy the benefits of their service offerings. We will keep everyone posted on further developments.


Some Recent Nerd Vittles Articles of Interest…

It’s Soup: The Definitive Quick Start Guide to Wazo 17.17

blank

Today we’re pleased to introduce Wazo 17.17, the latest iteration in the Wazo fork of XiVO. Twelve years in the making with the same development team, Wazo 17.17 is really something special. It’s the latest release featuring Asterisk® 15 with multi-party videoconferencing and also includes a new easy-to-use WebRTC feature and support for Asterisk FollowMe Roaming. We are pleased to announce that this release of Wazo 17.17 using the latest Incredible PBX 15 installer for Asterisk 15 now supports native Google Voice trunks with OAuth 2. Of course, all of your favorite Incredible PBX add-ons are ready as well. What follows is a new soup-to-nuts tutorial covering everything you need to know to get started with Incredible PBX for Wazo 17.17.

blank

Wazo 17.17 enhances the brand new user interface to complement Wazo’s existing GUI. Revolutionary is probably the best way to describe its design. The reason is that it is generated using pure API calls to the Wazo engine. What that means to the administrator is you can tweak it, enhance it, replace it, or build additional functionality into your UI using the same API calls that the Wazo developers employed to build these components. This is obviously the first of many iterations that will be released in coming months, but it gives you an opportunity to kick the tires. Once you complete the installation process which follows, simply use a browser to log into the IP address of your server at the following link: https://serverIP/admin/. To begin, login with your root GUI credentials and click Plugins to display available options (pictured above). Then install each of the following plugins to begin: Users, Extensions, Contexts, and Devices. The remaining plugins are optional; however, the following plugins are not yet operational: Outcalls and Trunks. The Parking Lots and Switchboard plugins are functional but do not yet show existing setups configured through the legacy GUI. Additional tips and getting started tips are available here and here.

If you’ve been following along in our XiVO adventure with Incredible PBX last year, then you already know that there were a significant number of configuration hoops to jump through once the base install was finished. While these steps are well documented in the original Incredible PBX for XiVO tutorial, there still were plenty of opportunities for typos and skipping steps. Any misstep could spell the difference in a perfectly functioning PBX and one that couldn’t make or receive calls. So we introduced XiVO Snapshots, and today we bring the same technology to the Wazo platform as well.

blank

A Wazo Snapshot is just what the name implies. It’s a snapshot of a working Wazo PBX that has virtually everything already configured: SIP settings that work with Asterisk®, a SIP extension that works with a SIP phone plus your cellphone, a SIP extension preconfigured for WebRTC that uses the new Opus codec, SIP and Google Voice trunk setups for many of the major commercial providers, and default inbound and outbound routes to ease the task of routing calls into and out of your PBX. Basically, you plug in your credentials from your favorite provider after running the Incredible PBX for Wazo installer, tell Wazo how to route the calls, and you’re done. You can have a stable and functional PBX making calls to anywhere in the world in a matter of minutes. Then you can review our numerous tutorials to add additional bells and whistles while actually using your Wazo PBX while you learn.

Incredible PBX for Wazo Installation Overview

Before we roll up our sleeves and walk you through the installation process, we wanted to provide a quick summary of the 10 Basic Steps in setting up Incredible PBX for Wazo. By the way, the whole process takes less than an hour!

  1. Set Up Desired PBX Platform: Stand-alone PC, Virtual Machine, or Cloud-Based Server
  2. Run the Incredible PBX for Wazo installer
  3. Set Up One or More SIP or Google Voice Trunks for Your PBX
  4. Tell Wazo Where to Direct Incoming Calls from Each Trunk
  5. Tell Wazo Which Trunk to Use for Every Outbound Calling Digit Sequence
  6. Set Up a SoftPhone or WebRTC Phone (or both)
  7. Decide Whether to Activate Simultaneous Ringing on your Cellphone
  8. Add Google Speech Recognition Key (if desired)
  9. Activate DISA with Incredible PBX for Wazo (if desired)
  10. Test Drive Incredible PBX for Wazo

1. Incredible PBX for Wazo Hardware Platform Setup

NOTE: Ignore references to Debian 9 in the platform setup tutorials. Debian 9 is not quite ready yet so stick with Debian 8.

The first step is to choose your hardware platform and decide whether you want to babysit a server and network or leave those tasks to others. We’ve taken the guesswork out of the setups documented below. Five of the options are cloud providers, each of whom provides a generous discount to let you kick the tires. So click on the links below to review the terms and our walkthrough of the setup process on each platform.

2. Running the Incredible PBX for Wazo Installer

Once you have your hardware platform up and running, the rest of the initial setup process is easy. Simply download and run the Incredible PBX for Wazo installer. On some platforms, it first updates Debian 8 to current specs and reboots. Then log back in and rerun the installer a second time if you are prompted to do so.

cd /root
wget http://incrediblepbx.com/IncrediblePBX15-Wazo.sh
chmod +x IncrediblePBX15-Wazo.sh
./IncrediblePBX15-Wazo.sh


3. Setting Up SIP and Google Voice Trunks with Wazo

When the installation is finished, you can make toll-free calls in the U.S. and Canada without doing anything except dialing "1″ and the 10-digit number from any phone connected to your server. For other calls, there are two steps in setting up trunks to use with Incredible PBX. First, you have to sign up with the provider of your choice and obtain trunk credentials. These typically include the FQDN of the provider’s server as well as your username and password to use for access to that server. Second, you have to configure a trunk on the Incredible PBX for Wazo server so that you can make or receive calls outside of your PBX. As with the platform tutorials, we have taken the guesswork out of the trunk setup procedure for roughly a dozen respected providers around the globe. In addition, Wazo Snapshots goes a step further and actually creates the trunks for you, minus your credentials, as part of the initial Incredible PBX install.

For Google Voice trunks with Incredible PBX 15, log into your server as root and run ./add-gvtrunk. When prompted, insert your 10-digit Google Voice number, your Google Voice email address and your OAuth 2 token. The native Google Voice OAuth tutorial explains how to obtain it.

blank

For the other providers, review the setup procedure below and then edit the preconfigured trunk for that provider by logging into the Wazo web GUI and choosing IPX → Trunk Management → SIP Protocol. Edit the setup for your provider (as shown above) and fill in your credentials and CallerID number in the General tab. Activate the trunk in the Register tab after again filling in your credentials. Save your settings when finished. No additional configuration for these providers is required using the Incredible PBX for Wazo Snapshot.

4. Directing Incoming Calls from Wazo Trunks

Registered Wazo trunks typically include a DID number. With the exception of CallCentric, this is the number that callers would dial to reach your PBX. With CallCentric, it’s the 11-digit account number of your account, e.g. 17771234567. In the Wazo web GUI, we use IPX → Call Management → Incoming Calls to create inbound routes for every DID and trunk associated with your PBX. Two sample DIDs have been preconfigured to show you how to route calls to an extension or to an IVR. To use these, simply edit their settings and change the DID to match your trunk. Or you can create new incoming routes to send calls to dozens of other destinations on your PBX.

5. Routing Outgoing Calls from Wazo to Providers

Outgoing calls from extensions on your Wazo PBX must be routed to a trunk provider to reach call destinations outside your PBX. Outgoing call routing is managed in IPX → Call Management → Outgoing Calls. You tell Wazo which trunk provider to use in the General tab. Then you assign a Calling Digit Sequence to this provider in the Exten tab. For example, if NXXNXXXXXX were assigned to Vitelity, this would tell Wazo to send calls to Vitelity if the caller dialed a 10-digit number. Wazo has the flexibility to add and remove digits from a dialed number as part of the outbound call routing process. For example, you might want callers to dial 48NXXNXXXXXX to send calls to a Google Voice trunk where 48 spells "GV" on the phone keypad. We obviously don’t want to send the entire dial string to Google Voice so we tell Wazo to strip the first 2 digits (48) from the number before routing the call out your Google Voice trunk. We’ve included two examples in the Wazo Snapshot to get you started. Skype Connect (shown below) is an example showing how to strip digits and also add digits before sending a call on its way:

blank


6. Setting Up a Softphone & WebRTC with Wazo

If you’re a Mac user, you’re lucky (and smart). Download and install Telephone from the Mac App Store. Start up the application and choose Telephone:Preference:Accounts. Click on the + icon to add a new account. To set up your softphone, you need 3 pieces of information: the IP address of your server (Domain), and your Username and Password. In the World of Wazo, you’ll find these under IPBX → Services → Lines. Just click on the Pencil icon beside the extension to which you want to connect. Now copy or cut-and-paste your Username and Password into the Accounts dialog of the Telephone app. Click Done when you’re finished, and your new softphone will come to life and should show Available. Dial the IVR (4871) to try things out. With Telephone, you can use over two dozen soft phones simultaneously on your desktop.

blank

For everyone else, we recommend the YateClient softphone which is free. Download it from here. Run YateClient once you’ve installed it and enter the credentials for the Wazo Line. You’ll need the IP address of your server plus your Line username and password associated with the 701 extension. On the Wazo platform, do NOT use an actual extension number for your username with Wazo. Go to IPBX Settings → Lines to decipher the appropriate username and password for the desired extension. Click OK to save your entries.

blank


WebRTC allows you to use your Chrome or Firefox browser as a softphone. Extension 701 comes preconfigured for WebRTC access with Incredible PBX for Wazo. It shares the same password as the Line associated with extension 701, but the username is 701 rather than the username associated with the Line. You can decipher the password by accessing the Wazo Web GUI and then IPBX → Services → Users → Incredible PBX → XiVO Client Password. Or log into your server as root using SSH or Putty and run: /root/show-701-pw. Wazo introduces several new features to WebRTC including support for the awesome new Opus codec plus voicemail management and even Gravatar support. It’s all preconfigured!

Special Note: Beginning with version 17.02 of Wazo, WebRTC is fully integrated with NGINX on your server, and a simplified method for configuring WebRTC users has been added. When you create a new User account, simply choose the SIP (WebRTC) Protocol when creating a new user account, and all of the Advanced Line options required to support WebRTC will be preconfigured for you.

blank

To use WebRTC, you no longer need to accept the different SSL certificates associated with the WebRTC app. From your browser, go to the following site and click on each link to accept the certificates. Once you’ve completed this process, simply visit the Wazo WebRTC site.

Before logging in, click on the Gear icon in the lower right corner and then click on the Pencil icon to edit your Settings. Fill in the public IP address of your Wazo server and specify 443 for the Port. Leave the Backend field blank and click Save. Now login to your WebRTC account with Username 701. The Password is the one you obtained running show-701-pw. The IP Address (if required) is the address of your Wazo PBX.

blank

Implementing FollowMe Roaming with a CellPhone

In addition to ringing your SIP extension when incoming calls arrive, Wazo 17.17 can also ring your cellphone simultaneously. This obviously requires at least one outbound trunk. If that trunk provider also supports CallerID spoofing, then Wazo will pass the CallerID number of the caller rather than the DID associated with the trunk. Incredible PBX for Wazo comes with cellphone support for extension 702 ready to go. To enable it, access the Wazo Web GUI and go to IPBX → Services → Users → Incredible PBX and insert your Mobile Phone Number using the same dial string format associated with the trunk you wish to use to place the calls to your cellphone. You then can answer the incoming calls on either your cellphone or the registered SIP phone. If you answer on your cellphone, you will be prompted whether you wish to accept the call. If you press 1 after observing the CallerID, the caller will be connected. If you decline, the caller will be routed to the Wazo voicemail account of the extension.

8. Activating Voice Recognition for Wazo

Google has changed the licensing of their speech recognition engine about as many times as you change diapers on a newborn baby. Today’s rule restricts use to “personal and development use.” Assuming you qualify, the very first order of business is to enable speech recognition for your Wazo PBX. Once enabled, the Incredible PBX feature set grows exponentially. You’ll ultimately have access to the Voice Dialer for AsteriDex, Worldwide Weather Reports where you can say the name of a city and state or province to get a weather forecast for almost anywhere, Wolfram Alpha for a Siri-like encyclopedia for your PBX, and Lefteris Zafiris’ speech recognition software to build additional Asterisk apps limited only by your imagination. And, rumor has it, Google is about to announce new licensing terms, but we’re not there yet. To try out the Voice Dialer in today’s demo IVR, you’ll need to obtain a license key from Google. This Nerd Vittles tutorial will walk you through that process. Add your key to /var/lib/asterisk/agi-bin/speech-recog.agi on line 72.

9. Adding DISA Support to Your Wazo PBX

If you’re new to PBX lingo, DISA stands for Direct Inward System Access. As the name implies, it lets you make calls from outside your PBX using the call resources inside your PBX. This gives anybody with your DISA credentials the ability to make calls through your PBX on your nickel. It probably ranks up there as the most abused and one of the most loved features of the modern PBX.

There are three ways to implement DISA with Incredible PBX for Wazo. You can continue reading this section for our custom implementation with two-step authentication. There also are two native Wazo methods for implementing DISA using a PIN for security. First, you can dedicate a DID to incoming DISA calls. Or you can add a DISA option to an existing IVR. Both methods are documented in our tutorial on the PIAF Forum.

blank

We prefer two-step authentication with DISA to make it harder for the bad guys. First, the outside phone number has to match the whitelist of numbers authorized to use your DISA service. And, second, you have to supply the DISA password for your server before you get dialtone to place an outbound call. Ultimately, of course, the monkey is on your back to create a very secure DISA password and to change it regularly. If all this sounds too scary, don’t install DISA on your PBX.

1. To get started, edit /root/disa-xivo.txt. When the editor opens the dialplan code, move the cursor down to the following line:

exten => 3472,n,GotoIf($["${CALLERID(number)}"="701"]?disago1)  ; Good guy

2. Clone the line by pressing Ctrl-K and then Ctrl-U. Add copies of the line by pressing Ctrl-U again for each phone number you’d like to whitelist so that the caller can access DISA on your server. Now edit each line and replace 701 with the 10-digit number to be whitelisted.

3. Move the cursor down to the following line and replace 12341234 with the 8-digit numeric password that callers will have to enter to access DISA on your server:

exten => 3472,n,GotoIf($["${MYCODE}" = "12341234"]?disago2:bad,1)

4. Save the dialplan changes by pressing Ctrl-X, then Y, then ENTER.

5. Now copy the dialplan code into your Wazo setup, remove any previous copies of the code, and restart Asterisk:

cd /root
sed -i '\:// BEGIN DISA:,\:// END DISA\:d' /etc/asterisk/extensions_extra.d/xivo-extrafeatures.conf
cat disa-xivo.txt >> /etc/asterisk/extensions_extra.d/xivo-extrafeatures.conf
/etc/init.d/asterisk reload

6. The traditional way to access DISA is to add it as an undisclosed option in an IVR that is assigned to one of your inbound trunks (DIDs). For the demo IVR that is installed, edit the ivr-1.conf configuration file and change the "option 0″ line so that it looks like this. Then SAVE your changes.

exten => 0,1(ivrsel-0),Dial(Local/3472@default)

7. Adjust the inbound calls route of one of your DIDs to point to the demo IVR by changing the destination to Customized with the following Command:

Goto(ivr-1,s,1)

A sample is included in the Wazo Snapshot. Here’s how ours looks for the Demo IVR:


blank

8. Now you should be able to call your DID and choose option 0 to access DISA assuming you have whitelisted the number from which you are calling. When prompted, enter the DISA password you assigned and press #. You then should be able to dial a 10-digit number to make an outside call from within your PBX.

SECURITY HINT: Whenever you implement a new IVR on your PBX, it’s always a good idea to call in from an outside number 13 TIMES and try every key from your phone to make sure there is no unanticipated hole in your setup. Be sure to also let the IVR timeout to see what result you get.

10. NEW: Travelin’ Man 3 WhiteList Firewall

All new installs of Incredible PBX for Wazo include the newly enhanced and preconfigured IPtables Firewall featuring Travelin’ Man 3. Please read the new tutorial when you have a few minutes. It documents how to enable access to your server for remote phones and traveling users.

PortKnocker previously let a remote user ping the server with a 3-digit code to temporarily add the remote user’s IP address to the IPtables Firewall WhiteList so that the user could gain remote access. We now are adding the ability to let end-users make successful PortKnocks permanent just as if an administrator had used add-ip on the server to add an IP address. Administrators still can remove these entries using del-acct although you will have to know the date and time that the entry was added. The file names consist of timestamp.iptables in /root and the additions are made to the custom WhiteList in /usr/local/sbin/iptables-custom. To enable permanent PortKnocker additions, simply run this command while logged into your server as root: iptables-knock activate.

11. Test Drive Incredible PBX for Wazo

To give you a good idea of what to expect with Incredible PBX for Wazo, just pick up a phone and dial any toll-free number in the U.S. and Canada using a 1 prefix. We’ve also set up a sample IVR using voice prompts from Allison. Try it out from any phone on your PBX by dialing 4871 (IVR1):

Nerd Vittles Demo IVR Options
1 – Call by Name (say "Delta Airlines" or "American Airlines" to try it out)
2 – MeetMe Conference
3 – Wolfram Alpha (Coming Soon!)
4 – Lenny (The Telemarketer’s Worst Nightmare)
5 – Today’s News Headlines
6 – Weather Forecast (enter a 5-digit ZIP code)
7 – Today in History (Coming Soon!)
8 – Speak to a Real Person (or maybe just Lenny if we’re out)

What To Do and Where to Go Next?

Here are a boatload of projects to get you started exploring Wazo on your own. Just plug the keywords into the search bar at the top of Nerd Vittles to find numerous tutorials covering the topics or simply follow our links. Unless there is an asterisk (*) the components already are in place so do NOT reinstall them. Just read the previous tutorials to learn how to configure each component. Be sure to also join the PIAF Forum to keep track of the latest tips and tricks with Wazo. There’s a treasure trove of information that awaits.

Wazo and Incredible PBX Dial Code Cheat Sheets

Complete Wazo documentation is available here. But here are two cheat sheets in PDF format for Wazo Star Codes and Incredible PBX Dial Codes.

blank

blank

Published: Wednesday, December 14, 2016  Last Updated: Monday, December 12, 2017


blankDon’t forget to List Yourself in Directory Assistance so everyone can find you by dialing 411. And add your new number to the Do Not Call Registry to block telemarketing calls. Or just call 888-382-1222 from your new number.


blank
Need help with Asterisk? Visit the PBX in a Flash Forum.


Special Thanks to Our Generous Sponsors


FULL DISCLOSURE: ClearlyIP, Skyetel, Vitelity, DigitalOcean, Vultr, VoIP.ms, 3CX, Sangoma, TelecomsXchange and VitalPBX have provided financial support to Nerd Vittles and our open source projects through advertising, referral revenue, and/or merchandise. As an Amazon Associate and Best Buy Affiliate, we also earn from qualifying purchases. We’ve chosen these providers not the other way around. Our decisions are based upon their corporate reputation and the quality of their offerings and pricing. Our recommendations regarding technology are reached without regard to financial compensation except in situations in which comparable products at comparable pricing are available from multiple sources. In this limited case, we support our sponsors because our sponsors support us.

blankBOGO Bonaza: Enjoy state-of-the-art VoIP service with a $10 credit and half-price SIP service on up to $500 of Skyetel trunking with free number porting when you fund your Skyetel account. No limits on number of simultaneous calls. Quadruple data center redundancy. $25 monthly minimum spend required. Tutorial and sign up details are here.

blankThe lynchpin of Incredible PBX 2020 and beyond is ClearlyIP components which bring management of FreePBX modules and SIP phone integration to a level never before available with any other Asterisk distribution. And now you can configure and reconfigure your new Incredible PBX phones from the convenience of the Incredible PBX GUI.

blankVitalPBX is perhaps the fastest-growing PBX offering based upon Asterisk with an installed presence in more than 100 countries worldwide. VitalPBX has generously provided a customized White Label version of Incredible PBX tailored for use with all Incredible PBX and VitalPBX custom applications. Follow this link for a free test drive!
 

blankSpecial Thanks to Vitelity. Vitelity is now Voyant Communications and has halted new registrations for the time being. Our special thanks to Vitelity for their unwavering financial support over many years and to the many Nerd Vittles readers who continue to enjoy the benefits of their service offerings. We will keep everyone posted on further developments.


blank

A New Day for 3CX: Free Text-to-Speech Apps from Santa

blank

And you thought you needed an Asterisk® PBX for your users to enjoy GPL1 text-to-speech applications such as current News Headlines and Weather reports from the convenience of their telephone. Well, move over Asterisk. PIAF5™ and 3CX® now offer virtually identical functionality with all of the terrific advantages that a commercial-quality PBX provides: reliability, support, updates, security, and an unmatched UC platform that is second to none.

There is no 3CX support for interactive TTS or STT applications (yet). So we’re doing the next best thing. Once or more a day, we will use cron jobs to retrieve the latest News Headlines and Weather reports for your local area. Then anyone on your 3CX PBX can pick up a phone and listen to the News Headlines by dialing 951 or U.S. weather forecasts by dialing 947, or worldwide weather forecasts from ApiXU by dialing 949. We’ll be using IBM’s awesome TTS engine to handle the text-to-speech chores. We think you will agree that IBM’s offering is the best in the business. And you can’t beat the price. After your first free month, you get a million characters of FREE text-to-speech synthesis every month forever! For ApiXU worldwide weather data, your first 2,500 queries from 3CX are also FREE every month.


[soundcloud url="https://api.soundcloud.com/tracks/364353344″ params="auto_play=false&hide_related=false&show_comments=true&show_user=true&show_reposts=false&visual=true" width="80%" height="350″ iframe="true" /]

Getting Started with IBM Bluemix TTS Service

NOV. 1 UPDATE: IBM has moved the goal posts effective December 1, 2018:

blank

You can start your free, 30-day trial of IBM Bluemix services without providing a credit card. Just sign up here. Once your account is activated, here’s how to obtain credentials for the TTS service to use with PIAF5 and 3CX. Start by logging in to your IBM Bluemix account. Once you’re logged in, click on your account name (1) in the upper right corner of your web page to reveal the pull-down to select your Region, Organization, and Space. Follow the blue links at the bottom of the pull-down menu to create an Organization and Space for your TTS service.


blank

Next, click the Menu icon which is displayed as three horizontal bars on the left side of the web page. Choose Watson. Click Create Watson Service and select Text to Speech from the applications listing. Watson will generate a new TTS service template and display it. Make certain that your Region, Organization, and Space are shown correctly. Then verify that the Standard Pricing Plan is selected. When everything is correct, click the Create button.

When your Text to Speech application displays, click Service Credentials and then click New Credential (+). When the Add New Credential dialog appears, leave the default settings as they are and click Add. Your Credentials Listing then will appear. Click View Credentials beside the new entry you just created. Write down your URL, username, and password. You’ll need these in Step #4 below to configure the IBM Bluemix TTS service. Logout of the IBM Cloud by clicking on the little face in the upper right corner of your browser window and choose Log Out. Confirm that you do, indeed, wish to log out.

Getting Started with ApiXU Weather

Finding free worldwide weather forecasts has been a difficult nut to crack. So we’re pleased to introduce ApiXU. Your first 5,000 API calls every month are free, but our Worldwide Weather application for 3CX actually makes two API calls to retrieve the latest weather conditions AND the weather forecast. What that means is you can make 2,500 free queries a month with the Nerd Vittles application. One or two a day should suffice. While the U.S. weather reports are retrieved by ZIP code, the ApiXU queries are retrieved by city. So long as you don’t choose small towns, the city names should be sufficiently unique to work well with the WorldWide Weather application. HINT: Nicosia in Cyprus (home of 3CX) works great! 😉

Before you can obtain worldwide weather reports, you’ll need to sign up for an account at ApiXU.com. Once you’re registered, log into your account and copy down your API Key. You’ll need it in a minute.

blank

5 Steps to TTS Paradise with 3CX

Once you have your IBM TTS credentials in hand, there are only five simple steps to get everything set up for TTS application support on your 3CX PBX. When we’re finished, anyone on your 3CX PBX can pick up a phone and listen to the News Headlines by dialing 951, a U.S. Weather Forecast by dialing 947, or Worldwide Weather for most international cities by dialing 949.

  1. Download WAV file placeholders to your Desktop PC
  2. Set up 3 Digital Receptionists on your 3CX Dashboard
  3. Install the Linux components to support TTS Applications
  4. Insert IBM and ApiXU Credentials, Email Address and Locations
  5. Run the News Headlines and Weather Update Scripts

1. Downloading WAV File Placeholders

On the desktop computer from which you will access the 3CX Dashboard with a browser, download and unzip http://incrediblepbx.com/3cx-tts-desktop.zip. This gets you the three WAV files that we will use as placeholders in 3CX to support current News Headlines and Weather reports.

2. Setting Up Digital Receptionists in 3CX

Before you can implement the Nerd Vittles TTS Apps for News Headlines, Weather by ZIP Code, and Worldwide Weather, we first need to create the proper environment on the 3CX side to support the new applications. We’ll be using the 3CX Digital Receptionist for this purpose, and we’ll make one adjustment to the IVR environment to support scripted updates. First, we need to disable caching of sound prompts since we’ll be updating these every day, and we don’t want to have to reload the 3CX IVR module each time we make changes. Then we need to set up three Digital Receptionist extensions, one for the News Headlines and one for each of the Weather applications.

Login to your 3CX Dashboard with a browser.

First, we need to add a hidden environment variable to the 3CX Parameters Table to disable caching of IVR sound files. Here’s how.

From the 3CX Dashboard, choose Settings, then Parameters, and click Add. Insert the following new entry to the Parameters Table and then click OK:

Name: IVR_CACHE_DISABLE
Description: Disable IVR caching of sound files
Value: 1

Now let’s add the Digital Receptionists to support the News and Weather applications. From the 3CX Dashboard, choose Digital Receptionist then Add. Fill in the blanks like this:

Name: News Headlines
Extension: 951
Prompt: news.wav (then click Upload and choose news.wav file that you downloaded in step #1 to your Desktop)

skip down toward the bottom of the template and change If no input within seconds: to 1.

Click OK to save the News Headlines Digital Receptionist.

From the 3CX Dashboard, choose Digital Receptionist then Add. Fill in the blanks like this:

Name: Weather by ZIP Code
Extension: 947
Prompt: weather.wav (then click Upload and choose weather.wav file that you downloaded in step #1 to your Desktop)

skip down toward the bottom of the template and change If no input within seconds: to 1.

Click OK to save the Weather by ZIP Code Digital Receptionist.

Name: Worldwide Weather
Extension: 949
Prompt: wwweather.wav (then click Upload and choose wwweather.wav file that you downloaded in step #1 to your Desktop)

skip down toward the bottom of the template and change If no input within seconds: to 1.

Click OK to save the Worldwide Weather Digital Receptionist.

Try things out by dialing 947, 949, and 951 from any 3CX extension. Be sure these work before proceeding!

3. Installing Linux Components for TTS

First, we need to get the missing pieces in place to support TTS applications using IBM Bluemix TTS and the Nerd Vittles scripts. We want to add PHP support from the Linux CLI only so there will be no security issues. And we want to add support for SQLite 3 so we can look up latitude and longitude data for U.S. zip codes. Just issue the following commands to get everything set up:

apt-get update
apt-get -y install php-fpm php-curl php-cli php-pear php-db php-gd sqlite3 libsqlite3-dev
apt-get -y install sox lame libsox-fmt-mp3
sed -i 's|;cgi.fix_pathinfo=1|cgi.fix_pathinfo=0|' /etc/php/7.0/fpm/php.ini
systemctl restart php7.0-fpm

Next, we need to put the Nerd Vittles scripts and ZIP code database for SQLite 3 in place:

cd /
wget http://incrediblepbx.com/3cx-tts-linux.tar.gz
tar zxvf 3cx-tts-linux.tar.gz
rm -f 3cx-tts-linux.tar.gz

Finally, we need to add cron jobs to run the three update scripts at least once a day. You can run them more often depending upon your needs. We have these configured to run at 6:15 am and 6:20 am every day. Adjust to meet your own requirements. To update the cached voice prompts, each of these update scripts stops and restarts the 3CX IVR Service. On a busy PBX, you probably don’t want to run them during the workday.

echo "15 6 * * * root /root/nv-weather-update.sh >/dev/null 2>&1" >> /etc/crontab
echo "20 6 * * * root /root/nv-news-update.sh >/dev/null 2>&1" >> /etc/crontab
echo "25 6 * * * root /root/nv-wwweather-update.sh >/dev/null 2>&1" >> /etc/crontab

4. Adding TTS Credentials to Your 3CX PBX

Now we need to add your IBM TTS and ApiXU credentials, email address, a local ZIP code for Weather by ZIP code reports, and a city for Worldwide Weather reports. Edit the credentials file and save it with your information:

cd /root
nano -w ibm-credentials.php

5. Running the News & Weather Update Scripts

Finally, we need to run the News Headlines and two Weather update scripts once to put current data in place for 3CX callers. After the initial setup, the cron jobs will update the News Headlines and Weather reports every day moving forward. Press ENTER as each of the scripts finishes to get back to a command prompt.

cd /root
./nv-news-update.sh
./nv-weather-update.sh
./nv-wwweather-update.sh

Taking the News & Weather Apps for a Spin

Now you’re ready to try things out. From any phone connected to your 3CX, dial 951 for current News Headlines. Then dial 947 for a local Weather Report matching your zip code. Finally, dial 949 to retrieve a worldwide weather forecast for most international cities. Enjoy!

Originally published: Monday, December 4, 2017  Updated: Friday, March 2, 2018


blankSupport Issues. With any application as sophisticated as this one, you’re bound to have questions. Blog comments are a terrible place to handle support issues although we welcome general comments about our articles and software. If you have particular support issues, we encourage you to get actively involved in the PBX in a Flash Forums. It’s the best Asterisk tech support site in the business, and it’s all free! Please have a look and post your support questions there. Unlike some forums, ours is extremely friendly and is supported by literally hundreds of Asterisk and 3CX gurus and thousands of users just like you. You won’t have to wait long for an answer to your question.


blank
Need help with Asterisk or 3CX? Visit the PBX in a Flash Forum.


Special Thanks to Our Generous Sponsors


FULL DISCLOSURE: ClearlyIP, Skyetel, Vitelity, DigitalOcean, Vultr, VoIP.ms, 3CX, Sangoma, TelecomsXchange and VitalPBX have provided financial support to Nerd Vittles and our open source projects through advertising, referral revenue, and/or merchandise. As an Amazon Associate and Best Buy Affiliate, we also earn from qualifying purchases. We’ve chosen these providers not the other way around. Our decisions are based upon their corporate reputation and the quality of their offerings and pricing. Our recommendations regarding technology are reached without regard to financial compensation except in situations in which comparable products at comparable pricing are available from multiple sources. In this limited case, we support our sponsors because our sponsors support us.

blankBOGO Bonaza: Enjoy state-of-the-art VoIP service with a $10 credit and half-price SIP service on up to $500 of Skyetel trunking with free number porting when you fund your Skyetel account. No limits on number of simultaneous calls. Quadruple data center redundancy. $25 monthly minimum spend required. Tutorial and sign up details are here.

blankThe lynchpin of Incredible PBX 2020 and beyond is ClearlyIP components which bring management of FreePBX modules and SIP phone integration to a level never before available with any other Asterisk distribution. And now you can configure and reconfigure your new Incredible PBX phones from the convenience of the Incredible PBX GUI.

blankVitalPBX is perhaps the fastest-growing PBX offering based upon Asterisk with an installed presence in more than 100 countries worldwide. VitalPBX has generously provided a customized White Label version of Incredible PBX tailored for use with all Incredible PBX and VitalPBX custom applications. Follow this link for a free test drive!
 

blankSpecial Thanks to Vitelity. Vitelity is now Voyant Communications and has halted new registrations for the time being. Our special thanks to Vitelity for their unwavering financial support over many years and to the many Nerd Vittles readers who continue to enjoy the benefits of their service offerings. We will keep everyone posted on further developments.


Some Recent Nerd Vittles Articles of Interest…

  1. The included applications are licensed pursuant to GPL2 with the exception of nv-worldwide-weather.php which is licensed pursuant to The MIT License. Terms and conditions of both licenses are included in /root/COPYING. []