

For many years, we’ve offered Vitelity’s $3.99 Unlimited DID special with a DID, 4 channels, unlimited inbound calling, and free text messaging. It’s a deal no VoIP user should pass up. And today we have another revolutionary development for Asterisk® deployments. Once in a while we feature a carrier with great calling rates. Today we’re introducing a service providing access to 300+ wholesale carriers, all under one roof. Almost 30 BILLION billed minutes already have been logged through TCXC so you’re in good hands!1 You can choose from any or all of their 300 wholesale VoIP carriers worldwide to make outbound calls at the same wholesale rates offered to the very largest resellers. Simply pay a 13% surcharge in lieu of the $650 annual fee, and TelecomsXchange (TCXC) will provide you access to their entire suite of wholesale carriers together with state-of-the-art tools to manage all of the services.2 You’ll never have to haggle with individual carriers or provide funds on a piecemeal basis to use any of the services. TCXC already has done the negotiating for you and TCXC handles financial reimbursements to carriers based upon the services you use. There’s more good news. When compared to commercial providers, TCXC’s one-second billing increment on most routes will recoup a healthy portion of the 13% wholesale surcharge. Here are a few sample per minute wholesale rates (all with one-second billing) to whet your appetite:
- $.0000 – U.S. TollFree
- $.0009 – U.S.
- $.0010 – Cyprus
- $.0011 – Canada
- $.0019 – Germany
- $.0021 – U.K. (London)
- $.0042 – China
What does a penny buy? 11-minute call to U.S., 10-minute call to Cyprus, 9-minute call to Canada, 5-minute call to Germany, 5 minute call to England, or 2½-minute call to China.
If you’re new to wholesale terminations, be advised that carriers change their rates regularly and, from time to time, every carrier experiences outages. Not to worry. For a modest additional charge, TelecomsXchange will manage rates and provide automatic failover for carrier outages. Simply choose TelecomsXchange as your preferred provider to the outbound destinations desired.
Before we get into the nuts and bolts of configuring Asterisk to use TCXC carriers for wholesale call terminations, let’s spend a minute discussing the architecture of the FreePBX® trunk and outbound routes model. In this design which you will find in most Incredible PBX® implementations including Issabel 4, Incredible PBX for CentOS and Ubuntu, and Incredible PBX for the Raspberry Pi as well as in other Asterisk distributions including AsteriskNOW® and the FreePBX Distro®, the administrator specifies Trunks for each provider and then assigns Outbound Routes for calls using those providers. When calls are placed, FreePBX chooses an Outbound Route based upon the dial string match specified in the route. If you have a dozen outbound routes, dialed numbers are analyzed against dial strings specified in each Outbound Route, and the routes are examined from the top to the bottom of the list. Once FreePBX chooses an Outbound Route to process a call, that ends the Outbound Route selection process. No other Outbound Route is ever considered whether it has a matching dial string or not. And it doesn’t matter whether the call fails or not, no other Outbound Route is attempted. The good news is that, within every Outbound Route, you can specify multiple Trunks which will be used in the order you’ve chosen to complete the call. If the ninth trunk happens to be the first trunk that doesn’t experience congestion, then the call will be routed to carrier #9. Keep in mind that calls to the previous eight carriers have to be attempted before we ever get to carrier #9. For this reason, it is important to create a Trunk for every carrier and specify multiple Trunks in every Outbound Route to avoid failed calls. Or, as noted above, you can specify TelecomsXchange as your final Trunk in every Outbound Route and leave it to TCXC to identify a working carrier to complete your call. In this way, you never have to worry about failed calls even though some may cost a little more depending upon carrier outages. So that’s how VoIP terminations work. You’re now an expert!
Getting Started with TelecomsXchange
The first step in your wholesale VoIP adventure is to sign up for an account with TelecomsXchange. Unless you’re chomping at the bit to pay the $650 annual fee, use our referral link. Your PBX will need a public IP address but, if it happens to be a dynamic IP address assigned by your provider, don’t worry. It’s easy to change it down the road, and we’ll show you how. Obviously, a cloud-based PBX makes this easier since you get a dedicated IP address, and this Nerd Vittles article provides several options.

Once you receive your credentials, simply login to the TelecomsXchange web site. Just a few words about how the site is organized. Dashboard is where you’ll land when you login. Accounts let you specify more than one account to be associated with your credentials. If you manage multiple PBXs, this is where you set things up. Each account must have a unique IP address. This is also where you can change the IP address associated with your primary account if the need ever arises. My Interconnections displays each of your accounts and all of the carriers you’ve chosen to associate with each account. Market View is where you search for prices and choose carriers to associate with your account(s). We’ll cover this one in more detail a little later. Payment History tracks all of your payments to TelecomsXchange by date. Call Statistics lets you download CDR and Stats data by the day, week, or month. CDR gives you an instant snapshot of your calling history and the price of the calls based upon criteria you specify. It’s very similar to the same feature in the Incredible PBX or FreePBX GUI. Preferences let you change settings for your account.
The item you’ll need to use first is the plus sign (+) at the top of the form. This is how you fund your account. As noted previously, there is a 13% wholesale surcharge and this will be deducted from whatever amount you choose to add to your account. For example, if you add $100 using PayPal, the PayPal fee plus 13% will be deducted from the $100. So your account would show an available balance of approximately $84. Cash or bank wires also are accepted.
Finally, here’s a link to the TelecomsXchange Knowledge Base and Help Center. There’s lot of helpful information there to get you started.
Choosing a Carrier with TelecomsXchange
Let’s walk through the procedure to add new carriers to your account. This is the first thing you’ll want to do after you get your credentials and fund your account. Begin by making yourself a list of the countries or dialing prefixes you’d like to call using TCXC wholesale carriers. The easiest way to perform searches and find carriers is to decipher the dialing prefix for the calls you wish to make. For example, to call London, the Prefix would be the U.K. country code (44) plus the London city code (20).
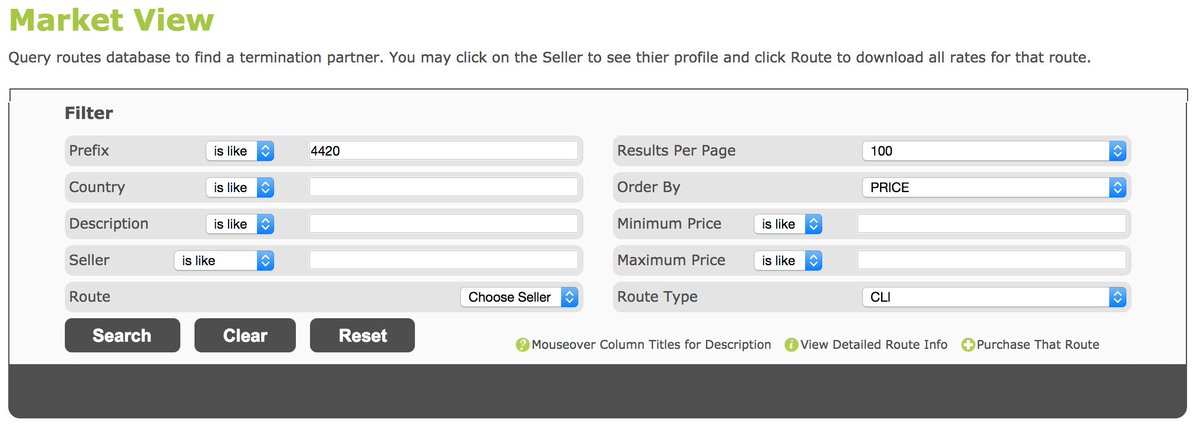
Now open the Market View tab to get started. Here’s how we’d fill in the form to find London carriers and to order the first hundred matches from least costly to most expensive: Prefix (4420), Results (100), Order By (PRICE), and Route Type (CLI) which means you can specify your own CallerID for the outgoing calls. Click Search to proceed. The results look like this:
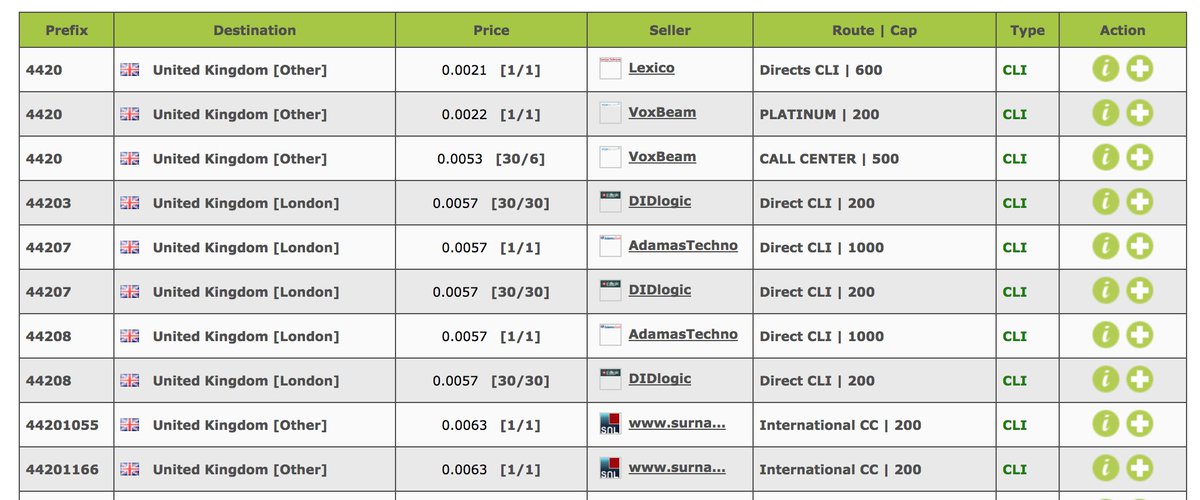
To add a carrier to your account, simply click on the plus sign (+) on the right side of the Action column beside the carrier of your choice. You then can choose whether to add it to all of your accounts, or you specify the account to which the carrier should be added. If you want to review the carrier’s history and ratings with TCXC, click on the Information icon in the Action column beside the carrier of your choice.
For NANPA call destinations, specify 1 plus the area code in the Prefix field. You can add the first 3 digits of the exchange to drill down further. Be advised that adding the 3-digit exchange may eliminate a number of carriers that only specify rates for an entire area code. For example, if a carrier specifies an area code rate for 1212 and no exchange limitations, then searching for 1212652 would not return that carrier.
If you already know which carriers you’d like to add, just search for them by specifying the carrier name in the Seller field and leaving the Prefix field blank. To get started, here are a few favorites for U.S./Int’l routes: IDT, LEXICO, TATA, VOXBEAM, and TELECOMSXCHANGE.
Placing Carrier-Specific Calls with TelecomsXchange
To set up the FreePBX Trunks and Outbound Routes, you first need to understand how calls are placed through TelecomsXchange carriers. In lieu of traditional trunk registrations on your PBX, TelecomsXchange uses the IP address that you registered for your account to determine whether SIP calls arriving at TCXC for routing to a carrier are authorized. Thus, it’s important that you keep your IP addresses updated whenever they change. Assuming your call passes the IP address check, the next hurdle is for TCXC to decipher which carrier should be used to route the call to its destination. This is handled by dialing prefixes which are unique to each TCXC carrier. For example, TATA has a dialing prefix of 32270#. To dial a U.S. call using the TATA carrier, the dial string would look like this: 32270#16785551212. A carrier must be assigned to your account before you can place calls from your PBX using that carrier’s dialing prefix. So there are two layers of protection on the TCXC side to prevent fraudulent calls. There must be both an IP address match and a carrier prefix match on your account before a call will be forwarded to a carrier.
Before we begin setting up your Trunks and Outbound Routes for Incredible PBX or one of the other Asterisk platforms, write down the names of each of the carriers you have chosen as well as their Dialing Prefixes. You’ll need them in the next steps. You can decipher carrier’s dialing prefixes assigned to your account under the My Interconnections tab in your TCXC Dashboard.
Setting Up TCXC Carrier Trunks in FreePBX
To begin, make certain that chan_SIP is assigned to UDP 5060 on your PBX. Particularly for trunks, there were just too many issues with PJsip in some releases of Asterisk so steer clear. With every TCXC carrier, the good news is the chan_SIP Trunk setup is virtually identical except for the carrier name and the carrier’s dialing prefix. For each carrier, start by adding a new chan_SIP Trunk in the Incredible PBX or FreePBX GUI. In the General tab, insert the carrier name in the Trunk Name field, e.g. TCXC. Leave the other default settings as they are.
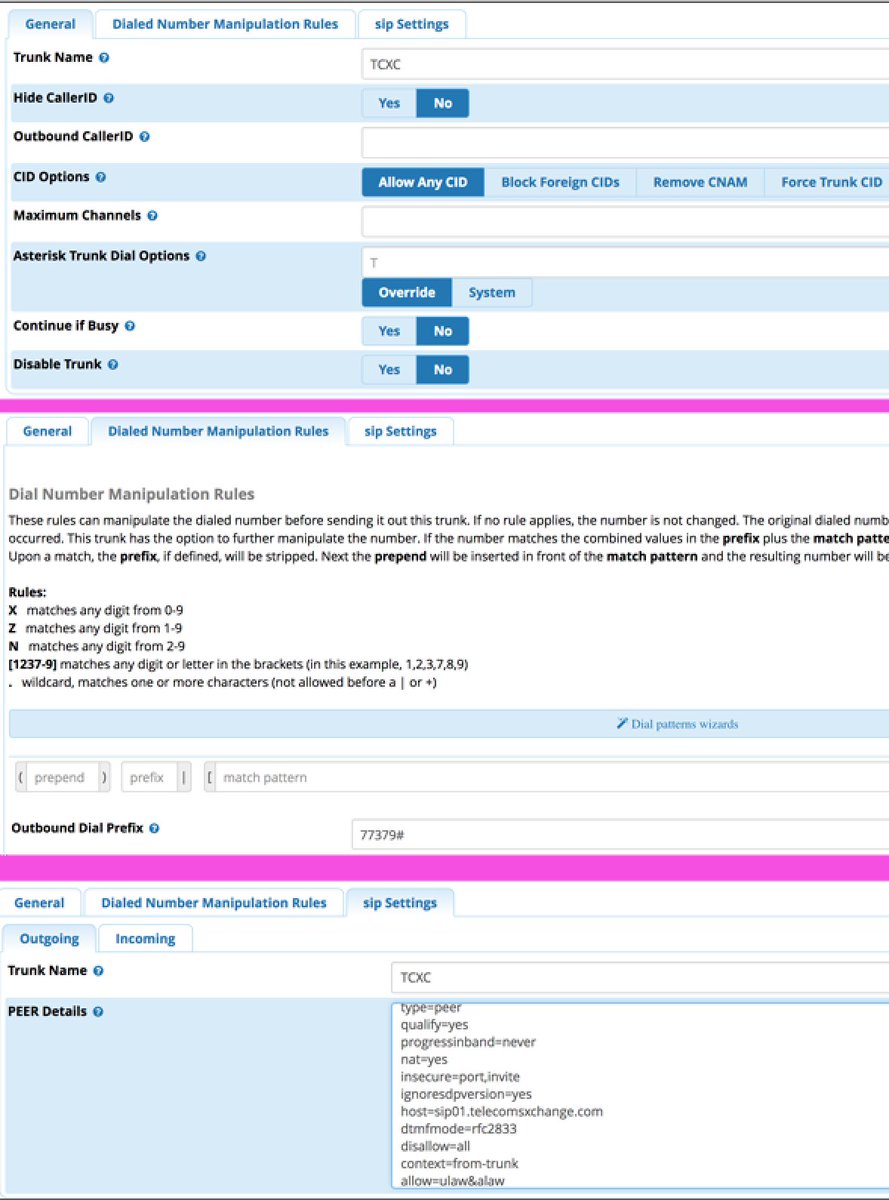
Switch to the Dialed Number Manipulation Rules tab. Leave the Dialing Rules empty and insert the carrier’s dialing prefix in the Outbound Dial Prefix field, e.g. 77379#.
Switch to the SIP Settings tab. In the Outgoing tab, insert the carrier name in the Trunk Name field. Insert the following in the PEER Details field:
type=peer
qualify=yes
progressinband=never
port=5060
nat=yes
insecure=port,invite
ignoresdpversion=yes
host=sip01.telecomsxchange.com
dtmfmode=rfc2833
disallow=all
context=from-trunk
allow=ulaw&alaw
While still in SIP Settings, switch to the Incoming tab, and clear out the default User Detail entries. Now click the Submit button and reload your dialplan when prompted.
Repeat this procedure for each of the carriers you set up in your TCXC profile.
Setting Up Outbound Routes for TCXC Calls
Setting Up Outbound Routes for TCXC Calls
Our preferred Outbound Route setup for TCXC carriers is to create a new Outbound Route for each destination (typically a country) to which you wish to enable calling. Be advised that setting up a dialing prefix of just the number 1 authorizes considerably more calls than just those to destinations in the United States. For foreign countries, if all of your calls to the U.K are to destinations in London, then don’t authorize country-wide calling. Narrow it down to the country code and city code for London. Remember, it’s your phone bill.
For international calls, we prefer that callers enter a dialing prefix that specifies that it’s a long distance call plus a two-digit prefix representing the country abbreviation, not the dial code of the country. For example, for the U.K., we use 085 where 0 specifies long distance call and 85 is the phone representation for UK. We’ll then use the Outbound Route to strip off the caller’s dialed prefix and to insert the proper country code to complete the call.
Within each Outbound Route, we recommend you specify one or more low-cost carriers and a final TCXC carrier to catch calls that fail to all of your designated carriers. Otherwise, the caller will get a failed call. And you will get the next call. 🙂
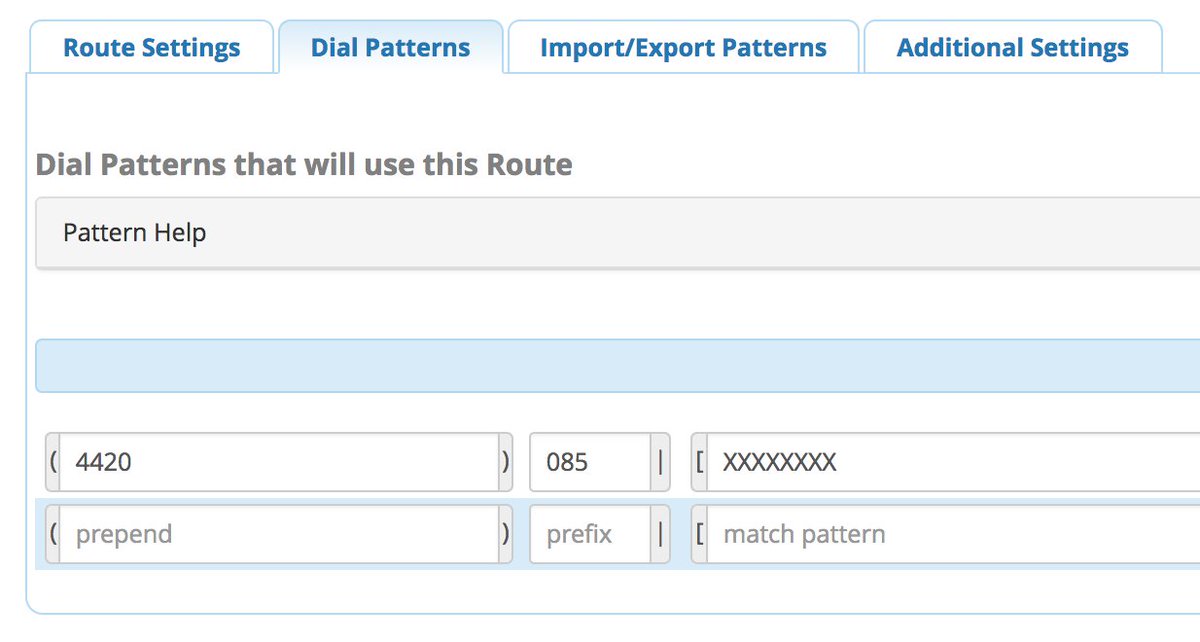
So here’s what our Outbound Route setup for London, England looks like. You only need entries in the Route Settings and Dial Patterns tabs. Be sure to put your desired CallerID in the Route CID field and set the Override Extension option to YES. Then add your preferred Trunks in the order in which you want the calls attempted:
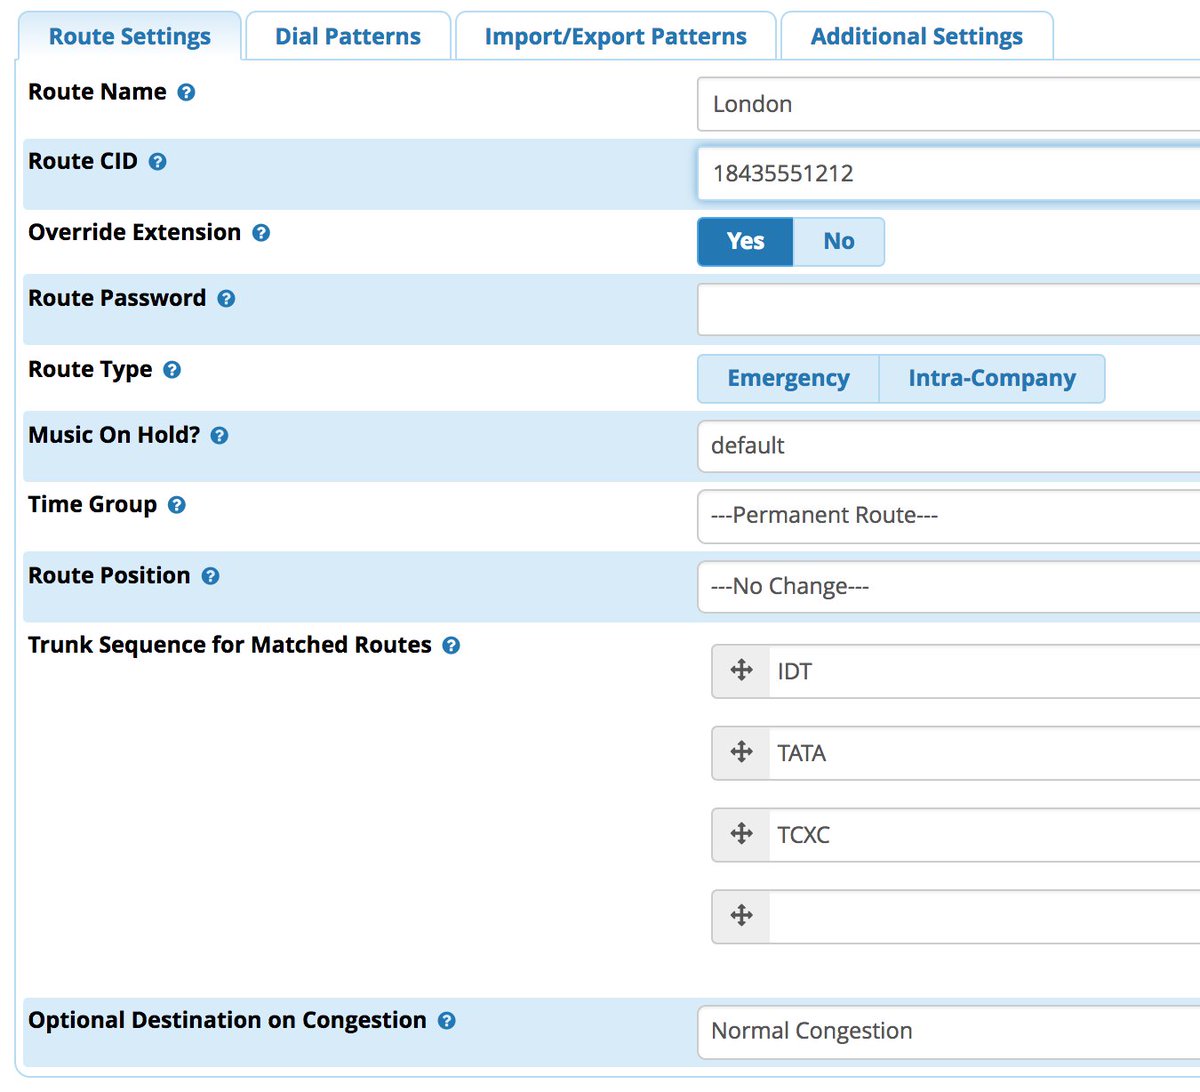
In the Dial Patterns tab, we specify a Prefix of 4420 to tell Asterisk to add a dialing prefix to the call to get it to London. Then we enter 085 in the Prefix field to tell Asterisk to strip off those digits entered by the caller before sending the call to the designated Trunk for processing. The Match Pattern is 8 X’s which represents an 8-digit London telephone number. To get a match on this Outbound Route, Asterisk will be searching for a dial string that looks like this: 085 + XXXXXXXX
Here’s an example of the Asterisk call flow using IDT as the primary trunk with this Outbound Route.
Caller Dials: 085-7499-0888
Outbound Route finds match on 085 Prefix + 8 X's and discards Prefix
Outbound Route sends 4420 (for London) + 74990888 to Trunk #1 (IDT)
IDT Trunk adds IDT Dialing Prefix 10729# before sending call to TCXC
TCXC receives: 10729#442074990888
TCXC strips IDT dialing prefix and sends call to IDT: 4420 + 74990888
IDT connects caller to Four Seasons Hotel in London
Adjustment with NAT-Based Implementations
Adjustment with NAT-Based Implementations
Keep in mind that TCXC was designed primarily for commercial resellers, not for PBX-level implementations. If your PBX is sitting in the cloud or is directly connected to the Internet rather than sitting behind a NAT-based router, then you’re good to go now. If, on the other hand, your PBX is sitting on a private LAN behind a NAT-based router, make certain that your router forwards all UDP 5060 traffic to the private LAN address of your PBX. Otherwise, you may experience disconnect anomalies where the called party hangs up a call before your callers since there will be no call path for TCXC to return the disconnect alert (BYE) when the call is completed. For Incredible PBX servers, this isn’t really a problem because Incredible PBX will disconnect the call automatically after detecting 30 seconds of RTP traffic inactivity anyway. But we wanted to make you aware of the potential issue. The good news is you won’t be billed for the extra connection time since TCXC already has dropped the call with the carrier and turned off the billing meter.
Adding Trunk Information to Incredible PBX
Adding Trunk Information to Incredible PBX
Some may wish to include Trunk information in the CDR listings of Incredible PBX or FreePBX. This makes it much easier to spot problems when calls aren’t routed to the Trunk destinations you expect. It also makes it easy to generate trunk-specific reports within the GUI. In the FreePBX 12 and 13 implementations, the trunk information can be added painlessly by revising the [macro-dialout-trunk] context. However, you cannot make these changes directly in /etc/asterisk/extensions_additional.conf because your modifications will be overwritten the next time your dialplan is reloaded. Instead, the modified context must be added to extensions_override_freepbx.conf. Here’s how:
cd /tmp
wget http://incrediblepbx.com/cdr-trunk-info.tar.gz
tar zxvf cdr-trunk-info.tar.gz
rm -f cdr-trunk-info.tar.gz
cat cdr-trunk-info.txt >> /etc/asterisk/extensions_override_freepbx.conf
asterisk -rx "dialplan reload"
The modified CDR listing will look something like this:

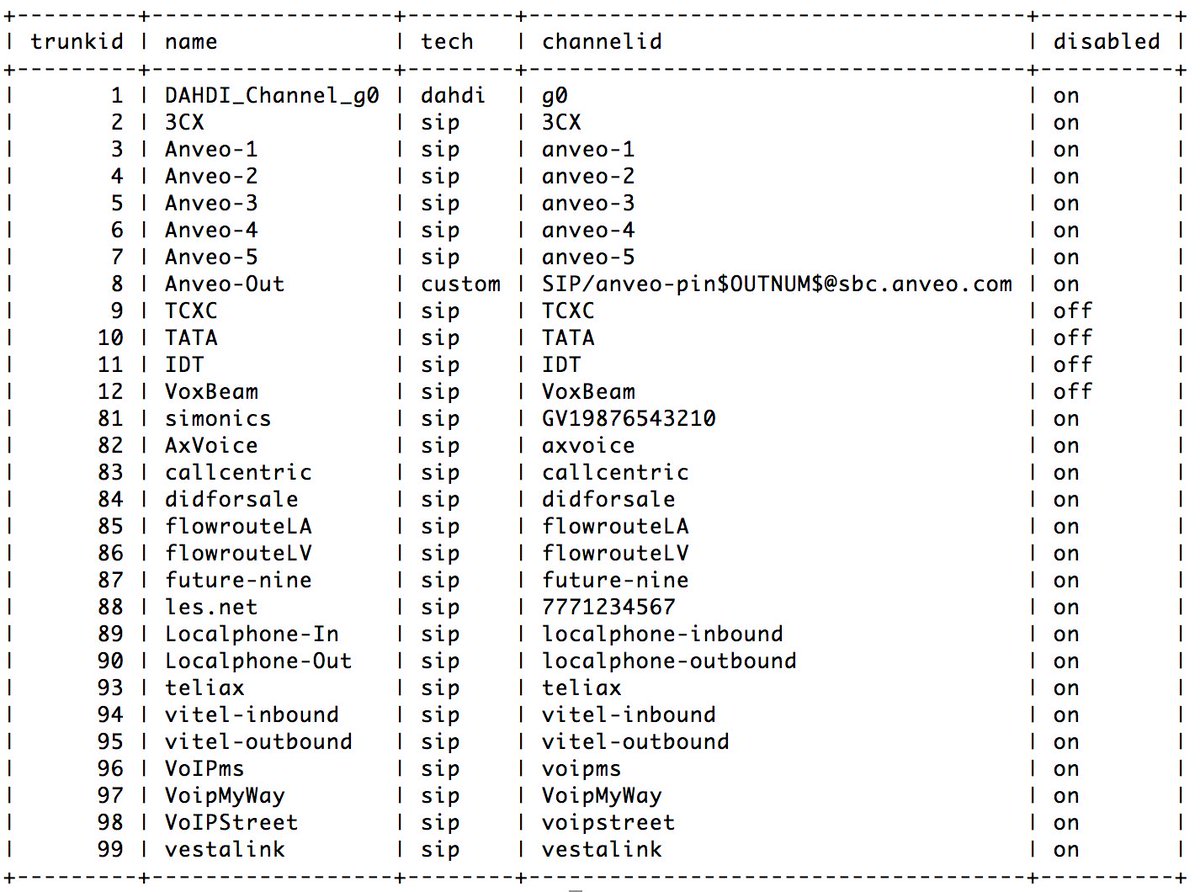
We also developed a handy utility to make it easy to list out all of your trunks and their status. Here’s how:
cd /root
wget http://incrediblepbx.com/list-trunks.tar.gz
tar zxvf list-trunks.tar.gz
rm -f list-trunks.tar.gz
./list-trunks
The listing will look something like this:
Rate Queries Using the TCXC API
Rate Queries Using the TCXC API
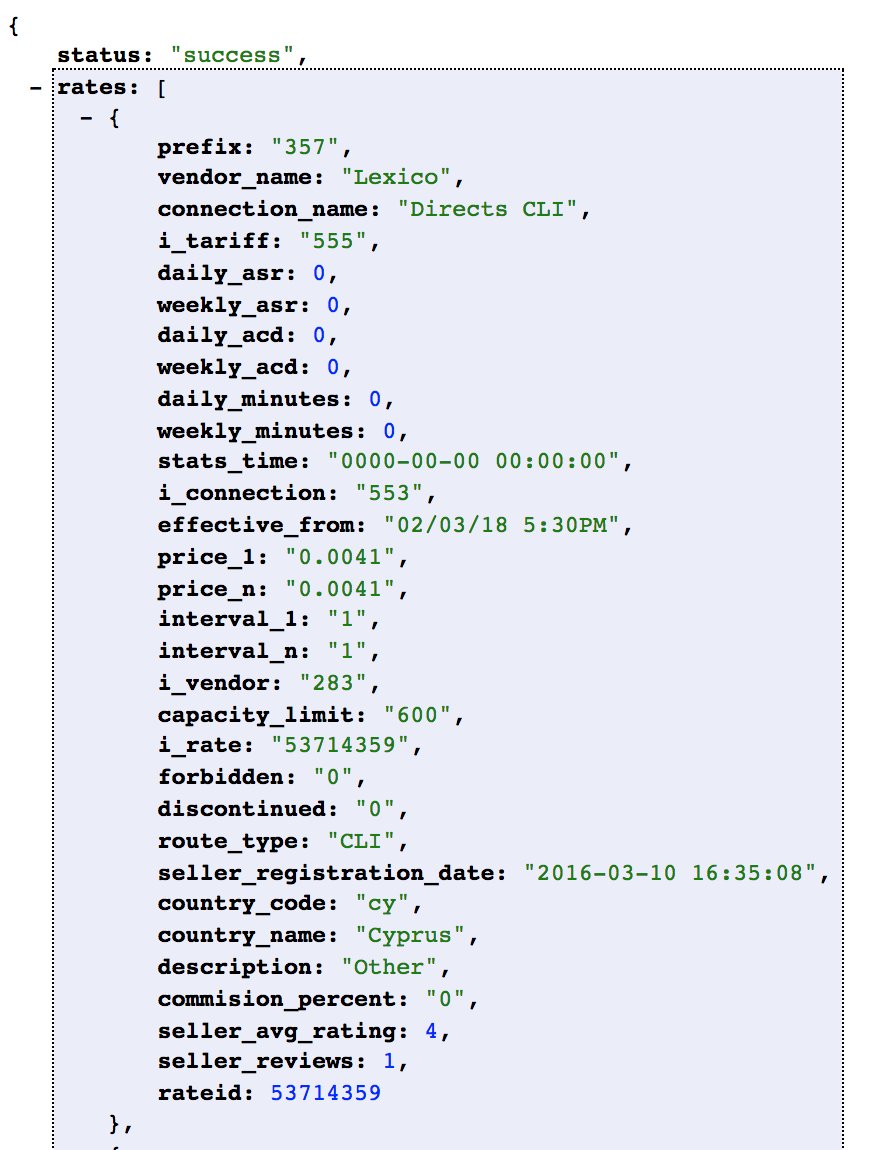
For those that want to query the TCXC rate tables locally, we’ve modified a TCXC sample JSON script slightly so that you can use Chrome (with JSONView) or FireFox (with JSON Lite viewer) to view JSON results. Using one of these browsers with the specified add-on, JSON results will be formatted automatically. The query results identity current providers and rates by entering a dialing prefix. The syntax for the web queries looks like the following where 192.168.0.224 is your server’s IP address and 357 is the dialing prefix rate table desired:
http://192.168.0.224/rates.php?prefix=357
The first 30 matching results will look something like this:
To use this script, you’ll need to insert your account name and API key (found in your TCXC Profile) into rates.php before first use. To install the script in the root folder of Apache, issue the following commands:
cd /var/www/html
wget http://incrediblepbx.com/TCXC-rates.tar.gz
tar zxvf TCXC-rates.tar.gz
rm -f TCXC-rates.tar.gz
Published: Monday, February 12, 2018

NEW YEAR’S TREAT: If you could use one or more free DIDs in the U.S. with unlimited inbound calls and unlimited simultaneous channels, then today’s your lucky day. TelecomsXChange and Bluebird Communications have a few hundred thousand DIDs to give away so you better hurry. You have your choice of DID locations including New York, New Jersey, California, Texas, and Iowa. The DIDs support Voice, Fax, Video, and even Text Messaging (by request). The only requirement at your end is a dedicated IP address for your VoIP server. Once you receive your welcome email with your number, be sure to whitelist the provider’s IP address in your firewall. For Incredible PBX servers, use add-ip to whitelist the UDP SIP port, 5060, using the IP address provided in your welcoming email.
Here’s the link to order your DIDs.
Your DID Trunk Setup in your favorite GUI should look like this:
Trunk Name: IPC
Peer Details:
type=friend
qualify=yes
host={IP address provided in welcome email}
context=from-trunk
Your Inbound Route should specify the 10-digit DID. Enjoy!

Need help with Asterisk? Visit the PBX in a Flash Forum.
Special Thanks to Our Generous Sponsors
FULL DISCLOSURE: ClearlyIP, Skyetel, Vitelity, DigitalOcean, Vultr, VoIP.ms, 3CX, Sangoma, TelecomsXchange and VitalPBX have provided financial support to Nerd Vittles and our open source projects through advertising, referral revenue, and/or merchandise. As an Amazon Associate and Best Buy Affiliate, we also earn from qualifying purchases. We’ve chosen these providers not the other way around. Our decisions are based upon their corporate reputation and the quality of their offerings and pricing. Our recommendations regarding technology are reached without regard to financial compensation except in situations in which comparable products at comparable pricing are available from multiple sources. In this limited case, we support our sponsors because our sponsors support us.
 BOGO Bonaza: Enjoy state-of-the-art VoIP service with a $10 credit and half-price SIP service on up to $500 of Skyetel trunking with free number porting when you fund your Skyetel account. No limits on number of simultaneous calls. Quadruple data center redundancy. $25 monthly minimum spend required. Tutorial and sign up details are here.
![]() The lynchpin of Incredible PBX 2020 and beyond is ClearlyIP components which bring management of FreePBX modules and SIP phone integration to a level never before available with any other Asterisk distribution. And now you can configure and reconfigure your new Incredible PBX phones from the convenience of the Incredible PBX GUI.
The lynchpin of Incredible PBX 2020 and beyond is ClearlyIP components which bring management of FreePBX modules and SIP phone integration to a level never before available with any other Asterisk distribution. And now you can configure and reconfigure your new Incredible PBX phones from the convenience of the Incredible PBX GUI.
 VitalPBX is perhaps the fastest-growing PBX offering based upon Asterisk with an installed presence in more than 100 countries worldwide. VitalPBX has generously provided a customized White Label version of Incredible PBX tailored for use with all Incredible PBX and VitalPBX custom applications. Follow this link for a free test drive!
 Special Thanks to Vitelity. Vitelity is now Voyant Communications and has halted new registrations for the time being. Our special thanks to Vitelity for their unwavering financial support over many years and to the many Nerd Vittles readers who continue to enjoy the benefits of their service offerings. We will keep everyone posted on further developments.
Some Recent Nerd Vittles Articles of Interest…
- We obviously have not verified TCXC’s billed minutes counter. Don’t rely upon it in deciding whether to use the service. As with all VoIP providers, what matters is the quality and cost of the calls. [↩]
- Our special thanks to TelecomsXchange. They have generously offered to contribute a portion of the wholesale surcharge to support the Incredible PBX open source project. [↩]


