Home » Posts tagged 'Networking' (Page 2)

Tag Archives: Networking

The Most Versatile VoIP Provider: FREE PORTING

Firewalls 101: Why Every Asterisk Server Should Have a Functioning Firewall


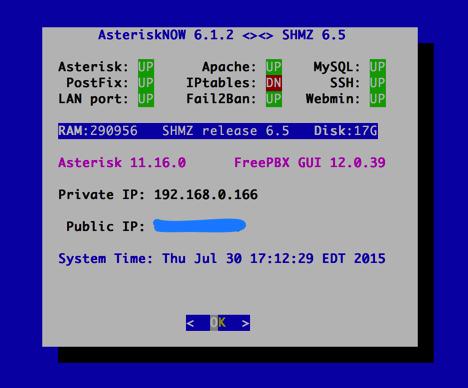
Part of our fundamental disagreement with the FreePBX® design can be summed up in one word: FIREWALL or the lack of a functioning firewall in the FreePBX Distro and in the functionally identical Digium product, AsteriskNOW®.1 Most of the other design choices including the controversial, non-GPL compliant Module Signature Checking mechanism are touted as failsafe ways to detect altered systems even though changes in FreePBX MySQL tables and Asterisk config files can be modified easily without triggering alerts. In short, the Band-Aid® approach to module tampering does nothing to address the fundamental problem, prevention of unauthorized intrusions in the first place.

Some would contend that the included Fail2Ban product is specifically designed to prevent unauthorized intrusions by locking out the bad guys after a certain number of failed login attempts. Assuming Fail2Ban were functioning properly, which does not appear to be the case, putting all your eggs in the Fail2Ban basket also ignores several critical shortcomings in Fail2Ban. First, it has been documented that powerful servers such as Amazon EC2 and Twitter botnets give hackers almost unlimited intrusion attempts before Fail2Ban ever gets a time slice sufficient to scan logs for intrusion attempts. Second, Fail2Ban provides no protection against stealthy distributed bruteforcing activity. For example, if a botnet with 770,000 PCs attacked your server and each PC executed only two login attempts, Fail2Ban never gets triggered even assuming your server could handle the load and Fail2Ban got sufficient server resources to actually scan your logs. Finally, Fail2Ban provides no protection against Zero Day vulnerabilities where an intruder basically walks right into your server because of an unidentified vulnerability lurking in the existing code. Unfortunately, these are not hypothetical situations but regular occurrences over the past 10 years of Asterisk and FreePBX development. In a nutshell, that’s why you need a real firewall. It completely blocks all access to your server by unauthorized users all of the time.

Numerous companies have intentionally exposed Asterisk® servers to the public Internet in a continuing effort to identify problems before they affect "real servers." We know of no similar efforts with a platform that includes FreePBX as an integral component of the server. Why? Because the potential for Zero Day Vulnerabilities in a platform of modular design is enormous. One vulnerable component in FreePBX and the entire house of cards collapses because of the blank check server access that a compromised FreePBX asterisk user account gives to an intruder. It’s the fundamental reason that services such as Apache were engineered to run with different user credentials than a root user in the real world. In essence, the current FreePBX design with Asterisk has elevated asterisk user credentials to allow root-like access to almost every server file and function with the exception of SSH access. And SSH access becomes all but unnecessary given the scope of the GUI functionality provided within FreePBX and the escalated privileges it enjoys.

On FreePBX-based Asterisk servers, the absence of any user account separation means Asterisk, Apache, and FreePBX services all operate under the single asterisk user account. If any piece collapses due to a vulnerability, the intruder gets the keys to the castle including read/write access to Asterisk and FreePBX manager credentials and config files as well as broad MySQL access. This, in turn, exposes your VoIP account credentials in addition to facilitating SQL injection into any and all FreePBX database tables. Because FreePBX "hides" numerous settings in over a hundred MySQL tables, the Asterisk DB, and dozens of Asterisk config files, once the asterisk user account access is compromised, many of the major components on your server could be cleverly reconfigured without leaving much of a hint that your server had been compromised. In fact, VoIP account credentials could be extracted and used elsewhere with no traceable footprint back to your server. For all you would know, your provider compromised your credentials rather than the other way around. Just another reminder that keeping a credit card on file for automatic replenishment with VoIP providers is a very bad idea!

Providing the asterisk user with these broad permissions was a (poor) design choice. Why was it done? To make it easy for the developers to alter virtually everything on your Asterisk server using FreePBX’s integrated Module Admin component. Root user permissions are never required to do much of anything other than server platform upgrades once the FreePBX Distro or AsteriskNOW product is installed. That’s exactly the design one would expect to find in a commercial, closed source software platform. But it’s unusual in the open source community to put it charitably. We trust we’ve made the case why a rock-solid firewall with any product that uses FreePBX modules is absolutely essential. FreePBX is a wonderful GUI, but use of the platform without a properly configured, fully functional firewall could be financially catastrophic not to mention the serious damage it could cause to others including the good reputation of Asterisk in the Internet community.

blank

Our objective next week will be to help you implement a functioning Linux-based software firewall on the FreePBX Distro and AsteriskNOW platforms. It’s FREE! Not only will this improve the security of your server, but it will deny the bad guys a platform from which to launch mischievous acts against the rest of us. Unless you’re running Asterisk on a Cloud-based platform, do all of us a favor NOW! Run, don’t walk, to your nearest electronics store (including WalMart and BestBuy) and purchase one of the dozens of inexpensive NAT-based routers. Install it between the Internet and your server TODAY! This is the one we use, but there are plenty from which to choose including our refurbished one.2


NEWS FLASH:
Download the new FUD-Free Firewall for FreePBX Distro and AsteriskNOW.

Originally published: Monday, August 3, 2015


blank
Need help with Asterisk? Visit the PBX in a Flash Forum.


Special Thanks to Our Generous Sponsors


FULL DISCLOSURE: ClearlyIP, Skyetel, Vitelity, DigitalOcean, Vultr, VoIP.ms, 3CX, Sangoma, TelecomsXchange and VitalPBX have provided financial support to Nerd Vittles and our open source projects through advertising, referral revenue, and/or merchandise. As an Amazon Associate and Best Buy Affiliate, we also earn from qualifying purchases. We’ve chosen these providers not the other way around. Our decisions are based upon their corporate reputation and the quality of their offerings and pricing. Our recommendations regarding technology are reached without regard to financial compensation except in situations in which comparable products at comparable pricing are available from multiple sources. In this limited case, we support our sponsors because our sponsors support us.

blankBOGO Bonaza: Enjoy state-of-the-art VoIP service with a $10 credit and half-price SIP service on up to $500 of Skyetel trunking with free number porting when you fund your Skyetel account. No limits on number of simultaneous calls. Quadruple data center redundancy. $25 monthly minimum spend required. Tutorial and sign up details are here.

blankThe lynchpin of Incredible PBX 2020 and beyond is ClearlyIP components which bring management of FreePBX modules and SIP phone integration to a level never before available with any other Asterisk distribution. And now you can configure and reconfigure your new Incredible PBX phones from the convenience of the Incredible PBX GUI.

blankVitalPBX is perhaps the fastest-growing PBX offering based upon Asterisk with an installed presence in more than 100 countries worldwide. VitalPBX has generously provided a customized White Label version of Incredible PBX tailored for use with all Incredible PBX and VitalPBX custom applications. Follow this link for a free test drive!
 

blankSpecial Thanks to Vitelity. Vitelity is now Voyant Communications and has halted new registrations for the time being. Our special thanks to Vitelity for their unwavering financial support over many years and to the many Nerd Vittles readers who continue to enjoy the benefits of their service offerings. We will keep everyone posted on further developments.


Some Recent Nerd Vittles Articles of Interest…

  1. Technically, IPtables is running on the FreePBX Distro and AsteriskNOW platforms; however, it’s sole function is to act as the shutdown mechanism for Fail2Ban-detected breaches. It does not independently examine packets. There is no functioning iptables config file. From our vantage point, serving as the Fail2Ban traffic cop doesn’t qualify as a functioning firewall since it lacks any of the traditional IPtables rules that manage PREROUTING, INPUT, FORWARD, OUTPUT, and POSTROUTING of packets. []
  2. Where prices are competitive or availability is a factor, we often recommend Amazon because Amazon provides financial support to Nerd Vittles through our referral links. We encourage everyone to shop independently and purchase products from suppliers that best meet your own requirements. []

A Firsthand Look at Disaster Recovery: Tethering and IAX with Asterisk

blank

One of the exciting challenges of building a swimming pool is knowing that it’s just a matter of time until your Internet connection dies. As you might imagine, swimming pools are major construction and involve a lot of digging. And digging usually means some oops moments when cables get cut. In our case, we had watched the folks digging the trenches for all of the pool plumbing to be sure they didn’t accidentally whack one of three coax cables coming into our house. And, when it came time to cover up the trenches, we pointed out the orange cables to the Bobcat driver knowing we were finally home free. Not so fast! Two minutes later, Mario had driven the Bobcat right over the primary Internet cable leaving the shredded remains sticking up through the dirt. Oops. Sorry. Shit happens!

Looking on the positive side, we chuckled, "What a perfect opportunity to test our backup Asterisk® system!" Our backup system is pretty clever if we do say so. It relies upon a Verizon WiFi HotSpot running on our Galaxy smartphone and a duplicate of our Asterisk-based PBX in a Flash™ server running as a virtual machine under VirtualBox on an iMac desktop. The entire setup takes less than a minute to activate. Well, that was the plan anyway.

It turns out that Verizon does SIP a little differently with a SIP ALG in the path so Asterisk couldn’t register with all but one of our dozen SIP providers. Congratulations, CallCentric! The workaround is to enable STUN. That is now possible with Asterisk 11. Short of that, you’re left with CallCentric. Unfortunately for us, we don’t do much SIP trunking with CallCentric, and none of our primary DIDs are connected through them. The other option is to add port=5080 to your trunk setup with any SIP trunks you register with VoIP.ms using a username and password. Our attention span was too short to tackle STUN in the middle of this crisis. But there’s good news. Verizon doesn’t mess with IAX network traffic at all. Since a couple of our primary DIDs are registered with VoIP.ms using IAX trunks, restoring these IAX trunks to full functionality took less than a minute. That is step one of a three-step process. You need inbound trunks, phones, and outbound trunks to get your redundant VoIP server back in business.

blank

Getting phones to function on what is now a purely WiFi network (through the Verizon HotSpot) can be problematic unless you’ve done your homework and sprinkled a few WiFi-capable SIP phones around your home or office. In our case, we still have Grandstream’s GXP2200 Android phones scattered everywhere so it was just a matter of plugging in the WiFI adapters and rebooting. The newer GXV3240 would work just as well.1

All that remained was enabling several trunks for outbound calls. Since VoIP.ms IAX trunks support both incoming and outgoing calls, we were home free. And, with Google Voice trunks, it was simply a matter of jumping through Google’s security hoops to reenable the connections on a new IP address.

Lessons Learned. Here’s a quick checklist for those of you that think about disaster recovery for your home or for clients and businesses. Nothing beats some advance planning. If money is no object, then WiFi tethering from a smartphone with one of the major providers whose service works well in your home or office environment is the way to go. 4G is a must!

blank

In our case, money was an object so we had the foresight to acquire a Verizon SIM card from eBay that included an unlimited data plan. With this setup, it costs only $1 a day extra to add WiFi tethering, and you can turn it off and on as often as you like without any additional fees or surcharges. There also are no additional charges for using boatloads of data! We’re actually writing this column with a tethered connection from a hotel in Washington (results above). To give you some idea of why an unlimited data plan is important, our home operation burned through 4 gigs of data in less than 24 hours once we activated WiFi tethering. Of course, there were people doing things other than making phones calls, but tethering enables 5 connections to function just about like the cable modem service you originally had in place. So expect the data usage to be substantial. Everybody likes 24/7 Internet service.

Loss of phone calls through a PBX is more of an annoyance than a crisis these days because almost everyone also has a smartphone. Even so, the SIP gotcha with Verizon Wireless was a surprise because we hadn’t really tested our super-duper emergency system in advance. That wasn’t too smart obviously. The old adage applies. Do as we say, not as we do. Unplug your cable modem or DSL connection and actually test your backup system before D-Day arrives.

blank

On the VoIP provider end, now is the time to set up an account with a provider that offers both SIP and IAX connectivity. Step 2 is to actually configure an IAX trunk (as a subaccount to use VoIP.ms parlance) and test it. IAX trunks actually have fewer headaches with NAT, but there are only a handful of providers that still provide the service. Find one now and make certain that your primary DIDs will roll over to the IAX trunk in case of an outage. I’m always reminded that we have Mark Spencer to thank for IAX. It was his brainchild. Thank you, Mark! With VoIP.ms, you also can spoof your CallerID so that calls will still appear to originate from your primary Asterisk PBX.

Keep in mind that a VirtualBox-based Asterisk virtual machine and a Desktop computer both need an IP address and will have to be started on WLAN0 rather than ETH0. Remember, your wired connection is now dead.

You’re also going to want to acquire at least a couple of WiFi-capable SIP phones that can be connected with your Asterisk server using your WiFi HotSpot. Also make certain that you have a preconfigured IPtables firewall on your backup system. Remember, your hardware-based firewall connected to your cable modem won’t provide any protection once you switch to HotSpot operation. Lucky for you, Incredible PBX™ servers come preconfigured with a locked-down IPtables firewall and a WhiteList. Just add the new IP addresses of your server and phones, and you’re secure on the public Internet.

Finally, let’s do the HotSpot connection math. You’ll need an IP address for your desktop computer running VirtualBox. You’ll need a second IP address for the Asterisk virtual machine. Then you’ll need an IP address for every WiFi-enabled SIP phone. If the maximum number of connections is five on your HotSpot, that means you’ve got the necessary capacity for at most 3 WiFi SIP phones assuming you don’t enable a WiFi printer and if nobody else wants to use a computer during the outage. The other option is to add an inexpensive travel router with bridge mode to your mix of 5 devices. We always keep one handy for extended trips. A properly configured travel router provides an additional WiFi network with some extra WiFi connections. Good luck!


Security Alerts. Serious SSL and FreePBX security vulnerabilities have been discovered AND patched during the past week. If you have not patched your server and Asterisk, FreePBX, Apache, and/or WebMin are exposed to the public Internet, you have a serious problem on your hands. See this thread for details on the FreePBX vulnerability. And see this thread for the steps necessary to patch SSL in Asterisk, Apache, and Webmin. While Incredible PBX servers were automatically patched for the FreePBX vulnerability, the SSL issues require manual patching and an Asterisk upgrade. A script for upgrading Asterisk 11 servers is included in the message thread linked above. ALWAYS run your VoIP server behind a firewall with no Internet port exposure to Asterisk, FreePBX, SSH, or the Apache and Webmin web servers! And, if you think all of this security stuff is just a silly waste of your time, then read about the latest lucky recipient of a $166,000 phone bill.

Originally published: Monday, October 20, 2014


blank
Need help with Asterisk? Visit the PBX in a Flash Forum.


Special Thanks to Our Generous Sponsors


FULL DISCLOSURE: ClearlyIP, Skyetel, Vitelity, DigitalOcean, Vultr, VoIP.ms, 3CX, Sangoma, TelecomsXchange and VitalPBX have provided financial support to Nerd Vittles and our open source projects through advertising, referral revenue, and/or merchandise. As an Amazon Associate and Best Buy Affiliate, we also earn from qualifying purchases. We’ve chosen these providers not the other way around. Our decisions are based upon their corporate reputation and the quality of their offerings and pricing. Our recommendations regarding technology are reached without regard to financial compensation except in situations in which comparable products at comparable pricing are available from multiple sources. In this limited case, we support our sponsors because our sponsors support us.

blankBOGO Bonaza: Enjoy state-of-the-art VoIP service with a $10 credit and half-price SIP service on up to $500 of Skyetel trunking with free number porting when you fund your Skyetel account. No limits on number of simultaneous calls. Quadruple data center redundancy. $25 monthly minimum spend required. Tutorial and sign up details are here.

blankThe lynchpin of Incredible PBX 2020 and beyond is ClearlyIP components which bring management of FreePBX modules and SIP phone integration to a level never before available with any other Asterisk distribution. And now you can configure and reconfigure your new Incredible PBX phones from the convenience of the Incredible PBX GUI.

blankVitalPBX is perhaps the fastest-growing PBX offering based upon Asterisk with an installed presence in more than 100 countries worldwide. VitalPBX has generously provided a customized White Label version of Incredible PBX tailored for use with all Incredible PBX and VitalPBX custom applications. Follow this link for a free test drive!
 

blankSpecial Thanks to Vitelity. Vitelity is now Voyant Communications and has halted new registrations for the time being. Our special thanks to Vitelity for their unwavering financial support over many years and to the many Nerd Vittles readers who continue to enjoy the benefits of their service offerings. We will keep everyone posted on further developments.


Some Recent Nerd Vittles Articles of Interest…

  1. Some of our links refer users to Amazon or other service providers when we find their prices are competitive for the recommended products. Nerd Vittles receives a small referral fee from these providers to help cover the costs of our blog. We never recommend particular products solely to generate commissions. However, when pricing is comparable or availability is favorable, we support these providers because they support us. []

It’s An Oligopoly, Stupid: What’s Wrong with Comcast Business Class Internet?

Let’s begin with what sounds like a fairy tale but turns out to be a nightmare. After watching your country invest hundreds of millions of dollars in taxpayer-subsidized infrastructure, you’ve finally decided it’s time to buy your own car. You visit the only car dealer in town and are told that all vehicles are leased, not sold, for a period of three years. Cars come in three models. Would you like a 200, 300, or 400 horsepower engine? You opt for the 400 horsepower model and, just as your new car sputters off the lot, you discover a 14-page list of Terms and Conditions in your glove box. The document reveals that the manufacturer doesn’t make any guarantees regarding the performance or reliability of your new vehicle. And, if you attempt to return the car in a couple months because of the vehicle’s unreliability or lousy performance, you agree to forfeit 75% of the entire cost of the 3-year lease. And, no, you cannot sublease or even give your crappy purple Scion1 to somebody else. Aside from the fact that Scion actually makes great automobiles with excellent warranties, the only real difference in this scenario and The World According to Comcast is the fact that, with a car, the item being leased becomes less valuable every day. With Comcast, prices continue to go up, and up, and up…


So perhaps you think the cellphone oligopoly is similar. The Bell Sisters could only wish. With a cellphone plan, the carriers actually subsidize the cost of your discounted cellphone by spreading the cost over a period of two years. Thus, their early termination fees which typically run $200 to $300 are closely tied to recovery of the subsidized cost of your discounted phone. With Comcast, the company is not providing any hardware that you don’t actually pay for either up front or on a pay-as-you-go basis. Build out costs are payable in advance. Cable modems are leased by the month. When you discontinue service, the cable modem is returned and handed out to the next poor sucker customer waiting in line.

[gview file="http://business.comcast.com/docs/smb-pdfs/cbc_terms_020309.pdf"]

Early Termination Fees. So let’s calculate the fee that Comcast could impose if you decide after a couple months that your business can no longer survive on their "Business Class" level of service and performance. On the Business Internet D50 plan (note that there’s no mention in the contract that this has been touted by the sales rep as a 50Mbit down, 10Mbit up Internet service), the "discounted" cost with one static IP address is $125 per month for 36 months = $4,500. You used the service for two months which reduces the lease balance to $4,250. The 75% Early Termination Fee for the service you never used and for which Comcast made no representation as to performance or reliability works out to a whopping $3,187.50. Makes your $125 monthly cellphone bill sound like a bargain, doesn’t it?

According to Craig Moffet, an analyst at the Wall Street firm Bernstein Research, Comcast and Time Warner are making a 97 percent margin on their “almost comically profitable” Internet services. So this is clearly not a case of recovering infrastructure costs. After all, most of those were either paid or subsidized by federal, state, and local governments. This is simply an oligopolist doing what they do best in unregulated local markets with almost zero competition by regulatory design. It’s good old-fashioned price gouging! What a coincidence that Comcast also happens to be one of the "top ten" political contributors in the United States.

Internet Performance. The other glaring problem lies with Comcast selling tiers of service at different price points while providing no assurance that the performance levels will ever be met. We all appreciate that Internet performance can vary; however, the Comcast terms go far beyond that. If Comcast provided a 2400 baud modem level of performance for three years, our reading of the contract terms suggests that Comcast is fully within its rights even though the service was sold as offering 50 megabit download speeds. Comcast’s terms and conditions specifically disclaim any responsibility for achieving any performance measurement ever. In short, the speed designations allow Comcast to charge higher rates without offering anything of contractual value to the customer in return.

How’s the Service? Let us briefly replay the last 8 days of dealing with Comcast Business Class in our office. This all transpired while a Comcast sales rep was pitching a new 3-year contract as the only way for us to decouple our existing Business Class Internet "service" from our residential cable TV bill. This would allow us to once again get business class support without a 30-minute residential support run-around on every Business Class Internet support call, a highly touted (and necessary!) feature that actually worked during the first two years of our first contract.

Sunday, Oct. 6, 6 a.m. – Preparing to leave town for AstriCon 10. Internet dead.
Sunday, Oct. 6, 7 a.m. – Reset cable modem, Comcast tests modem. All fine. Internet still dead.
Monday, Oct. 7, all day – Repeat of Sunday. Internet still dead.
Tuesday, Oct. 8, all day – Same story.
Wednesday, Oct. 9, all day – Same story.
Thursday, Oct. 10, 4 p.m. – Another hour with Comcast support. Will try to schedule visit for Friday.
Friday, Oct. 11, 10 a.m. – Tech arrives. Takes one look at modem and declares the unit defective.
Friday, Oct. 11, rest of day – Internet works.
Saturday, Oct. 12, 6 a.m. – Internet dead. Comcast reports A-OK. Is the modem in bridge mode? Yes.
Sunday, Oct. 13, 3 p.m. – Comcast support: In bridge mode? Ooops. No. Internet finally works.
Monday, Oct. 14, 4 p.m. – Internet dead. Looks like a fiber cut. Offers 1 month Internet credit.
Monday, Oct. 14, 9 p.m. – Internet works.

What Can You Do About It? For openers, raise hell with your favorite Congressman. Assuming he or she didn’t receive a "political contribution," it might actually help. Then write or visit your state and local elected representatives and hand them a copy of this article if you’re too shy to tell your own story. Nearly everybody has a ‘Comcast Story’ to tell. Encourage all of these folks either to open up the marketplace for real competition or to establish local initiatives to bring affordable Internet service to local businesses and communities. Last, but not least, write your local newspaper and encourage them to shine a spotlight on business practices such as these. You might be surprised by the results. If there’s an organization that deserves a lower job approval rating than Congress, we have a tip for you.

What’s Next? We’ve reached out to @ComcastCares for comment. We’ll let you know if there’s a meaningful response.

Originally published: Tuesday, October 15, 2013


blank
Need help with Asterisk? Visit the PBX in a Flash Forum.


Special Thanks to Our Generous Sponsors


FULL DISCLOSURE: ClearlyIP, Skyetel, Vitelity, DigitalOcean, Vultr, VoIP.ms, 3CX, Sangoma, TelecomsXchange and VitalPBX have provided financial support to Nerd Vittles and our open source projects through advertising, referral revenue, and/or merchandise. As an Amazon Associate and Best Buy Affiliate, we also earn from qualifying purchases. We’ve chosen these providers not the other way around. Our decisions are based upon their corporate reputation and the quality of their offerings and pricing. Our recommendations regarding technology are reached without regard to financial compensation except in situations in which comparable products at comparable pricing are available from multiple sources. In this limited case, we support our sponsors because our sponsors support us.

blankBOGO Bonaza: Enjoy state-of-the-art VoIP service with a $10 credit and half-price SIP service on up to $500 of Skyetel trunking with free number porting when you fund your Skyetel account. No limits on number of simultaneous calls. Quadruple data center redundancy. $25 monthly minimum spend required. Tutorial and sign up details are here.

blankThe lynchpin of Incredible PBX 2020 and beyond is ClearlyIP components which bring management of FreePBX modules and SIP phone integration to a level never before available with any other Asterisk distribution. And now you can configure and reconfigure your new Incredible PBX phones from the convenience of the Incredible PBX GUI.

blankVitalPBX is perhaps the fastest-growing PBX offering based upon Asterisk with an installed presence in more than 100 countries worldwide. VitalPBX has generously provided a customized White Label version of Incredible PBX tailored for use with all Incredible PBX and VitalPBX custom applications. Follow this link for a free test drive!
 

blankSpecial Thanks to Vitelity. Vitelity is now Voyant Communications and has halted new registrations for the time being. Our special thanks to Vitelity for their unwavering financial support over many years and to the many Nerd Vittles readers who continue to enjoy the benefits of their service offerings. We will keep everyone posted on further developments.


Some Recent Nerd Vittles Articles of Interest…

  1. With apologies to Scion that actually makes perfectly functional and dependable automobiles! Listen to the song for details. []

Introducing NeoRouter 1.9 VPN: Still a Shining Star

In a previous article, we introduced PPTP VPNs for interconnecting remote users and branch offices to a central network hub. Known as a hub-and-spoke VPN, the advantage of this design is it lets remote users participate as peers in an existing home office LAN. It’s simple to set up and easy to maintain. The drawback is vulnerability to man-in-the-middle attacks.

blank

Today, we want to revisit the more traditional client-server VPN which relies upon a central server but uses a star topology to connect remote nodes. The major difference is that only registered devices participate in the virtual private network so there is no direct access to other machines on the LANs of the registered devices. If you have servers scattered all over the countryside, however, this is an excellent way to manage and interconnect them. All data and communications between the nodes can then be routed through the encrypted VPN tunnel for rock-solid security and NSA avoidance. Well, maybe and maybe not…

https://twitter.com/chrisVEGGIE16/status/364463018647629824

With NeoRouter’s latest 1.9 (free) software, you can set up your VPN server using a PC, a Mac, a Linux or FreeBSD machine, OpenWrt Backfire, Tomato, or even a Raspberry Pi. VPN clients are available for PCs, Macs, Linux and FreeBSD machines, Raspberry Pi, OpenWrt, Tomato as well as Android and iOS phones and tablets. There’s even an HTML5 web application in addition to a Chrome browser plug-in. With the OpenWrt and Tomato devices or if you’re an extreme techie, you can broaden your NeoRouter star configuration to include bridging of remote LANs. See pp. 47-50 of the NeoRouter User’s Manual.

blank

You can interconnect up to 256 devices at no cost. For $999, you can enlarge your VPN to support 1,000 devices. Screen sharing, remote desktop connections, HTTP, and SSH access all work transparently using private IP addresses of the VPN nodes which are automatically assigned in the 10.0.0.0 private network.

blank

blank

Several years ago, we kissed Hamachi goodbye. Suffice it to say, LogMeIn put the squeeze on the free version to the point that it became next to worthless. In fact, you’d be hard-pressed to find any mention of a free version of Hamachi (other than a trial edition) on LogMeIn’s current web site. Here’s a feature comparison which says it better than we could:

blank

Today we are introducing the second generation of the NeoRouter VPN solution. We have a simple installation script that works with any current PBX in a Flash™ server. It’s suitable for use on a dedicated server or running as a virtual machine. Whether to run NeoRouter 1.9 server on a dedicated machine is your call. Keep in mind that a dedicated platform isolates your VPN server from your PBX which generally is a better network strategy. Regardless of the installation scenario you choose, remember that neither option requires exposure of your entire server to the Internet. Only a single TCP port needs to be opened in your hardware-based firewall and IPtables Linux firewall.

NeoRouter Setup with PIAF™. We’re assuming you already have a PBX in a Flash server set up behind a hardware-based firewall. If not, start there. Next, we’ll need to download and run the installer for your new NeoRouter Server. It also installs the client. Just log into your server as root and issue the following commands:

wget http://incrediblepbx.com/install-neorouter
chmod +x install-neorouter
./install-neorouter

The installer will walk you through these five installation steps, but we’ll repeat them here so you have a ready reference down the road.

First, on your hardware-based firewall, map TCP port 32976 to the private IP address of your PIAF server. This tells the router to send all NeoRouter VPN traffic to your PIAF server when it hits your firewall. If you forget this step, your NeoRouter VPN will never work!

Second, we’re going to use your server’s public IP address as the destination for incoming traffic to your NeoRouter VPN. If this is a dynamic IP address, you’ll need an FQDN that’s kept current by a service such as DynDNS.com.

Third, each administrator and user is going to need a username to access your NeoRouter VPN. You can use the same credentials to log in from multiple client machines, something you may or may not want to do. We’re going to set up credentials for one administrator as part of the install. You can add extra ones by adding entries with one of the following commands using the keyword admin or user. Don’t use any special characters in the username and password!

nrserver -adduser username password admin
nrserver -adduser username password user

Fourth, make up a very secure password to access your NeoRouter VPN. No special characters.

You’re done. Review your entries very carefully. If all is well, press Enter. If you blink, you may miss the completion of the install process. It’s that quick.

Fifth, after your NeoRouter 1.9 VPN is installed, you can optionally go to the NeoRouter web site and register your new VPN by clicking Create Standalone Domain. Make up a name you can easily remember with no periods or spaces. You’ll be prompted for the IP address of your server in the second screen. FQDNs are NOT permitted.

When a VPN client attempts to login to your server, the server address is always checked against this NeoRouter database first before any attempt is made to resolve an IP address or FQDN using DNS. If no matching entry is found, it will register directly to your server using a DNS lookup of the FQDN. Whether to register your VPN is totally up to you. Logins obviously occur quicker using this registered VPN name, but logins won’t happen at all if your server’s dynamic IP address changes and you’ve hard-coded a different IP address into your registration at neorouter.com.

Setting Up a NeoRouter Client. As mentioned previously, there are NeoRouter clients available for almost every platform imaginable, including iPhones, iPads, and our beloved Raspberry Pi. So Step #1 is to download whatever clients are appropriate to meet your requirements. Here’s the NeoRouter Download Link. Make sure you choose a client for the Free version of NeoRouter. And make sure it is a version 1.9 client! Obviously, the computing platform needs to match your client device. The clients can be installed in the traditional way with Windows machines, Macs, etc. Older NeoRouter 1.7 clients still work with the new 1.9 server; however, the Android client is much improved and now provides the same functionality as the Mac and Windows clients. In short, you can use your NeoRouter VPN tunnel to connect to another resource using SSH, VoIP clients, and web browsers.

CentOS NeoRouter Client. As part of the installation above, we have automatically installed the NeoRouter client for your particular flavor of CentOS 6, 32-bit or 64-bit. In order to access resources on your NeoRouter server from other clients, you will need to activate the client on your server as well. This gets the server a private IP address in the 10.0.0.0 network.

To activate the client, type: nrclientcmd. You’ll be prompted for your Domain, Username, and Password. You can use the registered domain name from neorouter.com if you completed step #5. Or you can use the private IP address of your server. If your router supports hairpin NAT, you can use the public IP address or server’s FQDN, if you have one. After you complete the entries, you’ll get a display that looks something like this:

blank

To exit from NeoRouter Explorer, type: quit. The NeoRouter client will continue to run so you can use the displayed private IP addresses to connect to any other online devices in your NeoRouter VPN. All traffic from connections to devices in the 10.0.0.0 network will flow through NeoRouter’s encrypted VPN tunnel. This includes inter-office SIP and IAX communications between Asterisk® endpoints.

Admin Tools for NeoRouter. Here are a few helpful commands for monitoring and managing your NeoRouter VPN.

Browser access to NeoRouter Configuration Explorer (requires user with Admin privileges)

Browser access to NeoRouter Network Explorer (user with Admin or User privileges)

Manage your account on line at this link

To access your NeoRouter Linux client: nrclientcmd

To restart NeoRouter Linux client: /etc/rc.d/init.d/nrservice.sh restart

To restart NeoRouter Linux server: /etc/rc.d/init.d/nrserver.sh restart

To set domain: nrserver -setdomain YOUR-VPN-NAME domainpassword

For a list of client devices: nrserver -showcomputers

For a list of existing user accounts: nrserver -showusers

For the settings of your NeoRouter VPN: nrserver -showsettings

To add a user account: nrserver -adduser username password user

To add admin account: nrserver -adduser username password admin

Test VPN access: http://www.neorouter.com/checkport.php

For a complete list of commands: nrserver –help

To change client name from default pbx.local: rename-server OR…

  • Edit /etc/hosts
  • Edit /etc/sysconfig/network
  • Edit /etc/sysconfig/network-scripts/ifcfg-eth0
  • Edit /etc/asterisk/vm_general.inc
  • reboot

For the latest NeoRouter happenings, follow the NeoRouter blog on WordPress.com.

Upgrading NeoRouter 1.7 Server to 1.9. If you followed our previous tutorial to install NeoRouter 1.7 Server, then upgrading to version 1.9 is easy. Log into your NeoRouter 1.7 server as root and download either the 32-bit or 64-bit 1.9 server software for your operating system. Then issue the following commands:


/etc/rc.d/init.d/nrserver.sh stop
rpm -Uvh nrserver-1.9*
/etc/rc.d/init.d/nrserver.sh start
chkconfig nrserver.sh on

GPL2 License. The install-neorouter application is open source software licensed under GPL2. The NeoRouter Server and Client software is freeware but not open source. This installer has been specifically tailored for use on PBX in a Flash servers, but it can be adjusted to work with virtually any Linux-based Asterisk system. If you make additions or changes, we hope you’ll share them on the PIAF Forum for the benefit of the entire VoIP community. Enjoy!


Deals of the Week. There are a few amazing deals still on the street, but you’d better hurry. First, for new customers, Sangoma is offering a board of your choice from a very impressive list at 75% off. For details, see this thread on the PIAF Forum. Second, a new company called Copy.com is offering 20GB of free cloud storage with no restrictions on file size uploads (which are all too common with other free offers). Copy.com has free sync apps for Windows, Macs, and Linux systems. To take advantage of the offer, just click on our referral link here. We get 5GB of extra storage, too, which will help avoid another PIAF Forum disaster. Finally, O’Reilly has over 1,000 Packt Ebooks on sale for 50% off until August 15. Better hurry!

Originally published: Tuesday, August 6, 2013


blank
Need help with Asterisk? Visit the PBX in a Flash Forum.


blank

Don’t miss the first-ever FreePBX World on August 27-28 at the Mandalay Bay in Las Vegas. For complete details, see this post on the FreePBX blog.


blank

We are pleased to once again be able to offer Nerd Vittles’ readers a 20% discount on registration to attend this year’s 10th Anniversary AstriCon in Atlanta. Here’s the Nerd Vittles Discount Code: AC13NERD.


Special Thanks to Our Generous Sponsors


FULL DISCLOSURE: ClearlyIP, Skyetel, Vitelity, DigitalOcean, Vultr, VoIP.ms, 3CX, Sangoma, TelecomsXchange and VitalPBX have provided financial support to Nerd Vittles and our open source projects through advertising, referral revenue, and/or merchandise. As an Amazon Associate and Best Buy Affiliate, we also earn from qualifying purchases. We’ve chosen these providers not the other way around. Our decisions are based upon their corporate reputation and the quality of their offerings and pricing. Our recommendations regarding technology are reached without regard to financial compensation except in situations in which comparable products at comparable pricing are available from multiple sources. In this limited case, we support our sponsors because our sponsors support us.

blankBOGO Bonaza: Enjoy state-of-the-art VoIP service with a $10 credit and half-price SIP service on up to $500 of Skyetel trunking with free number porting when you fund your Skyetel account. No limits on number of simultaneous calls. Quadruple data center redundancy. $25 monthly minimum spend required. Tutorial and sign up details are here.

blankThe lynchpin of Incredible PBX 2020 and beyond is ClearlyIP components which bring management of FreePBX modules and SIP phone integration to a level never before available with any other Asterisk distribution. And now you can configure and reconfigure your new Incredible PBX phones from the convenience of the Incredible PBX GUI.

blankVitalPBX is perhaps the fastest-growing PBX offering based upon Asterisk with an installed presence in more than 100 countries worldwide. VitalPBX has generously provided a customized White Label version of Incredible PBX tailored for use with all Incredible PBX and VitalPBX custom applications. Follow this link for a free test drive!
 

blankSpecial Thanks to Vitelity. Vitelity is now Voyant Communications and has halted new registrations for the time being. Our special thanks to Vitelity for their unwavering financial support over many years and to the many Nerd Vittles readers who continue to enjoy the benefits of their service offerings. We will keep everyone posted on further developments.


Some Recent Nerd Vittles Articles of Interest…

The Bluetooth Revolution: Watch What We Can Do

If ever there’s been a sleeping technology giant still worth watching, it’s got to be Bluetooth. Originally developed by Ericsson, the Swedish telecommunications company, Bluetooth is a proprietary wireless technology for exchanging data over short distances using fixed and mobile devices. If you use it at all, it’s probably to answer phone calls and play music in your car using your smartphone or to walk around looking like a lunatic talking to yourself because you have a Bluetooth headset for your cellphone hanging out of your ear. Or you may be using our Bluetooth Proximity Detection utility to automatically forward calls from your PBX in a Flash server to your cellphone when you leave the office. Well, that’s so last week!

What’s coming in tomorrow’s vehicles (unless the federal government gets too crazy) is literally a revolution in the way vehicles interact with your smartphone. Rather than buying all of your existing cellphone technology again in every car you own, Bluetooth will give you a dashboard with the rich feature set of your existing smartphone without another monthly cellphone bill. That’s right. All of the data will be delivered to your dashboard via Bluetooth using middleware that translates existing information on your cellphone to a display on your dash. And you’ll be able to control the flow and type of information using a touchscreen in your car or truck that bears an uncanny resemblance to the display on your iPad or Android Tablet. See why you might really need a quad-core processor on your next smartphone?

blank
I’m sorry. Did we say in tomorrow’s vehicles? You actually can get it right now in the Prius V with Entune. Of course, Toyota would like to replace your cellphone carrier and charge you monthly fees for services you’re already paying for on your cellphone, but that will sort itself out shortly. Why? Because there are some new open source experiments underway using Android instead of our old friend Micro$oft.

Meet The Watch. Suppose you were a nerd and just graduated from college with nothing to do except beg for a job flipping burgers. But then you had this idea to create a Bluetooth-enabled watch that could display content from your cellphone while you were driving, or running, or swimming. Well, you’d probably turn to KickStarter and try to raise $100,000 so you could build your dream watch. That was six weeks ago. They raised nearly $1 million the first day. And, by the time the fund-raising campaign ends in mid-May, it looks like this project will have raised nearly 10 million dollars!

blank

Nice Surprise. So now you have the background on coming attractions. But there’s more. There’s the company that inspired Steve Jobs doing what they once did better than anyone on the planet, quietly churning out incredible products while nobody was looking. Meet Sony and the SmartWatch.

blank

If you want a glimpse at what tomorrow’s vehicles will look like, the Sony SmartWatch is the one to follow. It’s in living color. It’s feature-rich. And it just works! Released in the United States three short weeks ago, there already are nearly 50 available Android applications (mostly free) that you can display on your watch. Here’s a sampling to give you some idea of the scope. We loaded a dozen on our SmartWatch in minutes!

blank

You actually manage and download apps for your SmartWatch using Sony’s LiveWare Manager which lives on your Android phone. And, yes, almost any Android phone will work although a higher end device with more memory is a definite plus. You won’t want just a couple of apps once you get started.

blank

We, of course, took one look at this watch and decided it was a perfect platform on which to display network management information about your PBX in a Flash communications servers or any other server. Keep reading!

blank

One of the terrific apps for the SmartPhone is called Traffic Cams which does just what you’d think. It displays live web cam images from traffic cameras using GPS technology to figure out which ones are closest to you. Very slick! As you can see, we have some stunning ones within a mile of our home. And if you depend upon bridges to get to where you need to go, you’ll soon learn how indispensable these traffic cams really are. The camera shown above actually faces due east. For a real treat, come visit Nerd Vittles at 6:30 a.m. EDT (this time of the year) and enjoy the sunrise. Stunning!

HINT: The image shows the local time if you are timezone-challenged. It is refreshed every 3-4 minutes during the day.

Update: Wondering why this bridge is so empty? Check our SmartWatch! Pays to use more than one traffic camera when you set this up.

blank

A bonus from the app is the ability to display your own 200×200 images on the watch from any public web site. So we whipped together a quick-and-dirty script that extracts status information about your PBX in a Flash server and converts it with ImageMagick (Don’t Forget: yum install ImageMagick) into a couple of jpeg images. Using FTP, these images then can be uploaded to a public web server and displayed on the phone. If you like the code and want to see what else is possible using the SmartWatch, come follow our progress on the PBX in a Flash Forum. Enjoy your new watch! Here’s a short list showing where to get a great deal on one.

blank

Originally published: Monday, April 30, 2012


blank
Need help with Asterisk®? Visit the NEW PBX in a Flash Forum.


whos.amung.us If you’re wondering what your fellow man is reading on Nerd Vittles these days, wonder no more. Visit our new whos.amung.us statistical web site and check out what’s happening. It’s a terrific resource both for us and for you.


Special Thanks to Our Generous Sponsors


FULL DISCLOSURE: ClearlyIP, Skyetel, Vitelity, DigitalOcean, Vultr, VoIP.ms, 3CX, Sangoma, TelecomsXchange and VitalPBX have provided financial support to Nerd Vittles and our open source projects through advertising, referral revenue, and/or merchandise. As an Amazon Associate and Best Buy Affiliate, we also earn from qualifying purchases. We’ve chosen these providers not the other way around. Our decisions are based upon their corporate reputation and the quality of their offerings and pricing. Our recommendations regarding technology are reached without regard to financial compensation except in situations in which comparable products at comparable pricing are available from multiple sources. In this limited case, we support our sponsors because our sponsors support us.

blankBOGO Bonaza: Enjoy state-of-the-art VoIP service with a $10 credit and half-price SIP service on up to $500 of Skyetel trunking with free number porting when you fund your Skyetel account. No limits on number of simultaneous calls. Quadruple data center redundancy. $25 monthly minimum spend required. Tutorial and sign up details are here.

blankThe lynchpin of Incredible PBX 2020 and beyond is ClearlyIP components which bring management of FreePBX modules and SIP phone integration to a level never before available with any other Asterisk distribution. And now you can configure and reconfigure your new Incredible PBX phones from the convenience of the Incredible PBX GUI.

blankVitalPBX is perhaps the fastest-growing PBX offering based upon Asterisk with an installed presence in more than 100 countries worldwide. VitalPBX has generously provided a customized White Label version of Incredible PBX tailored for use with all Incredible PBX and VitalPBX custom applications. Follow this link for a free test drive!
 

blankSpecial Thanks to Vitelity. Vitelity is now Voyant Communications and has halted new registrations for the time being. Our special thanks to Vitelity for their unwavering financial support over many years and to the many Nerd Vittles readers who continue to enjoy the benefits of their service offerings. We will keep everyone posted on further developments.


Some Recent Nerd Vittles Articles of Interest…

Introducing NeoRouter VPN: A Star Is Born

In our last article, we introduced PPTP VPNs for interconnecting remote users and branch offices to a central network hub. Known as a hub-and-spoke VPN, the advantage of this design is it lets remote users participate as peers in an existing home office LAN. It’s simple to set up and easy to maintain. The drawback is vulnerability to man-in-the-middle attacks.

blank

Today, we want to turn our attention to the more traditional client-server VPN which still relies upon a central server but uses a star topology to connect remote nodes. The major difference is that only registered devices participate in the virtual private network so there is no direct access to other machines on the LANs of the registered devices. If you have servers scattered all over the countryside, this is an excellent way to manage and interconnect them. All data and communications between the nodes can then be routed through the encrypted VPN tunnel for rock-solid security.

With NeoRouter’s free software, you can set up your VPN server using a PC, a Mac, a Linux or FreeBSD machine, OpenWrt Backfire, and Tomato. VPN clients are available for PCs, Macs, Linux and FreeBSD PCs, OpenWrt, Tomato as well as Android phones and tablets. There’s even an HTML5 web application in addition to a Chrome browser plug-in. With the OpenWrt and Tomato devices or if you’re an extreme techie, you can broaden your NeoRouter star configuration to include bridging of remote LANs. See pp. 47-50 of the NeoRouter User’s Manual. And you can interconnect up to 256 devices at no cost. For $999, you can enlarge your VPN to support 1,000 devices. Screen sharing, remote desktop connections, HTTP, and SSH access all work transparently using private IP addresses of the VPN nodes which are automatically assigned to the 10.0.0.0 private network.

You may be wondering why we’ve moved on from Hamachi. Suffice it to say, LogMeIn has put the squeeze on the free version to the point that it’s now next to worthless. In fact, you’d be hard-pressed to find any mention of a free version of Hamachi (other than a trial edition) on LogMeIn’s current web site. Here’s a feature comparison which says it better than we could.

Today we are introducing the first of two NeoRouter VPN solutions. First, we have a simple installation script that works with any PBX in a Flash 2™ server. See also our more recent column for the dedicated server edition of NeoRouter VPN known as VPN in a Flash. It’s suitable for use on a dedicated server or running as a virtual machine. For smaller VPNs, we prefer the add-on module for PBX in a Flash. For larger deployments, you probably should opt for the dedicated machine. It also isolates your VPN server from your PBX which generally is the better network strategy. Regardless of the installation scenario you choose, keep in mind that neither option requires exposure of your entire server to the Internet. Only a single TCP port needs to be opened in your hardware-based firewall and IPtables Linux firewall.

NeoRouter Setup with PIAF2™. We’re assuming you already have a PBX in a Flash 2 server set up behind a hardware-based firewall. If not, start there. Next, we’ll need to download and run the installer for your new NeoRouter Server. It also installs the client. Just log into your server as root and issue the following commands:

wget http://incrediblepbx.com/install-neorouter
chmod +x install-neorouter
./install-neorouter

The installer will walk you through these five installation steps, but we’ll repeat them here so you have a ready reference down the road.

First, on your hardware-based firewall, map TCP port 32976 to the private IP address of your PIAF2 server. This tells the router to send all NeoRouter VPN traffic to your PIAF2 server when it hits your firewall. If you forget this step, your NeoRouter VPN will never work!

Second, we’re going to use your server’s public IP address as the destination for incoming traffic to your NeoRouter VPN. If this is a dynamic IP address, you’ll need an FQDN that’s kept current by a service such as DynDNS.com.

Third, each administrator and user is going to need a username to access your NeoRouter VPN. You can use the same credentials to log in from multiple client machines, something you may or may not want to do. We’re going to set up credentials for one administrator as part of the install. You can add extra ones by adding entries with one of the following commands using the keyword admin or user. Don’t use any special characters in the username and password!

nrserver -adduser username password admin
nrserver -adduser username password user

Fourth, make up a very secure password to access your NeoRouter VPN. No special characters.

You’re done. Review your entries very carefully. If all is well, press Enter. If you blink, you may miss the completion of the install process. It’s that quick.

Fifth, after your NeoRouter VPN is installed, you can optionally go to the NeoRouter web site and register your new VPN by clicking Create Standalone Domain. Make up a name you can easily remember with no periods or spaces. You’ll be prompted for the IP address of your server in the second screen. FQDNs are NOT permitted.

When a VPN client attempts to login to your server, the server address is always checked against this NeoRouter database first before any attempt is made to resolve an IP address or FQDN using DNS. If no matching entry is found, it will register directly to your server using a DNS lookup of the FQDN. Whether to register your VPN is totally up to you. Logins obviously occur quicker using this registered VPN name, but logins won’t happen at all if your server’s dynamic IP address changes and you’ve hard-coded a different IP address into your registration at neorouter.com.

Setting Up a NeoRouter Client. As mentioned previously, there are NeoRouter clients available for almost every platform imaginable, except iPhones and iPads. Hopefully, they’re in the works. So Step #1 is to download whatever clients are appropriate to meet your requirements. Here’s the NeoRouter Download Link. Make sure you choose a client for the Free version of NeoRouter. And make sure it is a version 1.7 client! Obviously, the computing platform needs to match your client device. The clients can be installed in the traditional way with Windows machines, Macs, etc.

CentOS NeoRouter Client. As part of the installation above, we have automatically installed the NeoRouter client for your particular flavor of CentOS 6, 32-bit or 64-bit. In order to access resources on your NeoRouter server from other clients, you will need to activate the client on your server as well. This gets the server a private IP address in the 10.0.0.0 network.

To activate the client, type: nrclientcmd. You’ll be prompted for your Domain, Username, and Password. You can use the registered domain name from neorouter.com if you completed step #5. Or you can use the private IP address of your server. If your router supports hairpin NAT, you can use the public IP address or server’s FQDN, if you have one.

To exit from NeoRouter Explorer, type: quit. The NeoRouter client will continue to run so you can use the displayed private IP addresses to connect to any other online devices in your NeoRouter VPN. All traffic from connections to devices in the 10.0.0.0 network will flow through NeoRouter’s encrypted VPN tunnel. This includes inter-office SIP and IAX communications between Asterisk® endpoints.

Admin Tools for NeoRouter. Here are a few helpful commands for monitoring and managing your NeoRouter VPN.

Browser access to NeoRouter Configuration Explorer (requires user with Admin privileges)

Browser access to NeoRouter Network Explorer (user with Admin or User privileges)

To access your NeoRouter Linux client: nrclientcmd

To restart NeoRouter Linux client: /etc/rc.d/init.d/nrservice.sh restart

To restart NeoRouter Linux server: /etc/rc.d/init.d/nrserver.sh restart

To set domain: nrserver -setdomain YOUR-VPN-NAME domainpassword

For a list of client devices: nrserver -showcomputers

For a list of existing user accounts: nrserver -showusers

For the settings of your NeoRouter VPN: nrserver -showsettings

To add a user account: nrserver -adduser username password user

To add admin account: nrserver -adduser username password admin

Test VPN access: http://www.neorouter.com/checkport.php

For a complete list of commands: nrserver –help

To change client name from default pbx.local1:

  • Edit /etc/hosts
  • Edit /etc/sysconfig/network
  • Edit /etc/sysconfig/network-scripts/ifcfg-eth0
  • Edit /etc/asterisk/vm_general.inc
  • reboot

For the latest NeoRouter happenings, follow the NeoRouter blog on WordPress.com.

GPL2 License. The install-neorouter application is open source software licensed under GPL2. The NeoRouter Server and Client software is freeware but not open source. This installer has been specifically tailored for use on PBX in a Flash 2 servers, but it can easily be adjusted to work with virtually any Linux-based Asterisk system. If you make additions or changes, we hope you’ll share them on our forums for the benefit of the entire VoIP community. Enjoy!

Originally published: Wednesday, April 18, 2012


blank
Need help with Asterisk? Visit the NEW PBX in a Flash Forum.


whos.amung.us If you’re wondering what your fellow man is reading on Nerd Vittles these days, wonder no more. Visit our new whos.amung.us statistical web site and check out what’s happening. It’s a terrific resource both for us and for you.


Special Thanks to Our Generous Sponsors


FULL DISCLOSURE: ClearlyIP, Skyetel, Vitelity, DigitalOcean, Vultr, VoIP.ms, 3CX, Sangoma, TelecomsXchange and VitalPBX have provided financial support to Nerd Vittles and our open source projects through advertising, referral revenue, and/or merchandise. As an Amazon Associate and Best Buy Affiliate, we also earn from qualifying purchases. We’ve chosen these providers not the other way around. Our decisions are based upon their corporate reputation and the quality of their offerings and pricing. Our recommendations regarding technology are reached without regard to financial compensation except in situations in which comparable products at comparable pricing are available from multiple sources. In this limited case, we support our sponsors because our sponsors support us.

blankBOGO Bonaza: Enjoy state-of-the-art VoIP service with a $10 credit and half-price SIP service on up to $500 of Skyetel trunking with free number porting when you fund your Skyetel account. No limits on number of simultaneous calls. Quadruple data center redundancy. $25 monthly minimum spend required. Tutorial and sign up details are here.

blankThe lynchpin of Incredible PBX 2020 and beyond is ClearlyIP components which bring management of FreePBX modules and SIP phone integration to a level never before available with any other Asterisk distribution. And now you can configure and reconfigure your new Incredible PBX phones from the convenience of the Incredible PBX GUI.

blankVitalPBX is perhaps the fastest-growing PBX offering based upon Asterisk with an installed presence in more than 100 countries worldwide. VitalPBX has generously provided a customized White Label version of Incredible PBX tailored for use with all Incredible PBX and VitalPBX custom applications. Follow this link for a free test drive!
 

blankSpecial Thanks to Vitelity. Vitelity is now Voyant Communications and has halted new registrations for the time being. Our special thanks to Vitelity for their unwavering financial support over many years and to the many Nerd Vittles readers who continue to enjoy the benefits of their service offerings. We will keep everyone posted on further developments.


Some Recent Nerd Vittles Articles of Interest…

  1. We’ve built a script to rename your PIAF2 server in all the right places. You can download it here. []

The Incredible PBX: Safely Interconnecting Asterisk Servers

blank

 
WOW! What a couple of weeks it has been. The response to Incredible PBX for Asterisk® 1.8 has been, well, incredible. Just last week, SlickDeals and FatWallet introduced over 50,000 bargain hunters to the beauties of Asterisk and Google Voice using Incredible PBX. They joined our regular 50,000 weekly visitors in discovering what may be the best VoIP calling platform on the planet, free or otherwise.

But we’ve also heard from long-time users of PBX in a Flash: "How can we take advantage of this new Google Voice technology without breaking our existing server?" Well, starting today, it’s easy! We’re going to show you how to interconnect as many Asterisk servers as you like using a simple FreePBX tweak to make free calls using your Incredible PBX. To begin, just set up a second server or virtual machine running Incredible PBX 1.8. Then we’ll walk you through interconnecting it with any other Asterisk server that’s running FreePBX. It really is a 5 minute project… once you’ve finished reading this article.

Don’t be intimidated by all of the screen shots shown below. We’re just showing multiple ways of doing the same thing. So you don’t need to use all of them. Once you’ve added one trunk entry on each of your servers and an outbound route on your existing Asterisk server, all of the users on your primary server can instantly begin making free outbound calls through the Google Voice setup on your Incredible PBX. Keep in mind that, at least for now, there is no limit to the number of simultaneous (free) outbound calls you can make within the U.S. and Canada using the Incredible PBX 1.8 platform. And you can interconnect as many Asterisk servers as you like assuming you have the 100kbps VoIP bandwidth to support each simultaneous call.

To get started, follow our last article to get an Incredible PBX 1.8 server set up. As shown in the diagram above, we’re going to assume you’ve got both your new and old Asterisk servers running on the same subnet behind a very secure hardware-based firewall. But this isn’t really required from a technical standpoint. One or more additional servers could be strung all around the globe if that’s your requirement. Or you may wish to take advantage of the incredible deal at RentPBX.com and let them host Incredible PBX 1.8 for you at $15 a month. Just use this special coupon code: BACK10. Then all of your other Asterisk servers can take advantage of today’s free-calling solution. We would hasten to add that, once you’re using the Internet as the transport mechanism for interconnecting servers, we recommend you read and use the secure VPN setup outlined in our VPN in a Flash knol, but the IAX setup outlined below is secure except your voice data is not encrypted. So that’s your call to make.

Today’s Drill. We’re going to show you how to make calls from your existing Asterisk server through The Incredible PBX today. We’ll leave it to you to get things working in the other direction if that is a requirement for your project. First, we’ll create a new trunk on The Incredible PBX, and then we’ll create both a new trunk and a new outbound route on your existing server. We’ll also cover two different interconnection setups. First, we’ll do it using SIP. And then we’ll show you a similar setup using Asterisk’s IAX.

If both servers are sitting on the same private LAN, then the SIP setup is a little easier because the Linux firewall running on Incredible PBX allows SIP traffic to flow freely without any adjustment. It assumes you have added the recommended hardware firewall layer of protection with SIP access to your servers closed off. If one or more of your servers are outside the hardware firewall that is protecting Incredible PBX 1.8, then we recommend the VPN solution referenced above first and the IAX solution outlined here as a second option because the data is unencrypted. Both of these options avoid having to open up any SIP ports on your hardware firewall, and require only a minor adjustment to IPtables, the Linux-based firewall running on The Incredible PBX.

Naming Conventions. To keep things simple, we’re going to refer to the two servers in our example as incredible-pbx and piaf-main where incredible-pbx is your new Incredible PBX 1.8 server that will host the outbound Google Voice calls for users on your piaf-main server. You can obviously adjust these names in any way you like. The only gotcha is that Asterisk attempts to match an incoming call’s username against one of its corresponding trunk names before allowing the call. If there’s no match, the call will fail. So make sure that, if you change the names in the example, do it for both the username and trunk name entries on both servers. Better yet, follow the naming convention in our example, and it just works. 😉

Security Implications. If any of your Asterisk servers allow direct SIP traffic from the Internet, then you need to be extra careful in setting up this interconnectivity since it may allow anyone to attempt to make calls through your Incredible PBX depending upon how your primary server’s dialplan is configured. For example, once a server is interconnected with Incredible PBX, anyone could dial 6789876543@youripaddress and the call might be processed by Google Voice. To avoid this, the simple solution is to password-protect every Outbound Route on your Incredible PBX by adding a Route Password. Or, better yet, don’t expose any of your Asterisk servers to Internet SIP access. Whatever you do, be sure to test making a SIP URI call such as the one shown here once you have all of the pieces in place. Then you’ll know whether you have a security issue or not.

Setting Up Incredible PBX for Interconnecting Servers. Let’s set up a SIP and IAX trunk on your Incredible PBX first. You really don’t need both of these. To repeat, if The Incredible PBX is located on the same private subnet as your other Asterisk server, just use the SIP trunk. If you need access from an Asterisk server outside your private LAN, use the IAX setup. To begin, login to FreePBX using maint and the password you set up with passwd-master. To create a trunk, first choose Setup, Trunks.

To create a SIP trunk, click Add SIP Trunk. For the Trunk Name, enter piaf-main. Then skip down to the Outgoing Settings and use the following as a guide. Then clear out the Incoming Settings, leave the Registration String blank, and click Submit Changes. Replace 192.168.0.50 with the actual IP address of your piaf-main server. Replace password with a very secure alphanumeric password. Leave the other entries as they are.

blank

 
To create an IAX trunk, click Add IAX2 Trunk. For the Trunk Name, enter piaf-main. Then skip down to the Outgoing Settings and use the following as a guide. Then clear out the Incoming Settings, leave the Registration String blank, and click Submit Changes. Replace 192.168.0.50 with the actual IP address of your piaf-main server. Replace password with a very secure alphanumeric password. Leave the other entries as they are.

blank

With either or both trunks, you have the option of tightening up how calls placed from the other server are routed. To force all calls to go out through the Google Voice trunk, just change context=from-internal to context=gvoice. If you want extensions on the other server to be able to call extensions on The Incredible PBX directly, leave the context entry the way it is shown.

While we don’t recommend it, if you’re going to have multiple Asterisk servers connecting to The Incredible PBX to place Google Voice calls and you’re too lazy to create separate trunks to support each server, you can eliminate the IP address checking mechanism in Asterisk by replacing host=192.168.0.50 with insecure=port,invite. The security implications should be obvious.

Setting Up The Other Asterisk Server. There are two steps in setting up any other server that you wish to interconnect with The Incredible PBX. First, you have to create a compatible trunk to handle the calls. Then we’ll add an Outbound Route to send certain calls to Incredible PBX for processing. If you’re using SIP on the Incredible PBX, then you have to use SIP on the other Asterisk server. Same goes for IAX. We’ll set up both a SIP and IAX trunk on the PIAF main server just to show you what the entries should look like. And, to repeat, you really don’t need both of these. If your other Asterisk server is located on the same private subnet as Incredible PBX, use the SIP trunk. If you need access to Incredible PBX from elsewhere, use the IAX setup. To begin, login to FreePBX on your other PIAF server using maint and the password you set up with passwd-master. To create a trunk, first choose Setup, Trunks.

To create a SIP trunk, click Add SIP Trunk. For the Trunk Name, enter incredible-pbx. Then skip down to the Outgoing Settings and use the following as a guide. Then clear out the Incoming Settings, leave the Registration String blank, and click Submit Changes. Replace 192.168.0.212 with the actual IP address of your incredible-pbx server. Replace password with the same secure alphanumeric password you used on the Incredible PBX SIP trunk to which you will be connecting. Leave the other entries as they are.

blank

 
To create an IAX trunk, click Add IAX2 Trunk. For the Trunk Name, enter incredible-pbx. Then skip down to the Outgoing Settings and use the following as a guide. Then clear out the Incoming Settings, leave the Registration String blank, and click Submit Changes. Replace 192.168.0.212 with the actual IP address of your incredible-pbx server. Replace password with the same secure alphanumeric password you used on the Incredible PBX IAX trunk to which you will be connecting. Leave the other entries as they are.

blank

You’ll notice in the Dial Rules, we’ve used 48 (which is GV on a phone) as the prefix to be dialed on your other Asterisk server to route calls out through Google Voice on The Incredible PBX. So, to place a call from your other Asterisk server via Google Voice, a user would dial something like this: 48-678-987-6543. Before the call leaves the Asterisk server, the 48 prefix will be stripped off. You can make this prefix anything you’d like. Just be sure to use the same prefix when you set up the Outbound Route in the next step.

Adding an Outbound Route. The final configuration step is to add a new outbound route on your other Asterisk server to actually send calls to The Incredible PBX. As noted, we use a dialing prefix so that we can identify the calls to be sent. Create a new route called GoogleVoice and make your entries look like the following if you’re using IAX. If you’re using SIP, just change Trunk Sequence 0 to SIP/incredible-pbx. Click Submit Change and reload FreePBX when prompted.

blank


Keep in mind that FreePBX processes Outbound Routes in top down order, and the first matching route is the only route that is used to place the call even if the call fails. So the trick here is to move your new GoogleVoice route up the list so that it’s at least above the default calling route (which is a route with no specified dial patterns to match) and any other routes consisting of 12 or 13-digit dial strings which might match our GoogleVoice dial patterns.

IAX Firewall Adjustments. If you’re using the IAX method above, you’ll need to adjust the IPtables firewall rules on Incredible PBX to allow communications with your other Asterisk server. If your other Asterisk server is PBX in a Flash, you may need to add a similar entry in the IPtables rules on that machine as well. In addition, you’ll need to map UDP 4569 on your hardware-based firewall to the private IP address of your Asterisk server. Otherwise, calls will never make it past your firewall.

On each server, edit /etc/sysconfig/iptables and add an entry with the IP address of the other server with which you’ll be communicating. If your Incredible PBX is on a different public network than your other server, we’d need to add an entry near the end of the file and above COMMIT allowing IAX communications with the public (not private!) IP address of the piaf-main server assuming that server is outside the LAN, e.g. something like this:

-A INPUT -p udp -m udp -s 222.68.100.150 –dport 4569 -j ACCEPT

If you’re using IAX and both servers are on the same private subnet or interconnected private subnets, then the entry might look like this:

-A INPUT -p udp -m udp -s 192.168.0.50 –dport 4569 -j ACCEPT

Once you’ve saved your change, restart the firewall: service iptables restart

Testing Things Out. Now you’re ready to place a test call. Pick up an extension on your piaf-main system and dial 48-800-322-7300. You’ll be greeted by American Airlines courtesy of Google Voice. The CallerID of your outbound calls will be your Google Voice number regardless of the extension or server from which the call originates. Enjoy!

Originally published: Monday, November 15, 2010


Introducing The Incredible PBX for Asterisk 1.8

Adding Skype to The Incredible PBX

Adding Incredible Backup… and Restore to The Incredible PBX

Adding Remotes, Preserving Security with The Incredible PBX

Remote Phone Meets Travelin’ Man with The Incredible PBX


blankSupport Issues. With any application as sophisticated as this one, you’re bound to have questions. Blog comments are a terrible place to handle support issues although we welcome general comments about our articles and software. If you have particular support issues, we encourage you to get actively involved in the PBX in a Flash Forums. It’s the best Asterisk tech support site in the business, and it’s all free! We maintain a thread with the latest Patches and Bug Fixes for Incredible PBX. Please have a look. Unlike some forums, ours is extremely friendly and is supported by literally hundreds of Asterisk gurus and thousands of ordinary users just like you. So you won’t have to wait long for an answer to your questions.


blank
Need help with Asterisk? Visit the PBX in a Flash Forum.
Or Try the New, Free PBX in a Flash Conference Bridge.


whos.amung.us If you’re wondering what your fellow man is reading on Nerd Vittles these days, wonder no more. Visit our new whos.amung.us statistical web site and check out what’s happening. It’s a terrific resource both for us and for you.


Special Thanks to Our Generous Sponsors


FULL DISCLOSURE: ClearlyIP, Skyetel, Vitelity, DigitalOcean, Vultr, VoIP.ms, 3CX, Sangoma, TelecomsXchange and VitalPBX have provided financial support to Nerd Vittles and our open source projects through advertising, referral revenue, and/or merchandise. As an Amazon Associate and Best Buy Affiliate, we also earn from qualifying purchases. We’ve chosen these providers not the other way around. Our decisions are based upon their corporate reputation and the quality of their offerings and pricing. Our recommendations regarding technology are reached without regard to financial compensation except in situations in which comparable products at comparable pricing are available from multiple sources. In this limited case, we support our sponsors because our sponsors support us.

blankBOGO Bonaza: Enjoy state-of-the-art VoIP service with a $10 credit and half-price SIP service on up to $500 of Skyetel trunking with free number porting when you fund your Skyetel account. No limits on number of simultaneous calls. Quadruple data center redundancy. $25 monthly minimum spend required. Tutorial and sign up details are here.

blankThe lynchpin of Incredible PBX 2020 and beyond is ClearlyIP components which bring management of FreePBX modules and SIP phone integration to a level never before available with any other Asterisk distribution. And now you can configure and reconfigure your new Incredible PBX phones from the convenience of the Incredible PBX GUI.

blankVitalPBX is perhaps the fastest-growing PBX offering based upon Asterisk with an installed presence in more than 100 countries worldwide. VitalPBX has generously provided a customized White Label version of Incredible PBX tailored for use with all Incredible PBX and VitalPBX custom applications. Follow this link for a free test drive!
 

blankSpecial Thanks to Vitelity. Vitelity is now Voyant Communications and has halted new registrations for the time being. Our special thanks to Vitelity for their unwavering financial support over many years and to the many Nerd Vittles readers who continue to enjoy the benefits of their service offerings. We will keep everyone posted on further developments.


Some Recent Nerd Vittles Articles of Interest…

VoIP Over VPN: Securely Interconnecting Asterisk Servers

We’ve just returned from a week in the Pacific Northwest teaching an Asterisk® course for an organization that wants to interconnect satellite offices using Asterisk servers. This coincided with a support request from one of America’s premier airlines which wants to do much the same thing for all of its reservation counters in airports situated in feeder cities around the country. Suffice it to say, PBX in a Flash in conjunction with Asterisk and Hamachi VPNs is perfectly suited to let anyone build these interconnected systems in minutes rather than months. In fact, with less than a day’s worth of introduction to Asterisk and PBX in a Flash, a group of 16 network administrators with no previous Asterisk experience did just that in a one-hour lab session during our training seminar last week. At the risk of (further) destroying our ability to earn a living, here’s how we did it.

blank

Proxmox as a Training Tool. Before we get into the nitty gritty of actually interconnecting Asterisk servers with Hamachi VPNs, let us provide the free tip of the week for those of you that want to experiment with interconnecting Asterisk servers or for those that like to test various Asterisk scenarios without rebuilding servers all day long. There is no finer tool for this than the Proxmox Virtual Environment, a free and easy to use Open Source virtualization platform for running Virtual Appliances and Virtual Machines. With a sale-priced Dell T105 with a Quad Core AMD Opteron processor and 8 gigs of RAM, you’ll have a perfect platform to run about 16 simultaneous PBX in a Flash servers. The trick is finding the machines on sale for half price which is about every other week. Our lab system which matches this configuration was less than $600 with RAM purchased from a third party. You can save most of the shipping cost by using our coupon link in the right column to shop at Dell’s small business site.

Proxmox lets you build virtual machines in two ways: OpenVZ templates or Qemu/KVM Templates and ISO images. While we intend to offer an OpenVZ template for PBX in a Flash soon, currently it’s easy to create your own ISO template using the standard PBX in a Flash ISO image. Once you’ve uploaded your ISO image into Proxmox, simply create a new virtual machine by giving it a name, specifying 512MB of RAM and a 30GB partition. In 10 seconds or less, your new VM will be ready to boot. Start your VM and then open the VNC console window within the Proxmox web interface and install PBX in a Flash just as if you were building a stand-alone machine. When the 15-minute install completes, run through the Orgasmatron Installer setup, and you’ll have your turnkey PBX in a Flash system ready for production in less than 30 minutes.

You don’t have to repeat this drill for every virtual machine. Instead, use the built-in Proxmox backup utility to make a backup image of what you built. Shut down the VM, create a /backup directory, and then schedule the compressed backup in the web browser. When the backup completes, you’ll have a backup image in /backup with a file name like this: vzdump-101.tgz.

To create a new virtual machine, you issue the following command while positioned in the /backup directory specifying the number for the new virtual machine:

vzdump --restore vzdump-101.tgz 102

In about 3 minutes, you’ll have a second virtual machine that’s a clone of the first one. Because it’s a true clone, it would obviously have the same MAC address for the virtual NIC. You don’t want that or all of your VMs would boot up using the same IP address. Using the Proxmox web interface, just edit the new VM 102 by switching from the Status tab to the Hardware tab, delete the existing Ethernet device, and then create a new Ethernet device under the hardware address list pulldown. This will create a new virtual NIC with a new MAC address. So, when you boot VM 102, it will be assigned a new IP address by your DHCP server. You can decipher the new IP address by opening the VNC console window for VM 102 after you boot it up. Now you’re an expert. You can create the additional Baker’s Dozen turnkey PBX in a Flash servers in about an hour. Start all of them up, and you’ve got an instant training facility and PBX in a Flash playground.

April, 2012 Update. See our new article for a current state-of-the-art VoIP VPN.

Creating Hamachi VPN. You obviously don’t need a virtual private network in order to interconnect Asterisk servers. But, as easy as the Hamachi VPN is to set up, especially with PBX in a Flash servers, why wouldn’t you want all of your inter-Asterisk communications secured and encrypted? In addition to the capacity limitation of the Proxmox server, there’s another reason we chose to build 16 PBX in a Flash VMs. That happens to be the number of servers you can interconnect with the Hamachi Virtual Private Network without incurring a charge.1 Why use the Hamachi VPN when OpenVPN is free with unlimited network connections and no strings? The short answer is it’s incredibly simple to set up without public and private key hassles, and it supports dynamic IP server addressing with zero configuration. We plan to cover OpenVPN in a subsequent article but, for many implementations, Hamachi VPNs offer a robust, flexible alternative that can be deployed in minutes.

If you’re not using PBX in a Flash, there are a million good Hamachi VPN tutorials available through a quick Google search. If you are using PBX in a Flash, we’ve done the work for you. With the Orgasmatron Installer build, you’ll find the Hamachi VPN installation script in /root/nv. For other PBX in a Flash systems, just download the install-hamachi.x script from here or, after logging into your server as root, issue the following commands:

wget http://pbxinaflash.net/source/hamachi/install-hamachi.x
chmod +x install-hamachi.x
./install-hamachi.x

Before beginning the Hamachi VPN install, it’s a good idea to make yourself a cheat sheet for the servers you plan to interconnect. We’re going to interconnect 3 servers today, but doing 16 is just more of the same. You’ll need a unique name for your virtual private network. Pick a name that distinguishes this VPN from others you may build down the road. For our example, we’re going to use piaf-vpn. Next, you need a very secure password for your VPN. We’re going to use password for demonstration purposes only. Finally, you need a unique nickname for each of your servers, e.g. piaf-server1, piaf-server2, and piaf-server3 for our example setup today.

For the first Hamachi install, we’ll need to create the new network. For the remaining installs, we’ll simply join the existing network. Keep in mind that you can only remove machines from the network using the same server that was used to create the other VPN accounts initially so build out your virtual private network by starting with your main server, piaf-server1 in our example.

To begin the Hamachi VPN install, run the script using the commands shown above. Type Y to agree to the installer license and then press the Enter key to kick off the install. For the piaf-server1 install, type N to create a new Hamachi network. For the remaining installs, you’d type J to join an existing Hamachi network. Enter the network name you chose above. For our sample, we used piaf-vpn. Type it twice when prompted. Now type your network password and then your nickname for this server when prompted to do so. Then standby while the Hamachi software is installed. It takes a few minutes depending upon the speed of your network connection. And remember, do NOT use our sample network name. Make up your own and don’t forget it. When the install completes, you can review the log if you’d like. Unless something has come unglued, Hamachi should now be running on your first server. Repeat the drill on your other servers.

The next step is to grab some of our scripts to make it easier to manage Hamachi on your servers.

cd /usr/local/bin
wget http://pbxinaflash.net/source/hamachi/hampiaf
wget http://pbxinaflash.net/source/hamachi/hamachi-servers
chmod +x ham*
cd /root
wget http://pbxinaflash.net/source/hamachi/hamachi.faq

The hamachi.faq document provides all of the commands you’ll need to manage Hamachi including the steps to start over with a totally new virtual private network. For now, let’s be sure your network is running. Type: hamachi-servers piaf-vpn using the network name you assigned to your own VPN. Then type it again, and it should display all of the servers on your VPN with their private VPN IP addresses:

root@pbx:~ $ hamachi-servers piaf-vpn
This server:
Identity 5.151.123.1
Nickname piaf-server1
AutoLogin yes
OnlineNet piaf-vpn

Going online in piaf-vpn .. failed, already online
Retrieving peers’ nicknames ..
* [piaf-vpn]
5.151.123.2 piaf-server2
5.151.123.3 piaf-server3

Finally, a word of caution about security. One of the drawbacks of the ease with which you can create Hamachi VPNs is the ease with which you can create Hamachi VPNs. Anyone that knows your network name and password can join your network with one simple command. You can kick them off from the main server where the VPN was created (hampiaf evict piaf-vpn 5.249.146.66), but you can’t keep them from joining. So, protect your network by making the password extremely secure. There currently is no way to change your network password. All you can do is create a new network with a new network name and a more secure password.

Interconnecting Asterisk Servers. Once your VPN is established and all of your servers are on line, then we’re ready to interconnect them with Asterisk and FreePBX. There are a number of ways to do this. For smaller networks, we’re going to show you the easy and secure way using IAX and the VPN you just created. As with the VPN setup, a cheat sheet comes in handy to avoid erroneous entries that would cause your calls between servers to fail. What we recommend is assigning and creating a block of extensions on each of your servers with different ranges of numbers. For example, we’re going to use four-digit extensions in the 1xxx range for piaf-server1, 2xxx for piaf-server2, and 3xxx for piaf-server3. The idea here is that the extensions are unique between your servers. This makes it easy to dial between offices without having to resort to dialing prefixes. So the first step in interconnecting your servers is to build the necessary extensions on each of your servers.

Now for the cheat sheet. Using the hamachi-servers tool above, decipher the VPN IP address of each of your servers and make a chart with the server names, the range of extension numbers, and the VPN IP address of each server. You’ll also need to think up a very secure password. We’re going to use the same one for all of the servers although you certainly don’t need to. So long as the password you choose is secure, there’s really no reason not to use the same one.

piaf-server1 1xxx 5.151.123.1 password
piaf-server2 2xxx 5.151.123.2 password
piaf-server3 3xxx 5.151.123.3 password

Creating Trunks. The next step is to create an IAX trunk on each server for each remaining server in your network. In our example, on piaf-server1, we’d want to create trunks for piaf-server2 and piaf-server3. On piaf-server2, we’d want to create trunks for piaf-server1 and piaf-server3. And so on.

NOTE: Because of a change in IAX design to fix a security issue that arose after this article was originally published, be sure to add the following line in the User Details of each trunk below:

requirecalltoken=no


On your first server (piaf-server1 in our example), using a web browser, open FreePBX and choose Admin, Setup, Trunks and then click Add IAX2 Trunk. Create the trunk to piaf-server2 with the following entries. Leave everything blank except the entries shown below:

blank

While still on piaf-server1, repeat the process to create a trunk for piaf-server3:

blank

On your second server (piaf-server2 in our example), using a web browser, open FreePBX and choose Admin, Setup, Trunks and then click Add IAX2 Trunk. Create the trunk to piaf-server1 with the following entries. Leave everything blank except the entries shown below:

blank

While still on piaf-server2, repeat the process to create a trunk for piaf-server3:

blank

On your third server (piaf-server3 in our example), using a web browser, open FreePBX and choose Admin, Setup, Trunks and then click Add IAX2 Trunk. Create the trunk to piaf-server1 with the following entries. Leave everything blank except the entries shown below:

blank

While still on piaf-server3, repeat the process to create a trunk for piaf-server2:

blank

Creating Outbound Routes. Now we need to tell Asterisk how to route the calls between the servers. In a nutshell, we want calls to extensions in the 1xxx range routed to extensions on piaf-server1, calls to 2xxx extensions routed to piaf-server2, and calls to 3xxx extensions routed to piaf-server3. On each server, create an outbound route for each of the remaining servers. Name the routes server1, server2, and server3 as appropriate. The critical pieces of information in each outbound route are the dial string (which should match the extensions on the server we’re connecting to) and the Trunk Sequence (which should be the appropriate IAX trunk for the server we’re connecting to).

On piaf-server1, we’d have a server2 outbound route with a Dial String of 2xxx and a Trunk Sequence of IAX2/piaf-server2. Then we’d have another server3 route with a Dial String of 3xxx and a Trunk Sequence of IAX2/piaf-server3. If you have a catch-all outbound route, be sure to move these routes above the catch-all in the right column. Then reload your dialplan.

On piaf-server2, we’d have a server1 outbound route with a Dial String of 1xxx and a Trunk Sequence of IAX2/piaf-server1. Then we’d have another server3 route with a Dial String of 3xxx and a Trunk Sequence of IAX2/piaf-server3. If you have a catch-all outbound route, be sure to move these routes above the catch-all in the right column. Then reload your dialplan.

On piaf-server3, we’d have a server1 outbound route with a Dial String of 1xxx and a Trunk Sequence of IAX2/piaf-server1. Then we’d have another server2 route with a Dial String of 2xxx and a Trunk Sequence of IAX2/piaf-server2. If you have a catch-all outbound route, be sure to move these routes above the catch-all in the right column. Then reload your dialplan.

If you’re setting this up with PRI or T1 connections between your servers, you might also want to specify at least secondary trunk sequences for each of the outbound routes to provide some redundancy. For example, on piaf-server1, you might want a secondary Trunk Sequence for server2 that specified IAX2/piaf-server3. Then, if the primary connection between server1 and server2 was down, Asterisk would attempt to complete calls to 2xxx extensions by routing them to server3 and then on to server2 from there. To the caller and call recipient, they’d never know that the direct link between server1 and server2 had failed.

Alternate routing might also be appropriate where you have more capacity between certain servers. For example, if you had a single T1 line between server1 and server3 but you had PRI connections between server1 and server2 and between server2 and server3, then it might make more sense to indirectly route 3xxx calls from server1 through server2 and then on to server3 rather than the direct route from server1 to server3. Enjoy!


blank

Free DIDs While They Last. Sipgate is giving away a free U.S. DID with free incoming calls plus 200 free minutes for outbound calls. Better hurry. Here’s the trunk setup for FreePBX-based systems:

Trunk name: sipgate

type=peer
username=ACCTNO
fromuser=ACCTNO
secret=ACCTPW
context=from-trunk
host=sipgate.com
fromdomain=sipgate.com
insecure=very
caninvite=no
canreinvite=no
nat=no
disallow=all
allow=ulaw&alaw

Registration Strong: ACCTNO:ACCTPW@sipgate.com/YOUR-DID-NUMBER

ACCTNO is the account number assigned to your sipgate account. ACCTPW is the password for your account. YOUR-DID-NUMBER is your 10-digit DID.

Finally create an inbound route using your actual 10-digit DID and assign a destination for the inbound calls.


blank
Need help with Asterisk? Visit the PBX in a Flash Forum.
Or Try the New, Free PBX in a Flash Conference Bridge.


Twitter Magic. If you haven’t noticed the right margin of Nerd Vittles lately, we’ve added a new link to our Twitter feed. If you explore a little, you’ll discover that the user interface now brings you instant access to every Twitter feed from the convenience of the Nerd Vittles desktop. Enjoy!


whos.amung.us If you’re wondering what your fellow man is reading on Nerd Vittles these days, wonder no more. Visit our new whos.amung.us statistical web site and check out what’s happening. It’s a terrific resource both for us and for you.


Special Thanks to Our Generous Sponsors


FULL DISCLOSURE: ClearlyIP, Skyetel, Vitelity, DigitalOcean, Vultr, VoIP.ms, 3CX, Sangoma, TelecomsXchange and VitalPBX have provided financial support to Nerd Vittles and our open source projects through advertising, referral revenue, and/or merchandise. As an Amazon Associate and Best Buy Affiliate, we also earn from qualifying purchases. We’ve chosen these providers not the other way around. Our decisions are based upon their corporate reputation and the quality of their offerings and pricing. Our recommendations regarding technology are reached without regard to financial compensation except in situations in which comparable products at comparable pricing are available from multiple sources. In this limited case, we support our sponsors because our sponsors support us.

blankBOGO Bonaza: Enjoy state-of-the-art VoIP service with a $10 credit and half-price SIP service on up to $500 of Skyetel trunking with free number porting when you fund your Skyetel account. No limits on number of simultaneous calls. Quadruple data center redundancy. $25 monthly minimum spend required. Tutorial and sign up details are here.

blankThe lynchpin of Incredible PBX 2020 and beyond is ClearlyIP components which bring management of FreePBX modules and SIP phone integration to a level never before available with any other Asterisk distribution. And now you can configure and reconfigure your new Incredible PBX phones from the convenience of the Incredible PBX GUI.

blankVitalPBX is perhaps the fastest-growing PBX offering based upon Asterisk with an installed presence in more than 100 countries worldwide. VitalPBX has generously provided a customized White Label version of Incredible PBX tailored for use with all Incredible PBX and VitalPBX custom applications. Follow this link for a free test drive!
 

blankSpecial Thanks to Vitelity. Vitelity is now Voyant Communications and has halted new registrations for the time being. Our special thanks to Vitelity for their unwavering financial support over many years and to the many Nerd Vittles readers who continue to enjoy the benefits of their service offerings. We will keep everyone posted on further developments.


Some Recent Nerd Vittles Articles of Interest…

  1. See comment #1 below. []