VoIP Prioritizing The World’s Best Traveling Phone
Today we present our 10-minute explanation of why we’ve shelved our iPhone and never looked back. In the process, you’ll discover the world’s best cordless SIP telephone…

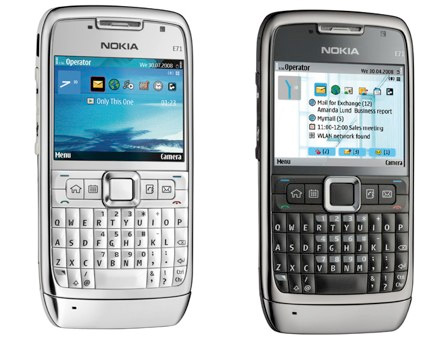
Today we present our 10-minute explanation of why we’ve shelved our iPhone and never looked back. In the process, you’ll discover the world’s best cordless SIP telephone…

Today we take Asterisk security to a new plateau with the introduction of IP Country. Now you can restrict access to your Asterisk server by countries based upon IP addresses. With minimal changes, this should work will all of the FreePBX-based Asterisk aggregations.

Introducing a turnkey Asterisk system with free inbound and outbound calling throughout the United States plus dozens of Asterisk utilities to handle every imaginable PBX chore.

With fingers crossed, here’s hoping that the Fifth Time’s a Charm. Introducing the latest and greatest tutorial for transparently integrating Google Voice into Asterisk for free calling throughout the United States.

Introducing a new Hotel Management System for Asterisk. Just a 5-minute install, and your hotel will be in business using PBX in a Flash.
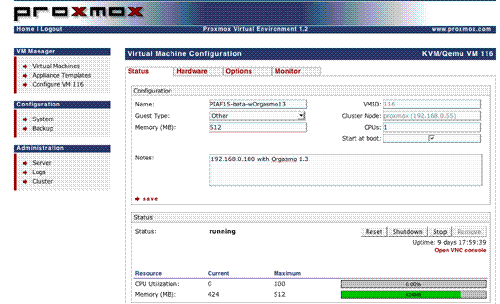
Today’s tutorial walks you through interconnecting Asterisk servers for secure communications using Hamachi virtual private networks and the Proxmox Virtual Environment. The setup process takes less than 15 minutes per server.

To celebrate Cinco de Mayo, today you can turn a garden-variety Asterisk PBX into a turnkey VoIP PBX with every bell and whistle on the planet… in less than 5 minutes: free text-to-speech apps for news, weather, tides, and messaging plus inbound and outbound faxing, regular and recurring reminders, wakeup calls, phone blasting, callerid lookups, 20-user conferences for under $10 a month, ODBC connectivity, and much, much more.
In our last column, we introduced you to the new Orgasmatron Installer for PBX in a Flash. After a one-week break to prepare for our visit to the Atlanta Asterisk® Users Group 3d Annual InstallFest, we’re back in the saddle today to flesh out the new baby. For those that are new to all of this, let’s briefly review what the Orgasmatron Installer has added to your Lean, Mean Asterisk Machine. Faxing and email now work out of the box.… Read More ›


 JUST RELEASED: Visit the Incredible PBX Wiki