
 In our last column, we introduced you to the new Orgasmatron Installer for PBX in a Flash. After a one-week break to prepare for our visit to the Atlanta Asterisk® Users Group 3d Annual InstallFest, we're back in the saddle today to flesh out the new baby.
For those that are new to all of this, let's briefly review what the Orgasmatron Installer has added to your Lean, Mean Asterisk Machine. Faxing and email now work out of the box. More than a dozen extensions and a number of hosting provider trunks are preconfigured as well. Delivery of CallerID names with numbers is now available from a half dozen providers of your choice. And, of course, the Flite text-to-speech engine is preconfigured with Cepstral TTS only a few keystrokes away. Also included are FreePBX 2.5, and Apache, SendMail, MySQL, PHP, phpMyAdmin, IPtables Linux firewall, Fail2Ban, and WebMin. And here's the complete list with all of your new Nerd Vittles applications:
- AsteriDex
- CallerID Superfecta (FreePBX Module)
- CallWho for Asterisk
- Cepstral TTS (installer script only)
- Email That Works with SendMail
- Extensions (15 preconfigured)
- Fax Module using nvFax
- FONmail
- FreePBX Backups
- Gizmo5 (FreePBX Module)
- Hamachi VPN (installer script only)
- Hotel-Style Wakeup Calls (FreePBX Module)
- MeetMe Conferences on the Fly
- Mondo Full System Backups
- NewsClips from Yahoo
- ODBC Database Support
- Reminders by Phone and Web
- SIP URI support (fax, mothership, e164, nv-demo)
- TeleYapper
- Tide Reports with xTide
- Trunk Lister Script
- Trunks (Vitelity, Fonica, Gizmo, ENUM, Remote Peer)
- Weather by Airport Code
- Weather by ZIP Code
- Worldwide Weather
- Zaptel Updater (script only)
Security First! Because your phone bill matters, today we begin with security. The design of virtually all of the open source Asterisk PBX aggregations is to leave SIP and IAX ports on your new server exposed to the Internet. This is done to facilitate communications with your hosting providers as well as telephone extensions which may be connected to your server from the other side of the globe. The wrinkle with this design is that, if a bad guy can guess an extension number on your system and its password, they get a free ticket to do whatever could be done from that extension on your PBX. In the case of one unlucky company, this resulted in a phone bill of over $100,000. For details, read our Primer on Asterisk Security. So... Security Matters!
Anyone obviously can download PBX in a Flash and the Orgasmatron Installer. Thus, you need to assume that everyone on the planet knows your default passwords. We walked you through changing some of the important ones with the passwd-master script last week. Use it regularly. Now let's turn our attention to your extensions and trunk passwords.
Extension Security. There now are a couple of ways to secure your extensions from the bad guys. First, you need to establish very secure passwords for your extensions and voicemail boxes. Second, you need to specify the IP addresses that are authorized to access every extension on your PBX. And third, remember do repeat this drill every time you add a new extension to your system.
To change an extension password, open FreePBX using a web browser pointed to the IP address of your server: http://ipaddress/admin/. On PBX in a Flash systems, you'll be prompted for a username (maint) and whatever password you set when you ran passwd-master. Now click the Setup tab and then the Extensions option. You'll see the list of configured extensions on your PBX in the right column. Click on each of those extensions, and you'll see a form like this:
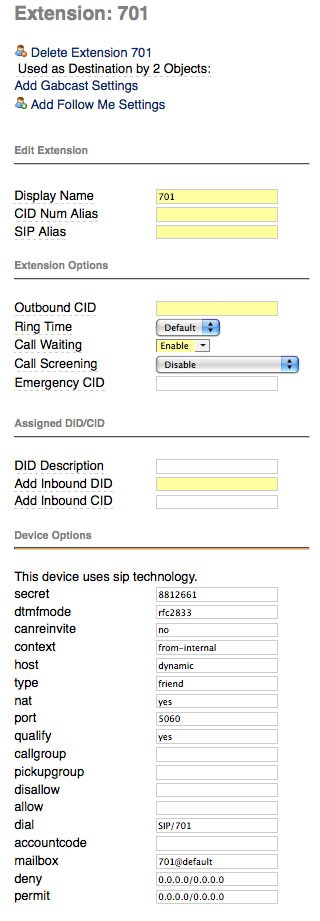
The password for this extension is stored in a field called secret. Make up a very secure password for every extension on your PBX. You will embed this password in the telephone connected to this extension. There's no other place you'll need it so a long and complex numeric password is essential.
The authorized IP addresses for this extension are stored in a field called permit. The way this works is that you first specify which IP addresses should be denied access (the deny field), and then you poke a little hole in the dike, if you're smart, to permit only one or a few IP addresses to connect to the extension. Leave the deny entry as it is. The default permit entry 0.0.0.0/0.0.0.0 opens the floodgates. It means any IP address can log into this extension. To restrict extension access to IP addresses on a private LAN of 192.168.1, the entry would look like this: 192.168.1.0/255.255.255.0. To further restrict extension access to a specific IP address (recommended!), the entry would look like this: 192.168.1.44/255.255.255.255. Use a permit entry that makes you sleep well at night. After all, it's your phone bill.
The third entry you'll want to change is further down the same data entry form, and that's the Voicemail Password field. This entry determines who can actually retrieve voicemails left for this extension. Set it accordingly.
Once you've made the three changes above, save your entries by clicking the Submit button at the bottom of the form. Repeat the drill for every extension, and then click the orange Apply Configuration Changes tab at the top of the screen and then Continue with Reload to reload your Asterisk dialplan.
Trunk Security. Securing the trunks on your PBX is equally important to securing extensions. Keep in mind that, with your trunk credentials, anyone can set up your trunk on their PBX to make calls on your nickel! Unlike the extensions, there are no working usernames and passwords in the default trunks with one exception. If you plan to use the providers we've preconfigured, simply insert your own username, fromuser, and secret settings in the fields provided, and you'll be making calls in a matter of seconds. The process is similar to the one we used for extensions. Choose Setup, Trunks and then click on each trunk and make your entries. Submit your entries and then reload the dialplan when you're finished.
In the case of the remote-peer trunk, this trunk is designed to make it extremely easy to interconnect Asterisk servers for interoffice communications. But it also means that a bad guy can easily interconnect with your server and start dialing. If you don't plan to connect to another Asterisk server, delete this trunk! If you do plan to connect to another Asterisk server, change the trunk secret and IP address of the host to which you are connecting. Do NOT leave the default secret in either the outgoing or incoming settings! Also change the password for the outbound route: Remote-Host. You may want to ultimately remove this password if you actually start interconnecting servers. Otherwise, users will have to enter this password whenever they may a call to an extension on the interconnected Asterisk server.
To interconnect your server to another server, you would simply add a new trunk called main-peer on the other server that looks like this (using your new password and correct IP address):

Configuring AsteriDex. AsteriDex is plug-and-play for most users. However, as configured, your AsteriDex web site is reachable from the Internet if you have mapped port 80 on your hardware-based firewall to your PBX in a Flash server or if you don't have a hardware-based firewall and your server is directly exposed to the Internet. If you don't mind people seeing your contact list or making prank calls that ring your extensions, this may be okay. If it's of concern to you, the easiest security precaution is to rename the asteridex4 directory to an obscure name that only you know, e.g. bahbah143. Here are the commands to issue after logging into your server as root. By using all of these commands, AsteriDex still will be accessible through FreePBX and the PBX in a Flash GUI:
cd /var/www/html
mv asteridex4 bahbah143
sed -i 's|asteridex4|bahbah143|' admin/modules/asteridex/page.asteridex.php
sed -i 's|asteridex4|bahbah143|' welcome/.htindex.cfg
The other adjustment you may need to make to AsteriDex is to configure who can access the Admin tab to add, modify, and delete entries in your database. As configured, the Admin tab is available to any computer with an IP address that begins with 192.168. This may not match your private subnet, and not all 192.168 IP address are non-routable. So you may wish to tighten this restriction to match your internal subnet. In the /var/www/html/asteridex4 folder (or whatever name you've chosen above), you'll find a configuration file: config.inc.php. Simply edit this file and change the $local_net entry. You also can set the long distance prefix ($LDprefix), your CallerID number ($CallerID), and the default extension to ring for click-to-dial from the web interface ($INtrunk and $defaultExt). The extension to dial can now be set from the web interface as well. Unless you really know what you're doing, leave everything else the way it is.
CallerID Superfecta. Most hosting providers deliver CallerID numbers as part of your payment for using their DIDs. Almost none deliver CallerID names without an additional charge. CallerID Superfecta is designed to fill that gap... for free. A number of us have worked on this project for years. And it now has been integrated directly into FreePBX. There are two steps to getting everything working properly on your new PBX. First, you need to identify which CallerID lookup sources you wish to use on your system. Then, you need to specify CallerID Superfecta as the lookup source on each Inbound Route where you want CallerID names looked up for incoming calls.
Open FreePBX with your web browser and navigate to Setup, CID Superfecta. You'll get a form that looks like this:
With the exception of AsteriDex and SugarCRM lookups which are almost instantaneous, keep in mind that each lookup takes a little time and slows down receipt of your inbound call. So long as you have a good Internet connection, you shouldn't have a problem using all of the sources. The way the CallerID Superfecta works is that, once it gets a name match in any of the sources beginning with AsteriDex and SugarCRM, it ends the lookups and provides the CallerID name it found to Asterisk for display on the extensions which are ringing in the designated inbound route. Filling out the form is self-explanatory for the most part. Tick off the lookup sources you wish to use. If you plan to use whocalled.us, you'll need to sign up for an account and provide your credentials before the lookup will work. With SugarCRM, fill in the blanks to match your implementation of SugarCRM. Click the SAVE button when you have CallerID Superfecta configured to meet your needs.
The final step in implementing CallerID Superfecta is to designate it as the CallerID Lookup Source for your Inbound Routes. Click on Setup, Inbound Routes and a list of your existing routes will be displayed in the right column. As installed, there will only be one: Any DID / Any CID. Click on this entry to display the form. Scroll down to the CallerID Lookup Source dropdown box and choose CallerID Superfecta. You'd do the same with any other inbound route you create down the road. Click the Submit button and reload your dialplan to enable CallerID Superfecta. Now sit back and wait on your first call.
CallWho for Asterisk. CallWho for Asterisk is a little script we put together to make it easy to look up and dial the numbers of people in your AsteriDex database. When you dial 4-1-2, you'll be prompted to enter the first three letters of the name of the person you wish to call. Once you key in the three letters, CallWho for Asterisk will look up every matching entry in your AsteriDex database and read you the list of matches. For example, if you had Joe Schmo and Joe The Plumber in your database, CallWho would say something like this:
Press 1 for Joe Schmo.
Press 2 for Joe The Plumber.
When you press 2, CallWho will place a call to Joe The Plumber. Not sure why you'd ever want to do that, but now you understand the way it works.
Before CallWho for Asterisk will work at all, you need to run the script which associates three letter codes with every entry in your AsteriDex database. And, whenever you add new entries to your database, you need to run it again. Using a web browser, here's the program to run. Be sure to use the correct IP address for your Asterisk server and your newly designated AsteriDex location instead of asteridex4:
http://192.168.0.44/asteridex4/dialcode.php
Cepstral TTS for Asterisk. PBX in a Flash is delivered with the Flite text-to-speech engine already enabled. But, unless you like the voices of Lurch and Fred Munster, you may wish to cough up a little cash and install Cepstral on your server. Cepstral now has a synthesized voice of Allison which exactly matches all of the other voice prompts in Asterisk. I'm embarrassed to report that we can't seem to get the correct installation script deposited in our Orgasmatron builds... ever! So, if you want to use Cepstral, here are the steps to download the real, working installation script and to install Cepstral:
cd /root/nv
rm install-cepstral
wget http://pbxinaflash.net/source/cepstral/install-cepstral
chmod +x install-cepstral
./install-cepstral
Once the 65MB download completes, you'll be prompted to agree to the license. You do this by pressing the Enter key to scroll down the license agreement. When you reach 100%, type yes to continue with the install. Press Enter to accept /opt/swift as the install directory. Very important: Type y to create the directory. The default is No which will mess up the installation. Now type yes to complete the install. Once the install completes, you can purchase a license for the Allison voice at this link. Under Voices, choose Language: US English, Voice: Allison-8kHz, and Platform: Linux. For non-commercial use, the $30 voice registration is all you need. For commercial use, you also need to acquire Concurrency Licenses which authorize a certain number of simultaneous voice ports on your system for Cepstral voices. These run $50 per port in 2-port multiples and are in addition to the $30 Allison voice license. For Nerd Vittles readers, you can save 15% on your purchase by sending an email to sales at cepstral.com explaining how you plan to use Cepstral and requesting the discount code.
We'll have an in-depth article on Cepstral in coming weeks. For those that want a head start, each of the Nerd Vittles text-to-speech applications typically includes dialplan code and one or more PHP/AGI scripts. The dialplan code can be found in /etc/asterisk/extensions_custom.conf. When you scroll through the dialplan code you will see entries like the following for each of the TTS applications:
exten => 611,5,Flite("Enter a 3 character airport code.")
;exten => 611,5,Swift("Enter a 3 character airport code.")
exten => 611,6,Read(APCODE,beep,3)
exten => 611,7,Flite("Please hold a moment.")
;exten => 611,7,Swift("Please hold a moment.")
The semicolon at the beginning of a line tells Asterisk this is a comment and to ignore it. To change the voice from the Munsters to Allison, just comment out the Flite lines and uncomment the Swift lines by deleting the leading semicolons. When you're finished making the changes, save the file and then reload your dialplan: asterisk -rx "dialplan reload". So, in the example above, the code would now look like this:
;exten => 611,5,Flite("Enter a 3 character airport code.")
exten => 611,5,Swift("Enter a 3 character airport code.")
exten => 611,6,Read(APCODE,beep,3)
;exten => 611,7,Flite("Please hold a moment.")
exten => 611,7,Swift("Please hold a moment.")
You also need to modify the PHP/AGI scripts that go with each application. All of these files are stored in /var/lib/asterisk/agi-bin. Typically the filenames begin with nv- and end in .php:
-rwxrwxr-x 1 asterisk asterisk  6835 Sep 16  2008 nv-callwho.php
-rwxrwxr-x 1 asterisk asterisk   201 Jul 12  2006 nv-config-555.php
-rwxrwxr-x 1 asterisk asterisk   201 Apr  2 13:08 nv-config.php
-rwxrwxr-x 1 asterisk asterisk 14329 Feb 10  2008 nv-mailcall.php
-rwxrwxr-x 1 asterisk asterisk  6072 Sep 24  2008 nv-mailit.php
-rwxrwxr-x 1 asterisk asterisk 10490 Apr 20 10:34 nv-news.php
-rwxrwxr-x 1 asterisk asterisk  6545 Apr 12 15:10 nv-today.php
-rwxrwxr-x 1 asterisk asterisk 21537 Apr  2 13:07 nv-weather.php
-rwxrwxr-x 1 asterisk asterisk 12043 Apr  2 13:07 nv-weather-world.php
-rwxrwxr-x 1 asterisk asterisk 22243 Apr  2 13:07 nv-weather-zip.php
In each of these scripts, you'll find a variable near the top that controls the TTS engine: $ttspick = 0 ;
To use Cepstral as the TTS engine instead of Flite, just change the $ttspick value from 0 to 1 and save the file.
Email That Works With SendMail. It's always been a knuckle drill to get your new server to reliably send outbound emails. Assuming your Internet service provider doesn't block downstream mail servers, the Orgasmatron Installer will get this working reliably. You can test it out by logging into your server as root and issuing the following command using your real email address. If you get the email, you can move on.
echo "test" | mail -s testmessage yourname@gmail.com
If you didn't get the email, you probably have a provider such as Comcast that blocks port 25 in many areas of the country. The easiest way to solve this is to set up a free Gmail account and use Gmail to deliver outbound messages from your server. This message thread on the PBX in a Flash Forum will walk you through the setup process. There's also a Comcast solution if you'd prefer not to use Gmail.
Stay Tuned. Your eyes are probably glazing over about now. I know mine are. So we'll quit here for today. In our next episode, we'll tackle the rest of the goodies that make up the Orgasmatron Installer. Enjoy!
Continue reading Part IV (Monday, May 25).
Tip of the Week. Ever wanted a 20-seat conference bridge for under $9 a month with a local phone number in any of 2600+ rate centers all over United States? You can add load balancing and automatic failover for an extra $1 per month. After you use the Orgasmatron Installer, just set up a conference extension in FreePBX and then head over to the PBX in a Flash Forum to read all about the latest rage in DID providers.
whos.amung.us If you're wondering what your fellow man is reading on Nerd Vittles these days, wonder no more. Visit our new whos.amung.us statistical web site and check out what's happening. It's a terrific resource both for us and for you.
Special Thanks to Our Generous Sponsors
FULL DISCLOSURE: ClearlyIP, Skyetel, Vitelity, DigitalOcean, Vultr, VoIP.ms, 3CX, Sangoma, TelecomsXchange and VitalPBX have provided financial support to Nerd Vittles and our open source projects through advertising, referral revenue, and/or merchandise. As an Amazon Associate and Best Buy Affiliate, we also earn from qualifying purchases. We’ve chosen these providers not the other way around. Our decisions are based upon their corporate reputation and the quality of their offerings and pricing. Our recommendations regarding technology are reached without regard to financial compensation except in situations in which comparable products at comparable pricing are available from multiple sources. In this limited case, we support our sponsors because our sponsors support us.
BOGO Bonaza: Enjoy state-of-the-art VoIP service with a $10 credit and half-price SIP service on up to $500 of Skyetel trunking with free number porting when you fund your Skyetel account. No limits on number of simultaneous calls. Quadruple data center redundancy. $25 monthly minimum spend required. Tutorial and sign up details are here.
The lynchpin of Incredible PBX 2020 and beyond is ClearlyIP components which bring management of FreePBX modules and SIP phone integration to a level never before available with any other Asterisk distribution. And now you can configure and reconfigure your new Incredible PBX phones from the convenience of the Incredible PBX GUI.
VitalPBX is perhaps the fastest-growing PBX offering based upon Asterisk with an installed presence in more than 100 countries worldwide. VitalPBX has generously provided a customized White Label version of Incredible PBX tailored for use with all Incredible PBX and VitalPBX custom applications. Follow this link for a free test drive!
Special Thanks to Vitelity. Vitelity is now Voyant Communications and has halted new registrations for the time being. Our special thanks to Vitelity for their unwavering financial support over many years and to the many Nerd Vittles readers who continue to enjoy the benefits of their service offerings. We will keep everyone posted on further developments.
Some Recent Nerd Vittles Articles of Interest...
Any considerations of switching to a better MTA such as Postfix or even Exim, rather than Sendmail? Far easier to configure and maintain, and a much better MTA overall.
Sendmail = Dodo Bird
For about 6 months I’ve been running Exim on PIAF instead of Sendmail and it was so much easier to configure. All I did was:
1) yum -y install exim system-switch-mail
2) Edit /etc/exim/exim.conf as needed
3) Run system-switch-mail and select exim.
So far so good; very reliable and no problems.
I just screwed up. I really wanted the google voice orgasmatron script on this page…
http://nerdvittles.com/?p=637
But after reading several pages, accidentally found myself on this page and installed this script which does not appear to include GV.
http://nerdvittles.com/?p=602
Do I have to start over, or do you have a trick for adding the GV portion of it all?
I’m terribly excited about this.
Thanks,
steve
[WM: Your safest alternative is to reinstall. Sorry, but it doesn’t take that long. 🙂 ]
I am really enjoying the Orgasmatron. It’s fantastic! About the Superfecta, I have looked everywhere for where to enable it in Incoming Routes in a drop-down box, but the box isn’t there. Perhaps that was removed from FreePBX? Also the only caller-id I get on GV incoming calls is my Sipgate number (instead of the Name.) By the way, the GV stuff works great, amazing job!
Thanks,
Steve
[WM: You’ve got to activate the Superfecta module before it will show up in the Incoming Routes. Directions are at the end of the Orgasmatron 5.2 article under Homework.]
A heads-up on the Extension secret passwords. Since this article was written, it looks like the rules for secret’s have changed. If you try to input an entirely numerical, it will complain saying that you need a password with at least 2 numbers and 2 letters and will not let you Submit. This doesn’t seem to affect the Orgasmatron defaults, but if you try to change them you’ll have to go to alphanumeric.