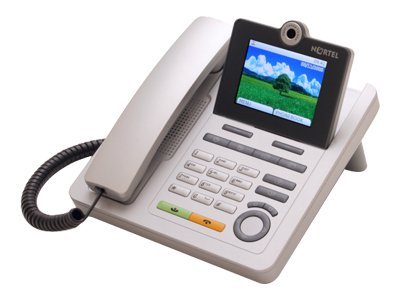
Home » Posts tagged 'sip' (Page 15)
Tag Archives: sip
The Incredible PBX: Remote Phone Meets the Travelin’ Man
Ever wrestled with one of those thorny problems for weeks only to wake up in the middle of the night with the answer? Thus was born Travelin’ Man, a web- based, one-click Asterisk® application that automatically reconfigures your Asterisk PBX to enable remote SIP phone access from your cellphone, iPad, remote PC, NetBook, or desktop telephone.
News Flash: Be sure to read our latest article introducing Travelin’ Man 3, a completely new security methodology based upon FQDN Whitelists and DDNS. In a nutshell, you get set-it-and-forget-it convenience and rock-solid VoIP security for your Cloud-based PBX or any PBX in a Flash server that’s lacking a hardware-based firewall and you get both transparent connectivity and security for your mobile or remote workforce.
If you’ve read the Incredible PBX series of articles on Nerd Vittles, you already know what a thorny problem remote phone access is if you want to preserve the overall security of your server. Indeed, our recommendation has been to leave SIP access closed on your hardware-based firewall because of the dangers inherent in activating remote SIP access. Now we have a better idea!
Today’s new approach works like this. First, we’ll run a little script that secures all of your extensions with permit entries locking down all these connections to the IP address range within your private network. Then we’ll open the SIP and RTP ports on your hardware and software firewalls and map these ports to your Asterisk server’s private IP address. With this setup, no one can attempt remote SIP logins to your server because Asterisk blocks all SIP extension connection attempts except those originating inside your LAN. To manage external phone connections to your server, the install script creates a new virtual Apache web server on your Incredible PBX using port 83. We’ll enable and map TCP port 83 on your hardware and software firewalls to your server as well. Web access with port 83 is limited to running the Travelin’ Man app to activate external phones.

Now we’re ready to set up access to your server for remote devices. For each extension you wish to enable for remote access, we’ll create a special web directory using an obscure, random file name which will serve as the web link for the Travelin’ Man web app. For example, in the diagram above, directory 184778 manages extension 501, directory 2389957h manages extension 701, and directory 6993h5j manages extension 702. This is accomplished by simply changing the extension number in the index.php script stored in each directory.
When one of these web links is accessed remotely, the PHP script will automatically reconfigure Asterisk to enable access to the designated SIP extension on your server using the remote IP address from which the web page was accessed. And, of course, there’s an additional layer of SIP security as well. You still need your extension credentials to actually log in to your server with a softphone to place and receive calls. The Travelin’ Man installation process takes only a couple minutes, and the remote SIP activation procedure takes just a couple seconds each time you want remote access from a different location. Here’s a quick example of how it actually works.

Let’s assume we want to use the new $3.95 Bria SIP softphone on an iPad to connect as extension 501 on our Incredible PBX back at home. The problem is that the dynamic IP address of your iPad changes at each new site on your itinerary. Some locations have WiFi while others only have 3G connections.
First, we’ll generate an icon to run Travelin’ Man from your iPad desktop. Use the same procedure with an iPhone or iPod Touch, and there’s a similar procedure for Android devices.1 You only have to do this once. Start up Safari on the iPad to access the new port 83 web server at the random web address the installer created to support extension 501. That web address is something like this using your own FQDN2: http://myserver.dyndns.org:83/184778. After establishing the link once, we’ll hit the + button in Safari and choose Add to Home Screen. This creates the TravelMan icon on the iPad. See the screenshot below of our demo iPad setup which used extension 221 instead of 501.

Once configured, it’s just two clicks to enable your remote phone anywhere: click once on the TravelMan icon. When your IP address is confirmed, return to your Home Screen and click the Bria softphone icon to establish a SIP connection back to your server. Behind the scenes, the Travelin’ Man application will generate the required permit entry for your remote IP address mapping it to the designated extension on your server, and then it will reload your SIP settings to make your Asterisk server accessible to the Bria softphone in your hotel room. The entire process takes only a couple seconds.

If your company happens to have a dozen traveling salesmen, then you’d simply assign a dedicated extension to each employee and create secure directory names for each person (e.g. 2389957h and 6993h5j in diagram above) with a copy of the Travelin’ Man app configured for that employee’s extension number. Now your entire mobile workforce has connectivity back to the home office from any location on the globe. And, when an employee leaves the company and another arrives, just create a new name for the old employee’s web directory to preserve the security of your system (e.g. 184778 in our example becomes 78hd773). Keep in mind that each time the Travelin’ Man app is run for any extension, it wipes out any previously authorized IP address entry for that extension. Thus, the security of your Incredible PBX is always preserved.
Prerequisites. Before proceeding with today’s install, you must be running a stock install of Incredible PBX with PBX in a Flash behind a properly-secured, hardware-based firewall3. We recommend the latest version of Asterisk 1.4 because it addresses a SIP vulnerability that might cause you problems if malformed SIP packets are targeted at your server. The current release of PBX in a Flash (1.7.5.5 Silver) is ideal, but any version of PBX in a Flash can be brought current with Asterisk using the update-source and update-fixes tools. Travelin’ Man assumes that you have the Incredible PBX base install of extensions: 501 plus 701-715. You can obviously add more or remove some, but you’ll need to manually adjust sip_custom_post.conf to reflect your actual extension list after the install completes.
The installer has been encrypted for your/our own protection. In source form, the script would allow anyone to defeat the Incredible PBX requirement. Doing so would mean the required IPtables security component would not be in place and properly configured to protect the underlying system from attack. So we’ve opted to play Big Brother to avoid potential security problems for all of us down the road. This article clearly explains all the necessary components if some folks want to roll their own version. We just don’t want the responsibility if something goes horribly wrong. As Forrest Gump would say, "Shit Happens." 🙂 If you don’t believe it, check out the latest security scramble in the trixbox forums.
Installation. Now we’re ready to get started. So log into your Incredible PBX as root and issue the following commands:
cd /root
wget http://incrediblepbx.com/travelinman.tar.gz
tar zxvf travelinman.tar.gz
./travelinman.x
NOTE: If you’re using PIAF2 with CentOS 6.2, you’ll need to use the updated version of Travelin’ Man because of a syntax change in the Apache config file:
cd /root
wget http://incrediblepbx.com/travelinman2.tar.gz
tar zxvf travelinman2.tar.gz
./travelinman2
The first step in the install procedure is to lock down access to all of your extensions to your private LAN subnet. In case you ever want to do this on another server not running the Incredible PBX, here’s a link to our privip.sh shell script that shows how to do it. This should work on most FreePBX-based Asterisk systems.
Once the extensions are locked down, the script will modify your IPtables and Apache configurations to permit web access on port 83. Next, it will adjust your Asterisk setup to support the Travelin’ Man permit scheme. This involves reworking of sip_custom_post.conf so that permit settings for individual extensions can be stored in files named 501.inc, 701.inc, etc. Finally, the installation procedure will set up a single web site to support extension 501 with a randomized directory name for remote access.4 This setup will be stored in /var/www/travelman. To activate support for additional extensions, you would simply copy the subdirectory giving it a new random name: cp -r dir1 dir2. Then edit config.php in the new subdirectory and change the $extension entry.
To complete the install, you must reconfigure your hardware-based firewall and map the following ports to the private IP address of your server:
TCP 83
UDP 5060
UDP 10000-20000
When the installation is completed, it will show you how to access the new web site for extension 501 using either a fully-qualified domain name or a public or private IP address. Now just follow the steps at the beginning of this article to set up your Android or iDevice, and test things out. Enjoy!
Reminders: Be sure to review the comments to this article and the related support forum thread for a week or two for late-breaking enhancements and issues. Also, Incredible PBX comes preconfigured with call forwarding activated for extension 501. Don’t forget to either disable it or set up a real call forwarding number for extension 501 if you want your cellphone to ring. From any extension on your server, just dial *72501 to set up call forwarding. To cancel call forwarding and pass calls directly to the registered 501 softphone, dial *74 and enter 501. Also be aware that the default RingAll ring group (700) configuration on Incredible PBX systems does not include extension 501. So add 501 if you want your remote extension to ring for incoming calls.
The Incredible PBX: Basic Installation Guide
Adding Skype to The Incredible PBX
Adding Incredible Backup… and Restore to The Incredible PBX
Adding Multiple Google Voice Trunks to The Incredible PBX
Adding Remotes, Preserving Security with Incredible PBX
Continue reading Basic Installation Guide, Part II.
Continue reading Basic Installation Guide, Part III.
Continue reading Basic Installation Guide, Part IV.
Support Issues. With any application as sophisticated as this one, you’re bound to have questions. Blog comments are a terrible place to handle support issues although we welcome general comments about our articles and software. If you have particular support issues, we encourage you to get actively involved in the PBX in a Flash Forums. It’s the best Asterisk tech support site in the business, and it’s all free! We maintain a thread with the latest Patches and Bug Fixes for Incredible PBX. Please have a look. Unlike some forums, ours is extremely friendly and is supported by literally hundreds of Asterisk gurus and thousands of ordinary users just like you. So you won’t have to wait long for an answer to your questions.

Need help with Asterisk? Visit the PBX in a Flash Forum.
Or Try the New, Free PBX in a Flash Conference Bridge.
whos.amung.us If you’re wondering what your fellow man is reading on Nerd Vittles these days, wonder no more. Visit our new whos.amung.us statistical web site and check out what’s happening. It’s a terrific resource both for us and for you.
Special Thanks to Our Generous Sponsors
FULL DISCLOSURE: ClearlyIP, Skyetel, Vitelity, DigitalOcean, Vultr, VoIP.ms, 3CX, Sangoma, TelecomsXchange and VitalPBX have provided financial support to Nerd Vittles and our open source projects through advertising, referral revenue, and/or merchandise. As an Amazon Associate and Best Buy Affiliate, we also earn from qualifying purchases. We’ve chosen these providers not the other way around. Our decisions are based upon their corporate reputation and the quality of their offerings and pricing. Our recommendations regarding technology are reached without regard to financial compensation except in situations in which comparable products at comparable pricing are available from multiple sources. In this limited case, we support our sponsors because our sponsors support us.
BOGO Bonaza: Enjoy state-of-the-art VoIP service with a $10 credit and half-price SIP service on up to $500 of Skyetel trunking with free number porting when you fund your Skyetel account. No limits on number of simultaneous calls. Quadruple data center redundancy. $25 monthly minimum spend required. Tutorial and sign up details are here.
The lynchpin of Incredible PBX 2020 and beyond is ClearlyIP components which bring management of FreePBX modules and SIP phone integration to a level never before available with any other Asterisk distribution. And now you can configure and reconfigure your new Incredible PBX phones from the convenience of the Incredible PBX GUI.
VitalPBX is perhaps the fastest-growing PBX offering based upon Asterisk with an installed presence in more than 100 countries worldwide. VitalPBX has generously provided a customized White Label version of Incredible PBX tailored for use with all Incredible PBX and VitalPBX custom applications. Follow this link for a free test drive!
Special Thanks to Vitelity. Vitelity is now Voyant Communications and has halted new registrations for the time being. Our special thanks to Vitelity for their unwavering financial support over many years and to the many Nerd Vittles readers who continue to enjoy the benefits of their service offerings. We will keep everyone posted on further developments.
Some Recent Nerd Vittles Articles of Interest…
- To create a desktop icon for Travelin’ Man on Android devices, navigate to the link with your browser. Then save the link as a Bookmark by clicking the Star icon in your browser then click Add. Return to the Home Screen and, from the screen on which you wish to add the icon, touch and hold your finger on the screen. When the Add to Home Screen menu appears, choose Shortcuts then Bookmarks and select the link you previously saved. As with iDevices, you only have to do this once. [↩]
- FQDN = Fully-qualified domain name [↩]
- We recommend the dLink Router/Firewall. Low Cost: $35 WBR-2310 Best: DGL-4500 [↩]
- If you’d like to download the web site code independently from the Travelin’ Man install procedure, here’s the link. [↩]
The Incredible PBX: Adding Remotes, Preserving Security
Unlike most Asterisk®-based PBXs which are insecure as installed and leave it to you to implement sufficient safeguards to preserve the integrity of your system, the Incredible PBX is delivered with rock-solid, air-tight security already in place. Because it is designed to operate behind a hardware- based firewall, what you'll be doing when you want to add functionality with the Incredible PBX is loosening security rather than tightening it. The trick, of course, is to do it in a way that doesn't compromise the overall integrity of your system. As delivered, the Incredible PBX relies upon four layers of network security: a hardware-based firewall of your choice1, a preconfigured IPtables software-based Linux firewall, preconfigured Fail2Ban to monitor your logs for suspicious activity and to block specific IP addresses when abuse is detected, and random passwords for all extensions and DISA connections.
If you installed the Incredible PBX using SIPgate as the intermediate provider with Google Voice, then your hardware-based firewall should have no ports opened and forwarded to your server. If you used IPkall, then only UDP 4569 has been opened and forwarded to your server. And the Incredible PBX IPtables setup for IAX restricts access to just a few IP addresses to support IPkall.
There are obviously situations in which you will want or need additional connectivity. The most likely one involves activation of SIP telephones at remote locations, such as a branch office, or Grandma's house or a relative in college. The other obvious use is with cellphones and PDAs that support SIP clients such as Android phones, iPhones, and iPads.2
What we'd recommend you not do is open the SIP floodgate to your PBX by providing unrestricted inbound SIP access, but we'll show you how if you really want or need this functionality. As desirable as this can be, it is accompanied by an array of security issues that really are not worth the risks unless you know what you're doing and you're willing to stay on top of security updates and keep your system patched.

Let's first tackle how to provide limited inbound SIP functionality without selling the farm. If the remote site has a fixed IP address, the procedure to allow remote access to your server is fairly straight-forward: just map the SIP ports on the hardware-based firewall to your server (UDP 5000:5082 and UDP 10000:20000) and then restrict SIP access using IPtables to the remote IP address as well as the subnet of your private LAN. You can decipher your private subnet by running status. If your server's IP address is 192.168.0.123, then your private subnet would be 192.168.0.0. The IPtables firewall settings are stored in /etc/sysconfig/iptables. Edit that file and find the line that looks like this:
-A INPUT -p udp -m udp --dport 5000:5082 -j ACCEPT
Delete or comment out this entry with a leading # and insert new entries that look like the following using the public IP address(es) you wish to add plus the private subnet:
-A INPUT -p udp -m udp -s 141.146.20.10 --dport 5000:5082 -j ACCEPT
-A INPUT -p udp -m udp -s 141.146.20.11 --dport 5000:5082 -j ACCEPT
-A INPUT -p udp -m udp -s 192.168.0.0/255.255.0.0 --dport 5000:5082 -j ACCEPT
After making the changes, save the file: Ctrl-X, Y, then Enter. Then restart IPtables: service iptables restart.
Unfortunately, in many situations, the remote phone or cellphone uses an Internet connection with a dynamic IP address. So we don't know the actual IP address that will be assigned. There are a number of solutions to this problem, and we'll rank them in our order of preference. First, spend the $200 and install another Incredible PBX at the remote site. Then the two servers can be linked with IAX connections between the servers making connectivity between the systems totally transparent. Second, install VPN routers at both sites and use a private IP address to establish connectivity with the host system. In this situation, you will have the equivalent of a fixed IP address for the remote device which makes it the equivalent of the fixed IP address solution above. Third, install OpenVPN on your host system and purchase a SIP phone or cellphone that supports VPN connectivity. Most of the high-end SNOM SIP phones have this functionality as do Android phones, iPhones, and iPads. With this setup you also have the equivalent of a fixed IP address, even though it's on a virtual private network. Fourth, talk to the Internet service provider at your remote site and obtain the range of IP addresses that DHCP hands out to those using their services... or just make an educated guess.3
BEFORE Activating Full SIP Connectivity. OK. We hear you. You travel for a living, and the IP address of your cellphone changes hourly, all day, every day of the year. Then, yes, you are a candidate for a full-fledged Asterisk server with unlimited SIP access. Before covering how, let's review what responsibilities go with running such a server. Bear in mind that one compromised SIP password or otherwise vulnerable application on your server (including Asterisk, FreePBX, SSH, and hundreds of others), and you may very well be the proud owner of a whopping phone bill. And we're not talking hundreds of dollars. It could very well be tens of thousands of dollars. And it doesn't take weeks or months. It could be a few hours.
Baker's Dozen SIP Security Checklist
1. Keep Asterisk Current & Patched
2. Keep FreePBX Current & Patched
3. Make Frequent Backups
4. Visit PBX in a Flash Forums Regularly
5. Subscribe to PBX in a Flash RSS Feed
6. Secure Alphanumeric Extension Passwords
7. Secure DISA, VMail, Root, FreePBX Passwords
8. Lock Down Extensions with Deny/Permit
9. Turn Off Recurring Payments with Providers
10. Restrict Trunks to 1-2 Simultaneous Calls
11. Tighten Dialplan by Removing Wildcards
12. Eliminate Intl & Toll Calls With Providers
13. Check FreePBX Call Logs Daily for Abuse
Baker's Dozen SIP Security Checklist. Before opening the floodgates, let's review what you need to do. First, you'll need to run the very latest version of Asterisk... all the time. This means you need to monitor asterisk.org, and keep your system up to date by running update-scripts, update-source, and update-fixes regularly. The default version of Asterisk on current PBX in a Flash and Incredible PBX builds is extremely reliable, but it contains SIP and IAX vulnerabilities which should not be exposed directly to the Internet! Second, you need to run the latest version of FreePBX and apply all patches as they are released. Third, you need to make frequent backups appreciating that sometimes the Asterisk and FreePBX developers get things horribly wrong, and stuff that used to work no longer does. Believe it or not, they're human! Fourth, you need to visit the PBX in a Flash Forums daily and keep abreast of security alerts and bug reports on CentOS, Asterisk, and FreePBX. Fifth, you need to subscribe to the PBX in a Flash RSS Feed which provides regular security alerts when there are reported problems. Sixth, you need to really secure your extension passwords with very long, complex alphanumeric passwords. Ditto for your root and FreePBX passwords! Seventh, for DISA and voicemail, these passwords need to be numeric, complex, and extra long. Eighth, you need to lock down as many of your extensions as possible with deny/permit settings to restrict the IP addresses of those extensions. If you only have one or two remote SIP extensions with dynamic IP addresses, then all of the rest should have deny/permit entries! Ninth, turn off recurring payments with all of your telephony providers and keep minimal funds available in all of your accounts. This means you'll have to monitor these accounts to make sure they are not deactivated for lack of funds. Tenth, restrict all of your trunks to one or at most two simultaneous calls to reduce your call exposure in the event someone breaks into your system. Eleventh, tighten up your Trunk Dial Rules and eliminate any entries that would permit calls to anywhere in the world! If you don't regularly make international calls, there's absolutely no reason to have such entries in your dialplan. If you still have Ma Bell PSTN lines, this is even more important. In fact, consider eliminating long distance access to all of these trunks. Twelfth, where possible, configure your provider accounts to eliminate international and toll calls of all varieties. Finally, check your FreePBX call log every day to make certain no one is making calls on your nickel.
If you are unwilling or unable to perform these Baker's Dozen steps while continuing to monitor the sites provided and recheck your setup regularly (at least every week), don't activate unrestricted SIP access to your server.
Other Options. Consider using an intermediate provider such as voip.ms to provide SIP URI access to your server. Keep in mind that having a registered connection between your server and a VoIP provider alleviates the need to punch a hole in your firewall. So the idea here is to sign up for an inexpensive voip.ms account and set up the trunk connection with your server as either an IAX or SIP account with an always-on connection. Then voip.ms gives you the option of activating a SIP URI as part of a subaccount setup. Just create an internal extension on their server, and this will generate a SIP URI, e.g. 123456666@sip.us4.voip.ms where 12345 is your voip.ms account number and 6666 is the internal extension you created. This lets you connect directly with your server through the SIP URI from anywhere once you map this subaccount to an extension or IVR on your server. The charge for SIP URI calls is only $.001 per minute. The last step is to use this SIP URI in your remote SIP phone to connect back to your server. You can take advantage of the full range of Asterisk functions once these calls reach your server including IVRs and DISA. The approach is not only simple to implement, but it's also safe and economical.
There are some other alternatives as well. Use something like Google Voice or Ooma to redirect calls to your cellphone when you're traveling. Or buy an Ooma for Grandma or a MagicJack for Joe College. These options also are safe, secure, and quite inexpensive.
Just Released: Remote Phone Meets Travelin' Man

Activating Inbound SIP on Your Server. If you still are hell-bent on opening SIP access to your server, the Incredible PBX already is preconfigured to support it. Just map the SIP ports on your hardware- based firewall to your server (UDP 5000:5082 and UDP 10000:20000). Once activated, anyone can reach you through the following SIP URI using the actual public IP address of your server: mothership@12.34.56.78. You also can adjust the e164 trunk in FreePBX to route inbound calls to any destination desired. Then register your phone number on e164.org and others can call you at no cost using your traditional phone number. Enjoy!
The Incredible PBX: Basic Installation Guide
Adding Skype to The Incredible PBX
Adding Incredible Backup... and Restore to The Incredible PBX
Adding Multiple Google Voice Trunks to The Incredible PBX
Remote Phone Meets Travelin' Man with The Incredible PBX
Continue reading Basic Installation Guide, Part II.
Continue reading Basic Installation Guide, Part III.
Continue reading Basic Installation Guide, Part IV.
Support Issues. With any application as sophisticated as this one, you're bound to have questions. Blog comments are a terrible place to handle support issues although we welcome general comments about our articles and software. If you have particular support issues, we encourage you to get actively involved in the PBX in a Flash Forums. It's the best Asterisk tech support site in the business, and it's all free! We maintain a thread with the latest Patches and Bug Fixes for Incredible PBX. Please have a look. Unlike some forums, ours is extremely friendly and is supported by literally hundreds of Asterisk gurus and thousands of ordinary users just like you. So you won't have to wait long for an answer to your questions.

Need help with Asterisk? Visit the PBX in a Flash Forum.
Or Try the New, Free PBX in a Flash Conference Bridge.
whos.amung.us If you're wondering what your fellow man is reading on Nerd Vittles these days, wonder no more. Visit our new whos.amung.us statistical web site and check out what's happening. It's a terrific resource both for us and for you.
Special Thanks to Our Generous Sponsors
FULL DISCLOSURE: ClearlyIP, Skyetel, Vitelity, DigitalOcean, Vultr, VoIP.ms, 3CX, Sangoma, TelecomsXchange and VitalPBX have provided financial support to Nerd Vittles and our open source projects through advertising, referral revenue, and/or merchandise. As an Amazon Associate and Best Buy Affiliate, we also earn from qualifying purchases. We’ve chosen these providers not the other way around. Our decisions are based upon their corporate reputation and the quality of their offerings and pricing. Our recommendations regarding technology are reached without regard to financial compensation except in situations in which comparable products at comparable pricing are available from multiple sources. In this limited case, we support our sponsors because our sponsors support us.
BOGO Bonaza: Enjoy state-of-the-art VoIP service with a $10 credit and half-price SIP service on up to $500 of Skyetel trunking with free number porting when you fund your Skyetel account. No limits on number of simultaneous calls. Quadruple data center redundancy. $25 monthly minimum spend required. Tutorial and sign up details are here.
The lynchpin of Incredible PBX 2020 and beyond is ClearlyIP components which bring management of FreePBX modules and SIP phone integration to a level never before available with any other Asterisk distribution. And now you can configure and reconfigure your new Incredible PBX phones from the convenience of the Incredible PBX GUI.
VitalPBX is perhaps the fastest-growing PBX offering based upon Asterisk with an installed presence in more than 100 countries worldwide. VitalPBX has generously provided a customized White Label version of Incredible PBX tailored for use with all Incredible PBX and VitalPBX custom applications. Follow this link for a free test drive!
Special Thanks to Vitelity. Vitelity is now Voyant Communications and has halted new registrations for the time being. Our special thanks to Vitelity for their unwavering financial support over many years and to the many Nerd Vittles readers who continue to enjoy the benefits of their service offerings. We will keep everyone posted on further developments.
Some Recent Nerd Vittles Articles of Interest...
- We, of course, continue to recommend a dLink Router/Firewall. Low Cost: $35 WBR-2310 Better: DIR-825 Best: DGL-4500 [↩]
- We recommend the free SipAgent client for Android devices and the commercial Acrobits Softphone for iPods and iPads. [↩]
- Adding an entry like the following would dramatically reduce the likelihood of a SIP attack: -A INPUT -p udp -m udp -s 141.146.0.0/255.255.0.0 --dport 5000:5082 -j ACCEPT [↩]
The Incredible PBX: Adding Multiple Google Voice Trunks
About the only drawback to Google Voice's free U.S. and Canada calling with the Incredible PBX has been the fact that you could only make one outbound call at a time... at least on Google's nickel. So today we'll fix that, and you can enjoy simultaneous outbound calls using as many Google Voice trunks as you have signed up for. If you're in the U.S., you're eligible and no invitation is required. Just head over to the Google Voice site to register.
Today's Incredible PBX enhancement also will permit you to set up multiple inbound DIDs for different area codes across the country which may save your out-of-town friends and relatives a little change when they want to contact you. And to think we had $200 a month phone bills in our college days just to call the hometown honey. The wonders of modern technology!
Prerequisites. Here's what you'll need to get started today. First, you need a functioning Incredible PBX. So start by installing Incredible PBX. Second, you'll need a second Google Voice account. And finally, you'll need an additional SIPgate One number.
Installation Assumptions. We'll walk you through the steps to get a second account activated with the Incredible PBX. If you need more than two, just repeat the steps below and substitute a new number for 2 in every step. As with baking cookies, if you skip a step, the cookies taste like crap. 🙂 For security reasons, we're using an additional SIPgate One account for the second setup. This avoids having to open up SIP access in your firewall which would require additional locking down of IPtables to specific SIP IP addresses.
Setting Up New SIPgate and Google Voice Accounts. As was true with the initial Incredible PBX setup, the first steps in activating a second line are to create and configure your SIPgate account and then tie that number into your new Google Voice account. For ease of reference, we've repeated below the pertinent portions of the original Nerd Vittles article.
Configuring SIPgate. If you live in the U.S. and have a cellphone, we'd recommend the SIPgate option since no adjustment of your hardware-based firewall is required. Otherwise, skip to the IPkall setup below. Step #1 is to request a SIPgate invite at this link. You'll need to enter your U.S. cellphone number to receive the SMS message with your invitation code. Don't worry. You can erase your cellphone number from your account once it is set up and working properly. Once you receive the invite code, enter it and choose the option to set up a residential account. Next, choose a phone number and write it down. The area code really doesn't matter because Google Voice is the only one that will be calling this number after we get things set up. For now, leave your cellphone number in place so that you can receive your confirmation call from Google Voice in the next step. After that, you'll want to revisit SIPgate and remove all parallel calling numbers. Finally, click on the Settings link and write down your SIP ID and SIP Password. You'll need these in a few minutes to complete the configuration of The Incredible PBX. Now place a call to your new SIPgate number and make certain that your cellphone rings before proceeding.
Configuring Google Voice. Once you've signed up for a new Google Voice account, choose a telephone number and plug in your new SIPgate number as the destination for your Google Voice calls and choose Office as the Phone Type.
Google Voice will place a test call to your number which SIPgate will forward to your cellphone. Enter the two-digit code that's displayed when you're prompted to do so.
While you're still in Google Voice Settings, click on the Calls tab. Make sure your settings match these:
- Call Screening - OFF
- Call Presentation - OFF
- Caller ID (In) - Display Caller's Number
- Caller ID (Out) - Don't Change Anything
- Do Not Disturb - OFF
Click Save Changes once you adjust your settings. Under the Voicemail tab, plug in your email address so you get notified of new voicemails. Down the road, receipt of a Google Voice voicemail will be a big hint that something has come unglued on your PBX.
Once you've confirmed your Google Voice number, revisit SIPgate and remove all parallel calling numbers including your cell number. Be sure you've written down your SIPid and SIPpassword while you're there!
FreePBX Overview. Don't be intimidated by the FreePBX setup instructions which follow. All we're really doing is cloning the original pieces of information that made Google Voice work in the initial Incredible PBX setup. For most of the items, we'll just tack a 2 onto the names previously used. Nothing prevents your adding 3, 4, and 5 accounts down the road if you have additional Google Voice and SIPgate accounts to support each iteration.
To begin, use a web browser to open FreePBX on your Incredible PBX. Using the actual private IP address of your server, go to the following link: http://192.168.0.33/admin.
Adding Parking Lot Slots. As originally configured, the Incredible PBX provides 5 parking lot slots for use on your PBX. These are numbers that let you temporarily "park" calls so that they can be picked up on another extension. One of those slots (75) is used by the Incredible PBX to place outbound Google Voice calls. If you want the ability to place simultaneous outbound Google Voice calls using multiple trunks, then we need additional parking lot slots for each simultaneous call. We recommend bumping up the number of parking lot slots from 5 to 9. Then you can use 75-79 for up to 5 simultaneous outbound calls with Google Voice. Here's how. In FreePBX, choose Setup, Parking Lot, Number of Slots: 9. Your entries should look like this screen shot:

When you've made the change, click Submit Changes, Apply Configuration Changes, Continue with Reload.
Creating Additional Custom Destinations. You'll recall that Google Voice actually places two calls when you make an outbound call. First, Google Voice calls you back. Then Google Voice places a call to your desired destination. The callback to you is handled transparently in Incredible PBX using pygooglevoice and Asterisk®'s parking lot feature. To handle multiple simultaneous calls, you'll need additional custom destinations. Here's how. In FreePBX, choose Tools, Custom Destinations, Add Custom Destination. Then make your new entries for custom-park2 look like this:

When you've made the entries and carefully checked them, click Submit Changes, Apply Configuration Changes, Continue with Reload.
Creating Additional Inbound Routes. Now we need an additional Inbound Route to handle the second incoming call generated by Google Voice. Here's how. In FreePBX, choose Setup, Inbound Routes, Add Incoming Route, gv-ringback2. Make the entries shown in the screenshot below substituting your 10-digit SIPgate/IPkall and Google Voice numbers in the appropriate fields. Be sure to choose Custom GV-Park2 as the Custom Destination for this Inbound Route. Check your entries carefully, a typo here will kill completion of the calls!

When you've made the entries and carefully checked them, click Submit, Apply Configuration Changes, Continue with Reload.
Creating Additional Custom Trunks. With every telephony provider, Asterisk needs a Trunk. In the case of Google Voice, we need a Custom Trunk for each Google Voice number to be used on your Incredible PBX. Think of a trunk as the bucket where Asterisk dumps an outbound call for processing. Two calls require two buckets. Three calls, three buckets. And so on. Well, that's almost true. Some providers can handle multiple calls, but Google Voice doesn't. So we need to make two changes in your trunk setup. First, we'll adjust the original Custom Trunk for Google Voice and limit it to one simultaneous call at a time. Then, we'll add a new Custom Trunk to support the second Google Voice account. Here's how.
In FreePBX, choose Setup, Trunks. In the right column, you'll see a list of all your existing trunks. Click on the second entry that looks like this: local/$OUTNUM$@ (custom). Be sure the Custom Dial String looks like what is shown below. If not, choose another trunk until you find the right one. Then make an entry of 1 in the Maximum Channels field:

When you've made the entry and carefully checked it, click Submit Changes, Apply Configuration Changes, Continue with Reload.
Now we're ready to Add the additional Custom Trunk. In FreePBX, choose Setup, Trunks, Add Custom Trunk. Make your entries look like what's shown below:

When you've made the Maximum Channels and Custom Dial String entries shown above and carefully checked them, click Submit Changes, Apply Configuration Changes, Continue with Reload.
Creating Additional Outbound Routes. FreePBX uses Outbound Routes to do just what the name implies: to route outbound calls to their destination. Outbound Routes are processed in the order in which they appear in the FreePBX Outbound Routes listing. We need to make three changes in the Outbound Routes processing to support a second Google Voice call path. First, we want to modify the existing Default Outbound Route to accommodate the second Google Voice account. Second, we want to add a new Outbound Route for the second Google Voice account so that calls can be placed directly with this route using a different dialing prefix. You'll recall that Google Voice calls in the Incredible PBX can optionally be dialed using the 48 prefix followed by a 10-digit number. The 48 spells GV on the phone key pad. So we'll add a new Outbound Route with a 482 (GV2) prefix which will tell Asterisk to route these calls out using the second Google Voice account. These prefixes can be anything you desire incidentally. Third, we'll need to move this new route UP the routes list so that it appears above and gets processed before the Default route. Here's how.
In FreePBX, choose Setup, Outbound Routes, Default. In the blank Trunk Sequence pulldown, choose the following entry: local/$OUTNUM#@custom-gv2. Now click the Add button. This should leave you with 3 outbound routes numbered 0, 1, and 2. Be sure your entries match the following:

When you've made the entry and carefully checked it, click Submit Changes, Apply Configuration Changes, Continue with Reload.
Now we're ready to add a new Outbound Route to support a custom dialing prefix for the second Google Voice account. In FreePBX, choose Setup, Outbound Routes. In the Add Route form, make the following entries:

When you've made the entries, click Submit Changes, Apply Configuration Changes, Continue with Reload.
Finally, look at the listing of Routes in the Right Margin. Using the arrow beside GoogleVoice2, move it up until it is just beneath the GoogleVoice entry. Then click Apply Config Changes, Continue with Reload.
Adding Additional SIPgate Trunks. If you set up your Incredible PBX originally using IPkall, then there already will be a sipgate trunk that can be used for this second line. Otherwise, you'll need to create a new sipgate2 trunk and clone the setup from the original sipgate trunk. Within FreePBX, goto Setup, Trunks and either Add a new SIP trunk or edit the existing sipgate trunk if it isn't already in use. If this is a newly added trunk, enter sipgate2 as the Trunk Name. The PEER Details under Outgoing Settings should be added so they look like this (substituting your actual SIPid and SIPpassword that were obtained from the SIPgate registration page:
type=peer
username=SIPid
fromuser=SIPid
secret=SIPpassword
context=from-trunk
host=sipgate.com
fromdomain=sipgate.com
insecure=very
caninvite=no
canreinvite=no
nat=yes
disallow=all
allow=ulaw&alaw
Blank out any data that's entered in the Incoming Settings section of the form. Then enter a Registration String with your actual SIPid, SIPpassword, and 10-digit SIPgate phone number:
SIPid:SIPpassword@sipgate.com/SIPphonenumber
Check your entries carefully for typos. Then click Submit Changes, Apply Configuration Changes, Continue with Reload.
Now is a good time to check and be sure the new SIPgate trunk registered with SIPgate. In FreePBX, choose Tools, Asterisk Info, SIP Info. Your newly created SIPgate trunk should display as Registered. If it says Request Sent, then you've got a typo in your credentials.
That takes care of all the FreePBX settings needed to support a second Google Voice number. Now we just need to add a chunk of dialplan code to Asterisk and restart Asterisk. Then you'll be ready to go. All of this is handled by a simple Nerd Vittles script so... not to worry! It's easy.
Adding Dialplan Code for Additional Trunks. Log into your server as root, and issue the following commands to download and run the dialplan configuration script. For future reference, be advised that there are configuration scripts for gv2, gv3, gv4, and gv5 with corresponding names.
cd /root
wget http://incrediblepbx.com/configure-gv2
chmod +x configure-gv2
./configure-gv2
When prompted, enter your 10-digit Google Voice phone number, your Google Voice email address, your Google Voice password, and your 10-digit SIPgate RingBack number. Check your work and then press the Enter key to adjust your dialplan and reload Asterisk. You now have a 2-line Incredible PBX. Enjoy!
The Incredible PBX: Basic Installation Guide
Adding Skype to The Incredible PBX
Adding Incredible Backup... and Restore to The Incredible PBX
Adding Remotes, Preserving Security with The Incredible PBX
Remote Phone Meets Travelin' Man with The Incredible PBX
Continue reading Basic Installation Guide, Part II.
Continue reading Basic Installation Guide, Part III.
Continue reading Basic Installation Guide, Part IV.
Support Issues. With any application as sophisticated as this one, you're bound to have questions. Blog comments are a terrible place to handle support issues although we welcome general comments about our articles and software. If you have particular support issues, we encourage you to get actively involved in the PBX in a Flash Forums. It's the best Asterisk tech support site in the business, and it's all free! We maintain a thread with the latest Patches and Bug Fixes for Incredible PBX. Please have a look. Unlike some forums, ours is extremely friendly and is supported by literally hundreds of Asterisk gurus and thousands of ordinary users just like you. So you won't have to wait long for an answer to your questions.

Need help with Asterisk? Visit the PBX in a Flash Forum.
Or Try the New, Free PBX in a Flash Conference Bridge.
whos.amung.us If you're wondering what your fellow man is reading on Nerd Vittles these days, wonder no more. Visit our new whos.amung.us statistical web site and check out what's happening. It's a terrific resource both for us and for you.
Special Thanks to Our Generous Sponsors
FULL DISCLOSURE: ClearlyIP, Skyetel, Vitelity, DigitalOcean, Vultr, VoIP.ms, 3CX, Sangoma, TelecomsXchange and VitalPBX have provided financial support to Nerd Vittles and our open source projects through advertising, referral revenue, and/or merchandise. As an Amazon Associate and Best Buy Affiliate, we also earn from qualifying purchases. We’ve chosen these providers not the other way around. Our decisions are based upon their corporate reputation and the quality of their offerings and pricing. Our recommendations regarding technology are reached without regard to financial compensation except in situations in which comparable products at comparable pricing are available from multiple sources. In this limited case, we support our sponsors because our sponsors support us.
BOGO Bonaza: Enjoy state-of-the-art VoIP service with a $10 credit and half-price SIP service on up to $500 of Skyetel trunking with free number porting when you fund your Skyetel account. No limits on number of simultaneous calls. Quadruple data center redundancy. $25 monthly minimum spend required. Tutorial and sign up details are here.
The lynchpin of Incredible PBX 2020 and beyond is ClearlyIP components which bring management of FreePBX modules and SIP phone integration to a level never before available with any other Asterisk distribution. And now you can configure and reconfigure your new Incredible PBX phones from the convenience of the Incredible PBX GUI.
VitalPBX is perhaps the fastest-growing PBX offering based upon Asterisk with an installed presence in more than 100 countries worldwide. VitalPBX has generously provided a customized White Label version of Incredible PBX tailored for use with all Incredible PBX and VitalPBX custom applications. Follow this link for a free test drive!
Special Thanks to Vitelity. Vitelity is now Voyant Communications and has halted new registrations for the time being. Our special thanks to Vitelity for their unwavering financial support over many years and to the many Nerd Vittles readers who continue to enjoy the benefits of their service offerings. We will keep everyone posted on further developments.
Some Recent Nerd Vittles Articles of Interest...
The Incredible PBX: Adding a Free Skype Gateway to Asterisk

Last week we got The Incredible PBX all set up with free worldwide SIP calls, free U.S./Canada PSTN calls using Google Voice with SIPgate or IPkall, and rock-solid Asterisk® security using our new Zero Internet Footprintâ„¢ design. Because of licensing restrictions, we couldn't include Skype out of the box. If you're an individual and not a business, today we'll walk you through adding free Skype calling worldwide to your Incredible PBX. With today's addition, the Incredible PBX now provides free calling to nearly a billion phones around the world via Skype, SIP, ENUM, FreeNUM, and U.S./Canada PSTN connections. Yowza!

If you use the recommended hardware, today's setup procedure takes less than 10 minutes! Once it's complete, inbound and outbound Skype calling is totally transparent on your Incredible PBX. To reach a Skype number, just dial * plus the user's Skype name from any phone with an alphanumeric keypad. To place a Skype Out call (fees apply), dial 8 plus the user's area code and number. When your 500 million friends on Skype contact you using your Skype name, all of your Incredible PBX phones will ring just like any other inbound call. What's the difference in today's solution and Digium®'s commercial Skype for Asterisk product? For openers, our solution is $66 cheaper. It's free! And, if you're an individual, you won't need Skype's commercial Business Control Panel to make calls. Functionally, the results with your Incredible PBX Skype implementation are identical.1

To make the Skype Magic work, you'll need three pieces of software in addition to The Incredible PBX obviously: Sun's 6u12 Java SE Development Kit, Skype's Static Edition for Linux plus an existing Skype account, and Greg Dorfuss' SipToSis product which manages the Skype Gateway to Asterisk.
As far as hardware is concerned, we're assuming you're using our recommended $200 Acer Aspire Revo to host your Incredible PBX. With other hardware, your mileage may vary because CentOS 5.4 may or may not support your audio card and graphics mode with your video card. Both are required to get Skype working properly under X-Windows. If you have problems with some other type of hardware, take a look at the tips in our previous article on Setting Up a Skype Gateway to Asterisk as well as the comments. Better yet, visit your neighborhood Best Buy and purchase an Aspire Revo for a hassle-free install.
Installing JDK. Using your favorite browser, go to Sun's 6u12 Java SE Development Kit website, choose Linux for the platform, and agree to the license. Click Continue. Download jdk-6u12-linux-i586-rpm.bin and copy it to the /root directory of your Incredible PBX. Next, make the file executable (chmod +x jdk-6u12-linux-i586-rpm.bin). Then run it: ./jdk-6u12-linux-i586-rpm.bin. Scroll down the wordy license agreement AGAIN and type yes. Java 1.6 then will be installed on your system. Check to be sure Java was properly installed with this command: rpm -q jdk.
Installing Skype and SipToSis. Now we're ready to load the remaining components. While still logged into your Incredible PBX as root, download and run the skype-setup script2:
cd /root
wget http://incrediblepbx.com/skype-setup
chmod +x skype-setup
./skype-setup
Activating Your Skype Gateway. Now we're ready to place your Skype gateway in production. You'll need to perform these steps from the console on your Incredible PBX since we have to run Skype in graphics mode. This may look complicated. It's really not. It's just a bit tedious to figure out the sequence of steps, but we've done that part for you.
WARNING: Be sure that you use a dedicated Skype account on this server! Do not run the same Skype account on any other server or desktop, or it fails!
1. Start up X-Windows: xinit3
2. Start up Skype. While still logged into your server as root, issue the following commands:
cd /root/skype/skype_static-2.0.0.72
./skype
Now log in to Skype with your Skype name and password. Be sure to set Skype to autologin whenever it is started. Then, in the Skype configuration option, set Skype to always run minimized. Save your settings.
Place a Skype Test Call4 to echo123 to be sure your audio settings are set correctly. Again, with the Aspire Revo, this won't be a problem assuming you have plugged in a microphone and speakers. These can be disconnected after you're sure things are working properly. HINT: Intel Atom-based motherboards are a piece o' cake!
Once you've got Skype working and all of the Skype settings configured above, shut down Skype.
3. Restart Skype in Background Mode: ./skype &
Be sure to write down the PID for Skype in case you need to kill the job if something goes wrong. 🙂 If you forget the PID, you can obtain it with this command: pgrep skype. You can kill Skype with the following command using your actual PID instead of 12345: kill 12345.
4. Start up SipToSis: Press Enter if the command prompt doesn't reappear. Then...
cd /siptosis
./SipToSis_linux
A message from Skype will pop up asking if you want to authorize external use of Skype: yes. Important: Be sure to select the Checkbox to save this setting for future connections!
5. Testing Skype. Go to a softphone (X-Lite recommended!) connected to an extension on your Incredible PBX and dial *echo123. You should be connected to the Skype Call Testing Service. Try *nerdvittles for the Nerd Vittles Demo.
Assuming you have a little money in your Skype Out account, go to any extension connected to your Asterisk server and dial 8 + your home phone number. This will place the outbound call through SkypeOut at 2¢ a minute.
Reboot your server when you're sure everything is working properly.
GUI Tips. Here are a few navigation tips for managing your Asterisk console on your Incredible PBX:
1. Ctrl-Alt-F2 gets you a new login prompt for your server
2. Ctrl-Alt-F7 gets you back to the SipToSis/Skype session. You can kill SipToSis by holding down Ctrl-C for several seconds. To decipher your SipToSis PID: pgrep -f SipToSis. To kill SipToSis: kill pid# (that you wrote down). To kill Skype: kill pid# (that you wrote down). To restart Skype: skype & and to restart SipToSis, just issue the command again: ./SipToSis_linux
3. Ctrl-Alt-F9 gets you to the Asterisk CLI.
Automating the Skype Gateway Startup. Once everything is working reliably, reboot your server again, log in as root, and issue the command: /root/skype-start. Place a test call again using a softphone on your Incredible PBX. If everything works fine, you now can add the skype-start command to your server's startup script, and you're all set.
echo "/root/skype-start" >> /etc/rc.d/rc.local
Setting Up Speed Dials for Skype Friends. One of the wrinkles with Skype is that Skype uses names for its users rather than numbers. If you don't have a SIP URI-capable softphone, there's still an easy way to place calls to your Skype friends using FreePBX. Just add a Speed Dial number to your FreePBX dialplan. Choose Extension, then select the Custom type, provide an Extension Number which is the Speed Dial number (this could actually spell your friend's name using a TouchTone phone), enter a Display Name for your friend, and add an optional SIP Alias. Then insert the following in the dial field replacing joeschmo with your friend's actual Skype name. Save your entries and reload the dialplan when prompted.
SIP/joeschmo@127.0.0.1:5070
Security Warning. Do NOT expose UDP port 5070 to the Internet by opening a port on your hardware firewall. You do not need UDP 5070 exposed to the Internet to implement today's gateway solution for inbound or outbound Skype calling from your server!
Enjoy!
Update: As of May 1, you now can set your Google Voice number as your Skype CallerID number. Previously, Google Voice blocked the verification SMS messages, but no longer. Thanks, @zsafwan.
Adding Multiple Google Voice Trunks to The Incredible PBX

Need help with Asterisk? Visit the PBX in a Flash Forum.
Or Try the New, Free PBX in a Flash Conference Bridge.
whos.amung.us If you're wondering what your fellow man is reading on Nerd Vittles these days, wonder no more. Visit our new whos.amung.us statistical web site and check out what's happening. It's a terrific resource both for us and for you.
Special Thanks to Our Generous Sponsors
FULL DISCLOSURE: ClearlyIP, Skyetel, Vitelity, DigitalOcean, Vultr, VoIP.ms, 3CX, Sangoma, TelecomsXchange and VitalPBX have provided financial support to Nerd Vittles and our open source projects through advertising, referral revenue, and/or merchandise. As an Amazon Associate and Best Buy Affiliate, we also earn from qualifying purchases. We’ve chosen these providers not the other way around. Our decisions are based upon their corporate reputation and the quality of their offerings and pricing. Our recommendations regarding technology are reached without regard to financial compensation except in situations in which comparable products at comparable pricing are available from multiple sources. In this limited case, we support our sponsors because our sponsors support us.
BOGO Bonaza: Enjoy state-of-the-art VoIP service with a $10 credit and half-price SIP service on up to $500 of Skyetel trunking with free number porting when you fund your Skyetel account. No limits on number of simultaneous calls. Quadruple data center redundancy. $25 monthly minimum spend required. Tutorial and sign up details are here.
The lynchpin of Incredible PBX 2020 and beyond is ClearlyIP components which bring management of FreePBX modules and SIP phone integration to a level never before available with any other Asterisk distribution. And now you can configure and reconfigure your new Incredible PBX phones from the convenience of the Incredible PBX GUI.
VitalPBX is perhaps the fastest-growing PBX offering based upon Asterisk with an installed presence in more than 100 countries worldwide. VitalPBX has generously provided a customized White Label version of Incredible PBX tailored for use with all Incredible PBX and VitalPBX custom applications. Follow this link for a free test drive!
Special Thanks to Vitelity. Vitelity is now Voyant Communications and has halted new registrations for the time being. Our special thanks to Vitelity for their unwavering financial support over many years and to the many Nerd Vittles readers who continue to enjoy the benefits of their service offerings. We will keep everyone posted on further developments.
Some Recent Nerd Vittles Articles of Interest...
- Skype and this suggested implementation are intended for individual use. Your use is, of course, governed by the Skype Terms of Service. [↩]
- Here are the actual commands in the skype-setup script if you'd prefer to execute them one at a time:
cd /root
mkdir skype
cd skype
wget http://www.skype.com/go/getskype-linux-beta-static
tar jxvf skype_static*
yum install xorg-x11-server-Xvfb
yum install qt4
yum install xterm
yum install libXScrnSaver.i386
wget http://pbxinaflash.net/source/skype/siptosis.tgz
cd /root
wget http://incrediblepbx.com/skype-start
chmod +x skype-start
cp skype-start skype/.
cd /
tar zxvf /root/skype/siptosis.tgz
cd /root
[↩] - Starting xinit won't be a problem on the Aspire Revo. But, if xinit won't start on your particular machine, you may need to create /etc/X11/xorg.conf. Here's a generic config file that should work fine for our purposes:
Section "ServerLayout"
Identifier "X.org Configured"
Screen 0 "Screen0" 0 0
EndSectionSection "Device"
Identifier "Card0"
Driver "vesa"
EndSectionSection "Screen"
Identifier "Screen0"
Device "Card0"
SubSection "Display"
Viewport 0 0
Depth 16
Modes "800x600"
EndSubSection
SubSection "Display"
Viewport 0 0
Depth 16
Modes "800x600"
EndSubSection
EndSection[↩]
- If the test call fails with a bad audio message, go into Options, Sound Devices and reconfigure your Audio settings until you can place the test call successfully. Otherwise, none of the rest will work! [↩]
Meet The iPhone Terminator: The World’s Best Mobile Phone

With apologies to Arnold’s infamous line, all we can say to iPhone enthusiasts of the world is that once you try this Android phone, you won’t ever go back. Google has done for the mobile phone what Apple did with Mac OS X except Google also opened up the hardware platform. Unfortunately, Apple opted for locked and proprietary hardware and software in rolling out its iPhone. Now that the second-generation Android phones are appearing, the difference is palpable.
Update. There’s now a third-generation Android phone that’s even better than this one. You can read all about it in our latest article.
Choosing the World’s Best Cell Phone is obviously fraught with peril. All other things being equal we would have bestowed the honor on Nokia’s E71 which we reviewed recently and have personally used until a month ago. That’s when we jumped into the Android World which we will tell you up front is still a bit of a work in progress. But, all we can say is WOW! The openness, the technology, and the creativity showcased in the new Android phones point to an inescapable conclusion. Google once again has struck the Mother Lode. Seeing is believing as they say. And today we’ll digress from our usual format to bring you a pictorial tour of the HTC Magic. No. You don’t have to carry a white one like Arnold. Heh. A shiny black one is readily available. We actually had planned to walk through the process of rooting the phone, but we’ll leave that for another day primarily because this mobile phone provides sufficient flexibility in its native state to deliver an almost perfect cellphone experience even without root access.

We’ve already covered our objections to the iPhone in a previous article so we won’t repeat them here other than to note that SIP clients can’t run in the background on an iPhone which makes them next to worthless for inbound calls. Yes, there are kludgey workarounds, but these open yet another can of worms. We’ll dispose of the Nokia product line by telling you they’re headed in the wrong direction just like Microsoft with the wrong operating system(s), the wrong product design, and the wrong technology mix. Just when the world is finally looking for a mobile platform that provides flexibility in transitioning between the cellular networks, WiFi, and WiMax, Nokia kills the SIP stack and SIP client on its entire line of new cellphones. So a company that once was THE innovative cell phone manufacturer in the world suddenly is looking a bit like Yahoo, lots of thrashing around but no cigar. Sadly, it’s mostly the result of self-inflicted wounds. But we’re not going to dwell on the past today. We’re going to look at what the future holds in mobile communications. And the one word that best sums up our hopes for future mobile telephony is Google… more precisely, Google’s totally open source Android Platform.
So let’s again go about this by the book… with a requirements analysis! You can match it to your own wish list. We want a cellphone that makes cellular calls from most locations, and we want the ability to decide which cell provider we use depending upon where we are. We want the option to make phone calls through our own SIP provider, or Asterisk® server, or Google Voice whenever we feel like it with or without a Wi-Fi connection. And, of course, we want VoIP Prioritization. This means we want our cell phone to prioritize incoming and outgoing calls by attempting to use VoIP services first, cellphone carrier second. We also want to be able to check our email using gMail, POP3 and IMAP servers at 3G data speeds. For the business community, we also think Microsoft Exchange support is indispensable. When we need to send or receive something on our notebook computer and there’s no WiFi around, we want our cellphone to provide data connectivity. We’re not going to be downloading movies and 1,000-page books all day long. We just want to get an important file attachment from the office so we can read it on a normal screen. If the cellphone provided a PDF viewer, so much the better. And, finally, we’d like a QWERTY keyboard for messaging, and we want to be able to change our own battery, add a memory chip, and swap out SIM cards whenever we’d like. We also want the ability to gain root access should we ever wish to do so. After all, it’s our phone! Bluetooth for phone calls and A2DP for music in the car would be great, and a good camera as well as GPS functionality would be nice to have on the phone as well. For those in the U.S., we’d add one additional requirement: support for AT&T’s 3G network so you’re not stuck with T-Mobile’s dog-slow (and incompatible) wireless data network. Most of the Android phones currently flunk this test leaving you with nothing but EDGE service if you use a provider other than T-Mobile. Of course, with T-Mobile, you get mostly EDGE service in the U.S. as well. 🙄
And the winner is…
Our pick is the unlocked Rogers HTC Magic phone, the only Android phone that we could find which supported rooting and AT&T’s 3G network in the U.S… albeit from a Canadian provider. That’s the price U.S. consumers pay for a government that continually rewards the telephone oligopoly with exclusivity rip-offs. So how does the HTC Magic stack up to our wish list? We’d give it a 94. It does everything on our Wish List… and more. The images which follow incidentally were taken using the screen capture utility that’s part of the Android 1.5 SDK. It is easily installed on either a Windows or Linux PC or your favorite Mac (except Snow Leopard for the moment). There’s a great tutorial on how to install the Android SDK as well as a YouTube video and tutorial on rooting the Rogers HTC Magic phone should you desire further information on those topics.
Getting Started. Before proceeding, set yourself up a Gmail account if you don’t already have one. As with most provider-specific cellphones, this HTC Magic phone is hard-coded to the Rogers network in Canada. Assuming you want to use AT&T’s network in the U.S., step #1 is to enter AT&T APN settings when you first turn on the phone. After inserting the AT&T SIM and booting the phone, press the Menu key before doing anything else. Next click Add APN. Enter the following values leaving the remaining fields blank:
Name: att
APN: wap.cingular
Password: CINGULAR1
Now press the Menu button again and choose Save. For other providers, try this Google Search.

Main Screen. Once you’ve entered your Gmail credentials, the phone will boot and display a Main menu. It actually is three screens wide. You can move to the other screens by swiping your finger to the left or to the right. You’ll notice a thumb tab at the bottom of the display. By dragging this up, you can access all of the other applications on the phone. Move it back out of the way by dragging it back down or pressing the Back button (←) which is the third from the left button just below the screen display.
Applications. Here’s the first page of our Applications. You scroll through the list using the trackball, or you can drag your finger vertically on the screen to reposition the display up or down. Tapping on an entry starts the application. Pressing the Home button on the far left just below the screen display returns you to the Main Screen. Every app is displayed in this listing except for Widgets. Widgets are more like scripts and typically are used to toggle functions on and off. In the left Main screen above are four widgets to toggle WiFi, BlueTooth, GPS, and Ringer/Vibrate/Silent functions of the phone.
Android Market. All of these applications didn’t necessarily come with the phone. Google’s Android Market has been set up for developers to display their wares. You can become a developer, too. And, unlike the iPhone apps, most of the Android apps still are free. Just another advantage to open source technology. To access the Market from your phone, just choose the Market app and follow the intuitive menus. There’s a great Search function. Again, unlike the iPhone, these applications get stored on a MicroSD card. A 2GB card comes with the phone. Do yourself a favor and start with a $50 16GB card.

Messaging. As you might expect from Google, the Android platform excels at messaging of all flavors. Whether it’s text messaging, Gmail, or POP3/IMAP email connectivity, Android has you covered (see above). And the support for Microsoft Exchange is nothing short of brilliant. In the social networking department, there’s full-featured support for Twitter and Facebook, among others. Using the Search function in the Android Market, you can have your phone set up with your favorite tools in just a few minutes.
Android Security. Securing your phone is also nothing short of brilliant on the Android 1.5 platform. Simply draw an unlock code pattern using your finger, and that becomes the signature for future access to your cellphone. Also works pretty well as a sobriety test. 🙂 If you can’t unlock your phone, don’t unlock your car! You also can lock your SIM card to your phone and set a password if you’re nervous about losing your $500 crown jewel. What the security system really demonstrates is that the open source community has nothing to apologize for. The quality of this software is every bit as good if not better than the software produced by the other cellphone players.

Placing Calls. Yes, we hear you. What about making phone calls? You’ll be pleased to know that the HTC Magic can do that, too. We were just saving the best for last. In fact, this phone can make calls in three different ways: through your cellphone provider, through SIP using your Asterisk server or another provider, and through Google Voice. Once you install the Google Voice application from the Android Market, simply configure it with either your cellphone number or an intermediate provider such as SIPgate or IPkall. You then have a choice of whether to make Google Voice the primary or secondary calling source. Or you can choose to be prompted for each call as shown above. Google Voice calls that go out through your WiFi data network connection incur no charges in the U.S. and Canada.
SIP calls are placed using the SIPdroid application which also is available in the Android Market. Shown to the left is a sample setup for SIPdroid to connect to your Asterisk server on a private home network. In the SIPdroid Call Options, specify whether to use WiFi and/or 3G/EDGE for the SIP calls. And set a preference for how your calls should be placed, i.e. cellphone carrier or SIP. The only tricky part is the Extension Settings on your Asterisk server. Just create an extension in the usual way using FreePBX. But make sure your settings include the following entries: canreinvite=no, nat=yes, and qualify=no.
To route outbound calls through SipDroid instead of your cellphone provider, just append + to the end of the phone number. You can generate a + symbol on your phone keypad with a long press of the 0 button.

Android Backups. No article would be complete without some mention of backups. The Android platform currently supports four options: Android images, MyBackup, and Google and Exchange Synchronization. Android images can only be created if you gain root access to your phone or load a different image on your phone. MyBackup is a $9.95 app from the Android Market that lets you backup your Applications and Data separately onto your MicroSD card. Unless you’re a techie, it’s well worth the money. Google and Exchange Synchronization you will find under Settings, Data Synchronization. With Google Sync, you can back up your Gmail, Calendar, and Contacts data automatically and as a background task. Be sure to activate it. Finally, you’ll see displayed above a browser display from mundy.org/whereib that you may find helpful from time to time. It displays not only a map of your current location based upon your IP address, but also shows your public IP address.
Android 3Gtest. We’ll leave you with a hot tip about one additional application: 3Gtest. Just download and install it from the Android Market and then run it. You’ll be amazed by the results. Not only will it tell you how good your upload and download speeds are, it also will tell you some interesting tidbits about whether your provider is living up to their oft-repeated promise of Net Neutrality. Our download 3G speed in Charleston, South Carolina was actually close to T-1 performance. Interestingly, our upload speed was pitiful… about as fast as a circa 1860’s telegraph machine.
Android System Backup. We said we weren’t going to cover rooting your phone, but we do want to point you in the right direction and also show you how to get a perfect image backup of your phone. If you’re not comfortable entering system commands, stop here! We are Mac snobs so what follows is the Mac way of doing things which is incredibly simple compared to the hassle with Windows in getting the correct USB driver loaded to make things function properly. If you’re determined to use Windows, be sure to install the Android SDK before you connect your phone to your PC. And read up on how to install the appropriate USB driver for Windows. With a Mac, all of this just works… out of the box. As we mentioned previously, we’ve only tested this with Leopard and Snow Leopard, and Snow Leopard does NOT work!
Before proceeding, you must enable USB Debugging on your phone. You’ll find it here: Settings->Applications->Development->USB Debugging
To get your Mac set up with the proper toolkit, do the following. There’s nothing tricky here. Just don’t skip any steps. And you only have to do this once! First, download the Android 1.5 SDK for the Mac from here. Unzip android-sdk-mac_x86-1.5_r3.zip on your Desktop and rename the folder to android-sdk. Now drag that folder into your Applications directory. Next, open a Terminal window and create/edit .bash_profile: nano -w .bash_profile. Add the following entry: export PATH=${PATH}:/Applications/android-sdk/tools. Then save the file: Ctrl-X, Y, Enter. Now run the same command from the CLI prompt to update your PATH now: export PATH=${PATH}:/Applications/android-sdk/tools. Next, download fastboot-mac onto your Desktop from the HTC Support site. Unzip the file and rename the file to fastboot. Then, download recovery-new.img to your Desktop. Drag both fastboot and recovery-new.img into the Applications/android-sdk/tools folder.
Now we’re ready to make your backup. Plug your phone into your Mac using the USB cable that came with the phone. Open a terminal window on your Mac and change to the SDK tools directory: cd /applications/android-sdk/tools. Run the following command and make certain your phone shows up in the listing: adb devices. You should get a display with the serial number of your phone:
List of devices attached
HT95RNK02843 device
Assuming your phone shows up in the list, you’re ready to proceed with a backup. Turn off your phone. Then, while pressing the Volume Down button, turn your phone back on. Hold down both buttons until you see a screen that says <BACK> FastBoot Mode with dancing Androids on skateboards at the bottom of the display. Press the BACK button (←) and the FASTBOOT USB menu will display. In your computer’s Terminal window (NOT on your phone), type: fastboot boot recovery-new.img. Your phone will reboot and display a screen with several options in blue. Use your phone’s trackball to carefully scroll down to the Nandroid Backup 2.1 option. Then depress the Trackball button to begin the backup. You’ll see a yellow display message indicating that the backup is proceeding. When the backup completes, choose the Reboot System Now option to restart your phone normally.
You’ll find the new backup on the SD card. To copy it to a safe place on your Mac, drag down the Message Bar at the top of the display after your phone has rebooted. Tap the USB Connected Select to copy files to/from your computer option. Then tap the Mount button. A new drive NO NAME will appear on your Desktop. Double-click on it and drag the nandroid folder to a safe place for permanent storage of your backup. To unmount the phone, do it on your Mac desktop first. Then reverse the mount process we initially used on the phone to mount it. Simple!
Rooting Your Phone. We have NOT done this so you’re on your own. You’ll probably void the warranty on your phone by proceeding. The best article we could find on the procedure for rooting and restoring your phone is here. But it doesn’t have the correct backup image. If you restore the wrong image, your phone’s radio may no longer work on your provider’s network. The consensus seems to be that the proper image for a rooted Rogers HTC Magic is here. The best tutorial for actually performing the magic appears to be here. But we would stress again that we have not actually tried this, and you really, really are on your own if you proceed past reading this article. It’s your $500 phone… or brick as the case may be. Before doing anything further, we would strongly recommend you make several backup images as outlined above and also spend some time doing a careful review of the postings in this forum until you are very comfortable with all of the wrinkles and procedures. If something goes wrong, post your problems there, not here. 🙂 We’re handing you the map, but it’s your choice whether to jump off the cliff. Enjoy!
Update: The unlocked Rogers HTC Magic phone used for this review is now available for purchase from Nerd Vittles. It supports 3G networks of both Rogers in Canada and AT&T in the United States. Just make us an offer we can’t refuse. It’s still a terrific phone!

The Future of Android. For a glimpse of what the future holds for Android, see this Giga OM article published on October 7.
Web Site of the Week. For all of your favorite Nerd gifts, don’t miss the new Mashable collection.
Articles of the Week. For another excellent technical review of the HTC Magic, check out TechRadar UK’s review. And be sure to check out Justin West’s Free Homebrew VoIP with Google Voice and Intel Atom.
Enhanced Google Maps. In case you haven’t noticed, we’ve added yet another Google Map to Nerd Vittles. Now, in addition to showing our location with Google Latitude, we also are displaying your location based upon your IP address. We’ll show you how to add something similar to any LAMP-based Linux system in coming weeks. It’s a powerful technology that has enormous potential. If you’re unfamiliar with Google Maps, click on the Hybrid and Satellite buttons and then check out the scaling and navigation options. Double-click to zoom. Incredible!
whos.amung.us If you’re wondering what your fellow man is reading on Nerd Vittles these days, wonder no more. Visit our new whos.amung.us statistical web site and check out what’s happening. It’s a terrific resource both for us and for you.

Need help with Asterisk? Visit the PBX in a Flash Forum.
Or Try the New, Free PBX in a Flash Conference Bridge.
Special Thanks to Our Generous Sponsors
FULL DISCLOSURE: ClearlyIP, Skyetel, Vitelity, DigitalOcean, Vultr, VoIP.ms, 3CX, Sangoma, TelecomsXchange and VitalPBX have provided financial support to Nerd Vittles and our open source projects through advertising, referral revenue, and/or merchandise. As an Amazon Associate and Best Buy Affiliate, we also earn from qualifying purchases. We’ve chosen these providers not the other way around. Our decisions are based upon their corporate reputation and the quality of their offerings and pricing. Our recommendations regarding technology are reached without regard to financial compensation except in situations in which comparable products at comparable pricing are available from multiple sources. In this limited case, we support our sponsors because our sponsors support us.
BOGO Bonaza: Enjoy state-of-the-art VoIP service with a $10 credit and half-price SIP service on up to $500 of Skyetel trunking with free number porting when you fund your Skyetel account. No limits on number of simultaneous calls. Quadruple data center redundancy. $25 monthly minimum spend required. Tutorial and sign up details are here.
The lynchpin of Incredible PBX 2020 and beyond is ClearlyIP components which bring management of FreePBX modules and SIP phone integration to a level never before available with any other Asterisk distribution. And now you can configure and reconfigure your new Incredible PBX phones from the convenience of the Incredible PBX GUI.
VitalPBX is perhaps the fastest-growing PBX offering based upon Asterisk with an installed presence in more than 100 countries worldwide. VitalPBX has generously provided a customized White Label version of Incredible PBX tailored for use with all Incredible PBX and VitalPBX custom applications. Follow this link for a free test drive!
Special Thanks to Vitelity. Vitelity is now Voyant Communications and has halted new registrations for the time being. Our special thanks to Vitelity for their unwavering financial support over many years and to the many Nerd Vittles readers who continue to enjoy the benefits of their service offerings. We will keep everyone posted on further developments.
Some Recent Nerd Vittles Articles of Interest…
Introducing ISN: Free SIP Dialing From Any Asterisk Phone
Wouldn't it be nice to pick up any telephone on your Asterisk® system and place free SIP calls to anywhere in the world by dialing joe@sip.asterisk.com or any SIP URI? The problem, of course, is that most phones don't include alphanumeric keyboards much less the @ symbol. Well, not to worry. A group of Asterisk gurus headed up by John Todd came up with a clever plan using DNS that lets you dial any SIP URI using the 10 numeric keys plus the asterisk key on any standard telephone keypad. Today, we'll show you how to set up your Asterisk system to support ISN's (aka ITAD Subscriber Numbers).
Overview. In laymen's terms, the trick to ISN dialing is that we pass a number such as 1234*1061 to a DNS server that knows how to translate the numeric sequence into a SIP URI that looks like this: 1234@sip.pbxinaflash.com. In short, it takes the number after the asterisk and resolves it to a fully-qualified domain name which is preconfigured at freenum.org. And the result is inter-domain numeric SIP addressing using ordinary telephone instruments. For our recommended setup, you'll actually dial ISN numbers like this: **1234*1061. The leading asterisks will tell FreePBX to treat this as an ISN dial string.1
Prerequisites. We're assuming that you already have one of the FreePBX-enhanced Asterisk aggregations in place such as PBX in a Flash. If not, start there and then run the Orgasmatron Installer which provides all of the SIP URI functionality you'll need for this project. If you're not using PBX in a Flash, then review our tutorial on SIP URI's which will walk you through getting this functionality set up on your FreePBX-enhanced Asterisk server.
Adjusting Your Phones to Support ISN Dialing. We'll be using a somewhat different dial plan to make ISN calls so you'll probably have to adjust the default dialplan on your actual phones or ATA to get this to work. If you can place ISN calls with a softphone but you get a fast busy when you dial the same number on your hardware-based phones, then it's a dialplan problem. For Aastra phones, you can access the Aastra dialplan settings with a web browser. Just go to the IP address of the phone and login with admin:22222. Click on the Preferences option and you should see Local Dial Plan at the top of the page with an entry that looks like this: x+#|xx+*. Just change it to: x+#|xx+*|'*'xx+* and click the Save Settings button. No reboot of the phone is required. Notice that we've enclosed the asterisk in single quotes in the third option. That's the trick to getting Aastra phones to recognize * as part of an actual dial string. If you're using other phones, consult your user's guide for tips on modifying your dialplan to accommodate an asterisk as the first character in the dial string.
Enabling Outbound ISN Dialing. There are a number of ways to get ISN outbound dialing to work with Asterisk. We're going to show you a couple of methods. You can either set up a trunk and outbound route to handle the calls, or you can add an extension to your system which actual prompts for the ISN number when you dial that extension. There are also two ways to look up ISN numbers at freenum.org. The preferred method is using DNS queries with the new Asterisk ENUMLOOKUP function. An alternative method (which is especially useful with older versions of Asterisk that do not support ENUMLOOKUP) is to use FreeNUM's external public resolver to map ISN dial strings to SIP URIs. With PBX in a Flash and Asterisk 1.4.21.2 or later, both methods work.
Implementing the Trunk Method for ISN Dialing. With this option, you'll be able to pick up any (properly configured) phone on your Asterisk system and dial **1234*1061 to complete a free ISN SIP call. To set this up, we'll add a new trunk and outbound route in FreePBX. Then we'll insert a dialplan script in extensions_custom.conf to finish up. Once you reload your Asterisk dialplan, you'll be good to go.
Open FreePBX in a web browser, and choose Admin, Setup, Trunks, Add Trunk, Add Custom Trunk. Leave the General Settings blank for now. In the Dial Rules, insert X.*X. (be sure to include trailing period!) and, for the Custom Dial String, insert: local/$OUTNUM$@freenum. Click the Submit button to save your settings and reload the dialplan when prompted. Now add an Outbound Route called OutFreeNUM. For the Dial Pattern, use **|X.*X. with the trailing period again. For the Outbound Route Dial Pattern, you can get more elaborate so that you don't have to dial the ** prefix. Just be aware that this may not work with all handsets (including the Aastra's). It does work well with Zoiper softphones. Here's the dial pattern we actually use. With this dial pattern, you can dial most ISN numbers directly with no prefix, e.g. 16781234567*1061 works fine.
**|X.*X.
1NXXNXXXXXX*X.
NXXNXXXXXX*X.
XX*X.
XXX*X.
XXXX*X.
XXXXX*X.
XXXXXX*X.
XXXXXXX*X.
For the Trunk Sequence, choose local/$OUTNUM$@freenum. Save your entries and reload the dialplan once more.
Finally, log into your server as root and edit extensions_custom.conf in /etc/asterisk. At the bottom of the file, insert the following code:
[freenum]
exten => _X.,1,Set(TIMEOUT(absolute)=10800)
exten => _X.,2,NoOp(Number to Call: ${EXTEN})
exten => _X.,3,Set(isnresult=${ENUMLOOKUP(${EXTEN},sip,,1,freenum.org)})
exten => _X.,4,GotoIf($["${isnresult}"=""]?6:5)
exten => _X.,5,Dial(SIP/${isnresult},40,r)
exten => _X.,6,Background(ss-noservice)
exten => _X.,7,Congestion
exten => _X.,8,Hangup
exten => h,1,Hangup
exten => i,1,Hangup
exten => T,1,Hangup
Make sure you eliminate the line-wrap on line 3 above. Then save the file and reload your dialplan: asterisk -rx "dialplan reload". Now place a test call by dialing: **1234*1061. If the call doesn't connect to Nerd Vittles' demo site, check the Asterisk CLI and fix any reported errors.
Implementing the Extension Method for ISN Dialing. With this option, you'll be able to pick up any phone on your Asterisk system and dial FREE (3733) to place an ISN call. You'll be prompted to enter the number using the following format: 1234*1061. Note that there are no leading asterisks with this method. Instead of using ENUMLOOKUP to find the ISN number, we'll use FreeNUM's external public resolver to do the ISN translation into a SIP URI.
Log into your Asterisk server as root and edit extensions_custom.conf in /etc/asterisk. At the bottom of the file, insert the following context:
[custom-freenum]
exten => s,1,Answer
exten => s,2,Wait(2)
exten => s,3,Background(pls-entr-num-uwish2-call)
exten => s,4,Read(NUM2CALL,beep,30)
exten => s,5,GotoIf($["foo${NUM2CALL}" = "foo"]?10)
exten => s,6,Set(TIMEOUT(absolute)=10800)
exten => s,7,Background(pls-hold-while-try)
exten => s,8,Dial(SIP/${NUM2CALL}@public.freenum.org,30,m)
exten => s,9,Congestion
exten => s,10,Hangup
exten => h,1,Hangup
exten => i,1,Hangup
exten => T,1,Hangup
Now move to the top of the file and insert the following line in the [from-internal-custom] context:
exten => 3733,1,Goto(custom-freenum,s,1)
Save the changes you've made to the file and then edit (or create, if necessary) sip_custom.conf and insert the following line:
promiscredir=yes
Save the file and then restart Asterisk: amportal restart. Now place a test call by dialing 3733. When prompted for the ISN number, enter 1234*1061 and press # to avoid the timeout delay. Be aware that on non-FreePBX systems, this code would go in sip.conf; however, that file gets overwritten with any FreePBX reload. Hence the reason that we've placed the code in sip_custom.conf.
Creating a SIP URI for Your Asterisk Server. Before you can receive any inbound calls with ISN dialing, you'll need at least one SIP URI for your Asterisk server. The format of a SIP URI is much like an email address: somename@yourdomain.dyndns.org or somenumber@yourdomain.dyndns.org. Step 1 is to register a fully-qualified domain name (FQDN) for your Asterisk server. Step 2 is to actually set up the SIP URI's on your server.
If you already have a registered domain, then we recommend you create a sip subdomain: sip.yourname.org. Then point that subdomain to the IP address of your Asterisk server. If your Asterisk server has a dynamic IP address, then register a subdomain with a service such as dyndns.org and point that domain at your Asterisk server. We've previously covered how to install software on your Asterisk server to make sure your FQDN always resolves to the correct dynamic IP address. Here's the link for DNS-O-Matic.
Once you have FQDN covered, you're ready to set up a SIP URI. With Orgasmastron builds of PBX in a Flash, the work already has been done for you. You should already have a SIP URI of mothership@yourFQDN. For everyone else, the drill involves moving a copy of the [from-sip-external] context into extensions_override_freepbx.conf in /etc/asterisk so that it can be edited without risking an overwrite from FreePBX. To find out the location of the [from-sip-external] context, issue the following commands while logged into your server as root:
cd /etc/asterisk
grep from-sip-external *
The result will look something like this:
extensions.conf:[from-sip-external]
extensions_override_freepbx.conf:[from-sip-external]
sip_general_additional.conf:context=from-sip-external
If the middle line is there, the context already has been copied over. Otherwise, list out the file showing [from-sip-external] which varies depending upon your version of FreePBX: cat extensions.conf. Now cut-and-paste the entire [from-sip-external] context into extensions_override_freepbx.conf. Then edit the override file and add an entry for each SIP URI you wish to create. The entries should be inserted just below the exten => s,1... line. Here are some samples:
exten => 16781234567,1,Goto(from-trunk,${DID},1)
This entry would let you control the routing of 16781234567 by creating a new incoming route in FreePBX with a DID entry of 16781234567. Then you can point the SIP URI to any FreePBX resource, e.g. an extension, ring group, IVR.
exten => e164,1,Goto(from-trunk,e164,1)
This entry would route e164@yourFQDN to the Inbound Route created for a DID number entry of e164.
exten => 18431234567,1,Goto(custom-windyhouse,s,1)
This entry would route incoming calls to 18431234567@yourFQDN to s,1 in a custom context called [custom-windyhouse] in extensions_custom.conf.
exten => 17065439876,1,Dial(SIP/17066313456@sip.otherdomain.com)
This entry would route incoming calls to 17065439876@yourFQDN to another SIP URI.
exten => 12021234567,1,Dial(local/12029876543@from-internal)
This entry would route incoming calls to 12021234567@yourFQDN to a cellphone at 12029876543 using your Asterisk dialplan to choose an appropriate trunk for the call.
exten => 18883331212,1,Dial(SIP/skype_joe@proxy01.sipphone.com)
This entry would route incoming calls to 18883331212@yourFQDN to a Skype user named joe using the free Gizmo5 gateway.
Once you've made all desired SIP URI entries, save the override file and reload your Asterisk dialplan.
Using the PBX in a Flash ITAD Number. So you're probably asking, "What's in this for me?" Well, a couple of things actually. First, if you're a PBX in a Flash user, we want you to join our free calling network. We already have reserved the 1061 ITAD number for our group. Just cut-and-paste the form below, fill in the blanks, and email it to us. We'll set up an ISN number for your server (one per customer, please) so that others can contact you without spending a dime. The other option is to obtain your own ITAD number for your organization and set it up on your own server. We'll get to that in a minute.
If you want to join our club (and we really don't mind if you're not using PBX in a Flash), then cut-and-paste the form below into your email and fill it out. And here's the email link. Once we receive your request, we'll set up an ISN number for you that matches your existing phone number. So, if your phone number is 16781234567, your new ISN number will be 16781234567*1061. Please include your international codes with your phone number. Before we activate your ISN number, we'll place a test call to your SIP URI to verify it's working. Please be sure it is before applying. 🙂
Name:
Mailing Address:
Phone Number:
SIP URI for Your Server: _____________@_____________________________
ISN Number (leave blank):
Publish Entry in Directory? Yes or No (choose one)
Obtaining Your Own ITAD Number. We know there are lots of you that prefer to do things yourself. And that's perfectly fine. We're going to quickly show you how. But, if you want to be included in the PBX in a Flash directory, please send us the form above with your own ISN contact number once you get things working.
To get your own ITAD number, visit this link and follow the instructions for requesting your own number. It's easy, but detail matters so do it right the first time! Within a few days, you'll get your shiny new number. And, in a few more days, freenum.org will notify you that your account has been established.
Setting Up An ISN Account at FreeNum.org. Once you receive your login credentials from FreeNUM, log in to your account. Leave the DNS Wildcard setting the way it is. All you have to do is insert your fully-qualified domain name in the FQDN placeholder. For example, if your FQDN were sip.big.edu, then the last part of the DNS entry should look like this:
sip:\\1@sip.big.edu!" .
Save your entry and wait an hour. Then test it by dialing your new ISN number or, after logging into your server as root, use a command like the following. Turn your SIP URI around from 6781234567*1061 so that it looks like this:
dig @freenum.org NAPTR 7.6.5.4.3.2.1.8.7.6.1061.freenum.org.

Need help with Asterisk? Visit the PBX in a Flash Forum.
Or Try the New, Free PBX in a Flash Conference Bridge.
Aretta Introduces Free NetPBX. In an industry first, Aretta Communications is rolling out a free Asterisk hosted solution known as NetPBX Free Edition. The only cost is for the minutes you use, and the free hosted service will support one inbound or outbound call at a time. Everything including the SIP trunking is preconfigured so the system is literally plug-and-play. We'll provide a more in-depth review once we've had some time to play.
whos.amung.us If you're wondering what your fellow man is reading on Nerd Vittles these days, wonder no more. Visit our new whos.amung.us statistical web site and check out what's happening. It's a terrific resource both for us and for you.
Special Thanks to Our Generous Sponsors
FULL DISCLOSURE: ClearlyIP, Skyetel, Vitelity, DigitalOcean, Vultr, VoIP.ms, 3CX, Sangoma, TelecomsXchange and VitalPBX have provided financial support to Nerd Vittles and our open source projects through advertising, referral revenue, and/or merchandise. As an Amazon Associate and Best Buy Affiliate, we also earn from qualifying purchases. We’ve chosen these providers not the other way around. Our decisions are based upon their corporate reputation and the quality of their offerings and pricing. Our recommendations regarding technology are reached without regard to financial compensation except in situations in which comparable products at comparable pricing are available from multiple sources. In this limited case, we support our sponsors because our sponsors support us.
BOGO Bonaza: Enjoy state-of-the-art VoIP service with a $10 credit and half-price SIP service on up to $500 of Skyetel trunking with free number porting when you fund your Skyetel account. No limits on number of simultaneous calls. Quadruple data center redundancy. $25 monthly minimum spend required. Tutorial and sign up details are here.
The lynchpin of Incredible PBX 2020 and beyond is ClearlyIP components which bring management of FreePBX modules and SIP phone integration to a level never before available with any other Asterisk distribution. And now you can configure and reconfigure your new Incredible PBX phones from the convenience of the Incredible PBX GUI.
VitalPBX is perhaps the fastest-growing PBX offering based upon Asterisk with an installed presence in more than 100 countries worldwide. VitalPBX has generously provided a customized White Label version of Incredible PBX tailored for use with all Incredible PBX and VitalPBX custom applications. Follow this link for a free test drive!
Special Thanks to Vitelity. Vitelity is now Voyant Communications and has halted new registrations for the time being. Our special thanks to Vitelity for their unwavering financial support over many years and to the many Nerd Vittles readers who continue to enjoy the benefits of their service offerings. We will keep everyone posted on further developments.
Some Recent Nerd Vittles Articles of Interest...
Google Voice: Is the SIP and Asterisk Honeymoon Over?
"Well. That was quick." Not encouraging words to hear from your new best friend. Google doesn’t make many mistakes so let’s give their decision to shut down SIP connectivity to Google Voice a little more time to percolate before concluding that they’ve thrown the baby out with the bathwater. The knee-jerk reaction is simply to write off Google as having about as much technical and business savvy in the VoIP market as AOL demonstrated… twice. But that’s not the Google many of us have known and done business with. And it’s the antithesis of everything Google Android and the company have sought to promote.
Update: The original SIP interface to Google Voice described in this posting no longer works. A new approach that really works is now available on Nerd Vittles at this link.
For the record, let’s back up a minute and review what transpired. Last Monday we (and others) released a tutorial showing users how to almost transparently connect Google Voice to Asterisk® PBXs as either a SIP extension or a trunk. The beauty of this was that it added a great new, low-cost telephony provider to the worldwide mix. The short-term advantage to Asterisk users was that calls within the U.S. currently were free although Google already has announced that those darn "accountants" have told them that they’re going to be forced to charge for the service one day soon. Cough cough!
In the process of testing this SIP connectivity, what we discovered was the only layer of protection standing between your wallet and free worldwide phone calls for every creep on the planet was a 4-digit PIN. That translates into 10,000 SIP calls to break into any user’s account. Even without the assistance of BOTs, that afforded your shiny new Google Voice account less than an hour of protection with a well-written SIP dialer and no added protection from Google Voice. By Friday, Google had closed the hole and blocked all SIP connectivity except for Gizmo.
The simple solution to open up safe SIP connectivity to Google Voice would be the addition of either an IP address field or a SIP URI in the Google Voice configuration options. SIP calls to and from that address would be allowed. All other calls would be blocked.
And why is this a good idea? First, it promotes the SIP open source standard. See Andy Abramson’s blog for a thought-provoking analysis of where this could ultimately lead. Second, it brings Google Voice connectivity to an enormous pool of users most of whom are tech-savvy and influential in the VoIP marketplace. Millions of Asterisk systems already have been deployed worldwide. Third, it’s the right business decision. Can you spell S-K-Y-P-E? At a time when Skype is opening up its network to SIP connectivity through Skype for SIP and Skype for Asterisk not to mention corded and cordless telephones, what possible business case could be made for introduction of a closed-platform VoIP service with no outside connectivity except through MaBell landlines? Hello!
This may come as a shocker to the Google accountants, but the call pricing and the double-hoop outbound dialing through Click2Dial aren’t that great. Comparable SIP call pricing is available from thousands of providers worldwide. And voice transcription through the Click2Dial voicemail service is downright horrendous. We proved that quickly with our Google Voice demo system.
It comes down to this. The one truly distinguishing factor with Google Voice is Google. At a time when Google has been at the forefront of open source telephony in the cellphone space with Android, the current Google Voice design is a giant step backwards. Rumor has it that Ma Bell had an offering that rang phones in multiple locations about 70 years ago. It was called a Party Line. How are they doing with that? We hope Google does the right thing and opens its new service to safe SIP connectivity. It’s the right and the bright thing to do.
The Honeymoon Ain’t Over… The Return of Googlified Messaging With Free U.S. Calling
Special Thanks to Our Generous Sponsors
FULL DISCLOSURE: ClearlyIP, Skyetel, Vitelity, DigitalOcean, Vultr, VoIP.ms, 3CX, Sangoma, TelecomsXchange and VitalPBX have provided financial support to Nerd Vittles and our open source projects through advertising, referral revenue, and/or merchandise. As an Amazon Associate and Best Buy Affiliate, we also earn from qualifying purchases. We’ve chosen these providers not the other way around. Our decisions are based upon their corporate reputation and the quality of their offerings and pricing. Our recommendations regarding technology are reached without regard to financial compensation except in situations in which comparable products at comparable pricing are available from multiple sources. In this limited case, we support our sponsors because our sponsors support us.
BOGO Bonaza: Enjoy state-of-the-art VoIP service with a $10 credit and half-price SIP service on up to $500 of Skyetel trunking with free number porting when you fund your Skyetel account. No limits on number of simultaneous calls. Quadruple data center redundancy. $25 monthly minimum spend required. Tutorial and sign up details are here.
The lynchpin of Incredible PBX 2020 and beyond is ClearlyIP components which bring management of FreePBX modules and SIP phone integration to a level never before available with any other Asterisk distribution. And now you can configure and reconfigure your new Incredible PBX phones from the convenience of the Incredible PBX GUI.
VitalPBX is perhaps the fastest-growing PBX offering based upon Asterisk with an installed presence in more than 100 countries worldwide. VitalPBX has generously provided a customized White Label version of Incredible PBX tailored for use with all Incredible PBX and VitalPBX custom applications. Follow this link for a free test drive!
Special Thanks to Vitelity. Vitelity is now Voyant Communications and has halted new registrations for the time being. Our special thanks to Vitelity for their unwavering financial support over many years and to the many Nerd Vittles readers who continue to enjoy the benefits of their service offerings. We will keep everyone posted on further developments.
Some Recent Nerd Vittles Articles of Interest…
SIP Proxies Make Asterisk Shine and Save You Money
We're going to take a break today and have a little fun by showing how to quickly connect to any other Asterisk® system to make free calls forever! It's been a long time since we discussed SIP proxies and some newer members of the Asterisk community may not appreciate what a cost-saving feature SIP proxies can be in your Asterisk system particularly if you, or your friends, or your business associates have other Asterisk systems in far away places. And, for the experts, yes, we're going to talk about Dundi soon. But, for today, we'll add a little FreePBX secret that wasn't even covered in the excellent FreePBX Training Seminar last week.
To get started, we're going to use dyndns.org as our dynamic SIP proxy server, i.e. to translate fully-qualified domain names (FQDNs) into IP addresses for Asterisk servers. In short, it works much like a DNS server. You type in a domain name, and the SIP proxy server looks up the IP address for you. Why does this all matter you might be asking? Well, when you have access to a "phone number" or account on a remote Asterisk server, you can reach that number through the Internet without paying any connection fees to any hosting provider. In fact, you don't even need a hosting provider to make today's exercise work. It's a pure point-to-point SIP connection from your Asterisk server to another Asterisk server. Think of it as a Skype-to-Skype call: connect for free, talk forever, pay nothing.
The Nerd Vittles Demo. Let's begin with a quick little demo to show how powerful the technology really is. We're going to assume you have an Asterisk system configured with FreePBX such as PBX in a Flash. If not, you'll have to do some reading between the lines. So we're going to add an entry to /etc/asterisk/extensions_custom.conf so that you can make a direct call to our demo hosted server at Aretta Communications in Atlanta by dialing D-E-M-O from any extension on your system. This demo also will give you a good idea why hosted service rocks since our Aretta-hosted PBX in a Flash server is sitting one millisecond off the Internet backbone.
To set this up at your end, log into your Asterisk server as root and issue the following commands only if you don't already have an extension 3366 (demo) on your system. Otherwise, edit the script and change 3366 to an available extension on your PBX.
cd /root
wget http://pbxinaflash.net/scripts/demo.pbx
chmod +x demo.pbx
./demo.pbx
Now go to any phone connected to your Asterisk server and dial D-E-M-O. NOTE: For those using FreePBX 2.4, you may need to add a Misc Destination. If so, call it Demo and enter 3366 as the number to dial. Reload the dialplan when prompted and try the call again. None of the demo apps require a password except for MailCall, option 1. The password is 1234.
Rolling Your Own on the Server-Side Now that you've seen how this works, you're probably wondering how to roll your own. This could be used for dialing into your Asterisk server from any other Asterisk server on the planet. So here's how to set up the server-side of a Poor Man's SIP server:
First, we'd recommend you obtain a fully-qualified domain name from dyndns.org and point it to the IP address of your Asterisk server. This isn't absolutely necessary provided your Asterisk server doesn't have a dynamic IP address. Obviously, if it has a dynamic IP address and your provider changes your IP address, then the SIP route must be adjusted at the client ends that will be making calls to your system.
Second, if you have a default incoming route, do NOT change the No setting for Allow Anonymous Inbound SIP Calls in the General Setting section of FreePBX. Otherwise, anyone can access your PBX from anywhere.
What we want to do instead of opening your system up to total anonymous SIP access is open a small hole for access to a specific extension or IVR (in the case of the demo). So here's how we did it for the demo above on the host system. This hole would normally be added in /etc/asterisk/extensions.conf; however, FreePBX "owns" that file and rewrites it periodically so we don't want to put our new code there. Instead, we will copy the code block from extensions.conf that we want to modify to /etc/asterisk/extensions_override_freepbx.conf. And then we'll add our changes there. Then our modifications won't get stepped on by the next FreePBX reload. The piece we want including our changes (in bold) is shown below so just cut-and-paste it into extensions_override_freepbx.conf. Be sure to examine the quotation marks to be sure WordPress hasn't converted anything to fancy quotes!!
[from-sip-external]
exten => _.,1,NoOp(Received incoming SIP connection from unknown peer to ${EXTEN})
exten => _.,n,Set(DID=${IF($["${EXTEN:1:2}"=""]?s:${EXTEN})})
exten => _.,n,Goto(s,1)
exten => s,1,GotoIf($["${ALLOW_SIP_ANON}"="yes"]?from-trunk,${DID},1)
exten => 3366,1,Goto(from-trunk,${DID},1)
exten => demo,1,Goto(from-trunk,3366,1)
exten => s,n,Set(TIMEOUT(absolute)=15)
exten => s,n,Answer
exten => s,n,Wait(2)
exten => s,n,Playback(ss-noservice)
exten => s,n,Playtones(congestion)
exten => s,n,Congestion(5)
exten => h,1,NoOp(Hangup)
exten => i,1,NoOp(Invalid)
exten => t,1,NoOp(Timeout)
Once you've saved the new code, reload your dialplan: asterisk -rx "dialplan reload". Now all we have to do is add an Inbound Route in FreePBX to handle incoming SIP calls to 3366. Click Setup, then Inbound Routes, then Add Incoming Route. For the DID, enter 3366. For the destination, choose an extension, ring group, or IVR to which you want to pass these calls. Submit your change and reload the dialplan when prompted to do so. Your new demo and 3366 anonymous SIP calls are now locked down so that the bad guys can't get into mischief. Remember, no one has to dial a DID (revealing their identity) with anonymous SIP calls... hence the name. All they need is an Internet connection.
Limiting Access By IP Address. In a business environment between branch offices, for example, you might want to further restrict access through direct SIP connections. There's an easy way to do it. Simply replace the 3366 and demo lines of code above with the following using the correct IP address from which you want to permit access. Fancy quote alert applies here, too. All the quotes must look like plain old quotes, not magazine quotes!1
exten => 3366,n,GotoIf($["${SIPCHANINFO(peerip)}"=↩
"69.59.142.143"]?from-trunk,${DID},1)
exten => demo,n,GotoIf($["${SIPCHANINFO(peerip)}"=↩
"69.59.142.143"]?from-trunk,3366,1)
Avoiding NAT Problems. If you get failed calls after setting up both ends, then you may have NAT issues with your router. Add the following code to /etc/asterisk/sip_additional_custom.conf and reload your dialplan:
[from-trunk]
type=user
nat=yes
insecure=very
dtmfmode=rfc2833
context=from-trunk
canreinvite=no
disallow=all
allow=ulaw
allow=gsm
Rolling Your Own on the Client-Side. For anyone that wants to call "SIP direct" to your system, they would simply add an entry in the [from-internal-custom] context of /etc/asterisk/extensions_custom.conf that looks like either one of the following. Either syntax works for the SIP call to the host server since we inserted entries for both 3366 and demo in the from-sip-external context on the host server. Substitute the FQDN or IP address of your own host server for our extra special one (nerdvittles.kicks-ass.net) unless you want to call our demo, of course.
exten => 3366,1,Dial(SIP/3366@nerdvittles.kicks-ass.net) ; demo from Nerd Vittles
or...
exten => 3366,1,Dial(SIP/demo@nerdvittles.kicks-ass.net) ; demo from Nerd Vittles
Now users on the client-side PBX can dial 3366 from any attached phone to reach the destination you set up on the host server. Enjoy!
Free DID and Free Incoming Calls with IPkall. There's one more really cool thing you can do now that you've mastered setting up SIP proxies with Asterisk. You can sign up for a free DID with free incoming calls to your very own Seattle phone number just like Bill Gates. Here's how:
First, in your extensions_override_freepbx.conf file that we created above, add another line that looks like the following and place it just under the demo line in bold. Change the 701 extension to match an actual ring group or extension number on your system and then reload your dialplan: asterisk -rx "dialplan reload".
exten => ipkall,1,Goto(from-trunk,701,1)
Second, go to dyndns.org and sign up for a dynamic host name with the external IP address of your Asterisk system. You can use any name you like... except nerdvittles.kicks-ass.net. That's already taken.
Third, go to IPkall's web site and fill out the form to get your free DID in Seattle. Choose SIP. Choose an area code for your free phone number. For your SIP phone number, enter ipkall. For your SIP proxy, insert the fully-qualified domain name that you chose from dyndns.org. Or you can just use the public IP address of your Asterisk server. Insert your real email address (or you'll never get your phone number) and create a password. Then wait for your email message with your new telephone number. Now call yourself on the number you just received. It doesn't get much easier than that.
Telephone Reminders Update. In case you missed the fun last month, be sure to read all about our new Telephone Reminders System for Asterisk 1.4 that provides phone and web access to schedule reminders. And, we've now added a few more requested features. First, you now can not only review reminders that have been scheduled, but you also can delete those you no longer want. And all of this still is done from the convenience of your web browser. Now you also can send reminders straight to an intercom/paging device on your system as well as directly to voicemail. For details, visit the PBX in a Flash Forum.
Special Thanks to Our Generous Sponsors
FULL DISCLOSURE: ClearlyIP, Skyetel, Vitelity, DigitalOcean, Vultr, VoIP.ms, 3CX, Sangoma, TelecomsXchange and VitalPBX have provided financial support to Nerd Vittles and our open source projects through advertising, referral revenue, and/or merchandise. As an Amazon Associate and Best Buy Affiliate, we also earn from qualifying purchases. We’ve chosen these providers not the other way around. Our decisions are based upon their corporate reputation and the quality of their offerings and pricing. Our recommendations regarding technology are reached without regard to financial compensation except in situations in which comparable products at comparable pricing are available from multiple sources. In this limited case, we support our sponsors because our sponsors support us.
BOGO Bonaza: Enjoy state-of-the-art VoIP service with a $10 credit and half-price SIP service on up to $500 of Skyetel trunking with free number porting when you fund your Skyetel account. No limits on number of simultaneous calls. Quadruple data center redundancy. $25 monthly minimum spend required. Tutorial and sign up details are here.
The lynchpin of Incredible PBX 2020 and beyond is ClearlyIP components which bring management of FreePBX modules and SIP phone integration to a level never before available with any other Asterisk distribution. And now you can configure and reconfigure your new Incredible PBX phones from the convenience of the Incredible PBX GUI.
VitalPBX is perhaps the fastest-growing PBX offering based upon Asterisk with an installed presence in more than 100 countries worldwide. VitalPBX has generously provided a customized White Label version of Incredible PBX tailored for use with all Incredible PBX and VitalPBX custom applications. Follow this link for a free test drive!
Special Thanks to Vitelity. Vitelity is now Voyant Communications and has halted new registrations for the time being. Our special thanks to Vitelity for their unwavering financial support over many years and to the many Nerd Vittles readers who continue to enjoy the benefits of their service offerings. We will keep everyone posted on further developments.
Some Recent Nerd Vittles Articles of Interest...
- Join the following line to the original line of code whenever you encounter the ↩ character. [↩]