Home » Posts tagged 'sip' (Page 13)

Tag Archives: sip

The Most Versatile VoIP Provider: FREE PORTING

Practicing Safe SIP: Adding SIP URI and Free DID Connectivity to Asterisk

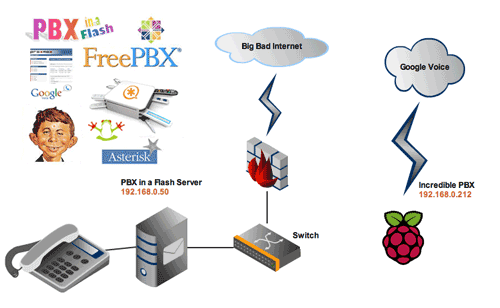
Last year, we began our exploration of safe SIP options for Asterisk® by introducing a hybrid solution using VoIP.ms for a registered SIP trunk and IPkall for a free DID. Today, in addition to a free IPkall DID to accept incoming PSTN calls, we have a slightly different approach that provides a direct SIP URI address from Sip2Sip.info for your server. As with the original tutorial, today’s implementation preserves our Zero Internet Footprint™ design for total SIP insulation of your server from the Internet. And all of the components to deploy today’s solution are completely free.

PBX in a Flash™ has a long (safe) history in the VoIP community, and the major reason is that we constantly preach never directly exposing any ports on your Asterisk server to the Internet without implementing a WhiteList of safe IP addresses. This Zero Internet Footprint™ design keeps everybody out except a trusted, defined group on your WhiteList. For everyone else, they never see your server. So how do you receive calls?

You do it with phone numbers (DIDs) or SIP URIs tied to registered Google Voice, SIP, and IAX trunks from reputable providers. Because these trunks have constant registrations with safe service providers on the Internet, calls to these DIDs and SIP URIs can flow in and out of your server without exposing your server directly to the Internet. Callers still can contact you, but they do it through an intermediary with whom you have a registered SIP trunk. Thus, the SIP vulnerability (if there is any) remains with the SIP provider and never with your server directly.

For today’s tutorial, we’ll be using the latest and greatest PIAF-Green™ Virtual Machine featuring Asterisk 11 and FreePBX® 2.11. We also recommend installation of Incredible PBX™ 11 which includes Travelin’ Man™ 3 to provide secure WhiteList management for your Asterisk firewall. Here are links to the PIAF-Green VM with Incredible PBX 11 as well as the Travelin’ Man 3 tutorial to get you started. We recommend you configure this using a VirtualBox® virtual machine on your favorite desktop computer just to get comfortable with the setup. Then you can repeat the drill using a dedicated or cloud-based server once you’ve mastered the basics. All of today’s setup will work without making any adjustments to your hardware-based firewall which should be sitting between your desktop computer and the Internet.

Registering for a Sip2Sip Account. Once you have the VoIP platform in place with Asterisk 11, FreePBX 2.11, Incredible PBX 11, and Travelin’ Man 3, you’re ready to add a SIP trunk from Sip2Sip.info. Just sign up for a free account on their site leaving the Account Name field blank. They will email you your credentials. Click on the provided link in the email to access your new account at http://x.sip2sip.info. Your account name will consist of a 10-digit-number@sip2sip.info. To log in, use the default SIP address as shown and leave the password field blank. Then click Login Now. Immediately click on the settings tab, choose an 8-digit numeric password, disable your Voice Mailbox, and click the SAVE button. Your Sip2Sip account is now secure unless someone is lucky enough to guess your password from the 100 million possibilities. You’ll need your 10-digit SIP account number and password to set up your SIP trunk on your Asterisk 11 server in the next step so write them down and then log out of your Sip2Sip account!

FreePBX and Asterisk Configuration Overview. Using a web browser, log into FreePBX® on your server. We’ll need to create several items to get everything working. First, we’ll add a new SIP trunk with your Sip2Sip credentials to handle incoming calls. Second, we’ll add a Custom Trunk to handle outbound calls to Sip2Sip. Third, we’ll add an Inbound Route to process incoming calls. Fourth, we’ll add an Outbound Route so that you can make calls using your outbound Sip2Sip trunk. Calls to other Sip2Sip numbers are free. For the rest, you’ll pay a per minute fee. Whether to use the pay service is completely up to you! Finally, we’ll log into your server as root and add Sip2Sip to your IPtables WhiteList and make two manual adjustments to the Asterisk dialplan to accommodate Sip2Sip’s way of handling SIP calls. Then we’ll restart Asterisk, and you’re done.

  1. Connectivity -> Trunks -> Add SIP Trunk
  2. Connectivity -> Trunks -> Add Custom Trunk
  3. Connectivity -> Inbound Routes -> Add Incoming Route
  4. Connectivity -> Outbound Routes -> Add Route
  5. Enable Sip2Sip in your IPtables WhiteList
  6. Add srvlookup=yes in sip_general_custom.conf
  7. Set enable=yes in dnsmgr.conf
  8. Restart Asterisk: amportal restart

Adding Sip2Sip SIP Trunk. While logged into FreePBX 2.11, choose Connectivity -> Trunks -> Add SIP Trunk. Fill out the form like this using your Sip2Sip 10-digit number and password. Unlike some trunk setups, entering your actual 10-digit Sip2Sip number as the Outbound Caller ID is mandatory, or inbound calls will be rejected by your server. Replace 223XXXXXXX with your actual 10-digit Sip2Sip number in the five places shown below. Replace 12345678 with your actual Sip2Sip password in the two places shown below.

  1. Trunk Name: Sip2Sip
  2. Outbound Caller ID: 223XXXXXXX
  3. Dial Pattern: leave blank
  4. Trunk Name: sip2sip
  5. Trunk Details:
    • type=peer
    • canreinvite=no
    • nat=yes
    • qualify=yes
    • domain=sip2sip.info
    • fromdomain=sip2sip.info
    • outboundproxy=proxy.sipthor.net
    • fromuser=223XXXXXXX
    • defaultuser=223XXXXXXX
    • secret=12345678
    • insecure=invite
    • context=from-trunk
    • host=sip2sip.info&81.23.228.129&81.23.228.150&85.17.186.7
  6. Register String: 223XXXXXXX:12345678@sip2sip.info/223XXXXXXX

Adding Sip2Sip Custom Trunk for Outbound Calling. While logged into FreePBX 2.11, choose Connectivity -> Trunks -> Add Custom Trunk. Fill out the form like this using the entries below:

  1. Trunk Name: sip2sip-out
  2. Dialed Number Matched Pattern: 223NXXXXXX
  3. Custom Dial String: SIP/$OUTNUM$@sip2sip.info

Adding Inbound Route. Next you need to tell FreePBX how to process incoming calls from your Sip2Sip number. Choose Connectivity -> Inbound Routes -> Add Incoming Route and fill out the form to look like this. Change the destination to match whatever you prefer: an extension, ring group, IVR, etc. If you followed last week’s tutorial to install Lenny Encore, then you can choose Lenny as your destination as well.

Adding Outbound Route. Next you need to tell FreePBX how to process outbound calls to your Sip2Sip account. Choose Connectivity -> Outbound Routes -> Add Route and fill out the form to look like this. After you have saved your entries, make certain that you drag the sip2sip-out route to the top of your Outbound Route List (on the right side). Otherwise, 10-digit Sip2Sip calls may inadvertently be processed by one of your other trunks that handles 10-digit numbers. The 3333 and 4444 numbers are test accounts at Sip2Sip to enable you to try out connectivity.

Adding Sip2Sip to Your IPtables WhiteList. We’re assuming you already have installed Travelin’ Man 3 and secured your server by running /root/secure-iptables. If not, start there. Now we need to enable UDP SIP connectivity for Sip2Sip in your WhiteList by running the following commands while logged in as root:

/root/add-fqdn sip2sip sip2sip.info
/root/add-ip sip2sip1 81.23.228.129
/root/add-ip sip2sip2 81.23.228.150
/root/add-ip sip2sip3 85.17.186.7

Making Asterisk Dialplan Adjustments. While still logged into your server as root, issue the following commands to finish up enabling Sip2Sip URI support in Asterisk. The last command verifies that your Sip2Sip trunk is actually registered.

echo "enable=yes" >> /etc/asterisk/dnsmgr.conf
echo "srvlookup=yes" >> /etc/asterisk/sip_general_custom.conf
amportal restart
asterisk -rx "sip show registry"

Adding an IPkall DID for Your SIP URI. We’ve now completed all the steps necessary to receive incoming SIP URI calls using your new Sip2Sip URI: 323XXXXXXX@sip2sip.info. Anyone in the world can dial that SIP URI from a SIP phone, and the calls will be answered by your server. But suppose we’d also like folks to be able to pick up a Plain Old Telephone and call using Sip2Sip.info to route the incoming call through the SIP URI. Here’s the easy way to do it. Just sign up for a free DID at www.ipkall.com. After choosing an area code for your free number, you’ll be prompted for the following information. Here’s what you’d enter using today’s example:

  • Sip2Sip Phone Number: 323XXXXXXX
  • SIP Proxy: sip2sip.info
  • Email Address: your-email-address
  • Password: some-password-to-get-back-into-your-account

Once you’ve completed the form, submit it and wait for your new phone number to be delivered in your email. You should get it within a couple minutes so check your spam folder if you don’t see it. Congratulations! You’ve done everything you need to do for anyone to call you using either your Sip2Sip URI or your new DID number from IPkall.

It’s worth noting that IPkall recycles DIDs that aren’t used for 30 days. If you use Incredible PBX, the easiest way to assure you don’t lose your number is to set up a weekly recurring Telephone Reminder that calls your IPkall number.

Adding SIP URI Dialing with Your Own Domain. Thanks to a great tip from @w1ve on the PIAF Forum, you now can create free SIP URIs using your own domain. Here’s how.

Troubleshooting. If you experience intermittent congestion issues with attempted connections to your SIP URI, try the [from-sip-external] trick outlined in our PIAF Forum posting.

Add Free Calls to 40 Million Asterisk Servers with e164.org. While we’re on a roll of free calling, here’s a simple way to add free calling to 40 million Asterisk servers around the world. Just add your name and phone numbers to the e164.org registry at no cost and configure FreePBX with ENUM support. Then outbound calls to numbers in the e164 registry will always be free as well. The whole setup takes less than 10 minutes. Here’s how.

You already have a SIP URI for your Asterisk server from the Sip2Sip setup above. Now let’s get you signed up with an account on e164.org. Go to the web site and click the Sign Up tab. Go through the sign up drill and then log into your new account. Then click the Phone Numbers tab and add your IPkall phone number to e164. If you have additional DIDs, enter the area code and number for each of them. Then click the Next button. You’ll be warned about not having the number you’ve specified redirected to an IVR. If you already have this DID redirected to an IVR, change the routing temporarily to an extension that you can answer to obtain your PIN before you press Next to proceed. You’ll then be prompted for the SIP address to contact your server. Leave the default SIP protocol and plug in the address you were assigned by Sip2Sip. As soon as you click the Next button, your phone should start to ring, but there may not be a message when you answer. Hang up and wait for the second call within 15 minutes. It will include your PIN. Now click on the Phone Numbers tab and update your phone entry by choosing Enter PIN and typing your assigned PIN. Your phone number now has been activated with the e164 service. To complete the setup, you’ll want to click on the Do Not Call option and make your selections. You also can decide whether to list yourself in the ENUM White Pages directory.

Remember that the real purpose of this drill is to avoid charges when you place outbound calls to numbers in the ENUM directory. We merely added your numbers to e164.org so that others could benefit as well. So the final step before you can start saving money is to configure FreePBX to handle ENUM lookups for outbound calls from your server. One more observation may be helpful. You’ll recall that one of the limitations of FreePBX has always been that once an outbound route was chosen for a call, if the call was completed using the first destination trunk in that route, then the call processing ended there. ENUM adds a new wrinkle because we basically want to connect to ENUM to check for a free route and, if no matching entry is found, then we want the next trunk to process the call. As luck would have it, FreePBX has been tweaked to allow this scenario. All you have to do is create an ENUM trunk and then place it first in your sequence of trunks for each of your outbound routes. If an ENUM entry is found for the number you’re calling, the call will be routed as a free call with a direct SIP connection. Otherwise, the call processing will continue and the call will be routed using the next trunk specified in your outbound route.

There are two steps in FreePBX to implement ENUM. First, create a special ENUM trunk. Second, adjust your Outbound Routes to process outbound calls using the ENUM trunk first. Then the series of trunks you already have specified in each outbound route will be triggered if there is no ENUM path for your call. NOTE: You obviously wouldn’t do this for an emergency 911 outbound route.

In FreePBX, click Connectivity -> Trunks, Add ENUM Trunk. Enter your desired CallerID for these calls. Set a maximum number of channels, if desired, and then leave the other entries blank in most cases. Save your settings and reload your dialplan. Now click Connectivity -> Outbound Routes and adjust the sequence of trunks for each of your existing routes. Be sure to put ENUM in the top position of each desired route. Also make certain that all calls are dialed with a dial string of 1NXXNXXXXXX or NXXNXXXXXX with a Prepend entry of 1 as shown below. Enjoy!


Don’t forget to List Yourself in Directory Assistance so everyone can find you by dialing 411. And add your new number to the Do Not Call Registry to block telemarketing calls. Or just call 888-382-1222 from your new number.


Deals of the Week. There’s still one amazing deal on the street, but you’d better hurry. A new company called Copy.com is offering 20GB of free cloud storage with no restrictions on file size uploads (which are all too common with other free offers). Copy.com has free sync apps for Windows, Macs, and Linux systems. To take advantage of the offer, just click on our referral link here. We get 5GB of extra storage which will help avoid another PIAF Forum disaster.

Originally published: Monday, August 19, 2013


Need help with Asterisk? Visit the PBX in a Flash Forum.


Don’t miss the first-ever FreePBX World on August 27-28 at the Mandalay Bay in Las Vegas. For complete details, see this post on the FreePBX blog.


We are pleased to once again be able to offer Nerd Vittles’ readers a 20% discount on registration to attend this year’s 10th Anniversary AstriCon in Atlanta. Here’s the Nerd Vittles Discount Code: AC13NERD.


Special Thanks to Our Generous Sponsors


FULL DISCLOSURE: ClearlyIP, Skyetel, Vitelity, DigitalOcean, Vultr, VoIP.ms, 3CX, Sangoma, TelecomsXchange and VitalPBX have provided financial support to Nerd Vittles and our open source projects through advertising, referral revenue, and/or merchandise. As an Amazon Associate and Best Buy Affiliate, we also earn from qualifying purchases. We’ve chosen these providers not the other way around. Our decisions are based upon their corporate reputation and the quality of their offerings and pricing. Our recommendations regarding technology are reached without regard to financial compensation except in situations in which comparable products at comparable pricing are available from multiple sources. In this limited case, we support our sponsors because our sponsors support us.

BOGO Bonaza: Enjoy state-of-the-art VoIP service with a $10 credit and half-price SIP service on up to $500 of Skyetel trunking with free number porting when you fund your Skyetel account. No limits on number of simultaneous calls. Quadruple data center redundancy. $25 monthly minimum spend required. Tutorial and sign up details are here.

The lynchpin of Incredible PBX 2020 and beyond is ClearlyIP components which bring management of FreePBX modules and SIP phone integration to a level never before available with any other Asterisk distribution. And now you can configure and reconfigure your new Incredible PBX phones from the convenience of the Incredible PBX GUI.

VitalPBX is perhaps the fastest-growing PBX offering based upon Asterisk with an installed presence in more than 100 countries worldwide. VitalPBX has generously provided a customized White Label version of Incredible PBX tailored for use with all Incredible PBX and VitalPBX custom applications. Follow this link for a free test drive!
 

Special Thanks to Vitelity. Vitelity is now Voyant Communications and has halted new registrations for the time being. Our special thanks to Vitelity for their unwavering financial support over many years and to the many Nerd Vittles readers who continue to enjoy the benefits of their service offerings. We will keep everyone posted on further developments.


Some Recent Nerd Vittles Articles of Interest…

The SIPaholic’s Dream Come True: Introducing Anveo Direct

We’re incredibly happy with the current list of providers that we recommend to PBX in a Flash™ users for VoIP trunking. At the top of our list is Vitelity, a leading VoIP provider that has been a major contributor to the Nerd Vittles and PBX in a Flash projects for many years. But, as often happens, one of our gurus on the PIAF Forum comes up with a terrific discovery that we just can’t wait to pass along. This week it was @w1ve who stumbled upon a new Anveo® Direct service for end-users with a special DID and SIP trunk offer. While the sub-account flexibility of Vitelity and some of the other providers is sorely missing, Anveo Direct does provide end-users with many of the same routing tools and SIP feature set that previously were reserved for use by major carriers. If you don’t believe some of the competition is less than thrilled, read this message thread on dslreports.com. And, until June 1, you can order DIDs in almost any U.S. region for 50¢ a month per DID with no setup fee. With Anveo Direct Value, that 50¢ buys you two trunks with 400 free incoming minutes a day. Outbound calls are pay-as-you-go and vary depending upon where you’re calling. Typical U.S. rates are $.001 to $.0055 per minute with least cost routing and automatic failover when a particular carrier’s route is having problems. As a point of reference, sending a one-page fax using Incredible Fax costs less than a penny and worked flawlessly using Anveo’s least costly routes.

DIDs also are available in more than 50 countries around the world, and all setup fees are waived until June 1. Most European DIDs are $1 or less per month. You’ll find the complete price list here. It’s worth mentioning that the 400 free incoming minutes a day applies collectively to all of your DIDs, not individually to each one. Additional incoming calls each day are billed at a penny a minute. The alternative is to purchase dedicated Anveo Direct trunks which provide unlimited inbound calling (one call at a time) for a monthly charge of $17 per trunk (worldwide), $11.25 per trunk (U.S. and Canada), or $6.50 per trunk (most of Europe). Monthly DID prices then are roughly 50% less.

Another nice surprise is that most of the DIDs include SMS messaging support. Incoming SMS messages are billed at a penny per message. Outbound SMS messages are routed through Europe and are billed at 4.4¢ per message. Unlike most providers, Anveo gives you the flexibility to configure your carriers and routes in almost any way you like. And there’s no proxy media so voice calls are passed directly from the carrier to your SIP endpoint. Anveo actually began as a wholesale provider of Voxbone services. With Anveo Direct, virtually all of the functions offered to commercial providers are now available to everybody. Along with fully redundant architecture and automatic SIP failover, Anveo offers you a choice of POPs in New York and Los Angeles as well as in Germany, Belgium, and China.

I know. I hear some of you saying, "Why would I want to pay good money for a DID when U.S. and Canadian calls plus the DIDs that Google Voice currently provides are all free?" Setting aside the ups and downs of Google Voice with Asterisk® over the years, it’s worth remembering that good things don’t last forever, and the word on the street is that Google’s generosity ship may be about to sail. In fact, it already has with worldwide iNum calls which Google originally handled for free. Now they’re 3¢ a minute even when calling across the street. Also keep in mind that, with VoIP, it costs you almost nothing to have a number of backup providers in place for that rainy day.

If you’ve used IPkall that provides free DIDs in the Seattle area with call routing to any SIP URI, then you will be generally familiar with the setup process for Anveo DIDs. There is no registration facility with Anveo Direct. Incoming calls to your DID are routed to SIP URIs of your choice. Outbound calls are sent to a SIP URI with a 6-character alphanumeric passcode of your choice. If this is all Greek to you, keep reading or stick with Vitelity. :wink:

Configuring a Destination SIP Trunk for Use with Anveo Direct

Before you can successfully configure a DID at Anveo Direct, you’ll first need to set up a SIP URI on your PIAF™ server. There are four initial steps: (1) enabling SIP URI access in your IPtables firewall, (2) mapping UDP 5060 to the IP address of your Asterisk server in your hardware-based firewall, (3) creating a SIP trunk for Anveo in FreePBX®, and (4) creating a custom context for incoming SIP URI calls from Anveo Direct.

Step #1: Just a couple of words of warning before we begin. You’ll need to open port 5060 on your hardware-based firewall and point it to your Asterisk server to use a SIP URI. Before you do that, make certain that you’ve installed Travelin’ Man 3 for PBX in a Flash which blocks inbound SIP connections except from trusted providers. Once Travelin’ Man 3 is installed, you’ll need to add Anveo Direct to your list of trusted providers for SIP connections (UDP 5060) with this command:

/root/add-ip anveo1 50.22.101.14
/root/add-ip anveo2 67.212.84.21
/root/add-ip anveo3 176.9.39.206
/root/add-ip anveo4 72.9.149.25
/root/add-ip anveo5 50.22.102.242
/root/add-ip anveo6 204.216.109.55

If you’re generally familiar with IPtables, you can add the following block of code directly:

-A INPUT -s 50.22.101.14/32 -p udp -m udp --dport 5060:5069 -j ACCEPT
-A INPUT -s 67.212.84.21/32 -p udp -m udp --dport 5060:5069 -j ACCEPT
-A INPUT -s 176.9.39.206/32 -p udp -m udp --dport 5060:5069 -j ACCEPT
-A INPUT -s 72.9.149.25/32 -p udp -m udp --dport 5060:5069 -j ACCEPT
-A INPUT -s 50.22.102.242/32 -p udp -m udp --dport 5060:5069 -j ACCEPT
-A INPUT -s 204.216.109.55/32 -p udp -m udp --dport 5060:5069 -j ACCEPT

Once you’ve completed this step, restart IPtables: service iptables restart. Then run: iptables -nL. Make certain that all of the above IP addresses are in the trusted providers list. Do NOT proceed until you’re sure your server is protected! It’s your phone bill.

Step #2: Now access your hardware-based firewall and map incoming UDP port 5060 traffic to the IP address of your PBX in a Flash server. The exact steps vary slightly depending upon the type of router you have. Look for a tab that deals with redirecting Internet traffic through your router to destination IP addresses.

Step #3: Using a web browser, open the FreePBX Administration GUI by pointing to the IP address of your server. In FreePBX 2.10 and 2.11, choose Connectivity -> Trunks -> Add SIP Trunk. Create an entry that looks like the following removing any other entries in the User Details section of the form. Then save your settings and update the dialplan. If you don’t have success with our settings, try the ones recommended by @w1ve.

Repeat this process by creating five additional SIP trunks named anveo-2, anveo-3, anveo-4, anveo-5, and anveo-6 using the other four IP addresses that Anveo uses to route SIP calls: 67.212.84.21, 176.9.39.206, 72.9.149.25, 50.22.102.242, and 204.216.109.55.

NOTE: If using a PJsip trunk, add these IP addresses in the trunk’s Match= field.

Step #4: Log into your server as root with SSH, and edit /etc/asterisk/extensions_custom.conf. Add the following code to the bottom of the file and save your changes. Then restart Asterisk: amportal restart.

[from-anveo]
exten => _.,1,Ringing
exten => _.,n,Goto(from-trunk,${SIP_HEADER(X-anveo-e164)},1)

Just a word of explanation about why we’re using a custom trunk context for Anveo rather than using the standard from-trunk entry. Because of its environment, Anveo doesn’t pass the DID of the trunk in the traditional way.1 Instead, it passes the DID in a customized SIP header as shown above. If you used from-trunk as the destination for the incoming calls, then FreePBX would process the call using the Default Inbound Route which most sane people map to Hangup or Congestion. By using the custom context above, we can grab the actual DID and use it for FreePBX routing purposes. For Anveo purposes, the actual SIP URI we’ll be using is serverDID@serverIPaddress where the 1904… number in the example is your actual DID which we’ll obtain in the next section. If you have a fully-qualified domain name for your server, you can use that after the @ symbol instead of your server’s public IP address.

Configuring a DID in Anveo Direct

Now that we have almost everything in place on your server, we’re ready to begin today’s adventure with Anveo. For openers, you’ll need to register for an account at Anveo Direct. It’s a simple process. Just click on the Get Started icon on the website and follow your nose. Once you’ve registered and confirmed your email address, login to your account and you’ll find a 60¢ credit for experimentation. Since you can purchase a DID for 50¢ and because it’s prorated to the 15th of this month, you’ll have plenty of money to test out the service without spending a dime.

There are three steps to complete on the Anveo site: (1) purchase a DID, (2) create a SIP URI which will be used to route the calls from a specific DID to your server, and (3) configure the DID to route calls using the SIP URI created in the previous step.

Step #1: If you haven’t already done so, log into your Anveo Direct account. Then purchase a DID in your favorite town. From the Inbound Service pulldown, choose Order Anveo Direct DID. Just fill in the blanks after choosing your desired DID.

Step #2: Choose Inbound Service -> Configure Destination SIP Trunks -> Add a New SIP Trunk. Fill in the blanks as shown below using the DID you created in step #1. Be sure to use the complete DID number. Either an IP address or FQDN is fine after the @ symbol. Then click SAVE.

If you read the "hint" in the form, you will note that you can replace the actual DID number (1904… in our example) with $[E164]$ to make the SIP URI generic. Then you don’t have to create separate SIP URI entries for every DID you purchase. We’re pleased to report that it works as advertised, and we’re using it in our sample trunk so you can try it for yourself.

NOTE: For those using some Incredible PBX builds in which PJsip is assigned port 5060 and chan_sip is assigned port 5061, you should make an adjustment in your incoming dial string: $[E164]$@serverIPaddress:5061.

Step 3: From the Inbound Service pulldown, choose Configure Anveo DIDs. Click on the EDIT tab beside the DID you wish to configure. You’ll get a form that looks like the following:

Choose the Call Options tab and select the SIP URI that you configured in Step #2. Click SAVE.

Choose the Geo. Pop tab and select the POP server closest to you. Click SAVE.

Choose the Codecs tab and select the codecs you wish to enable. We recommend using only G.711u until you’re sure everything is working correctly. Click SAVE.

Completing the FreePBX Setup for Anveo Direct

We’re almost finished. The last step is to create an Inbound Route in FreePBX for the DID you just purchased from Anveo Direct. So jump back over to FreePBX in your browser. Choose Connectivity -> Inbound Routes -> Add Incoming Route. Fill out the form using the complete DID Number, e.g. 1904… Choose a Destination for Incoming Calls that works on your server. It could be an extension, a ring group, an IVR, or any other resource that’s available. In our example, we’ve chosen the Weather Underground application from Incredible PBX. Save your settings and update the dialplan.

Now you’re ready to place your first call, or you can call the number shown above to try out our demo system using Anveo. Ignore the + symbol when dialing calls. It’s not necessary.

Making Outbound Calls with Anveo Direct

If you also want to use Anveo to place outbound calls, all of the rates are per minute. The rate tables can be downloaded from here. Before you can place outbound calls, you’ll need to create a Call Termination Trunk under Outbound Service. In the form, you set up a 6-character code for access to the SIP URI and also specify the IP addresses from which calls can be placed. A sample is shown below. You obviously need to create a VERY secure access code. The code must begin with a zero and may contain any number as well as A-Z and a-z for each character. Once you’re finished, SAVE your settings. This is the area where Anveo’s Least Cost Routing methodology really shines. If you’re cheap (like us), use the settings shown. If you prefer higher quality trunks, change the Carriers to All Carriers. It gets more complicated if you want it to, but these settings will get you started with incredible rates.

The final step is to define a Custom Trunk (AnveoOut) and Outbound Route (AnveoSIP) in FreePBX to send outbound calls to Anveo. Typically, you would specify a dialing prefix (555 in the example) to force certain calls to use the Anveo Direct route. Here’s a sample Custom SIP Trunk to handle the calls. The custom dial string should look like this using your own 6-character code, of course: SIP/012345$OUTNUM$@sbc.anveo.com.

Once you’ve saved your settings, create an Outbound Route for the calls that looks something like what’s shown below. Be sure to add the CallerID number you wish to use for the outbound calls and make the 555 prefix match what you used when you created the Custom Trunk in the last step. When you Save your setup, be sure to move the Outbound Route up the priority list on the right so that these calls get evaluated before your other calling routes.

Receiving SMS Messages with Anveo Direct

To receive SMS messages from Anveo, there’s an SMS tab in the DID configuration menu for each of your DIDs. You must have a web server with PHP 4 or 5 to manage the incoming messages. It’s important to use a file name for the web link that is difficult for people to guess. Otherwise, anybody can bombard you with SMS messages if they happen to guess the web link. Here’s a sample to get you started. In the Anveo SMS tab for your DID, you’d insert something like the following and check the Forward to URL box:

http://myserver.org/smsmessenger.php?from=$[from]$&to=$[to]$&message=$[message]$

On your web server using whatever filename you chose for the smsmessenger.php file, insert the following code replacing the $deliverto contents with your actual email address:


<?php
$deliverto = "youremailname@gmail.com";
$from = $_REQUEST['from'];
$to = $_REQUEST['to'];
$message = $_REQUEST['message'];
$subject="SMS Message from $from to $to";
$comment="SMS Message\n\n FROM: $from\n\nTO: $to\n\nMSG: $message\n\n";
mail("$deliverto", "$subject", "$comment", "$from");
?>

Once this is in place, people can simply send an SMS message to your 11-digit DID, and it will be delivered to the email address you inserted for $deliverto. Incoming SMS messages are a penny apiece.

Sending SMS Messages with Anveo Direct

Sending SMS messages through Anveo Direct is similar to the key procedure used for placing outbound calls. Before you can send SMS messages, however, you’ll need to activate an API account which is free. This gets you an API key. Once you have a key, SMS messages are sent using API requests to https://www.anveo.com/api/v2.asp. Sample PHP scripts to handle the details are available on the Anveo Direct web site. The procedure works well, but the messaging rates are not cheap at 4.4¢ per message. In addition, there appears to be a glitch in the "sent from" feature of the API which results in outbound SMS messages always appearing to come from an international number in the United Kingdom. But, again, the functionality is there, if you need it. For the time being, the SMS messaging functionality built into Incredible PBX is free and much easier to use. See the SMS Dictator article on Nerd Vittles for details. Enjoy!

Originally published: Monday, May 6, 2013


Need help with Asterisk? Visit the PBX in a Flash Forum.
Or Try the New, Free PBX in a Flash Conference Bridge.


whos.amung.us If you’re wondering what your fellow man is reading on Nerd Vittles these days, wonder no more. Visit our new whos.amung.us statistical web site and check out what’s happening. It’s a terrific resource both for us and for you.


Special Thanks to Our Generous Sponsors


FULL DISCLOSURE: ClearlyIP, Skyetel, Vitelity, DigitalOcean, Vultr, VoIP.ms, 3CX, Sangoma, TelecomsXchange and VitalPBX have provided financial support to Nerd Vittles and our open source projects through advertising, referral revenue, and/or merchandise. As an Amazon Associate and Best Buy Affiliate, we also earn from qualifying purchases. We’ve chosen these providers not the other way around. Our decisions are based upon their corporate reputation and the quality of their offerings and pricing. Our recommendations regarding technology are reached without regard to financial compensation except in situations in which comparable products at comparable pricing are available from multiple sources. In this limited case, we support our sponsors because our sponsors support us.

BOGO Bonaza: Enjoy state-of-the-art VoIP service with a $10 credit and half-price SIP service on up to $500 of Skyetel trunking with free number porting when you fund your Skyetel account. No limits on number of simultaneous calls. Quadruple data center redundancy. $25 monthly minimum spend required. Tutorial and sign up details are here.

The lynchpin of Incredible PBX 2020 and beyond is ClearlyIP components which bring management of FreePBX modules and SIP phone integration to a level never before available with any other Asterisk distribution. And now you can configure and reconfigure your new Incredible PBX phones from the convenience of the Incredible PBX GUI.

VitalPBX is perhaps the fastest-growing PBX offering based upon Asterisk with an installed presence in more than 100 countries worldwide. VitalPBX has generously provided a customized White Label version of Incredible PBX tailored for use with all Incredible PBX and VitalPBX custom applications. Follow this link for a free test drive!
 

Special Thanks to Vitelity. Vitelity is now Voyant Communications and has halted new registrations for the time being. Our special thanks to Vitelity for their unwavering financial support over many years and to the many Nerd Vittles readers who continue to enjoy the benefits of their service offerings. We will keep everyone posted on further developments.


Some Recent Nerd Vittles Articles of Interest…

Interconnecting Asterisk Servers with Incredible PBX and the $35 Raspberry Pi

We’ve spent the last couple months perfecting Incredible PBX™ as a full-featured VoIP platform for deployment on the $35 Raspberry Pi®. And, with the recent addition of 512MB RAM on the main system board, the Raspberry Pi not only is a great platform for home or SOHO use, but now it’s an ideal server for remote deployment in organizations with small satellite offices scattered around the countryside or for those with a loved one stationed in a faraway place. It’s especially important for those that want to take advantage of free interoffice communications or perhaps low-cost communications facilities that are only available through the main office headquarters. Our project for today is to show you how easy it is to interconnect these satellite offices, traveling salesmen, and troops stationed on the other side of the globe to provide system-wide, transparent Asterisk® communications at no cost. Using Raspberry Pi devices for the remote office or employee, you can set this up with FreePBX® in less than 5 minutes per site! Once configured, everyone in the organization can call everyone else by simply dialing their extension or a prefix with the local extension number. And finally we’ll show you how to securely share communications trunks at one site with your other locations.

There’s a little advance planning that needs to take place before you actually deploy today’s setup. First, you’ll need to adjust your hardware-based firewalls at each location to allow communications between the various sites. You’ll also need to authorize SIP access for each site in the Linux iptables firewalls. If some or all of the remote sites have dynamic IP addresses, then you’ll either need to deploy a PPTP VPN for your servers or use a service such as DynDNS.com to create fully-qualified domain names for each site. Dynamic IP addresses can be kept current at each site using a dynamic update app such as ddclient. And ipchecker can be run periodically to update IP address changes in iptables. Both apps are available for Incredible PBX on the Raspberry Pi. Finally, some thought needs to go into the extension numbering scheme at each site. The simplest way to is reserve extensions in the 1000 range for the home office, 2000-2999 for office #2, etc. If your organization already has an existing numbering system, then Plan B is to devise a dialing prefix that can be used to access extensions at various sites. For example, you might dial 1-2345 to reach extension 2345 in the main office or 2-2345 to reach extension 2345 in office 2 and so on. Either way works, and Asterisk with FreePBX supports both dialing schemes.

Hardware-Based Firewall Setup. For each site to which you wish to interconnect, you’ll need to add an entry to your hardware-based firewall using the FQDN or IP address of the site with the following ports mapped to your Asterisk server at that site: UDP 5060 and UDP 10000-20000.

IPtables Configuration and Dynamic IP Address Setup. If you have one or more sites whose servers have dynamic IP addresses, then you’ll need fully-qualified domain names for those sites that can be kept current using ddclient on the remote server and ipchecker on the main server. For background, start by reading the Nerd Vittles article on Travelin’ Man 3. You’ll need to deploy this on your main server. It’s already incorporated into the Incredible PBX builds for PBX in a Flash and the Raspberry Pi.

You’ll first need a DynDNS account. For $20 a year, you can set up 30 FQDNs and keep the IP addresses for these hostnames current 24-7. For $30 a year, you can manage 75 hostnames using your own domain and execute up to 600,000 queries a month. That’s more than ample for almost any small business but, if you need more horsepower, DynDNS.com can handle it.

Our Travelin’ Man 3 article will walk you through the steps in setting up iptables entries for your new FQDNs on your main server. On the Raspberry Pi devices, you’ll need to install ddclient: apt-get install ddclient. The installer will walk you through the setup process to keep your dynamic IP addresses synced with your FQDN. You’ll also need to add iptables entries for your main site and any other sites to which you wish to directly connect. In the /root folder, you’ll find scripts to add-fqdn or add-ip entries to iptables. The setup is covered in detail in the Travelin’ Man 3 article so we won’t repeat it here.

Interconnecting Servers with SIP Trunks. For our example today, we’re going to simplify things a bit and show how to interconnect a Main server and a Remote server where both servers are on the same private LAN. The only difference from real life is that you typically would use the public IP addresses of both servers when they are housed in different locations and accessible via the Internet. To avoid the hassle of wrestling with dynamic IP addresses and for added security and encrypted communications, you can interconnect your servers using a PPTP VPN. It’s included in Incredible PBX on all platforms. In configuring your SIP trunks, just substitute the PPTP IP addresses of each server in lieu of public IP addresses. Then you don’t have to worry about dynamic IP addressing issues. And, to add support for additional remote servers, just create separate SIP trunk pairs at the Main and Remote sites with a naming scheme like this: Main1 and Remote1 for adding the first remote site, Main2 and Remote2 for adding the second one, and so on.

Adding a Remote SIP Trunk on Your Main Server. Let’s begin by adding a SIP trunk to your Main Server to support the Remote Raspberry Pi device. We’ll refer to the Remote SIP trunk as remote for our example. Using FreePBX 2.10, choose Connectivity -> Trunks -> Add SIP Trunk. Make up a very secure password to interconnect your two servers. We’ll use it as the secret at both ends. Then fill out the template using the example below. In the Registration String, use the actual IP address or FQDN of your remote server:

Adding the Main SIP Trunk to Your Remote Server. On your Remote Server using FreePBX 2.10, choose Connectivity -> Trunks -> Add SIP Trunk. Use the same password as the secret you set up on the main server. Then fill out the template using the example below. In the Registration String, use the IP address or FQDN of your main server:

Adding an Outbound Route from Remote Server to Main Server. To allow calls from the Remote Server to your Main Server, we’ll create an Outbound Route on the Remote Server: main-out. In FreePBX 2.10, choose Connectivity -> Outbound Routes -> Add Route. For our example, let’s assume that we want Remote users to dial 9 as a prefix to connect back to extensions on the Main server. And let’s also assume that all extensions on the Main server are either three or four digits long. Just fill out the template using the example below and, for Trunk Sequence 0, choose main from the pull-down list. If you wanted to allow Remote users to place calls using the Outbound U.S./Canada trunks available on the Main server, just add an additional Dial Pattern with 9 as the prefix and NXXNXXXXXX as the Match.

Adding an Outbound Route from Main Server to Remote Server. To set up something similar on the Main Server to allow users to make calls to the Remote Server, you’d create an Outbound Route similar to the one above. Call it remote-out. Use whatever dial prefix you’d like and make the rest of the Dial Pattern match the length of the extension numbers at the Remote site. Then choose remote as Trunk Sequence 0 from the pull-down list.

Congratulations! You now have unlimited free calling between all of the extensions registered to your two servers, regardless of where those servers happen to be located. You can follow your nose to add as many additional servers as you like. So long as there is a reliable Internet connection, your total, non-recurring cost to add each additional site is a $35 Raspberry Pi and a few accessories. Got a family member stationed in Afghanistan? Send them a Raspberry Pi with Incredible PBX for Christmas. They not only can call you, but they can make calls to anyone else using your outbound trunks without incurring any toll charges for the communications link between Afghanistan and your server. Enjoy!

Security ALERT! For those running Incredible PBX on the Raspberry Pi, there have been some security patches released in the last few days. First, be sure you’re running Incredible PBX 3.5. Second, log into your server as root and issue the following command: /root/update-my-pi. Done.

Where To Go From Here: Getting Started with Incredible PBX for the Raspberry Pi and The ‘Fab 35’ Apps Tutorial

Originally published: Monday, November 5, 2012  


Need help with Asterisk? Visit the PBX in a Flash Forum.


whos.amung.us If you’re wondering what your fellow man is reading on Nerd Vittles these days, wonder no more. Visit our new whos.amung.us statistical web site and check out what’s happening. It’s a terrific resource both for us and for you.


Special Thanks to Our Generous Sponsors


FULL DISCLOSURE: ClearlyIP, Skyetel, Vitelity, DigitalOcean, Vultr, VoIP.ms, 3CX, Sangoma, TelecomsXchange and VitalPBX have provided financial support to Nerd Vittles and our open source projects through advertising, referral revenue, and/or merchandise. As an Amazon Associate and Best Buy Affiliate, we also earn from qualifying purchases. We’ve chosen these providers not the other way around. Our decisions are based upon their corporate reputation and the quality of their offerings and pricing. Our recommendations regarding technology are reached without regard to financial compensation except in situations in which comparable products at comparable pricing are available from multiple sources. In this limited case, we support our sponsors because our sponsors support us.

BOGO Bonaza: Enjoy state-of-the-art VoIP service with a $10 credit and half-price SIP service on up to $500 of Skyetel trunking with free number porting when you fund your Skyetel account. No limits on number of simultaneous calls. Quadruple data center redundancy. $25 monthly minimum spend required. Tutorial and sign up details are here.

The lynchpin of Incredible PBX 2020 and beyond is ClearlyIP components which bring management of FreePBX modules and SIP phone integration to a level never before available with any other Asterisk distribution. And now you can configure and reconfigure your new Incredible PBX phones from the convenience of the Incredible PBX GUI.

VitalPBX is perhaps the fastest-growing PBX offering based upon Asterisk with an installed presence in more than 100 countries worldwide. VitalPBX has generously provided a customized White Label version of Incredible PBX tailored for use with all Incredible PBX and VitalPBX custom applications. Follow this link for a free test drive!
 

Special Thanks to Vitelity. Vitelity is now Voyant Communications and has halted new registrations for the time being. Our special thanks to Vitelity for their unwavering financial support over many years and to the many Nerd Vittles readers who continue to enjoy the benefits of their service offerings. We will keep everyone posted on further developments.


Some Recent Nerd Vittles Articles of Interest…

Practicing Safe SIP: Adding SIP URI Connectivity with a Zero Internet Footprint

PBX in a Flash™ has a long (safe) history in the VoIP community, and the major reason is that we constantly preach never directly exposing any ports on your Asterisk® server to the Internet without implementing a WhiteList of safe IP addresses. This Zero Internet Footprint™ design keeps everybody out except a trusted, defined group on your WhiteList. For everyone else, they never see your server. So how do you receive calls? You do it with phone numbers (DIDs) tied to registered Google Voice, SIP, and IAX trunks from reputable providers. Because these trunks have constant registrations with safe service providers on the Internet, calls to these DIDs can flow in and out of your server without exposing your server directly to the Internet.

The drawback of this design is that it rules out inbound SIP URI calls to your server, and these calls typically are free. If you do a lot of international business or have family in far away places, that matters. Using a SIP proxy with Asterisk means anybody with a SIP telephone or a SIP-enabled web app anywhere in the world can punch in a SIP URI such as 1234567@nerdvittles.com, and your phones start ringing.

Practice Safe SIP! Today we’ll show you how easy it is to set up a hybrid SIP URI facility for your server while totally preserving your server’s Zero Internet Footprint. It’s not quite free, but it’s close. If paying 6¢ an hour for incoming calls is too rich for your blood, then stop reading now. For us, it’s a small price to pay to sleep well and avoid a $100,000 phone bill because someone hacked your server through an anonymous SIP attack in the middle of the night. There’s more good news. You may not even be charged the 6¢ an hour tariff.

How It Works. Today’s design works like this. We’ll set up an account with VoIP.ms and then create a standard SIP subaccount. As part of that setup, you can create a random extension on their server and tie that extension to a SIP URI for your subaccount. On our server, we’ll create a new SIP trunk and register to the voip.ms SIP subaccount we just created. This gets us a safe tunnel to make and receive calls using this trunk OR the SIP URI we just created. With this 2-layer SIP design, we’re basically using voip.ms as our anonymous SIP firewall. They get to worry about anonymous SIP attacks, and we pay them 6¢ an hour for inbound SIP URI calls that they pass along and we choose to answer.

There are also some collateral benefits using the hybrid SIP URI approach. First, it means that, instead of paying $1 a month and a penny a minute for calls using an actual DID from voip.ms, you now can take advantage of IPkall’s free DIDs in Washington state. By signing up for one of these, you now have a regular phone number that people can call to reach your server without your having to pay a monthly fee for the DID. In this cellphone era, it doesn’t much matter what the area code of your number happens to be since nationwide cellphone calls are all priced the same. The only cost to you is 6¢ an hour for the inbound calls. Oddly enough, VoIP.ms hasn’t been charging for the calls at least during the last couple weeks of our testing. Don’t count on it forever, but it is good to see they are at least considering a different pricing structure for SIP URI calls.

There’s a security advantage with hybrid SIP URIs as well. By never activating auto-replenishment on a VoIP provider account, your maximum financial exposure if something goes horribly wrong is limited to the prepay balance in your account. Finally, for those that want multiple SIP URIs and multiple DIDs, nothing precludes your repeating this drill. Just add another subaccount to your voip.ms account. So let’s get started.

VoIP.ms Setup. Register for a new account at VoIP.ms if you don’t already have one. This gets you an account with an account number such as 1234567. Don’t ever use your main account. Instead, create a subaccount:

Create a username for this subaccount. It will be your account number, an underscore, and a name of your choosing (up to 12 characters). Make up a very secure password. These are the two pieces you will need to create a SIP trunk on your server so write them down. Leave CallerID Number blank. We can handle that on your Asterisk server. Be sure to select Asterisk for the Device Type. The remaining entries at the top of the form are self-explanatory. Just make your settings match ours.

The bottom section of the form needs to be filled out to create a SIP URI. Make up an extension number for this subaccount, 1010 in our example. Ignore the leading 10 which is only used to make calls between voip.ms subaccounts. This would mean your SIP URI for this subaccount is 12345671010@atlanta.voip.ms where 1234567 is your account number, 1010 is your extension, and atlanta.voip.ms is one of the voip.ms POPs. For the list of available POPs, go to Main Menu -> Account Settings -> Default DID Routing in your Customer Portal. Click Create Account when you’re finished and wait a minute for your settings to propagate to all of the voip.ms servers.

FreePBX 2.10 Setup. Using a web browser, log into FreePBX® on your server. We’ll need to create three items to get everything working. First, we’ll add a new SIP trunk with your voip.ms credentials. Second, we’ll add an Inbound Route to process incoming calls. Third, we’ll add an Outbound Route so that you can make calls using your voip.ms trunk.

  1. Connectivity -> Trunks -> Add SIP Trunk
  2. Connectivity -> Inbound Routes -> Add Incoming Route
  3. Connectivity -> Outbound Routes -> Add Route

Adding VoIP.ms SIP Trunk. While logged into FreePBX 2.10, choose Connectivity -> Trunks -> Add SIP Trunk. Fill out the form like this using your correct subacctname, subacctpassword, desired VoIP.ms host, and whatever 10-digit number you’d like your server to use to identify inbound calls from this VoIP.ms subaccount (12345671010 in the example below). If you plan to use this trunk for outbound calls, enter a CallerID number. Legally, it must be a number that you own, i.e. don’t use the White House number or you may get a call you don’t want. Also be aware that for outbound calls, VoIP.ms rejects 10-digit numbers so you must prepend a 1 to 10-digit calls destined for the U.S. and Canada.

  1. Trunk Name: VoIPms
  2. Outbound Caller ID: any number you own
  3. Dial Pattern: Prepend: 1  Match Pattern: NXXNXXXXXX
  4. Trunk Name: voipms
  5. Trunk Details:
    • canreinvite=nonat
    • nat=yes
    • context=from-trunk
    • host=atlanta.voip.ms
    • secret=yourpassword
    • type=friend
    • username=1234567_subacctname
    • disallow=all
    • allow=ulaw
    • fromuser=1234567_subacctname
    • trustrpid=yes
    • sendrpid=yes
    • insecure=port,invite
    • qualify=yes
  6. Register String: 1234567_subacctname:yourpassword@atlanta.voip.ms/12345671010

Finally, in Settings:SIP Settings, add the following entry at the bottom in the Other SIP Settings field: match_auth_username=yes. Save your changes and reload your dialplan when prompted.

Adding VoIP.ms Inbound Route. While logged into FreePBX 2.10, choose Connectivity -> Inbound Routes -> Add Incoming Route. The only trick to this is the DID Number you enter must match the 10-digit number you chose for the end of the SIP registration string in the last step. The numbers really don’t matter, but they must match because this is what FreePBX uses to identify calls as originating from this SIP Trunk. You use the Inbound Route to tell FreePBX how to route the incoming calls once they hit your PBX. For example, you could ring an extension, a ring group, or route the call to an IVR where the caller was given a list of choices from which to pick their own call routing option. Don’t put your CallerID Number in here or only calls from your number would be accepted! Here’s a typical setup to route the calls to an IVR. Leave the other options at their defaults.

  1. Description: VoIPms
  2. DID Number: 12345671010
  3. CallerID Number: leave blank
  4. CID Source: Caller ID Superfecta
  5. Destination:
    • IVR: nv-ivr

Adding VoIP.ms Outbound Route. How you set up the Outbound Route to handle outgoing calls depends upon what you already have in place. Unless you don’t already have outbound trunks on your PBX, our recommendation is to add a prefix to force certain calls to go out through your VoIP.ms trunk. For example, a caller might dial 9-1-404-555-1212 or 9-404-555-1212 to force the call out through VoIP.ms. We’ll strip off the 9 before passing the number to VoIP.ms, and our Trunk setup will take care of adding the 1 if only 10-digits are dialed. Here’s how to set that up. While logged into FreePBX 2.10, choose Connectivity -> Outbound Routes -> Add Route.

  1. Route Name: VoIPms
  2. Dial Pattern: Prefix: 9  Match Pattern: NXXNXXXXXX
  3. Trunk Sequence: 0 VoIPms

If you have a default Outbound Route that already uses another Trunk such as Google Voice or Vitelity, then you can add a little redundancy to your system by adding VoIPms as an additional option at the end of the Default Trunk Sequence. Then, if the primary outbound route is out of service, the calls will automatically be routed out through VoIP.ms.

Adding an IPkall DID for Your SIP URI. We’ve now completed all the steps necessary to receive incoming SIP URI calls using our example VoIP.ms SIP URI: 12345671010@atlanta.voip.ms. Anyone in the world can dial that SIP URI from a SIP phone, and the calls will be answered by our sample IVR, nv-ivr. But suppose we’d also like folks to be able to pick up a Plain Old Telephone and call us using VoIP.ms to route the incoming call through our SIP URI at the 6¢ per hour calling rate. Here’s the easy way to do it. Just sign up for a free DID at www.ipkall.com. After choosing an area code for your free number, you’ll be prompted for the following information. Here’s what you’d enter using today’s example:

  • SIP Phone Number: 12345671010
  • SIP Proxy: atlanta.voip.ms
  • Email Address: your-email-address
  • Password: some-password-to-get-back-into-your-account

Once you’ve completed the form, submit it and wait for your new phone number to be delivered in your email. You should get it within a couple minutes so check your spam folder if you don’t see it. Congratulations! You’ve done everything you need to do for anyone to call you using either your SIP URI or your new DID number from IPkall.

It’s worth noting that IPkall recycles DIDs that aren’t used for 30 days. If you use Incredible PBX, the easiest way to assure that you don’t lose your number is to set up a recurring Telephone Reminder that calls your own number once a week.

Free iNum DID. There’s another important benefit from signing up for a VoIP.ms account. You’re also eligible for a free iNum DID. This lets people around the world call you by dialing a local number in most countries. And iNum calls are always free with Google Voice. You can read all about how it works and how to set up your free iNum DID in this Nerd Vittles article.

Test Drive. The proof is in the pudding, as they say. So we invite you to take our SIP URI, iNum DID, and IPkall DID for a test drive. They’re all running on a $35 Raspberry Pi with Incredible PBX 3.3 with its Applications AutoAttendant. You can try a news, weather, or stock report as well as checking the current East Coast time. Or you can try a text-to-speech call from the AsteriDex phone book by choosing option 5 and saying one of the airlines in the default install, e.g. American Airlines. Enjoy!

  • SIP URI: 10159521010@raspi.mundy.org
  • iNum DID: 883510009901997
  • IPkall DID: 1-425-998-2778
  • GVoice DID: 1-843-284-6844

Don’t forget to List Yourself in Directory Assistance so everyone can find you by dialing 411. And add your new number to the Do Not Call Registry to block telemarketing calls. Or just call 888-382-1222 from your new number.

Originally published: Thursday, 10/11/12


Astricon 2012. Astricon 2012 will be in Atlanta at the Sheraton beginning October 23 through October 25. We hope to see many of you there. We called Atlanta home for over 25 years so we’d love to show you around. Be sure to tug on my sleeve and mention you’d like a free PIAF Thumb Drive. We’ll have a bunch of them to pass out to our loyal supporters. Nerd Vittles readers also can save 20% on your registration by using coupon code: AC12VIT.


Need help with Asterisk? Visit the PBX in a Flash Forum.


whos.amung.us If you’re wondering what your fellow man is reading on Nerd Vittles these days, wonder no more. Visit our new whos.amung.us statistical web site and check out what’s happening. It’s a terrific resource both for us and for you.


Special Thanks to Our Generous Sponsors


FULL DISCLOSURE: ClearlyIP, Skyetel, Vitelity, DigitalOcean, Vultr, VoIP.ms, 3CX, Sangoma, TelecomsXchange and VitalPBX have provided financial support to Nerd Vittles and our open source projects through advertising, referral revenue, and/or merchandise. As an Amazon Associate and Best Buy Affiliate, we also earn from qualifying purchases. We’ve chosen these providers not the other way around. Our decisions are based upon their corporate reputation and the quality of their offerings and pricing. Our recommendations regarding technology are reached without regard to financial compensation except in situations in which comparable products at comparable pricing are available from multiple sources. In this limited case, we support our sponsors because our sponsors support us.

BOGO Bonaza: Enjoy state-of-the-art VoIP service with a $10 credit and half-price SIP service on up to $500 of Skyetel trunking with free number porting when you fund your Skyetel account. No limits on number of simultaneous calls. Quadruple data center redundancy. $25 monthly minimum spend required. Tutorial and sign up details are here.

The lynchpin of Incredible PBX 2020 and beyond is ClearlyIP components which bring management of FreePBX modules and SIP phone integration to a level never before available with any other Asterisk distribution. And now you can configure and reconfigure your new Incredible PBX phones from the convenience of the Incredible PBX GUI.

VitalPBX is perhaps the fastest-growing PBX offering based upon Asterisk with an installed presence in more than 100 countries worldwide. VitalPBX has generously provided a customized White Label version of Incredible PBX tailored for use with all Incredible PBX and VitalPBX custom applications. Follow this link for a free test drive!
 

Special Thanks to Vitelity. Vitelity is now Voyant Communications and has halted new registrations for the time being. Our special thanks to Vitelity for their unwavering financial support over many years and to the many Nerd Vittles readers who continue to enjoy the benefits of their service offerings. We will keep everyone posted on further developments.


Some Recent Nerd Vittles Articles of Interest…

The Asterisk Mother Lode: Introducing Incredible PBX 4.0 with FreePBX 2.10

We thought we’d start your summer off with a bang by introducing an all-new Incredible PBX™. So what’s new? 50 Asterisk® Apps. 9-Layer Security. 20 Preconfigured VoIP Provider Trunks. 1-Click Installers for Asterisk.everything. FreePBX® 2.10. Certified Asterisk support. And what’s the same? It’s all still FREE!

Coming January 19: Incredible PBX 11 & Incredible Fax for Asterisk 11 and FreePBX 2.11

Coming February 11: Incredible PBX 10 & Incredible Fax for 64-bit Asterisk 1.8 and FreePBX 2.10

We heard you. Yes, we needed Incredible PBX™ support for FreePBX 2.10 with Asterisk 1.8. And today it’s finally here. Incredible PBX 4.0 brings all of the original Asterisk applications plus more than a dozen new turnkey applications released in 2012 and an all-new level of security to protect your phone bill. The installation process is so simple a monkey could do it. You still can add Incredible Fax 2.0™ to deliver free faxing with HylaFax™ and AvantFax® in a setup process that’s as simple as pressing the Enter key. When you’re finished, you’ll have one of the open source wonders of the world with free phone calls and faxing throughout the U.S. and Canada together with almost every Asterisk application ever developed. There’s more good news. You don’t have to be smarter than a fifth grader to get any of it installed and working reliably with Asterisk. Just run the simple install script, and presto.

July Update: Incredible in the Cloud. For those that would prefer to run Incredible PBX 4.0 in the Cloud, RentPBX now is offering a pre-built image with PIAF-Brown and FreePBX 2.10 that is ready to go using servers all around the world. On your first order, Incredible in the Cloud is just $15/month using coupon code PIAF2012. Sign up at this link.

August 15 Update: Incredible Pi. We needed a back-to-school project, and this year we’ve chosen to port most of the Incredible PBX feature set to the new $35 Raspberry Pi. Thanks to the pioneering work of Gernot, this was fairly straight-forward. We’re still aiming for an early September release but, if you’d like to get a head start, you can order your device and follow our progress on the PIAF Forum.

If you’re curious why we no longer are supporting Asterisk 10, read all about it in last week’s Nerd Vittles article. Suffice it to say, if Digium is unwilling to fully support the platform, then we think it is a dead-end product. Unfortunately, this further splinters Asterisk development. In addition to long-term support (LTS) releases, "certified" (SLA) releases, and "other" releases, we now have a new category for Digium-supported modules and "community modules." To us, this signals the death knell for modules which Digium is no longer willing to actively support. Consequently, we will no longer recommend Asterisk 10 for production use. And we continue to be nervous about what the future holds for Google Voice support in Asterisk 1.8 and Asterisk 11 as well. The good news is, if you read last week’s article, you already know we have a rock-solid alternative waiting in the wings. YATE rocks! And FreeSentral is no slouch either.

The Incredible PBX 4 Inventory. For those that have never heard of The Incredible PBX, here’s the current 4.0 feature set in addition to the base install of PBX in a Flash with the CentOS 6.2, Asterisk 1.8 or Certified Asterisk 1.8, FreePBX 2.10, and Apache, SendMail, MySQL, PHP, phpMyAdmin, IPtables Linux firewall, Fail2Ban, and WebMin. Cepstral TTS, Incredible Fax, Skype, NeoRouter and PPTP VPNs, and all sorts of backup solutions are still just one command away and may be installed using the scripts included with Incredible PBX 4 and PBX in a Flash. Type help-pbx and browse /root and /root/nv for dozens of one-click install scripts.

And then there’s the Incredible Freebie! As they say, "Never look a gift horse in the mouth." What began as a kludgey, dual-call, dual-provider Google Voice implementation to take advantage of Google’s free PSTN calling in the U.S. and Canada with Asterisk 1.4 and 1.6 is now a zippy-quick, Gtalk-based calling platform that rivals the best SIP-to-SIP calls on the planet. The Incredible PBX Google Voice implementation provides virtually instantaneous PSTN connections to almost anybody, anywhere. Trust us! Except for the price which is still free, you’ll never know you weren’t connected via Ma Bell’s overpriced long-distance lines and neither will the Little Mrs. And, yes, our recommended $50 Nortel SIP videophone is plug-and-play.

To get started, download the latest 32-bit PBX in a Flash 2.0.6.2 ISO from SourceForge, burn to then boot from the PIAF2 CD, choose the PIAF-Purple option to load Asterisk 1.8 or PIAF-Brown to load Certified Asterisk, and pick FreePBX 2.10 when prompted. Once the PIAF2 install is completed, just run the new Incredible PBX 4.0 installer. In less than an hour, you’ll have a turnkey PBX with a local phone number and free calling in the U.S. and Canada via your own Google Voice account plus over 50 terrific Asterisk applications to keep you busy exploring for months.

A Few Words About Security. Thanks to its Zero Internet Footprint™ design, Incredible PBX 4 is different. It remains the most secure Asterisk-based PBX around. What this means is The Incredible PBX™ has been engineered to sit safely behind a NAT-based, hardware firewall with no Internet port exposure to your actual server. For those needing remote telephone support, Incredible PBX loads Travelin’ Man 2 and 3 for you so your IPtables Linux Firewall can be either self-managed by end-users or set up with predefined IP addresses and FQDNs for all of your remote sites. If you’ve read about Asterisk’s latest SIP vulnerability published just last week and occurring almost as often as you tie your shoes, then you’ll understand why WhiteList-based server security has become absolutely essential. WhiteList Security means only those devices with a registered IP address in your WhiteList can get to your server’s resources. To everyone else, your server doesn’t even exist. Their only way to connect to you is with a POTS telephone and your published phone number.

For those with multiple servers to interconnect, we’ve provided one-click installers for not one but two VPN solutions: NeoRouter and PPTP. Suffice it to say, Incredible PBX has Security in Spades™: customized IPtables Linux Firewall, Fail2Ban tweaked for Asterisk security monitoring, FreePBX Extension Lockdown by IP address, randomized FreePBX extension passwords, Travelin’ Man 2 and 3 WhiteList Security, multiple VPN solutions for encrypted server-to-server communications, plus a bottom-up design focused on flawless operation behind a hardware-based firewall. You won’t find a more secure Personal Branch Exchange™ at any price.

Here’s the Incredible PBX 9-Layer Security Model:

Prerequisites. Here’s what we recommend to get started properly:

We’ve shifted gears on our recommended Atom platform for PIAF2 after excellent results with both the single-core and dual-core Atom kits manufactured by Foxconn (pictured on the left below). That’s the dLink Gaming Router on the right. Seems kinda silly to spend twice as much for a machine that you can build yourself in under 5 minutes. Basically you remove four screws, insert a Phillips screwdriver in one of the holes and gently pry the cover away from the box. Then you pop off the back by inserting a small flat-blade screwdriver, remove four more screws, slide in a solid-state drive (SSD) and a 4GB stick of notebook computer RAM, and you’re done in a couple minutes. Replace the screws and the cover, and you have a perfect PIAF2 platform with terrific performance and no moving parts for about $200. The link above will take you to the PIAF Forum thread for these machines. They go on sale almost weekly. See the right column of Nerd Vittles (just below our tweets) for this week’s special at Amazon. The dual-core Atom box typically is under $150. It could easily handle an office with 50+ employees sitting on a bookshelf with an Internet connection (wired or wireless!). No noise. Very little heat. Low power requirements. Perfect!

Installing Incredible PBX 4.0. The installation process is simple. Here are the 3 Easy Steps to Free Calling, and The Incredible PBX will be ready to receive and make free U.S./Canada calls immediately:

1. Install PIAF-Purple or PIAF-Brown with FreePBX 2.10 using 32-bit PIAF2 ISO
2. Run Incredible PBX 4 installer
3. Configure Google Voice and a softphone or SIP phone

Installing PBX in a Flash. Here’s a quick tutorial to get PBX in a Flash 2 installed. To use Incredible PBX 4, just install the latest 32-bit version of PBX in a Flash 2. Unlike other Asterisk aggregations, PBX in a Flash utilizes a two-step install process. The ISO only installs the CentOS 6.2 operating system. Once CentOS is installed, the server reboots and downloads a payload file that includes Asterisk, FreePBX, and many other VoIP and Linux utilities including all of the new Google Voice components. Just choose the PIAF-Purple or PIAF-Brown payload. You’ll then be prompted to choose your flavor of FreePBX. Choose FreePBX 2.10. Then set your time zone and set up a password for FreePBX access, and you’re all set. As part of the install, yum now will automatically update your operating system with the latest updates for CentOS 6.2.

You can download the 32-bit PIAF2 from SourceForge. Burn the ISO to a CD. Then boot from the installation CD and press the Enter key to begin. If you’ve chosen a machine without an optical drive such as the Atom boxes we recommend, then this Nerd Vittles article will show you how to make a bootable flash drive from the PIAF2 ISO.

WARNING: This install will completely erase, repartition, and reformat EVERY DISK (including USB flash drives) connected to your system so disable any disk you wish to preserve AND remove any USB flash drives! Press Ctrl-C to cancel.

At the time zone prompt, tab once, highlight your time zone, tab to OK and press Enter. At the password prompt, make up a VERY secure root password. Type it twice. Tab to OK, press Enter. Get a cup of coffee. Come back in about 5 minutes. When the system has installed CentOS 6.2, it will reboot. Remove the CD promptly. After the reboot, choose PIAF-Purple or PIAF-Brown. In less than a minute, you’ll be prompted for the FreePBX version you wish to install. Choose FreePBX 2.10 and fill in your choices for the remaining prompts. Then have a 15-minute cup of coffee. After installation is complete, the machine will reboot a second time. You now have a PBX in a Flash base install. On a stand-alone machine, it takes 30-60 minutes. On a virtual machine, it takes about half that time. Log into your server with your root password and write down the server’s IP address. You’ll need it to access FreePBX with your browser. While you’re logged in, issue the following command to make sure your IPtables firewall loads after your network is enabled:

echo "/etc/init.d/iptables restart" >> /etc/rc.d/rc.local

NOTE: For previous users of PBX in a Flash, be aware that this new version automatically runs update-programs, update-fixes, and passwd-master for you. So your system is relatively secure out of the box if you install it behind a hardware-based firewall as we recommend! See the Proxmox cautionary alert in the footnotes to this article!

Configuring Google Voice. If you plan to use Google Voice, you’ll need a dedicated Google Voice account to support Incredible PBX 4. If you want to use the inbound fax capabilities of Incredible Fax 2, then you’ll need an additional Google Voice line that can be routed to the FAX miscellaneous destination using FreePBX. The more obscure the username (with some embedded numbers), the better off you will be. This will keep folks from bombarding you with unsolicited Gtalk chat messages, and who knows what nefarious scheme will be discovered using Google messaging six months from now. So keep this account a secret!

We’ve tested this extensively using an existing Gmail account, and inbound calling is just not reliable. The reason seems to be that Google always chooses Gmail chat as the inbound call destination if there are multiple registrations from the same IP address. So, be reasonable. Do it our way! Set up a dedicated Gmail and Google Voice account, and use it exclusively with Incredible PBX 4. It’s free at least through 2013. Google Voice no longer is by invitation only so, if you’re in the U.S. or have a friend that is, head over to the Google Voice site and register. If you’re living on another continent, see MisterQ’s posting for some setup tips.

You must choose a telephone number (aka DID) for your new account, or Google Voice calling will not work… in either direction. Google used to permit outbound Gtalk calls using a fake CallerID, but that obviously led to abuse so it’s over! You also have to tie your Google Voice account to at least one working phone number as part of the initial setup process. Your cellphone number will work just fine. Don’t skip this step either. Just enter the provided 2-digit confirmation code when you tell Google to place the test call to the phone number you entered. Once the number is registered, you can disable it if you’d like in Settings, Voice Setting, Phones. But…

IMPORTANT: Be sure to enable the Google Chat option as one of your phone destinations in Settings, Voice Setting, Phones. That’s the destination we need for The Incredible PBX to work its magic! Otherwise, all inbound and outbound calls will fail. If you don’t see this option, you may need to call up Gmail and enable Google Chat there first. Then go back to the Google Voice Settings.

While you’re still in Google Voice Settings, click on the Calls tab. Make sure your settings match these:

  • Call ScreeningOFF
  • Call PresentationOFF
  • Caller ID (In)Display Caller’s Number
  • Caller ID (Out)Don’t Change Anything
  • Do Not DisturbOFF
  • Call Options (Enable Recording)OFF
  • Global Spam FilteringON

Click Save Changes once you adjust your settings. Under the Voicemail tab, plug in your email address so you get notified of new voicemails. Down the road, receipt of a Google Voice voicemail will be a big hint that something has come unglued on your PBX.

Incredible PBX 4.0 Installation. Log into your server as root and issue the following commands to run The Incredible PBX 4 installer:

cd /root
wget http://incrediblepbx.com/incrediblepbx4.x
chmod +x incrediblepbx4.x
./incrediblepbx4.x

UPDATE: There are some new releases. Incredible PBX 10 supports 64-bit PIAF-Purple with Asterisk 1.8 and FreePBX 2.10. There also are prebuilt appliances for Amazon EC2 and VirtualBox. Incredible PBX 11 supports 32-bit PIAF-Green with Asterisk 11 and FreePBX 2.11. There also are prebuilt appliances for VirtualBox and VMware. Both Incredible PBX 10 and Incredible PBX 11 support Incredible Fax as well.

When The Incredible PBX install begins, you’ll be prompted for your FreePBX maint password. This is required to properly configure CallerID Superfecta for you. Your credentials never leave your server!

Now have another 15-minute cup of coffee. While you’re waiting just make sure that you’ve heeded our advice and installed your server behind a hardware-based firewall. No ports need to be opened on your firewall to support Incredible PBX. Leave it that way!

One final word of caution is in order regardless of your choice of providers: Do NOT use special characters in any provider passwords, or nothing will work!

FINAL STEPS. Once the Incredible PBX install completes, there are two optional steps for those that will have remote phones or users outside your firewall. Install both Travelin’ Man 2 and 3 for an ultra-secure system. Also be sure to run update-fixes before restarting your machine!

Logging in to FreePBX 2.10. Using a web browser, you access the FreePBX GUI by pointing your browser to the IP address of your Incredible PBX. Click on the Users tab. It will change to Admin. Now click the FreePBX button. When prompted for a username, it’s maint. When prompted for the password, it’s whatever you set up as your maint password when you installed Incredible PBX 4. If you forget it, you can always reset it by logging into your server as root and running passwd-master.

Configuring Google Voice Trunks in FreePBX. All trunk configurations now are managed within FreePBX, including Google Voice. This makes it easy to customize your Incredible PBX to meet your specific needs. If you plan to use Google Voice, here’s how to quickly configure one or more Google Voice trunks within FreePBX. After logging into FreePBX with your browser, click the Other tab and choose Google Voice. To Add a new Google Voice account, just fill out the form:

Phone number is your 10-digit Google Voice number. Username is your Google Voice account name without @gmail.com. Password is your Google Voice password. NOTE: Don’t use 2-stage password protection in this Google Voice account! Be sure to check all three boxes: Add trunk, Add routes, and Agree to TOS. Then click Submit Changes and reload FreePBX. You can add additional Google Voice numbers by clicking Add GoogleVoice Account option in the right margin and repeating the drill.

While you’re still in FreePBX, choose Setup, Extensions, and click on the 701 extension. Write down your extension password which you’ll need to configure a phone in a minute.

IMPORTANT LAST STEP: Google Voice will not work unless you restart Asterisk from the Linux command line at this juncture. Using SSH, log into your server as root and issue the following command: amportal restart. You’ll note that Incredible PBX 4 now automatically enables the Asterisk Gtalk and Jabber modules for you once you create a Google Voice account.

Incredible Fax 2 Installation. If you want the added convenience of having your Incredible PBX double as a free fax machine, run install-incredfax2 after the Incredible PBX 4 install completes. Plug in your email address for delivery of incoming faxes and enter your home area code when prompted. For every other prompt, just press the Enter key. If you’d like to also add the optional OCR utility, just choose it when prompted. For complete documentation, see this Nerd Vittles article. Don’t forget that a REBOOT OF YOUR SERVER is requiredwhen the install is finished, or faxing won’t work! Then log in through the PIAF GUI using maint:password. Be sure to change your password!

Also be sure to set up a second, dedicated Google Voice number if you want support for inbound faxing. Once the Google Voice credentials are configured in FreePBX for the additional Google Voice line, simply add an Inbound Route for this DID to point to the fax destination. This comes preconfigured with Incredible PBX 4. Just plug in your 10-digit Google Voice number and other entries shown in the form below. Save your entries and reload FreePBX.

Extension Password Discovery. If you’re too lazy to look up your extension 701 password using the FreePBX GUI, you can log into your server as root and issue the following command to obtain the password for extension 701 which we’ll need to configure your softphone or color videophone in the next step:

mysql -uroot -ppassw0rd -e "select id,data from asterisk.sip where id='701' and keyword='secret'"

The result will look something like the following where 701 is the extension and 18016 is the randomly-generated extension password exclusively for your Incredible PBX:

+—–+——-+
id         data
+—–+——-+
701      18016
+—–+——-+

Configuring a SIP Phone. There are hundreds of terrific SIP telephones and softphones for Asterisk-based systems. Once you get things humming along, you’ll want a real SIP telephone such as the $50 Nortel color videophone we’ve recommended above. You’ll also find lots of additional recommendations on Nerd Vittles and in the PBX in a Flash Forum. If you’re like us, we want to make damn sure this stuff works before you shell out any money. So, for today, let’s download a terrific (free) softphone to get you started. We recommend X-Lite because there are versions for Windows, Mac, and Linux. So download your favorite from this link. Install and run X-Lite on your Desktop. At the top of the phone, click on the Down Arrow and choose SIP Account Settings, Add. Enter the following information using your actual password for extension 701 and the actual IP address of your Incredible PBX server instead of 192.168.0.251. Click OK when finished. Your softphone should now show: Available.

Incredible PBX Test Flight. The proof is in the pudding as they say. So let’s try two simple tests. First, let’s place an outbound call. Using the softphone, dial your 10-digit cellphone number. Google Voice should transparently connect you. Answer the call and make sure you can send and receive voice on both phones. Second, from another phone, call the Google Voice number that you’ve dedicated to The Incredible PBX. Your softphone should begin ringing shortly. Answer the call, press 1 to accept the call, and then make sure you can send and receive voice on both phones. Hang up. If everything is working, congratulations!

Here’s a brief video demonstration showing how to set up a softphone to use with your Incredible PBX, and it also walks you through several of the more than 50 Asterisk applications included in your system.


Learn First. Explore Second. Even though the installation process has been completed, we strongly recommend you do some reading before you begin your VoIP adventure. VoIP PBX systems have become a favorite target of the hackers and crackers around the world and, unless you have an unlimited bank account, you need to take some time learning where the minefields are in today’s VoIP world. Start by reading our Primer on Asterisk Security. We’ve secured all of your passwords except your root password and your passwd-master password. We’re assuming you’ve put very secure passwords on those accounts as if your phone bill depended upon it. It does! There’s loads of additional documentation on the PBX in a Flash documentation web site.

Solving One-Way Audio Problems. If you experience one-way audio on some of your phone calls, you may need to adjust your Asterisk SIP settings. These now can be tweaked within FreePBX by choosing Settings, Asterisk SIP Settings. Just plug in your public IP address and replace 192.168.0.0 with the subnet address of your private network. Save settings and reload FreePBX.

Choosing VoIP Providers. Nothing beats free when it comes to long distance calls. But nothing lasts forever. And, in the VoIP World, redundancy is dirt cheap. So we strongly recommend you set up another account with Vitelity using our special link below. This gives your PBX a secondary way to communicate with every telephone in the world, and it also gets you a second real phone number for your new system… so that people can call you. Here’s how it works. You pay Vitelity a deposit for phone service. They then will bill you $3.99 a month for your new phone number. This $3.99 also covers the cost of unlimited inbound calls (two at a time) delivered to your PBX for the month. For outbound calls, you pay by the minute and the cost is determined by where you’re calling. If you’re in the U.S., outbound calls to anywhere in the U.S. are a little over a penny a minute. If you change your mind about Vitelity and want a refund of the balance in your account, all you have to do is ask. The trunks for Vitelity already are preconfigured with The Incredible PBX. Just insert your credentials using FreePBX and uncheck the Disable Trunk checkbox. Then add the Vitelity trunk as the third destination for your default outbound route. That’s it. Congratulations! You now have a totally redundant phone system.

Incredible PBX includes preconfigured trunk setups for all of your favorite trunk providers. Just plug in your credentials and activate the trunks you need. In less than a minute, you’re done. Here’s the Incredible PBX Top 20 Trunk List with some reasons why these providers made our short list:

  • AxVoice ($14.99/mo. Business Plan; $16.58/mo. Unlimited Calls to 45 Countries)
  • CallCentric (Good International Calling Rates)
  • DIDforSale (20 channels per DID; unlimited DID calls for $8.99/mo.)
  • ENUM
  • FlowRoute (Good International Calling Rates)
  • FreeNum
  • Future-Nine (Supports CallerID Spoofing)
  • Google Voice (Free DIDs and free U.S./Canada calling)
  • IPkall (Free SIP/IAX DIDs)
  • Les.net (Supports CallerID Spoofing; very low rates)
  • LocalPhone (Dirt-cheap DIDs and calling rates worldwide; Free iNum DID)
  • Simon Telephonics (Free SIP-to-GoogleVoice Gateway)
  • SIPgate (Free residential DIDs sometimes)
  • Skype (Free Skype-to-Skype calls worldwide)
  • Teliax (Unlimited inbound DID $5/mo.)
  • Vitelity (Our supporter and the Best in the Business!)
  • VoIPms (CallerID spoofing; Free iNum calling; Very low rates)
  • VoIPMyWay (Residential Unlimited: $15.50/mo. Business Unlimited: $40/mo.)
  • VoIPStreet (Free DID)

Stealth AutoAttendant. When incoming calls arrive, the caller is greeted with a welcoming message from Allison which says something like "Thanks for calling. Please hold a moment while I locate someone to take your call." To the caller, it’s merely a greeting. To those "in the know," it’s actually an AutoAttendant (aka IVR system) that gives you the opportunity to press a button during the message to trigger the running of some application on your Incredible PBX. As configured, the only option that works is 0 which fires up the Nerd Vittles Apps IVR. It’s quite easy to add additional features such as voicemail retrieval or DISA for outbound calling. Just edit the MainIVR option in FreePBX under Setup, IVR. Keep in mind that anyone (anywhere in the world) can choose these options. So be extremely careful not to expose your system to security vulnerabilities by making certain that any options you add have very secure passwords! It’s your phone bill. 😉

Configuring Email. You’re going to want to be notified when updates are available for FreePBX, and you may also want notifications when new voicemails arrive. Everything already is set up for you except actually entering your email notification address. Using a web browser, open the FreePBX GUI by pointing your browser to the IP address of your Incredible PBX. Then click Administration and choose FreePBX. To set your email address for FreePBX updates, go to Settings, General Settings and scroll to the bottom of the screen. To configure emails to notify you of incoming voicemails, go to Applications, Extensions, 701 and scroll to the bottom of the screen. Then follow your nose. Be sure to reload FreePBX when prompted after saving your changes.

A Final Word About Security. In case you couldn’t tell, security matters to us, and it should matter to you. Not only is the safety of your system at stake but also your wallet and the safety of other folks’ systems. Our only means of contacting you with security updates is through the RSS Feed that we maintain for the PBX in a Flash project. This feed is prominently displayed in the web GUI which you can access with any browser pointed to the IP address of your server. Check It Daily! Or add our RSS Feed to your favorite RSS Reader. We also recommend you follow @NerdUno on Twitter. We’ll keep you entertained and provide immediate notification of security problems that we hear about. Finally, visit the PIAF Forums regularly. You’ll be surprised what you can learn in 10 minutes of browsing. Be safe!

Kicking the Tires. OK. That’s enough tutorial for today. Let’s play. Using your new softphone, begin your adventure by dialing these extensions:

  • D-E-M-O – Incredible PBX Demo (running on your PBX)
  • 1234*1061 – Nerd Vittles Demo via ISN FreeNum connection to NV
  • Z-I-P – Enter a five digit zip code for any U.S. weather report
  • 6-1-1 – Enter a 3-character airport code for any U.S. weather report
  • 5-1-1 – Get the latest news and sports headlines from Yahoo News
  • T-I-D-E – Get today’s tides and lunar schedule for any U.S. port
  • F-A-X – Send a fax to an email address of your choice
  • 4-1-2 – Phonebook lookup/dialer with AsteriDex
  • M-A-I-L – Record a message and deliver it to any email address
  • C-O-N-F – Set up a MeetMe Conference on the fly
  • 1-2-3 – Schedule regular/recurring reminder (PW: 12345678)
  • 2-2-2 – ODBC/Timeclock Lookup Demo (Empl No: 12345)
  • 2-2-3 – ODBC/AsteriDex Lookup Demo (Code: AME)
  • 3-3-3 – Look up a definition for any word or term
  • 9-4-9 – Weather forecast for any city in the world
  • 9-5-0 – Retrieve stock report by stock symbol
  • 9-5-1 – Latest Google News headlines
  • Dial *68 – Schedule a hotel-style wakeup call from any extension
  • 1-204-666-1001 – PIAF Support Conference Bridge (Conf#: 1091881)
  • 882*1061VoIP Users Conference every Friday at Noon (EST)

PBX in a Flash SQLite Registry. We want to introduce you to the PBX in a Flash Registry which uses SQLite, a zero-configuration SQL-compatible database engine. After logging into your server as root, just type show-registry for a listing of all of the applications, versions, and install dates of everything on your new server. Choosing the A option will generate registry.txt in the /root folder while the other options will let you review the applications by category on the screen. For example, the G option displays all of The Incredible PBX add-ons that have been installed. Here’s the complete list of options:

  • A – Write the contents of the registry to registry.txt
  • B – PBX in a Flash install details
  • C – Extra programs install details
  • D – Update-fixes status and details
  • E – RPM install details
  • F – FreePBX modules install details
  • G – Incredible PBX install details
  • Q – Quit this program

And here’s a sample from an install we recently completed.


Special Thanks. It’s hard to know where to start in expressing our gratitude for all of the participants that made today’s incredibly simple-to-use product possible. To Philippe Sultan and the rest of the Asterisk development team, thank you for making Jabber jabber with Asterisk. Wish you were still involved! To Leif Madsen, thanks for your pioneering work with Gtalk and Jabber which got this ball rolling. To Philippe Lindheimer, Tony Lewis, and the rest of the FreePBX development team, thanks for FreePBX 2.10 which really makes Asterisk shine. To Lefteris Zafiris, thank you for making Flite and all of the Google TTS and STT utilities work with Asterisk 1.8 thereby preserving all of the Nerd Vittles text-to-speech applications while allowing us to add dozens of new ones. To Darren Sessions, thanks for whipping app_swift into shape and restoring Cepstral and commercial TTS applications to the land of the living. The new all-in-one installer is awesome. To all of our pals in the PBX Open Source Software Alliance (POSSA) that develop and maintain some our favorite Asterisk apps, you’re unbelievable! To Andrew Nagy, thanks for all you do and especially for keeping Google Voice humming along in FreePBX. And to our pal, Tom King, we couldn’t have done it without you. You rolled up your sleeves and really made CentOS 6.2 and Asterisk 1.8 sit up and bark. No one will quite understand what an endeavor that is until they try it themselves. CentOS 6 implementations of Asterisk are few and far between, and Tom has made it look incredibly easy. It wasn’t! And, last but not least, to all of our pioneers and beta testers who spent their Independence Day and many other days testing this new release, THANK YOU!

Don’t forget to List Yourself in Directory Assistance so everyone can find you by dialing 411. And add your new number to the Do Not Call Registry to block telemarketing calls. Or just call 888-382-1222 from your new number. Enjoy!

Originally published: Monday, July 9, 2012


Support Issues. With any application as sophisticated as this one, you’re bound to have questions. Blog comments are a terrible place to handle support issues although we welcome general comments about our articles and software. If you have particular support issues, we encourage you to get actively involved in the PBX in a Flash Forums. It’s the best Asterisk tech support site in the business, and it’s all free! In fact, there is a thread dedicated to support of Incredible PBX 4.0. Please have a look and post your support questions there. Unlike some forums, ours is extremely friendly and is supported by literally hundreds of Asterisk gurus and thousands of ordinary users just like you. You won’t have to wait long for an answer to your question.


Weather Alert. If you’re already using the Nerd Vittles Weather Applications including Weather by ZIP Code and Weather by Airport Code, you may have noticed that the National Weather Service "improved" things over the Fourth of July holiday. Consequently, neither app worked any longer. The fixes now have been posted on the PIAF Forum and can be downloaded at your convenience. Incredible PBX 4.0 already includes the updates.


Astricon 2012. Astricon 2012 will be in Atlanta at the Sheraton beginning October 23 through October 25. We hope to see many of you there. We called Atlanta home for over 25 years so we’d love to show you around. Be sure to tug on my sleeve and mention you’d like a free PIAF Thumb Drive. We’ll have a bunch of them to pass out to our loyal supporters. Nerd Vittles readers also can save 20% on your registration by using coupon code: AC12VIT.


Need help with Asterisk? Visit the PBX in a Flash Forum.
Or Try the New, Free PBX in a Flash Conference Bridge.


whos.amung.us If you’re wondering what your fellow man is reading on Nerd Vittles these days, wonder no more. Visit our new whos.amung.us statistical web site and check out what’s happening. It’s a terrific resource both for us and for you.


Special Thanks to Our Generous Sponsors


FULL DISCLOSURE: ClearlyIP, Skyetel, Vitelity, DigitalOcean, Vultr, VoIP.ms, 3CX, Sangoma, TelecomsXchange and VitalPBX have provided financial support to Nerd Vittles and our open source projects through advertising, referral revenue, and/or merchandise. As an Amazon Associate and Best Buy Affiliate, we also earn from qualifying purchases. We’ve chosen these providers not the other way around. Our decisions are based upon their corporate reputation and the quality of their offerings and pricing. Our recommendations regarding technology are reached without regard to financial compensation except in situations in which comparable products at comparable pricing are available from multiple sources. In this limited case, we support our sponsors because our sponsors support us.

BOGO Bonaza: Enjoy state-of-the-art VoIP service with a $10 credit and half-price SIP service on up to $500 of Skyetel trunking with free number porting when you fund your Skyetel account. No limits on number of simultaneous calls. Quadruple data center redundancy. $25 monthly minimum spend required. Tutorial and sign up details are here.

The lynchpin of Incredible PBX 2020 and beyond is ClearlyIP components which bring management of FreePBX modules and SIP phone integration to a level never before available with any other Asterisk distribution. And now you can configure and reconfigure your new Incredible PBX phones from the convenience of the Incredible PBX GUI.

VitalPBX is perhaps the fastest-growing PBX offering based upon Asterisk with an installed presence in more than 100 countries worldwide. VitalPBX has generously provided a customized White Label version of Incredible PBX tailored for use with all Incredible PBX and VitalPBX custom applications. Follow this link for a free test drive!
 

Special Thanks to Vitelity. Vitelity is now Voyant Communications and has halted new registrations for the time being. Our special thanks to Vitelity for their unwavering financial support over many years and to the many Nerd Vittles readers who continue to enjoy the benefits of their service offerings. We will keep everyone posted on further developments.


Some Recent Nerd Vittles Articles of Interest…

YATE in a Flash: Rolling Your Own SIP to Google Voice Gateway for Asterisk

A few weeks ago we introduced you to Bill Simon’s SIP to Google Voice Gateway featuring YATE. This let you set up a SIP connection to your Google Voice accounts in about 5 minutes by filling out a simple web form. Today, we take it to the next plateau for those who prefer to do it yourself. With a little assistance from Bill (about 99% of the brainpower behind what you’re about to read), we’re pleased to now offer you the alternative of creating your own SIP to Google Voice Gateway. You need not share your Google Voice credentials with anybody. Meet YATE in a Flash™.

Using today’s tutorial, we’ll show you how to create a YATE in a Flash server to which you can connect as many Asterisk® servers as you like using garden-variety SIP trunks. For those that have been using one of the last half-dozen Asterisk 10 releases in which Google Voice connectivity was totally broken and for those who have languished at Asterisk 10.0.x simply to preserve Google Voice connectivity, today’s YATE alternative is a godsend because it restores the ability to make free incoming and outgoing calls in the U.S. and Canada using any flavor of Asterisk with nothing more than a SIP trunk connection to your YATE in a Flash server. We also believe it is in everyone’s best interests to pursue other Google Voice alternatives given Digium’s recent position to no longer support Gtalk and Google Voice.

If you read Malcolm Davenport’s comment in a vacuum, you’d probably come away believing that Google Voice is just too unreliable to be a supported piece of Asterisk. Funny thing is that Google Voice still works flawlessly with Asterisk 1.8, Certified Asterisk, ObiHai devices, FreeSwitch, and, of course, YATE. We’ll let you draw your own conclusions about who is responsible for the mess with Asterisk 10. Suffice it to say, if "the community" hasn’t managed to address this in 90 days, it’s probably never going to be resolved satisfactorily… and Asterisk 11 is just around the corner. So, for once, we find ourselves in total agreement with Malcolm, "building a business based on Google Voice calling using Asterisk is not something that would be recommended." YATE appears to us to be a much more satisfactory long-term solution for those that actually rely upon Google Voice.

All of the scripts today are licensed as GPL2 code, by the way, so you’re free to embellish and enhance them to meet your own needs. Please share your improvements with us so we can pass them along to "the community."

Prerequisites. Today’s design assumes you have a server running under CentOS™ 6.2. A virtual machine works fine. While YATE runs on many other operating systems, we wanted a platform that matched our existing PBX in a Flash™ and VPN in a Flash™ environment. You will also need one or more dedicated Google Voice accounts to use in conjunction with Yate in a Flash. Do NOT use a Google Voice account with a Gmail address that you already use for email, messaging, or web phone calls!

Using the original install scripts won’t work to run YATE on an existing Asterisk server. But, if you’re a true pioneer and appreciate the risks, we’ve now included scripts for BOTH dedicated server and colocated server setups so you won’t need to make any manual adjustments. Be advised that we haven’t tested colocated YATE and Asterisk under a real-world load yet to determine what impact YATE will have on the performance of an existing Asterisk server so it’s probably not a good idea to try this on your production Asterisk machine just yet. With the low cost of virtual machine environments, there’s really no reason to run YATE and Asterisk on the same machine or virtual machine. Suffice it to say, there are many issues with conflicting port assignments for telnet, sip, and iax2 as well as listening ports. While YATE is very flexible, this colocated setup still is untested.

PBX in a Flash 2.0.6.2.5 should be on the street within the next few days or weeks. With its new all-in-one design, there will be an ISO menu option allowing you to install Yate in a Flash as a standalone server with one click. Until then, we recommend using the PIAF 2.0.6.2.4 ISO and selecting the VPN in a Flash server option. This provides an ideal platform for YATE in a Flash with the added bonus of a NeoRouter VPN server and client which happens to be the perfect way to securely interconnect your PIAF and YIAF platforms via SIP.

Overview. Yate in a Flash actually consists of several scripts. For dedicated servers (meaning Asterisk is running on a separate machine), you’ll use install-yate and add-yate-user. For colocated servers (meaning Asterisk is running on the same machine), you’ll use install-yate-on-piaf and add-piaf-yate-user. As the names imply, the first script is used to actually set up your YATE in a Flash server. The second script is used to add SIP/Google Voice accounts to the YATE server. As part of the installation process, YATE is actually compiled from source code that you’ll find in /usr/src/yate on your server. Never run install-yate more than once on the same server.

To begin, you’ll need to download and untar the YIAF tarball. Then you run install-yate or install-yate-on-piaf to get YATE installed and configured. After creating and testing your Google Voice accounts at google.com/voice, you add user accounts to YATE for each existing Google Voice account you wish to activate on your YATE in a Flash server. Each time you run add-yate-user (dedicated) or add-piaf-yate-user (colocated), the script will create a new YATE user account, Google Voice account, and SIP account on your YATE server based upon your 10-digit Google Voice number. Do yourself a favor and delete the two scripts that don’t pertain to your particular setup: dedicated or colocated. Then you won’t have to worry about using the wrong ones down the road.

Once you have YATE set up and at least one account configured, then we’ll switch to your dedicated Asterisk server and use FreePBX® to add a SIP trunk, outbound route, and inbound route for each YATE account that was created. For outbound calling, we think the easiest method to take advantage of multiple Google Voice trunks is to use a different dial prefix for each account you wish to set up.

To keep it simple, in our examples today we’ll use airport codes as prefixes so we know which Google Voice trunk is actually being used to place a call, e.g. dialing ATL-404-555-1212 (285-404-555-1212) will tell FreePBX to dial out through an Atlanta Google Voice trunk and MIA-305-555-1212 (642-305-555-1212) will tell FreePBX to dial out through a Miami Google Voice trunk. Of course, the free calls can be placed to anywhere in the U.S. and Canada regardless of the Google Voice trunk you use. However, the outbound CallerID will always be the CallerID number of the Google Voice trunk being used to place the call. Before the call is actually sent via SIP to YATE for processing via Google Voice, we’ll use FreePBX to strip off the dial prefix and add a leading 1 to match the dial string format that YATE expects to see: 1NXXNXXXXXX. If you happen to be a regex genius, this could all be done on the YATE side as well, but using FreePBX makes it easy to follow:

^285\(1[0-9]\+\)$=jingle/\1@voice.google.com;line=GV40412334567;ojingle_version=0;ojingle_flags=noping;...etc.

Installing YATE. As we mentioned, until the PIAF 2.0.6.2.5 ISO is released with the option to install YATE, we recommend you download the PIAF 2.0.6.2.4 ISO and install the VPN in a Flash server from the all-in-one menu. Once you have completed the installation of VIAF, log into your server as root and issue the following commands to install YATE:

cd /root
wget http://pbxinaflash.com/YIAF.tgz
tar zxvf YIAF.tgz

If you’re installing YATE on a separate server than your Asterisk server, then issue the following command to install YATE:

/root/install-yate

If you’re installing YATE on the same server as your Asterisk server, then issue the following command to install YATE:

/root/install-yate-on-piaf

It takes about 5 minutes for YATE to compile. Once YATE is up and running, you can monitor your YATE server using telnet. If it’s running on a dedicated server, use the command: telnet 127.0.0.1 5038. If YATE is colocated on the same server as your Asterisk machine, use this command: telnet 127.0.0.1 5039. 5038 is reserved for Asterisk. Issuing the status command will tell you what’s loaded. And we’ve found it especially handy to issue the command: debug on. This lets you track everything going on with YATE without referring to the log: /var/log/yate. To exit from your telnet session, type quit. We, of course, are barely scratching the surface of what you can do with YATE. It also can be used as a full-fledged telephony engine. Here are some examples:

Just a heads up that the version of YATE being installed comes from an svn checkout several weeks ago. We zipped it up into a tarball which is downloaded as part of install-yate. With more recent builds, we have had problems with audio and the RTP stream. Until someone can sort out the issue, you’re well advised to stick with our snapshot if you want your calls to complete successfully.

Hopefully, today’s article will bring some of the YATE gurus out of the woodwork and inspire them to share their knowledge with the rest of the VoIP community. We’d be delighted to publish further articles. It’s a truly awesome platform. As I have mentioned to some of my colleagues, it reminds me of where the Asterisk community was about seven years ago. Much of the information about YATE is buried in endless threads of mailing list messages. This is an extremely difficult way to learn about and deploy a new technology. But we’re more than willing to do our part to spread the word. We’d also be happy to add a YATE Forum to the PIAF Forums so that everyone would have a searchable collection of tips in using YATE. Let us know what you think.

Configuring Google Voice. As we mentioned, you’ll need a dedicated Google Voice account for this. The more obscure the username (with some embedded numbers), the better off you will be. This will keep folks from bombarding you with unsolicited Gtalk chat messages, and who knows what nefarious scheme will be discovered using Google messaging six months from now.

We’ve tested this extensively using an existing Gmail account, and inbound calling is just not reliable. The reason seems to be that Google always chooses Gmail chat as the inbound call destination if there are multiple registrations from the same IP address. So, be reasonable. Do it our way! Set up a dedicated Gmail and Google Voice account, and use it exclusively for this new SIP gateway. Head over to the Google Voice site and register. If you’re living on another continent, see MisterQ’s posting for some tips on getting set up.

You must choose a telephone number (aka DID) for your new account, or Google Voice calling will not work… in either direction. You also have to tie your Google Voice account to at least one working phone number as part of the initial setup process. Your cellphone number will work just fine. Don’t skip this step either. Just enter the provided 2-digit confirmation code when you tell Google to place the test call to the phone number you entered. Once the number is registered, you can disable it if you’d like in Settings, Voice Setting, Phones. But…

IMPORTANT: Be sure to enable the Google Chat option as one of your phone destinations in Settings, Voice Setting, Phones. That’s the destination we need for the SIP gateway to work its magic! Otherwise, all inbound and outbound calls will fail. If you don’t see this option, you may need to call up Gmail and enable Google Chat there first. Then go back to the Google Voice Settings.

While you’re still in Google Voice Settings, click on the Calls tab. Make sure your settings match these:

  • Call ScreeningOFF
  • Call PresentationOFF
  • Caller ID (In)Display Caller’s Number
  • Caller ID (Out)Don’t Change Anything
  • Do Not DisturbOFF
  • Call Options (Enable Recording)OFF
  • Global Spam FilteringON

Click Save Changes once you adjust your settings. Under the Voicemail tab, plug in your email address so you get notified of new voicemails. Down the road, receipt of a Google Voice voicemail will be a big hint that something has come unglued.

Next, go into Gmail for this same account and place a test call using your new Google Voice number. You’ll find the Call Phone icon in the Chat and SMS section of Gmail in the left column. Once you complete this step, be sure to log out of both Gmail and Google Voice for this account, or inbound calling will never work.

Finally, a heads up. If you are planning to use a Google Voice account that you set up previously from a different IP address, be advised that Google has some sophisticated protection mechanisms in place to deter the bad guys. As Bill Simon discovered, this may result in your not being able to connect to Google Voice from your new YIAF server. If that happens to you, follow the steps in this Google article to unlock your account.

Adding Accounts to YATE. Now that you have your Google Voice account set up and tested, we’re ready to add an account to YATE to manage it. First, be sure you have logged out of Gmail and Google Voice for the account you plan to use, or inbound calls will never make it to YATE. You’re going to need the following information to set up a new account on your YATE server:

Google Voice account name (without @gmail.com)
Google Voice account domain (usually gmail.com)
Google Voice account password
Google Voice 10-digit phone number
YATE account name will be auto-generated
YATE account password (make it very secure!)
IP address of your YATE server (unless colocated)

If you care about security, we’d strongly recommend you consider installing a NeoRouter VPN Client on both your YATE server and Asterisk server. Use the 10.0.0.x addresses for communications between the servers, and everything will be encrypted between the machines. It also greatly simplifies the firewall and security issues. If you’ve taken our advice and installed your YATE server with VPN in a Flash, then the VPN client is already in place. Just run nrclientcmd and fill in the blanks to activate it. For tips on VPN in a Flash server setup, see this article. Be sure to write down the 10.0.0.x address of your YATE server once you get the VPN client running.

To add a new account to YATE for your new Google Voice number, log into your YATE in a Flash server as root and issue the command: /root/add-yate-user (dedicated) or /root/add-piaf-yate-user (colocated). Fill in the blanks as shown above. Be sure to write down the FreePBX Trunk settings when they are displayed. You’ll need them in the next step.

Configuring FreePBX. To finish the install, you’ll need to open the FreePBX GUI on your PBX in a Flash server using a web browser. Here are the steps. If your system doesn’t already have a default inbound route pointing to Hangup, do that first: Setup -> Inbound Routes -> Add Incoming Route.

After you have the Default Inbound Route pointing to Hangup in place, only then is it advisable to Allow Anonymous SIP Calls. Any Anonymous SIP Call not handled by an Inbound Route will immediately be disconnected. You’ll find the Allow Anonymous SIP Calls option under Setup -> General Settings or Settings -> General Settings for FreePBX 2.10:

Once you have those two pieces in place, then you’re ready to Add a new SIP trunk, Outbound Route, and Inbound Route for each new Google Voice account that you add to YATE.

1. Add SIP Trunk. Choose Connectivity -> Trunks -> Add SIP Trunk and plug in the credentials that were provided when you added your Google Voice account to YATE. We recommend numbering your SIP trunks for Yate in sequential order, e.g. YIAF1, YIAF2, etc. We’re assuming YIAF1 is your Miami Google Voice trunk in this example so ignore the 843 area code. You’re smart enough to figure out your Miami Google Voice DID for yourself. This 10-digit Google Voice DID also goes on the end of the Register String after the hash tag (/) and is not shown below:

2. Add Outbound Route. Choose Connectivity -> Outbound Routes -> Add Outbound Route. Assuming this is the Outbound Route for your Miami Google Voice trunk, fill in the form in every spot we’ve placed a pink mark like this:

These dialing rules tell PBX in a Flash to dial out through the YIAF1 SIP trunk to Google Voice whenever a user dials a 10-digit or 11-digit number with the M-I-A (642) prefix. And it tells FreePBX to strip off the 642 and add a 1 (if it is missing) before sending the call to YATE. The SIP trunk settings in YIAF1 will assure that YATE places the outbound call on the Miami Google Voice trunk when it receives 1NXXNXXXXX from Asterisk.

3. Add Inbound Route. Incoming calls from the Miami Google Voice trunk will come into Asterisk as Anonymous SIP calls with the DID of the Google Voice trunk. In order to avoid an automatic Hangup, we need to create an Inbound Route for this DID. This will be the 10-digit DID of your Google Voice trunk and will match the 10-digit number on the end of the YIAF1 trunk’s Registration String. You can route these calls in any way you like on your Asterisk system, e.g. to an Extension, a Ring Group, an IVR, or whatever. Here’s an example for you to follow. Again, please ignore the non-Miami area code. We were too lazy to fix it.

So there you have it. You’re now the proud owner of your own SIP-to-GoogleVoice Gateway courtesy of YATE and Bill Simon. You can add as many Google Voice trunks as you like. And you’ll have Google Voice connectivity with Asterisk 1.8, Asterisk 10, or Certified Asterisk without ever worrying about Asterisk "improvements" that break Google Voice down the road. To add additional trunks, do the following. On the YATE side, add-yate-user. And, on the PBX in a Flash side, complete FreePBX steps 1, 2, and 3 above using the credentials provided by add-yate-user. Enjoy!

NEWS FLASH: We are pleased to announce a new YATE Forum to provide support for YATE in a Flash as well as YATE. Come visit soon!

Originally published: Monday, June 25, 2012


Trials and Tribulations of a Service Provider. We have one of the best service providers in the business. WestNic has offered exemplary service and a secure computing platform to Nerd Vittles and PBX in a Flash for many years. We consume enormous computing resources for what we pay. But the last couple weeks have been painful. First, we were on vacation when WestNic made the transition (again) to PHP 5.3. These things usually happen in the middle of the night, and this was no exception. Unfortunately, we still were running a very old, highly customized (but very secure) version of WordPress. When morning came, Nerd Vittles died. We immediately knew why because we already had experienced PHP 5.3 a few months earlier, and WestNic graciously rolled it back… just for us. Unfortunately (for us), they didn’t tell us the new drop dead date. And, yes, we should have been updating WordPress. But it’s kinda like going to the dentist. You never quite get around to it until you have to. Well, now we had to. This involved backing up and restoring Nerd Vittles to another server still running the older version of PHP. So far, so good. It took about three hours to do the three WordPress updates, but all went well. Then we moved the site back to its home, and nothing worked again. Unfortunately, this hit on a weekend, and the weekend guys claimed it was a WordPress problem. It wasn’t this time, but it took until Monday morning to get the new php.ini file sorted out to accomodate PHP 5.3. Whew!

Then came the real fun. About 25% of the threads on the PBX in a Flash Forum could not be displayed. All you got was a blank screen when you clicked on a thread. As is customary with these types of issues, the XenForo developers blamed the provider. And the provider blamed XenForo. The provider uses mod_security to protect its web sites. But the provider assured us that nothing had changed. Well, nothing in mod_security anyway. After days and days of testing and back and forth, it turned out that the provider had added a new security mechanism, suhosin, which its developer touts as the "Guardian Angel" for PHP. That may be true for providers, but not so much for folks that actually depend upon their sites working. Welcome to a new can of worms!

Having been on both sides of this fence, we can readily appreciate the dilemma of the service providers. They don’t want their servers hacked. Denying access to all users would accomplish that goal but would reduce the number of paying customers pretty dramatically. So we all try to reach that happy medium trading off a little security for a bit more access. In this case, it turned out to be a couple of suhosin settings that monitor the length of URLs. We discovered that only after running literally hundreds of tests. Since XenForo’s forum software makes extensive use of lengthy URLs to maintain compatibility with older vBulletin posts, this caused a problem. HTML requests with URLs exceeding a certain length are simply thrown in the bit bucket by suhosin. The biggest hint was sitting in the service provider’s Apache log, but we had no access to that information, and they never looked until two and a half days after we first opened a trouble ticket. No errors appeared in our logs, and users got nothing but blank pages where the subject of a post on the forum exceeded 50 characters. Fortunately, that was enough of a hint to finally resolve the problem. The unfortunate part of this story is that, without 25 years of personal IT experience plus over 100 IT gurus that visit our sites regularly, it’s doubtful this ever would have gotten resolved other than by begging the provider to turn off mod_security and suhosin for our sites, something we were unwilling to do. If something similar ever happens to you, the command you need to know is php -v. This will tell you what’s running with PHP on your host. Our provider had implied that suhosin had not yet been activated. php -v suggested just the opposite. So did their error log once they looked. The other place to start searching for configuration information is /usr/local/lib/php.ini. This will tell you how your provider has PHP configured and whether your local php.ini file is even activated. Our provider suggested more than once that our local php.ini file had been misconfigured. We’d never touched it and, in our case, the server’s php.ini file indicated that it was never activated regardless of what its contents may have contained.

We’re glad everything is fixed. We all learned more than we ever wanted to know about suhosin. Still wishing there had been a little better communications with our provider. It would have made resolution a lot easier and quicker for all concerned. It’s especially difficult to resolve thorny issues like this using service tickets with response times of half a day per message. Did we mention there is virtually no documentation on suhosin and what each of its several dozen settings actually do. Our apologies to everyone that was impacted by the service disruptions. We’re glad it’s behind us.


Need help with Asterisk? Visit the NEW PBX in a Flash Forum.


whos.amung.us If you’re wondering what your fellow man is reading on Nerd Vittles these days, wonder no more. Visit our new whos.amung.us statistical web site and check out what’s happening. It’s a terrific resource both for us and for you.


Special Thanks to Our Generous Sponsors


FULL DISCLOSURE: ClearlyIP, Skyetel, Vitelity, DigitalOcean, Vultr, VoIP.ms, 3CX, Sangoma, TelecomsXchange and VitalPBX have provided financial support to Nerd Vittles and our open source projects through advertising, referral revenue, and/or merchandise. As an Amazon Associate and Best Buy Affiliate, we also earn from qualifying purchases. We’ve chosen these providers not the other way around. Our decisions are based upon their corporate reputation and the quality of their offerings and pricing. Our recommendations regarding technology are reached without regard to financial compensation except in situations in which comparable products at comparable pricing are available from multiple sources. In this limited case, we support our sponsors because our sponsors support us.

BOGO Bonaza: Enjoy state-of-the-art VoIP service with a $10 credit and half-price SIP service on up to $500 of Skyetel trunking with free number porting when you fund your Skyetel account. No limits on number of simultaneous calls. Quadruple data center redundancy. $25 monthly minimum spend required. Tutorial and sign up details are here.

The lynchpin of Incredible PBX 2020 and beyond is ClearlyIP components which bring management of FreePBX modules and SIP phone integration to a level never before available with any other Asterisk distribution. And now you can configure and reconfigure your new Incredible PBX phones from the convenience of the Incredible PBX GUI.

VitalPBX is perhaps the fastest-growing PBX offering based upon Asterisk with an installed presence in more than 100 countries worldwide. VitalPBX has generously provided a customized White Label version of Incredible PBX tailored for use with all Incredible PBX and VitalPBX custom applications. Follow this link for a free test drive!
 

Special Thanks to Vitelity. Vitelity is now Voyant Communications and has halted new registrations for the time being. Our special thanks to Vitelity for their unwavering financial support over many years and to the many Nerd Vittles readers who continue to enjoy the benefits of their service offerings. We will keep everyone posted on further developments.


Some Recent Nerd Vittles Articles of Interest…

5-Minute VoIP: Deploying a SIP to Google Voice Gateway

We’ve been big fans of Google Voice since the outset. But, with the exception of one brief week, the piece Google has always refused to put in place is a SIP gateway to make connections from VoIP devices a no-brainer. You’d think they’d do it for no other reason than economics. SIP calls are free. PSTN calls are not. Well, never mind Google. Bill Simon has done it for you, and he leveraged the same Yate toolkit that Google originally deployed. Today, we’ll show you how to spend five minutes and take advantage of the Simon Telephonics gateway to interconnect a dedicated Google Voice account with any SIP device you’d like, whether it’s an Asterisk® server, a smartphone with a free SIP client from GrooVe IP or Zoiper, a free softphone from Zoiper or X-Lite 4, or any SIP telephone. Once we’re finished today, you can use any SIP client to call your 10-digit Google Voice number through the Simon Telephonics gateway: SIP/9991234567@gvgw1.simonics.com. And you can make and receive calls throughout the U.S. and Canada using your new Google Voice number the old fashioned way, using a Plain Old Telephone. Did we mention that everything is free: the Google Voice number, the Simon Telephonics gateway connection, all of the inbound calls, and outbound calls throughout the U.S. and Canada… at least in 2012. If you take advantage of Bill’s gateway, we would encourage you to at least donate one day’s lunch money to Bill’s site to help pay the light bill.

Getting Started. The drill for today goes like this. First, you’ll create a new Google Voice account with a new phone number at google.com/voice. Next, you’ll make a test call from that number using the Gmail account associated with that same account. Then, you’ll register the Google Voice number on the Simon Telephonics gateway. Next, we’ll set up a SIP trunk on your Asterisk server for this new DID. Finally, configure any SIP client with an extension number from your Asterisk PBX, and you can start making and receiving calls using your new Google Voice number.

A Word About Security. Google doesn’t (yet) support OAuth authentication for Google Voice accounts. What this means is that you’ll have to use your actual Google Voice credentials to set up your account on the Simon Telephonics gateway. Could Bill steal your credentials? Absolutely. Will he? Absolutely not. Why? First, there’s no money in your Google Voice account so all he could do is make free calls on Google’s nickel, the same thing he could do using his own Google Voice accounts. Second, Bill is better off setting up his own accounts where you don’t share his password and the Google Voice call logs won’t tell you who he’s calling. If you’re paranoid, don’t put money in your calling account, make the account name something that could not be associated with you, and then check your call logs several times every day. Better yet, spend $50 and use an OBi110 device to set up your own private gateway where Obihai knows your credentials instead of Bill. 😉

Configuring Google Voice. As we mentioned, you’ll need a dedicated Google Voice account for this. The more obscure the username (with some embedded numbers), the better off you will be. This will keep folks from bombarding you with unsolicited Gtalk chat messages, and who knows what nefarious scheme will be discovered using Google messaging six months from now.

We’ve tested this extensively using an existing Gmail account, and inbound calling is just not reliable. The reason seems to be that Google always chooses Gmail chat as the inbound call destination if there are multiple registrations from the same IP address. So, be reasonable. Do it our way! Set up a dedicated Gmail and Google Voice account, and use it exclusively for this new SIP gateway. Head over to the Google Voice site and register. If you’re living on another continent, see MisterQ’s posting for some tips on getting set up.

You must choose a telephone number (aka DID) for your new account, or Google Voice calling will not work… in either direction. You also have to tie your Google Voice account to at least one working phone number as part of the initial setup process. Your cellphone number will work just fine. Don’t skip this step either. Just enter the provided 2-digit confirmation code when you tell Google to place the test call to the phone number you entered. Once the number is registered, you can disable it if you’d like in Settings, Voice Setting, Phones. But…

IMPORTANT: Be sure to enable the Google Chat option as one of your phone destinations in Settings, Voice Setting, Phones. That’s the destination we need for the SIP gateway to work its magic! Otherwise, all inbound and outbound calls will fail. If you don’t see this option, you may need to call up Gmail and enable Google Chat there first. Then go back to the Google Voice Settings.

While you’re still in Google Voice Settings, click on the Calls tab. Make sure your settings match these:

  • Call ScreeningOFF
  • Call PresentationOFF
  • Caller ID (In)Display Caller’s Number
  • Caller ID (Out)Don’t Change Anything
  • Do Not DisturbOFF
  • Call Options (Enable Recording)OFF
  • Global Spam FilteringON

Click Save Changes once you adjust your settings. Under the Voicemail tab, plug in your email address so you get notified of new voicemails. Down the road, receipt of a Google Voice voicemail will be a big hint that something has come unglued.

Finally, go into Gmail for this same account and place a test call using your new Google Voice number. You’ll find the Call Phone icon in the Chat and SMS section of Gmail in the left column. Once you complete this step, be sure to log out of both Gmail and Google Voice for this account, or inbound calling will never work.

Registering on the Simon Telephonics Gateway. Now we’re ready to register your Google Voice account on the Simon Telephonics Gateway. Click on the link and fill in the blanks with your Google Voice account credentials and phone number. Be sure to include a 1 at the beginning of your Google Voice number! You’ll note that Google Apps email domains are supported as well as gmail.com addresses.

  • Google Voice Number19991234567
  • GV Usernamejoeschmo2468
  • GV Domaingmail.com
  • GV Passwordmightysecret
  • GV Password againmightysecret
  • Email Addressjoeschmo@yahoo.com

Check your entries carefully and then click the Add button. The only way to make changes if you screw things up is to delete the existing account by entering your original credentials to Delete the original account and then you Add a new one. So type carefully and check your work. Once your account is successfully registered, the Simon Telephonics Gateway will spit back your new SIP credentials. Write them down or take a screenshot and put them in a safe place. You’ll need them to set up your Asterisk SIP trunk. The Username will be your 11-digit Google Voice number with a GV prefix. The Secret will be a randomized string. The Registration String will be used in setting up your Asterisk SIP trunk and is in the proper format. The DID for your Inbound Route in FreePBX® will be your 11-digit Google Voice number.

  • Servergvgw1.simonics.com
  • UsernameGV19991234567
  • SecretXyzkk
  • Registration StringGV19991234567:Xyzkk@gvgw1.simonics.com/19991234567
  • Dialing FormatE.164 without + (for US calls, 11 digits starting with 1)

NOTE: Newer users may be provided an alternate gateway, e.g. gvgw2.simonics.com. You would obviously need to use whichever gateway FQDN is provided in all of the settings shown here.

Creating FreePBX SIP Trunk. Now we’re ready to create your new SIP trunk in FreePBX. Choose Add SIP Trunk and fill in the blanks as shown below with your new credentials. The Trunk Name can be any name you like. Don’t forget the 1 in Prepend for the Dialed Number Manipulation Rules! Leave the Incoming Settings blank. Be sure to add your Registration String from the credentials that were provided as part of the Simon Telephonics registration. Then Save Your Settings.

Creating FreePBX Inbound Route. Now you’ll need to add an Inbound Route to process incoming calls from the Simon Telephonics Gateway. The DID entry will be your 11-digit Google Voice number. The Destination for the incoming calls can be whatever you like: an extension, a ring group, an IVR, or any of the other available options on your server.

Creating FreePBX Outbound Route. If you want to send outbound calls out through your new Google Voice trunk, then you’ll need to add the SIP trunk to your outbound dialing rules. Just add the SIP Trunk Name you’ve defined to the Trunk Sequence for calls with the NXXNXXXXXX Dial Pattern, and you’re all set. Enjoy!

Originally published: Monday, June 11, 2012


Need help with Asterisk? Visit the PBX in a Flash Forum.


whos.amung.us If you’re wondering what your fellow man is reading on Nerd Vittles these days, wonder no more. Visit our new whos.amung.us statistical web site and check out what’s happening. It’s a terrific resource both for us and for you.


Special Thanks to Our Generous Sponsors


FULL DISCLOSURE: ClearlyIP, Skyetel, Vitelity, DigitalOcean, Vultr, VoIP.ms, 3CX, Sangoma, TelecomsXchange and VitalPBX have provided financial support to Nerd Vittles and our open source projects through advertising, referral revenue, and/or merchandise. As an Amazon Associate and Best Buy Affiliate, we also earn from qualifying purchases. We’ve chosen these providers not the other way around. Our decisions are based upon their corporate reputation and the quality of their offerings and pricing. Our recommendations regarding technology are reached without regard to financial compensation except in situations in which comparable products at comparable pricing are available from multiple sources. In this limited case, we support our sponsors because our sponsors support us.

BOGO Bonaza: Enjoy state-of-the-art VoIP service with a $10 credit and half-price SIP service on up to $500 of Skyetel trunking with free number porting when you fund your Skyetel account. No limits on number of simultaneous calls. Quadruple data center redundancy. $25 monthly minimum spend required. Tutorial and sign up details are here.

The lynchpin of Incredible PBX 2020 and beyond is ClearlyIP components which bring management of FreePBX modules and SIP phone integration to a level never before available with any other Asterisk distribution. And now you can configure and reconfigure your new Incredible PBX phones from the convenience of the Incredible PBX GUI.

VitalPBX is perhaps the fastest-growing PBX offering based upon Asterisk with an installed presence in more than 100 countries worldwide. VitalPBX has generously provided a customized White Label version of Incredible PBX tailored for use with all Incredible PBX and VitalPBX custom applications. Follow this link for a free test drive!
 

Special Thanks to Vitelity. Vitelity is now Voyant Communications and has halted new registrations for the time being. Our special thanks to Vitelity for their unwavering financial support over many years and to the many Nerd Vittles readers who continue to enjoy the benefits of their service offerings. We will keep everyone posted on further developments.


Some Recent Nerd Vittles Articles of Interest…

Introducing PPTP VPNs: The Travelin’ Man’s Best Friend

It’s been almost three years since we introduced VoIP Over VPN to securely interconnect Asterisk® servers. As LogMeIn® continues to squeeze the free Hamachi® VPN into oblivion, we’ll have a new, Really Free™ matrix VPN solution for you in coming weeks. This will let you interconnect up to 256 PBX in a Flash™ servers in minutes, not months, with no muss, no fuss, no fees, and no licensing worries. But today we want to begin VPN Month by turning our attention to those that need a virtual private network to connect back to a home office network or a home for that matter. This includes the traveling businessman or woman, the physician or lawyer with multiple remote offices, and any hub-and-spoke business such as a bank that has small branch offices that need to transparently link back to the mothership for network and communications services. The hidden beauty of PPTP VPNs is that all data (including phone calls) travels through an encrypted tunnel between the satellite office and home base. If you travel for a living and rely on other people’s WiFi networks for Internet access, a layer of network security will be a welcome addition.

Believe it or not, Microsoft introduced the Point-to-Point-Tunneling-Protocol (PPTP) with Windows 95. Back then we knew it as Dial-Up Networking. Suffice it to say that, in those days, PPTP was anything but secure. Unfortunately, the bad name kinda stuck. For the most part, the security issues have been addressed with the possible exception of man-in-the-middle attacks which are incredibly difficult to pull off unless you are a service provider or have access to the wiring closets of your employer. You can read the long history of PPTP VPNs on Wikipedia for more background. If you’re traveling to China or other democracy-challenged destinations, you probably shouldn’t rely upon PPTP for network security. If these security considerations aren’t applicable in your situation, keep reading because PPTP VPNs are incredibly useful and extremely easy to deploy for an extra layer of VoIP and network security in most countries that have severe wiretapping penalties in place.

PPTP VPNs also provide home-away-from-home transparency to home office network services. Simply stated, with a PPTP VPN, you get a private IP address on the home office LAN that lets you do almost anything you could have done sitting at a desk in the home office. There’s more good news. Fifteen years ago, we paid Cisco thousands of dollars for hardware boxes known as PPTP VPN Concentrators. You can still find some of them on eBay. For history buffs, a little company in California originally built these boxes. I think we paid about $3,000 for them. One year later Cisco bought the company and promptly doubled the price. Today, you can Do It For Free™ using your existing PIAF2 server platform. And, trust me, today’s 2-minute setup runs circles around the hoops we jumped through 15 years ago to install PPTP VPNs. Once deployed, they revolutionized mobile computing.

If you’re already running one or more PIAF2™ servers, then adding a PPTP VPN server to an existing system is a job for a Fifth Grader. Remember, you only need to do this on one server at your home base even if you have a dozen. The other good news is there are PPTP VPN clients for almost any platform you can name. Linux, Windows, Macs, Android, as well as iPhones, iPads, and iPod Touch devices all have free PPTP VPN clients that can be activated in less than a minute giving you instant, secure home base access.

Getting Started. We’re assuming you already have a PBX in a Flash 2 server set up behind a hardware-based firewall. If not, start there. Next, we’ll need to download and run the installer for your PPTP VPN Server. Just log into your server as root and issue the following commands:

wget http://incrediblepbx.com/install-pptp
chmod +x install-pptp
./install-pptp

UPDATE: For those of you still running a PBX in a Flash 1.7.x server under CentOS 5, we have a separate install script for you thanks to the great work of scurry7:

wget http://incrediblepbx.com/install-pptp-centos5
chmod +x install-pptp-centos5
./install-pptp-centos5

The Server Install: Five Easy Pieces. The installer will walk you through these five installation steps, but we’ll repeat them here so you have a ready reference down the road.

First, on your hardware-based firewall, map TCP port 1723 to the private IP address of your PIAF2 server. This tells the router to send all PPTP VPN traffic to your PIAF2 server when it hits your firewall. If you forget this step, your PPTP VPN will never work!

Second, you’re going to need a dedicated IP address on your private LAN to assign to the PPTP VPN server. Make sure it’s not an IP address from your router’s DHCP pool of addresses, and make sure it’s not one of the addresses from Step #3 below.

Third, you’re going to need two or more sequential IP addresses on your private LAN to assign to PPTP VPN clients that connect to your server. Remember, the PPTP design makes every remote client a node on your local area network so each client needs a private IP address on your LAN. Figure out how many client devices will be simultaneously connecting to your server and add one to it. Make sure the addresses you choose are in sequential order and not part of your router’s DHCP pool of addresses. Don’t use the address reserved for your PPTP server in Step #2 above. The address range should look something like this entry: 192.168.0.41-49. If you get the syntax wrong, guess what happens? If you screw it up, you can edit your localip and remoteip entries in /etc/pptpd.conf.

Fourth, each user is going to need a username to access your PPTP server. We’re going to set up credentials for one user as part of the install. You can add extra ones by adding entries to /etc/ppp/chap-secrets. For an extra layer of security, make the username as obscure as a password. Just don’t use any special characters. Upper and lowercase letters sprinkled with numbers are perfect. We recommend a length of at least 8 alphanumeric characters.

Fifth, make up an equally secure password to access your PPTP server. Same rules apply as in Step #4.

You’re done. Review your entries very carefully. If all is well, press Enter. If you blink, you may miss the completion of the install process. It’s that quick.

Configuring PPTP Client Devices. As we mentioned, there are available PPTP clients for Linux and Windows machines and Macs as well as Android and Apple smartphones and tablets. We’ve documented the steps for the various client setups on the PBX in a Flash Forum. Come visit! You’ll also discover some great tips from our resident gurus. We also would encourage you to post any questions that arise in your use of PPTP VPNs in that thread. You’ll get a quick and courteous response.

Secure VoIP Calling. The collateral benefit of implementing a PPTP VPN on your PIAF server is that all calls between remote extensions and home base can now be transmitted through a secure VPN tunnel. The only adjustment necessary using a SIP client on either an Android or Apple device is to replace the public server IP address with the server’s LAN IP address, and all of the communications traffic will flow through the VPN tunnel. The way we set up our Android phone with the Bria SIP client is to allocate an extension from the home office PIAF server to the SIP client and then enter the private IP address of the PIAF server in the Bria configuration. Then, when you’re at home base with WiFi, the client just works. And, when you’re on the road, just turn on the PPTP VPN, and Bria will register through the VPN tunnel using the exact same settings. It’s that easy, and it works great with WiFi or 3G/4G.

Checking for Connected Clients. If you get curious about who is logged into your PPTP server, here’s the command that’ll let you know: last | grep ppp.

GPL2 License. The install-pptp application is open source software licensed under GPL2. It has been specifically tailored for use on PBX in a Flash 2 (and now PIAF 1.7.x) servers, but it can easily be adjusted to work with virtually any Linux-based Asterisk system. If you make additions or changes, we hope you’ll share them on our forums for the benefit of the entire VoIP community. Enjoy!

What’s Next? For a more traditional client-server VPN which still relies upon a central server but uses a star topology to connect remote nodes, see this new Nerd Vittles article on the NeoRouter VPN.

Originally published: Monday, April 9, 2012


Need help with Asterisk? Visit the NEW PBX in a Flash Forum.


whos.amung.us If you’re wondering what your fellow man is reading on Nerd Vittles these days, wonder no more. Visit our new whos.amung.us statistical web site and check out what’s happening. It’s a terrific resource both for us and for you.


Special Thanks to Our Generous Sponsors


FULL DISCLOSURE: ClearlyIP, Skyetel, Vitelity, DigitalOcean, Vultr, VoIP.ms, 3CX, Sangoma, TelecomsXchange and VitalPBX have provided financial support to Nerd Vittles and our open source projects through advertising, referral revenue, and/or merchandise. As an Amazon Associate and Best Buy Affiliate, we also earn from qualifying purchases. We’ve chosen these providers not the other way around. Our decisions are based upon their corporate reputation and the quality of their offerings and pricing. Our recommendations regarding technology are reached without regard to financial compensation except in situations in which comparable products at comparable pricing are available from multiple sources. In this limited case, we support our sponsors because our sponsors support us.

BOGO Bonaza: Enjoy state-of-the-art VoIP service with a $10 credit and half-price SIP service on up to $500 of Skyetel trunking with free number porting when you fund your Skyetel account. No limits on number of simultaneous calls. Quadruple data center redundancy. $25 monthly minimum spend required. Tutorial and sign up details are here.

The lynchpin of Incredible PBX 2020 and beyond is ClearlyIP components which bring management of FreePBX modules and SIP phone integration to a level never before available with any other Asterisk distribution. And now you can configure and reconfigure your new Incredible PBX phones from the convenience of the Incredible PBX GUI.

VitalPBX is perhaps the fastest-growing PBX offering based upon Asterisk with an installed presence in more than 100 countries worldwide. VitalPBX has generously provided a customized White Label version of Incredible PBX tailored for use with all Incredible PBX and VitalPBX custom applications. Follow this link for a free test drive!
 

Special Thanks to Vitelity. Vitelity is now Voyant Communications and has halted new registrations for the time being. Our special thanks to Vitelity for their unwavering financial support over many years and to the many Nerd Vittles readers who continue to enjoy the benefits of their service offerings. We will keep everyone posted on further developments.


Some Recent Nerd Vittles Articles of Interest…