
We’ve been raving about Zorin OS 16 last month as the best desktop operating system available. And today we combine it with a $500 MiniPC to provide not one, but three, virtualization platforms with a single machine. You get LXC Linux Containers, VirtualBox, and the Windows 11 WSL platform all rolled into one dual-boot desktop PC. On the Linux side with Zorin OS 16, you can run multiple LXC containers (shown above) and VirtualBox virtual machines simultaneously. And on the Windows 11 platform, you get the Windows Subsystem for Linux in addition to VirtualBox. For those clamoring for a multi-tenant Asterisk®, our question is why when you can securely run standalone platforms for each tenant on one PC.
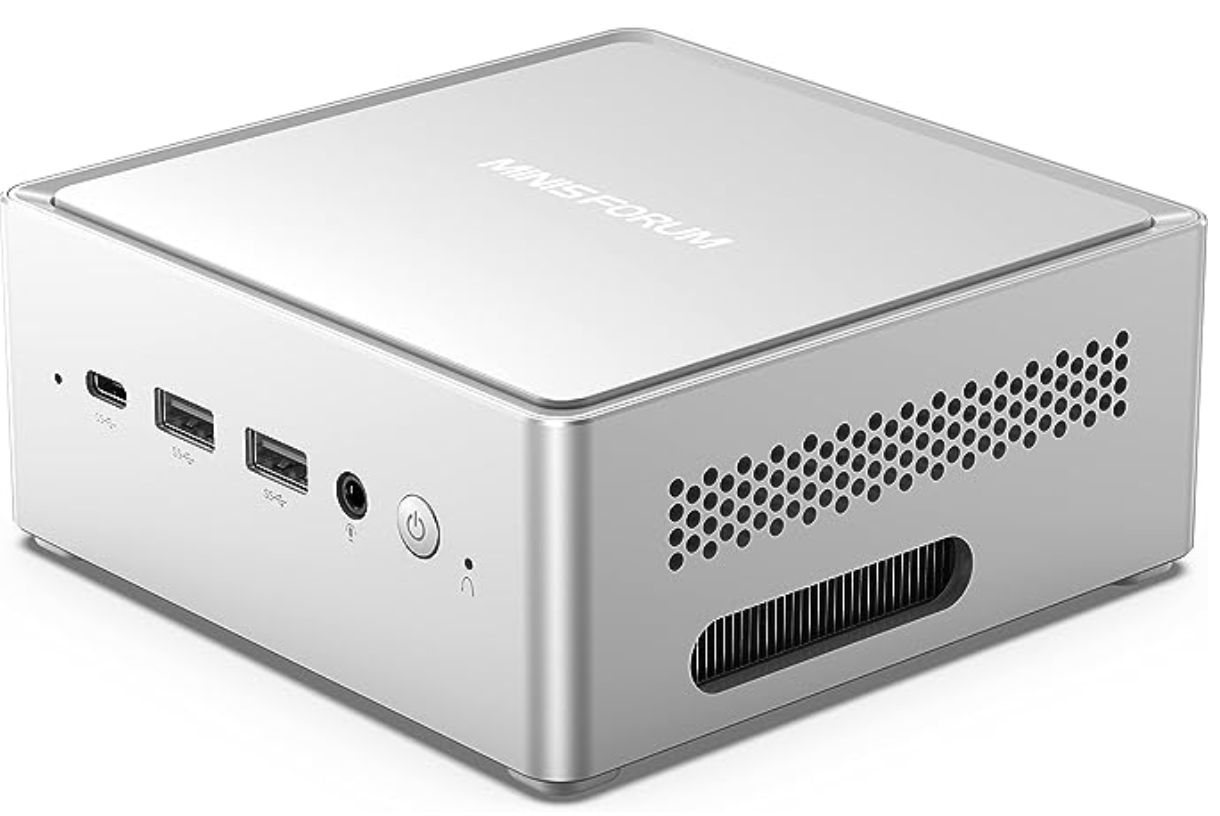
Because UEFI protections have complicated deployment of Linux on Windows 11 platforms, the secret sauce to make this magic happen is finding a hardware supplier who has elected not to cripple Linux deployment. There may be others and feel free to post a comment sharing your successes, but our favorite supplier is MINISFORUM with their Venus Series of MiniPCs. We obviously haven’t tested all of their offerings, but we are actively using the NAB6 Mini PC featuring a 12th Gen Core i7-12650H processor, 32GB of DDR4 RAM, and a 1TB PCIe4.0 SSD. It’s available on Amazon today for $440 or refurbished for $299. If you’re in the market for a gaming platform as well, the UM690 has gotten rave reviews and looks like a good fit for under $600 or refurbished UM790 Pro for $459.
As frequent visitors to our site know, referral revenue from Amazon helps keep the lights on at Nerd Vittles, but we also eat our own dog food. We recommend products we actually use.
Installing Incredible PBX 2027 with Windows 11 WSL
Let’s start with an easy virtualization platform, the Windows 11 Subsystem for Linux. To save you having to jump around behind tutorials, here’s a quick refresher on the process.
To get started, you’ll need Windows 11 (build 22000.*) or Windows 11 Insider Preview (builds 21362+) using any hardware platform that supports Windows 11. To begin, from the Windows 11 Start Menu, Search for powershell. Right click on the app and choose Run As Administrator.
Here are some wsl commands you’ll want to keep handy:
List Available Linux Offerings  : wsl --list --online
Show Installed Linux Platforms  : wsl -l -v
Install a Linux Virtual Machine : wsl --install -d {distro}
Startup a Linux Virtual Machine : wsl -d {distro}
Shutdown Running Virtual Machine: wsl --terminate {distro}
Remove any Linux Virtual Machine: wsl --unregister {distro}
Backup any Linux Virtual Machine: wsl --export {distro} {filename.tar}
Restore a Linux Virtual Machine : wsl --import {distro} {filename.tar}
Let’s begin by installing an Ubuntu Virtual Machine: wsl --install -d Ubuntu-22.04. You’ll be prompted to create a user account and password, e.g. nerd and password. If you’re not prompted to create a user account, reboot your Windows machine and reopen the Ubuntu-22.04 app from the Start menu. That will straighten things out. Once the Ubuntu CLI window appears, enter the following commands to set up the root user account and begin your Incredible PBX install. Then go have a very long cup of coffee.
sudo passwd root
su root
# enter password you created for root
cd ~
apt install wget -y
wget http://incrediblepbx.com/IncrediblePBX2027-U-Win11.sh
chmod +x IncrediblePBX2027-U-Win11.sh
./IncrediblePBX2027-U-Win11.sh
While you’re waiting, notice that the Windows Start Menu now includes a new Ubuntu app which you will use to launch the Incredible PBX 2027-U virtual machine down the road.
When the install finishes, reboot.
Keep in mind that Incredible PBX will be running as an Ubuntu-22.04 virtual machine under Windows 11. So it’s important to know how to start things up and shut things down. As with any operating system, you don’t want to simply pull the plug and risk damaging both the file system and your MySQL databases.

To start the Ubuntu-22.04 virtual machine, you can do it in either of two ways. From the Windows Start Menu, double-click on the Ubuntu-22.04 app. Or from the PowerShell running as Administrator, type: wsl -d Ubuntu-22.04. Verify it’s running like this: wsl -l -v
Once the Ubuntu CLI appears, issue the following commands to activate all of the Linux components upon which Incredible PBX depends:
su root
# enter root password
cd ~
./update-IncrediblePBX
pbxstatus
# if pbxstatus shows non-fax apps down
# then run startup below
./startup
pbxstatus
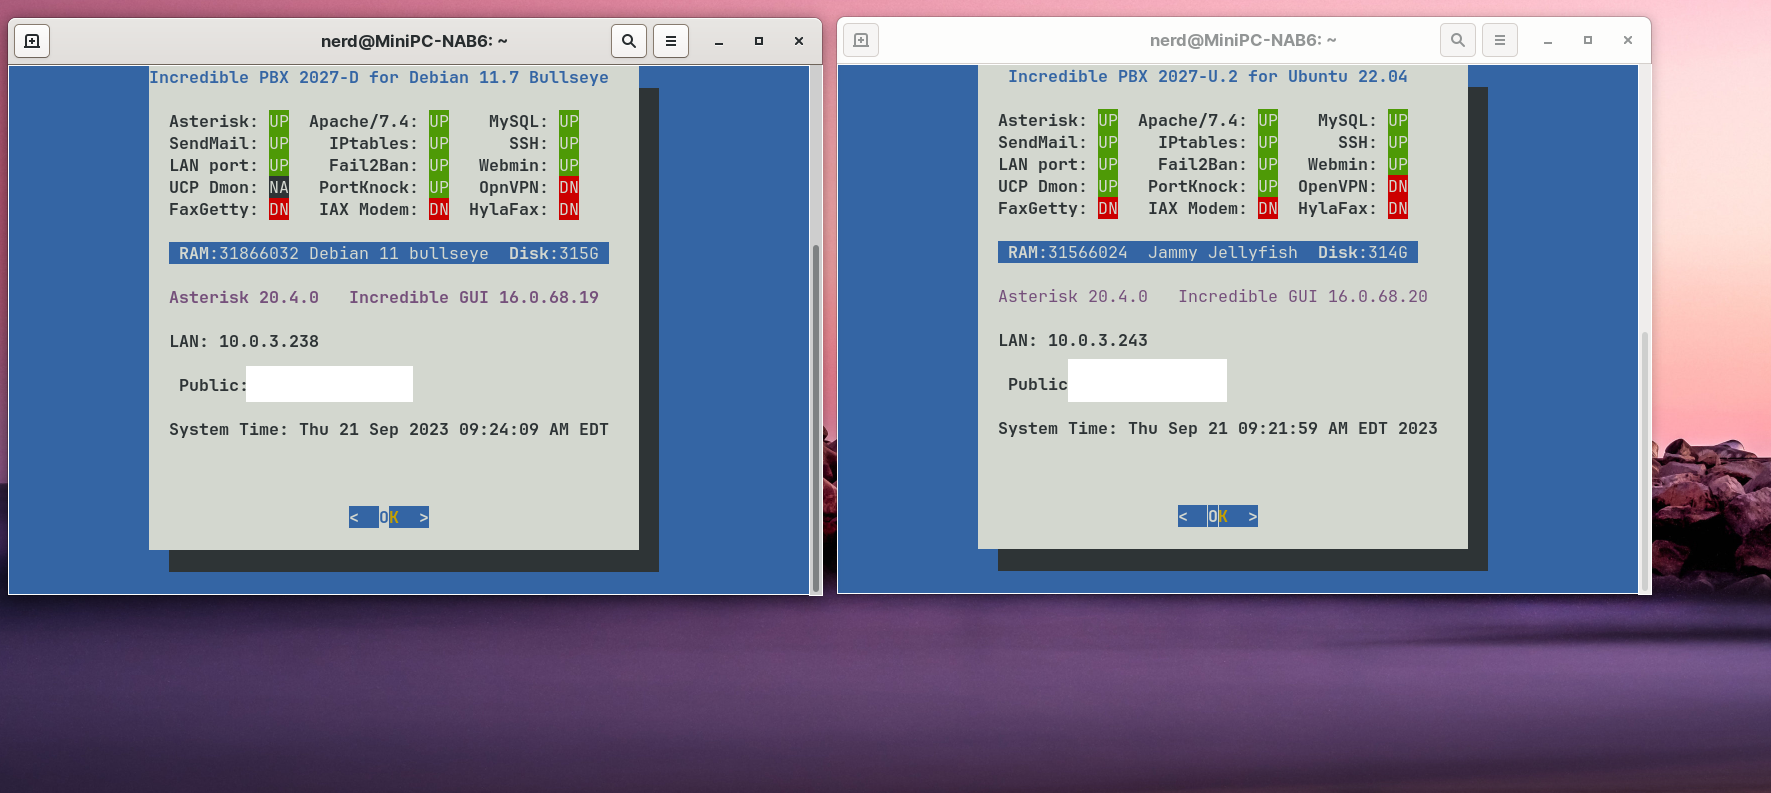
The LAN IP address is only accessible from your Windows machine. To run the Automatic Update Utility, you’ll need to SSH into this LAN address from the PowerShell running as Administrator where 172.19.180.143 is the LAN address shown in pbxstatus:
ssh root@172.19.180.143
To shutdown the Ubuntu-22.04 virtual machine, first open the Ubuntu-22.04 app and switch to the root user. Issue the halt command. This gracefully shuts down Asterisk, MySQL, and Apache. When the script completes, return to the PowerShell and issue this command to halt the virtual machine: wsl --terminate Ubuntu-22.04
Deploying OpenVPN with Incredible PBX. We strongly recommend deploying an OpenVPN client as part of your WSLg install and also on the Windows 11 desktop. It will simplify access to the server both from within Windows and also from any external source without having to wrestle with your firewall settings. This Incredible PBX Wiki article will walk you through creation of an OpenVPN Server platform, and this Incredible PBX Wiki article will walk you through the OpenVPN Client setup process. Simply name your Ubuntu .ovpn config file incrediblepbx.ovpn and save it in the /etc directory for automatic startup.
CAUTION: Be sure to create and use a separate .ovpn configuration file for your Windows desktop including these additional settings documented in the Wiki:
pull-filter ignore redirect-gateway
route-nopull
route 10.8.0.0 255.255.255.0
Installing Incredible PBX with VirtualBox & Windows 11
Oracle’s virtual machine platform inherited from Sun is amazing. It’s not only free, but it’s pure GPL2 code. VirtualBox gives you a virtual machine platform that runs on top of many desktop operating systems including Linux, Windows, and Intel-based Macs. In terms of limitations, we haven’t found any. We even tested this on an Atom-based Windows 7 machine with 2GB of RAM, and it worked without a hiccup. So step #1 today is to download one or more of the VirtualBox 6.1 installers. Our recommendation is to put all of these 100MB installers on a USB thumb drive.1 Then you’ll have everything in one place whenever and wherever you happen to need it. Once you’ve downloaded the software, install it onto your Windows 11 desktop. Accept all of the default settings, and you’ll be good to go. For more details, here’s a link to the Oracle VM VirtualBox User Manual.
NOTE: A VirtualBox 6.1 platform is required with Windows 11. Adjust screen size in View -> Virtual Screen.
To install Incredible PBX, download the Incredible PBX 2027-D image with Debian 11 (3.7 GB) or the Incredible PBX 2027-U image with Ubuntu 22.04 onto your desktop.
Next, double-click on the Incredible PBX .ova image on your desktop. Be sure to check the box to initialize the MAC address of the image if you’re using an older version of VirtualBox. Then click Import. Once the import is finished, you’ll see a new Incredible PBX 2027 virtual machine in the VM List of the VirtualBox Manager Window. Let’s make a couple of one-time adjustments to the Incredible PBX configuration to account for possible differences in sound and network cards on different host machines.
(1) Click once on the Incredible PBX 2027 virtual machine in the VM List. Then (2) click the Settings button. In System tab, check Hardware Clock in UTC Time. In the Audio tab, check the Enable Audio option and choose your sound card. In the Network tab for Adapter 1, check the Enable Network Adapter option. From the Attached to pull-down menu, choose Bridged Adapter. Then select your network card from the Name list. Then click OK. That’s all the configuration that is necessary for Incredible PBX.
Once you’ve imported and configured the Incredible PBX Virtual Machine, you’re ready to go. Highlight the Incredible PBX 2027 virtual machine in the VM List on the VirtualBox Manager Window and click the Start button. The standard Linux boot procedure will begin and, within a few seconds, you’ll get the familiar Linux login prompt. During the bootstrap procedure, you may see a couple of dialogue boxes pop up that explain the keystrokes to move back and forth between your host operating system desktop and your virtual machine. Remember, you still have full access to your desktop computer. Incredible PBX 2027 is merely running as a task in a VM window. Always gracefully halt Incredible PBX just as you would on any computer.
Here’s what you need to know. To work in the Incredible PBX virtual machine, just left-click your mouse while it is positioned inside the VM window. To return to your host operating system desktop, press the right Option key on Windows machines or the left Command key on any Mac. On Linux desktops, press the right Ctrl key. For other operating systems, read the dialogue boxes for instructions on moving around. To access the Linux CLI, login as root with the default password: password.
Deploying Incredible PBX with VirtualBox on Zorin
Now let’s reboot your machine and choose Zorin as the platform to load. The Incredible PBX setup is similar to the process used with Windows 11, but UEFI machines are temperamental about which non-Windows apps can run. To enable VirtualBox on the Zorin platform, here are the steps. First, run the Terminal app and reinstall VirtualBox:
apt remove virtualbox-dkms
apt install virtualbox-dkms
You’ll be prompted to set up a password for your new VirtualBox UEFI key (8 characters). Then reboot and register the new key when prompted. Enter the password when prompted. Now run VirtualBox from the Applications menu, and you should be good to go.
Once you have VirtualBox running successfully, you can install Incredible PBX 2027. Using the Firefox browser, download the IncrediblePBX2027-U with Ubuntu 22.04 image or the IncrediblePBX2027-D with Debian 11 image to your Downloads folder. From the File Manager, double-click on the .ova image to install it into VirtualBox. Click RUN to start up Incredible PBX 2027. The rest of the setup process is the same as what we described for Windows 11.
Deploying Linux Containers Using Static Routes
The beauty of Linux Containers is they run natively sharing the Linux kernel. So performance is outstanding. But, unlike VirtualBox, there is no simple way to create a Linux Container that obtains a DHCP address from the LAN’s DHCP server, so called bridge mode. This is especially true if your Zorin host is connected wirelessly. Read both of those sentences again to make sure you understand the network limitation of Linux Containers. Simply stated, networking with Linux Containers functions much like the NAT (as opposed to Bridge) option in VirtualBox. Here’s what that means.
Linux Containers are created on their own private subnet. If you wish to access them from a different device on the same LAN shared with your Zorin desktop hosting your Linux Containers, the simplest method is to create a static route to the private LXC subnet either on your LAN’s router or ON EVERY LAN DEVICE that needs to connect to your Linux Containers.
Here are the Mac and Linux commands to create, delete, and list static routes on the other LAN devices where 10.0.3.0 is the LXC subnet hosting the Linux Containers and 192.168.0.167 is the LAN address of the Zorin host PC:
sudo route add -net 10.0.3.0/24 192.168.0.167
sudo route -n delete 10.0.3.0
netstat -rn
Here are the Windows commands to create, delete, and list the same:
route add 10.0.3.0 MASK 255.255.255.0 192.168.0.167
route delete 10.0.3.0
route print
Deploying Linux Containers on the Primary LAN
If you are dead set in wanting to configure your Linux Containers to use IP addresses on the same subnet as your primary LAN, keep in mind that DHCP will not work for Linux Containers on a secured wireless network. For a tutorial on setting this up using static IP addresses, go here. It’s the only alternative that works.
Deploying Linux Containers with OpenVPN
A less painful way to accomplish the same thing is to install OpenVPN clients in your Linux Containers. To do this, you first must enable tun for Linux Containers. On your Zorin host machine, create a new 00-openvpn.conf file in /usr/share/lxc/config/common.conf.d:
lxc.cgroup.devices.allow = c 10:200 rwm
lxc.mount.entry = /dev/net dev/net none bind,create=dir 0 0
lxc.mount.entry = /dev/net/tun dev/net/tun none bind,create=file
Next, create an OpenVPN client config file for your Linux Container on your OpenVPN server. Now start up the Linux Container, switch to the root user, and copy the new config file (.ovpn) into the /etc folder naming it openvpn2027.ovpn. Then restart the Linux Container and wait for about 10 seconds for the OpenVPN client to load. Running pbxstatus now will show the OpenVPN IP address in your LAN listing, and the Linux Container is accessible from any device on your OpenVPN virtual private network.
Originally published: Monday, October 2, 2023
Need help with Asterisk? Visit the VoIP-info Forum.
Special Thanks to Our Generous Sponsors
FULL DISCLOSURE: ClearlyIP, Skyetel, Vitelity, DigitalOcean, Vultr, VoIP.ms, 3CX, Sangoma, TelecomsXchange and VitalPBX have provided financial support to Nerd Vittles and our open source projects through advertising, referral revenue, and/or merchandise. As an Amazon Associate and Best Buy Affiliate, we also earn from qualifying purchases. We’ve chosen these providers not the other way around. Our decisions are based upon their corporate reputation and the quality of their offerings and pricing. Our recommendations regarding technology are reached without regard to financial compensation except in situations in which comparable products at comparable pricing are available from multiple sources. In this limited case, we support our sponsors because our sponsors support us.
BOGO Bonaza: Enjoy state-of-the-art VoIP service with a $10 credit and half-price SIP service on up to $500 of Skyetel trunking with free number porting when you fund your Skyetel account. No limits on number of simultaneous calls. Quadruple data center redundancy. $25 monthly minimum spend required. Tutorial and sign up details are here.
The lynchpin of Incredible PBX 2020 and beyond is ClearlyIP components which bring management of FreePBX modules and SIP phone integration to a level never before available with any other Asterisk distribution. And now you can configure and reconfigure your new Incredible PBX phones from the convenience of the Incredible PBX GUI.
VitalPBX is perhaps the fastest-growing PBX offering based upon Asterisk with an installed presence in more than 100 countries worldwide. VitalPBX has generously provided a customized White Label version of Incredible PBX tailored for use with all Incredible PBX and VitalPBX custom applications. Follow this link for a free test drive!
Special Thanks to Vitelity. Vitelity is now Voyant Communications and has halted new registrations for the time being. Our special thanks to Vitelity for their unwavering financial support over many years and to the many Nerd Vittles readers who continue to enjoy the benefits of their service offerings. We will keep everyone posted on further developments.
- Many of our purchase links refer users to Amazon when we find their prices are competitive for the recommended products. Nerd Vittles receives a small referral fee from Amazon to help cover the costs of our blog. We never recommend particular products solely to generate Amazon commissions. However, when pricing is comparable or availability is favorable, we support Amazon because Amazon supports us. [↩]