

As continued use of FreePBX® becomes more and more precarious because of deprecated components and looming incompatibility with Asterisk® 21, the appeal of 3CX and VitalPBX as a VoIP platform becomes increasingly compelling. Whether you’re a home user, a small business, or a call center, VitalPBX provides a solution to meet your requirements. To make the transition a bit less painful, today we introduce a number of popular Incredible PBX applications for VitalPBX 4. And, as always, all of the Incredible PBX additions are free, open source, and GPL code.

If you’re unfamiliar with the VitalPBX VoIP platform, here are some features that may be of interest. First, it runs on the latest Debian 11 platform and is Asterisk-based freeware with optional commercial components. Most GPL applications designed for FreePBX will run equally well under VitalPBX without modification. Second, VitalPBX provides multi-tenant functionality with the purchase of a commercial module. Third, VitalPBX supports Asterisk High Availability (HA) failover at no cost using an open source script provided by the VitalPBX developers. Complete tutorial here. Compare this to the FreePBX HA offering which retails for $1,500. Commercial modules offer Microsoft Teams integration as well as the full complement of Sonata Suite Call Center offerings: Billing, Switchboard, Stats, Dialer, and Recordings. Faxing, Paging, Queues Callback, and Phone Provisioning modules are also available at modest cost. Keep reading if any of these are of interest to you.

Getting Started with VitalPBX
Before you can install VitalPBX applications, you’ll obviously need a VitalPBX server. You can build the platform with on-premise hardware, or in the cloud using one of our recommended providers, or on a Raspberry Pi. We recommend at least 4GB of RAM and at least a 30GB disk. Two gigs of RAM will suffice with a 2GB swap file. VitalPBX can be deployed using the VitalPBX ISO, or you can start with a fresh Debian 11 platform and then run the VitalPBX install script:
wget https://repo.vitalpbx.com/vitalpbx/v4/apt/debian_vpbx_installer.sh
chmod +x debian_vpbx_installer.sh
apt install sudo
./debian_vpbx_installer.sh
For Raspberry Pi deployments, here are the steps using a 32GB microSD card:
Begin by downloading Raspberry Pi Imager for PC, MAC, or Ubuntu desktop. Run the Imager from your desktop computer with the following settings after inserting your 32GB microSD card into your desktop machine (see the sidebar for an inexpensive microSD/USB device):
OS: Raspberry Pi OS (other) -> Raspberry Pi OS Lite (64-bit)
Storage: Select your microSD card (32GB Type 10 recommended)
Click WRITE
Remove the microSD card from your desktop computer. Insert it into your Raspberry Pi and power on the device. The initial Raspberry Pi OS setup for the United States follows. For users elsewhere, follow your nose.
Choose keyboard layout: (Other, English (US) for USA users)
Keyboard Layout: English (US)
username: nerd
password: make it secure, type it twice
login: nerd with new password
sudo passwd root
create new secure root password
logout: exit
login: root with new root password
userdel nerd
nano -w /etc/ssh/sshd_config
  edit and uncomment: PermitRootLogin yes
  uncomment PasswordAuthentication yes
  save: Ctrl-X, Y, then ENTER key
run: raspi-config
  Settings Apply to: pi
  Localization: WLAN Country: US
  System Options: Wireless LAN: Enter your SSID and SSID passphrase
  System Options: Hostname: debian
  System Options: Power LED: YES
  Interface Options: SSH: YES
  Localization: Locale: Disable en_GB.UTF-8 and Enable en_US.UTF-8
  Localization: TimeZone: America, NewYork
  FINISH and Reboot
Once your Raspberry Pi has restarted, login as root with your root password and run the debian_vpbx_installer.sh script from above.
Adding a Whitelist & Hardening Your Firewall
We’ve built firewall whitelist rules for some of our favorite providers: Skyetel, BulkVS, VoIP.ms, Acrobits, SignalWire, Nexmo, Callcentric, and Anveo Direct. Also included are all private LAN, non-routable IP addresses and the default OpenVPN addresses. Issuing the following commands will install this whitelist and overwrite your existing firewall whitelist, if any. WARNING: The existing VitalPBX Firewall exposes all of your SIP ports as well as SSH, HTTP, and HTTPS so deploy VitalPBX behind a hardware-based firewall unless you significantly harden the VitalPBX Firewall ports. If you’re sure you’ve whitelisted the IP addresses of all your remote PCs, extensions, and trunk providers in Admin -> Firewall -> Access Control, then you can harden your firewall and protect your server by deleting the following entries in Admin -> Firewall -> Rules: HTTP, HTTPS, SSH, PJSIP, SIP, and IAX2. Then test all your connections to make certain they still are accessible. For future additions, we strongly recommend using OpenVPN addresses which require no new Firewall additions.
cd /root
wget https://filedn.com/lBgbGypMOdDm8PWOoOiBR7j/VitalPBX-4/whitelist.sql
mysql -u root ombutel < whitelist.sql
vitalpbx apply-firewall
iptables -nL
gTTS Text-to-Speech Engine for VitalPBX
We've tested and implemented at least a half dozen text-to-speech engines to support Asterisk applications including Festival, FLITE, Amazon's Polly, IBM's Bluemix TTS, Pico TTS, and more. None are better than Google's free gTTS engine. Here's how to deploy it with VitalPBX to support all of your applications requiring TTS support. Login to your server as root and issue the following commands:
apt-get update
apt-get -y install jq libsox-fmt-all
apt-get -y install python3-pip
pip install --upgrade pip
pip3 install --upgrade pip
ln -s /usr/bin/pip3 /usr/bin/pip
pip install gTTS
Adding Custom Contexts Support to VitalPBX
In addition to the commercial modules, there are a number of free VitalPBX add-ons, one of which is Custom Contexts. We would recommend adding all of the free ones to get started. After logging into the web interface as admin, navigate to Admin -> Add-ons -> Add-ons. Click the Check Online button to load the latest available add-ons. Then click the Install icon for the following add-ons: System API, Authentication Codes, Bulk Extensions, Custom Contexts, Phone Books, and Task Manager. Once these add-ons are installed, you can install the following components.
Adding Incredible PBX Starter Kit to VitalPBX
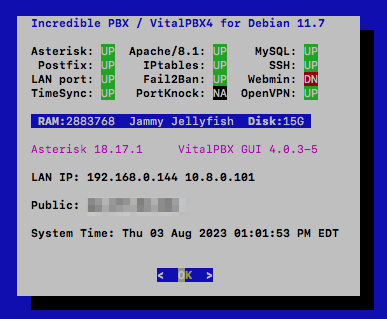
We've put together a collection of some of our favorite Incredible PBX applications to enhance the VitalPBX platform. These include telephone apps like Yahoo News Headlines (dial 951), NWS Weather Reports by ZIP Code (947), Today in History (86329), and Telephone Reminders (123). In addition, we've reworked the pbxstatus utility (above) which will display whenever you log into your server as root from the Linux command line.
Many of these applications rely upon the gTTS text-to-speech engine so be sure you install it before proceeding.
To install the Incredible PBX collection, log into your server as root and issue the following commands:
cd /etc/asterisk/vitalpbx
cp extensions__80-IncrediblePBX.conf /root/extensions__80-IncrediblePBX.conf.bak
cd /
wget https://filedn.com/lBgbGypMOdDm8PWOoOiBR7j/VitalPBX-4/incrediblepbx.tar.gz
tar zxvf incrediblepbx.tar.gz
rm -f incrediblepbx.tar.gz
asterisk -rx "dialplan reload"
echo "0 0 * * * root /var/lib/asterisk/agi-bin/run_recurring >/dev/null 2>&1" >> /etc/crontab
echo "3 0 * * * root /var/lib/asterisk/agi-bin/run_reminders >/dev/null 2>&1" >> /etc/crontab
Using Telephone Reminders with VitalPBX
Nerd Vittles Telephone Reminder System has been reworked for VitalPBX 4 and PHP 8.1. It lets you schedule reminders for future events (at least 4 minutes in the future) by telephone by dialing 123. When the appointed date and time arrives, Asterisk swings into action and places a call to the number you designate to deliver a customized reminder message. Recurring reminders also are supported. You can set up reminders that place calls daily or on weekdays as well as weekly, monthly, and annually. This means it can be used to wake you up in the morning, or to remind Granny to take her medicine every day, or to remind your Little League team of practice times and locations, or to remind you and your customers of scheduled and recurring events. External reminder calls are supported using your default outbound route's dial string, e.g. NXX-NXX-XXXX.
The complete tutorial for Telephone Reminders 4 is available here. The web interface is not yet supported on the VitalPBX platform; however, this Telephone Reminders app adds features that are not available in the *38 offering included in the VitalPBX Feature Code listing. Among these are optional recurring reminders as well as the ability to revise your reminder message before actually scheduling it.
Headline News & Weather Forecasts & Today in History
These three applications are self-explanatory. The best way to learn about them is to dial the three extensions from any phone registered on your VitalPBX server: Headline News (dial 951), Weather Forecasts by ZIP Code (dial 947), and Today in History (dial T-O-D-A-Y)
Adding OpenVPN to VitalPBX
The most secure method for accessing VitalPBX is to place your server behind a hardware-based firewall and use OpenVPN from the client PCs and phones to access the server. VitalPBX includes an OpenVPN add-on that includes both a server and a free 2-client license. For unlimited clients, you can purchase the commercial module for $120. In the alternative, you can deploy your own OpenVPN server and clients using this Nerd Vittles tutorial for Debian.
If you already have an OpenVPN server in operation, create an OpenVPN client for VitalPBX and name it incrediblepbx.ovpn. Copy it into the /etc directory of your VitalPBX server. Then issue the following commands and reboot to activate OpenVPN on your VitalPBX server:
apt-get update
apt-get -y install openvpn unzip
cd /
wget https://filedn.com/lBgbGypMOdDm8PWOoOiBR7j/VitalPBX-4/openvpn-vitalpbx.tar.gz
tar zxvf openvpn-vitalpbx.tar.gz
rm -f openvpn-vitalpbx.tar.gz
shutdown -r now
Getting Started with Faxing
If your deployment is for a home or home office, then VitalPBX offers a free faxing component for a single trunk. We've tested this with VoIP.ms, and it works flawlessly. Begin by enabling the Virtual Faxes module. For your Trunk, enable FAX Detection and T.38, if desired. For your Fax Device, provide a Description, Destination Email, and CallerID Name and Number. For your Inbound Route, enable Fax Detection and Fax Destination of Fax Devices selecting the Destination Description you assigned to your Fax Device. Now place a test call to your DID from FaxZero.com. The Fax Sending module worked equally well.
Adding CallerID Names for Incoming Calls
Legal Disclaimer: Most CNAM providers have restrictions regarding caching of CNAM data. The courts consistently have ruled that phonebook data is not copyrightable. And every PBX caches CNAM data. After all, that's what CDR logs are all about. Consult with your own attorney if you have concerns, or simply stop reading here. 🙂

Some providers of DIDs also offer CallerID Name (CNAM) service for incoming calls. With VoIP.ms, it's optional and costs $0.008 per call. With BulkVS, it's mandatory and costs $0.003 per call. With many DID providers, you will only receive the CallerID Number on incoming calls. Thus was born our CallerID Trifecta and later Superfecta add-ons many years ago. Most of the free sources from yesteryear have disappeared, and we've only found two commercial sources that are reasonably priced at $0.003 per call: BulkCNAM (from the BulkVS folks) and EZCNAM at same price with a 25¢ credit to let you try out their service. Both work well.
Once you have installed Custom Context module for VitalPBX as well as the Incredible PBX Starter Kit from above, here are the steps to implement CNAM lookups on your incoming calls. First, sign up for an account with one or both of the providers and obtain a SOAP API Key from BulkCNAM or a traditional API key from EZcnam. Then login to your server as root and create an executable install script using the following template for BulkCNAM:
cd /root
rm -f superfecta-bulkcnam
wget https://filedn.com/lBgbGypMOdDm8PWOoOiBR7j/VitalPBX-4/superfecta-bulkcnam
sed -i 's|SOAP-API-KEY|actual-key|' superfecta-bulkcnam
sed -i '\:// BEGIN CallerID Superfecta:,\:// END CallerID Superfecta:d' /etc/asterisk/vitalpbx/extensions__80-IncrediblePBX.conf
cat superfecta-bulkcnam >> /etc/asterisk/vitalpbx/extensions__80-IncrediblePBX.conf
asterisk -rx "dialplan reload"
Or create an executable install script using the following template for EZCNAM:
cd /root
rm -f superfecta-ezcnam
wget https://filedn.com/lBgbGypMOdDm8PWOoOiBR7j/VitalPBX-4/superfecta-ezcnam
sed -i 's|=API-KEY|=actual-key|' superfecta-ezcnam
sed -i '\:// BEGIN CallerID Superfecta:,\:// END CallerID Superfecta:d' /etc/asterisk/vitalpbx/extensions__80-IncrediblePBX.conf
cat superfecta-ezcnam >> /etc/asterisk/vitalpbx/extensions__80-IncrediblePBX.conf
asterisk -rx "dialplan reload"
In your install script of choice, replace actual-key with the SOAP API key or API key you obtained from the provider. Make the script executable (chmod +x) and then run it to install the new script in your dialplan. Then reload dialplan: asterisk -rx "dialplan reload"
As deployed, the [superfecta] context assumes you want incoming calls routed to extension 501. You can modify this in /etc/asterisk/vitalpbx/extensions__80-IncrediblePBX.conf and reload your dialplan.
In the VitalPBX GUI, login as admin and navigate to PBX -> Applications -> Custom Contexts and create a new Custom Context and reload the dialplan:
Description: CallerID Superfecta
Context: superfecta
Extension: s
Priority: 1

Destination:

Custom Contexts -> Incredible PBX
In PBX -> Calls Routing -> Inbound Routes, edit your existing Inbound Route for your incoming DID and set the Inbound Destination to: Custom Contexts -> CallerID Superfecta. Then reload your dialplan.
How It Works: When an incoming call from a new caller is detected, the Superfecta script will greet the caller and ask the caller to press 7. Once the caller presses 7, the Superfecta script will look up the CNAM entry matching the CallerID Number and then route the call to extension 501. Successful callers are whitelisted and logged in the Asterisk database: database show cidname. When the same caller calls again, the call will be routed to extension 501 without prompting to press 7. Additional routing options are available by editing the [superfecta] context.
Configuring Gmail as SMTP Relay Host
The VitalPBX Portal includes the option to configure either a self-hosted email server (which may or may not work depending upon your upstream provider) as well as an SMTP relay host such as Gmail. You'll find it under Admin -> System Settings. In the alternative, you may prefer to do it yourself. Here's how.
1. Log into your server as root and issue the following command:
dpkg-reconfigure postfix
Click OK on the first dialog. Choose Internet Site as your Type of Mail Configuration. Accept the defaults for the System Mail Name, Root and Postmaster Recipient, and Other Destinations. Choose Yes for Forced Synchronous updates. Accept the defaults for the Local Networks, Default Mailbox Size, and Local Address Extension Character. Choose IPv4 for the Internet Protocol.
2. Once Postfix is reconfigured, edit /etc/postfix/main.cf. In the second section of code beginning with relayhost =, replace the relayhost= line with the following block of commands:
relayhost = [smtp.gmail.com]:587
smtp_use_tls = yes
smtp_sasl_auth_enable = yes
smtp_sasl_security_options = noanonymous
smtp_sasl_password_maps = hash:/etc/postfix/sasl_passwd
smtp_tls_CAfile = /etc/ssl/certs/ca-certificates.crt
smtp_fallback_relay =
3. Create the following new file using your Gmail account name and password.
nano -w /etc/postfix/sasl_passwd:
[smtp.gmail.com]:587 yourname@gmail.com:yourpassword
5. Change the permissions on the sasl_passwd file:
chmod 600 /etc/postfix/sasl_passwd
6. Use postmap to compile and hash the sasl_passwd file:
postmap /etc/postfix/sasl_passwd
7. Restart Postfix: systemctl restart postfix
8. apt -y install mailutils
9. Send yourself a test email: echo "test" | mail -s "Test Mail" somebody@gmail.com
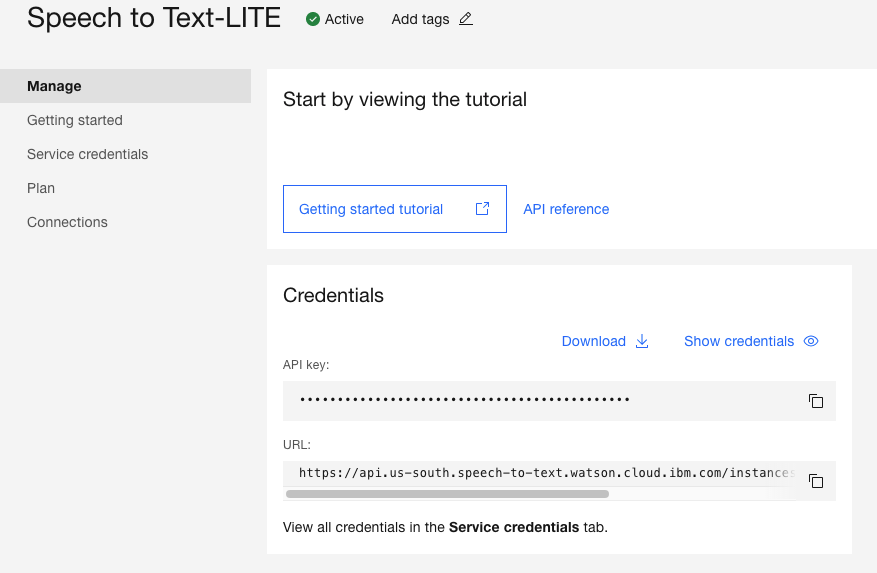
Free Voicemail Transcription of Messages
For many years, Incredible PBX has included documentation to deploy IBM's Speech-to-Text (STT) engine to transcribe voicemail messages and deliver them by email for missed calls. Today we are pleased to bring that same functionality to VitalPBX 4. To get started, make certain that you have outbound email functioning on your server using the steps in the previous section. Then open an account with IBM and sign up for their LITE Speech-to-Text service. This provides you with 500 minutes a month of free STT transcription; however, you must use it at least once every 30 days or risk having your STT account terminated. So you may wish to setup up a recurring weekly reminder at a time when your extension will not otherwise be answered. Set up a short message to assure that voicemail transcription will be triggered. This will keep your LITE plan active without using many of your allocated minutes.
Once you have signed up for the STT-LITE service, navigate to Resources:AI/Machine Learning:STT in the LITE Tier and obtain or create an API Key and URL. Copy both the API Key and URL to your desktop. You'll need them as part of the VitalPBX component install below.
Next, login to your VitalPBX server as root and issue the following commands:
cd /root
apt -y install dos2unix lame
wget https://filedn.com/lBgbGypMOdDm8PWOoOiBR7j/VitalPBX-4/sendmailibm.tar.gz
tar zxvf sendmailibm.tar.gz
rm -f sendmailibm.tar.gz
nano -w sendmailibm
# insert your API Key and URL and Save file: Ctrl-X, Y, ENTER
cp -p sendmailibm /usr/local/sbin/.
cp -p voicemail__60-1-transcript.conf /etc/asterisk/vitalpbx/.
asterisk -rx "dialplan reload"
When the nano editor opens in step 6 above, insert your API Key and URL in the spaces provided. Then save the file: Ctrl-X, Y, then ENTER. Continue with the remaining steps above to complete the install.
By default, this setup assumes that incoming calls are delivered to an extension on your PBX. Assuming that is extension 501, open the VitalPBX GUI and edit your Extension's settings by adding your email address in General Settings and in the Voicemail tab specify Enable Voicemail and Attach Voicemail YES. If you wish to delete the messages from your server after sending the email, specify Delete YES. Then save your settings and reload your dialplan.

Finally, make a test call to that extension and don't answer. Leave a brief message and hang up. The transcribed voicemail together with an MP3 recording of the message should arrive within a minute or two.
You Snooze, You Lose
Sorry to say our supply of free licenses to one of our favorite add-ons, the $100 Starter Kit, has been exhausted. If we get additional ones to hand out, we'll post an update here. Here's what's included in the VitalPBX Starter Kit:
Originally published: Monday, August 7, 2023 Updated: September 13, 2023

Need help with Asterisk? Visit the VoIP-info Forum.
Special Thanks to Our Generous Sponsors
FULL DISCLOSURE: ClearlyIP, Skyetel, Vitelity, DigitalOcean, Vultr, VoIP.ms, 3CX, Sangoma, TelecomsXchange and VitalPBX have provided financial support to Nerd Vittles and our open source projects through advertising, referral revenue, and/or merchandise. As an Amazon Associate and Best Buy Affiliate, we also earn from qualifying purchases. We’ve chosen these providers not the other way around. Our decisions are based upon their corporate reputation and the quality of their offerings and pricing. Our recommendations regarding technology are reached without regard to financial compensation except in situations in which comparable products at comparable pricing are available from multiple sources. In this limited case, we support our sponsors because our sponsors support us.
 BOGO Bonaza: Enjoy state-of-the-art VoIP service with a $10 credit and half-price SIP service on up to $500 of Skyetel trunking with free number porting when you fund your Skyetel account. No limits on number of simultaneous calls. Quadruple data center redundancy. $25 monthly minimum spend required. Tutorial and sign up details are here.
![]() The lynchpin of Incredible PBX 2020 and beyond is ClearlyIP components which bring management of FreePBX modules and SIP phone integration to a level never before available with any other Asterisk distribution. And now you can configure and reconfigure your new Incredible PBX phones from the convenience of the Incredible PBX GUI.
The lynchpin of Incredible PBX 2020 and beyond is ClearlyIP components which bring management of FreePBX modules and SIP phone integration to a level never before available with any other Asterisk distribution. And now you can configure and reconfigure your new Incredible PBX phones from the convenience of the Incredible PBX GUI.
 VitalPBX is perhaps the fastest-growing PBX offering based upon Asterisk with an installed presence in more than 100 countries worldwide. VitalPBX has generously provided a customized White Label version of Incredible PBX tailored for use with all Incredible PBX and VitalPBX custom applications. Follow this link for a free test drive!
 Special Thanks to Vitelity. Vitelity is now Voyant Communications and has halted new registrations for the time being. Our special thanks to Vitelity for their unwavering financial support over many years and to the many Nerd Vittles readers who continue to enjoy the benefits of their service offerings. We will keep everyone posted on further developments.


Hi Ward,
I’m looking to upgrade me IncrediblePBX RaspberryPi system (home use only!) from the 2020 version.
Which do you recommend? Incredible PBX 2027 or rolling to your version of VitalPBX (from your August 7 blog)?
[WM: On RasPi platform, we recommend the latest Incredible PBX 2027 build here.]