
 We feel like a kid in a candy store with our new $35 Raspberry Pi® Model B. Imagine squeezing a 700 mHz ARM processor with 512MB of RAM, 2 USB ports, a 10/100 Ethernet port, an HDMI port, composite video, a separate audio jack, an SDHC card slot, and a micro USB port onto a motherboard the size of a credit card with a total weight of 1.6 ounces and a typical power draw of 3.5 watts. Thanks to Gernot and his Asterisk for Raspberry Pi project, a full LAMP stack with Asterisk® and FreePBX® gave us a head start on turning the Raspberry Pi into yet another Incredible PBX™ platform complete with free Google Voice™ calling through 2013.1
[iframe-popup id="3″]
07/01/2019 NEWS FLASH: Just released Incredible PBX LITE for the Raspberry Pi 2, 3, and 4 featuring Raspbian 10 Buster. Tutorial here.
Trust us when we say the performance of this $35 computer is nothing short of amazing. Can it do everything a $200 dual-core Atom PC can do? No. Can it do 90% of everything for someone whose requirements do not exceed a few simultaneous calls at a time but still wants a full-blown PBX for call routing, voicemail, IVRs, music on hold, and text-to-speech and speech-to-text apps for a home, a SOHO office, a Little League team, or a dorm room? Absolutely. We’re now at the two-month mark with this project, and the Raspberry Pi Foundation already has released a 512MB version of the computer at the same price AND new firmware that autodetects the proper memory setup depending upon whether you have a 256MB or 512MB Pi. Version 3.5 and beyond incorporates the new firmware into Incredible PBX.
The honeymoon isn’t over yet. Incredible Pi™ 3.5 featured the very latest Debian 7 firmware specifically tailored for the Raspberry Pi™ from its developers. You can read all about it here. Is it better? Can you spell ROCKET SHIP? With a reliable power supply, you now can overclock the Raspberry Pi and join the 1GHz Club. That represents a 50% performance improvement. And doubling the RAM to 512MB now makes the Raspberry Pi a near perfect VoIP platform. Better yet, the Raspbian kernel handles management of the overclocking so you never have to confront Fried Raspberry Pi. When the CPU temperature gets too high, the kernel will throttle things back to avoid a disaster. And version 3.7 adds Incredible Fax to the platform for those with a 512MB Raspberry Pi. The complete tutorial is available here.
Eben Upton Visits Charleston. The developer of the Raspberry Pi, Eben Upton, and his lovely wife, Liz, made a brief appearance in Our Town last Thursday night. Makelab Charleston, in cooperation with the College of Charleston and the Lowcountry Graduate Center, hosted the event. With an SRO crowd, we all got to hear the Raspberry Pi story first hand. If you missed the presentation, you missed a real treat.
What’s New in Incredible PBX 3.x. For those of you already running a previous version, here’s a quick thumbnail of the other new features in addition to overclocking. We’ve tried to mimic as much of the previous builds as possible. But keep in mind that this is a new creation from the ground up because there was no migration path from Debian Squeeze and Wheezy to Raspbian. But we keep good notes, and Gernot did much of the heavy lifting. 😉
SECURITY ALERT: Incredible PBX 3.7 addresses a serious security flaw in prior versions of Asterisk. With the exception of the new Asterisk release incorporated into this release, the functionality is identical to Incredible PBX 3.6.
Incredible PBX 3.5 and beyond added automatic detection and support of 512MB Raspberry Pi devices without touching anything. And the latest version 3.7 adds an awesome fax server to Incredible PBX for those with a 512MB board. The complete tutorial is available here. update-my-pi in the /root folder of your server helps to safeguard your system by bringing it up to date with the latest fixes and enhancements. After running it the first time, it gets run automatically whenever you log in as root. For the safety of your server, don’t disable it! It’s free for the first ten updates, and then it’s just $20 a year. We have to eat, too. If you are philosophically opposed to ever spending a dime to support the open source movement, then feel free to load the latest version of Incredible PBX at no cost whenever you like. It will always be free! Then you can restore your settings using the backup and restore feature built into FreePBX.
To enable overclocking at your own risk, run: raspi-config. Overclocking works for us. YMMV! The key is a good power supply. If you’re using an SD card larger than 4GB, version 3.3 and beyond now can resize your partitions on the fly. Just choose the option in raspi-config and reboot. Even though the kernel now monitors CPU temperature and manages overclocking, it’s always nice to see for yourself. To monitor the CPU temperature, just run the status program which provides a current snapshot anytime. Temperature data now is provided on the FreePBX Dashboard as well.
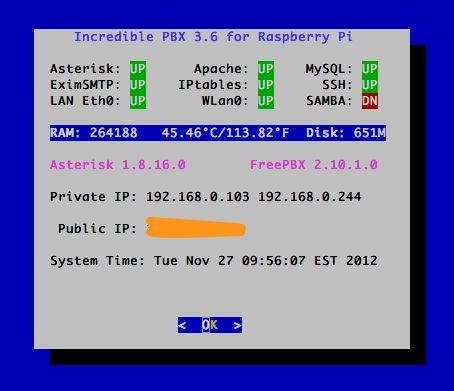
There’s more good news. Networking is much more stable; however, we’ve dropped support for the TP-Link WiFi adapters. If you still have one of these, see the setup instructions in the PIAF Forum. Otherwise you’ll need the recommended AirLink 101 N-150 if you want WiFi capability. In the 3.3 release and beyond, your server will automatically attempt to connect to any open WiFi network that it can find. We’ve also added two scripts in /root to let you restart either your wired or wireless network and designate it as the primary network: restart-eth0 and restart-wlan0. Time zone management was also a bit of mess with multiple file settings required to support both Linux and PHP. In the 3.3 update and beyond, you’ll be prompted to select your timezone when you first log in as root. The setup script will automatically apply your entry in all the right places. We’ve also replaced SendMail with Exim to simplify the process of using an SMTP mail gateway such as Gmail. We’ve documented the procedure for making the change here.
As part of the 3.x migration, we’ve also eliminated the pi user account. Everything you need to do to configure Incredible PBX requires root permission. So goodbye sudo. Only the root user account is included, and the default password is raspberry. Change the password when you first log in. New SSH and DUNDI keys now are automatically generated when you first boot your server. The FreePBX Backup and Restore Utility is included in this new build. AsteriDex SpeedDials have been fixed. Enter 3-digit Dial Codes in AsteriDex, and you can call by dialing 00nnn. In the latest update, Telephone Reminders again work.
X Windows is included in this build. This won’t work with SSH. For a demo slideshow, plug in a real monitor and log in as root. In the /root folder, enter the command: startx. To end the slideshow, press ESCape. To disable the slideshow: mv .xinitrc xinitrc. To add photos, copy .jpg images into /root/slideshow. No mouse is required for the slideshow but, if you run X Windows natively, you’ll need a USB mouse. The SMS Blasting app in /root now supports phone numbers (which use SMS) and email addresses (which use SendMail).
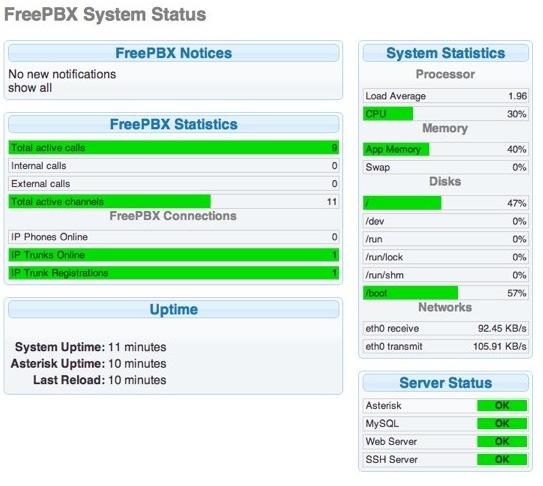
Last but not least, a sophisticated Conference Bridge has been added to Incredible PBX 3.x releases. If you route one of your inbound DIDs to the predefined IVR, users can press 0 and enter 1234 for the conference PIN to join the conference. Local extensions simply dial C-O-N-F. We’ve already tested a 9-person conference call with excellent results. But don’t take our word for it. Try it for yourself. Just call our demo Raspberry Pi AutoAttendant and take the Conference Bridge and a handful of other Incredible PBX™ apps for a test drive:

And here’s what the conference call looked like in the FreePBX Dashboard:
So you don’t have to jump around between articles, we’ve put together this Quick Start Guide that tells you everything you need to know to get up and running in about an hour. Most of that time will be consumed copying the Incredible Pi image to an SD card. So there’s plenty of time for lunch during the hour. Once your system is running and you’ve completed the setup steps below, then jump over to the application tutorial which explains how to use every one of the 35 Incredible PBX Apps for the $35 Raspberry Pi.
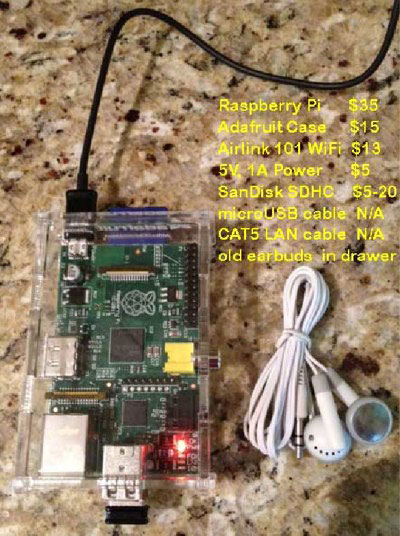
What to Buy. Here’s everything you need to get started.2 The case is optional. Yes, you can run the Raspberry Pi sitting on your desk with no case. It’s only 5 volts. WiFi is also optional. There’s a 10/100 port on the Raspberry Pi that gives you all the networking you need. Here are the links to buy the pieces. You also need a CAT5 cable and either a spare PC or Mac with Putty or SSH and a pair of earbuds or an HDMI cable to connect to a TV or monitor and a USB keyboard.
- $35 512MB Raspberry Pi from MCM or Newark or Amazon
- $10 Power Adapter (this one is rock solid!)
- $10 SanDisk 16GB SDHC Type 4 card
- $15 Adafruit Acrylic Case
- $13 AirLink 101 N150 WiFi Adapter or Adafruit Mini WiFi Adapter
Setting Up Google Voice. If you want free calling in the U.S. and Canada, then you’ll need a Google Voice account, and you’ll need one dedicated to Incredible Pi, or it won’t work. Log out after setting up the new Google Voice account!
- Register for Google Voice account (no funky characters in your password!)
- Enable Google Chat as Phone Destination
- Configure Google Voice Calls Settings:
- Call Screening – OFF
- Call Presentation – OFF
- Caller ID (In) – Display Caller’s Number
- Caller ID (Out) – Don’t Change Anything
- Do Not Disturb – OFF
- Call Options (Enable Recording) – OFF
- Global Spam Filtering – ON
- Place test call in and out using GMail Call Phone
Baking Your Incredible Pi. The disk drive for the Raspberry Pi is an SD card. So what you need to do is download Incredible Pi and copy the image onto an SDHC card. Mac and Linux installers are included. For Windows, just use Win32 Disk Imager. Here are the steps:
- Download the Incredible Pi package
- Decompress the tarball: tar zxvf incrediblepi-version.tar.gz
- Copy .img file to SDHC using image utility or script
- Insert SDHC card into Raspberry Pi
- Boot the Raspberry Pi from Incredible Pi SDHC card
Your First Bite of Incredible Pi. If you’re not using a monitor and keyboard, you can use SSH to gain root access to Incredible Pi. And you can use any web browser on your private network to access your server. There are a couple of hurdles. First, you need the network address of your new server. And, second you need an SSH client. With Incredible PBX 3.3 and beyond, you needn’t worry about the IP address. You now can access your server via SSH by logging in like this: root@incrediblepbx.local. And browser access to your server is available at the following address: http://incrediblepbx.local. You still can plug in some earbuds when the bootup process begins and listen for the Incredible Pi to tell you its IP address when the boot procedure completes (about 90 seconds). Then you can use that IP address instead of incrediblepbx.local. The latest releases of Incredible PBX also include a Java-based SSH client in the FreePBX web GUI: Admin -> Java SSH.
Here’s everything you need to know about security for Incredible Pi:
1. ALWAYS RUN INCREDIBLE PI BEHIND A SECURE HARDWARE-BASED FIREWALL/ROUTER
2. NEVER EXPOSE ANY INCREDIBLE PI PORTS DIRECTLY TO THE INTERNET
3. NEVER MAP INBOUND INTERNET PORTS FROM YOUR FIREWALL TO INCREDIBLE PI
Initial Setup. There also are a few setup steps to complete once your Incredible Pi finishes the bootup process. When you first login (username: root password: raspberry), you’ll be prompted to change your root password and to set your default time zone. If you’re using either a wired network or an open WiFi network, then everything just works. If you’re using secured WiFi, then you’ll need to plug in your credentials in /etc/wpa.conf and reboot. The wired network always takes precedence so unplug the cable if you want WiFi to be your primary network. Next, run /root/update-my-pi to bring your server up to current specs. Finally, now’s the time to repartition your SD card if you’re using a card larger than 4GB. While you’re at it, bump up the performance of your Raspberry Pi by 50% by setting the overclocking to turbo mode. It works great for us. YMMV! The key is a rock-solid power adapter such as the one we’ve recommended. Just run raspi-config and follow your nose.
Accessing Incredible Pi By GUI. You don’t have to be a Linux guru to use Incredible Pi. In fact, we’re just about finished with the Linux command prompt, but stay logged in until we finish the steps below. Most of your configuration of the PBX will be performed using the FreePBX® Web GUI. You also can access SSH through the FreePBX interface.
If you’re new to Asterisk® and FreePBX, here’s the one paragraph primer on what needs to happen before you can make free calls with Google Voice. You’ll obviously need a free Google Voice account. This gets you a phone number for people to call you and a vehicle to place calls to plain old telephones throughout the U.S. and Canada at no cost. You’ll also need a softphone or SIP phone to actually place and receive calls. YATE makes a free softphone for PCs, Macs, and Linux machines so download your favorite and install it on your desktop. Phones connect to extensions in FreePBX to work with Incredible Pi. Extensions talk to trunks (like Google Voice) to make and receive calls. FreePBX uses outbound routes to direct outgoing calls from extensions to trunks, and FreePBX uses inbound routes to route incoming calls from trunks to extensions to make your phones ring. In a nutshell, that’s how a PBX works. There are lots of bells and whistles that you can explore down the road.
Let’s get started. Using a browser, enter the IP address of your server or just use incrediblepbx.local as the address. Choose FreePBX Administration. When prompted for a username and password, use admin for both. Here are the six steps you need to complete before making your first free call:
- Change FreePBX admin Password and Default Email
- Add Google Voice Account credentials
- Set Destination for Incoming Calls
- Change Extension 701 Passwords
- Eliminate Audio and DTMF Problems
- Install and Register a Softphone to Extension 701
1. Changing FreePBX admin Password and Default Email. From the main FreePBX GUI, click Admin => Administrators. Click on admin user in the far-right column. Enter a new Password and click Submit Changes button. Then click the Apply Config button. Next, set your default email address at the bottom of Settings -> General Settings. Repeat the procedure above to save your entry.
2. Activating a Google Voice Trunk. To create a Trunk in FreePBX to handle calls to and from Google Voice, you’ll need three pieces of information from the Google Voice account you set up above: the 10-digit Google Voice phone number, your Google Voice account name, and your Google Voice password. Choose Other -> Google Voice from the FreePBX GUI. The following blank form will appear:
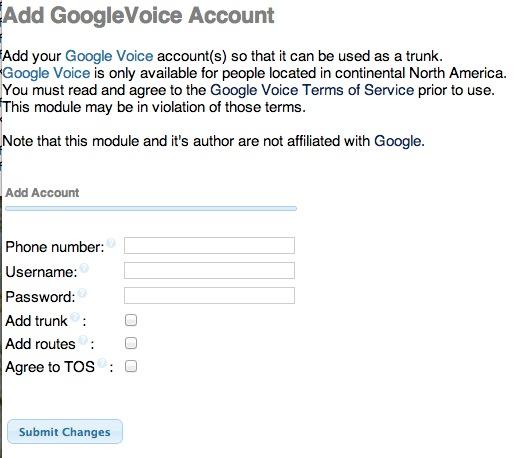
Fill in the blanks with your information and check all 3 boxes. If your Google Voice account name ends in @gmail.com, you can leave that out. Otherwise, include the full email address. Then click Submit Changes and Apply Config.
There’s one more step or your Google Voice account won’t work reliably with Incredible Pi! From the Linux command prompt while logged into your server as root, restart Asterisk: amportal restart
3. Setting a Destination for Incoming Calls. Now that you’ve created your Google Voice Trunk, we need to tell FreePBX how to process inbound calls when someone dials your Google Voice number. There are any number of choices. You could simply ring an extension. Or you could ring multiple extensions by first creating a Ring Group which is just a list of extension numbers. Or you could direct incoming calls to an Interactive Voice Response (IVR) system (we’ve actually set one up for you to play with).
By default, Incredible Pi is configured to route all incoming calls to a demo IVR that shows off some of the applications that come with Incredible Pi. You can change whenever you like by choosing Connectivity -> Inbound Routes -> Default. In the Set Destination section of the form, change the target to Extensions and then select 701 from the list. Then click Submit and Apply Config.
4. Changing Extension Passwords. From the main FreePBX GUI, choose Applications -> Extensions. Then click on 701 in the Extension List on the right side of your display. You’ll see a form that looks like this:
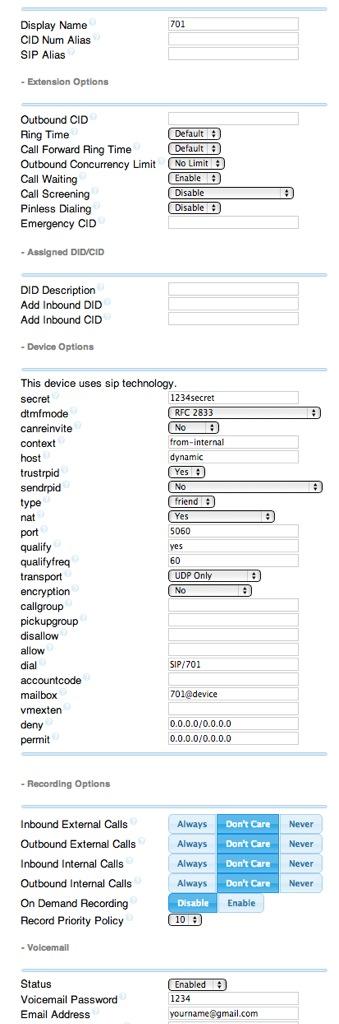
For now, we only need to make a few changes. First, you need a very secure password for both the extension itself and your voicemail account for this extension. The extension secret needs to be a combination of letters and numbers. The Voicemail Password needs to be all numbers, preferably six or more. Replace the existing 1234secret and 1234 with your own (very secure) entries. You also need to lock down this extension so that it is only accessible from devices on your private LAN. You do that with the deny and permit entries which currently are filled with zeroes. Leave the deny entry the way it is which tells Incredible Pi to block everybody except those allowed in the permit entry below. For the permit, we need the first three octets of your private LAN address, e.g. if your LAN is 192.168.0.something then the permit entry will be 192.168.0.0/255.255.255.0.
Finally, you need to plug in your actual email address in the Voicemail section so that voicemails can be delivered to you when someone leaves a message. You can also include a pager email address if you want a text message alert with incoming voicemails. If you want the voicemails to automatically be deleted from the server after they are emailed to you (a good idea considering the disk storage limitations of an SDHC card), change the Delete Voicemail option from No to Yes. That’s it. Now save your settings by clicking the Submit button. Then reload the dialplan by clicking on the red prompt when it appears.
In case you’re curious, unless you’ve chosen to automatically delete voicemails after emailing them, you can retrieve your voicemails by dialing *98701 from any extension on your phone system. You’ll be prompted to enter the voicemail password you set up. In addition to managing your voicemails, you’ll also be given the opportunity to either return the call to the number of the person that called or to transfer the voicemail to another extension’s voicemail box. And you can always leave a voicemail for someone by dialing their extension number preceded by an asterisk, e.g. *701 would let someone leave you a voicemail without actually calling you.
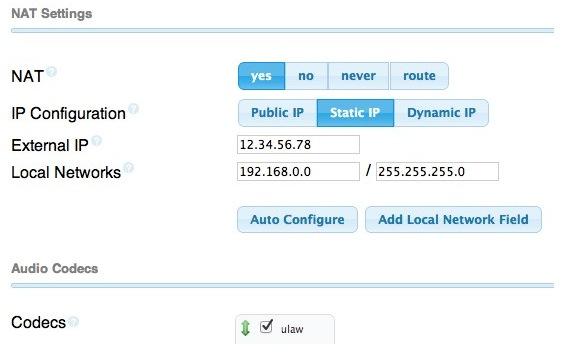
5. Eliminating Audio and DTMF Problems. You can avoid one-way audio on calls and touchtones that don’t work with these simple settings in FreePBX: Settings -> Asterisk SIP Settings. Just plug in your public IP address and your private IP subnet. Then set ULAW as the only Audio Codec.
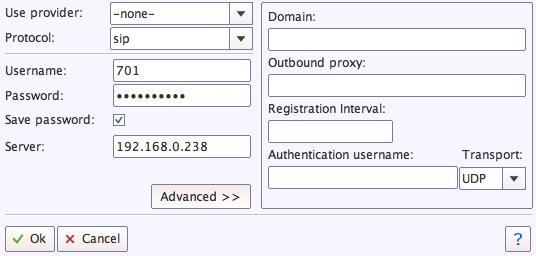
6. Setting Up a Desktop Softphone. Incredible Pi supports all kinds of telephones, but we’ll start with the easy (free) one today. You can move on to "real phones" once you’re smitten with the VoIP bug. For today, you’ll need to download a softphone to your desktop PC or Mac.
As we mentioned, the easiest way to get started with Incredible Pi is to set up a YATE softphone on your Desktop computer. Versions are available at no cost for Macs, PCs, and Linux machines. Just download the appropriate one and install it from this link. Once installed, it’s a simple matter to plug in your extension 701 credentials and start making calls. Run the application and choose Settings -> Accounts and click the New button. Fill in the blanks using the IP address of Incredible Pi, 701 for your account name, and whatever password you created for the extension. Click OK.
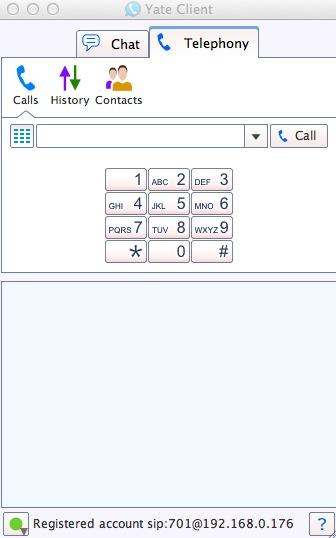
Once you are registered to extension 701, close the Account window. Then click on YATE’s Telephony Tab and place your first call. It’s that easy!
Monitoring Call Progress with Asterisk. That about covers the basics. We’ll leave you with a tip on how to monitor what’s happening with your PBX. There are several good tools within the FreePBX GUI. You’ll find them under the Reports tab. In addition, Asterisk has its own Command Line Interface (CLI) that is accessible from the Linux command prompt. Just execute the following command while logged in as root: asterisk -rvvvvvvvvvv.
Activating SAMBA for Windows Networking. SAMBA is included for transparent access using the Windows Networking Protocol from PCs, Macs, and other Linux machines. As delivered, SAMBA is deactivated. For obvious reasons, we recommend you never activate root login access to SAMBA without a very secure password. If you wish to enable SAMBA on your server, here are the steps while logged in as root:
- 1. Set SAMBA password for user root: smbpasswd -a root
- 2. Change Windows workgroup from WORKGROUP, if needed: nano -w /etc/samba/smb.conf
- 3. Manually start SAMBA from command prompt: service samba start
- 4. If desired, set SAMBA to start on boot: rcconf and activate SAMBA option
If you’d like to update your status application to display SAMBA status instead of WLan1, here are the steps:
cd /usr/local/sbin

wget http://incrediblepbx.com/sambastatus.tgz

tar zxvf sambastatus.tgz

rm sambastatus.tgz
Activating the PPTP VPN Client. If you’ve followed the Nerd Vittles tutorial and previously set up a PPTP VPN Server for your devices, then it’s pretty simple to add Incredible Pi to the mix by activating its PPTP VPN client. You’ll need the FQDN or public IP address of your VPN server as well as a username and password for VPN access to your VPN server. Once you have those in hand, log into Incredible Pi as root.
Lest we forget to mention, you cannot log into your PPTP server from an IP address on the same private LAN so you’d only use the PPTP VPN when your Incredible Pi is at a remote location.
Edit the connection template: nano -w /etc/ppp/peers/my-pptp-server. Insert the following text and replace myfqdn.org with the FQDN of your PPTP server, replace myname with your PPTP username, and replace mypassword with your PPTP password. Then save the file: Ctrl-X, Y, then Enter.
To test it, issue the following command: /etc/init.d/pptp start. When you run ifconfig, you should now see a ppp0 entry:
ppp0      Link encap:Point-to-Point Protocol

          UP POINTOPOINT RUNNING NOARP MULTICAST  MTU:1500  Metric:1

          RX packets:0 errors:0 dropped:0 overruns:0 frame:0

          TX packets:0 errors:0 dropped:0 overruns:0 carrier:0

          collisions:0 txqueuelen:3

          RX bytes:0 (0.0 B)  TX bytes:0 (0.0 B)
Remember, it won’t show an IP address if the Raspberry Pi and your PPTP VPN Server are on the same subnet (like ours). Once you install your Raspberry Pi in a remote location, you now can access it at the first IP address in your reserved PPTP IP address pool.
To permanently activate the PPTP VPN client on your Incredible Pi server, run rcconf. Scroll to the bottom of the list and highlight pptp. Press the space bar to select it for automatic startup when you boot your server. Then tab to OK and press Enter.
Shutting Down Your Server. Last but not least, never just pull the plug when you want to shut down your server, or you may end up with corrupted MySQL databases. Then nothing will run. Instead, log into your server as root, and issue the following command: shutdown -h now. Enjoy!
3.7 Update: Activating Incredible Fax. With a 512MB Raspberry Pi, here are the 5 Simple Steps to activate Incredible Fax. The complete tutorial is available here.
- Download and Install Incredible PBX 3.7
- Run the /root/fax-enable Script to Automatically Configure HylaFax
- Using FreePBX, Add Additional, Dedicated DID and Inbound Route to Handle Incoming Faxes
- Install Any Desktop HylaFax Client to Send Faxes via Print-to-Fax using any PDF
- Reboot Your Server and Enjoy
Where To Go Next. Once you’ve done a little exploring, take a few minutes to read the complete tutorial on all 35 Incredible PBX applications for Raspberry Pi. A few require a bit of configuration before you start using them. And then you’ll want to explore Interconnecting Asterisk Servers with Incredible PBX and the Raspberry Pi. Enjoy!
 Don’t forget to List Yourself in Directory Assistance so everyone can find you by dialing 411. And add your new number to the Do Not Call Registry to block telemarketing calls. Or just call 888-382-1222 from your new number.
Originally published: Tuesday, September 25, 2012 Updated: Sunday, October 21, 2012 Updated: Tuesday, November 27, 2012
 Support Issues. With any application as sophisticated as this one, you’re bound to have questions. Blog comments are a terrible place to handle support issues although we welcome general comments about our articles and software. If you have particular support issues, we encourage you to get actively involved in the PBX in a Flash Forums. It’s the best Asterisk tech support site in the business, and it’s all free! In fact, there is a thread dedicated to support of Incredible Pi. Please have a look and post your support questions there. Unlike some forums, ours is extremely friendly and is supported by literally hundreds of Asterisk gurus and thousands of ordinary users just like you. You won’t have to wait long for an answer to your question.
Bug Fixes. A few bugs are to be expected. If you’re using Incredible Pi, please review these on the PIAF Forum.

Astricon 2012. Astricon 2012 will be in Atlanta at the Sheraton beginning October 23 through October 25. We hope to see many of you there. We called Atlanta home for over 25 years so we’d love to show you around. Be sure to tug on my sleeve and mention you’d like a free PIAF Thumb Drive. We’ll have a bunch of them to pass out to our loyal supporters. Nerd Vittles readers also can save 20% on your registration by using coupon code: AC12VIT.

Need help with Asterisk? Visit the PBX in a Flash Forum.
whos.amung.us If you’re wondering what your fellow man is reading on Nerd Vittles these days, wonder no more. Visit our new whos.amung.us statistical web site and check out what’s happening. It’s a terrific resource both for us and for you.
Special Thanks to Our Generous Sponsors
FULL DISCLOSURE: ClearlyIP, Skyetel, Vitelity, DigitalOcean, Vultr, VoIP.ms, 3CX, Sangoma, TelecomsXchange and VitalPBX have provided financial support to Nerd Vittles and our open source projects through advertising, referral revenue, and/or merchandise. As an Amazon Associate and Best Buy Affiliate, we also earn from qualifying purchases. We’ve chosen these providers not the other way around. Our decisions are based upon their corporate reputation and the quality of their offerings and pricing. Our recommendations regarding technology are reached without regard to financial compensation except in situations in which comparable products at comparable pricing are available from multiple sources. In this limited case, we support our sponsors because our sponsors support us.
 BOGO Bonaza: Enjoy state-of-the-art VoIP service with a $10 credit and half-price SIP service on up to $500 of Skyetel trunking with free number porting when you fund your Skyetel account. No limits on number of simultaneous calls. Quadruple data center redundancy. $25 monthly minimum spend required. Tutorial and sign up details are here.
![]() The lynchpin of Incredible PBX 2020 and beyond is ClearlyIP components which bring management of FreePBX modules and SIP phone integration to a level never before available with any other Asterisk distribution. And now you can configure and reconfigure your new Incredible PBX phones from the convenience of the Incredible PBX GUI.
The lynchpin of Incredible PBX 2020 and beyond is ClearlyIP components which bring management of FreePBX modules and SIP phone integration to a level never before available with any other Asterisk distribution. And now you can configure and reconfigure your new Incredible PBX phones from the convenience of the Incredible PBX GUI.
 VitalPBX is perhaps the fastest-growing PBX offering based upon Asterisk with an installed presence in more than 100 countries worldwide. VitalPBX has generously provided a customized White Label version of Incredible PBX tailored for use with all Incredible PBX and VitalPBX custom applications. Follow this link for a free test drive!
 Special Thanks to Vitelity. Vitelity is now Voyant Communications and has halted new registrations for the time being. Our special thanks to Vitelity for their unwavering financial support over many years and to the many Nerd Vittles readers who continue to enjoy the benefits of their service offerings. We will keep everyone posted on further developments.
Some Recent Nerd Vittles Articles of Interest…
- Google Voice calling is free throughout the United States and Canada at least through the end 0f 2012. Extensions typically have been announced during the last week of December each year… but nothing lasts forever. [↩]
- Many of our purchase links refer users to Amazon when we find their prices are competitive for the recommended products. Nerd Vittles receives a small referral fee from Amazon to help cover the costs of our blog. We never recommend particular products solely to generate Amazon commissions. However, when pricing is comparable or availability is favorable, we support Amazon because Amazon supports us. [↩]


Use Bluetooth Proximity Detection with your Raspberry Pi to Forward Calls to Your Cell When You’re Away. Here’s how: http://nerd.bz/PDUoGi
Great work so far. 1 question though, with such limited resources, why are you using a heavy webserver like Apache? Why not Lighttpd or Nginx?
Also what about using Exim instead of sendmail?
I used gparted to move the linux-swap (swapoff first) to the end of the device.
Then the raspi-config – expand_rootfs will work.
So you might want to re-arrange the partitions to have ‘/’ as the last partition in the image on your next release for expand_rootfs to work.
[WM: Thanks. This has been resolved in Incredible PBX 3.3.]
Incredible PBX 3.3 bug reports and fixes can be found at this link.
If you’re in the U.K., looks like you can already order a 512MB Raspberry Pi… if you hurry.
Hi,
I have PIAF running on basic machine, I have MP118 for POTS lines and Intepeer for VOIP.
I have two NICs – 1 for internal network and 1 for external.
I want to go with this hardware. Can I share the 1 NIC or should I use the WIFI as well? I have never been able to use NAT on my router/firewall successfully. I must be missing something. Ideas?
Doug
I want to use the GPIO pins to trigger a phone ring so this acts as a doorbell. Someone has already posted scripts of how to do this on Asterisk at http://www.raspberrypi.org/phpBB3/viewtopic.php?t=15348&p=168350 – how easy is it to set this up on Incredible PBX?
[WM: Kinda depends on your skill level. The detailed instructions are here. Incredible PBX for the Raspberry Pi uses "pure Raspbian" so the process is fairly straight-forward. All the tools needed to recompile Asterisk can be found in /usr/src/asterisk-1.8.16.0 on your SD card. If things go horribly wrong, just be sure you have a good backup of your SD card before you begin. Good luck!]
Can this also be used to setup regular (non google voice) sip trunks. I haven’t downloaded and read all of the docs yet, so apologies if it is clear. I like the polished look of your version, just would rather bring in my own SIP trunk.
[WM: You can use both SIP and IAX2 trunks. Just add them within FreePBX, and away you go.]
Thinking about a really basic doorbell with no compiling etc., I found this script to make an extension ring if pin 17 is activated.
#!/bin/bash

while true;

do

   cmd=$(cat /sys/class/gpio/gpio17/value)

      if [ $cmd = '0' ]; then

         asterisk -rx 'originate local/s@fromdoor application Playback beep'

      fi

sleep 1

done
Then edit extensions_custom.conf to include:
[fromdoor]
exten => s,1,SET(CALLERID(name)=From DOOR)
same => n,Dial(SIP/nnnn,10)
same => n,hangup()
(Where nnnn is extension number).
I understand I would need to take 3.3v with a 10k Ohm resistor, run this parallel with pin 17, then switch to ground to activate it. (Like this http://i.imgur.com/FqnNB.png)
This is a really basic question – I am not a programmer, how do I run the script?
[WM: Log into your server as root. Create a file for the script, e.g. nano -w /root/doorbell.sh. Save the file: Ctrl-X, Y, then Enter. Run the script in the background after testing it without using the ampersand: /root/doorbell.sh &
Thanks, one more question – once I have set the script all up properly, how can I get it to run automatically on boot?
(Does this version have watchdog to reboot the device if it crashes too?)
[WM: Crashes? We don’t want no stinking crashes. But, yes, watchdog is included in the build. Once the script is running, you can add a line to /etc/init.d/freepbx just below ${AMPORTAL_BIN} start
ward
what is the capacity for this pbx?
how many simultaneous call can Handel ?
thanks in advance
Just Released: Incredible PBX 3.5 Torrent for 256MB and 512MB Raspberry Pi. 2MB/sec downloads. http://nerd.bz/RnKASK
I followed the directions and went back and double checked to make sure everything was correct, but I’m still unable to receive incoming calls from google voice, although outgoing calls work perfectly.
I have asterisk -rvvvvvvvvvv running in an ssh session and I see lots of debugging info when I place an outgoing call, but when I try to make one incoming, nothing appears on the debugger.
I’m kinda stumped, anyone have an idea how to go about debugging this?
Thanks
Argh, please disregard last message. I was logged in to google chat through my android phone.
CallCentric network outage may cause IPtables to fail with Incredible PBX for Raspberry Pi. Here’s the fix: http://nerd.bz/Sc6FBw
I was thinking maybe this would be good for a sip door phone?
Incredible Faxing for the 512MB Raspberry Pi finally has arrived. Install instructions here: http://nerd.bz/TSbzqC
Have you tried adding a heatsink to keep the CPU cooler when overclocking? There seem to be a bunch of different heatsink kits for the Raspberry Pi available.
– Crusadio
I have v3.5 on a 256K Pi running at home to help me learn Asterisk. I have 3 SPA942 phones with a trunk to the outside world. All is working great, but is there anyway to do paging to all the phones ? PiAF talks about a Paging module, but I can’t see it as a built-in or an available module.
Incredible PBX 3.6 featuring Incredible Fax is now ready for testing. http://nerd.bz/UOOgL9
Is it possible to incorporate Skype gateway into this Rasspberry Pi distro?
[WM: Skype is proprietary, and M$FT has not chosen to release a version for this ARM processor. Sorry.]
Thanks sooo much for all this work. As a software engineer, I know all the work this took, and it is so nice to have everything working in one package. I have had several false starts with Freeswitch, Asterisk by itself, plugpbx, etc. I am waiting for my new model PI and will eagerly set this up and get it going with my Nexvortex.com account (these guys are great for a very cost-effective SIP account).
My next effort will be creating a package for a SOHO SMB that can be easily turnkey’d SD card image that can be setup for multiple offices (one with a PI pbx, and the rest with just phones behind their router).
Amazing coordination and thoughtfulness in putting this together.
Thanks again, your place in heaven is preserved 😉
I haven’t been able to boot v3.6 successfully. It keeps getting stuck at the same spot:
…
[ 17.450507] EXT4-fs (mmcblk0p2): re-mounted. Opts: (null)
[ 17.955682] bcm2708 watchdog, heartbeat=10 sec (nowayout=0)
[ 18.082264] bcm2835 ALSA card created!
[ 18.088798] bcm2835 ALSA chip created!
[ 18.108266] bcm2835 ALSA chip created!
[ 18.119225] bcm2835 ALSA chip created!
[ 18.127708] bcm2835 ALSA chip created!
[ 18.136138] bcm2835 ALSA chip created!
[ 18.144602] bcm2835 ALSA chip created!
[ 18.152828] bcm2835 ALSA chip created!
[ 25.949645] bcm2835-cpufreq: switching to governor ondemand
[ 25.961321] bcm2835-cpufreq: switching to governor ondemand
[ 28.339789] NET: Registered protocol family 10
[ 32.709849] Adding 897020k swap on /var/swap. Priority:-1 extents:27 acrossS
[ 86.499399] ip_tables: (C) 2000-2006 Netfilter Core Team
[ 89.714954] watchdog stopped
I’ve tried 2 different cards and 2 different Pi’s all with the same result. I created the cards using the make_sdhc script.
This is the first version I’ve tried. I’m going to downgrade and try v3.5 and see if it works better. But, any idea what problem is here?
Thanks.
Never mind. I didn’t know Incredible PBX doesn’t show a login prompt on the serial console which is why the system appears to be hung. (I don’t have a graphical display.) I can log in through SSH now.
Thanks.
I have a static I/P address and a FQDN that I want to use with 3.6 on a Pi.
I tried setting SIP from within FreePBx and set the changes to be accepted from my server and it doesn’t work.
I modify interfaces and I added dns-nameservers and it crashes.
Any ideas?
[WM: See this thread on the forum for some suggestions.]
Am still waiting for my Pi to arrive… I intend to make this as my first project, however, I would like to know if someone has done this with a USB stick 3G modem (Huawei) as extension to transfer calls to a gsm network. I understand that there are "cheap" GoIP sip-gsm gateways but if the project can just be on one device, why not? I have tried venturing into asterisk + chan_datacard and chan_mobile sometime ago but I could not make it work. There’s this nice win program from Oktell called sipgsm… has anyone ported such in linux? Thanks
Is there any chance to connect 3G-modem Huawei E1550 as SIP-GSM Gateway to Incredible Pi? Any ideas how to do it?
I have not been able to get inbound gtalk calls to work. Looking at the asterisks log, Asterisk does not see anything when a call is made to my gvoice number. Network trace also does not see any xmpp traffic when a call is made. Although outbound gvoice calls work. And I can see JABBER: messages reporting buddy status message changes. Any Advice? I am using a my main gmail account, But I have verified all of my other gtalk sessions were closed on all devices. This used to work a few months ago but stopped, I have not been able to pin down the cause.
[WM: Don’t know how much clearer we can be. You cannot use a Google account that is being used for other purposes elsewhere. That means Gmail, Jabber, Jingle, XMPP, SMS, or any other Google function that requires your credentials for use. If you do, you will never get incoming calls to work. One more time: you must use a dedicated Google account for Incredible PBX if you expect inbound calling to work reliably.]
I am running Incredible PBX on my Pi and it is working well. I have a few questions relating to it:
1) Using windows how do I make a backup of the entire SD card that is running Incredible PBX? I have tried win32diskimager, but it only backs up the 1st partion.
2) I would like to be able to call a ‘custom destination’ and have the text to speak engine tell me the status of a GPIO pin. How would I go about do this?
3) How would I setup an IVR that would allow me to turn on/off a gpio pin?
Thank you!!
I am trying to install 3.7 on my new Pi (with 512MB of memory), and it hangs starting network interface. Connectivity is not an issue, Asterisk for Raspberry boots up perfectly, as well as Raspberry’s own Debian. Any advice?
[WM: It’s either a bad image on the SD card, or a bad SD card, or a defective power supply. Since you say the other builds boot, that would narrow it down to the first two in my opinion. Does the checksum of the image match what it should be? That would be the first place to look. Then I’d try burning the image to another card.]
No, unfortunately, I tried re-download; untar on Linux instead of Windows; put on SD rather than on microSD with adapter. the result is the same – it’s hanging right after telling me about eth interface. If there is anything I can do to troubleshoot – please let me know. I’ll happily swap raspberry-asterisk card for Incredible PBX card. Thanks.
[WM: Unfortunately we can’t diagnose networking problems via comments. Please head to the PIAF Forum for assistance. Sounds like it’s not getting an IP address from your router which would cause it to hang. This is a wired connection, right? Without a network address, it can’t access the network to set the clock so Asterisk cannot load.]
Great directions! Just wondering: I have version 2 of raspberry pi. Do you think it has enough processing power to record a conference while it is handling 2 did lines without deteriorating audio quality?
[WM: Only one way to find out. 🙂 ]
I make lots of international call from my vonage VOIP phone . I want to build a call recorder (incoming and outgoing). Can raspberry pi and Free Incredible PBX and my vonage adapter work together to make it happen?
[WM: If you add an OBi110, you can use your Vonage adapter.]
I followed the process mentioned above. But whenever I try to make call using Yate Client from my PC. I got a error message " All circuits are busy"
Please help.
[WM: Please head to the PIAF Forum for assistance. Can’t do it on a blog. Sorry.]
Absolute perfection. Other than the slow write speeds to the sd card (you might add a warning note about that part), I had it swapped over to local extension numbers and trunked to existing asterisk servers in minutes. FreePBX is noticeably slower but it doesn’t get any cooler than this!
A few people have asked how this device would scale. How many IP handsets might this support, and how many concurrent calls in/out? OR, is this really just a perfect DEV env for someone wanting to test and learn Asterisk?
[WM: Seems to do just fine from what we’ve seen and heard.]