
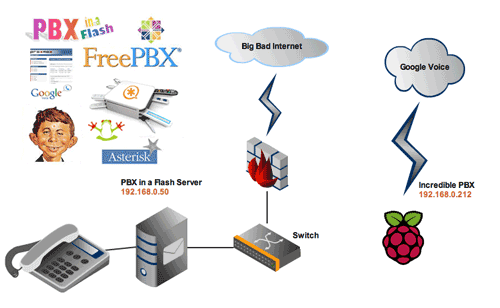
We’ve spent the last couple months perfecting Incredible PBX™ as a full-featured VoIP platform for deployment on the $35 Raspberry Pi®. And, with the recent addition of 512MB RAM on the main system board, the Raspberry Pi not only is a great platform for home or SOHO use, but now it’s an ideal server for remote deployment in organizations with small satellite offices scattered around the countryside or for those with a loved one stationed in a faraway place. It’s especially important for those that want to take advantage of free interoffice communications or perhaps low-cost communications facilities that are only available through the main office headquarters. Our project for today is to show you how easy it is to interconnect these satellite offices, traveling salesmen, and troops stationed on the other side of the globe to provide system-wide, transparent Asterisk® communications at no cost. Using Raspberry Pi devices for the remote office or employee, you can set this up with FreePBX® in less than 5 minutes per site! Once configured, everyone in the organization can call everyone else by simply dialing their extension or a prefix with the local extension number. And finally we’ll show you how to securely share communications trunks at one site with your other locations.
There’s a little advance planning that needs to take place before you actually deploy today’s setup. First, you’ll need to adjust your hardware-based firewalls at each location to allow communications between the various sites. You’ll also need to authorize SIP access for each site in the Linux iptables firewalls. If some or all of the remote sites have dynamic IP addresses, then you’ll either need to deploy a PPTP VPN for your servers or use a service such as DynDNS.com to create fully-qualified domain names for each site. Dynamic IP addresses can be kept current at each site using a dynamic update app such as ddclient. And ipchecker can be run periodically to update IP address changes in iptables. Both apps are available for Incredible PBX on the Raspberry Pi. Finally, some thought needs to go into the extension numbering scheme at each site. The simplest way to is reserve extensions in the 1000 range for the home office, 2000-2999 for office #2, etc. If your organization already has an existing numbering system, then Plan B is to devise a dialing prefix that can be used to access extensions at various sites. For example, you might dial 1-2345 to reach extension 2345 in the main office or 2-2345 to reach extension 2345 in office 2 and so on. Either way works, and Asterisk with FreePBX supports both dialing schemes.
Hardware-Based Firewall Setup. For each site to which you wish to interconnect, you’ll need to add an entry to your hardware-based firewall using the FQDN or IP address of the site with the following ports mapped to your Asterisk server at that site: UDP 5060 and UDP 10000-20000.
IPtables Configuration and Dynamic IP Address Setup. If you have one or more sites whose servers have dynamic IP addresses, then you’ll need fully-qualified domain names for those sites that can be kept current using ddclient on the remote server and ipchecker on the main server. For background, start by reading the Nerd Vittles article on Travelin’ Man 3. You’ll need to deploy this on your main server. It’s already incorporated into the Incredible PBX builds for PBX in a Flash and the Raspberry Pi.
You’ll first need a DynDNS account. For $20 a year, you can set up 30 FQDNs and keep the IP addresses for these hostnames current 24-7. For $30 a year, you can manage 75 hostnames using your own domain and execute up to 600,000 queries a month. That’s more than ample for almost any small business but, if you need more horsepower, DynDNS.com can handle it.
Our Travelin’ Man 3 article will walk you through the steps in setting up iptables entries for your new FQDNs on your main server. On the Raspberry Pi devices, you’ll need to install ddclient: apt-get install ddclient. The installer will walk you through the setup process to keep your dynamic IP addresses synced with your FQDN. You’ll also need to add iptables entries for your main site and any other sites to which you wish to directly connect. In the /root folder, you’ll find scripts to add-fqdn or add-ip entries to iptables. The setup is covered in detail in the Travelin’ Man 3 article so we won’t repeat it here.
Interconnecting Servers with SIP Trunks. For our example today, we’re going to simplify things a bit and show how to interconnect a Main server and a Remote server where both servers are on the same private LAN. The only difference from real life is that you typically would use the public IP addresses of both servers when they are housed in different locations and accessible via the Internet. To avoid the hassle of wrestling with dynamic IP addresses and for added security and encrypted communications, you can interconnect your servers using a PPTP VPN. It’s included in Incredible PBX on all platforms. In configuring your SIP trunks, just substitute the PPTP IP addresses of each server in lieu of public IP addresses. Then you don’t have to worry about dynamic IP addressing issues. And, to add support for additional remote servers, just create separate SIP trunk pairs at the Main and Remote sites with a naming scheme like this: Main1 and Remote1 for adding the first remote site, Main2 and Remote2 for adding the second one, and so on.
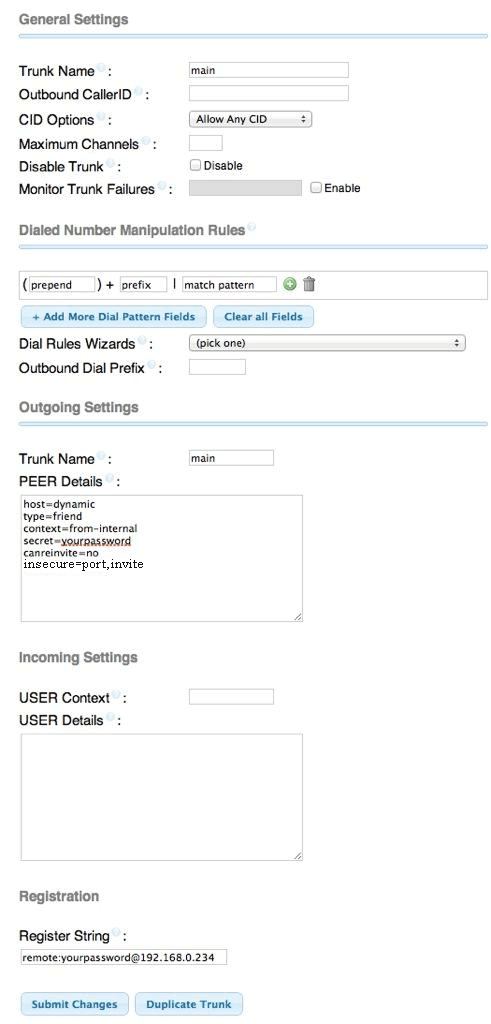
Adding a Remote SIP Trunk on Your Main Server. Let’s begin by adding a SIP trunk to your Main Server to support the Remote Raspberry Pi device. We’ll refer to the Remote SIP trunk as remote for our example. Using FreePBX 2.10, choose Connectivity -> Trunks -> Add SIP Trunk. Make up a very secure password to interconnect your two servers. We’ll use it as the secret at both ends. Then fill out the template using the example below. In the Registration String, use the actual IP address or FQDN of your remote server:
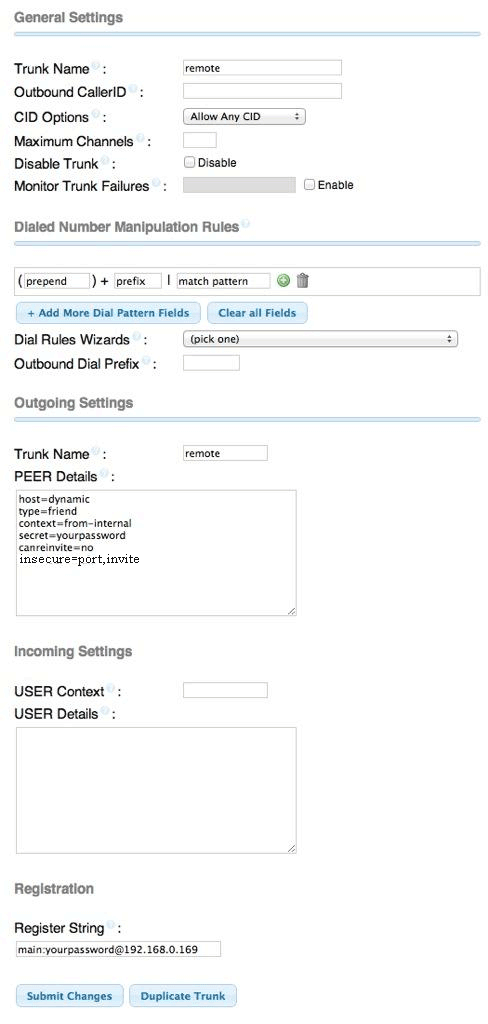
Adding the Main SIP Trunk to Your Remote Server. On your Remote Server using FreePBX 2.10, choose Connectivity -> Trunks -> Add SIP Trunk. Use the same password as the secret you set up on the main server. Then fill out the template using the example below. In the Registration String, use the IP address or FQDN of your main server:
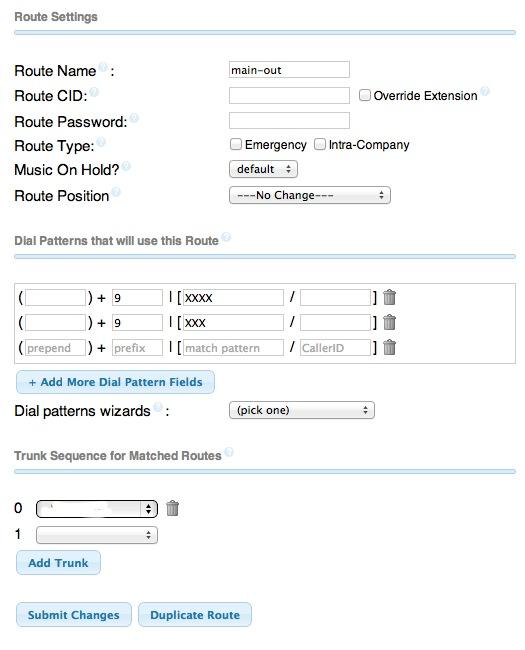
Adding an Outbound Route from Remote Server to Main Server. To allow calls from the Remote Server to your Main Server, we’ll create an Outbound Route on the Remote Server: main-out. In FreePBX 2.10, choose Connectivity -> Outbound Routes -> Add Route. For our example, let’s assume that we want Remote users to dial 9 as a prefix to connect back to extensions on the Main server. And let’s also assume that all extensions on the Main server are either three or four digits long. Just fill out the template using the example below and, for Trunk Sequence 0, choose main from the pull-down list. If you wanted to allow Remote users to place calls using the Outbound U.S./Canada trunks available on the Main server, just add an additional Dial Pattern with 9 as the prefix and NXXNXXXXXX as the Match.
Adding an Outbound Route from Main Server to Remote Server. To set up something similar on the Main Server to allow users to make calls to the Remote Server, you’d create an Outbound Route similar to the one above. Call it remote-out. Use whatever dial prefix you’d like and make the rest of the Dial Pattern match the length of the extension numbers at the Remote site. Then choose remote as Trunk Sequence 0 from the pull-down list.
Congratulations! You now have unlimited free calling between all of the extensions registered to your two servers, regardless of where those servers happen to be located. You can follow your nose to add as many additional servers as you like. So long as there is a reliable Internet connection, your total, non-recurring cost to add each additional site is a $35 Raspberry Pi and a few accessories. Got a family member stationed in Afghanistan? Send them a Raspberry Pi with Incredible PBX for Christmas. They not only can call you, but they can make calls to anyone else using your outbound trunks without incurring any toll charges for the communications link between Afghanistan and your server. Enjoy!
Security ALERT! For those running Incredible PBX on the Raspberry Pi, there have been some security patches released in the last few days. First, be sure you’re running Incredible PBX 3.5. Second, log into your server as root and issue the following command: /root/update-my-pi. Done.
Where To Go From Here: Getting Started with Incredible PBX for the Raspberry Pi and The ‘Fab 35’ Apps Tutorial
Originally published: Monday, November 5, 2012

Need help with Asterisk? Visit the PBX in a Flash Forum.
whos.amung.us If you’re wondering what your fellow man is reading on Nerd Vittles these days, wonder no more. Visit our new whos.amung.us statistical web site and check out what’s happening. It’s a terrific resource both for us and for you.
Special Thanks to Our Generous Sponsors
FULL DISCLOSURE: ClearlyIP, Skyetel, Vitelity, DigitalOcean, Vultr, VoIP.ms, 3CX, Sangoma, TelecomsXchange and VitalPBX have provided financial support to Nerd Vittles and our open source projects through advertising, referral revenue, and/or merchandise. As an Amazon Associate and Best Buy Affiliate, we also earn from qualifying purchases. We’ve chosen these providers not the other way around. Our decisions are based upon their corporate reputation and the quality of their offerings and pricing. Our recommendations regarding technology are reached without regard to financial compensation except in situations in which comparable products at comparable pricing are available from multiple sources. In this limited case, we support our sponsors because our sponsors support us.
 BOGO Bonaza: Enjoy state-of-the-art VoIP service with a $10 credit and half-price SIP service on up to $500 of Skyetel trunking with free number porting when you fund your Skyetel account. No limits on number of simultaneous calls. Quadruple data center redundancy. $25 monthly minimum spend required. Tutorial and sign up details are here.
![]() The lynchpin of Incredible PBX 2020 and beyond is ClearlyIP components which bring management of FreePBX modules and SIP phone integration to a level never before available with any other Asterisk distribution. And now you can configure and reconfigure your new Incredible PBX phones from the convenience of the Incredible PBX GUI.
The lynchpin of Incredible PBX 2020 and beyond is ClearlyIP components which bring management of FreePBX modules and SIP phone integration to a level never before available with any other Asterisk distribution. And now you can configure and reconfigure your new Incredible PBX phones from the convenience of the Incredible PBX GUI.
 VitalPBX is perhaps the fastest-growing PBX offering based upon Asterisk with an installed presence in more than 100 countries worldwide. VitalPBX has generously provided a customized White Label version of Incredible PBX tailored for use with all Incredible PBX and VitalPBX custom applications. Follow this link for a free test drive!
 Special Thanks to Vitelity. Vitelity is now Voyant Communications and has halted new registrations for the time being. Our special thanks to Vitelity for their unwavering financial support over many years and to the many Nerd Vittles readers who continue to enjoy the benefits of their service offerings. We will keep everyone posted on further developments.
Some Recent Nerd Vittles Articles of Interest…


What is the case for doing this rather than having sip phones in the remote office register directly with the main office PBX? Especially if we’re speaking of a home office of a single telecommuter?
I can think of a few things. Better use of bandwidth, with calls within each location not using the internet connection. Better fault tolerance, with a main office outage leaving remote offices still up. Smaller burden on main office PBX. Remote office PBX can choose nearest sip trunk provider for outside calls rather than an extra hop through main office pbx.
I liked dyndns until I found out about
https://freedns.afraid.org/
and
https://dns.he.net/
For another approach to safely interconnecting Asterisk servers without the hassle of managing dynamic IP addresses, see this thread for tips on implementing UserAgent Knocks with iptables.
Forgive me if this is a newbie question but is there a reason not to interconnect both with Hamachi or Neorouter and register remote phones via the server they are on a LAN with (due to no mobile client on Hamachi for instance) ?
Good to see this new connection environment, it is totally new for me. I want to try it as soon as possible & if it is suitable for me then I’ll continue it for my business.
Like Grey One above, I also would like to know why in the Pi article regarding the VPN setup you talk about PPTP VPN and not NeoRouter VPN which I understand had been added to PIAF installs?
I was away from PIAF scene for the last year so I am not sure if in the meantime the NeoRouter VPN fell into disfavor like Hamachi did previously?
Can anyone comment?
[WM: We still love NeoRouter. They were just late to the Raspberry Pi party. The PIAF Forum has lots of information about the Raspberry Pi implementation, and we intend to cover it in a future article.]
Aaah, my bad, should have read the forum first ->
http://pbxinaflash.com/community/index.php?threads/neorouter-for-raspberry-pi.14935/
Thanks for the heads up, I have to catch up on all those great things you guys were doing for the last year or so 🙂
What is this the best way to setup two servers when you need to share the Digium contacts? I did this and now have a "main" & "remote" server setup so that I can register a SIP trunk through Callcentric at my remote site (to improve call quality there) but in doing that users from the "main" site do not see the Digium contacts at the "remote" and users at the "remote" site can’t see contacts at the "main" site. Is there a configuration example or tutorial for sharing contacts or directories between servers when they are connected this way?