

Much has been made of the lack of multi-tenant functionality with Asterisk® and FreePBX®. Today we’ll show you how to interconnect as many Asterisk servers as you like and make transparent calls between all of them at zero cost. Setup time is under 5 minutes per server. When you couple PBXs with distributed infrastructure and inexpensive cloud servers costing $25 or less a year and on-premise virtual machine platforms including Proxmox, VMware ESXi, VirtualBox, Windows 11 WSL, and Mac UTM, it makes little sense in terms of reliability and redundancy to put all your eggs in one basket with a MultiTenant telephony solution.
PJsip Interconnection Design
Our basic design goes like this. Create as many decentralized Incredible PBX platforms as you need to cover the various locations of your business. Whether that’s two cities or eighty-nine, the design is the same. Next, use the same extension design at every site. For example, in each location choose 3-digit extensions in the 100 range for management offices and the receptionist, in the 200 range for human resources, in the 300 range for IT services, and so on. Next, number your locations. For nine or fewer cities, use single digits. For up to 89, use two digits beginning with 10. We actually use the last octet of our server’s OpenVPN IP address for the dialing prefix. For our example, we’ll use 1 for the Atlanta office, 2 for Dallas, and 3 for Boston. When someone in Atlanta wishes to call the main human resources number in Dallas, the user would dial 2200. For Boston, they’d dial 3200. And, when someone in Dallas or Boston wishes to reach the main HR number in Atlanta, they’d dial 1200. Assuming the receptionist in each location has extension 100, callers in Dallas would dial 1100 for Atlanta and 3100 for Boston. Hopefully, you get the idea now. Sketch these out on a piece a paper until it all makes sense to you.
You’ll need static IP addresses for each of your Incredible PBX servers. But, if one or more of your servers are sitting behind a corporate firewall, that’s not a deal breaker. Simply set up an OpenVPN network and assign a private OpenVPN IP address to each server. Then use these OpenVPN IP addresses in interconnecting your servers rather than static, public IP addresses. OpenVPN addresses are automatically whitelisted in the Incredible PBX firewall. For other IP addresses, you’ll need to whitelist them using the add-ip utility in the /root folder of each of your PBXs. Be sure to also add the IP addresses of the servers to the ignoreip list in /etc/fail2ban/jail.conf. Note in our design that, for security reasons, PJsip trunks must be created on BOTH the sending and receiving PBXs before interconnected calls between the servers will successfully complete. You wouldn’t want strangers making PJsip calls through your servers. In the alternative, if you only want to enable outbound calls from one PBX to another, you can avoid creating a PJsip trunk on the destination server and instead enable Outbound Authentication on the originating server. In this case, you also will need to enter extension credentials from the destination server in the PJsip Username and Secret fields. But let’s continue on assuming you want calls to flow in both directions.
Using our 3-city example, let’s begin by configuring the Atlanta PBX using the FreePBX GUI. Login to the web interface as admin and navigate to Connectivity -> Trunks. We want to create two PJsip trunks, one to connect to Dallas and another to connect to Boston. Similarly, in Dallas, we’ll create PJsip trunks for Atlanta and Boston. And, in Boston, we’ll create PJsip trunks for Atlanta and Dallas.
Configuring PJsip Trunks For Each Location
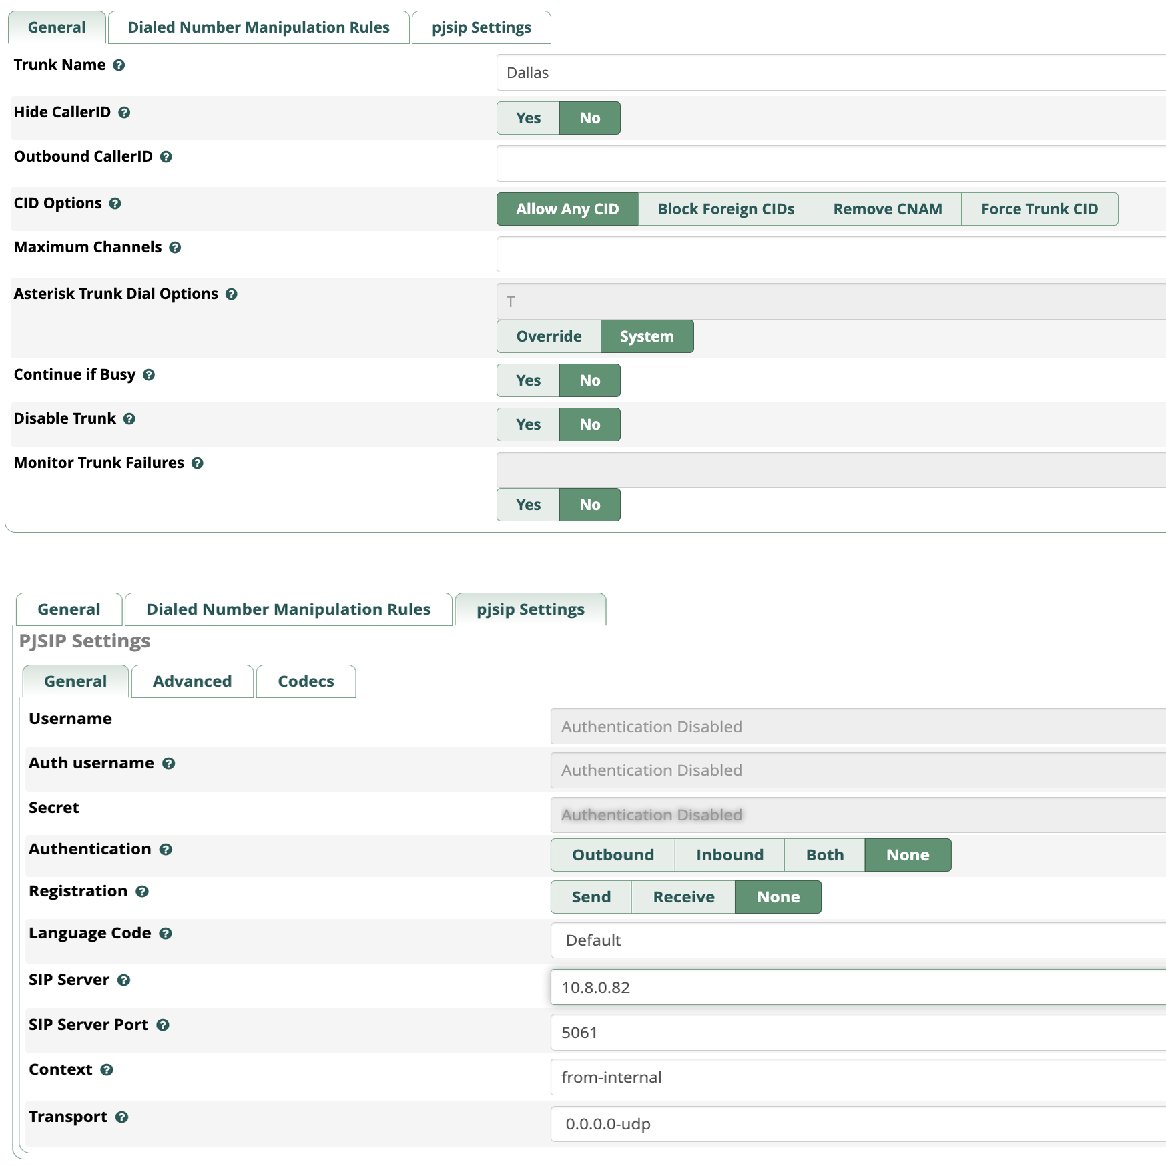
On the Atlanta PBX, click the Add Trunk button and choose Add SIP (chan_pjsip) Trunk. For the first PJsip trunk, in the General tab, let’s keep it simple and enter Trunk Name as Dallas. Leave the remaining default settings and click the pjSIP Settings tab. Leave all of the default settings as they are in both the Advanced and Codecs tabs. In the General tab, change the Authentication and Registration settings to None. For the SIP Server IP address, enter the IP address (or OpenVPN address) of the Dallas server. For the SIP Server Port, enter 5061. Finally, change the Context entry to from-internal. That’s all the settings you’ll need. So click Submit and Apply Config when prompted. Repeat the drill for Boston.
Configuring Outbound Routes For Each Location
Next, we need to create two Outbound Routes for calls to Dallas and Boston. Navigate to Connectivity -> Outbound Routes. For each city, click Add Outbound Route. Name the Outbound Route using the city name, e.g. Dallas. Change the Time Zone, if required. For the Trunk Sequence, choose the Trunk with the matching City name from the pull-down menu. Next, click the Dial Patterns tab. Here you’ll need to decide which calls you want to permit between the Headquarters office and Dallas. For the Dallas extensions, you would enter 2 in the Prefix field and NXX in the Match Pattern field. If there are 4-digit numbers on the Dallas PBX that you want to enable for callers from Atlanta, you add another Dial Pattern with the 2 Prefix and NXXX for the Match Pattern. If you want callers from Atlanta to be able to use Outbound Routes on the Dallas PBX to make PSTN calls, you would add another Dial Pattern with the 2 Prefix and NXXNXXXXXX for the Match Pattern. Similar additions could be made for international calls assuming you allow them on your Dallas PBX. Once you’ve added the desired Match Patterns, click Submit and Apply Config when prompted. Repeat these steps to add an Outbound Route for Boston, and you’re finished on the Atlanta PBX.

Repeating the Setup Process in Other Cities
Now simply repeat the steps above on each of your PBXs. For PJsip trunks, you’ll need to create one for every other city in your operation. And, for Outbound Routes, do the same. Once all of your PJsip trunks are activated, you can verify functionality in the Asterisk CLI with this command: pjsip show aors. Once the Status for each city displays as Avail, you can begin making test calls between the servers using a phone connected to each PBX.
Originally published: Tuesday, May 16, 2023
Need help with Asterisk? Visit the VoIP-info Forum.
Special Thanks to Our Generous Sponsors
FULL DISCLOSURE: ClearlyIP, Skyetel, Vitelity, DigitalOcean, Vultr, VoIP.ms, 3CX, Sangoma, TelecomsXchange and VitalPBX have provided financial support to Nerd Vittles and our open source projects through advertising, referral revenue, and/or merchandise. As an Amazon Associate and Best Buy Affiliate, we also earn from qualifying purchases. We’ve chosen these providers not the other way around. Our decisions are based upon their corporate reputation and the quality of their offerings and pricing. Our recommendations regarding technology are reached without regard to financial compensation except in situations in which comparable products at comparable pricing are available from multiple sources. In this limited case, we support our sponsors because our sponsors support us.
BOGO Bonaza: Enjoy state-of-the-art VoIP service with a $10 credit and half-price SIP service on up to $500 of Skyetel trunking with free number porting when you fund your Skyetel account. No limits on number of simultaneous calls. Quadruple data center redundancy. $25 monthly minimum spend required. Tutorial and sign up details are here.
The lynchpin of Incredible PBX 2020 and beyond is ClearlyIP components which bring management of FreePBX modules and SIP phone integration to a level never before available with any other Asterisk distribution. And now you can configure and reconfigure your new Incredible PBX phones from the convenience of the Incredible PBX GUI.
VitalPBX is perhaps the fastest-growing PBX offering based upon Asterisk with an installed presence in more than 100 countries worldwide. VitalPBX has generously provided a customized White Label version of Incredible PBX tailored for use with all Incredible PBX and VitalPBX custom applications. Follow this link for a free test drive!
Special Thanks to Vitelity. Vitelity is now Voyant Communications and has halted new registrations for the time being. Our special thanks to Vitelity for their unwavering financial support over many years and to the many Nerd Vittles readers who continue to enjoy the benefits of their service offerings. We will keep everyone posted on further developments.