

[iframe-popup id="3″]
NEWS FLASH: New Incredible PBX release with Raspbian 8 Jessie supports BOTH the Raspberry Pi 3 and the Raspberry Pi 2. Much improved installer and overall performance! Check out the new tutorial and download the new image here.
07/01/2019 NEWS FLASH: Just released Incredible PBX LITE for the Raspberry Pi 2, 3, and 4 featuring Raspbian 10 Buster. Tutorial here.
Today we’re pleased to introduce the ultimate hobbyist platform to learn about and then to deploy and use VoIP and unified communications in your home, home office, or small business. You’ll need a couple hours and a $35 Raspberry Pi 2 with its quad-core processor and gig of RAM.1 Everything else is free… as in beer. And what a collection it is. You’ll get the very latest, production-ready version of Asterisk® 13, the new Incredible PBX GUI featuring a superset of FreePBX®-compatible modules, the newest Google Voice refinements with secure OAUTH 2 authentication for free calling and faxing in the U.S. and Canada, a rock-solid, preconfigured, Linux firewall, a free virtual private network client for NeoRouter that’s ready for your credentials, preconfigured trunks for the very best SIP providers in the world, a turnkey GPL fax solution featuring a HylaFax/AvantFax combination that delivers incoming faxes in PDF format using the included SendMail email server, free SMS messaging, a free conference bridge, SCCP encrypted communications support, and literally dozens of free applications for Asterisk including a news service, weather reports, the world’s best on-line almanac, telephone reminders, voice recognition for hands-free calling, and more. Do you need to be a Linux, network, or communications engineer? Not at all. If you can read, you’ve met the only prerequisite to implement Incredible PBX. The sky’s the limit on where to go next. Enjoy!
|
Target Audience: Home or SOHO/SBO seeking a GPL PBX with a web-based Graphical User Interface Default Configuration: Asterisk 13 with Incredible PBX GUI, Kennonsoft GUI, and NANPA dialplan Platform: Raspbian 7 running on a Raspberry Pi 2 Standard Memory: 1024MB Recommended Disk: 16GB+ Default Trunks: Google Voice, CallCentric, DIDlogic, Future-Nine, IPcomms, Les.net, Vitelity, VoIP.ms2 Feature Set: SMS messaging, VPN, Reminders, ConfBridge Conferencing, AsteriDex, Voicemail, Email, IVR, News, Weather, Voice Dialer, Wolfram Alpha, Today in History, TM3 Firewall WhiteList, Speed Dialer, iNUM and SIP URI (free) worldwide calling, OpenCNAM CallerID lookups, DISA, Call Forwarding, SCCP, CDRs Administrator Utilities: Incredible Backup/Restore, Automatic Updater, Asterisk Upgrader, phpMyAdmin, Timezone Config, Plug-and-Play Trunk Configurator, WebMin, External IP Setup, Firewall WhiteList Tools |
As with all Incredible PBX products, your server is protected out of the box by our 10-Layer Network Security Model:
- Preconfigured IPtables Linux Firewall (IPv4)
- Preconfigured Travelin’ Man 3 WhiteLists
- Randomized Port Knocker for Remote Access
- TM4 WhiteListing by Telephone (optional)
- Fail2Ban Log Monitoring for SSH, Apache, Asterisk
- Randomized Ultra-Secure Passwords
- Automatic Security Updates & Bug Fixes
- Asterisk Manager Lockdown to localhost
- Apache htaccess Security for Vulnerable Web Apps
- Security Alerts via RSS Feeds in Kennonsoft and Incredible PBX GUIs
Getting Started with Incredible PBX and Incredible PBX GUI (RasPi 2 Edition)
Here’s a quick overview of the installation and setup process for Incredible PBX featuring the Incredible PBX GUI:
- Install the Raspberry Pi 2 OS in text mode (No GUI) – Raspbian Wheezy
- Configure Raspbian 7 – Optimize Raspbian Wheezy for Incredible PBX
- Download and Install Incredible PBX + Incredible PBX GUI
- Install Incredible Fax with HylaFax/AvantFax (optional)
- Set Up Passwords for Incredible PBX
- Configure Trunks using Incredible PBX GUI
- Connect a Softphone using Incredible PBX GUI

1. Install Raspbian 7 Platform for Raspberry Pi 2
For those with Raspberry Pi experience, this is the same drill you’ve performed a dozen times before. For newbies, here’s the procedure. You’ll need a microSD card of at least 8GB, and we strongly recommend a 16GB or 32GB Type 10 card for Incredible PBX. We’ve tested both the SanDisk and Transcend cards, and they both work great.
Begin by downloading the latest RASPBIAN Wheezy image from RaspberryPi.org to your desktop. For the time being, DO NOT USE Raspbian Jessie! After you’ve unzipped the image, you need to get it moved to your microSD card. RaspberryPi.org has excellent tutorials that will walk you through the process using a Linux, Mac, or Windows desktop platform. Don’t forget to unmount the card before removing it. Building the SD card with Raspbian 7 takes about 30 minutes.
Once you have your microSD card ready to go, plug it into the slot on the back of the Raspberry Pi 2 and then plug in the power cord. On your attached monitor, you can follow the boot up process. If a login prompt appears, log in as user pi with the password raspberry and run: raspi-config. Usually this isn’t necessary.

2. Optimizing Raspbian 7 for Incredible PBX
The first time you boot up your Raspberry Pi 2 with Raspbian 7, it will run the raspi-config script. This allows you to make a number of changes to your Raspberry Pi environment to maximize performance. Let’s take advantage of it. Choose text mode for the bootup since we don’t need the RasPi GUI at all.
Advanced Options. Enable Remote SSH access to your Raspberry Pi 2.
Option 1. Expand the File System to fill your SD card. Otherwise, there’s insufficient disk space to complete the install.
Tab to the Finish option and press ENTER. Then choose Reboot and NO.
At the Linux command prompt, set a very secure root password: sudo passwd root. Decipher your IP address so that you can log in as root via SSH: ifconfig. Now reboot the system: sudo reboot.
We strongly recommend completing the rest of the install by logging in as root using a desktop computer via SSH or Putty (for Windows). This gives you the ability to scroll back up and find errors if something happens to come unglued during the install. It also assures that your desktop computer will be whitelisted in the automated setup of the IPtables firewall for IPv4.
3. Install Incredible PBX on Your Raspberry Pi 2
Adding Incredible PBX to the Raspberry Pi 2 is easy. To restate the obvious, your server needs a reliable Internet connection to proceed. Using SSH (or Putty on a Windows machine), log into your Raspberry Pi 2 as root at the IP address you deciphered in the ifconfig step at the end of the Raspbian install procedure above.
Now let’s begin the Incredible PBX install. After logging in as root, issue the following commands. The install takes an hour or more and runs unattended so there’s no need to watch unless you’re curious about how sausage is made. Remember, as part of the build process, we compile all of the major components for Incredible PBX from source. That takes some time. If you’re curious, you can review the open source GPL script to see how it’s done or to embellish it. Incredible PBX is GPL open source, 100% Gotcha-Free code so go for it and share your discoveries. That’s what open source is all about!
cd /root
wget http://incrediblepbx.com/incrediblepbx13-12.3.raspbian.tar.gz
tar zxvf incrediblepbx13-12.3.raspbian.tar.gz
rm -f incrediblepbx13-12.3.raspbian.tar.gz
./IncrediblePBX13-12.3-raspbian.sh
4. Install Incredible Fax for Incredible PBX (optional)
Administrators have been trying to stomp out faxing for at least two decades. Here’s a hint. It ain’t gonna happen. So go with the flow and add Gotcha-Free Faxing to your server. It’ll be there when you need it. And sooner or later, you’ll need it. This install script is simple enough for any monkey to complete. Run the script and enter the email address for delivery of your faxes. Then, press the Enter key to accept every default entry during the HylaFax and AvantFax installation steps.
cd /root
./incrediblefax11_raspi2.sh
When the installation finishes, reboot your server to bring faxing on line. After rebooting, you can access the AvantFax GUI with your browser by logging in as admin with the default password: password. Follow the prompts to update your admin password. You also can log into AvantFax from within the Incredible PBX GUI itself by clicking on the Other tab and choosing AvantFax.
Outgoing faxes using standard document attachments can be created using the AvantFax GUI. The faxes will be sent out using your default outbound dial rules. You can add a dial prefix for sending a fax with AvantFax to force the call out a particular trunk that has been preconfigured in the Incredible PBX GUI.
Incoming faxes will be delivered to the email address you specified when installing Incredible Fax; however, incoming faxes will be ignored until you configure a destination DID to accept the faxes. You’ll want a dedicated line for incoming faxes! A free Google Voice trunk works fine. Keep reading for DID setup instructions. For the incoming route of the destination DID for your faxes, specify: 
If you ever forget your admin password for AvantFax, you can reset it by running the script: /root/avantfax-pw-change.
5. Initial Configuration of Incredible PBX
Incredible PBX is installed with the preconfigured IP4tables Linux firewall already in place. It implements WhiteList Security to limit server access to private LANs, your server’s IP address, your desktop computer’s IP address, and a few of our favorite SIP providers. You can add additional entries to this WhiteList whenever you like using the add-ip and add-fqdn tools in /root. There’s also an Apache security layer for our web applications. And the Incredible PBX GUI has its own security methodology. Finally, we randomize extension and DISA passwords as part of the initial install process. Out of the starting gate, you won’t find a more secure VoIP server implementation anywhere. After all, it’s your phone bill.
Even with all of these layers of security, here are 10 Quick Steps to better safeguard your server. You only do this once, but failing to do it may lead to security issues you don’t want to have to deal with down the road. So DO IT NOW!
First, log into your server as root with your root password and do the following:
Make your root password very secure: passwd
Set your correct time zone: /root/timezone-setup
Restart Asterisk: amportal restart
Create admin password for Incredible GUI: /root/admin-pw-change
Create admin password for web apps: htpasswd -b /etc/pbx/wwwpasswd admin newpassword
Make a copy of your Knock codes: cat /root/knock.FAQ
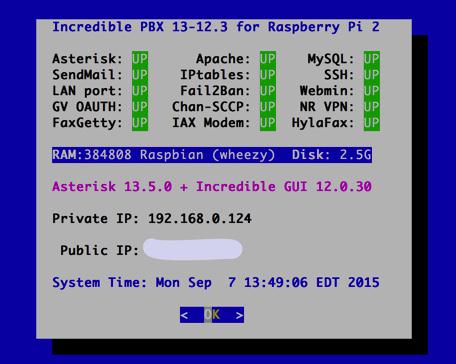
Decipher IP address and other info about your server: status
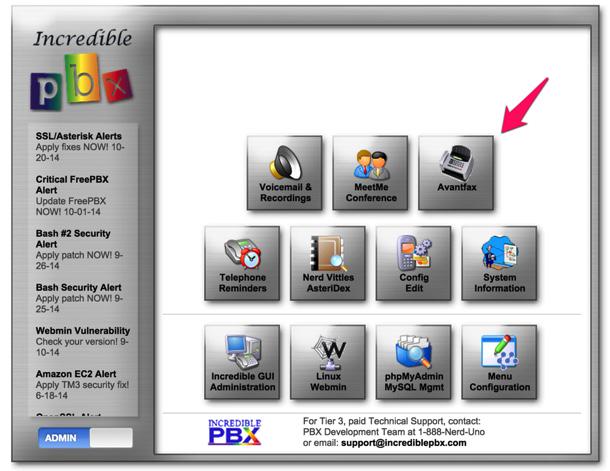
Second, use a web browser pointed to your server’s IP address. Click on the Users tab (bottom left below RSS Feed in Main Menu) to bring up the Administrator Menu. Click the Incredible GUI Administration button (bottom left). When the Incredible GUI Menu appears (shown above), click the Server Administration icon on the left. Login as admin with the password you set using admin-pw-change above. Now change your extension 701 extension and voicemail passwords.
Click Applications tab
Choose Extensions from the pull-down menu
Click on 701 in the far-right Extensions list
Don’t forget to click Submit and then Apply Settings to save your new entries.
Last but not least, Incredible PBX includes an Automatic Update Utility which downloads important updates whenever you log into your server as root. We recommend you log in once a week to keep your server current. Now would be a good time to log out and back into your server at the Linux command line to bring your Raspberry Pi 2 up to current specs.
6. Configure Trunks with Incredible PBX
Now for the fun part. If this is your first VoIP adventure, be advised that this ain’t your grandma’s phone system. You need not and should not put all your eggs in one basket when it comes to telephone providers. In order to connect to Plain Old Telephones, you still need at least one provider. But there is nothing wrong with having several. And a provider that handles an outbound call (termination) need not be the same one that handles an incoming call (origination) and provides your phone number (DID). We cannot recommend Vitelity highly enough, and it’s not just because they have financially supported our projects for almost a decade. They’re as good as VoIP providers get, and we use lots of them. If you’re lucky enough to live in the U.S., you’d be crazy not to set up a Google Voice account. It’s free as are all phone calls to anywhere in the U.S. and Canada. The remaining preconfigured providers included in Incredible PBX are equally good, and we’ve used and continue to use almost all of them. So pick a few and sign up. You only pay for the calls you make with each provider so you have little to lose by choosing several. The PIAF Forum includes dozens of recommendations on VoIP providers if you want additional information.
With the preconfigured trunks in Incredible PBX, all you need are your credentials for each provider and the FQDN of their server. Log into Incredible PBX GUI Administration as admin using a browser. From the System Status menu, click Connectivity -> Trunks. Click on each provider you have chosen and fill in your credentials including the host entry. Be sure to uncheck the Disable Trunk checkbox! Fill in the appropriate information for the Register String. Save your settings by clicking Submit Changes. Then click the red Apply Config button.
7. Configure a Softphone for Incredible PBX
We’re in the home stretch now. You can connect virtually any kind of telephone to your new PBX. Plain Old Phones require an analog telephone adapter (ATA) which can be a separate board in your computer from a company such as Digium. Or it can be a standalone SIP device such as ObiHai’s OBi100 or OBi110 (if you have a phone line from Ma Bell to hook up as well). SIP phones can be connected directly so long as they have an IP address. These could be hardware devices or software devices such as the YateClient softphone. We’ll start with a free one today so you can begin making calls. You can find dozens of recommendations for hardware-based SIP phones both on Nerd Vittles and the PIAF Forum when you’re ready to get serious about VoIP telephony.
We recommend YateClient which is free. Download it from here. Run YateClient once you’ve installed it and enter the credentials for the 701 extension on Incredible PBX. You’ll need the IP address of your server plus your extension 701 password. Choose Applications _> Extensions -> 701 and write down your SIP/IAX Password. You can also find it in /root/passwords.FAQ. Fill in the blanks using the IP address of your server, 701 for your account name, and whatever password is assigned to the extension. Click OK to save your entries.

Once you are registered to extension 701, close the Account window. Then click on YATE’s Telephony Tab and place some test calls to the numerous apps that are preconfigured on Incredible PBX. Dial a few of these to get started:
DEMO - Apps Demo

123 - Reminders

947 - Weather by City and State or Country*

951 - Yahoo News

*61 - Time of Day

TODAY - Today in History
* Voice recognition apps require Google credentials. Keep reading.
If you are a Mac user, another great no-frills softphone is Telephone. Just download and install it from the Mac App Store.
8. Configuring Google Voice on the Google Side
If you want to use Google Voice, you’ll need a dedicated Google Voice account to support Incredible PBX. The more obscure the username (with some embedded numbers), the better off you will be. This will keep folks from bombarding you with unsolicited Gtalk chat messages, and who knows what nefarious scheme will be discovered using Google messaging six months from now. So keep this account a secret!
IMPORTANT: Do NOT under any circumstances take Google’s bait to switch from Google Chat to Hangouts, or you will forever lose the ability to use Google Chat with Incredible PBX. Also be sure to enable the Google Chat option as one of your phone destinations in Settings, Voice Setting, Phones. That’s the destination we need for The Incredible PBX to work its magic! Otherwise, all inbound and outbound calls will fail. Good News! You’re in luck. Google has apparently had a change of heart on discontinuing Google Chat support so it’s enabled by default in all new Google Voice accounts. Once you’ve created a Gmail and Google Voice account, go to Google Voice Settings and click on the Calls tab. Make sure your settings match these:
- Call Screening – OFF
- Call Presentation – OFF
- Caller ID (In) – Display Caller’s Number
- Caller ID (Out) – Don’t Change Anything
- Do Not Disturb – OFF
- Call Options (Enable Recording) – OFF
- Global Spam Filtering – ON
Click Save Changes once you’ve adjusted your settings. Under the Voicemail tab, plug in your email address so you get notified of new voicemails. Down the road, receipt of a Google Voice voicemail will be a big hint that something has come unglued on your PBX.
One final word of caution is in order regardless of your choice of providers: Do NOT use special characters in any provider passwords, or nothing will work!
This release of Incredible PBX implements OAUTH2 authentication for Google Voice trunks. Even though it’s a bit more work on the front end, the good news is you won’t have to worry about your Google Voice trunks failing when Google phases out plain-text passwords. The other good news is you won’t be passing your plain-text Google Voice credentials across the open Internet for everyone in the world to see.
While you’re still logged into your Google Voice account, you need to obtain a refresh_token which is what you’ll use instead of a password when setting up your Google Voice account in the GUI. Here’s how.
1. Be sure you are still logged into your Google Voice account. If not, log back in at https://www.google.com/voice.
2. Go to the Google OAUTH Playground using your browser while still logged into your Google Voice account.
3. Once logged in to Google OAUTH Playground, click on the Gear icon in upper right corner (as shown below).
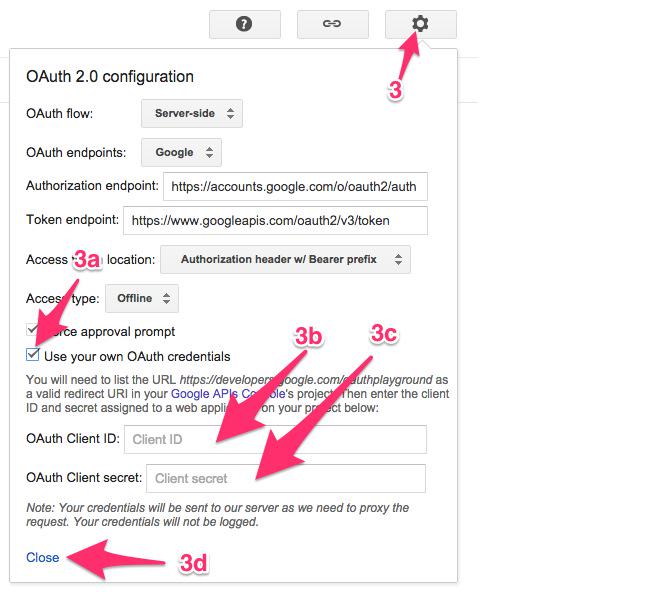
3a. Check the box: Use your own OAuth credentials
3b. Enter Incredible PBX OAuth Client ID:
466295438629-prpknsovs0b8gjfcrs0sn04s9hgn8j3d.apps.googleusercontent.com
3c. Enter Incredible PBX OAuth Client secret: 4ewzJaCx275clcT4i4Hfxqo2
3d. Click Close
4. Click Step 1: Select and Authorize APIs (as shown below)
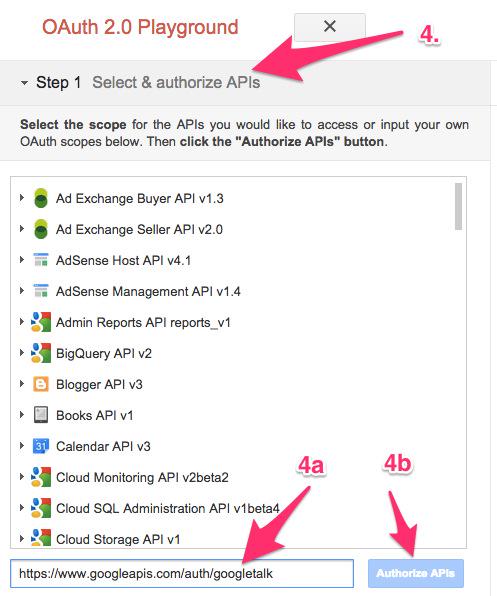
4a. In OAUTH Scope field, enter: https://www.googleapis.com/auth/googletalk
4b. Click Authorize APIs (blue) button.
5. Click Step 2: Exchange authorization code for tokens
5a. Click Exchange authorization code for tokens (blue) button
5b. When the tokens have been generated, Step 2 will close.
6. Reopen Step 2 and copy your Refresh_Token. This is the "password" you will need to enter (together with your Gmail account name and 10-digit GV phone number) when you add your GV trunk in the Incredible PBX GUI. Store this refresh_token in a safe place. Google doesn’t permanently store it!
7. Authorization tokens NEVER expire! If you ever need to remove your authorization tokens, go here and delete Incredible PBX Google Voice OAUTH entry by clicking on it and choosing DELETE option.
Yes, this is a convoluted process. Setting up a secure computing environment often is. Just follow the steps and don’t skip any. It’s easy once you get the hang of it. And you’ll sleep better.
9. Configuring Google Voice in the Incredible PBX GUI
Now you’re ready to configure your Google Voice account in Incredible PBX. You do it from within the Incredible PBX GUI by choosing Connectivity -> Google Voice. Just plug in your Google Voice Username, enter your refresh_token from Step #6 above as your Google Voice Password, enter your 10-digit Google Voice Phone Number, and check the first two boxes: Add Trunk and Add Outbound Routes. Then click Submit and Apply Settings to save your new entries.
IMPORTANT: Once you’ve entered your credentials, you MUST restart Asterisk from the Linux command line, or Google Voice calls will fail: amportal restart
10. Troubleshooting Google Voice Connectivity Problems
If you have trouble getting Google Voice to work (especially if you have previously used your Google Voice account from a different IP address), try this Google Voice Reset Procedure. It usually fixes connectivity problems. If it still doesn’t work, enable Less Secure Apps using this Google tool.
If you have difficulty finding the Google Chat option after setting up a new Google Voice account, follow this tutorial.
Another option is to use one of the inexpensive SIP Gateways to Google Voice. HINT: The Simonics trunk in the Incredible PBX GUI is preconfigured. All you’ll need are your credentials.
Adding Speech Recognition Support to Incredible PBX
To support many of our applications, Incredible PBX has included Google’s speech recognition service for years. These applications include Weather Reports by City (949), AsteriDex Voice Dialing by Name (411), and Wolfram Alpha for Asterisk (4747), all of which use Lefteris Zafiris’ terrific speech-recog AGI script. Unfortunately (for some), Google now has tightened up the terms of use for their free speech recognition service. Now you can only use it for "personal and development use." If you meet those criteria, keep reading. Here’s how to activate speech recognition on Incredible PBX. Don’t skip any steps!
To use Wolfram Alpha by phone, you first must obtain a free Wolfram Alpha APP-ID. Then issue the following command replacing APP-ID with your actual ID. Do NOT change the yourID portion of the command:
sed -i "s|yourID|APP-ID|" /var/lib/asterisk/agi-bin/4747
Now you’re ready to try out the speech recognition apps. Dial 949 and say the name of a city and state/province/country to get a current weather forecast from Yahoo. Dial 411 and say "American Airlines" to be connected to American.
To access Wolfram Alpha by phone, dial 4747 and enter your query, e.g. "What planes are overhead." Read the Nerd Vittles tutorial for additional examples and tips.
Implementing WiFi on the Raspberry Pi 2
You don’t need to rely upon a wired network connection once you get your Raspberry Pi 2. WiFi works just as well. You’ll need a compatible USB WiFi Dongle. We recommend the AirLink 101 from Amazon or the Adafruit 814. Insert it into a free USB slot on your RasPi and boot up. Log in as root and edit /etc/wpa_supplicant/wpa_supplicant.conf. Add the following lines to the bottom of the file using your actual SSID and password. Then reboot after disconnecting your LAN cable.
network={
 ssid="your-SSID"
 psk="SSID-password"
}
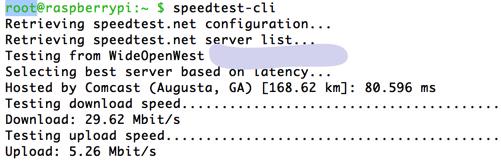
You can test the performance of your WiFi connection by installing speedtest-cli and then running it:
easy_install speedtest-cli
speedtest-cli
Implementing SCCP for Secure, Encrypted Communications with Asterisk
Today marks our first effort to include and support the extended SCCP Channel Driver for Asterisk 13. All you’ll need to do is add the SCCP and device configuration files, and the rest should work. For a good overview of SCCP, start here. For excellent documentation on SCCP setup, go here. For PIAF Forum support, start here.
Homework Assignment: Mastering the Incredible PBX Feature Set
Now would be a good time to explore the Incredible PBX applications. Continue reading there. If you have questions, join the PBX in a Flash Forums and take advantage of our awesome collection of gurus. There’s an expert available on virtually any topic, and the price is right. As with Incredible PBX, it’s absolutely free.
Originally published: Monday, September 7, 2015
 Support Issues. With any application as sophisticated as this one, you’re bound to have questions. Blog comments are a terrible place to handle support issues although we welcome general comments about our articles and software. If you have particular support issues, we encourage you to get actively involved in the PBX in a Flash Forums. It’s the best Asterisk tech support site in the business, and it’s all free! Please have a look and post your support questions there. Unlike some forums, ours is extremely friendly and is supported by literally hundreds of Asterisk gurus and thousands of users just like you. You won’t have to wait long for an answer to your question.

Need help with Asterisk? Visit the PBX in a Flash Forum.
Special Thanks to Our Generous Sponsors
FULL DISCLOSURE: ClearlyIP, Skyetel, Vitelity, DigitalOcean, Vultr, VoIP.ms, 3CX, Sangoma, TelecomsXchange and VitalPBX have provided financial support to Nerd Vittles and our open source projects through advertising, referral revenue, and/or merchandise. As an Amazon Associate and Best Buy Affiliate, we also earn from qualifying purchases. We’ve chosen these providers not the other way around. Our decisions are based upon their corporate reputation and the quality of their offerings and pricing. Our recommendations regarding technology are reached without regard to financial compensation except in situations in which comparable products at comparable pricing are available from multiple sources. In this limited case, we support our sponsors because our sponsors support us.
 BOGO Bonaza: Enjoy state-of-the-art VoIP service with a $10 credit and half-price SIP service on up to $500 of Skyetel trunking with free number porting when you fund your Skyetel account. No limits on number of simultaneous calls. Quadruple data center redundancy. $25 monthly minimum spend required. Tutorial and sign up details are here.
![]() The lynchpin of Incredible PBX 2020 and beyond is ClearlyIP components which bring management of FreePBX modules and SIP phone integration to a level never before available with any other Asterisk distribution. And now you can configure and reconfigure your new Incredible PBX phones from the convenience of the Incredible PBX GUI.
The lynchpin of Incredible PBX 2020 and beyond is ClearlyIP components which bring management of FreePBX modules and SIP phone integration to a level never before available with any other Asterisk distribution. And now you can configure and reconfigure your new Incredible PBX phones from the convenience of the Incredible PBX GUI.
 VitalPBX is perhaps the fastest-growing PBX offering based upon Asterisk with an installed presence in more than 100 countries worldwide. VitalPBX has generously provided a customized White Label version of Incredible PBX tailored for use with all Incredible PBX and VitalPBX custom applications. Follow this link for a free test drive!
 Special Thanks to Vitelity. Vitelity is now Voyant Communications and has halted new registrations for the time being. Our special thanks to Vitelity for their unwavering financial support over many years and to the many Nerd Vittles readers who continue to enjoy the benefits of their service offerings. We will keep everyone posted on further developments.
Some Recent Nerd Vittles Articles of Interest…
- If you don’t have an HDMI-compatible monitor, you now can add the official Raspberry Pi 7″ touch display for $60. [↩]
- Vitelity and Google provide financial support to Nerd Vittles and the Incredible PBX projects. [↩]


If you need a reliable power supply for your RasPi, here’s a good one from our friends at Amazon.
The directions suggest, "Begin by downloading the very latest RASPBIAN image from RaspberryPi.org to your desktop." As of 8/25 the latest is "Jessie", which the "IncrediblePBX13-12.3-raspbian.sh" script doesn’t like. I’m sure you’re already aware, but wanted to make sure it had been reported. Jessie has only been out a few days, so I’m sure it will take some time to validate it before updating the script/directions.
Thanks for the great tools and tutorials!
[WM: Thanks, Dave. Jessie was released after we published the script and tutorial. For the time being, we will revise the article to make clear that you need Raspbian Wheezy. Appreciate the heads up, and we’ll work on an upgrade.]
thanks for the great articles. I have installed many asterisks following your guides.
One question: could you follow this guide to install it on the original raspberry B model?
[WM: Not enough horsepower or RAM on the original Raspberry Pi B. Sorry.]
Is DADHI included? If not, any suggestion on how I can build it into IncrediblePBX? Thank you.
[WM: DAHDI requires a card. There’s no place to put one in a Raspberry Pi. Use an external ATA.]
And on the Raspberry Pi B+?
[WM: Insufficient horsepower in our opinion, but you’re more than welcome to try it.]
I found a good You Tube video by Vitelity that explains how to configure:
https://www.youtube.com/watch?v=MAn9KrswKxg. THe Vitelity trunk is now up and running.
NB: The cut and paste that was used to create this page is rife with errors that creates a lot of chaos for noobs like me.