
Remember when you could buy an awesome server for under $200? Thanks to Intel® and Yogi Berra, it’s déjà vu all over again! Years ago we discovered a machine called the Acer Revo that could be had for about $200. It met all of the Unified Communications requirements that a home office or small office could dream of, but then they doubled in price. That led us to the Raspberry Pi 2. While it met the basic needs for most SOHO environments, it involved a bit more hardware tinkering than many folks were comfortable with. And it’s overall performance was something less than robust.

Say what you will about Intel hardware. They may not get things quite right out of the starting gate. But give them a little time, and issues get addressed and fixed. And you end up with incredible hardware at a terrific price. So it is with the $119 third-generation Intel NUC DN2820FYKH. Slip in a 4GB stick of RAM and an economical SSD drive to complement the built-in WiFi and Bluetooth, and you’ve got an amazing hardware platform that takes up 4″ x 4″ of real estate in your office. While its 2.4 GHz Celeron dual-core processor isn’t exactly a screamer compared to some Intel chips, it’s an energy-efficient rocketship compared to the Raspberry Pi 2. Intel VT-x virtualization support1 also is included. The average BOGOMIPS rating of the current Raspberry Pi is 96. The Intel NUC’s BOGOMIPS average is 5332! In Plain English, it would take 55 Raspberry Pi 2’s to match the processing power of one Intel NUC.
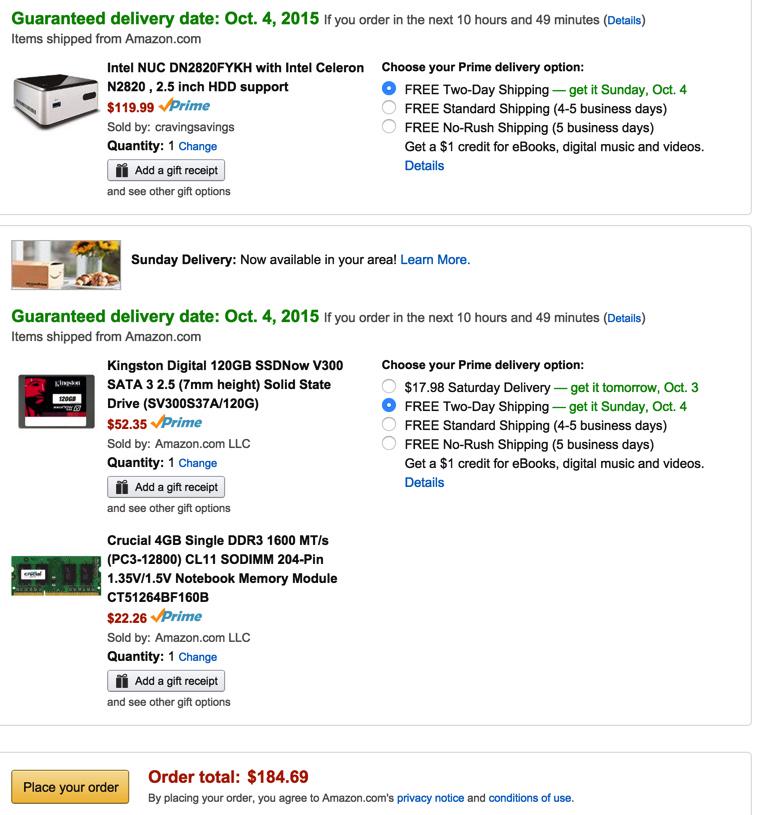
Performance, of course, is only half of the equation. There’s also price. Let’s be completely fair and spec out the Raspberry Pi with one-quarter of the RAM and disk storage of the Intel NUC. Cost of the board itself ($41+) + case ($10) + power adapter ($10) + 32GB microSD Type 10 card ($20) + WiFi Dongle ($10) comes to at least $90. Here’s what our Intel NUC set us back on Amazon2 with quadruple the RAM and disk storage, basically the cost of 2 RasPi setups. The FreePBX® Phone System 50 with similar specs starts at $579 and takes up a healthy chunk of your office space. With Incredible PBX and the Intel NUC, you not only save on space, but it’s also about a third of the cost of the FreePBX alternative. For power users, you’re probably wondering whether you can scale up from Celeron-based system. The answer is ABSOLUTELY. The Core i5 model with 16GB of RAM and a 250GB SSD drive runs about $500. And, of course, Incredible PBX imposes no artificial limitations on user accounts or number of simultaneous calls regardless of the hardware platform you choose. No Gotchas!
Initial Setup of the Intel NUC Platform
Once you receive your hardware, the first step is installation of the memory card and SATA drive. HINT: You’d be crazy not to use an SSD drive. They’re dirt cheap and FAST! Start your adventure by reviewing the User’s Guide from Intel. As you can see below, it walks you through the hardware installation process which takes about 10 minutes.
[gview file="https://downloadmirror.intel.com/23417/eng/DN2820FYKH_UserGuide02.pdf"]
The most important step comes next. Until you get the BIOS upgraded on the hardware, it will NOT boot. Visit the Download Page for the Intel NUC and grab the latest BIOS Update from here. The only piece you need is FY0051.BIO. Copy it to a DOS-formatted USB flash drive using any desktop computer. Once you’ve done that, insert the flash drive into the front slot on the Intel NUC, plug in a USB keyboard, HDMI monitor, USB DVD drive, and network cable. Turn on the machine. Press F7 after the beep. Follow the instructions to upgrade the BIOS and identify the firmware file you copied to your flash drive. Agree to the license and let the firmware update proceed. It takes about 10 minutes.
While you’re waiting, burn the Incredible PBX 13 ISO to a DVD to use with an external USB DVD drive and your Intel NUC. Tutorial is here.
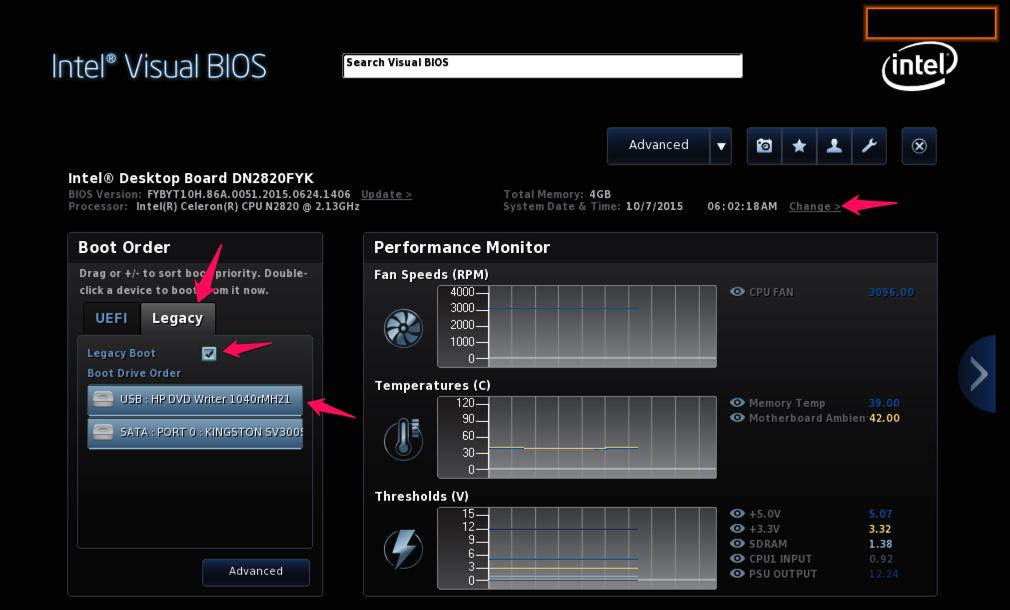
Once the BIOS has been upgraded, your Intel NUC will reboot. You must change a few BIOS settings to complete the hardware setup, or nothing will work. After the machine reboots, press F2 to access Intel’s new Visual BIOS. First, enable the Legacy Boot Procedure, not UEFI (as shown above). Next, make certain that booting from the DVD drive has priority. And, last but not least, set the correct date and time for the computer. Without accurate time, Asterisk will not compile, and you’ll have to repeat the drill! Once you’ve made these changes, save your settings by pressing F10. Your machine will again reboot. Hardware setup is complete. To install Incredible PBX, reboot and press F10 for the boot menu. Pick your USB DVD drive.
If you don’t happen to have one, LG’s tiny USB-powered DVD Writer is the best $25 you will ever spend.

And, if you really want to splurge, take the plunge with this awesome 10″ HDMI (and everything else) monitor:

Installing Incredible PBX 13 on the Intel NUC
Choose the Basic Install, set your time zone, and create a very secure root password. It takes about 20 minutes to install the Scientific Linux 6.7 platform. After a reboot, press Enter to accept the Incredible PBX license agreement and complete the install. We initially were concerned that RedHat-based platforms would not load on the Intel NUC since they are not mentioned in the Intel compatibility chart. Not to worry. SL 6.7 works fine. This may very well be because of the latest BIOS upgrade. In any case, you can follow along in our Incredible PBX 13 ISO tutorial for the details. Adding free fax support with Incredible Fax is equally easy. Just run the Hylafax/AvantFax installer: /root/installfax11.sh. If you want to enable encrypted OAUTH2 authentication for your Google Voice accounts, follow this tutorial beginning at step #1b. When you get everything humming along, check out our tutorial for the three dozen Incredible Apps that are bundled with Incredible PBX.
Finally, tidy up the status display to accomodate the Intel NUC’s generous RAM and Disk sizes:
sed -i 's|$OSrelease|<> Sci Linux 6.7 <>|' /usr/local/sbin/status

Setting Up WiFi Connectivity on the Intel NUC
You probably noticed that two private IP addresses are listed on the status display shown above. The first is the wired network connection. The second is either the wireless network connection or the NeoRouter VPN address depending upon how you’ve set up your server. Incredible PBX can be run using either the eth0 or wlan0 interface. You really don’t want both, and we’ll show you how to turn one of them off. Here’s how to activate WiFi on your server. Follow the steps carefully and don’t be intimidated that you’re venturing down into the network weeds. It’s a number of steps but nothing difficult.
WARNING: We strongly recommend installing Incredible Fax before you enable WiFi connectivity to avoid problems. Trust us on this one. We learned the hard way, and you can only run the Incredible Fax installer once!
1. Install wpa_supplicant to manage WiFi access: yum -y install wpa_supplicant
2. Download and install the latest WiFi driver. Just cut-and-paste the code below while logged in as root:
cd /root
wget --no-check-certificate https://wireless.wiki.kernel.org/_media/en/users/drivers/iwlwifi-7260-ucode-25.30.14.0.tgz
tar zxvf iwlwifi-7260-ucode-25.30.14.0.tgz
cd iwlwifi-7260-ucode-25.30.14.0
cp iwlwifi-7260-14.ucode /lib/firmware/.
reboot
3. Edit /etc/sysconfig/wpa_supplicant. Modify line 3 to look like this: INTERFACES="-iwlan0"
4. Edit /etc/wpa_supplicant/wpa_supplicant.conf. Insert the following lines at the end of the file after replacing the ssid and psk entries below with the actual name and password needed to access your WiFi network:
update_config=1
network={
 ssid="yourSSID"
 psk="yourSSIDpassword"
 key_mgmt=WPA-PSK
 scan_ssid=1
}
5. Edit /etc/sysconfig/network-scripts/ifcfg-wlan0. Change ONBOOT=no to ONBOOT=yes
6. Edit /etc/sysconfig/network. Add CRDA_DOMAIN=US
7. Edit /etc/sysconfig/knockd. Add OPTIONS="-i wlan0"
8. Set up a couple services to start on bootup (default=off):
chkconfig messagebus on
chkconfig wpa_supplicant on
9. Edit /etc/rc.local. Add the following lines immediately above the iptables-restart line in the file:
/sbin/ifup wlan0
/usr/local/sbin/amportal kill
/usr/local/sbin/amportal start
/etc/init.d/knockd restart
For those that are curious, step #9 is necessary because the system attempts to start these services before the wireless network is properly configured. And they fail. So… we simply restart them at the end of the boot procedure.
10. Reboot to bring everything on line properly. Check status for results.
11. We have observed interference issues between the wired and wireless networks occasionally. For that reason, once you have verified that your wireless network is functioning properly, we strongly recommend disabling eth0. Edit /etc/sysconfig/network-scripts/ifcfg-eth0. Change ONBOOT=yes to ONBOOT=no. Then reboot your server, and the interference problems disappear.
12. Down the road, if you’d prefer to use the wired network, just undo the settings in steps 5 – 9 and 11. Then reboot.

Deploying a Mobile Office with the Intel NUC
Some are probably wondering why you’d ever need WiFi with a Unified Communications platform. One reason for those that travel regularly is that you might want your PBX to ride along with you. Still others might want to use the Intel NUC for demonstrations at events such as this week’s AstriCon in Orlando. Using the Mobile HotSpot feature on your smartphone, WiFi access is easy even when there’s no local WiFi connection. Once configured, there’s no need for a keyboard or monitor with the Intel NUC. You can use Putty or SSH to access the server. While the Intel NUC is now a 12 volt device, you may not want to wrestle with building the necessary cable to connect it directly to a vehicle. An easier solution is to install an inexpensive power inverter and then use the standard power brick that came with the Intel NUC. The inVERT 100 Watt Portable Power Inverter does the trick for $35, or you might prefer this 150-watt BESTEK inverter from Amazon for $19. Don’t forget to adjust your SmartHost setting to accommodate your cellphone carrier’s SMTP host! Better yet, use gMail as your SMTP Relay host and never have to worry about it again. Then add the following line to your /etc/rc.local startup file with your email address, and your DHCP address will be sent to you whenever and wherever your server boots up:
echo "`cat /etc/hostip`" | mail -s "Intel NUC is UP" yourname@youremailserver.net
Enjoy your new Unified Communications System…
Originally published: Monday, October 12, 2015
9 Countries Have Never Visited Nerd Vittles. Got a Friend in Any of Them https://t.co/wMfmlhiQ9y #asterisk #freepbx pic.twitter.com/TPFGZbqWB6
— Ward Mundy (@NerdUno) April 22, 2016

Need help with Asterisk? Visit the PBX in a Flash Forum.
Special Thanks to Our Generous Sponsors
FULL DISCLOSURE: ClearlyIP, Skyetel, Vitelity, DigitalOcean, Vultr, VoIP.ms, 3CX, Sangoma, TelecomsXchange and VitalPBX have provided financial support to Nerd Vittles and our open source projects through advertising, referral revenue, and/or merchandise. As an Amazon Associate and Best Buy Affiliate, we also earn from qualifying purchases. We’ve chosen these providers not the other way around. Our decisions are based upon their corporate reputation and the quality of their offerings and pricing. Our recommendations regarding technology are reached without regard to financial compensation except in situations in which comparable products at comparable pricing are available from multiple sources. In this limited case, we support our sponsors because our sponsors support us.
 BOGO Bonaza: Enjoy state-of-the-art VoIP service with a $10 credit and half-price SIP service on up to $500 of Skyetel trunking with free number porting when you fund your Skyetel account. No limits on number of simultaneous calls. Quadruple data center redundancy. $25 monthly minimum spend required. Tutorial and sign up details are here.
![]() The lynchpin of Incredible PBX 2020 and beyond is ClearlyIP components which bring management of FreePBX modules and SIP phone integration to a level never before available with any other Asterisk distribution. And now you can configure and reconfigure your new Incredible PBX phones from the convenience of the Incredible PBX GUI.
The lynchpin of Incredible PBX 2020 and beyond is ClearlyIP components which bring management of FreePBX modules and SIP phone integration to a level never before available with any other Asterisk distribution. And now you can configure and reconfigure your new Incredible PBX phones from the convenience of the Incredible PBX GUI.
 VitalPBX is perhaps the fastest-growing PBX offering based upon Asterisk with an installed presence in more than 100 countries worldwide. VitalPBX has generously provided a customized White Label version of Incredible PBX tailored for use with all Incredible PBX and VitalPBX custom applications. Follow this link for a free test drive!
 Special Thanks to Vitelity. Vitelity is now Voyant Communications and has halted new registrations for the time being. Our special thanks to Vitelity for their unwavering financial support over many years and to the many Nerd Vittles readers who continue to enjoy the benefits of their service offerings. We will keep everyone posted on further developments.
Some Recent Nerd Vittles Articles of Interest…
- We’ll have much more to say about virtualization soon as Proxmox has just introduced Proxmox VE 4.0 with support for KVM and Linux Containers. Stay tuned! [↩]
- Some of our links refer users to Amazon or other service providers when we find their prices are competitive for the recommended products. Nerd Vittles receives a small referral fee from these providers to help cover the costs of our blog. We never recommend particular products solely to generate commissions. However, when pricing is comparable or availability is favorable, we support these providers because they support us. [↩]


