

DEC. 7 NEWS FLASH: The Elastix project has been sold to 3CX. Elastix 4.0 and Elastix MT have been removed from production "due to a legal disagreement with another open source distribution."
Our crystal ball suggests that 2016 is shaping up to be a fantastic year full of VoIP surprises and excitement. We’ll be there to cover every new development. When it comes to graphical user interfaces for Asterisk®, the days of the one trick pony are officially over. Free At Last! And leave it to Edgar Landivar and Team Elastix® to be first out of the gate with Elastix 4.0. What a terrific new product it is! The Elastix project began nearly a decade ago, and every release continues to demonstrate why Elastix remains at the top of the leader board when it comes to true open source unified communications solutions. Whether you’re building a commercial call center or seeking an open source telephony platform for your organization, Elastix competes favorably with the best commercial brands in the business. We’ll put a little icing on the cake today by offering an all-new Incredible PBX release for Elastix 4.0. It adds a preconfigured and locked down firewall plus dozens of applications for Asterisk including text-to-speech and voice recognition applications as well as new SIP gateways to RingPlus cellular service and Google Voice communications. So let’s begin and take Elastix 4.0 for a spin! Download the ISO here.
Celebrate with us!
Elastix, 10 years delivering Open Source Communications #opensource #voip #asterisk pic.twitter.com/r29QPL4eFu— Elastix (@elastix) March 23, 2016
A Word of Caution. If you’re new to Incredible PBX, install a clean version of Elastix 4.0 with NO MODIFICATIONS before you begin the Incredible PBX install. All of the existing Elastix 4.0 setup will be modified as part of the Incredible PBX install, and these changes will wipe out any additions you’ve previously made to Elastix. So don’t make any! Once the Incredible PBX install is completed, you can make all the changes you wish in your Elastix configuration. The only major design change we’ve made is to rework the Elastix MySQL database tables into MyISAM format from InnoDB. This facilitates making future backups and restores of your server as well as providing the necessary platform to install current and future Incredible PBX components.
Did We Mention Security? You also get a locked down, preconfigured IPtables Firewall WhiteList with all of the Travelin’ Man 3 tools plus the automatic update service to keep your server up to date and safe. There is a $20 voluntary annual license fee for the update service but, if you’d prefer to buy donuts, be our guest. But understand that voluntary is a two-way street. Running the update service costs us time and money and, when it ceases to be worthy of our time and financial investment, we reserve the right to discontinue the service down the road. The next time you log into your server after installing Incredible PBX, you’ll quickly appreciate why an automatic update service is important. We watch for and fix problems so you don’t have to.
Getting Started with Incredible PBX and Elastix 4.0
Here’s a quick overview of the installation and setup process for Incredible PBX for Elastix 4.0:
- Choose a Hardware Platform – Dedicated PC, Cloud Provider, or Virtual Machine
- Install Elastix 4.0 – 64-bit CentOS 7 platform
- Download and Install Incredible PBX for Elastix 4.0
- Set Up Passwords for Incredible PBX for Elastix 4.0
- Activate Trunks with Incredible PBX for Elastix 4.0
- Connect a Softphone to Incredible PBX for Elastix 4.0
- Configuring SMTP Mail with Incredible PBX for Elastix 4.0
1. Choose a Platform for Incredible PBX and Elastix 4.0
Incredible PBX for Elastix 4.0 works equally well on dedicated hardware, a cloud-based server, or a virtual machine. Just be sure you have a sufficiently robust Internet connection to support 100Kb of download and upload bandwidth for each simultaneous call you wish to handle with your new PBX.
For Dedicated Hardware, we recommend at least an Atom-based PC of recent vintage with at least a 30GB drive and 4GB of RAM. That will take care of an office with 10-20 extensions and a half dozen or more simultaneous calls if you have the Internet bandwidth to support it. Our favorite hardware platform remains the $200 Intel NUC, and you can read all about it here.
For Cloud-Based Servers, we recommend RentPBX, one of our financial supporters who also happens to size servers properly and restrict usage solely to VoIP. This avoids performance bottlenecks that cause problems with VoIP calls. Yes, we have a coupon code for you to get the $15/month rate: NOGOTCHAS. The new image to support Incredible PBX for Elastix 4.0 should be available shortly.
Or you can install Elastix 4.0 on top of an existing CentOS 7 platform by following this tutorial.
For Virtual Machine Installs, we recommend Oracle’s VirtualBox platform which runs atop almost any operating system including Windows, Macs, Linux, and Solaris. Here’s a link to our original VirtualBox tutorial to get you started. We suggest allocating 1GB of RAM and at least a 20GB disk image to your virtual machine for best performance. We actually used VirtualBox to build Incredible PBX for Elastix 4.0.
2. Install 64-bit Elastix 4.0 on Your Platform
Begin by downloading the 64-bit Elastix 4.0 ISO. For dedicated hardware, burn the ISO image to a DVD and boot your server with the Elastix 4.0 ISO to begin the install. You’ll be presented with the CentOS 7 Installation GUI:
Choose: Time Zone (click)
Choose: Keyboard (click)
Choose: Install Drive (double-click)
Choose: Root Password (Make it Secure!)
Wait for Install and Reboot to Complete
Set MySQL Password to: passw0rd (MANDATORY: with a zero!)
Set Elastix admin Password: minimum 10 alphanumeric characters with upper & lowercase
For VirtualBox, create an Elastix 4.0 virtual machine of Linux (RedHat 64-bit) type by clicking New. Click Settings button. In System, enable I/O APIC and disable Hardware Clock in UTC Time. In Audio, enable Audio for your sound card. In Network, enable Bridged Adapter for Adapter 1. In Storage, click on Empty in the Storage Tree. Then click on the Disk icon to the right of CD/DVD Drive attributes. Choose the Elastix 4.0 ISO file that you downloaded. Click OK. Then start the virtual machine to begin the installation process. Follow the setup steps above to install Elastix 4.0 in your virtual machine.
3. Download and Install Incredible PBX for Elastix 4.0
After completing the Elastix 4.0 install, log into your server as root using SSH or Putty from a desktop machine that you will use to manage your server. This is important with the Incredible PBX IPtables Firewall WhiteList so you don’t get locked out of your own server! Then issue the following commands to begin the Incredible PBX install. You’ll actually run the installer twice, once to upgrade CentOS 7 and Elastix 4.0 and a second time to install Incredible PBX.
cd /root
yum -y install wget
wget http://incrediblepbx.com/incrediblepbx11elastix40.tar.gz
tar zxvf incrediblepbx11elastix40.tar.gz
rm -f incrediblepbx11elastix40.tar.gz
./IncrediblePBX*
# after reboot, login again as root and...
./IncrediblePBX*
4. Initial Configuration of Incredible PBX for Elastix 4.0
Incredible PBX is installed with the preconfigured IPtables Linux firewall already in place. It implements WhiteList Security to limit server access to connected LANs, your server’s IP address, your desktop computer’s IP address, and a few of our favorite SIP providers. You can add additional entries to this WhiteList whenever you like using the add-ip and add-fqdn tools in /root. There’s also an Apache security layer for our web applications. And, of course, Elastix 4.0 has its own security methodology. Finally, we randomize various passwords as part of the initial install process. You’ll also be prompted to set your MySQL and Elastix admin password again. Be sure your MySQL password is passw0rd with a zero, or nothing will work! Out of the starting gate, you won’t find a more secure VoIP server implementation anywhere. After all, it’s your phone bill.
Even with all of these layers of security, here are 6 Quick Steps to better safeguard your server. You only do this once, but failing to do it may lead to security issues you don’t want to have to deal with down the road. So DO IT NOW!
First, log out and back into your server as root with your root password to get the latest updates. Then do the following:
Make your root password very secure: passwd
Set your correct time zone: ./timezone-setup
Create admin password for web apps: htpasswd -b /etc/pbx/wwwpasswd admin newpassword
Set MySQL and Elastix admin PW: ./admin-pw-change (MySQL PW MUST be passw0rd with zero)
Make a copy of your other passwords: cat passwords.FAQ
Decipher IP address and other info about your server: pbxstatus
Last but not least, Incredible PBX includes an automatic update utility which downloads important updates whenever you log into your server as root. We recommend you log in once a week to keep your server current. If you haven’t already done so, NOW would be a good time to log out and back into your server at the Linux command line to bring your server current.
Incredible PBX Stand-Alone Apps. Currently, there are several standalone applications included with Incredible PBX that cannot be accessed from within the Elastix Dashboard because the Elastix Developer component for Elastix 4.0 still is under development. For all of these web applications except WebMin, you will need to set up Apache web credentials using the web apps password syntax documented above. Once you’ve done that, you can access the applications using a browser with the username admin. Just substitute your server’s IP address for 192.168.0.1 in the examples below. For WebMin only, use root as your username and your root password for access.
- Config Edit: https://192.168.0.1/maint/configedit
- phpMyAdmin: https://192.168.0.1/maint/phpMyAdmin
- Sys Info: https://192.168.0.1/maint/sysinfo
- Telephone Reminders: https://192.168.0.1/reminders
- WebMin: https://192.168.0.1:9001
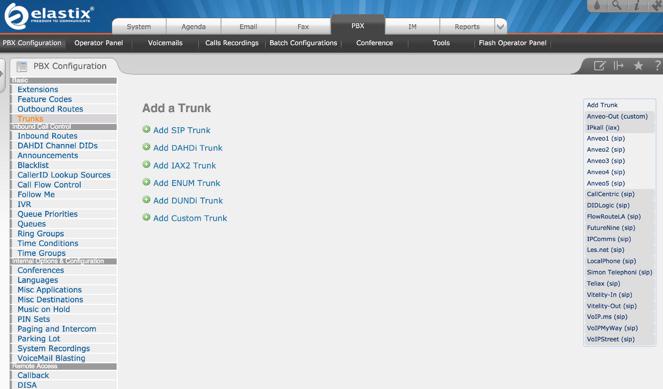
5. Activate Trunks with Incredible PBX for Elastix 4.0
For those migrating from another aggregation including PBX in a Flash, this should be familiar territory for you. Using a browser, log into Elastix 4.0 at the IP address of your server using your admin password. Before you can actually make or receive calls outside your PBX, you’ll need at least one trunk. In the Elastix 4.0 GUI, click PBX -> PBX Configuration -> Trunks. Once you have your credentials from a provider, choose a provider from the list of preconfigured trunks on the right or create a new one. If you’re using one of the preconfigured options, remember to enable the trunk after adding your desired CallerID and credentials. Then save your settings and reload your Asterisk dialplan. That’s it. You’re ready to go.
To display your trunk registrations: asterisk -rx "sip show registry"
Google Voice Setup. If you wish to use Google Voice for free calling in the U.S. and Canada, you’ll need to sign up for an account with Simonics SIP to Google Voice Gateway service. Complete documentation is here.
RingPlus SIP Gateway. If you’ve signed up for (free) RingPlus cellular service, you also can use your cellular account as a SIP gateway to Elastix. Complete documentation is here.
Connection Issues. If you experience problems getting trunks to register with providers, add or remove the following entry in /etc/asterisk/sip_custom.conf: nat=yes. Then restart Asterisk: amportal restart.
6. Configure a Softphone with Incredible PBX for Elastix 4.0
Incredible PBX comes preconfigured with two extensions (701 and 702) that let you connect phones to your PBX. You can connect virtually any kind of telephone to your Elastix 4.0 PBX. Plain Old Phones require an analog telephone adapter (ATA) which can be a separate board in your computer from a company such as Digium. Or it can be a standalone SIP device such as ObiHai’s OBi100 or OBi110 (if you have a phone line from Ma Bell to hook up as well). SIP phones can be connected directly so long as they have an IP address. These could be hardware devices or software devices such as the YateClient softphone. We’ll start with a free one today so you can begin making calls. You can find dozens of recommendations for hardware-based SIP phones both on Nerd Vittles and the PIAF Forum when you’re ready to get serious about VoIP.
We recommend YateClient which is free. Download it from here. Run YateClient once you’ve installed it and enter the credentials for the 701 extension on Incredible PBX. You’ll need the IP address of your server plus your extension 701 password. You can find them in /root/passwords.FAQ. Fill in the blanks using the IP address of your server, 701 for your account name, and whatever password is assigned to the extension. Here’s what your entries should look like. Click OK to save your entries.

Once you are registered to extension 701, close the Account window. Then click on YATE’s Telephony Tab and place some test calls to the numerous apps that are preconfigured on Incredible PBX. Here are a few numbers to get you started:
123 - Reminders

222 - ODBC Demo (use: 12345)

947 - Weather by ZIP Code

951 - Yahoo News

DEMO - Allison's IVR Demo

TODAY - Today in History
7. Configuring SMTP Mail with Incredible PBX for Elastix 4.0
Outbound email support using Postfix is preconfigured with Elastix 4.0. You can test whether it’s actually working by issuing the following command using your destination email address after logging in as root:
echo "test" | mail -s testmessage yourname@gmail.com
If you don’t receive the email message within a minute or two and you’ve checked your spam folder, chances are your ISP is blocking downstream SMTP servers in an effort to combat spam. Comcast is one of the usual suspects. To enable outbound email service for delivery of voicemail and other email messages with a provider blocking downstream SMTP servers, you first need to obtain the SMTP domain of your ISP, e.g. smtp.comcrap.net. Next, edit /etc/postfix/main.cf and add your SmartHost entry [in brackets] to the line that begins like this: relayhost =. The line should look like this: relayhost = [smtp.comcrap.net]. Save your addition and restart Postfix: service postfix restart. Be sure to try another email test message after completing the SmartHost update. To use Gmail as your mail relay, see this tutorial.
8. Homework Assignment: Mastering Incredible PBX for Elastix 4.0
We’ve put together a complete tutorial for the applications included in Incredible PBX for Asterisk-GUI. Most of it is fully applicable to Elastix 4.0 as well. That should be your next stop. Then you’ll be ready to tackle Elastix 4.0. Google is your friend. Do some exploring, and we’ll post links to great articles on this terrific platform as we discover them. Your suggestions are also welcomed!
9 Countries Have Never Visited Nerd Vittles. Got a Friend in Any of Them https://t.co/wMfmlhiQ9y #asterisk #freepbx pic.twitter.com/TPFGZbqWB6
— Ward Mundy (@NerdUno) April 22, 2016
In the meantime, if you have questions, join the PBX in a Flash Forums and take advantage of our awesome collection of gurus. There’s an expert available on virtually any topic, and the price is right. As with Incredible PBX, it’s absolutely free. The same applies to the Elastix forum.
And if all of that wasn’t enough, feast your eyes on the Elastix Add-Ons that are only a button click away:
[gview file="http://nerdvittles.com/wp-content/ElastixAddOns.pdf"]
Originally published: Monday, February 22, 2016
Need help with Asterisk? Visit the PBX in a Flash Forum.
Special Thanks to Our Generous Sponsors
FULL DISCLOSURE: ClearlyIP, Skyetel, Vitelity, DigitalOcean, Vultr, VoIP.ms, 3CX, Sangoma, TelecomsXchange and VitalPBX have provided financial support to Nerd Vittles and our open source projects through advertising, referral revenue, and/or merchandise. As an Amazon Associate and Best Buy Affiliate, we also earn from qualifying purchases. We’ve chosen these providers not the other way around. Our decisions are based upon their corporate reputation and the quality of their offerings and pricing. Our recommendations regarding technology are reached without regard to financial compensation except in situations in which comparable products at comparable pricing are available from multiple sources. In this limited case, we support our sponsors because our sponsors support us.
BOGO Bonaza: Enjoy state-of-the-art VoIP service with a $10 credit and half-price SIP service on up to $500 of Skyetel trunking with free number porting when you fund your Skyetel account. No limits on number of simultaneous calls. Quadruple data center redundancy. $25 monthly minimum spend required. Tutorial and sign up details are here.
The lynchpin of Incredible PBX 2020 and beyond is ClearlyIP components which bring management of FreePBX modules and SIP phone integration to a level never before available with any other Asterisk distribution. And now you can configure and reconfigure your new Incredible PBX phones from the convenience of the Incredible PBX GUI.
VitalPBX is perhaps the fastest-growing PBX offering based upon Asterisk with an installed presence in more than 100 countries worldwide. VitalPBX has generously provided a customized White Label version of Incredible PBX tailored for use with all Incredible PBX and VitalPBX custom applications. Follow this link for a free test drive!
Special Thanks to Vitelity. Vitelity is now Voyant Communications and has halted new registrations for the time being. Our special thanks to Vitelity for their unwavering financial support over many years and to the many Nerd Vittles readers who continue to enjoy the benefits of their service offerings. We will keep everyone posted on further developments.
Some Recent Nerd Vittles Articles of Interest…