
We promised you that 2016 was going to be a year filled with surprises, and today we’re pleased to introduce another open source, pure GPL3 solution for any business. Whether your requirements are a call center or a versatile phone system for hundreds of employees, XiVO™ offers a compelling unified communications solution that checks all the boxes. Unlike some products that function merely as a code generator for Asterisk®, XiVO is in a league of its own. XiVO is actually an integral component of the Asterisk application itself. It manages your telephony server in realtime using its versatile PostGreSQL database platform. Did we mention it’s also a great playground for hobbyists and SOHO VoIP enthusiasts? Let’s get started.
UPDATE: The first release of Incredible PBX for XiVO is now available here. Please consider this article superseded by the new release.
There’s no way to do justice to a product like XiVO in a single article. So our plan is to introduce XiVO today and get your platform up and running where you can make and receive free calls throughout the United States and Canada. Then you can add Incredible PBX components and additional SIP providers as we continue to build them out. Just follow along with our Incredible PBX development for XiVO on the PIAF Forum, and you’ll get a first-hand look at how sausage is made. We already have text-to-speech applications for news and weather up and running. You can take them for a test drive by calling the XiVO demo: 
And, of course, we’ve integrated the Travelin’ Man 3 IPtables firewall to provide rock-solid security for XiVO, and we’ll cover that today as well. As part of this development process, you’ll discover how easy it is to build Asterisk applications for XiVO on your own. And hopefully you’ll share some of your creations with the rest of us. That’s what open source development is all about.
Choosing an Experimental Platform for XiVO
We’re just getting started with XiVO development so, like us, we’re assuming you’ll want to kick the tires a bit before jumping into a new VoIP solution for the long haul. That means you first must choose a platform on which to install XiVO. We have several recommendations for you. If you have a robust desktop machine with lots of RAM and processing power, then installing XiVO under VirtualBox may be the way to go. We actually use an iMac with 16GB of RAM, and it provides plenty of horsepower to run VirtualBox and XiVO. With VirtualBox, we’ll start by downloading the XiVO ISO.
We didn’t mention that XiVO has been under development for over 10 years and is supported by the original developers with financial support from Avencall. Because of its Canadian roots, it seems only fitting that many may wish to consider CloudAtCost in Canada as an appropriate site to host your experimental XiVO server. A one-time payment of $10.50 still buys you a sandbox in the cloud for life with coupon code TAKE70, and XiVO installs on the CloudAtCost platform without a hiccup. For a CloudAtCost implementation, we’ll start by creating a Debian 8 server.1 And then we’ll download and run the XiVO installation script to build our XiVO server. Finally, we’ll walk you through setting up XiVO on a $5/month Digital Ocean Droplet which provides state-of-the-art performance at rock-bottom Cloud pricing. So begin by choosing your hardware platform from the three options below:
1. Installing XiVO as a VirtualBox Virtual Machine
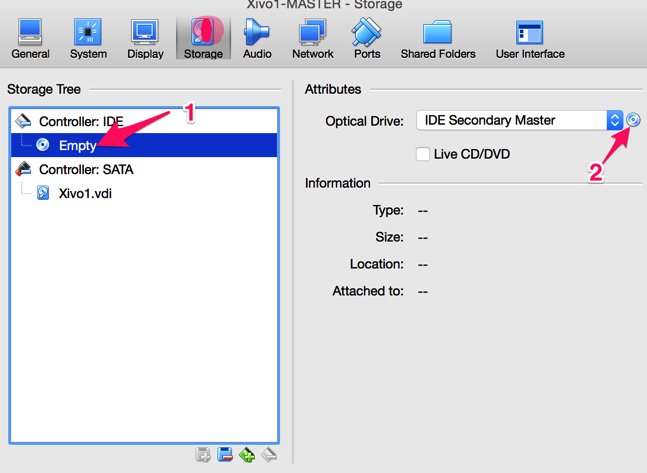
For standalone implementations including VirtualBox, we’ll begin by downloading the 64-bit XiVO Server ISO to your desktop. Next, create a VirtualBox 64-bit Debian VM platform with 1024 MB RAM and at least a 10GB virtual drive. In System Settings, enable I/O APIC and disable the other options. Select a Sound Card to match your machine and configure Network Adapter 1 as a Bridged Network Device. In the Storage Settings (shown below) for your (1) Empty IDE Controller, (2) select the downloaded XiVO ISO as your installation media. Start the VM and proceed through the initial install.
Click Install, choose your language, pick your time zone, choose your keyboard map, create a very secure root password, and choose a Debian mirror that’s close to your server. Choose /dev/sda as your bootloader assuming that’s the disk drive configured by VirtualBox. In less than 10 minutes, the install will complete and your VM will reboot. Log into your server as root and obtain your IP address: ifconfig. You’ll need it for the web configuration step that comes next.
2. Installing XiVO as a CloudAtCost Cloud-Based Server
You can’t use an ISO as the installation media at CloudAtCost so we have to start by building a 64-bit Debian 8 virtual machine with at least 512 MB RAM and a 10GB virtual drive. No need to choose a larger drive at the moment since there’s a bug in CloudAtCost’s installer for Debian 8. See the footnote for details. Once your virtual machine is built, log in as root and issue the following commands to kick off the XiVO install:
apt-get -y remove apache2*
apt-get update
apt-get -y upgrade
reboot
# log back in as root and...
wget http://mirror.xivo.io/fai/xivo-migration/xivo_install_current.sh
bash xivo_install_current.sh
3. Installing XiVO as a Digital Ocean Droplet
As with CloudAtCost, you’ll need to begin your XiVO adventure at Digital Ocean by first signing up for an account. With our referral code, you’ll get a $10 credit (and so will Nerd Vittles). That’s good for two full months of service to kick the tires of XiVO without ever spending a dime. Once your account is set up, create a $5/month Debian 8 (64-bit) Droplet. When you receive the email with your droplet credentials, log into your new server as root using SSH/Putty and issue the following commands to get Debian 8 squared away:
apt-get update
apt-get upgrade -y
dd if=/dev/zero of=/swapfile bs=1024 count=1024k
chown root:root /swapfile
chmod 0600 /swapfile
mkswap /swapfile
swapon /swapfile
echo "/swapfile          swap            swap    defaults        0 0" >> /etc/fstab
sysctl vm.swappiness=10
echo vm.swappiness=10 >> /etc/sysctl.conf
free
reboot
After the reboot, log into your server again with your new root password and kick off the XiVO install:
wget http://mirror.xivo.io/fai/xivo-migration/xivo_install_current.sh
bash xivo_install_current.sh
Enabling SSH Root Access with XiVO
If you installed XiVO using the XiVO ISO, then root logins via SSH are disabled by default. Only enable it if you plan to also implement the firewall in the next step! To enable root logins via SSH, log into the server console as root and edit the SSH config file: nano -w /etc/ssh/sshd_config. Find the line in the Authentication section that begins with PermitRootLogin and change it to: PermitRootLogin yes. Save your change (Ctrl-X, y, ENTER) and then restart SSH: /etc/init.d/ssh restart.
Setting Up a Firewall to Protect XiVO
We don’t build PBXs without a rock-solid firewall, but it’s your phone bill so the choice is all yours. The Travelin’ Man 3 implementation of the Linux IPtables firewall provides a safe computing platform using a WhiteList to only allow access by trusted users and providers. You can add additional users to the whitelist as desired using add-ip and add-fqdn in the /root folder. Restart your firewall using only this command: iptables-restart. If you’ll be using FQDNs in your WhiteList, then add the ipchecker script to your cron jobs. Then review Step #5 in the TM3 tutorial.
echo "*/10 5-22 * * * root /root/ipchecker > /dev/null 2>&1" >> /etc/crontab
It’s imperative that you set this up from a client workstation that’s running SSH or Putty. Otherwise, you may inadvertently lock yourself out from your own server. While logged into your server via SSH as root, issue the following commands:
cd /root
wget http://incrediblepbx.com/firewall-xivo.tar.gz
tar zxvf firewall-xivo.tar.gz
rm -f firewall-xivo.tar.gz
./tm3-xivo.sh
Configuring XiVO with a Web Browser
Once the basic install is completed, you use a web browser to actually configure and manage your XiVO server. To get things started, point your browser to the IP address of your XiVO server. Choose your Language. Accept the GPL3 license agreement. Then fill in the blanks to create a Hostname for your server (XiVO), a domain name (some domain that you own or one chosen from your favorite dynamic DNS provider), a very secure Web interface password (choose as if your phone bill depends upon it). The network interface and DNS server entries should already be correct. Click Next.
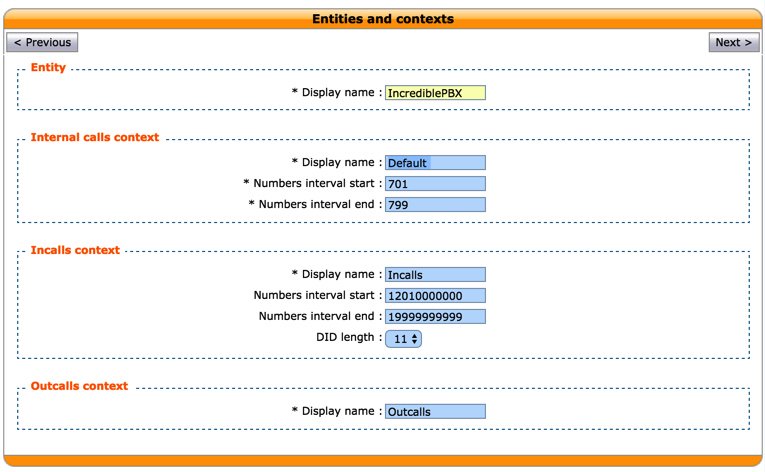
On the second configuration screen, choose an Entity (department/organization name or IncrediblePBX will suffice). Then set up the Contexts to manage calls on your PBX:
- Internal Calls Context: manages extension numbers that can be reached internally
- Incalls Context: manages calls coming from outside of your system
- Outcalls Context: manages calls going from your system to the outside
Here’s what we’ll be using by way of example:
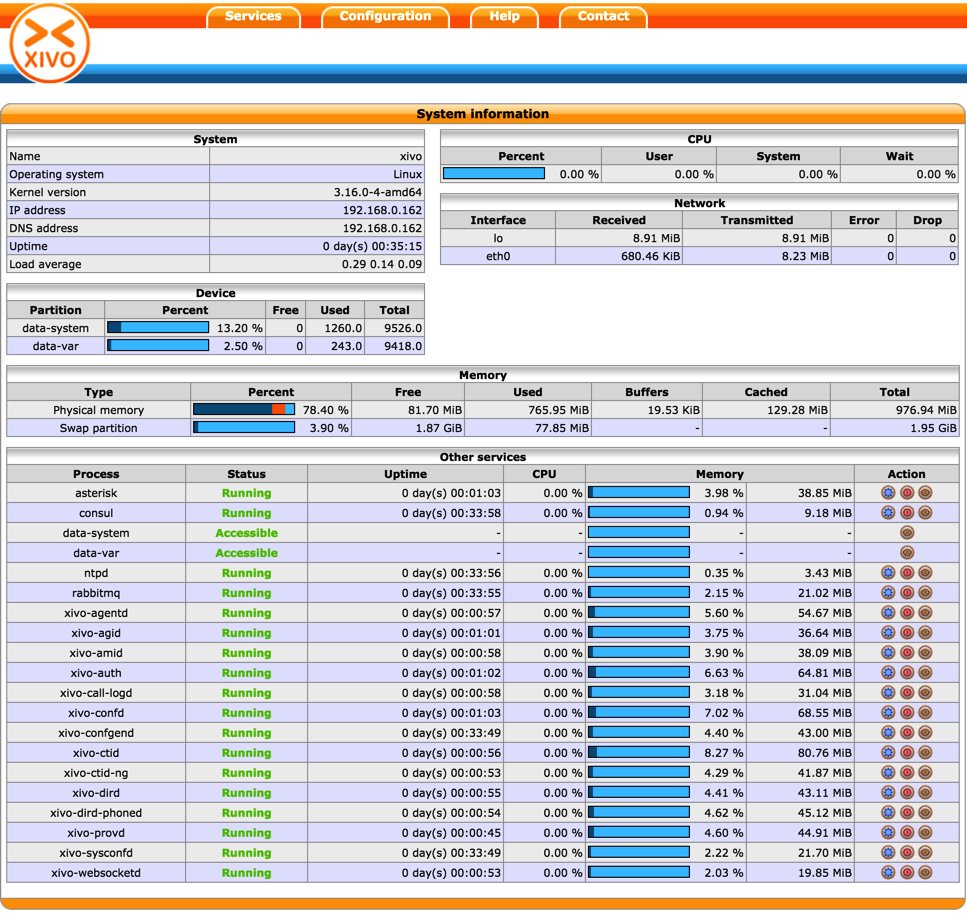
Finally, validate your entries to complete the configuration. Now log into your XiVO server as root using your newly created web password. You should get a status screen that looks something like this. If you had any doubts about the quality of the XiVO product, this should put your mind at ease. 🙂
Logging Into the XiVO Web Interface
To make changes in your XiVO setup, you’ll need to log into the web interface at the IP address of your XiVO PBX. Login with root as the username together with the Web Interface Password you set up above. You can change this password at any time under the Configuration tab by clicking on Users and editing your existing settings.
Creating Users and Lines with XiVO
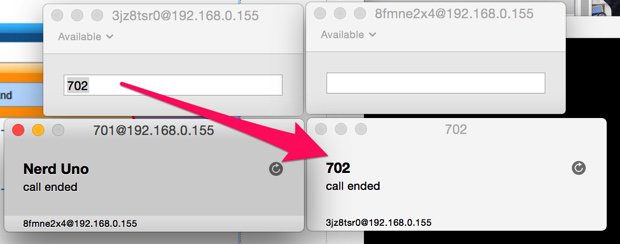
For those migrating from the FreePBX® world, you’re probably most familiar with the procedure for creating extensions. More advanced administrators may have switched to device and user mode where users and devices are created separately. Phone numbers or extensions were associated with users while phone instruments were associated with devices. In the World of XiVO, we’ll start with the simplest configuration, and you can move on from there when you’re ready. In our scenario today, we’ll create a couple of users. Each user has a Name, Language, Time Zone, and other optional characteristics such as a Mobile Phone Number which can ring simultaneously whenever a user receives a call to his or her local XiVO phone number. By adding a Line (aka Phone Number) for the user as the user account is created, XiVO will automatically generate a separate Line with username and password credentials. This Line will be associated with the User during the initial user setup procedure, and this Line then can be registered to a SIP phone, softphone, or XiVO client (which we will cover separately down the road). In the example below, we’re using Nerd Uno’s extension 701 (associated with line 3jz8tsr0) to call Nerd Dos’ extension 702 (associated with line 8fmne2x4).
XiVO has an excellent tutorial that covers creating Users with a SIP Line. So jump there and add a couple of Users following the steps in the tutorial. When you’re finished, you’ll have two Users and two associated Lines with credentials to set up SIP phones. Since you’re just getting your feet wet and will probably make some mistakes, it’s probably a good idea to turn off Fail2Ban while you’re experimenting. Otherwise, you may accidentally lock yourself out of your server (ask us how we know) and think it’s a problem with XiVO. Here’s how:
/etc/init.d/fail2ban stop
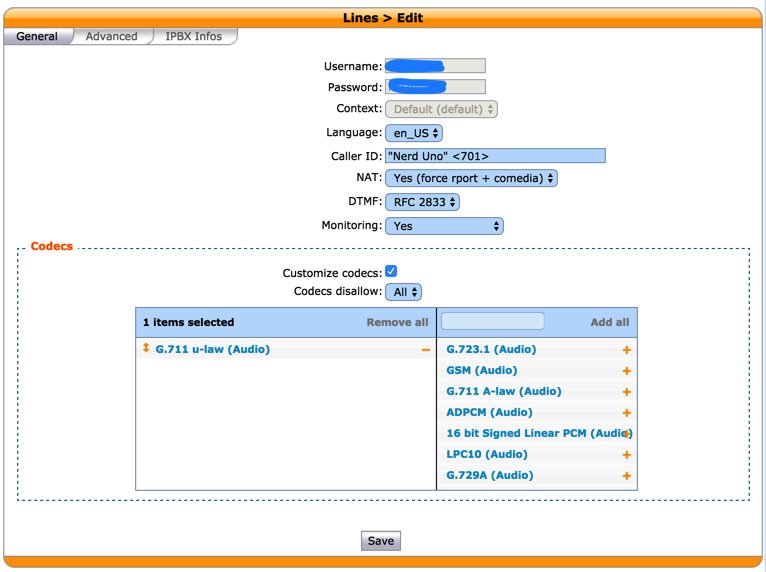
To set up your SIP phones, you’ll need the credentials for each of the two lines. Under the Lines tab, click on the Pencil icon to reveal the Username and Password. Fill in the missing pieces as shown below and make certain that your NAT entry is set to Yes.

With those credentials in hand, go ahead and configure a couple of SIP phones and make certain you can call between them with audio in both directions before proceeding. For those with a Mac, Telephone is perfect for experimentation because you can set up multiple softphones and place calls between them.
IMPORTANT: If your server is sitting behind a NAT-based firewall, you must set the external and local network IP addresses for XiVO in General Settings -> SIP Protocol. You’ll find the fields in the Network tab.
Configuring a SIP Trunk for Google Voice with XiVO
Now that you have internal calls working, let’s turn our attention to connecting your PBX to the rest of the world. We obviously can’t cover the setup for every SIP provider, but we can provide a good example that will get our U.S. friends free calling in the U.S. and Canada. We’ve chosen the Simonics SIP Gateway to Google Voice because a one-time payment of $5.99 gets you a traditional SIP trunk to interface with any existing Google Voice number. If you don’t have a Google Voice number, sign up here. In your Google Voice Settings, make sure Forward Calls to Google Chat is enabled and disable Call Screening in the Calls tab. Then, with your Google credentials and Google Voice number in hand, visit the Simonics web site to sign up for service. Sign in with your Google credentials and complete the registration process. Once you have your Simonics account name and password, log into your XiVO web portal.
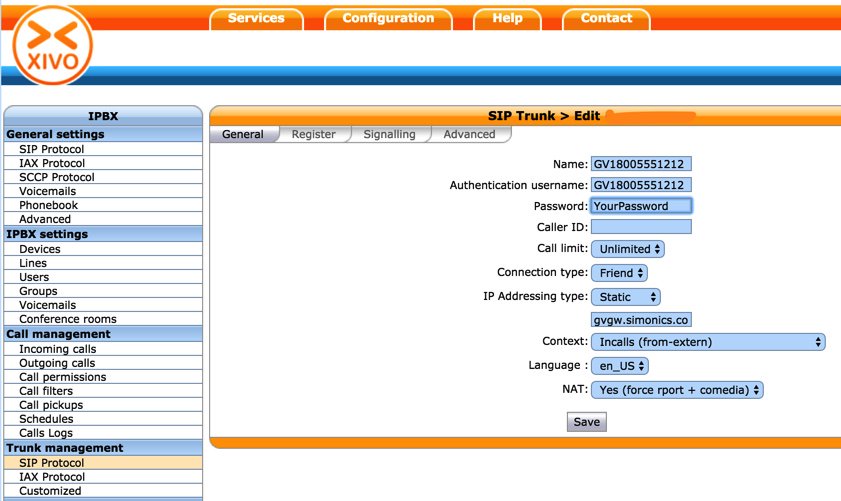
With credentials in hand, on the XiVO side, start by choosing the SIP Protocol tab under Trunk Management. There are actually three tabs to configure for the SIP trunk. Begin in the General tab and make it look like this using your credentials. NOTE: The complete FQDN for the Simonics gateway should be gvgw.simonics.com:
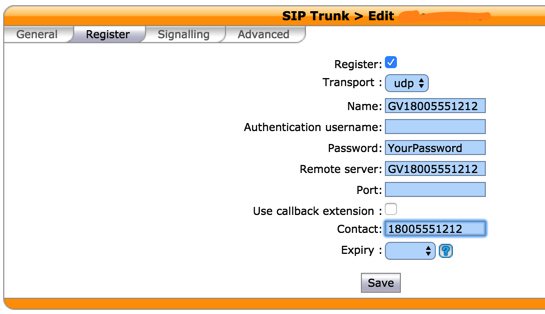
Next, click on the Register tab and reenter your credentials. Leave the empty fields exactly as shown. Be sure the Register box is checked.
Next, in the Signaling tab, change the Monitoring option to Yes and then click Save. Monitoring is the XiVO equivalent of the SIP Qualify option.
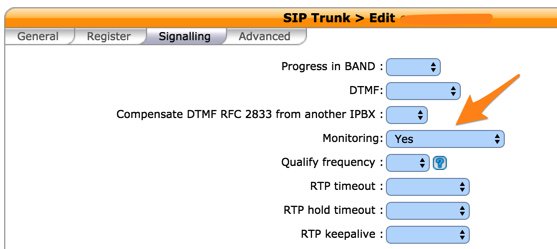
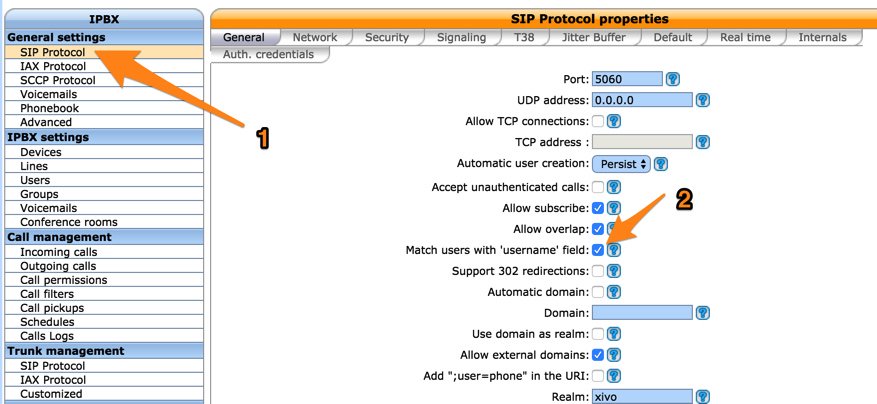
We also need to make one minor adjustment in the SIP Protocol Defaults in the General Settings. Just Save your settings after checking Match users with ‘username’ field.
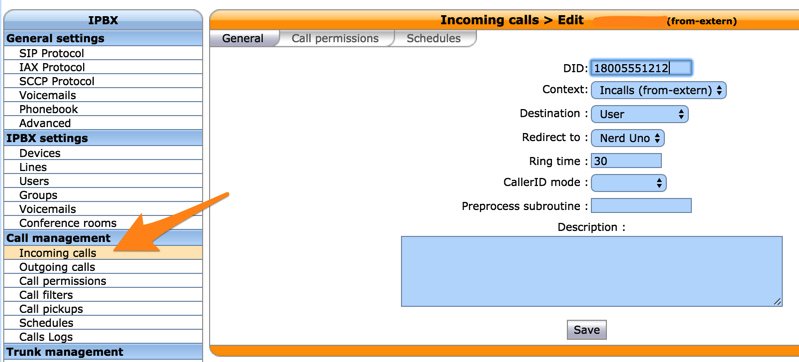
Next, we need to tell XiVO how to process Incoming and Outgoing Calls using the Google Voice SIP trunk. Under the Call Management section, let’s begin with the Incoming Calls setup by creating a new Incoming Calls DID for your 11-digit Google Voice number. To keep things simple, we’ll route the incoming calls to the User mapped to extension 701:
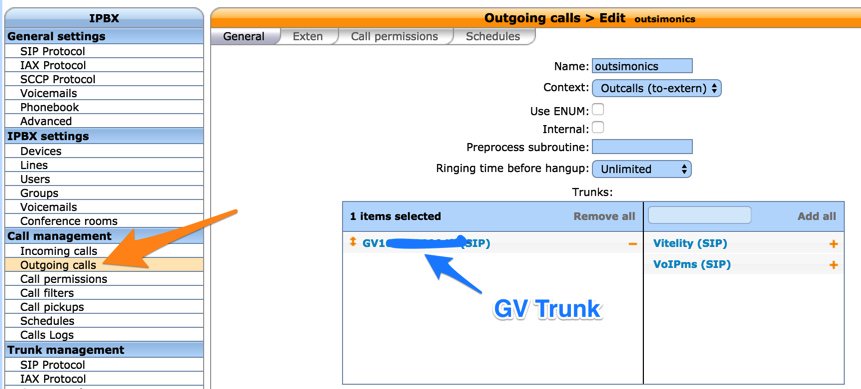
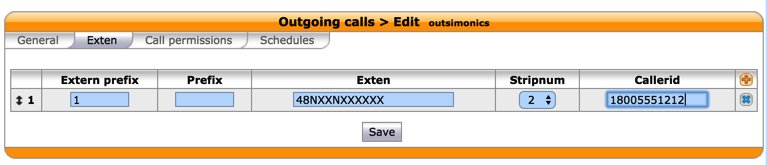
For Outgoing Calls, we need to route calls with a specific dial string out the Simonics SIP trunk using the to-extern context. By way of example, we’ve set this up using a dialing prefix of 48 (GV) and a 10-digit number. We’re letting XiVO supply the missing 1 country code required by Google Voice, and we’ll let XiVO strip off the 48 prefix in processing the outbound calls. If this is your only outgoing trunk, you may prefer not to use a dial prefix at all. In that case, change the dial string to a 10-digit number (NXXNXXXXXX) and set Stripnum to 0.
Well, that’s enough for today. There’s complete XiVO PDF Documentation available here. We’ll have lots more to say about XiVO in coming weeks. Come join the party!
Published: Thursday, May 5, 2016
9 Countries Have Never Visited Nerd Vittles. Got a Friend in Any of Them https://t.co/wMfmlhiQ9y #asterisk #freepbx pic.twitter.com/TPFGZbqWB6
— Ward Mundy (@NerdUno) April 22, 2016

Need help with Asterisk? Visit the PBX in a Flash Forum.
Special Thanks to Our Generous Sponsors
FULL DISCLOSURE: ClearlyIP, Skyetel, Vitelity, DigitalOcean, Vultr, VoIP.ms, 3CX, Sangoma, TelecomsXchange and VitalPBX have provided financial support to Nerd Vittles and our open source projects through advertising, referral revenue, and/or merchandise. As an Amazon Associate and Best Buy Affiliate, we also earn from qualifying purchases. We’ve chosen these providers not the other way around. Our decisions are based upon their corporate reputation and the quality of their offerings and pricing. Our recommendations regarding technology are reached without regard to financial compensation except in situations in which comparable products at comparable pricing are available from multiple sources. In this limited case, we support our sponsors because our sponsors support us.
 BOGO Bonaza: Enjoy state-of-the-art VoIP service with a $10 credit and half-price SIP service on up to $500 of Skyetel trunking with free number porting when you fund your Skyetel account. No limits on number of simultaneous calls. Quadruple data center redundancy. $25 monthly minimum spend required. Tutorial and sign up details are here.
![]() The lynchpin of Incredible PBX 2020 and beyond is ClearlyIP components which bring management of FreePBX modules and SIP phone integration to a level never before available with any other Asterisk distribution. And now you can configure and reconfigure your new Incredible PBX phones from the convenience of the Incredible PBX GUI.
The lynchpin of Incredible PBX 2020 and beyond is ClearlyIP components which bring management of FreePBX modules and SIP phone integration to a level never before available with any other Asterisk distribution. And now you can configure and reconfigure your new Incredible PBX phones from the convenience of the Incredible PBX GUI.
 VitalPBX is perhaps the fastest-growing PBX offering based upon Asterisk with an installed presence in more than 100 countries worldwide. VitalPBX has generously provided a customized White Label version of Incredible PBX tailored for use with all Incredible PBX and VitalPBX custom applications. Follow this link for a free test drive!
 Special Thanks to Vitelity. Vitelity is now Voyant Communications and has halted new registrations for the time being. Our special thanks to Vitelity for their unwavering financial support over many years and to the many Nerd Vittles readers who continue to enjoy the benefits of their service offerings. We will keep everyone posted on further developments.
Some Recent Nerd Vittles Articles of Interest…
- There’s a glitch in the CloudAtCost builds for Debian8. Regardless of how much disk storage you allocate, CloudAtCost will only use 10GB. Moral: Don’t waste your resources by allocating more than 10GB of disk space. This is an experimental platform, and 10GB will suffice. If you really need more space, this thread on the PIAF Forum will walk you through expanding the storage allocation beyond the 10GB threshold. [↩]


So I tried getting past the "Validate" mark this morning trying to get Xivo up and running. Looks like after spending a couple of hours with different devices and web browsers, you will absolutely need to use a PC (or MAC) version of Firefox in order to get past the "Validate" part of Xivo’s initial configuration. Again, this is a must do first before you can use any other browser to configure Xivo. Firefox running on a PC and or MAC. The bug is partially explained here: http://projects.xivo.fr/issues/2450
Cheers,
The VoIP Guy
[WM: We actually use the latest Chrome browser without problems.]