
Today we want to talk a little about design choices and IVRs. First and foremost, we don’t want to leave anyone behind during our XiVO adventure. XiVO is a platform that adjectives really can’t describe. It’s that good and, frankly, we’re having a hard time believing it’s been around for almost a decade and nobody much talked about it. Leave it to the crazy Americans to only look at stuff from the U.S. of A. Funny thing is that the two major GUIs for Asterisk® now are both Canadian-based.
America calling pic.twitter.com/bMqg601m8l
— 🇺🇦Evan Kirstel #B2B #TechFluencer (@EvanKirstel) May 24, 2016
One of our PIAF Forum readers posted a comment last week that said:
The only downside I see is that XiVO does not have [a] GUI for building IVRs. To build [a] complex, nested IVR system, everything has to be thought about in great detail writing contexts and dial plans to suit your unique requirements. It would be nice if XiVO offered a GUI for building IVRs.
This raises some issues about GUI design and development that are worth addressing. As with any GUI, the development cycle is lengthy and incredibly complex. This is especially true with XiVO where new versions are released every two weeks! In our second XiVO article, we showed how easy the upgrade procedure was. Those coming from other Asterisk platforms will appreciate this little shocker. XiVO doesn’t break stuff with their upgrades. Frankly, the only other company I can say that about is SONOS. If you don’t have their music platform, you’re missing a treat.
Introducing new components into any "main product" can cause all sorts of problems with the pieces that used to work. If you don’t believe it, look at some of the "other forums" and look at the number of message threads complaining that the new X Widget broke the Y widget and now nothing works. While we can’t speak for everyone, I think it’s safe to say nobody that depends upon their phone system wants to see it go up in flames regularly because some developer had a great new idea that didn’t quite do what it was supposed to do.
To their credit, the XiVO developers were smarter than that. They’ve not only built a mighty mousetrap, but they’ve done it in a way that supports outside integration of additional components without breaking the main product. There are numerous "hooks" that allow anyone with any skill set to add missing pieces. Some of these hooks are exclusively for programmers, but many were designed to let anybody integrate almost anything into the XiVO platform.
So, when a user says "I wish XiVO had an IVR Builder in the GUI," our first inclination was to chuckle and respond with "You just don’t appreciate how lucky you are not to have an IVR Builder in the GUI." What the commenter didn’t appreciate is that you don’t need to pre-build components with XiVO before developing an IVR. With the "other" GUI, you first had to create Custom Destinations and Custom Contexts and Miscellaneous Applications and Miscellaneous Destinations and Custom Recordings in the GUI before you could take advantage of the IVR GUI to build much of anything. Think about that for a minute. Yes, there was an IVR builder but, before you could use it, you first had to transform every component to be incorporated into the IVR using a large number of subcomponents to translate all of your Asterisk pieces into the GUI’s special lingo. Think of them as GUI pigeonholes, and you had to decipher which Asterisk square pegs went in which GUI round holes. We can’t count the number of times we’ve begun the IVR creation process only to have to stop and create missing components because the IVR builder simply wouldn’t recognize a feature as being part of our Asterisk dialplan.
Building IVRs and AutoAttendants with XiVO
The anatomy of an IVR in Asterisk could not be more straight-forward. You have a prerecorded message that plays to the caller giving them choices from which to choose from a menu of selections. The caller presses one of the 12 keys on their phone, and the IVR goes off and does some task: calls an extension, plays a recording, runs an Asterisk application, makes an outside call, or kicks off another IVR with another recording and more choices. Some options in the IVR may not be mentioned, and this is commonly referred to as the Stealth AutoAttendant. None of this is rocket science.
To build an IVR, you need these components: (1) a prerecorded message, (2) a list of the choices you want to provide to the caller with the corresponding destinations on the PBX to execute those choices, and (3) a template to follow to create the IVR dialplan code in XiVO.
Trust us when we say the major problem with IVRs is not that they’re difficult to build in XiVO. The real issue with most IVRs is that the person that implemented the IVR spent all their time worrying about the mechanics of PBX implementation and didn’t put sufficient thought into the IVR layout and the caller’s experience when actually interacting with the IVR. If you haven’t heard Allison Smith speak about IVR design, put it on your Bucket List for the next AstriCon or do some reading. That’s a long-winded way of saying that filling in the blanks of an IVR template is just as easy as point-and-click or drag-and-drop except for the eye candy. Just be thankful the XiVO platform gives you the flexibility to do it yourself without having to create imaginary destination hooks and recording linkages before they can be used in the product’s IVR GUI because the developers didn’t have the foresight to think outside their own GUI’s box. Every Windows user can appreciate that problem.
For today, we’re assuming you’ve done your homework and have already sketched out the options you want to incorporate into your IVR or IVRs. No GUI can help with that! So we’ll pick up from there and show you how easy it is to incorporate your IVR design into XiVO.
Adding Prerecorded Messages in XiVO
For openers, you obviously need a recording to greet callers and tell them what their choices are when using your IVR or AutoAttendant. You can build these recordings yourself on the XiVO platform or, for a more professional IVR, you can send the text off to Allison Smith and let her record the voice prompts for you. Digium makes it easy. Visit their web site, type in the text, and you’ll have your recording in a couple of days. No, they’re not free, but they’re not expensive either.
Since we’re just getting started, let’s assume you want to create a recording prototype on your own to work out the kinks in your IVR first. Here’s how. We’re assuming you’ve already read the Nerd Vittles XiVO tutorial and put the Festival TTS platform in place. Next, log into your XiVO server as root. To keep things simple, let’s put the recordings in WAV format in the /var/lib/xivo/sounds/playback directory which is reserved for our custom recordings:
cd /var/lib/xivo/sounds/playback
To actually generate the sound file that Asterisk can play back, execute the command below after placing your text between the quotation marks and giving the sound file a name, e.g. ivr-number1.wav:
echo "Text goes here" | /usr/bin/text2wave -F 8000 -o ivr-number1.wav
Here’s an example:
echo "Thank you for calling. Press 1 for Tom, 2 for Dick, or 3 for Harry. Press 0 to be connected to the operator." | /usr/bin/text2wave -F 8000 -o ivr-number1.wav
Marrying IVR Choices to PBX Destinations
Whether you’re deploying an IVR using FreePBX® or XiVO, you still have to translate your Plain English options into code that the GUI understands so that calls get routed successfully to the intended destinations.
Let’s begin with the FreePBX Way. Our previous IVR tutorial showed how it was done:
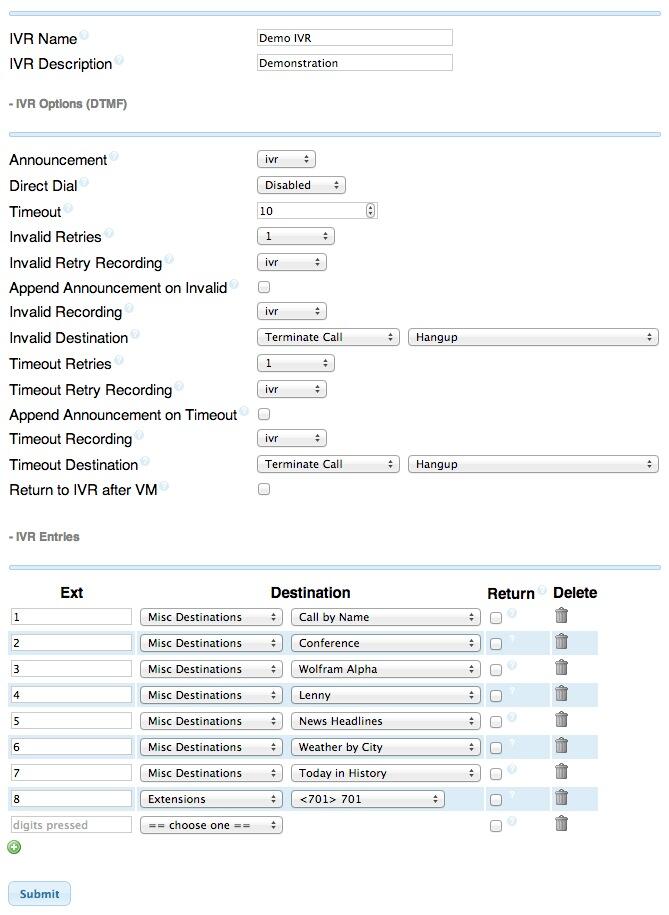
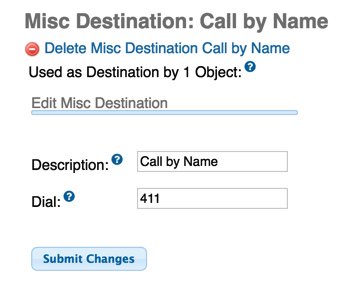
As you can see from the above routing procedure, there were interim steps for every single option in this IVR menu except #8. What you may not appreciate is that you first had to create both a Misc Destination AND a Custom Extension before these options could be used in FreePBX. Otherwise, the options simply didn’t appear in the IVR GUI’s pull-down pick lists.
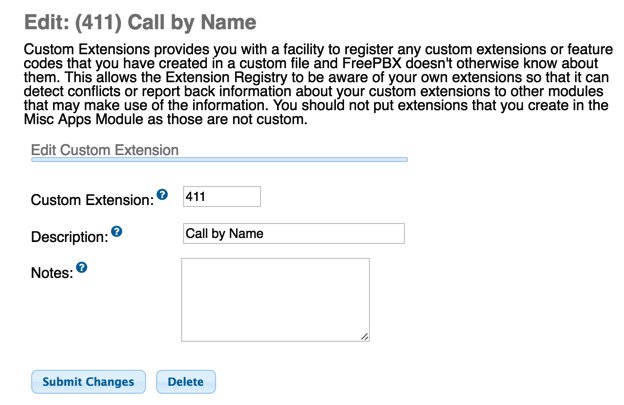
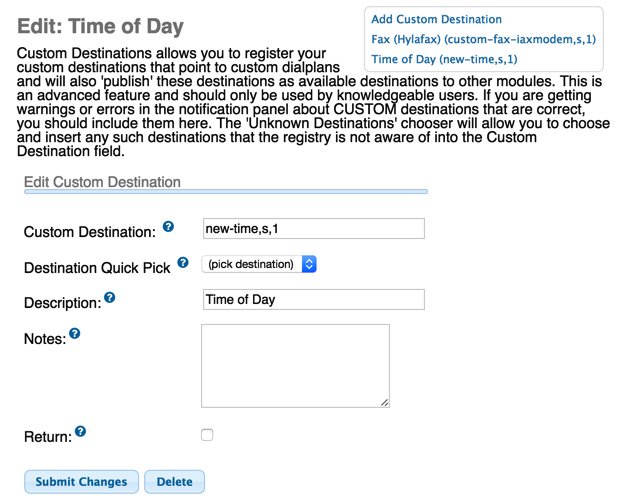
If you wished to incorporate a custom context that wasn’t assigned an extension number on your PBX, there was a different GUI procedure. For something as simple as retrieving the time of day, you had to get the custom context registered with FreePBX before the dialplan code could be used in the IVR. According to the FreePBX developers, this functionality was considered an "advanced feature and should only be used by knowledgeable users."
Our purpose in documenting all of this is to demonstrate that building IVRs even in a GUI is much more than point-and-click. It requires mastery of some fundamental Asterisk dialplan concepts not to mention the GUI’s own labyrinth of secret pigeonholes. Once you’ve had to master all of that, we believe it’s simpler to build IVRs using simple commands rather than jumping through all of the convoluted hoops required just to make your IVR GUI platform happy.
Let’s compare this methodology to the XiVO way of doing things by way of example. Then you can decide for yourself which approach is more complex. Would you know all of these on your own? Probably not. But now you can see how simple it really is. There really are only two words you need to learn: Dial and Goto. 🙂
Call an Extension: Dial(Local/701@default)
Call a Ring Group: Dial(Local/801@default)
Call a PSTN Number: Dial(Local/8005551212@default)
Call a SIP URI: Dial(SIP/2233435945@rentpbx.mundy.org)
Access DISA with permission: Dial(Local/3472@default)
Join a Conference: Dial(Local/2663@default)
Playback Yahoo News: Dial(Local/951@default)
Playback Weather Forecast: Dial(Local/947@default)
Identify IVR Option as Invalid and Repeat Menu: Goto(i,1)
Hangup on Caller for Choosing Invalid Option: Goto(t,1)
Execute Time of Day Custom Context: Goto(new-time,s,1)
Send Caller to a Second IVR and Play Second Recording: Goto(ivr-2,s,3)
Building XiVO IVRs from an IVR Template
We can’t speak for everyone, but we’ve always told folks not to write a book about how to do something. Just give us an example that’s easy to follow and we’ll take it from there. So here you go.
In the XiVO world, IVRs are nothing more than custom contexts. They have a name in [brackets], and they’re stored in config files saved in /etc/asterisk/extensions_extra.d. A config file can include multiple contexts or only one. For IVRs, we recommend you save each one in a single configuration file that houses a single context.
We’re going to give you a template to follow in creating all of the IVRs you can dream up. All you need is a custom recording for each one and your list of choices and destinations for those choices. The examples above tell you everything you need to know to build awesome IVRs.
After downloading the template, we recommend that you not edit it directly. Make a copy with a new file name and change the context name in the template to match your new file name. We also do one other little trick with all of our custom contexts. They always begin and end with comment lines like this using the context name:
;# // BEGIN ivr-template
;# // END ivr-template
The reason for this is it makes it incredibly easy to remove the entire context with a single command:
sed -i '\\:// BEGIN ivr-template:,\\:// END ivr-template:d' ivr-template.conf
This doesn’t matter so much when you only have a single context in a single file. But it is immensely helpful when you’ve stored dozens of contexts within the same file. Some may prefer to store all of the related IVR contexts for their entire IVR tree in a single file. And then you’ll appreciate this tip when it’s time to make major changes in your IVR.
Let’s begin by putting your template in place and then cloning it to ivr-number1:
cd /etc/asterisk/extensions_extra.d
wget http://incrediblepbx.com/ivr-template.tar.gz
tar zxvf ivr-template.tar.gz
rm -f ivr-template.tar.gz
cp -p ivr-template.conf ivr-number1.conf
sed -i 's|ivr-template|ivr-number1|' ivr-number1.conf
The rest of today’s exercise can be performed in the XiVO GUI using its built-in editor. Open the GUI with your browser and navigate to Services -> iPBX -> Configuration files and then open ivr-number1.conf by clicking on the pencil icon beside it.
Anatomy of the XiVO IVR Template
First things first. Change the sound recording in line s,3 to match the recording you made above without the .wav extension: ivr-number1. Leave the directory path just as it is. So your line should now look like this:
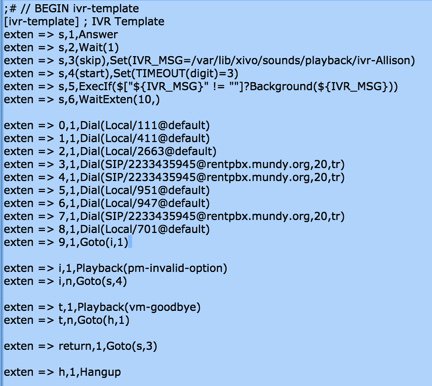
exten => s,3(skip),Set(IVR_MSG=/var/lib/xivo/sounds/playback/ivr-number1)
Next, take a look at the structure of the file. You’ll note that there are options labeled exten => 0,1, through exten => 9,1,. These match the numeric keys on a telephone obviously. In the IVR world, it’s called a phone tree. All you need to change is what comes after the second comma on each line. This destination should be one of the XiVO commands we documented above telling XiVO how to process the call. For option 0, let’s assume you wanted to route the call to extension 701. Your 0 branch would look like this:
exten => 0,1,Dial(Local/701@default)
The remaining dial options should be obvious. If you want to designate a particular option to be invalid, make the option look like this:
exten => 9,1,Goto(i,1)
Another alternative is to remove the line entirely; however, we prefer the above approach because it makes it easy to change things down the road if you decide to use option 9 as a call destination.
Two other options warrant a brief explanation. The i option tells XiVO how to process the call if the caller chooses an invalid option. The t option tells XiVO what to do if the 3-second timeout occurs without the caller pressing a key. You can modify these to meet your own requirements. As configured, an invalid option sends the caller back to the recording to start over. And the timeout option hangs up the call.
Finally, phone trees can get quite complex. A GUI can’t fix that either. Pressing option 2 might trigger phone tree 2 while pressing 3 might trigger phone tree 3. Programmers could obviously rewrite the dialplan to handle all of these separate phone trees with their separate branches in one giant, convoluted chunk of dialplan code. But why? Just make each phone tree a separate IVR housed in its own file with its own context. And navigate between the IVRs using simple Goto commands such as Goto(ivr-number2,s,3). To return to the main IVR, do the same thing pointing to the line number to which the call should be redirected, e.g. Goto(ivr-number1,s,3). You obviously don’t need to answer each call but once so skip those lines in the IVR dialplan when choosing the line number to which to redirect processing.
Routing Incoming Calls to Your IVR
If you’ve already set up one or more DIDs on your PBX, then you probably routed those Incoming Calls to a user or ring group. Changing the routing to send the calls to your IVR is easy. Just edit the DID entry for the Incoming Calls you wish to redirect and set the Destination to Customized and the destination Command to the context of your IVR: Goto(ivr-number1,s,1). Save your change and you’re all set. Remember, XiVO is a real-time Asterisk server so all of your changes take effect immediately. There’s no rewriting of the entire Asterisk dialplan. Enjoy!
Letting Callers Dial Extensions Within IVR
Some administrators prefer to let callers dial an extension directly while an IVR is playing. You can easily add this functionality in XiVO. This post on the PIAF Forum showed how. Simply edit /etc/asterisk/extensions_extra.d/ivr-1.conf and modify the code like this. Be sure to change the number of X’s in the last line to match the length of your extension numbers. Then reload your dialplan.
;exten => s,n,ExecIf($["${IVR_MSG}" != ""]?Background(${IVR_MSG}))
;exten => s,n,WaitExten(10,)
exten => s,n,Read(Digits,${IVR_MSG})
exten => s,n,Goto(${Digits},1)
exten => _XXX,1,Dial(Local/${Digits}@default)
Taking Nerd Vittles’ XiVO IVR for a Test Drive
There’s a Demo IVR running at www.pacificnx.com on their XenServer virtualization platform. Scott McCarthy, a leading outside XiVO developer and a principal at PacificNX, tells us they soon will have a $20 a month platform specifically tailored to XiVO. And that’s what you’ll be hearing when you call the Nerd Vittles Demo IVR: 
Nerd Vittles Demo IVR Options
1 – Call by Name (say "Delta Airlines" or "American Airlines" to try it out)
2 – MeetMe Conference
3 – Wolfram Alpha (Coming Soon!)
4 – Lenny (The Telemarketer’s Worst Nightmare)
5 – Today’s News Headlines
6 – Weather Forecast (enter a 5-digit ZIP code)
7 – Today in History (Coming Soon!)
8 – Speak to a Real Person (or maybe just Lenny if we’re out)
Published: Thursday, May 26, 2016
UPDATE: The first release of Incredible PBX for XiVO is now available here. Please consider this article as a supplement to the new release.
9 Countries Have Never Visited Nerd Vittles. Got a Friend in Any of Them https://t.co/wMfmlhiQ9y #asterisk #freepbx pic.twitter.com/TPFGZbqWB6
— Ward Mundy (@NerdUno) April 22, 2016

Need help with Asterisk? Visit the PBX in a Flash Forum.
Special Thanks to Our Generous Sponsors
FULL DISCLOSURE: ClearlyIP, Skyetel, Vitelity, DigitalOcean, Vultr, VoIP.ms, 3CX, Sangoma, TelecomsXchange and VitalPBX have provided financial support to Nerd Vittles and our open source projects through advertising, referral revenue, and/or merchandise. As an Amazon Associate and Best Buy Affiliate, we also earn from qualifying purchases. We’ve chosen these providers not the other way around. Our decisions are based upon their corporate reputation and the quality of their offerings and pricing. Our recommendations regarding technology are reached without regard to financial compensation except in situations in which comparable products at comparable pricing are available from multiple sources. In this limited case, we support our sponsors because our sponsors support us.
 BOGO Bonaza: Enjoy state-of-the-art VoIP service with a $10 credit and half-price SIP service on up to $500 of Skyetel trunking with free number porting when you fund your Skyetel account. No limits on number of simultaneous calls. Quadruple data center redundancy. $25 monthly minimum spend required. Tutorial and sign up details are here.
![]() The lynchpin of Incredible PBX 2020 and beyond is ClearlyIP components which bring management of FreePBX modules and SIP phone integration to a level never before available with any other Asterisk distribution. And now you can configure and reconfigure your new Incredible PBX phones from the convenience of the Incredible PBX GUI.
The lynchpin of Incredible PBX 2020 and beyond is ClearlyIP components which bring management of FreePBX modules and SIP phone integration to a level never before available with any other Asterisk distribution. And now you can configure and reconfigure your new Incredible PBX phones from the convenience of the Incredible PBX GUI.
 VitalPBX is perhaps the fastest-growing PBX offering based upon Asterisk with an installed presence in more than 100 countries worldwide. VitalPBX has generously provided a customized White Label version of Incredible PBX tailored for use with all Incredible PBX and VitalPBX custom applications. Follow this link for a free test drive!
 Special Thanks to Vitelity. Vitelity is now Voyant Communications and has halted new registrations for the time being. Our special thanks to Vitelity for their unwavering financial support over many years and to the many Nerd Vittles readers who continue to enjoy the benefits of their service offerings. We will keep everyone posted on further developments.
Some Recent Nerd Vittles Articles of Interest…


