
Since we began our XiVO/Wazo adventure 18 months ago, the most requested feature has been direct support for Google Voice with OAuth 2 authentication. For those in the United States, it remains the cheapest VoIP solution on the planet with unlimited free calls in the U.S. and Canada. When Wazo migrated to Asterisk® 15, the Asterisk platform natively supported Google Voice, but there was no direct support in either Wazo or Incredible PBX. Instead, over the past couple months, we’ve had Google Voice functionality through Simonics SIP to Google Voice Gateway. Well, today’s a new day. We’re pleased to announce Google Voice is back!
Overview. If you’re new to Google Voice, here’s how the installation scenario goes. First, you set up a Gmail account at gmail.com. Next, you create a Google Voice account. Then, you configure Google Voice for use with Asterisk®. Next, you obtain your Google Voice OAuth 2 Refresh Token which becomes your password to use in configuring Google Voice on the Wazo platform. Next, using SSH or Putty, you log into your Wazo server as root and run the add-gvtrunk script to get your Google Voice credentials set up in Wazo. Finally, you log into the Wazo GUI with a browser and set up a custom trunk as well as an outgoing and incoming route for Google Voice calls. To add more Google Voice trunks, you simply repeat the drill. You now should have a perfectly functioning, free VoIP platform compliments of Google and Sylvain Boily and his development team. Start by deploying Incredible PBX 15 for Wazo.
Configuring Google Voice for Wazo
If you’re one of the five people on Earth that does not yet have a Gmail account, start there. Once you’ve set up your Gmail account and logged in, open a new browser tab to access the Google Voice site. Accept the Google Terms and Privacy Policy. Then choose a new Phone Number in your favorite area code. NOTE: Before Google will assign you a number, you must enter an existing U.S. phone number to verify your identity and location as well as to use for initially forwarding calls. Once your account is set up, you will get an email asking that you verify your email address.
Google continues to tighten up on obtaining more than one Google Voice number from the same computer or the same IP address. If this is a problem for you, here’s a workaround. From your smartphone, install the Google Voice app from iPhone App Store or Google’s Play Store. Then open the app and login to your new Google account. Choose your new Google Voice number when prompted and provide a cell number with SMS as your callback number for verification. Once the number is verified, log out of Google Voice. Do NOT make any calls. Now head back to your PC’s browser and login to http://google.com/voice. You will be presented with the new Google Voice interface which does not include the Google Chat option. But fear not. At least for now there’s still a way to get there. After you have set up your new phone number and opened the Google Voice interface, click on the 3 vertical dots in the left sidebar (it’s labeled More). When it opens, click Legacy Google Voice in the sidebar. That will return you to the old UI. Now click on the Gear icon (upper right) and choose Settings. Make sure the Google Chat option is selected and disable forwarding calls to whatever default phone number you set up.
Next, click on the Calls tab. Make sure your settings match these:
- Call Screening – OFF
- Call Presentation – OFF
- Caller ID (In) – Display Caller’s Number
- Caller ID (Out) – Don’t Change Anything
- Do Not Disturb – OFF
- Call Options (Enable Recording) – OFF
- Global Spam Filtering – ON
Under the Voicemail tab, plug in your email address so you get notified of new voicemails. Then click Save Settings. Down the road, receipt of a Google Voice voicemail will be a big hint that something has come unglued on your PBX.
One final word of caution is in order regardless of your choice of providers: Do NOT use special characters in your Google Voice password, and don’t enable two-step authentication.
Now it’s time to obtain your OAuth 2 credentials. Even though it’s a bit more work on the front end, the good news is you won’t have to worry about your Google Voice trunks failing when Google phases out plain-text passwords. The other good news is you won’t be passing your plain-text Google Voice credentials across the Internet for everyone in the world to see.
Obtaining Your Google Voice OAuth 2 Credentials
While you’re still logged into your Google Voice account, you need to obtain a refresh_token which is what you’ll use instead of a password when setting up your Google Voice account with XiVO. Here’s how.
1. Be sure you are still logged into your Google Voice account. If not, log back in at https://voice.google.com.
2. In a separate browser tab, go to the Google OAUTH Playground using your browser while still logged into your Google Voice account.
3. Once logged in to Google OAUTH Playground, click on the Gear icon in upper right corner (as shown below).
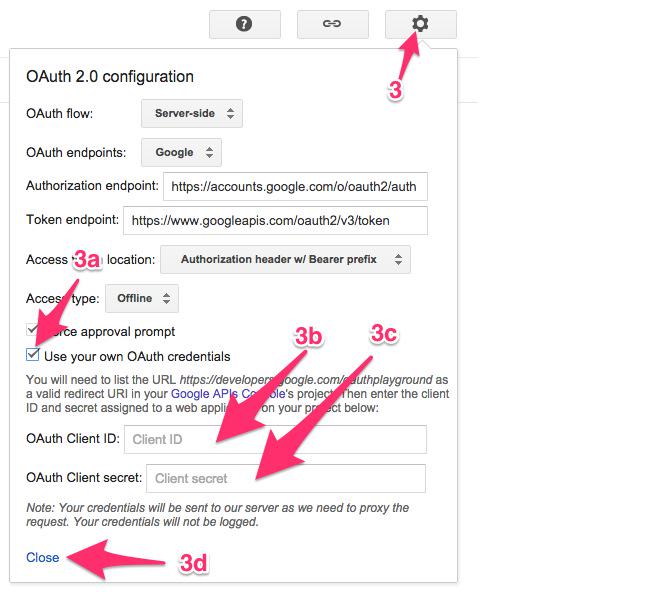
3a. Check the box: Use your own OAuth credentials
3b. Enter Incredible PBX OAuth Client ID:
466295438629-prpknsovs0b8gjfcrs0sn04s9hgn8j3d.apps.googleusercontent.com
3c. Enter Incredible PBX OAuth Client secret: 4ewzJaCx275clcT4i4Hfxqo2
3d. Click Close
4. Click Step 1: Select and Authorize APIs (as shown below)
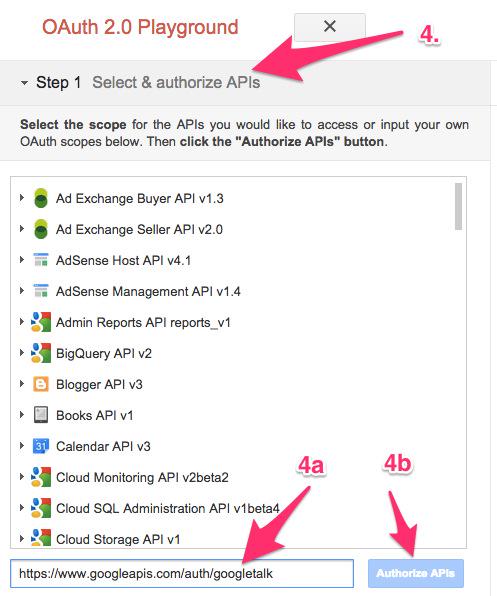
4a. In OAUTH Scope field, enter: https://www.googleapis.com/auth/googletalk
4b. Click Authorize APIs (blue) button.
With a recent Google change, you then will be prompted to choose your Google account again. Click on the same account name that you logged into in Step #1. You then will be prompted whether to allow Google to view and send Chat messages. Click Allow.
5. Click Step 2: Exchange authorization code for tokens
5a. Click Exchange authorization code for tokens (blue) button
5b. When the tokens have been generated, Step 2 will close.
6. Reopen Step 2 and copy your Refresh_Token. This is the "password" you will need to enter (together with your Gmail account name and 10-digit GV phone number) when you add your GV trunk with the add-gvtrunk script. Store this refresh_token in a safe place. Google doesn’t permanently store it!
7. Authorization tokens NEVER expire! If you ever need to remove your authorization tokens, go here and delete Incredible PBX Google Voice OAUTH entry by clicking on it and choosing DELETE option.
Switch back to your Gmail account and click on the Phone icon at the bottom of the window to place one test call. Once you successfully place a call, you can log out of Google Voice and Gmail.
Yes, this is a convoluted process. Setting up a secure computing environment often is. Just follow the steps and don’t skip any. It’s easy once you get the hang of it. And you’ll sleep better.
Downloading and Installing Google Voice with OAuth 2
Installs of Incredible PBX 15 for Wazo beginning December 7 already have the necessary components in place to support Google Voice. If you have an earlier installation of Incredible PBX 15 for Wazo, you can easily upgrade your server to support Google Voice. Simply log into your server’s Linux CLI as root using SSH or Putty and issue the following commands:
cd /root
wget http://incrediblepbx.com/gvtrunk15.tar.gz
tar zxvf gvtrunk15.tar.gz
rm -f gvtrunk15.tar.gz
If you’re upgrading Wazo from a release before 17.15, you can follow the usual upgrade steps after first removing your existing Google Voice trunks from the configuration. Start by copying your Google Voice credentials from /etc/asterisk/oauth_xmpp.conf. Next, delete the following file: /etc/asterisk/extensions_extra.d/gv.conf. Then perform the upgrade:
cd /root
cp -pr /etc/postfix /root
cp -p /etc/nginx/sites-enabled/xivo /root
echo "noload => res_xmpp_oauth.so" >> /etc/asterisk/modules.conf
xivo-dist wazo-17.17
apt-get update
/etc/init.d/netfilter-persistent stop
wazo-upgrade
iptables-restart
# put the Incredible PBX web add-ons back in place
cd /
wget http://incrediblepbx.com/incredible-nginx.tar.gz
tar zxvf incredible-nginx.tar.gz
rm -f incredible-nginx.tar.gz
ln -s /etc/nginx/locations/https-available/01_incrediblepbx /etc/nginx/locations/https-enabled/.
cd /etc/nginx
wget http://incrediblepbx.com/nginx-config.tar.gz
tar zxvf nginx-config.tar.gz
rm -f /etc/nginx/sites-enabled/default
cp -p /root/xivo /etc/nginx/sites-enabled
/etc/init.d/nginx restart
cp -pr /root/postfix /etc
/etc/init.d/postfix restart
sed -i 's|fr|us|' /etc/asterisk/indications.d/99-general.conf
/etc/init.d/asterisk restart
Initial Google Voice OAuth Trunk Setup with Wazo
Now it’s time to create your Google Voice OAuth 2 trunk to use with Wazo. Log back into the Linux CLI as root. Be sure you have your 10-digit Google Voice phone number, your Google account name without @gmail.com, and your Refresh Token from the previous step. Then run the script to add your Google Voice trunk:
cd /root
./add-gvtrunk
Plug in your Google Voice phone number, your account name (without @gmail.com), and refresh token when prompted. Check your work carefully. When the install finishes, fire up your favorite browser to finish the setup using the settings displayed in the Linux CLI.
Configuring Wazo for Google Voice OAuth
From a browser pointed to your server’s IP address, log in to Wazo as root with your GUI password.
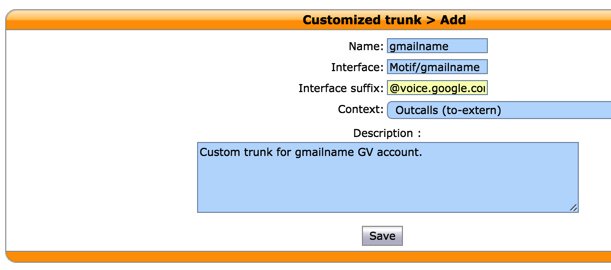
Choose Services.IPBX.Trunk Management.Customized. Click on + Add to create a new custom trunk. Configure the trunk using the settings provided in the previous step. Click the Save button when finished. The Trunk Name will be your actual gmailname (without @gmail.com). Interface will be Motif/gmailname (using your actual Gmail name). Interface suffix will be @voice.google.com. And the Context will be Outcalls (to-extern).
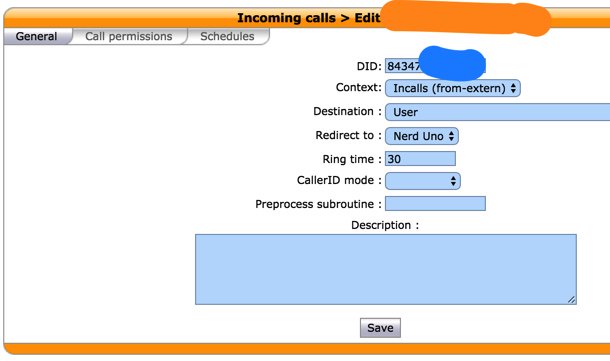
Next, choose Services.IPBX.Call Management.Incoming Calls. Click on + Add to create a new inbound route for your Google Voice DID. This is where you tell Wazo how to route calls placed to your Google Voice number. For your DID, enter your 10-digit Google Voice number. For the Context, choose Incalls (from-extern). Then choose from the pick lists to select a Destination and Redirect option for the incoming calls. It could be an extension, a ring group, a conference room, or an IVR. Click Save when you’re finished.
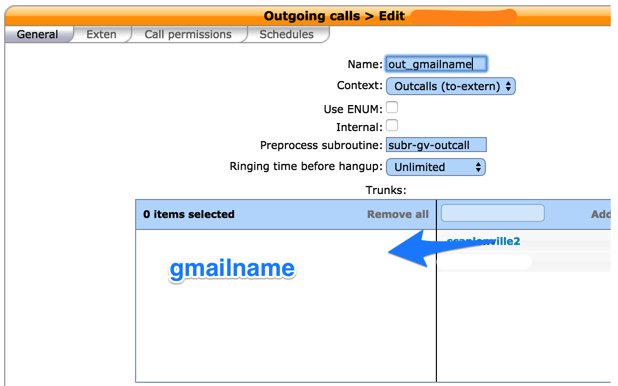
Finally, choose Services.IPBX.Call Management.Outgoing Calls. Click on + Add to create a new outbound route. Under the General tab, configure the route as shown below using a Name of out_gmailname (using your actual Gmail name). The Context should be Outcalls (to-extern). The Preprocess subroutine should be subr-gv-outcall. And the desired Custom Trunk should be dragged left to the selected column:
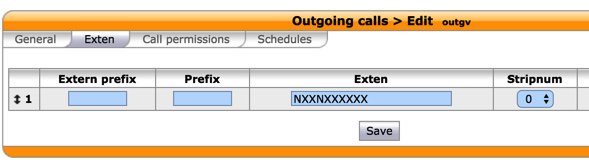
Under the Exten tab, add the desired 10-digit Exten string that users will dial to place a call through the Google Voice trunk. Trim off any prefix (such as 9) that you assigned to the dial string using the Stripnum setting. Then click the Save button.
For example, for a first trunk, you might choose NXXNXXXXXX as the Exten with a Stripnum of 0. This would tell Wazo to route all 10-digit calls to this Custom GV Trunk. For a second Google Voice trunk, you might choose 9NXXNXXXXXX with a Stripnum of 1. This would tell Wazo to route 11-digit calls with a 9 prefix to this Custom Trunk AND to strip off the first digit (9) before sending the 10-digit call to Google Voice.
SMS Messaging with Google Voice
Incredible PBX implementations include a separate Python-based component called pygooglevoice that allows SMS messaging using a Google Voice account. You’ll find the SMS Dictator and SMS message blasting scripts in the /root folder of your server. Be advised that the gvoice script used to send these SMS messages does NOT use OAuth 2 authentication and requires your traditional Google Voice account name and password. Because it uses plain text, you probably will experience failures using gvoice unless your PBX is housed on the same server from which you traditionally access this account. The workaround is to do the following immediately before attempting to use SMS messaging with Google Voice. Using a browser, log into the Gmail account that corresponds to the account you plan to use for SMS messaging. In a separate tab of your browser while still logged into Gmail, go to the following link and enable Less Secure Apps for this account. In a third tab, go to the following link and activate the Google Reset Procedure. Now, from the Linux CLI on your PBX, attempt to login to gvoice using your Gmail account name including @gmail.com AND your plain-text Gmail password. If it succeeds, you’re good to go and can now use the SMS messaging tools. Type quit to exit from gvoice. Google normally follows up insecure access attempts with an email requesting that you confirm this is a "safe IP address" for your account. If you fail to respond to that email, you probably will need to repeat this exercise every time you attempt to use SMS messaging.
Taking Google Voice for a Test Drive
That completes the Google Voice setup. You now should be able to place a call using your Google Voice trunk by dialing any 10-digit number. And calls placed to your Google Voice number should ring at the inbound destination you chose above.
If you have additional Google Voice trunks, simply run /root/add-gvtrunk again and insert the new credentials.
If you ever need to delete a Google Voice account, just run /root/del-gvtrunk with the name of the Google Voice trunk to delete. Enjoy your free phone service!
Originally published: Monday, December 11, 2016
 Support Issues. With any application as sophisticated as this one, you’re bound to have questions. Blog comments are a terrible place to handle support issues although we welcome general comments about our articles and software. If you have particular support issues, we encourage you to get actively involved in the PBX in a Flash Forums. It’s the best Asterisk tech support site in the business, and it’s all free! Please have a look and post your support questions there. Unlike some forums, ours is extremely friendly and is supported by literally hundreds of Asterisk and Wazo gurus and thousands of users just like you. You won’t have to wait long for an answer to your question.

Need help with Asterisk or Wazo? Visit the PBX in a Flash Forum.
Special Thanks to Our Generous Sponsors
FULL DISCLOSURE: ClearlyIP, Skyetel, Vitelity, DigitalOcean, Vultr, VoIP.ms, 3CX, Sangoma, TelecomsXchange and VitalPBX have provided financial support to Nerd Vittles and our open source projects through advertising, referral revenue, and/or merchandise. As an Amazon Associate and Best Buy Affiliate, we also earn from qualifying purchases. We’ve chosen these providers not the other way around. Our decisions are based upon their corporate reputation and the quality of their offerings and pricing. Our recommendations regarding technology are reached without regard to financial compensation except in situations in which comparable products at comparable pricing are available from multiple sources. In this limited case, we support our sponsors because our sponsors support us.
 BOGO Bonaza: Enjoy state-of-the-art VoIP service with a $10 credit and half-price SIP service on up to $500 of Skyetel trunking with free number porting when you fund your Skyetel account. No limits on number of simultaneous calls. Quadruple data center redundancy. $25 monthly minimum spend required. Tutorial and sign up details are here.
![]() The lynchpin of Incredible PBX 2020 and beyond is ClearlyIP components which bring management of FreePBX modules and SIP phone integration to a level never before available with any other Asterisk distribution. And now you can configure and reconfigure your new Incredible PBX phones from the convenience of the Incredible PBX GUI.
The lynchpin of Incredible PBX 2020 and beyond is ClearlyIP components which bring management of FreePBX modules and SIP phone integration to a level never before available with any other Asterisk distribution. And now you can configure and reconfigure your new Incredible PBX phones from the convenience of the Incredible PBX GUI.
 VitalPBX is perhaps the fastest-growing PBX offering based upon Asterisk with an installed presence in more than 100 countries worldwide. VitalPBX has generously provided a customized White Label version of Incredible PBX tailored for use with all Incredible PBX and VitalPBX custom applications. Follow this link for a free test drive!
 Special Thanks to Vitelity. Vitelity is now Voyant Communications and has halted new registrations for the time being. Our special thanks to Vitelity for their unwavering financial support over many years and to the many Nerd Vittles readers who continue to enjoy the benefits of their service offerings. We will keep everyone posted on further developments.
Some Recent Nerd Vittles Articles of Interest…


Like the new Some Recent Nerd Vittles Articles of Interest… layout
step 4a/4b result in error 400
[WM: You cannot access the link directly. With a recent Google "improvement" after completing steps 4a and 4b, you will be prompted to choose your Google account again. Click on the same account name that you logged into in Step #1. You then will be prompted whether to allow Google to view and send Chat messages from this account. Click Allow. Once you do this, you can continue with Step #5. Thanks for the heads up.]