

Unless you’ve been living under a rock, you probably already know that most folks spend a lot more time texting on their smartphones rather than talking. So it only made sense to develop some useful SMS tools to get the most out of your VitalPBX platform. Today we’re pleased to introduce SMS Toolkit for VitalPBX using SMS-enabled DIDs from Skyetel, VoIP.ms, and Vitelity. Any SMS message sent to an SMS-enabled DID associated with your PBX will be processed by Incredible PBX which will do the heavy lifting and either call you back with the query results or reply to the text message. You can whitelist an IP address in your firewall, retrieve news headlines or a weather forecast, and look up a phone number in your AsteriDex phone book, or place a call through your PBX using the AsteriDex Voice Dialer. You can enable and disable call forwarding from your PBX extension to your smartphone, and a simple SMS command also brings the calling flexibility of DISA to your smartphone. Finally, there are commands to actually help you manage your PBX.
The SMS Toolkit provides two layers of security. First, you must whitelist the phone numbers from which to process queries. Second, for the more vulnerable queries, a PIN is required as well. Here are 15 SMS queries that let you harness the power of Incredible PBX via SMS:
- @help – Play a list of supported SMS commands
- @news – Retrieve latest news headlines from Yahoo
- @weather – Retrieve weather report by zip code
- @wolfram – Siri-like query to Wolfram Alpha
- @whitelist – Whitelist a new IP address in your firewall
- @disa – Use DISA calling from your smartphone with password
- @cf on – Enable call forwarding from PBX extension to smartphone
- @cf off – Disable call forwarding from PBX extension
- @asteridex – Use AsteriDex Voice Dialer to place a call from PBX
- @fail2ban+ XXXXX – Restart Fail2Ban with PIN: XXXXX
- @fail2ban- XXXXX – Stop Fail2Ban with PIN: XXXXX
- @firewall+ XXXXX – Restart FirewallD with PIN: XXXXX
- @firewall- XXXXX – Stop FirewallD with PIN: XXXXX
- @asterisk+ XXXXX – Restart Asterisk with PIN: XXXXX
- @pbxstatus – Returns status of Asterisk, Fail2Ban, and FirewallD
Prerequisites for SMS Toolkit Deployment
To get started, you’ll need a DID from Skyetel, Vitelity, or VoIP.ms that supports SMS messaging. You’ll be hard-pressed to beat our Skyetel special which is summarized at the end of this article, but the choice is all yours. The way this works is you provide a forwarding email address in the Skyetel, Vitelity, or VoIP.ms portal for delivery of incoming SMS messages. These emails will be sent to your PBX where we will use Postfix and our mailcall script to process the messages and deliver the results.
Since Skyetel, Vitelity, and VoIP.ms will be delivering incoming SMS messages by email, it means you’ll also need a dedicated account and fully-qualified domain name (FQDN) for your server, e.g. smsuser@mypbx.mydomain.com. While a dynamic IP address will work if you implement automatic FQDN updating on your PBX, a static IP address for your PBX is obviously preferable and our recommended VitalPBX cloud solution provides that.
Implementing the SMS Toolkit for VitalPBX
Let’s walk through the steps to put all the pieces in place for the SMS Toolkit:
- Add a Dedicated Account to Linux for SMS Messaging
- Configure VitalPBX for Receipt of Incoming SMS Emails
- Configure Postfix for Receipt of Incoming Emails
- Obtain and Configure DID with Skyetel, Vitelity, or VoIP.ms
- Install and Configure MailCall Components
1. Adding a Dedicated Account to VitalPBX
To simplify the task of sifting through incoming emails, we’ll want to create a new Linux user account that can be dedicated to receipt of SMS email messages. You can use any name you prefer instead of smsuser. The second and third commands will verify that the account has been created with support for incoming mail. Just log into your server as root and issue the following commands:
adduser smsuser --shell=/bin/false --no-create-home --system -U
ls /var/spool/mail/smsuser
mail -u smsuser
2. Configuring VitalPBX to Receive Inbound Email
By design, both Postfix and the VitalPBX firewall block incoming email. We’re going to change that but, in doing so, we wish to caution that we don’t want to turn your server into an open mail relay for the spammers of the world. Once we’ve opened up your server to receive email, it’s important to test it to be sure it’s not insecure. Because the SMS Toolkit is intended to be a dedicated application just for you as administrator of your server, it’s equally important not to publicize the FQDN of your server. Once the spammers find your email address, incoming email can be just a big a problem as serving as an open mail relay.
To add a firewall rule in VitalPBX to support incoming SMTP mail traffic, log in to VitalPBX GUI as admin and navigate to Admin:Security:Firewall:Services. Add a new service with the following entries. Then click Save.
- Name: Email
- Protocol: TCP
- Port: 25
Next, click on the Rules tab and add a new service entry for Email with Action: Accept. Then click Save again.
3. Configuring Postfix to Receive Inbound Email
Configuring Postfix to receive incoming email requires a few additions. If you changed the user account (smsuser) above, then do the same in steps #2 and #4 below.
1. Issue the following commands to update Postfix to support incoming email:
cd /etc/postfix
cp -p master.cf master.cf.bak
wget http://incrediblepbx.com/postfix-master.tar.gz
tar zxvf postfix-master.tar.gz
rm -f postfix-master.tar.gz
postconf -e "inet_interfaces = all"
2. Using the fully-qualified domain name (FQDN) of your server, issue the following commands:
postconf -e "mydestination = your-FQDN, localhost.localdomain, localhost"
echo "smsuser:    smsuser@your-FQDN" >> /etc/aliases
systemctl restart postfix
3. Assuming you don’t mind discarding emails to the root user to avoid malicious spam attacks, enter the following commands. If you prefer to take your chances and preserve root email, omit the first line below:
echo "root:       /dev/null" >> /etc/aliases
echo "*:          /dev/null" >> /etc/aliases
newaliases
4. Test your new mail account by sending an email to smsuser@your-FQDN. Wait a bit and check for email: mail -u smsuser. Then delete the email: rm /var/spool/mail/smsuser/*
4a. Configuring Skyetel DID for SMS Email Relay
Effective 10/1/2023, $25/month minimum spend required.
1. In the VitalPBX GUI, navigate to Admin:Security:Firewall:WHITELIST and Add the IP address of the Skyetel SMTP server: 168.245.13.6.
2. Login to your Skyetel Portal and begin by deciphering your Username and Password for access to the Skyetel SMTP server in Tools:Voicemail Transcription.
3. While still in the Skyetel Portal, navigate to Phone Numbers:Local Numbers and click the Settings icon to the right of each DID you wish to enable for SMS messaging.
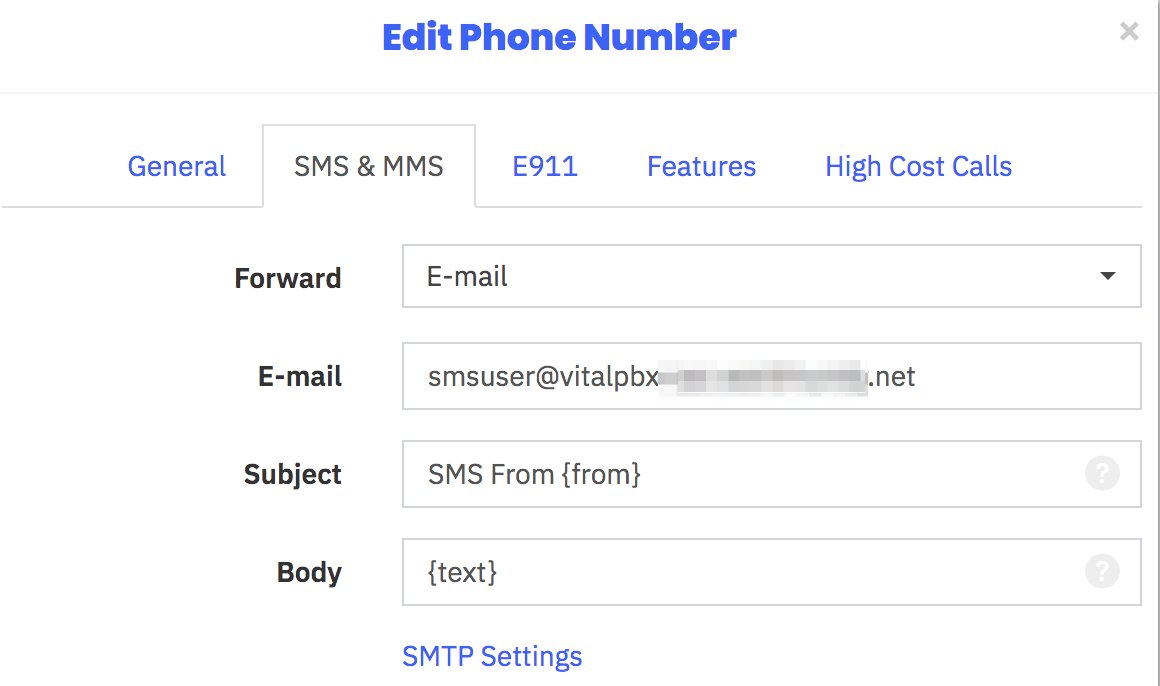
a. Click on the SMS & MMS tab and fill in the template as shown below using the Email address you’ve assigned to VitalPBX for SMS messaging. Do NOT change the Subject and Body entries, and do NOT click SAVE at this time.
b. Click on SMTP Settings at the bottom of the template. Fill in the SMTP template as shown below using the Username and Password you deciphered in Step #2 above. For the Sender, enter the email address to deliver SMS messages to your smartphone. For Default Recipient, enter the email address associated with your PBX.
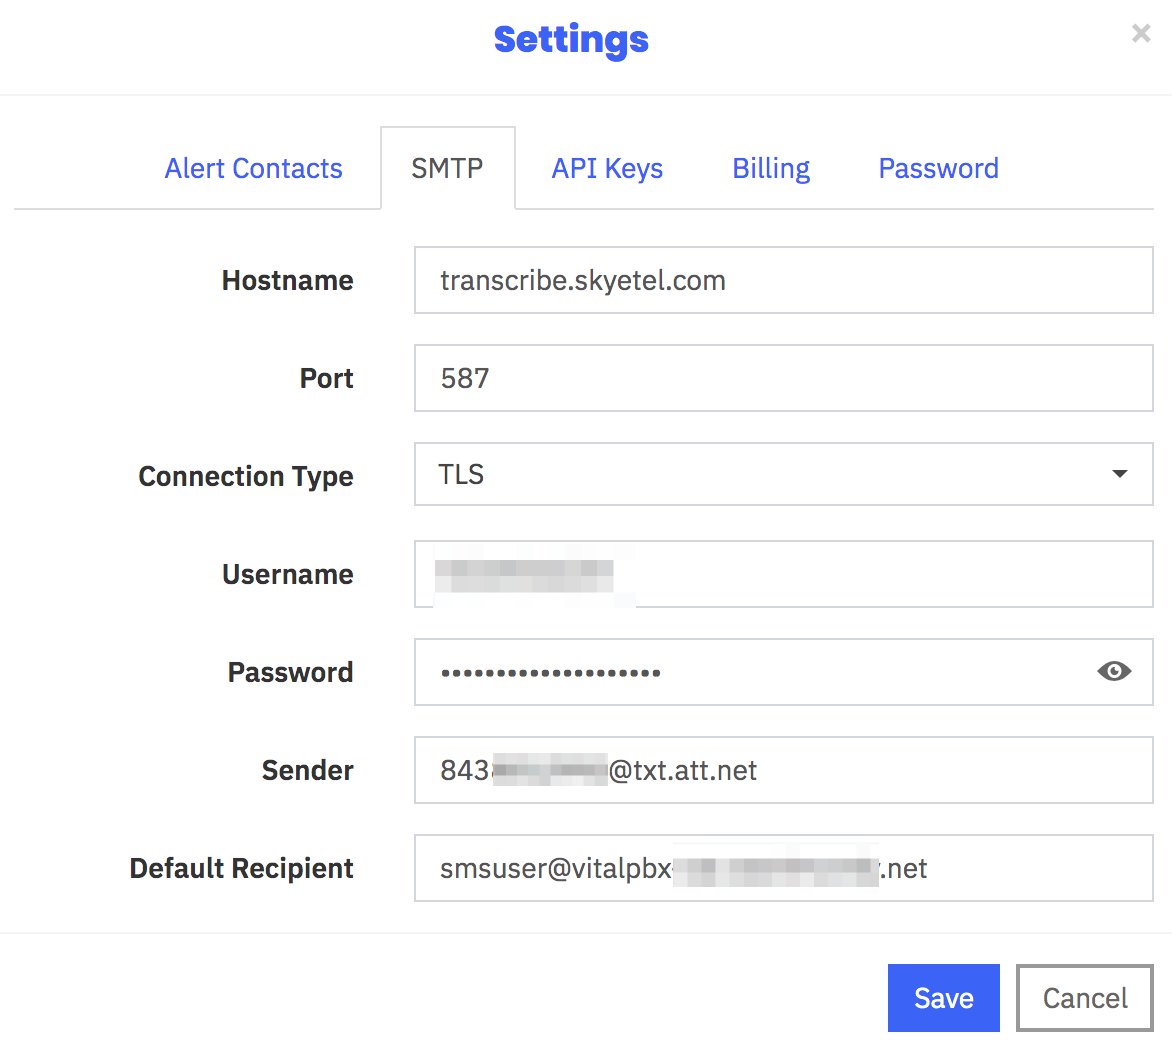
c. Finally, click the Save button in the SMTP Settings template and then Save again in the Email template.
d. Repeat these steps for every DID to enable for delivery of SMS messages to VitalPBX.
4b. Configuring Vitelity DID for SMS Email Relay
With Vitelity DIDs, the first step is to order a DID that supports SMS, most do. Next, you need to decide whether this DID will be used for other purposes, such as serving as a trunk on your PBX for receipt of incoming calls. If you only want to use the DID to support SMS messaging, then there’s little reason to sign up for the unlimited calling plan. Instead, choose the pay-per-minute (PPM) plan for your DID. It costs $1.49 a month. Don’t even both registering the trunk which will save your having to pay for misdialed calls and spam. SMS messages are free.
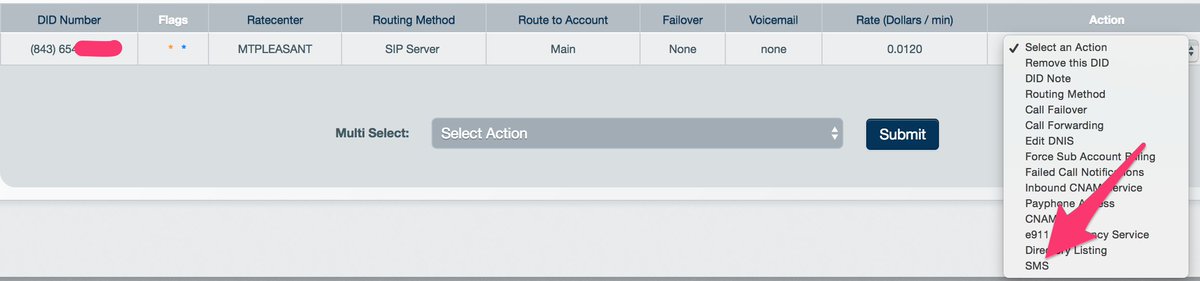
Once your DID is set up, go to My Numbers -> Local in the Vitelity web portal and choose SMS from the Action pull-down menu of your new DID:
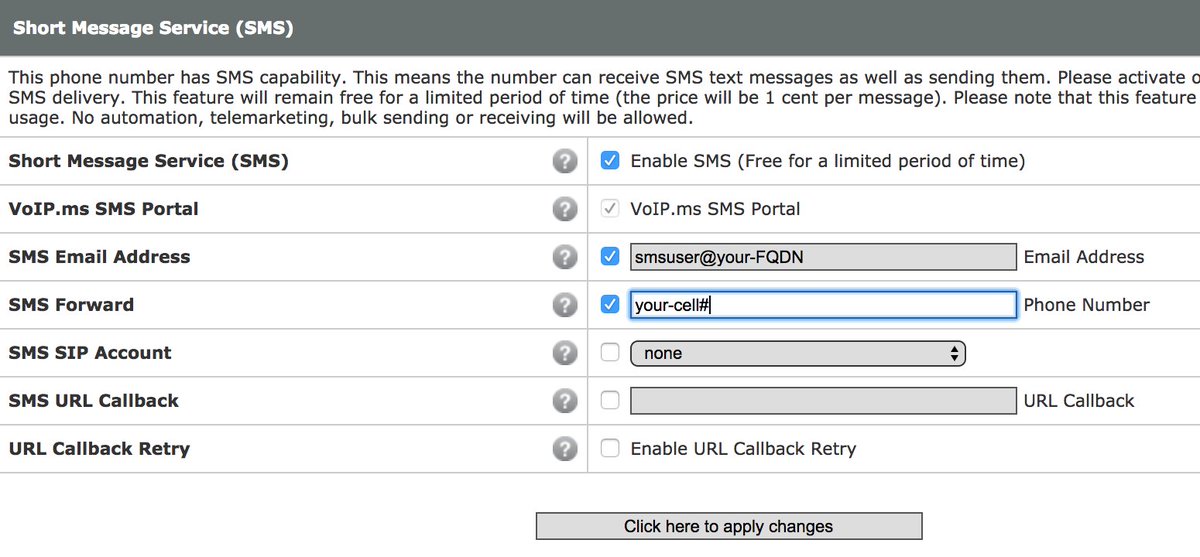
In the SMS dialog, set up a password for messaging, disable international messages, and enter the email forwarding address for your incoming SMS messages. Save your settings, and you’re good to go.
On the VitalPBX side, don’t forget to whitelist your Vitelity server’s IP address.
4c. Configuring VoIP.ms DID for SMS Email Relay
If you plan to dedicate a DID to SMS messaging, two advantages of the VoIP.ms offering are (1) the price ($0.85/month on the pay by the minute plan with $0.40 setup fee and (2) you can forward incoming SMS messages to another SMS number (such as your smartphone) in addition to an email address if you want to use the DID for traditional SMS messaging while also deploying our SMS Toolkit. As noted above, there’s no charge for SMS messages at this time although VoIP.ms has warned (for years) that they may begin charging a penny a message.
To get started, sign up for a VoIP.ms account and order a DID with SMS support. A cellphone is displayed beside each DID that supports SMS in their ordering page. As with Vitelity, there’s no need to register the trunk on your PBX if you only plan to use the SMS messaging component. Once your DID is provisioned, choose DID Numbers -> Manage DIDs in the VoIP.ms portal. Then edit the DID you just purchased. At the bottom of the form, fill in the SMS section as shown below:
On the VitalPBX side, don’t forget to whitelist your VoIP.ms POP’s IP address.
5. Installing and Configuring MailCall with VitalPBX
This version of MailCall was specifically designed for Incredible PBX for VitalPBX. Many of the MailCall features will not work until they are first configured on your server, e.g. Voice Dialing, Wolfram Alpha, and Voice SMS Messaging. All of the setups are covered in this VitalPBX tutorial.
After logging into your server as root, issue the following commands to install MailCall:
cd /
wget http://incrediblepbx.com/MailCall-VitalPBX.tar.gz
tar zxvf MailCall-VitalPBX.tar.gz
rm -f MailCall-VitalPBX.tar.gz
chown -R asterisk:asterisk /var/lib/asterisk
chown -R asterisk:asterisk /etc/asterisk
For a number of the queries, a 5-digit PIN is required for obvious reasons. This needs to be set in two places: (1) in two chunks of dialplan code (/tmp/sms-dialplan.txt) to be added and (2) at the top of the mailcall script itself (/root/mailcall). Just search for XXXXX and replace the five X’s with a 5-digit secure PIN in all three places. While editing the mailcall script, you’ll also need to whitelist the 10-digit or 11-digit phone numbers from which to accept calls in the AUTHORIZED field. Just separate each number with a space. Then issue the remainder of the commands below:
nano -w /tmp/sms-dialplan.txt
nano -w /root/mailcall
cat /tmp/sms-dialplan.txt >> /etc/asterisk/ombutel/extensions__80-custom.conf
echo "asterisk ALL = NOPASSWD: /usr/sbin/iptables" >> /etc/sudoers
echo "*/2 * * * * root /root/mailcall > /dev/null 2>&1" >> /etc/crontab
asterisk -rx "dialplan reload"
As a security precaution, you can only use SMS Toolkit to forward and unforward calls to your cellphone from a PBX extension designated for your use. You can associate more than one cellphone with a given extension, but you can’t associate multiple extensions with a single cellphone. To set up the association between your cellphone and an extension on your PBX, issue the following command while logged in as root where 8431234567 is your cell phone number and 701 is the associated extension:
asterisk -rx "database put CELL 8431234567 701"
Sending an SMS message of @CF ON to your DID from 8431234567 will automatically forward extension 701 calls to your cell. Sending @CF OFF will disable forwarding to extension 701.
Finally, a few words about the SMS @whitelist command. It can be used in two ways. If you just text whitelist, then you will get a call back that first prompts for your PIN. You then will be prompted for the IP address to whitelist. Using your cellphone, enter the IP address using * for periods, e.g. 1*2*3*4 becomes 1.2.3.4. The alternative whitelist option doesn’t require a callback. Just send a text message with @whitelist PIN ip-address using periods, not *, e.g. @WHITELIST 98765 1.2.3.4 would whitelist 1.2.3.4 if your PIN was correctly entered as 98765 and matches the entry in /root/mailcall.
Email Addresses for SMS Smartphone Delivery
United States:
- AT&T – number@txt.att.net
- Verizon – number@vtext.com
- Sprint – number@messaging.sprintpcs.com
- T-Mobile – number@tmomail.net
- Mint Mobile – number@tmomail.net
- Virgin Mobile – number@vmobl.com
- Tracfone – number@mmst5.tracfone.com
- Ting – number@message.ting.com
- Boost Mobile – number@myboostmobile.com
- U.S. Cellular – number@email.uscc.net
- Metro PCS – number@mymetropcs.com
Canada:
- Rogers Wireless: number@pcs.rogers.com
- Fido: number@fido.ca
- Telus: number@msg.telus.com
- Bell Mobility: number@txt.bell.ca
- Kudo Mobile: number@msg.koodomobile.com
- MTS: number@text.mtsmobility.com
- President’s Choice: number@txt.bell.ca
- Sasktel: number@sms.sasktel.com
- Solo: number@txt.bell.ca
- Virgin: number@vmobile.ca
Managing the AsteriDex SQLite3 Database
We’ve alluded to the AsteriDex database in a couple of VitalPBX articles but never mentioned how to access it. Using a browser, point it to http://server-ip/asteridex4. You can add, edit, display, and delete entries from there. Before you can make changes in the database, issue the following command after logging into your server as root:
chown asterisk:apache /var/lib/asterisk/agi-bin
Published: Monday, November 18, 2018

Need help with Asterisk? Visit the VoIP-info Forum.
Special Thanks to Our Generous Sponsors
FULL DISCLOSURE: ClearlyIP, Skyetel, Vitelity, DigitalOcean, Vultr, VoIP.ms, 3CX, Sangoma, TelecomsXchange and VitalPBX have provided financial support to Nerd Vittles and our open source projects through advertising, referral revenue, and/or merchandise. As an Amazon Associate and Best Buy Affiliate, we also earn from qualifying purchases. We’ve chosen these providers not the other way around. Our decisions are based upon their corporate reputation and the quality of their offerings and pricing. Our recommendations regarding technology are reached without regard to financial compensation except in situations in which comparable products at comparable pricing are available from multiple sources. In this limited case, we support our sponsors because our sponsors support us.
 BOGO Bonaza: Enjoy state-of-the-art VoIP service with a $10 credit and half-price SIP service on up to $500 of Skyetel trunking with free number porting when you fund your Skyetel account. No limits on number of simultaneous calls. Quadruple data center redundancy. $25 monthly minimum spend required. Tutorial and sign up details are here.
 VitalPBX is perhaps the fastest-growing PBX offering based upon Asterisk with an installed presence in more than 100 countries worldwide. VitalPBX has generously provided a customized White Label version of Incredible PBX tailored for use with all Incredible PBX and VitalPBX custom applications. Follow this link for a free test drive!
 Special Thanks to Vitelity. Vitelity is now Voyant Communications and has halted new registrations for the time being. Our special thanks to Vitelity for their unwavering financial support over many years and to the many Nerd Vittles readers who continue to enjoy the benefits of their service offerings. We will keep everyone posted on further developments.


Quick question, about the email setup, wouldn’t it be better for the VitalPBX server to access a pop3 account instead of being it’s own email server? this way ports don’t need to be opened on the server or the firewall.
[WM: If you have a POP3 account that could be dedicated to this specific use, that would be a great alternative.]