

At every opportunity I always tell new VoIP enthusiasts that one of the true advantages of switching to a VoIP platform is the fact that you don’t have to put all your eggs in one basket. Just this morning, I read a Facebook post from one of the elders in my family lamenting the fact that her MaBell landline had failed in the midst of this week’s snowstorm in North Carolina. Her local WiFi and cable TV still worked but not her landline or cellphone.
With that background, we are pleased to introduce BulkVS trunking as another option to add to your collection. Unlike Skyetel, ClearlyIP, Vitelity, and VoIP.ms, we receive no commissions from BulkVS so chalk this article up as a good example of biting off your nose to spite your face. There is a PayPal link to the right if you’re feeling grateful. 😉
Why does BulkVS matter? In the words of Alex Trebek, it’s The 3 P’s: Price, Price, and Price. An inbound US48 Tier0 phone number (DID) will set you back 6¢ a month with a 25¢ setup fee. And calls are billed at $.0003 per minute. Toll-free numbers in the U.S. and Canada are 14¢ a month with a per minute rate of $.0055. CNAM lookups are $.002. Outbound calls are $0.004/minute. E911 service is 49¢/month. Billing increment: 6 seconds. Those aren’t typos.
Getting Started with BulkVS
To get started, click the sign up link on the main BulkVS page. Then fund your account with $25 using PayPal. Or you can sign up for Net 15 billing and pay by check or credit card if you’re not in a rush to get started.
BulkVS offers two ways to set up your BulkVS trunking: IP-based authentication and SIP registration. If you don’t have a firewall which means you’re not using Incredible PBX, the first method is a little safer because nobody can spoof the IP address of your Asterisk® PBX. But it’s not for everyone. For example, if you’re behind a NAT-based firewall or if your server has a dynamic IP address, then IP-based authentication really isn’t an option. Similarly, if you don’t have control of the router that your PBX is sitting behind, then IP-based authentication won’t work since you have to forward both the SIP port (UDP 5060) and the RTP ports (10000-20000) to your PBX. The beauty of SIP registrations is they work from almost anywhere including double-NAT environments. So today, we’ll cover the SIP registration approach which will work for everyone.
There are three setup procedures: one using the BulkVS Control Panel, a second using the Linux CLI, and a third using the FreePBX® GUI included in Incredible PBX®.
BulkVS Setup with SIP Registration
Step 1: Go to Inbound -> DIDs – Purchase and buy one or more DIDs for your PBX.
Step 2: Go to Interconnection -> Host – Add and add your PBX’s public IP address. Leave the port as 5060 for both chan_sip and chan_pjsip setups.
Step 3: Go to Interconnection -> Trunk Group – Add and create a Trunk Group.
Step 4: Go to Interconnection -> Trunk Group – Manage and add the Primary IP Address for your new Trunk Group. Set Delivery Type to 11DIGITS.
Step 5: Go to Interconnection -> SIP Registration and write down the credentials for one of the SIP credentials you wish to use to register your new trunks.
Step 6: Go to Inbound -> DIDs – Manage and select each telephone number. Then set the Trunk Group to the SIPREG Trunk Group you chose in the previous step. Click Update button.
Step 7: Wait 15 minutes for the new IP and Trunk Group settings to propagate to SBC nodes.
Linux CLI Setup for BulkVS
First, log into your server as root and edit iptables-custom in /usr/local/sbin. Add the following just above the # End of Trusted Provider Section marker:
# BulkVS WhiteList
/usr/sbin/iptables -A INPUT -p udp -m udp -s 162.249.171.198 --dport 5060:5069 -j ACCEPT
/usr/sbin/iptables -A INPUT -p udp -m udp -s 76.8.29.198 --dport 5060:5069 -j ACCEPT
/usr/sbin/iptables -A INPUT -p udp -m udp -s 69.12.88.198 --dport 5060:5069 -j ACCEPT
/usr/sbin/iptables -A INPUT -p udp -m udp -s 192.9.236.42 --dport 5060:5069 -j ACCEPT
/usr/sbin/iptables -A INPUT -p udp -m udp -s 52.206.134.245 --dport 5060:5069 -j ACCEPT
For chan_sip trunk implementations, while logged into your server as root, edit sip_custom_post.conf in /etc/asterisk. Add the following:
[bulkvs1](bulkvs);
host=192.9.236.42

[bulkvs2](bulkvs);
host=162.249.171.198

[bulkvs3](bulkvs);
host=69.12.88.198

[bulkvs4](bulkvs);
host=76.8.29.198

[bulkvs5](bulkvs);
host=52.206.134.245
Finally, restart the IPtables firewall and reload Asterisk:
iptables-restart
fwconsole reload
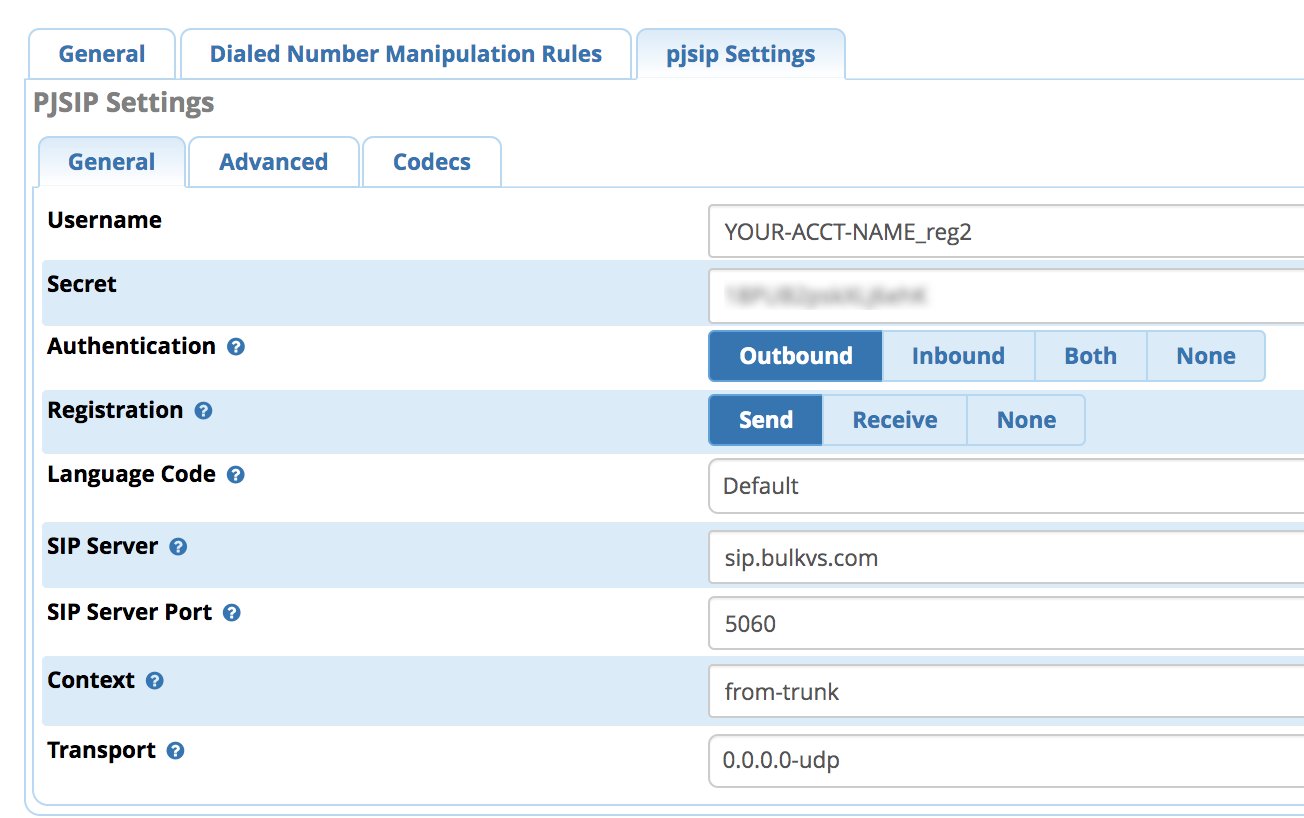
FreePBX PJsip Setup with SIP Registration
The PJsip alternative is considerably easier. First, you don’t need sip_custom_post.conf entries at all. To begin, navigate to Connectivity -> Trunks and choose Add a PJsip trunk. Name the trunk BulkVS and then click on the pjsip Settings tab. Fill out the form as shown below substituting the BulkVS registration account name you chose above. Any of the three SIP registrations offered for your account under Interconnection -> SIP Registration in the BulkVS Dashboard will work as long as you use the matching password.
Next, click on the Advanced tab and enter the following in the Match (Permit) field.
162.249.171.198,76.8.29.198,69.12.88.198,192.9.236.42,52.206.134.245
In the Codecs tab, enable ULAW and ALAW. Then click Submit and reload your dialplan.
With PJsip registrations, you may also need to add the following lines to the end of extensions_custom.conf in /etc/asterisk using your actual DID. Then reload your dialplan: asterisk -rx "dialplan reload"
[from-sip-external]
; BulkVS
exten => 18005551212,3,Goto(from-trunk,${DID},1)
FreePBX chan_sip Setup with SIP Registration
If you prefer to set up your BulkVS trunk the old-fashioned way, navigate to Connectivity -> Trunks -> Add chan_sip trunk and enter:

In the Incoming tab, enter a Registration String in the following format where 19991234567 is one of your actual BulkVS DIDs. Then Save the settings and reload the dialplan.
yourBulkVSacctname:yourBulkVSpassword@sip.bulkvs.com/19991234567
Finally, navigate to Settings -> Asterisk SIP Settings and the chan_SIP tab, then set the Registration Minimum Expiry and Registration Default Expiry entries to 25. Then click Submit and reload the dialplan.
FreePBX Inbound & Outbound Route Configuration
Finally, we need to tell FreePBX how to route BulkVS calls into and out of your PBX. In the FreePBX GUI under Connectivty -> Inbound Routes, add a new route for BulkVS specifying the 11-digit DID you purchased from BulkVS. Choose a Destination for the incoming calls, save your settings, and reload the dialplan. Repeat this process for each of your BulkVS DIDs. HINT: The monthly cost of the DIDs is inexpensive enough to assign a DID to every extension on your PBX.
Next, navigate to Connectivity -> Outbound Routes and create a new Outbound Route for calls you wish to process using BulkVS termination services. Name the Outbound Route BulkVS and assign the bulkvs trunk as the first entry in the call sequence. In the Dial Patterns tab, you would want match patterns for 1NXXNXXXXXX and NXXNXXXXXX. For the latter entry, be sure to add a Prepend entry of 1. Then save your settings and reload the dialplan.
SMS Message Delivery from BulkVS Trunks
BulkVS also supports SMS messaging on most of their DIDs. To deliver SMS messages from BulkVS, you’ll need a public-facing web server (not Incredible PBX). Assuming you already have that in place, delivery of SMS messages from BulkVS DIDs to your email address or smartphone’s messaging app is straight-forward. Begin by enabling SMS messaging on your DID: Inbound -> DIDs Manage. Next, assign a web address to process the incoming messages on your web server, e.g. http://yourdomain.com/bulkvs-sms/index.php. Then create the index.php file using the sample code below after inserting your email address for delivery of the incoming messages:
<?php

// Syntax for delivery from bulkvs.com SMS Forwarding Service

  $deliverto = "yourname@yourdomain.org";
//  $deliverto = "18431234567@txt.att.net";
  $from = htmlspecialchars($_REQUEST['from']);
  $to = htmlspecialchars($_REQUEST['to']);
  $message = htmlspecialchars($_REQUEST['message']);
  $subject="SMS Message from $from to $to";
  $comment="SMS Message\\n\\nFROM: $from\\n\\nTO: $to\\n\\nMSG: $message\\n\\n";
  mail("$deliverto", "$subject", "$comment", "$from");
  echo "OK";
?>
To send an SMS message from one of your BulkVS DIDs, you’ll need your API credentials from the BulkVS web site. Simply insert them together with one of your 11-digit DIDs in the script below, and you can send SMS messages to your heart’s content.
from="18005551212"
apikey="aaabbbccc"
apisecret="dddeeefff"

if [ -z "$1" ]; then
echo 'Syntax: send-sms-bulkvs 18005551212 "Your SMS message"'
exit
fi
if [ -z "$2" ]; then
echo 'Syntax: send-sms-bulkvs 18005551212 "Your SMS message"'
exit
fi

to=$1
msg=$2

curl --header "Content-Type: application/json" --request POST --data \\
'{"apikey":"'"$apikey"'","apisecret":"'"$apisecret"'","from":"'"$from"'","to":"'"$to"'","message":"'"$msg"'"}' \\
https://portal.bulkvs.com/sendSMS
To send SMS messages from a Windows machine, see this post from @jerrm.
Originally published: Tuesday, May 12, 2020
Need help with Asterisk? Visit the VoIP-info Forum.
Special Thanks to Our Generous Sponsors
FULL DISCLOSURE: ClearlyIP, Skyetel, Vitelity, DigitalOcean, Vultr, VoIP.ms, 3CX, Sangoma, TelecomsXchange and VitalPBX have provided financial support to Nerd Vittles and our open source projects through advertising, referral revenue, and/or merchandise. As an Amazon Associate and Best Buy Affiliate, we also earn from qualifying purchases. We’ve chosen these providers not the other way around. Our decisions are based upon their corporate reputation and the quality of their offerings and pricing. Our recommendations regarding technology are reached without regard to financial compensation except in situations in which comparable products at comparable pricing are available from multiple sources. In this limited case, we support our sponsors because our sponsors support us.
BOGO Bonaza: Enjoy state-of-the-art VoIP service with a $10 credit and half-price SIP service on up to $500 of Skyetel trunking with free number porting when you fund your Skyetel account. No limits on number of simultaneous calls. Quadruple data center redundancy. $25 monthly minimum spend required. Tutorial and sign up details are here.
The lynchpin of Incredible PBX 2020 and beyond is ClearlyIP components which bring management of FreePBX modules and SIP phone integration to a level never before available with any other Asterisk distribution. And now you can configure and reconfigure your new Incredible PBX phones from the convenience of the Incredible PBX GUI.
VitalPBX is perhaps the fastest-growing PBX offering based upon Asterisk with an installed presence in more than 100 countries worldwide. VitalPBX has generously provided a customized White Label version of Incredible PBX tailored for use with all Incredible PBX and VitalPBX custom applications. Follow this link for a free test drive!
Special Thanks to Vitelity. Vitelity is now Voyant Communications and has halted new registrations for the time being. Our special thanks to Vitelity for their unwavering financial support over many years and to the many Nerd Vittles readers who continue to enjoy the benefits of their service offerings. We will keep everyone posted on further developments.