
In our last article, we introduced the PBX in a Flash Virtual Machine for Oracle’s VirtualBox. To commemorate the end of the world today, we wanted to go out with a bang. So we’re pleased to introduce Incredible PBX 11 Virtual Machine. As with the PIAF-Green Virtual Machine, this new appliance features CentOS 6.3, Asterisk® 11, and FreePBX® 2.11 beta. In addition, it includes Incredible Fax with HylaFax and AvantFax, SMS speech-to-text messaging as well as SMS message blasting with Google Voice, and several dozen turnkey Asterisk applications including a speech-to-text phonebook dialer, text-to-speech news, weather, tide, and stock reports, a conference bridge for MeetMe conferencing, NeoRouter and PPTP VPN support, SAMBA for Windows Networking, ODBC database integration, Telephone Reminders and Hotel-Style Wakeup Calls, CallerID Superfecta, PBX End Point Manager, and Wolfram Alpha to name but a few. With the addition of free Google Voice accounts, you still get free voice and fax calling in 2013 throughout the United States and Canada. And, yes, Incredible PBX 11 still installs and is ready to go in under 5 minutes on any Windows, Mac, Linux, or Solaris desktop.
The Ultimate VoIP Appliance: Incredible PBX 11 Virtual Machine for VirtualBox
We broke new ground in the virtual machine development arena last week with the introduction of the PIAF Virtual Machine. Today we take it to the next plateau with a turnkey VoIP appliance that can be deployed and functional in less time than it takes you to shave. Today’s Incredible PBX Virtual Machine still gives you everything a bare metal install from source code would have provided. And, most importantly, the components are truly portable. They can be copied to a 4GB flash drive1 for the price of a good hamburger and installed from there onto any type of machine that happens to be in front of you. Five minutes later, you have a fully functional Asterisk server with FreePBX and exactly the same feature set and source code that you would have had installing Incredible PBX onto a dedicated server. Before you ask any questions, we urge you to try this VoIP appliance for yourself. The install process is as easy as 1-2-3:
- Download and install VirtualBox onto a Desktop Machine of your choice
- Download and double-click on Incredible PBX 11 Virtual Machine to import it into VirtualBox
- Select the Incredible PBX 11 Virtual Machine in VirtualBox Manager Window and click the Start button
Introducing Oracle VM VirtualBox

Here’s a quick review if you missed our last article. VirtualBox®, Oracle’s virtual machine platform inherited from Sun, is really something. It’s not only free, but it’s pure GPL2 code. VirtualBox gives you a virtual machine platform that runs on top of any desktop operating system. In terms of limitations, we haven’t found any. We even tested this on an Atom-based Windows 7 machine with 2GB of RAM, and it worked without a hiccup. So step #1 is to download one or more of the VirtualBox installers from VirtualBox.org or Oracle.com. As mentioned, our recommendation is to put all of the 100MB installers on a 4GB thumb drive. Then you’ll have everything in one place whenever and wherever you happen to need it. Once you’ve downloaded the software, simply install it onto your favorite desktop machine. Accept all of the default settings, and you’ll be good to go. For details, here’s a link to Oracle’s VM VirtualBox User Manual.
Introducing Incredible PBX Virtual Machine
To get Incredible PBX VM installed on your desktop is quick and easy. Because the image tips the scales at over 2GB and due to the 2GB file size limit on many systems, we’ve chosen to split this download into two pieces. You need both of them. Just download them onto any flavor desktop from SourceForge. Once you’ve downloaded the two files, reassemble them into a single file known as an Open Virtualization Appliance (.ova). Then verify the checksums for the reassembled file to be sure everything is in its proper place. Finally, double-click on the .ova file which will initiate the import process into VirtualBox.
So let’s begin by downloading the two halves from SourceForge: INCREDIBLEPBX11aa and INCREDIBLEPBX11ab.
The reassembly procedure depends upon your desktop operating system. For Windows PCs, you’ll need to drop down to the Command Prompt, change to the directory in which you downloaded the two files, and type the following command:
copy /b INCREDIBLEPBX11aa + INCREDIBLEPBX11ab IncrediblePBX11.ova
To check the MD5/SHA1 checksums in Windows, download and run Microsoft’s File Checksum Integrity Verifier.
For Mac or Linux desktops, open a Terminal window, change to the directory in which you downloaded the two files, and type the following commands:
cat INCREDIBLEPBX11a{a..b} > IncrediblePBX11.ova

md5 IncrediblePBX11.ova (use md5sum for Linux)

openssl sha1 IncrediblePBX11.ova
The MD5 checksum for IncrediblePBX11.ova is b17655785ef00381ffd70899a19375f9. The SHA1 checksum is 86ccd31d64d3b51e10a8e7429548be6ce15ecd9b. If you have a match, proceed. Otherwise, rinse and repeat.
Importing Incredible PBX 11 Virtual Machine into VirtualBox
You only perform the import step one time. Once imported into VirtualBox, Incredible PBX is ready to use. There’s no further installation required, just like an OpenVZ template… only better. Double-click on the .ova file you downloaded to begin the procedure and load VirtualBox. When prompted, be sure to check the Reinitialize the Mac address of all network cards box. Read and accept the license agreement. Then click the Import button. Once the import is finished, you’ll see a new IncrediblePBX11 virtual machine in your VM List on the VirtualBox Manager Window. You need to make a couple of one-time adjustments to the IncrediblePBX11 Virtual Machine configuration to account for differences in sound and network cards on different host machines.
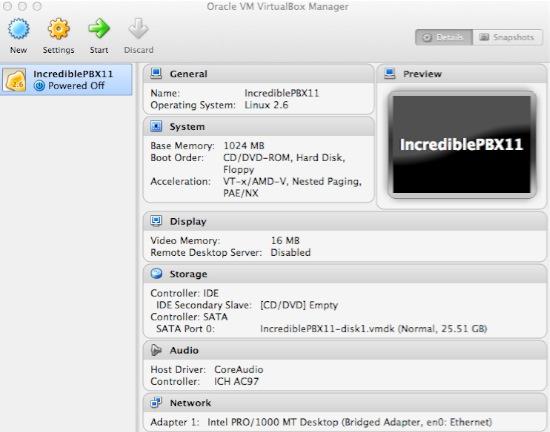
Click on IncrediblePBX11 Virtual Machine in the VM List. Then click Settings -> Audio and check the Enable Audio option and choose your sound card. Save your setup by clicking the OK button. Next click Settings -> Network. For Adapter 1, check the Enable Network Adapter option. From the Attached to pull-down menu, choose Bridged Adapter. Then select your network card from the Name list. Then click OK to save your setup. Finally, click Settings -> System, uncheck Hardware clock in UTC time, and click OK. That’s all the configuration that is necessary for Incredible PBX Virtual Machine. If you blinked, you probably missed it.
Running Incredible PBX Virtual Machine in VirtualBox
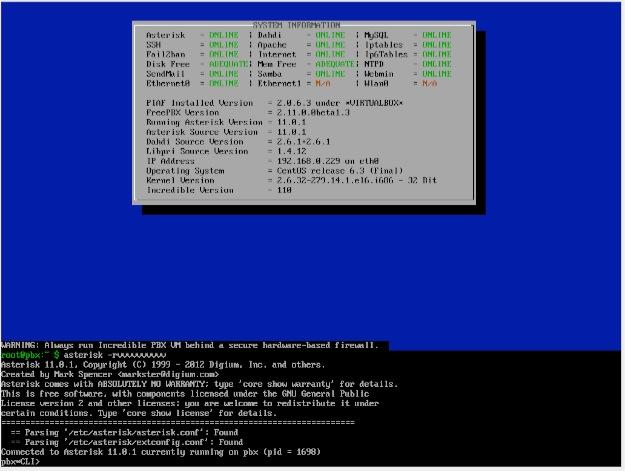
Once you’ve imported and configured Incredible PBX Virtual Machine, you’re ready to go. Highlight the appliance in the VM List on the VirtualBox Manager Window and click the Start button. The boot procedure with CentOS 6.3 will begin just as if you had installed PBX in a Flash and Incredible PBX on a standalone machine. You’ll see a couple of dialogue boxes pop up that explain the keystrokes to move back and forth between your host operating system desktop and Incredible PBX.
Here’s what you need to know. To work in the Incredible PBX Virtual Machine, just left-click your mouse while it is positioned inside the VM window. To return to your host operating system desktop, press the right Option key on Windows machines or the left Command key on any Mac. For other operating systems, read the dialogue boxes for instructions on moving around. Always shut down Incredible PBX gracefully! Click in the VM window with your mouse, log in as root, and type: shutdown -h now. Or, from the VirtualBox Manager Window, Ctl-Click on the IncrediblePBX11 VM and choose Close -> ACPI Shutdown.
Always run Incredible PBX VM behind a hardware-based firewall with no Internet port exposure!
Linux CLI Setup. To begin, position your mouse over the VM window and left-click. Once the virtual machine has booted, log in as root with password as the password. Change your root password immediately by typing passwd at the command prompt. Now set up a secure maint password for FreePBX as well. Type passwd-master. If you’re not in the Eastern U.S. time zone, then you’ll want to adjust your timezone setting so that reminders and other time-sensitive events happen at the correct time. Issue the following command to pick your time zone: /root/timezone-setup. If you plan to use Incredible Fax to send and receive faxes, set an email address for delivery of incoming faxes: /root/incrediblefax-setup. To use SMS messaging in Incredible PBX, you’ll need a Google Voice account which is covered below. Once you have your credentials, edit extensions_custom.conf in /etc/asterisk and insert your username and password in the 767 extension. To use SAMBA for Windows networking, replace the Interfaces IP address in /etc/samba/smb.conf with your actual IP address. Next, run smbpasswd and assign a password for root access to your server. Then restart SAMBA: service smb restart.
FreePBX Setup. Use a browser to log into your Incredible PBX server by pointing to the IP address of the virtual machine displayed in the status window of the CLI. Click on the User button to display the Admin choices in the Main PIAF Menu. Click on the FreePBX Admin option to load the FreePBX GUI. You will be prompted for a username and password. For the username, use maint. For the password, use whatever password you set up with passwd-master above.
You’ll want to keep FreePBX up to date. The easiest way is to configure FreePBX for email notifications when there are updates. In the FreePBX GUI, choose Admin -> Module Admin -> Upgrade Notifications and plug in your email address. Updates are installed in this same window. Click Check Online -> Upgrade All -> Process and Confirm. Scroll to the bottom of the Status window and click Return. Then click Apply Config. Now you try it.
GOOGLE VOICE ALERT: For old-timers that used the previous Google Voice module in FreePBX 2.x, it’s a little different in FreePBX 2.11. It now is called Google Voice (Motif), and you’ll find it under the Connectivity tab instead of the Other tab. More importantly, the form has changed. Do NOT check all 3 checkboxes as you did previously, or your incoming calls won’t be answered. Leave last checkbox "Send Unanswered to GoogleVoice Voicemail" UNCHECKED!!
Incredible PBX supports SIP, IAX, and Google Voice trunks to handle your outbound and incoming calls. The easiest way to get started it to set up a couple of Google Voice trunks, one for voice calls and one for faxing. These trunks must be dedicated for exclusive use with Incredible PBX. If you’re logged into these Google Voice accounts elsewhere, Incredible PBX won’t receive incoming calls. Read our Incredible PBX Quick Start Guide for the procedure to register for new Google Voice accounts. Once you have your credentials and phone numbers, choose Connectivity -> Google Voice in FreePBX to set up the accounts in FreePBX. For each trunk, you also need to set up an Inbound Route to tell FreePBX how to route the incoming calls. For your Fax trunk, here’s the drill. Choose Connectivity -> Inbound Routes. Insert your 10-digit Google Voice number in the DID Number field. Check Enable CID Superfecta and, for Set Destination, choose Custom Destinations -> Fax (HylaFax). Click Submit and then click Apply Config.
Before your Google Voice trunks will work reliably, there are two final steps. First, restart Asterisk from the Linux CLI: amportal restart. Then, make at least one outbound call using each Google Voice trunk.
We’ve preconfigured SIP trunks for all of the major VoIP providers in Incredible PBX. All you have to do is sign up for a few accounts. This isn’t like the old Ma Bell days so take advantage of the redundancy that using multiple VoIP providers gives you. There’s a very special offer from one of the major sponsors of the PBX in a Flash and Nerd Vittles projects below. Take advantage of it and support our open source projects.
1-7-13 Security Alert: We’ve just released Incredible PBX 11.1.2 which includes Asterisk 11.1.2 and the latest FreePBX 2.11 beta. The Asterisk Dev Team announced a serious security vulnerability in Asterisk 1.8, 10, and 11 late last week. This update addresses that. You can read all about it in the readme file on SourceForge. If you still are using an earlier version of Incredible PBX 11, make certain that it is behind a hardware-based firewall with no Internet port exposure. And you should immediately patch your server or, better yet, switch to this new release.
Now read the latest Incredible PBX Quick Start Guide and begin your VoIP adventure. Then you’ll want to do some reading on VirtualBox. We’ve barely scratched the surface. Setting up Headless VMs that run in the background on any server is a breeze. From the command line, here’s an article to get you started. But you also can start Headless VMs from within the GUI by highlighting the VM and clicking Shift->Start. REMEMBER: Always shut down VMs gracefully: Close->ACPI Shutdown. You’ll find more great tips at virtualbox.org and GitHub.
One of the real beauties of VirtualBox is you don’t have to use a GUI at all. The entire process can be driven from the command line. Other than on a Mac, here is the procedure to import, configure, and run Incredible PBX 11 Virtual Machine:
VBoxManage import IncrediblePBX11.ova

VBoxManage modifyvm "IncrediblePBX11" --nic1 nat

VBoxManage modifyvm "IncrediblePBX11" --acpi on --nic1 bridged

VBoxHeadless --startvm "IncrediblePBX11" &

# Wait 1 minute for IncrediblePBX11 to load. Then decipher IP address like this:

VBoxManage guestproperty get "IncrediblePBX11" /VirtualBox/GuestInfo/Net/0/V4/IP

# Now you can use SSH to login to IncrediblePBX11 at the displayed IP address

# Shutdown the IncrediblePBX11 Virtual Machine with the following command:

VBoxManage controlvm "IncrediblePBX11" acpipowerbutton
On a Mac, everything works the same way except for deciphering the IP address. Download our findip script for that.
Have a very Merry Christmas!
Originally published: Friday, December 21, 2012 Updated: Saturday, December 22, 2012

Need help with Asterisk? Visit the PBX in a Flash Forum.
Special Thanks to Our Generous Sponsors
FULL DISCLOSURE: ClearlyIP, Skyetel, Vitelity, DigitalOcean, Vultr, VoIP.ms, 3CX, Sangoma, TelecomsXchange and VitalPBX have provided financial support to Nerd Vittles and our open source projects through advertising, referral revenue, and/or merchandise. As an Amazon Associate and Best Buy Affiliate, we also earn from qualifying purchases. We’ve chosen these providers not the other way around. Our decisions are based upon their corporate reputation and the quality of their offerings and pricing. Our recommendations regarding technology are reached without regard to financial compensation except in situations in which comparable products at comparable pricing are available from multiple sources. In this limited case, we support our sponsors because our sponsors support us.
 BOGO Bonaza: Enjoy state-of-the-art VoIP service with a $10 credit and half-price SIP service on up to $500 of Skyetel trunking with free number porting when you fund your Skyetel account. No limits on number of simultaneous calls. Quadruple data center redundancy. $25 monthly minimum spend required. Tutorial and sign up details are here.
![]() The lynchpin of Incredible PBX 2020 and beyond is ClearlyIP components which bring management of FreePBX modules and SIP phone integration to a level never before available with any other Asterisk distribution. And now you can configure and reconfigure your new Incredible PBX phones from the convenience of the Incredible PBX GUI.
The lynchpin of Incredible PBX 2020 and beyond is ClearlyIP components which bring management of FreePBX modules and SIP phone integration to a level never before available with any other Asterisk distribution. And now you can configure and reconfigure your new Incredible PBX phones from the convenience of the Incredible PBX GUI.
 VitalPBX is perhaps the fastest-growing PBX offering based upon Asterisk with an installed presence in more than 100 countries worldwide. VitalPBX has generously provided a customized White Label version of Incredible PBX tailored for use with all Incredible PBX and VitalPBX custom applications. Follow this link for a free test drive!
 Special Thanks to Vitelity. Vitelity is now Voyant Communications and has halted new registrations for the time being. Our special thanks to Vitelity for their unwavering financial support over many years and to the many Nerd Vittles readers who continue to enjoy the benefits of their service offerings. We will keep everyone posted on further developments.
Some Recent Nerd Vittles Articles of Interest…
- Many of our purchase links refer users to Amazon when we find their prices are competitive for the recommended products. Nerd Vittles receives a small referral fee from Amazon to help cover the costs of our blog. We never recommend particular products solely to generate Amazon commissions. However, when pricing is comparable or availability is favorable, we support Amazon because Amazon supports us. [↩]


My friend you know how run virtual box in Ms windows as daemon?, thank U. 😉
Incredible PBX 11.1 Virtual Machine for VMware (Player, Workstation, and ESXi) is now available. http://nerd.bz/VnBW43
Incredible PBX 11.1.2 Virtual Machine for VMware addressing the Asterisk security vulnerabilities is now available on SourceForge. http://nerd.bz/W1MOao
The file INCREDIBLEPBX11aa is corrupted at the source. The file size and checksums listed below…
MD5: 79ed22b02eeb221b1ecdb6412cd096f4
SHA1: 6dceff38bf86ac5d96a3d0e9ffc387a43de14643 incrediblepbx11aa
[WM: I’m not sure what you downloaded, but you should be using Incredible PBX 11.1.2. The checksums are provided in the readme file and also can be viewed by clicking on the i to the right of each filename. Good luck.]
Why is this so CPU intensive, I’ve run this on quad core 3ghz and when i’m running this its using all cores at like 98% surely this program doesn’t need so much resources??
[WM: If you notice that CPU usage is pegged in the FreePBX System Status or when you run top as root, then issue the following command: service iaxmodem restart. That usually fixes it until reboot. For a permanent fix: echo "service iaxmodem restart" >> /etc/rc.d/rc.local ]
Thanks. Yes that’s done the trick. Can this system use the SRTP and ZRTP encryption, and which works the best/stable?
After testing out this virtual machine and making all the settings, is there any way I can move this onto a real machine?
[WM: Sure. Build up a stand-alone machine with the same versions of Asterisk, FreePBX, and Incredible PBX. Then use Incredible Backup 11 and Incredible Restore to move everything else over.]
replaced my existing Older asterisk install with this VM. Works great with one exception. When outbound with Google voice, I do not get any ringing when calling.. just dead until someone answers. Not sure where to look to fix that. Happens with any device I use. Was using yate with old asterisk, using built in google voice this time with the VM above. any advise?