
In our never-ending trek to build the Perfect PBX™, we have another installment for you today featuring VMware’s just released vSphere Hypervisor 5.5 (ESXi). And, yes, there’s still a free ESXi version with a free license available here. But, unlike VirtualBox, you’ll need a dedicated (beefy) server on which to install ESXi. Be sure to register on the site and obtain then install the unrestricted license, or you’re SOL after the short eval period. We’ve built an ESXi appliance which installs in under 5 minutes featuring the latest, greatest PIAF-Green with a CentOS® 6.4 LAMP stack (32-bit), Asterisk® 11.5.1, and FreePBX® 2.11. This 2.0.6.4.4 release also has a number of new security patches including a new Linux kernel that’s been patched to eliminate the reported zero-day vulnerability. If this is your first experience with our virtual machine builds, we’re not talking about a crippled telephony platform with limited functionality. What you’ll have is the same platform that hundreds of thousands of organizations use to run their corporate phone systems. And, if you want the Incredible PBX™ feature set with literally dozens of open source telephony applications including news, weather, stocks, tide reports, SMS messaging, free faxing with Incredible Fax™, telephone reminders, wakeup calls, and more then just add a couple minutes to run two one-click installers. Welcome to the world of open source!
The real beauty of PBX in a Flash has not been that someone with sufficient expertise couldn’t assemble something just as good or even better. Watch the AstriCon presentations from last year if you have any doubts. And, just a reminder that’s it’s almost AstriCon time again. Come join us to celebrate the 10th Anniversary. You’ll find a registration discount coupon at the end of this article. The beauty of PBX in a Flash is it puts this technology down where the goats can get it. PIAF provides a toolset that encourages further development by simplifying the learning curve for a broad cross-section of the VoIP community while not compromising functionality or flexibility. The source code for the major components is included in the build so you can customize and recompile Asterisk or load a new version of Asterisk or any additional Linux app in minutes without losing your existing setup.
When it comes to support, we have literally hundreds of gurus on the PIAF Forum. That doesn’t mean any particular person or group knows everything. It’s merely a designation that a particular individual is an expert at something. The collective wisdom of the group is what makes PBX in a Flash as a project better because we’ve put in place a platform that experts from many different disciplines can build upon without needing to learn everything about everything. Simply stated, you can be a terrific chef without knowing how to build a stove!
The latest Asterisk® 11 and FreePBX® 2.11 releases are a remarkable step forward both in terms of toolset and in the new mindset of the development community. They are as close to bug-free as any software product ever can be, and that’s obviously a good thing. For our part, we want to get our latest release of PBX in a Flash with CentOS 6.4, Asterisk 11 and FreePBX 2.11 release into as many hands as possible. Many of our readers have existing VMware platforms in their businesses so today’s installment makes PIAF deployment a breeze whether you just want to kick the tires or deploy it in a production environment.
The Ultimate VoIP Appliance: PIAF-Green Virtual Machine for ESXi
Today brings us to yet another plateau in the virtual machine development era. Because most major companies already have a VMware platform in place, we’ll begin by walking you through the 5-minute exercise to install the PIAF-Green appliance. If you’re new to VMware and want to deploy an EXSi server on which to run PIAF-Green, then skip over the PIAF-Green install procedure for the time being. Jump down to the section where we walk you through bringing up your own ESXi server, and then return here once your ESXi server is humming along. Let us hasten to add that we make no claims with regard to VMware expertise. If you need help with VMware, head over to the PIAF Forum and chat with our VMware gurus. We’re not one of them.
To install the PIAF-Green Virtual Machine for ESXi, there are six simple steps:
- Download the ESXi PIAF-Green .ova template from SourceForge
- Verify checksums for downloaded ESXi PIAF-Green .ova template
- Deploy the PIAF-Green Template on ESXi using vSphere Client
- Start PIAF-Green appliance
- Login using Virtual Machine Console
- Complete the PIAF-Green Setup Checklist
Installing the PIAF-Green Virtual Machine for ESXi
1. Download the PIAF-Green Open Virtualization Appliance (.ova) for ESXi from SourceForge. Do not confuse it with our OVA appliance for VirtualBox. They’re not the same!
2. Verify the checksums for the 32-bit .ova appliance to be sure everything got downloaded properly. To check the MD5/SHA1 checksums in Windows, download and run Microsoft’s File Checksum Integrity Verifier.
For Mac or Linux desktops, open a Terminal window, change to the directory in which you downloaded the .ova file of your choice, and type the following commands:
md5 PIAF-Green-32.ova (use md5sum for Linux)

openssl sha1 PIAF-Green-32.ova
The correct MD5 checksum for PIAF-Green-32.ova is 2ba3a84d3be3167274308342f73a7a1f. The correct SHA1 checksum for PIAF-Green-32 is b79f2a96b65465337ddda5426e4a8d63982651ad. The bold portion isn’t actually shown in the i file display on SourceForge. Don’t worry about it.
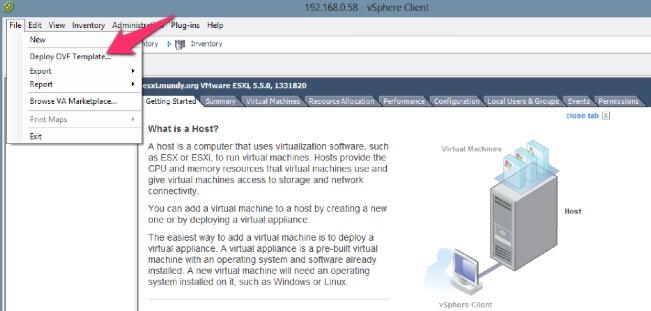
3. To deploy the template on your ESXi server, open vSphere Client on your Windows desktop. Click File -> Deploy OVF Template as shown below. Browse to the location of your downloaded template and select it. Give the virtual machine a unique name (you can have multiple VMs using the same template). Accept the Disk Format defaults and click Finish to begin the import.
Once the import is finished, you’ll see a new PIAF-Green virtual machine in the Inventory under the IP address of your ESXi server.
4. Start up the new virtual machine by highlighting it and clicking Power on Virtual Machine in the right pane of vSphere Client. You can see it at the bottom of the screenshot below.
5. Open the Virtual Machine Console by clicking on the icon as shown below. Use your mouse to click inside the console window once it opens. Then log in as root with the default password: password.
HINT: To exit from the VM Console window, press Ctrl-Alt simultaneously.

PIAF-Green Virtual Machine Setup Checklist for ESXi
Once you’ve logged into PIAF-Green, you’ll see the status window telling you what’s running and what’s not. It should look something like what’s shown below. It includes the IP address of your virtual machine. This can be used with SSH to log in from any computer on your LAN. It also is required information to log in to the PIAF and FreePBX GUIs using a browser.
Here’s what you need to know. To work in the PIAF Virtual Machine from the vSphere Console, just left-click your mouse while it is positioned inside the VM Console window. To return to your host operating system desktop, press Ctrl-Alt. Remember to always shut down PIAF gracefully! Click in the VM Console window with your mouse, log in as root, and type: shutdown -h now.
Run ESXi and Virtual Machines behind a hardware-based firewall with no Internet port exposure!
Here’s the quick PIAF Setup Checklist:
- Change your root password immediately by typing passwd
- Set up a secure maint password for FreePBX: passwd-master
- Adjust your timezone setting: /root/timezone-setup
- Decipher your PIAF-Green VM’s IP address: status
- Browser log into PIAF: Point to IP address of PIAF-Green VM
- Click on User button to display the PIAF Admin menu
- Click on the FreePBX icon to load FreePBX GUI
- When prompted for Apache username and password: Username=maint
- Password is whatever password you set up with passwd-master
Now read the latest PIAF Quick Start Guide and begin your VoIP adventure.
You can read all about the Incredible PBX 11 and Incredible Fax feature set in our recent Nerd Vittles article. If you decide you’d like to add one or both to your PIAF-Green Virtual Machine, just log into your server as root and issue the following commands. NOTE: You must install Incredible Fax after installing Incredible PBX, or you will lose the ability to install Incredible PBX at a later time. With Incredible Fax, there are a number of prompts during the install. With the exception of the prompt asking for your local area code, just press Enter at every other prompt.
cd /root

wget http://incrediblepbx.com/incrediblepbx11.gz

gunzip incrediblepbx11.gz

chmod +x incrediblepbx11

./incrediblepbx11

./incrediblefax11.sh
The Incredible PBX 11 Inventory. For those that have never heard of The Incredible PBX, here’s the current 11.0 feature set in addition to the base install of PBX in a Flash with the CentOS 6.4, Asterisk 11, FreePBX 2.11, and Apache, SendMail, MySQL, PHP, phpMyAdmin, IPtables Linux firewall, Fail2Ban, and WebMin. Incredible Fax, NeoRouter and PPTP VPNs, and all sorts of backup solutions are still just one command away and may be installed using the scripts included with Incredible PBX 11 and PBX in a Flash. Type help-pbx and browse /root for dozens of one-click install scripts.
- AsteriDex
- CallerID Superfecta (FreePBX Module adds Names to CID Numbers)
- CallWho for Asterisk (Dial 411)
- Digium Phone Support (install-digiphones)
- Preconfigured Email That Works with SendMail and Incredible Fax
- OSS Endpoint Manager
- Extensions (1 preconfigured with random password)
- Festival Server and Festival TTS for Asterisk (festival –server &)
- Flite TTS for Asterisk
- FreePBX Backups
- Google Dictionary by Phone (Dial 333)
- Google News by Phone (Dial 951)
- Google Stocks by Phone (Dial 950)
- Google Voice (FreePBX GV/Motif Module)
- Hotel-Style Wakeup Calls (FreePBX Module)
- Incredible Backups… and Restores (install-incredbackup2)
- ISN: FreeNum SIP Calling from Any Phone
- MeetMe Conference Bridge (just dial C-O-N-F)
- Mondo Full System Backups (install-diskbackup)
- Incredible Fax 11 (/root/incrediblefax11.sh)
- Incremental Daily Backups (install-dailybackup)
- Munin Reports (install-munin)
- NeoRouter VPN Client (nrclientcmd)
- NewsClips from Yahoo
- ODBC Database Support (Dial 222, 223)
- OpenFire Instant Messaging & Chat Server (install-openfire)
- New PBX in a Flash Registry (show-registry)
- PPTP VPN for PIAF (/root/install-pptp)
- Reminders by Phone and Web
- SAMBA Windows Networking (configure-samba)
- SMS Dictator with Google Voice (Dial S-M-S)
- Speech-to-Text Directory Assistance (Dial 411)
- Stealth AutoAttendant
- TFTP Server (setup-tftp)
- Tide Reports with xTide (Dial T-I-D-E)
- Travelin’ Man 2 & 3 (Secure, remote access)
- Trunks (Vitelity, Gtalk, SIPgate, IPkall, VoIP.ms, and more)
- Weather by ZIP Code
- Worldwide Weather by Phone (Dial 949)
- Wolfram Alpha by Phone (/root/wolfram)
Unlike the dedicated machine platforms and OpenVZ compromises of years past, today’s PIAF-Green Virtual Machine is state-of-the-art giving you everything a bare metal install from source code would have provided. Most importantly, the components are truly portable. They can be exported and copied to an external USB drive or flash drive for instant portability for use on any ESXi server.
Installing VMware Tools (optional). If you wish to install VMware Tools in your Virtual Machine, here’s the two-step procedure. First, enable the tools in vSphere Client: VM -> Guest -> Install VMware Tools. See image below. Then log in to your virtual machine in the console and issue the following commands:
cd /mnt

mkdir cdrom

mount /dev/cdrom /mnt/cdrom

cd /tmp

tar zxvf /mnt/cdrom/VMware*

cd vmware-tools-distrib

./vmware-install.pl
Introducing vSphere Hypervisor 5.5 (ESXi)
We’re late to the party (again), but VMware’s latest ESXi platform is quite impressive. Because there’s a free version, we wanted to walk through the installation scenario just in case you have a spare (beefy) server sitting around gathering dust. Security is always our primary concern, and you are well-advised to install ESXi behind a secure, hardware-based firewall with no Internet port exposure to your ESXi server or its virtual machines!
There are dozens of VMware products and add-ons for the ESXi platform. Almost all of them cost money, lots of it. If your company is considering a move to VMware, then the free ESXi platform is a good way to get your feet wet. Before you make purchasing decisions, you really need to hire a VMware consultant. It could save you tens of thousands of dollars.
For today, our focus is getting a free ESXi platform in place to run PBX in a Flash virtual machines. Here’s what you’ll need: a server, the vSphere Hypervisor 5.5 ESXi ISO, a free license for ESXi, and the vSphere Client for Windows. All are free, but you do have to register for an account on the VMware web site. A web client is also available for dedicated Mac and Linux users. See the VMware site for details.
ESXi comes with a short-term license to let you try the application. Once you register for an account on the VMware web site, you also can obtain a full license here at no cost. Don’t put it off. Once your short-term eval license expires, you’re dead in the water unless you previously have installed the free, unrestricted license.
Installing ESXi. Here are the steps to get yourself in the (free) ESXi business:
- Download the ESXi ISO and burn it to a CD/DVD
- Obtain permanent license key from VMware
- Boot your server from the CD and answer the (easy) prompts
- When install finishes, remove CD and reboot
- Start up ESXi and log in as root with your new password
- Write down the IP address of your server
- Your temporary license key (only) is now active
- Using a browser, access your ESXi server by its IP address
- Click on the provided link to download and install the vSphere Client
- Open vSphere Client on Windows Desktop and login as root with same password
Registering Your ESXi License Key. Once the vSphere Client is open on your desktop…
- Select Configuration tab
- Click Software and choose Licensed Features
- Click Edit link in the top right hand corner as shown below
- Choose: Assign a new license key to this host
- Enter the license key you obtained from VMware
- Click OK to save your changes
- Make sure your key was accepted and is displayed
Getting Support. If you need help or have tips with regard to this tutorial, please visit this thread on the PIAF Forum and post your comments. Enjoy!
Deals of the Week. There are a couple of amazing deals still on the street, but you’d better hurry. First, for new customers, Sangoma is offering a board of your choice from a very impressive list at 75% off. For details, see this thread on the PIAF Forum. Second, a new company called Copy.com is offering 20GB of free cloud storage with no restrictions on file size uploads (which are all too common with other free offers). Copy.com has free sync apps for Windows, Macs, and Linux systems. To take advantage of the offer, just click on our referral link here. We get 5GB of extra storage, too, which will help avoid another PIAF Forum disaster.
Originally published: Tuesday, September 24, 2013
Need help with Asterisk? Visit the PBX in a Flash Forum.
We are pleased to once again be able to offer Nerd Vittles’ readers a 20% discount on registration to attend this year’s 10th Anniversary AstriCon in Atlanta. And, if you hurry, you also can take advantage of the early bird registration discount. Here’s the Nerd Vittles Discount Code: AC13NERD.
Special Thanks to Our Generous Sponsors
FULL DISCLOSURE: ClearlyIP, Skyetel, Vitelity, DigitalOcean, Vultr, VoIP.ms, 3CX, Sangoma, TelecomsXchange and VitalPBX have provided financial support to Nerd Vittles and our open source projects through advertising, referral revenue, and/or merchandise. As an Amazon Associate and Best Buy Affiliate, we also earn from qualifying purchases. We’ve chosen these providers not the other way around. Our decisions are based upon their corporate reputation and the quality of their offerings and pricing. Our recommendations regarding technology are reached without regard to financial compensation except in situations in which comparable products at comparable pricing are available from multiple sources. In this limited case, we support our sponsors because our sponsors support us.
BOGO Bonaza: Enjoy state-of-the-art VoIP service with a $10 credit and half-price SIP service on up to $500 of Skyetel trunking with free number porting when you fund your Skyetel account. No limits on number of simultaneous calls. Quadruple data center redundancy. $25 monthly minimum spend required. Tutorial and sign up details are here.
The lynchpin of Incredible PBX 2020 and beyond is ClearlyIP components which bring management of FreePBX modules and SIP phone integration to a level never before available with any other Asterisk distribution. And now you can configure and reconfigure your new Incredible PBX phones from the convenience of the Incredible PBX GUI.
VitalPBX is perhaps the fastest-growing PBX offering based upon Asterisk with an installed presence in more than 100 countries worldwide. VitalPBX has generously provided a customized White Label version of Incredible PBX tailored for use with all Incredible PBX and VitalPBX custom applications. Follow this link for a free test drive!
Special Thanks to Vitelity. Vitelity is now Voyant Communications and has halted new registrations for the time being. Our special thanks to Vitelity for their unwavering financial support over many years and to the many Nerd Vittles readers who continue to enjoy the benefits of their service offerings. We will keep everyone posted on further developments.
Some Recent Nerd Vittles Articles of Interest…
FYI: As a user of VMware products the last 10 years or so the VMware Tools should always be installed.
You solved my problem with PIAF : )
Thank you so much Ward