

No. We’re not going to make you relive the 1970’s with us today although now you can listen to this Number 1 Hit and a million others for free with Amazon’s new Prime Music. No, we don’t get a commission if you sign up for Amazon Prime. Yes, we make millions when you buy something from Amazon using our links. Thank you! What we have for you today is a Number 1 Utility, and it works on virtually any Linux platform. If your fraternity or sorority had a secret knock to gain access, then you already know the basic concept. Port Knocker (aka knockd) from Judd Vinet is a terrific utility that runs as a daemon on your server and does just what you’d expect. It listens for knocks. When it detects three knocks on the correct three ports in the proper sequence and from the same IP address, it opens the IPtables Linux Firewall for remote access from that IP address to your server for a predefined period of time. This would allow you to log into your server with SSH or make SIP phone calls using a softphone registered to your remote Asterisk® server. What makes Port Knocker especially useful is the existence of knocking clients for virtually any smartphone, tablet, or desktop computer. For the Travelin’ Man, it’s another must have utility.
We introduced a turnkey implementation of Port Knocker in Incredible PBX for Ubuntu 14 late last week. If you were a pioneer earlier in the week, go back and install it again to take advantage of Port Knocker. Or better yet, follow along and we’ll show you how to install it on your own RedHat/CentOS or Ubuntu/Debian server in just a couple of minutes.
Prerequisites. We’ve built open source installation scripts for both the RedHat/CentOS platform as well as the Ubuntu/Debian operating systems. These knockd installers assume that you have a fully functional and locked down IPtables firewall with an existing WhiteList of authorized users. We’d recommend Travelin’ Man 3 if you need to deploy this technology and haven’t done so already. Last week’s Incredible PBX for Ubuntu 14 already includes Travelin’ Man 3 whitelisting technology. Read the article for full details.
Today’s knockd installers are fairly generic but, if you’re running a version of CentOS earlier than 6.x or Ubuntu earlier than 14 or Debian.anything, be advised that we haven’t tested these installers on those platforms so you’re on your own. Finally, if your server is sitting behind a hardware-based firewall (as we ALWAYS recommend), then you’ll also need to map the service you wish to access (e.g. UDP 5060 for SIP or TCP 22 for SSH) plus the three TCP ports from your hardware-based firewall to your server so that legitimate "knocks" can find their way to your server. The "knock" ports themselves do not need to be opened in your IPtables firewall configuration! We’re just knocking, not entering. 🙂
Overview. As configured, today’s installation scripts will install and preconfigure knockd to load automatically when you boot up your server. Three random TCP ports will be assigned for your server, and this port sequence is what remote users will need to have in order to gain access. Yes, you can change almost everything. How secure is it? Well, we’re randomizing the 3-port knock sequence using over 3,900 ports so you can do the math to figure out the odds of a bad guy guessing the correct sequence. HINT: 3900 x 3900 x 3900. Keep in mind that these "knocks" must all be received from the same IP address within a 15-second window. So sleep well but treat the port sequence just as if it were a password. It is! Once a successful knock sequence has been received, the default Port Knocker configuration will open all ports on your server for remote access from the knocking IP address for a period of one hour. During this time, "The Knocker" can log in using SSH or make SIP calls using trunks or extensions on the server. Port Knocker does not alleviate the need to have legitimate credentials to log into your server. It merely opens the door so that you can use them. At the bewitching (end of the) hour, all ports will be closed for this IP address unless "The Knocker" adds a whitelist entry for the IP address to IPtables during the open period. Yes, all of this can be modified to meet your individual requirements. For example, the setup could limit the range of ports available to "The Knocker." Or the setup could leave the ports open indefinitely until another series of knocks were received telling knockd to close the IPtables connection. Or perhaps you would want to leave the ports open for a full day or a week instead of an hour. We’ll show you how to modify all of the settings.
Server Installation. To get started, log into your server as root and download and run the appropriate installer for your operating system platform.
For RedHat/Fedora/CentOS/ScientificLinux servers, issue the following commands:
cd /root
wget http://nerdvittles.com/wp-content/knock-R.tar.gz
tar zxvf knock*
rm knock-R.tar.gz
./knock*
For Ubuntu/Debian servers, issue the following commands:
cd /root
wget http://nerdvittles.com/wp-content/knock-U.tar.gz
tar zxvf knock*
rm knock-U.tar.gz
./knock*
For ARM-based servers, issue the following commands:
cd /root
wget http://nerdvittles.com/wp-content/knock-ARM.tar.gz
tar zxvf knock*
rm knock-ARM.tar.gz
./knock*
Server Navigation Guide. On both the RedHat/CentOS/Fedora and Ubuntu/Debian platforms, the knockd configuration is managed in /etc/knockd.conf. Before making changes, always shutdown knockd. Then make your changes. Then restart knockd. On RedHat systems, use service knockd stop and start. On Ubuntu, use /etc/init.d/knockd stop and start. By default, knockd monitors activity on eth0. If your setup is different, on Ubuntu, you’ll need to change the port in /etc/default/knockd: KNOCKD_OPTS="-i wlan0". On RedHat, the config file to modify is /etc/sysconfig/knockd and the syntax: OPTIONS="-i venet0:0".
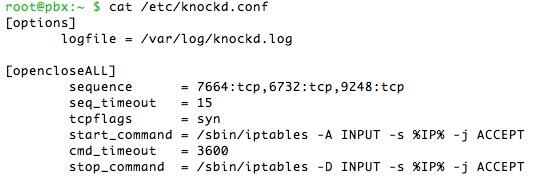
In /etc/knockd.conf, create an additional context to either start or stop an activity. It can also be used do both as shown in the example code above. More examples here. There’s no reason these activities have to be limited to opening and closing the IPtables firewall ports. You could also use a knock sequence to turn on home lighting or a sprinkler system with the proper software on your server.
To change the knock ports, edit sequence. Both tcp and udp ports are supported. seq_timeout is the number of seconds knockd waits for the complete knock sequence before discarding what it’s already received. We’ve had better luck on more servers setting tcpflags=syn. start_command is the command to be executed when the sequence matches. cmd_timeout and stop_command tell knockd what to do after a certain number of seconds have elapsed since the start_command was initiated. If you’re only starting or stopping some activity (rather than both), use command instead of start_command and stop_command to specify the activity.
IPtables 101. The default setup gives complete server access to anyone that gets the knock right. That doesn’t mean they get in. In the PIAF World, it means they get rights equivalent to what someone else on your LAN would have, i.e. they can attempt to log in or they can use a browser to access FreePBX® provided they know the server’s root or FreePBX credentials.
If you would prefer to limit access to a single port or just a few ports, you can modify command or start_command and stop_command. Here are a few examples to get you started.
To open SSH access (TCP port 22):
/sbin/iptables -A INPUT -s %IP% -p tcp --dport 22 -j ACCEPT
To close SSH access (TCP port 22):
/sbin/iptables -D INPUT -s %IP% -p tcp --dport 22 -j ACCEPT
To open a range of SIP ports (UDP 5060 to 5069):
/sbin/iptables -A INPUT -s %IP% -p udp --dport 5060:5069 -j ACCEPT
To close a range of SIP ports (UDP 5060 to 5069):
/sbin/iptables -D INPUT -s %IP% -p udp --dport 5060:5069 -j ACCEPT
Here’s a gotcha to be aware of. If you’re using the Travelin’ Man 3 WhiteList setup on your server, be especially careful in crafting your IPtables rules so that you don’t accidentally remove an existing Travelin’ Man 3 rule in closing some port with knockd. You will note that the syntax of the knockd commands is intentionally a bit different than what you will find in your Travelin’ Man 3 setup. This avoids clobbering something accidentally.
Monitoring Activity. Here are the two best tools to monitor knockd activity to make certain your setup is performing as expected. The knockd log (/var/log/knockd.log) will tell you when a knocking attempt has occurred and whether it was successful:
[2014-07-06 14:44] starting up, listening on eth0

[2014-07-06 15:29] 79.299.148.11: opencloseSSH: Stage 1

[2014-07-06 15:29] 79.299.148.11: opencloseSSH: Stage 2

[2014-07-06 15:29] 79.299.148.11: opencloseSSH: Stage 3

[2014-07-06 15:29] 79.299.148.11: opencloseSSH: OPEN SESAME

[2014-07-06 15:29] opencloseSSH: running command: /sbin/iptables -A INPUT -s 79.299.148.11 -p tcp --dport 22 -j ACCEPT
Next, verify that the IPtables command did what it was supposed to do. iptables -nL will tell you whether port 22 access was, in fact, enabled for 79.299.148.11. The entry will appear just above the closing Chain entries in the listing:
ACCEPT tcp -- 79.299.148.11 0.0.0.0/0 tcp dpt:22
Two things typically can go wrong. Either the knock from a client computer or cellphone wasn’t successful (knockd.log will tell you that) or IPtables didn’t open the port(s) requested in your knockd command (the iptables -nL query will show you that). In the latter case, it’s usually a syntax error in your knockd command. Or it could be the timing of the knocks. See /var/log/knockd.log.
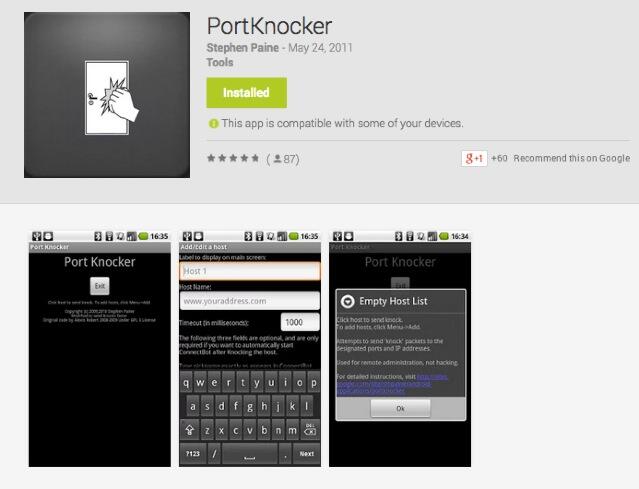
Port Knocker Clients. The idea behind Port Knocker is to make remote access easy both for system administrators and end-users. From the end-user perspective, the simplest way to do that is to load an app on the end-user’s smartphone so that even a monkey could push a button to gain remote access to a server. If the end-user’s cellphone has WiFi connectivity sitting behind a firewall in a hotel somewhere, then executing a port knock from the smartphone should open up connectivity for any other devices in the hotel room including any notebook computers and tablets. All the devices typically will have the same public IP address, and this is the IP address that will be enabled with a successful knock from the smartphone.
Gotta love Apple’s search engine. Google, they’re not…
There actually are numerous port knocking clients for both Android and iOS devices. Here are two that we’ve tested that work: PortKnock for the iPhone and iPad is 99¢ and PortKnocker for Android is free. Some clients work better than others, and some don’t work at all or work only once. DroidKnocker always worked great the first time. Then it wouldn’t work again until the smartphone was restarted. KnockOnD for the iPhone, which is free, worked fine with our office-based server but wouldn’t work at all with a cloud-based server at RentPBX. With all the clients, we had better results particularly with cloud-based servers by changing the timing between knocks to 200 or 500 milliseconds. How and when the three knocks are sent seems to matter! Of all the clients on all the platforms, PortKnocker was the least temperamental and offered the most consistent results. And you can’t beat the price. A typical setup is to specify the address of the server and the 3 ports to be knocked. Make sure you have set the correct UDP/TCP option for each of the three knocks (the default setup uses 3 TCP ports), and make sure the IP address or FQDN for your server is correct.
Another alternative is to use nmap to send the knocks from a remote computer. The knock.FAQ file in your server’s /root directory will tell you the proper commands to send to successfully execute a connection with your server’s default Port Knocker setup. Enjoy!
Originally published: Monday, July 7, 2014
 Support Issues. With any application as sophisticated as this one, you’re bound to have questions. Blog comments are a terrible place to handle support issues although we welcome general comments about our articles and software. If you have particular support issues, we encourage you to get actively involved in the PBX in a Flash Forums. It’s the best Asterisk tech support site in the business, and it’s all free! Please have a look and post your support questions there. Unlike some forums, ours is extremely friendly and is supported by literally hundreds of Asterisk gurus and thousands of users just like you. You won’t have to wait long for an answer to your question.

Need help with Asterisk? Visit the PBX in a Flash Forum.
Special Thanks to Our Generous Sponsors
FULL DISCLOSURE: ClearlyIP, Skyetel, Vitelity, DigitalOcean, Vultr, VoIP.ms, 3CX, Sangoma, TelecomsXchange and VitalPBX have provided financial support to Nerd Vittles and our open source projects through advertising, referral revenue, and/or merchandise. As an Amazon Associate and Best Buy Affiliate, we also earn from qualifying purchases. We’ve chosen these providers not the other way around. Our decisions are based upon their corporate reputation and the quality of their offerings and pricing. Our recommendations regarding technology are reached without regard to financial compensation except in situations in which comparable products at comparable pricing are available from multiple sources. In this limited case, we support our sponsors because our sponsors support us.
 BOGO Bonaza: Enjoy state-of-the-art VoIP service with a $10 credit and half-price SIP service on up to $500 of Skyetel trunking with free number porting when you fund your Skyetel account. No limits on number of simultaneous calls. Quadruple data center redundancy. $25 monthly minimum spend required. Tutorial and sign up details are here.
![]() The lynchpin of Incredible PBX 2020 and beyond is ClearlyIP components which bring management of FreePBX modules and SIP phone integration to a level never before available with any other Asterisk distribution. And now you can configure and reconfigure your new Incredible PBX phones from the convenience of the Incredible PBX GUI.
The lynchpin of Incredible PBX 2020 and beyond is ClearlyIP components which bring management of FreePBX modules and SIP phone integration to a level never before available with any other Asterisk distribution. And now you can configure and reconfigure your new Incredible PBX phones from the convenience of the Incredible PBX GUI.
 VitalPBX is perhaps the fastest-growing PBX offering based upon Asterisk with an installed presence in more than 100 countries worldwide. VitalPBX has generously provided a customized White Label version of Incredible PBX tailored for use with all Incredible PBX and VitalPBX custom applications. Follow this link for a free test drive!
 Special Thanks to Vitelity. Vitelity is now Voyant Communications and has halted new registrations for the time being. Our special thanks to Vitelity for their unwavering financial support over many years and to the many Nerd Vittles readers who continue to enjoy the benefits of their service offerings. We will keep everyone posted on further developments.
Some Recent Nerd Vittles Articles of Interest…


