
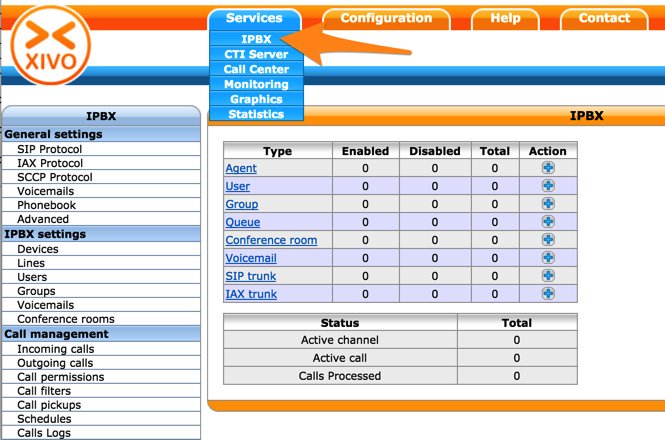
These are the first steps to complete after you have finished your initial XiVO installation and firewall configuration. Log into the web interface at the IP address of your server using username root and the web password created during installation. All of this initial setup will be completed under the IPBX option of the Services tab as shown below. For each of the categories below, click on the matching section and tab in XiVO’s IPBX toolbar and fill in the properties as indicated.
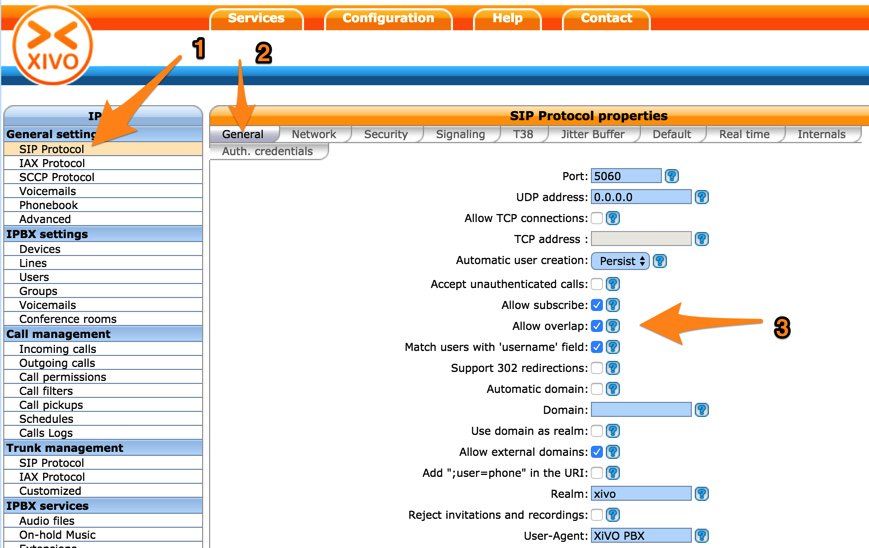
General Settings:SIP Protocol
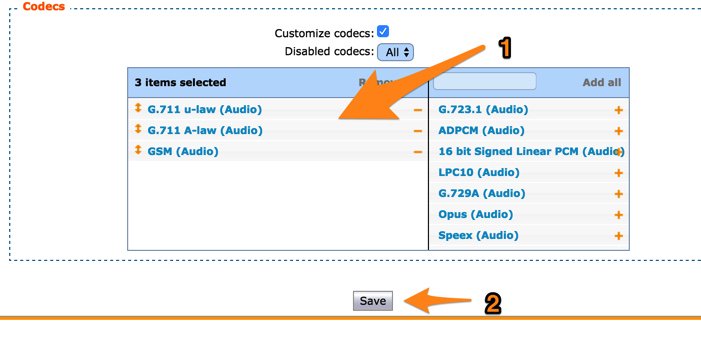
General Settings:SIP Protocol:Signaling (Default Codecs)
In order of priority, move desired Codecs from right to left by clicking on + icons. If you plan to use the IAX or SCCP protocol for phones and/or trunks, also select Default Codecs under General Settings:IAX Protocol:Default and General Settings:SCCP Protocol tabs, respectively.
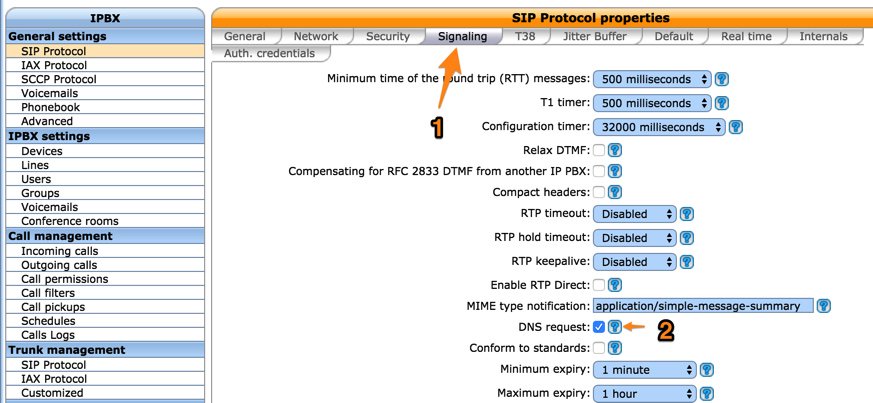
General Settings:SIP Protocol:Signaling (DNS Manager/srvlookup)
For DNS Manager and Server Lookup support (required for some SIP providers), enable the DNS Request field:
General Settings:Advanced (Time Zone)

IPBX Settings:Users (Creating a Default User Account)
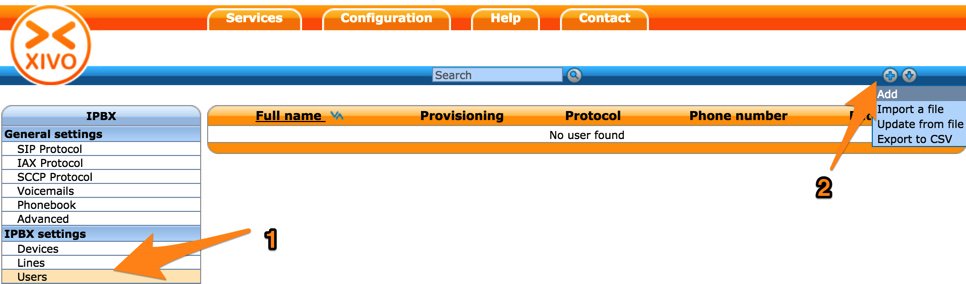
Before you can actually make or receive calls with XiVO PBX, you’ll first need at least one User, Extension, and Line. So click on the (1) Users tab and then (2) the + icon and Add option (as shown below) to get started.
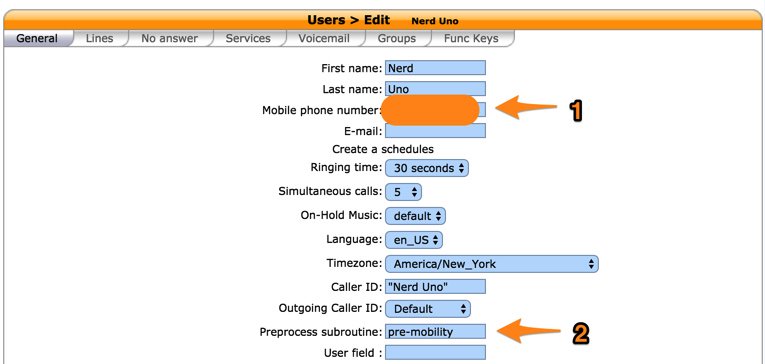
Use the General tab entries below as a guide to create your first user account. You only need to fill in options (1) and (2) if you would like this user to receive a simultaneous call on a mobile phone whenever this user’s internal phone rings.
In the Lines tab, assign an internal phone number for this user. By default, the initial configuration script created a range of extension numbers for you: 701-799. This can be changed in the next section to meet your specific requirements.
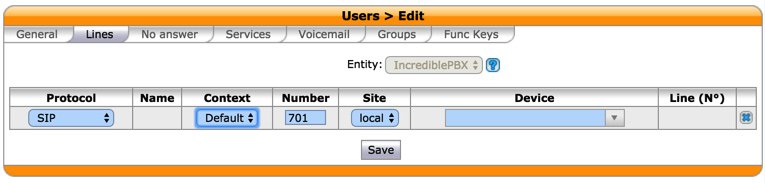
Once you’ve chosen an extension, click the Save button and a Line will automatically be generated to associate with your new User account.
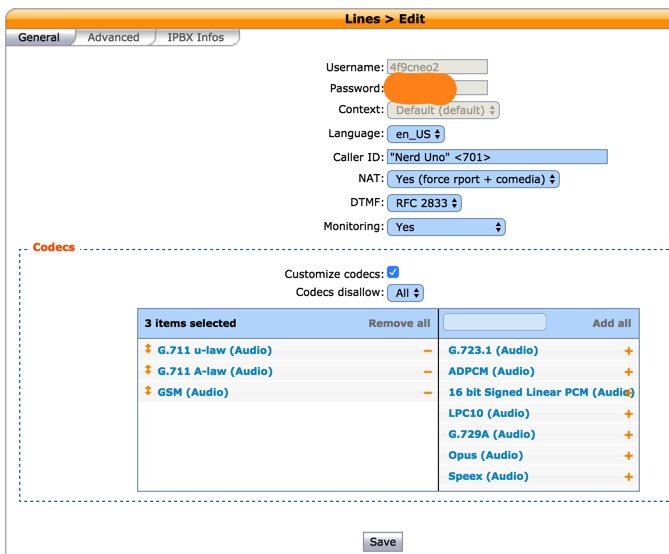
Next, goto IPX Settings:Lines and click the pencil icon to obtain your SIP username and password credentials. You’ll need these to connect a SIP phone or softphone to your user account.

While you’re obtaining your username and password SIP credentials, fill in the blanks for the Line and click Save:
IPX Settings:Users (Voicemail Setup)
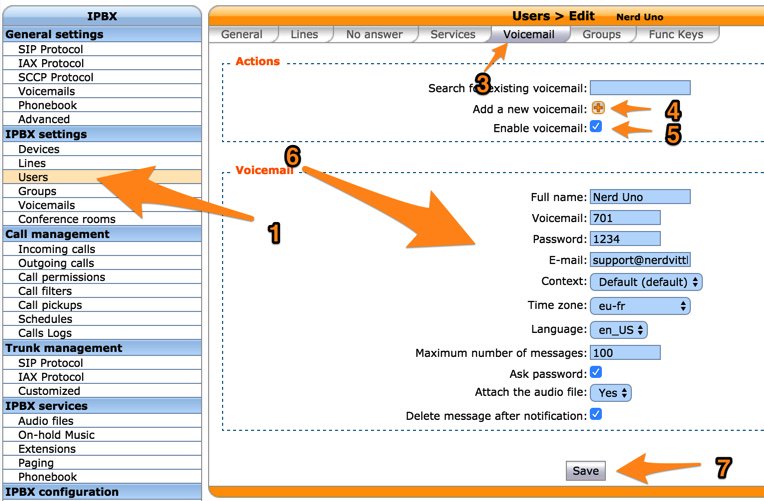
Go to (1) IPX Settings:Users, edit your (2) User account, and click the (3) Voicemail tab. (4) Click the + icon to Add a new Voicemail account. (5) Check Enable Voicemail. (6) Fill in the form using the sample below. Uncheck Delete message after notification to retrieve voicemail messages by dialing *98 from an extension. (7) Click Save.
IPBX Configuration:Contexts
XiVO differs from some other Asterisk implementations in the way it manages the routing of calls. XiVO uses Contexts to define what constitute Internal calls (Default), External calls (Outcalls), and Incoming calls (Incalls). Think of these contexts as dialing rules. They define how the three categories of calls are managed internally by the XiVO PBX and determine which callers can do what with your PBX resources. XiVO uses dial strings and ranges of phone numbers to manage and constrain how various classes of calls are routed. The reason for these call specifications is pretty simple. You don’t want outside callers dialing into your PBX and making outbound calls using your PBX trunks on your nickel.

Some basic settings to enable internal calls and allow creation of user accounts were configured when you set up your XiVO PBX by running the configuration script. However, before anyone can make or receive calls to/from outside the XiVO PBX, you’ll need some additional specifications.
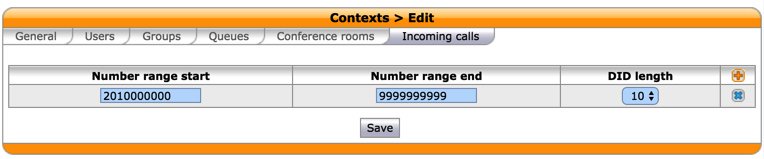
Edit the from-extern (Incalls) context and click Incoming Calls tab then the + icon. Add a range of DID numbers for incoming calls that will be allowed. These are the phone numbers assigned to SIP and IAX trunks that were acquired through commercial providers such as Vitelity. Click Save once you’ve entered your settings.
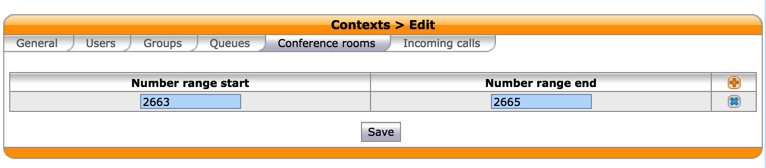
Let’s also modify the Default context to support MeetMe conferencing for your server. Edit the default context and click Conference Rooms tab then + icon. For the extension range, enter 2663-2665. 2663 spells C-O-N-F by the way. Then click Save. If you have a DAHDI timing source on your server, you then can add conferences: IPBX Setting:Conference Rooms. If you don’t have a DAHDI timing source or you don’t know what any of this means, keep reading. There’s an easier way to set up a conference room for your users.
IMPORTANT: If you want to use the new (beta) Incredible PBX installer to complete your installation, stop here, activate your Trunks and Incoming and Outgoing Routes. Then download the Incredible PBX installer and run it. If you’re a do-it-yourself type, continue on with the manual installation procedure below.
Activating Asterisk DNS Manager
From the Linux CLI, activate the Asterisk DNS Manager:
 echo [general] >> /etc/asterisk/dnsmgr.conf
 echo enable=yes >> /etc/asterisk/dnsmgr.conf
 chown asterisk:www-data /etc/asterisk/dnsmgr.conf
 /etc/init.d/asterisk restart
 asterisk -rx "dnsmgr status"
Adding Music on Hold to XiVO
By default, XiVO doesn’t come with any music on hold. Fortunately, Digium has negotiated a music on hold license that you can use to add it to your PBX at no cost. While logged into your XiVO PBX as root, issue the following commands:
cd /
wget http://incrediblepbx.com/moh-xivo.tar.gz
tar zxvf moh-xivo.tar.gz
/etc/init.d/asterisk restart
Adding SQLite3 to Support Incredible PBX Applications
XiVO doesn’t use MySQL or MariaDB for its database management tasks. Instead, the XiVO development team chose PostGreSQL which is equally powerful, but different. For the Incredible PBX application suite, we’ve chosen to rewrite the ones that depend upon MySQL so that they can run under SQLite3 which is considerably less processor intensive than running both PostGreSQL and MySQL 24/7. We also didn’t want to interfere with the PostGreSQL setup of XiVO since it is an integral component of the product and will get upgraded automatically as part of the regular XiVO upgrade cycle.
Here’s how to put the SQLite3 and corresponding ODBC components in place on your new server. While logged into your server as root, simply issue the following commands:
cd /
wget http://incrediblepbx.com/sqlite3-xivo.tar.gz
tar zxvf sqlite3-xivo*
rm -f sqlite3-xivo.tar.gz
cd /root
./sqlite3-xivo.sh
And here are a couple SQLite3 queries to get you started with syntax:
sqlite3 /var/lib/asterisk/agi-bin/zipcodes.sqlite "select zip,city,state from zipcodes where zip=29401;"
sqlite3 /var/lib/asterisk/agi-bin/asteridex.sqlite 'select name,out from user1 where name LIKE "%Airlines%";'
A bonus script in /root will let you convert existing MySQL databases to SQLite3. For example, if you’re currently using AsteriDex on another Incredible PBX platform, it only takes a couple seconds to convert your MySQL database to SQLite3. The syntax to run the script looks like this:
./mysql2sqlite3.sh -u root -ppassw0rd yourdatabase | sqlite3 yourdatabase.sqlite
Move the script to the server on which your existing MySQL databases are stored and run it there using the above syntax. Then copy the asteridex.sqlite file to your XiVO server and save it in /var/lib/asterisk/agi-bin.
Installing and Activating the Festival TTS Engine with Asterisk
Many of the Incredible PBX applications rely upon text-to-speech and/or voice recognition (speech-to-text) to work their magic. Neither comes installed with XiVO by default, but Asterisk was properly configured to support Festival so let’s work with that. Festival is the Big Brother of FLITE and includes some additional voices of fairly good quality.
To get Festival installed and activated for use with Asterisk, issue these commands:
cd /
wget http://incrediblepbx.com/festival-xivo.tar.gz
tar zxvf festival-xivo.tar.gz
cd /root
./festival-xivo.sh
# verify that test.wav below is not a 0-byte file
echo "This is a test." | /usr/bin/text2wave -F 8000 -o /tmp/test.wav
ls -all /tmp/test.wav
Adding Asterisk ULAW Sound Files to Your XiVO PBX
At least for us, the default sound files distributed with XiVO didn’t work. Here’s how to add the ulaw versions of all the files to your server:
cd /usr/share/asterisk/sounds/en
wget http://downloads.asterisk.org/pub/telephony/sounds/asterisk-extra-sounds-en-ulaw-current.tar.gz
wget http://downloads.asterisk.org/pub/telephony/sounds/asterisk-core-sounds-en-ulaw-current.tar.gz
tar zxvf asterisk-extra-sounds-en-ulaw-current.tar.gz
tar zxvf asterisk-core-sounds-en-ulaw-current.tar.gz
rm -f *.tar.gz
chown asterisk:asterisk *.ulaw
Installing Dial Plan Code for Sample Incredible PBX Applications
To put the available Incredible PBX Dial Plan Code and IVR in place and load the PHP/AGI components necessary to make the sample applications work, issue these commands:
cd /etc/asterisk/extensions_extra.d
wget http://incrediblepbx.com/configfiles.tar.gz
tar zxvf configfiles.tar.gz
rm -f configfiles.tar.gz
cd /var/lib/asterisk/agi-bin
wget http://incrediblepbx.com/agibin.tar.gz
tar zxvf agibin.tar.gz
rm -f agibin.tar.gz
cd /var/lib/xivo/sounds/playback
wget http://incrediblepbx.com/ivr-Allison.tar.gz
tar zxvf ivr-Allison.tar.gz
rm -f ivr-Allison.tar.gz
cd /root
wget http://incrediblepbx.com/COPYING
/etc/init.d/asterisk restart
Incredible PBX Application Quick Start Guide
Here’s a quick list of the Incredible PBX applications that are installed or available and what they do. There’s also a link for more information. This remains a work-in-progress so expect more applications in coming weeks.
- CallerID Superfecta – Match Names to CallerID Numbers
- Caller Blacklist – Block Calls from Spammers and Old Girlfriends
- CDR Reports in CSV Format
- CDR Reports in SQLite3 Format
- Asteridex – The Poor Man’s Rolodex (SQLite3 version)
- AsteriDex Click-to-Dial with XiVO Phonebook
- NeoRouter VPN for XiVO
- Dial 951 – Latest Yahoo News
- Dial 947 – Weather Forecasts by ZIP Code
- Dial 411 – Call by Name from AsteriDex
- Dial 2663 – Conference Call
- Dial 4871 – Allison’s Sample IVR
- Dial 53669 – Meet Lenny, the Robocaller’s Worst Nightmare
Installing and Activating Voice Recognition for XiVO
Google has changed the licensing of their speech recognition engine about as many times as you change diapers on a newborn baby. Today’s rule restricts use to “personal and development use.” Assuming you qualify, the very first order of business is to enable speech recognition for your XiVO PBX. Once enabled, the Incredible PBX feature set grows exponentially. You’ll ultimately have access to the Voice Dialer for AsteriDex, Worldwide Weather Reports where you can say the name of a city and state or province to get a weather forecast for almost anywhere, Wolfram Alpha for a Siri-like encyclopedia for your PBX, and Lefteris Zafiris’ speech recognition software to build additional Asterisk apps limited only by your imagination. And, rumor has it, Google is about to announce new licensing terms, but we’re not there yet. To try out the Voice Dialer in today’s demo IVR, you’ll need to obtain a license key from Google. This Nerd Vittles tutorial will walk you through that process. Don’t forget to add your key to /var/lib/asterisk/agi-bin/speech-recog.agi on line 72.
Adding a Conference Room to XiVO
Enable a Conference Room for your users by adding the following code to your dialplan. This setup uses a Conference Bridge which requires no DAHDI timing source. Thus, it is suitable for use on virtual machines that lack a timing source. While logged into your server as root, issue the following commands:
echo ";# // BEGIN Conf 2663" >> /etc/asterisk/extensions_extra.d/xivo-extrafeatures.conf
echo "exten=2663,1,Answer" >> /etc/asterisk/extensions_extra.d/xivo-extrafeatures.conf
echo "same=n,Set(CONFBRIDGE(user,music_on_hold_when_empty)=yes)" >> /etc/asterisk/extensions_extra.d/xivo-extrafeatures.conf
echo "same=n,Set(CONFBRIDGE(user,music_on_hold_class)=default)" >> /etc/asterisk/extensions_extra.d/xivo-extrafeatures.conf
echo "same=n,ConfBridge(2663)" >> /etc/asterisk/extensions_extra.d/xivo-extrafeatures.conf
echo "same=n,Hangup" >> /etc/asterisk/extensions_extra.d/xivo-extrafeatures.conf
echo ";# // END Conf 2663" >> /etc/asterisk/extensions_extra.d/xivo-extrafeatures.conf
/etc/init.d/asterisk reload
For a more elaborate solution with password support, see this thread on voip-info.org.
Adding DISA Support to Your XiVO PBX
If you’re new to PBX lingo, DISA stands for Direct Inward System Access. As the name implies, it lets you make calls from outside your PBX using the call resources inside your PBX. This gives anybody with your DISA credentials the ability to make calls through your PBX on your nickel. It probably ranks up there as the most abused and one of the most loved features of the modern PBX.
We use two-step authentication with DISA to make it harder for the bad guys. First, the outside phone number has to match the whitelist of numbers authorized to use your DISA service. And, second, you have to supply the DISA password for your server before you get dialtone to place an outbound call. Ultimately, of course, the monkey is on your back to create a very secure DISA password and to change it regularly. If all this sounds too scary, don’t install DISA on your PBX.
1. Download the DISA dialplan script into your /root folder where it can be edited:
cd /root
wget http://incrediblepbx.com/disa-xivo.tar.gz
tar zxvf disa-xivo.tar.gz
rm -f disa-xivo.tar.gz
nano -w disa-xivo.txt
2. When the editor opens the dialplan code, move the cursor down to the following line:
exten => 3472,n,GotoIf($["${CALLERID(number)}"="701"]?disago1) ; Good guy
3. Clone the line by pressing Ctrl-K and then Ctrl-U. Add copies of the line by pressing Ctrl-U again for each phone number you’d like to whitelist so that the caller can access DISA on your server. Now edit each line and replace 701 with the 10-digit number to be whitelisted.
4. Move the cursor down to the following line and replace 12341234 with the 8-digit numeric password that callers will have to enter to access DISA on your server:
exten => 3472,n,GotoIf($["${MYCODE}" = "12341234"]?disago2:bad,1)
5. Save the dialplan changes by pressing Ctrl-X, then Y, then ENTER.
6. Now copy the dialplan code into your XiVO setup, remove any previous copies of the code, and restart Asterisk:
cd /root
sed -i '\:// BEGIN DISA:,\:// END DISA\:d' /etc/asterisk/extensions_extra.d/xivo-extrafeatures.conf
cat disa-xivo.txt >> /etc/asterisk/extensions_extra.d/xivo-extrafeatures.conf
/etc/init.d/asterisk reload
7. The traditional way to access DISA is to add it as an undisclosed option in an IVR that is assigned to one of your inbound trunks (DIDs). For the demo IVR that we installed last week, edit the ivr-1.conf configuration file and change the "option 0″ line so that it looks like this. Then SAVE your changes.
exten => 0,1(ivrsel-0),Dial(Local/3472@default)
8. Adjust the inbound calls route of one of your DIDs to point to the demo IVR by changing the destination to Customized with the following Command:
Goto(ivr-1,s,1)
Here’s how ours looks for the Nerd Vittles XiVO Demo IVR:

9. Now you should be able to call your DID and choose option 0 to access DISA assuming you have whitelisted the number from which you are calling. When prompted, enter the DISA password you assigned and press #. You then should be able to dial a 10-digit number to make an outside call from within your PBX.
SECURITY HINT: Whenever you implement a new IVR on your PBX, it’s always a good idea to call in from an outside number 13 TIMES and try every key from your phone to make sure there is no unanticipated hole in your setup. Be sure to also let the IVR timeout to see what result you get.
Setting Up a Softphone or WebRTC to Connect to XiVO
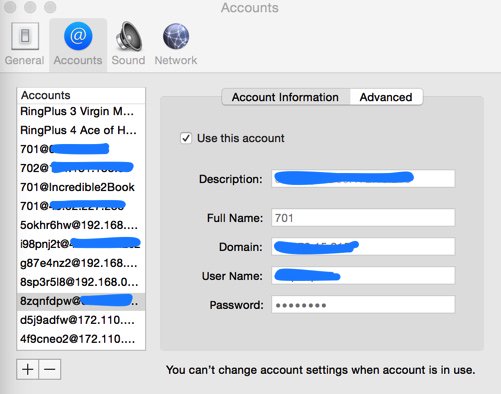
If you’re a Mac user, you’re lucky (and smart). Download and install Telephone from the Mac App Store. Start up the application and choose Telephone:Preference:Accounts. Click on the + icon to add a new account. To set up your softphone, you need 3 pieces of information: the IP address of your server (Domain), and your Username and Password. In the World of XiVO, you’ll find these under IPBX:Services:Lines. Just click on the Pencil icon beside the extension to which you want to connect. Now copy or cut-and-paste your Username and Password into the Accounts dialog of the Telephone app. Click Done when you’re finished, and your new softphone will come to life and should show Available. Dial the IVR (4871) to try things out. With Telephone, you can use over two dozen soft phones simultaneously on your desktop.
Prefer to use WebRTC from your browser as a softphone? XiVO has you covered. Complete setup instructions available here.
More to come…
Taking the Sample Incredible PBX Apps for a Test Drive
Once your softphone is registered, you can try out some of the Incredible PBX sample applications:
- 4871 (IVR1) – Allison’s Demo IVR
- 411 (Voice Dialing) – Call by Name (try "Delta Airlines")
- 2663 (CONF) – Conference Room with Music on Hold
- 951 – Yahoo! News Headlines (TTS)
- 947 (ZIP) – NWS Weather by ZIP Code
- 53669 (LENNY) – The Telemarketer’s Worst Nightmare
You can review the Dialplan code in the GUI by choosing IPBX Configuration:Configuration Files and clicking xivo-extrafeatures.conf. The sample IVR code is in ivr-1.conf. This Nerd Vittles tutorial will walk you through building your own IVRs for XiVO.
Adding PBX Status to XiVO
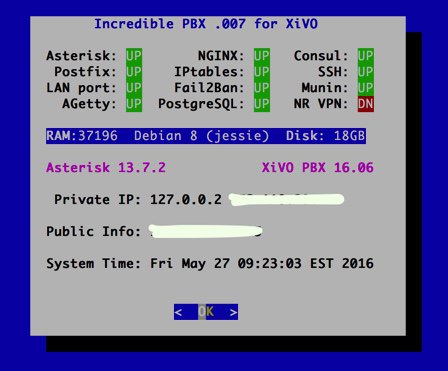
For those that like to see how things are going from the Linux CLI, a modified version of pbxstatus is available for XiVO:
apt-get -y install dialog
cd /
wget http://incrediblepbx.com/status-xivo.tar.gz
tar zxvf status-xivo.tar.gz
rm -f status-xivo.tar.gz
pbxstatus
Using FQDNs with the Travelin’ Man 3 Firewall
If you plan to use FQDNs with your IPtables firewall or if your remote users will be using a Dynamic DNS provider to keep their IP addresses fresh, be sure to review Step #5 in the Travelin’ Man 3 tutorial which explains how to configure your firewall to automatically refresh IP addresses based upon changes in dynamic addresses.
Travelin’ Man 3: Securing a PBX in a Flash or VoIP in the Cloud Server

 JUST RELEASED: Visit the Incredible PBX Wiki
