Home » Search results for 'sip uri'

Search Results for: sip uri

The Most Versatile VoIP Provider: FREE PORTING

Adding SIP URI Dialing to Asterisk for Free Worldwide Calling


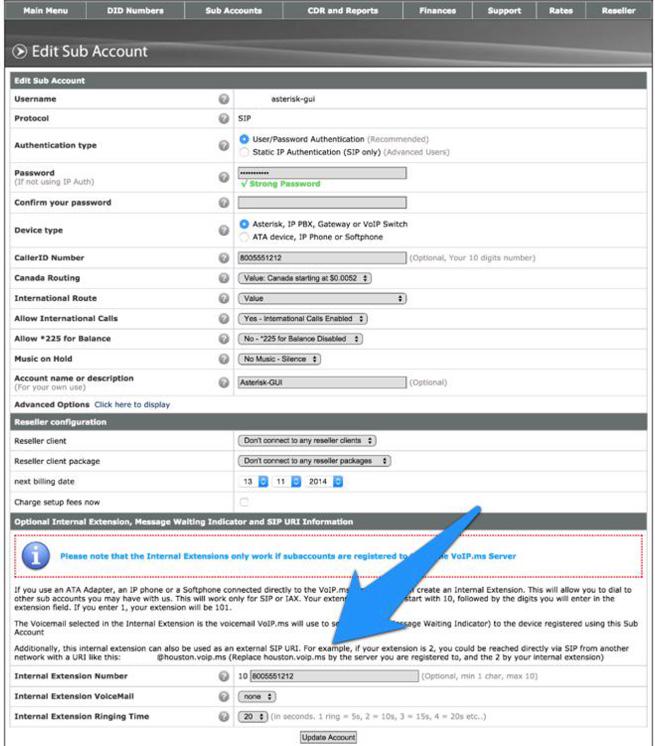
Since giving up on Google Voice, we’ve been extolling the virtues of SIP URI dialing which gives you unlimited free calls to anyone else in the world that happens to have their own SIP URI address. SIP URIs look very much like email addresses except they’re used to share phone conversations instead of email messages. And, as we’ve mentioned previously, if everyone in the world had their own SIP URI, paying for phone calls would become a thing of the past. We hope you’ll join us in making that happen. As a fallback, give our $50 credit at Skyetel a try.

One of the drawbacks of Asterisk® PBXs using the FreePBX® GUI has been the inability to place outbound SIP URI calls from SIP phones registered as extensions on the PBX. Today we first want to address that shortcoming. Our SIP URI dialing solution for Asterisk should work with any FreePBX-based implementation including Incredible PBX® and Issabel as well as on Raspberry Pi platforms. We’ll wrap things up by providing some tips on obtaining and deploying your own SIP URI at little or no cost and pointing you to some excellent resources that facilitate calling millions of SIP phones around the world at zero cost. All you need is an Internet connection, and we’ll point you to a terrific softphone to begin your adventure.

Let’s begin by examining why SIP URI dialing is a problem with FreePBX. The reason is pretty simple. FreePBX interprets dial strings by matching them against some rules to determine whether you’re making an internal call or a call outside your PBX. It matches internal calls against a list of available internal extensions. External calls are matched against rules defined in your outbound routes which are associated with trunks. Since SIP URI calls don’t match any extension or outbound route, the caller receives a congestion tone.

The traditional workaround has been to define a custom extension using the FreePBX GUI which points to a SIP URI. Then the user can dial the custom extension, and the call will be routed to the defined SIP URI. These custom extensions also can be defined in extensions_custom.conf within the from-internal-custom context. For example, the following dialplan code would let users dial 411 to reach AT&T’s Toll-Free Directory Assistance: exten => 411,1,18005551212@switch.starcompartners.com.

But there’s a better way. Wouldn’t it be nice to be able to dial any SIP URI from a softphone or to store SIP URI addresses in the phonebook of your SIP phone?1 Well, now you can. Before we actually put the dialplan code in place, let us explain how this will work. First, FreePBX still needs to be able to distinguish a SIP URI call from a "regular call." The reason this gets tricky is because Asterisk typically throws away the destination hostname when you place a call. For example, calls to 8005551212 and 8005551212@sip2sip.info are processed by Asterisk in exactly the same way, i.e. dropping the host address before dialing.

Using the new dialplan code in the next section, here’s how calls will be processed:

User dials                    Asterisk processes call as
------------------------      ---------------------------------------------
701                           internal call to local extension 701
4045551212                    external call using NXXNXXXXXX outbound route
2233435945@sip2sip.info       SIP URI call to Lenny by acct at sip2sip.info
lennybgood@sip2sip.info       SIP URI call to alias lennybgood@sip2sip.info 

Cautionary Notes: Our code should work fine with any Asterisk 13 and FreePBX 13 or Incredible PBX deployment on any Linux platform; however, with servers other than Incredible PBX, make sure you have added the following entries to sip_general_custom.conf, or you can configure them in the GUI by making the changes in Settings -> Asterisk SIP Settings -> Chan SIP Settings:

srvlookup=yes
allowguest=yes

You also need to test a traditional outbound call (e.g. 8005551212) immediately after you finish the install procedure. Monitor the Asterisk CLI (asterisk -rvvvvvvvvvv) and observe the first few lines of the log after you place a call. The second line will show SIPDOMAIN which should be either the FQDN of your server or an IP address depending upon how you registered your softphone extension. The first line should display the MyDomain variable. If it is empty or doesn’t match the SIPDOMAIN entry, the outbound call will fail. To fix it, add an entry to the Asterisk database from the Asterisk CLI using syntax like the following: database put MyDomain FQDN 10.0.0.11 or database put MyDomain FQDN sip.me.com where 10.0.0.11 or sip.me.com matches the SIPDOMAIN entry shown on the second line. Then retry your outbound call, and it should complete successfully. We’ve tested this back to the early Asterisk 11 days with FreePBX 2.11 without any problems. If your calls still fail, then you will probably need to remove the new code from your platform until you upgrade to a more current version of Asterisk and FreePBX. The code hasn’t been tested with FreePBX 14 and 15.

Finally, you may want to manually set the CallerID for your outgoing SIP URI calls. From the Asterisk CLI, issue a command for every extension from which you will be placing SIP URI calls, e.g. extension 701 syntax: database put 701 user_sipname "Nerd Uno"

Enabling SIP URI Dialing with FreePBX

To enable SIP URI dialing from phones registered with your Asterisk PBX, we’ll modify the dialplan in order to detect SIP URI dial strings entered into a softphone or retrieved from a phonebook associated with almost any SIP phone. When a SIP URI dial string is detected, we’ll send the call out as requested rather than passing the call through the outbound routes and trunks associated with your PBX. All of this dialplan code is open source and is licensed pursuant to the GPL2 license.

SECURITY ALERT: Never use the SIP URI MOD on a server with a publicly-exposed SIP port as it is possible for some nefarious individual to spoof your FQDN in the headers of a SIP packet and easily gain outbound calling access using your server’s trunk credentials.

FEB. 21 UPDATE: There was a bug in the original code which caused some internal calls to fail including calls to a DISA extension. Simply install the application again, and it will overwrite the previous version.

MAR. 5 UPDATE: A bug was discovered in previous releases that treated 911 and 933 calls as internal calls when, in fact, they should have been routed out using your outbound trunks. Simply install the application again, and it will overwrite the previous version.

MAR. 13 ALERT: This software is not compatible with the Debian, Raspbian, and Ubuntu platforms.

To begin or update your installation, log in to your PBX as root using SSH or Putty and issue these commands:

cd /tmp
wget http://incrediblepbx.com/sipuri-mod.tar.gz
tar zxvf sipuri-mod.tar.gz
rm -f sipuri-mod.tar.gz
./install-sip-uri-mod.sh

Obtaining Your Own SIP URI

There are a number of ways to obtain your own SIP URI. Perhaps the easiest is to set up the open Incredible PBX cloud platform that we introduced several weeks ago. Then you can create as many SIP URIs as you like, and they can be used to perform any task that’s available with Asterisk. If you’re not quite ready to make that leap, a free or almost free SIP URI is available from the following sources. VoIP.ms provides a SIP URI for every subaccount you create. Just set up an internal extension number for the subaccount, and that becomes a SIP URI to connect back to your registered server or SIP phone. In the alternative, VoIP.ms will also provide you with a free iNUM DID which can be reached at the following IP address: 81.201.82.50. CallCentric provides a SIP URI matching your account number which can be reached @in.callcentric.com. CallCentric will also provide you with a free iNUM DID which can be reached at the following IP address: 81.201.82.50. LocalPhone provides the same two options as CallCentric: you can be reached by your account number @localphone.com. Or the LocalPhone-assigned iNUM DID can be reached @81.201.82.50. Then there’s pbxes.org. Your account name can be used for SIP URI access @pbxes.org. And, of course, if you’re a 3CX user, you can set up a SIP URI for each extension on your PBX. Just navigate to the Options tab of the desired extension(s) and enter a unique SIP ID for each extension. The SIP URI becomes SIPID@YOUR-3CX-FQDN. SIP URI calls to 3CX Clients on smartphones are also free! This list is not exhaustive. There are now more than 2,000 VoIP networks that support SIP URI access. Using a SIP URI dialing prefix, call any of the referenced networks @sipbbroker.com.2

Choosing a SIP Phone or Softphone

You can find dozens of recommendations for hardware-based SIP phones both on Nerd Vittles and the PIAF Forum. For today we’ll get you started with one of our favorite (free) softphones, YateClient. It’s available for almost all desktop platforms. Download YateClient from here. Run YateClient once you’ve installed it and enter the credentials for an extension on your PBX. You’ll need the IP address of your server plus your extension number and its password. Fill in the Yate Client template using the IP address of your PBX as well as your extension credentials. Click OK to save your entries.

Once the Yate softphone shows that it is registered, try a test call to Lenny using one of the following SIP URIs: 2233435945@sip2sip.info or 883510001198938@81.201.82.50. Better yet, try out a few Incredible PBX samples from the public server we previously deployed:

Yahoo News Headlines    - news@demo.nerdvittles.com
Weather by Zip Code     - weather@demo.nerdvittles.com
Directory Assistance    - information@demo.nerdvittles.com
Lenny for Telemarketers - lenny@demo.nerdvittles.com

Originally published: Monday, February 11, 2019


Need help with Asterisk? Visit the VoIP-info Forum.


Special Thanks to Our Generous Sponsors


FULL DISCLOSURE: ClearlyIP, Skyetel, Vitelity, DigitalOcean, Vultr, VoIP.ms, 3CX, Sangoma, TelecomsXchange and VitalPBX have provided financial support to Nerd Vittles and our open source projects through advertising, referral revenue, and/or merchandise. As an Amazon Associate and Best Buy Affiliate, we also earn from qualifying purchases. We’ve chosen these providers not the other way around. Our decisions are based upon their corporate reputation and the quality of their offerings and pricing. Our recommendations regarding technology are reached without regard to financial compensation except in situations in which comparable products at comparable pricing are available from multiple sources. In this limited case, we support our sponsors because our sponsors support us.

BOGO Bonaza: Enjoy state-of-the-art VoIP service with a $10 credit and half-price SIP service on up to $500 of Skyetel trunking with free number porting when you fund your Skyetel account. No limits on number of simultaneous calls. Quadruple data center redundancy. $25 monthly minimum spend required. Tutorial and sign up details are here.

The lynchpin of Incredible PBX 2020 and beyond is ClearlyIP components which bring management of FreePBX modules and SIP phone integration to a level never before available with any other Asterisk distribution. And now you can configure and reconfigure your new Incredible PBX phones from the convenience of the Incredible PBX GUI.

VitalPBX is perhaps the fastest-growing PBX offering based upon Asterisk with an installed presence in more than 100 countries worldwide. VitalPBX has generously provided a customized White Label version of Incredible PBX tailored for use with all Incredible PBX and VitalPBX custom applications. Follow this link for a free test drive!
 

Special Thanks to Vitelity. Vitelity is now Voyant Communications and has halted new registrations for the time being. Our special thanks to Vitelity for their unwavering financial support over many years and to the many Nerd Vittles readers who continue to enjoy the benefits of their service offerings. We will keep everyone posted on further developments.


  1. Special thanks to Olivier Adler and voip-info.org for their early work on SIP URI dialing with Asterisk. []
  2. Some of our links refer users to sites or service providers when we find their prices are competitive for the recommended products. Nerd Vittles receives a small referral fee from these providers to help cover the costs of our blog. We never recommend particular products solely to generate commissions. []

Free Worldwide VoIP Calling with SIP URIs and Issabel 4

SIP URIs make the VoIP World go ’round. They’re the email-like addresses that carry VoIP calls between SIP servers to reach their destination. But there’s gold in them hills if you know how to use SIP URIs because SIP URI calls are free even if the calls travel all the way around the world. We previously documented how to deploy SIP URI calling with PIAF5 and 3CX, and today we’ll show you how to make SIP URI calls from and to your Issabel™ server using Incredible PBX®. More importantly, we’ll show you how to do it safely without opening up the anonymous calling floodgates and compromising your Asterisk® server.

Now that we’ve gotten the price of cloud-based servers down to a respectable $1.50 to $2.50 per month, it’s time to cut the cord and kiss your home-grown server goodbye. The babysitting headaches and maintenance costs of running your own server and paying for electricity simply aren’t worth it. There’s another reason. NAT-based routers and firewalls complicate things when it comes to VoIP. Not only do you have to wrestle with SIP headers and ALG, but you also have to troubleshoot thorny one-way audio issues with VoIP calling. So bite the bullet and play along today. Skip that Starbucks coffee this week and you’ve all but paid for a full year’s worth of VoIP server hosting in the Cloud.

Getting Started with Vultr

If you just want to experiment in a cloud-based sandbox, then there’s no better option than Vultr. For less than a penny an hour, you can build a VoIP platform, tear it down, and build another one for less than the cost of a nickel candy bar. You remember those, don’t you? I actually tried to think of something that still costs a nickel, but that was the best I could do… and that was 50+ years ago.

After you’ve created an account on Vultr with our referral link, the first step is to create your new cloud instance. Choose New York or Miami as your desired hosting site (they both have $2.50/month availability) and select 64-bit CentOS 7 as your server platform. An additional 50¢ a month buys you automatic daily, weekly, or monthly backups to a separate, fault tolerant storage system in the same data center. HINT!

(1) Once you’ve built and started your new virtual machine, log into your server as root using SSH/Putty and immediately change your root password: passwd.

(2) With the $2.50 size VULTR virtual machine, you must create a swapfile before beginning the Issabel installation. Here are the commands:

dd if=/dev/zero of=/swapfile bs=1024 count=1024k
chown root:root /swapfile
chmod 0600 /swapfile
mkswap /swapfile
swapon /swapfile
echo "/swapfile swap swap defaults 0 0">>/etc/fstab
sysctl vm.swappiness=10
echo vm.swappiness=10>>/etc/sysctl.conf
free -h
cat /proc/sys/vm/swappiness

(3) Now skip down to the Issabel installation section to continue.

Getting Started with WootHosting

If $2.50 a month is too rich for your blood, there actually are two $1.50 a month options at WootHosting if you sign up for a year. With the New York special, you get a single VPS platform. With the twofer special, you actually get two VPS platforms in your choice of cities. WootHosting also offers considerably more horsepower with quadruple the RAM and more storage space. You can read our review of WootHosting here.

(1) Start by creating a CentOS 7 Minimal VPS platform in New York, Miami, or Los Angeles. If you opted for the WootHosting twofer special, then you’ll need to create a user and then a virtual server platform that looks something like this:

(2) Set a root password in the Root/Admin Password tab and enable TUN/TAP (needed for NeoRouter) in the Settings tab.

(3) Login to your server as root using SSH Terminal or Putty.

(4) Now continue with the Issabel installation as documented below.

Installing Issabel on Your VPS Platform

Issue the following commands to install Issabel. When prompted for a MariaDB (MySQL) and admin password, make certain to use passw0rd (with a zero) for your MariaDB password and a very secure password for your admin password, the one you’ll use to login as admin to Issabel’s web interface.

yum -y update
yum -y install wget nano
wget -O - http://repo.issabel.org/issabel4-netinstall.sh | bash

When the Issabel install is complete, your server will automatically reboot.

Installing Incredible PBX for Issabel on Your VPS

After the reboot, log back into your server as root and issue the following commands to install Incredible PBX for Issabel. You will again be prompted for MariaDB and admin passwords. Do exactly as you did above using passw0rd as your MariaDB password. At the conclusion of the install, you will again be prompted for the same admin password you used above. This is actually used for Apache web security and will be the first prompt you see when you attempt to login to any web application including Issabel, AsteriDex, and Reminders.

wget http://incrediblepbx.com/IncrediblePBX11-Issabel4.sh
chmod +x IncrediblePBX11-Issabel4.sh
./IncrediblePBX11-Issabel4.sh

When the installation finishes, reboot your server once again and then log back in as root. The Automatic Update Utility will load current patches and then display pbxstatus.

Using a browser, login to the Issabel web client at the IP address shown in pbxstatus. You’ll be prompted twice (http and https) for your Apache admin credentials which should be the same as your Issabel GUI admin credentials. Save your Apache credentials in your browser when prompted to do so. Then you won’t have to provide Apache credentials again. Next, login to the Issabel GUI with admin and your admin password.

That completes the basic install of Incredible PBX and Issabel. Our previous tutorial will walk you through the basics of setting up your trunks, extensions, and routes in Issabel.

Overview of SIP URI Implementation with Issabel

There are any number of ways to implement incoming SIP URI support on Asterisk-based servers. Most are terribly insecure and provide an easy target for the bad guys to make free calls using your paid VoIP provider accounts. The traditional method to permit SIP URI access to your server would require poking a hole in your firewall to allow unrestricted access to the SIP port of your server, UDP 5060. In addition, it would require enabling unrestricted anonymous calling access to Asterisk via FreePBX®. After all, that’s similar to the way the Ma Bell telephone system operated. Anyone in the world could call you provided they had your number. The major deterrent was that most of the calls incurred costs to the caller with no monetary benefits being derived. VoIP changed all of that. Using a SIP client and SIP URIs, anonymous individuals now can place unlimited calls to unlimited VoIP servers at no cost. And, if they get lucky, they can decipher a way to call into your PBX via SIP URI and then call out using phone trunks that you actually have to pay for. Bad idea!

We have a better way that’s entirely secure and won’t incur calling charges for incoming anonymous SIP URI calls. The solution is to set up a trunk with a hosting provider that supports anonymous SIP URI access and then leave it to the VoIP provider to manage the thorny SIP security problems which is not Asterisk’s strong suit. Once we’ve set up the SIP URI with the provider, we will register a trunk with that provider on our Issabel server. Then all of the anonymous SIP URI calls will come into the SIP provider and be rerouted to Issabel through our registered trunk with that provider. No firewall puncturing is required because we will be using a registered trunk and tunnel between our server and the provider.

Implementing SIP URI Support with VoIP.ms

Our favorite VoIP provider to implement this is VoIP.ms in Canada. They have POP servers throughout the world so you can pick a server that is close to your cloud-based Issabel server. VoIP.ms POPs are available in Tampa, New York, and Los Angeles among others worldwide. Step one is to set up an account at VoIP.ms if you don’t already have one. Step two is to set up a SubAccount with a difficult-to-guess VoIP.ms Internal Extension Number. Be sure to jot down the Username and Password you set up for your SubAccount. You’ll need them in a minute. In our example today, we’re using 4772235642 as the internal extension number. This means other VoIP.ms account holders can reach this account by dialing 10+ 4772235642. And anyone on the Internet can reach this account by dialing your VoIP.ms account number + 4772235642 at the POP to which you are registering a VoIP.ms DID associated with this SubAccount. Clear as mud? Hang in there a bit longer.

Step three is to sign up for a VoIP.ms DID. This could be a free iNUM DID or a commercial DID (traditional 10-digit NANPA number) that your PBX could actually use to receive traditional calls. Commercial DIDs range in price from under $1 a month with incoming calls costing under a penny a minute to $4.25 a month with unlimited incoming (residential) calls. For our purposes today, the type of DID and its commercial cost really don’t matter. When any of these DIDs are connected to a SubAccount with an associated Internal Extension Number, SIP URI calls to that DID’s internal extension number are free! So… the cheaper, the better.

The final step on the VoIP.ms side of things is to associate your DID with a SubAccount and choose a POP server to process the calls coming to you. This is done under the Manage DIDs tab in the VoIP.ms web interface.

So let’s review what we’ve done. We set up a VoIP.ms account. We created a SubAccount in their web interface and created an internal extension number for that subaccount. Next, we ordered a DID. And finally, we associated that DID with the subaccount we created and chose a POP server to deliver the inbound calls to our server.

Now we’re ready to set up a VoIP.ms trunk on our Issabel server and test things out.

Implementing SIP URI Support with Issabel

Incredible PBX makes setting up a VoIP.ms trunk easy. The template is already in place in the Issabel GUI. All you’ll need are your VoIP.ms credentials (SubAccount Username and Password), your DID number that you ordered from VoIP.ms, and the name of the VoIP.ms POP server (from Manage DIDs) that will be delivering the incoming calls. You’ll also want to jot down your Internal Extension Number (without leading 10) that you set up in your VoIP.ms SubAccount. You’ll need that and the FQDN of the VoIP.ms POP in order to decipher the SIP URI (phone number) to reach your server.

While logged into the Issabel GUI, navigate to PBX:PBX Config:Trunks:VoIPms. Insert your DID in the Outbound CallerID field. Uncheck the Disable Trunk box. Under PEER Details, insert your VoIP.ms username in the username and fromuser fields. Insert your VoIP.ms password in the password field. Insert the FQDN of the VoIP.ms POP server in the host field. Under Register String, insert your username, followed by a colon, your password, followed by @, your POP FQDN, followed by /DID, e.g. johndoe:secret@tampa.voip.ms/8005551212.

Next, we need to create an Inbound Route to process the incoming calls from VoIP.ms. Navigate to PBX:PBX Config:Inbound Routes. Click Add Incoming Route. In the Description field, enter VoIPms-Incoming. In the DID Number field, insert your DID number. In the Source field, choose OpenCNAM. In the Set Destination dialog, choose a destination for the incoming calls, e.g. an extension, ring group, or IVR. Then click Submit and reload dialplan.

Finally, we need to adjust a SIP setting to support SIP URI calls from VoIP.ms. Navigate to Security:Advanced Settings. Set Enable Direct Access ON. Set Allow Anonymous Calls OFF. Enter your admin password twice. Click SAVE.

Next, navigate to PBX:PBX Config:Unembedded IssabelPBX. When the new window opens, navigate to Settings:Asterisk SIP Settings. In the External IP field, insert the IP address of your Issabel server. Click Auto Configure button immediately below that. Scroll to the bottom and, in Other SIP Settings, insert match_auth_username = yes in the two fields provided. Click Submit Changes and reload dialplan. Click Logout: Admin at the top of the browser window and then close the browser tab to return to the main Issabel GUI.

Deciphering the SIP URI for Your Issabel PBX

From the information you wrote down above, here’s how to assemble the SIP URI for your Issabel PBX. Start with your VoIP.ms account number, e.g. 101595. Add your Internal Extension Number, e.g. 4772235642. Add the @ symbol followed by the VoIP.ms POP routing calls to Issabel, e.g. tampa.voip.ms. You can give ours a try if you’d like to interact with Allison’s Demo IVR: 1015954772235642@tampa.voip.ms. Most SIP clients support SIP URI calling including Zoiper (PCs) and Telephone (Macs).

Placing Outbound SIP URI Calls from Issabel PBX

The easiest way to place outbound SIP URI calls from your Issabel PBX is to set up Custom Extensions for the destinations you wish to reach.

Navigate to PBX:PBX Config:Extensions:Other (Custom) Device. Assign an extension number and display name to the extension and insert the SIP URI in the dial field using the syntax shown below. Then click Submit and reload your dialplan.


We’ve barely scratched the surface of what you can do with Incredible PBX for Issabel. Head over to our introductory article where we’ve documented dozens of Asterisk® applications that await your exploration. Enjoy!

Published: Thursday, August 24, 2017  


Need help with Asterisk? Visit the PBX in a Flash Forum.


Special Thanks to Our Generous Sponsors


FULL DISCLOSURE: ClearlyIP, Skyetel, Vitelity, DigitalOcean, Vultr, VoIP.ms, 3CX, Sangoma, TelecomsXchange and VitalPBX have provided financial support to Nerd Vittles and our open source projects through advertising, referral revenue, and/or merchandise. As an Amazon Associate and Best Buy Affiliate, we also earn from qualifying purchases. We’ve chosen these providers not the other way around. Our decisions are based upon their corporate reputation and the quality of their offerings and pricing. Our recommendations regarding technology are reached without regard to financial compensation except in situations in which comparable products at comparable pricing are available from multiple sources. In this limited case, we support our sponsors because our sponsors support us.

BOGO Bonaza: Enjoy state-of-the-art VoIP service with a $10 credit and half-price SIP service on up to $500 of Skyetel trunking with free number porting when you fund your Skyetel account. No limits on number of simultaneous calls. Quadruple data center redundancy. $25 monthly minimum spend required. Tutorial and sign up details are here.

The lynchpin of Incredible PBX 2020 and beyond is ClearlyIP components which bring management of FreePBX modules and SIP phone integration to a level never before available with any other Asterisk distribution. And now you can configure and reconfigure your new Incredible PBX phones from the convenience of the Incredible PBX GUI.

VitalPBX is perhaps the fastest-growing PBX offering based upon Asterisk with an installed presence in more than 100 countries worldwide. VitalPBX has generously provided a customized White Label version of Incredible PBX tailored for use with all Incredible PBX and VitalPBX custom applications. Follow this link for a free test drive!
 

Special Thanks to Vitelity. Vitelity is now Voyant Communications and has halted new registrations for the time being. Our special thanks to Vitelity for their unwavering financial support over many years and to the many Nerd Vittles readers who continue to enjoy the benefits of their service offerings. We will keep everyone posted on further developments.


Some Recent Nerd Vittles Articles of Interest…

Integrating SIP URIs into XiVO for Free Worldwide Calling

It’s been a while since we’ve explored SIP URIs and all of the advantages that SIP URI calling brings to your PBX. Number one on that list is FREE calling to and from anyone on the planet so long as both of you have an Internet connection with a SIP phone or a VoIP server such as Incredible PBX for XiVO. SIP URIs are the fundamental building blocks for VoIP technology. Consider this. If everyone in the world had a SIP address instead of a phone number, every call to every person in the world via the Internet would be free. That pretty much sums up why SIP URIs are important. The syntax for SIP URIs depends upon your platform. With Asterisk® they look like this: SIP/somebody@FQDN.yourdomain.com. On SIP phones, SIP URIs look like this: sip:somenameORnumber@FQDN.yourdomain.com. Others use somenameORnumber@FQDN.yourdomain.com. Assuming you have a reliable Internet connection, once you have “dialed” a SIP URI, the destination SIP device will ring just as if the called party had a POTS phone. Asterisk® processes SIP URIs in much the same way as other calls originating from trunks and, as noted, SIP URI calls of any duration to anywhere are free. Today we’ll show you how to set things up on your XiVO PBX without exposing any ports to the Internet in a way that would jeopardize your server’s security.

Placing Outbound SIP URI Calls with a SIP Softphone

There are two ways to place outbound SIP calls. You can use a SIP phone or softphone that supports SIP URI calling to dial SIP URIs directly. If you have a Mac, the best free softphone for SIP URI calling is Telephone which you can download from the App Store. On other platforms as well as Macs, Zoiper is a great no-cost option. Both of these softphones support the sip:someone@FQDN.yourdomain.com syntax. An excellent way to test this is to call our friend Lenny and strike up a conversation: sip:2233435945@sip2sip.info.

Configuring Outbound SIP URIs with XiVO

The major drawback of SIP URIs is they’re difficult both to remember and to dial. It’s much simpler to dial a short number using a traditional phone. And, with Incredible PBX for XiVO, it’s easy to create custom extensions that can be accessed simply by dialing a few digits from any phone connected to your server. Here’s how to set it up in the XiVO GUI.

1. Create a User and assign the Customized Protocol and an Extension Number to that user:

TIP: If you’d prefer to use a different series of numbers for speeddials so you don’t get them mixed up with your standard extension numbers, just add a new range of numbers for XiVO: IPX Configuration → Contexts → Default → Users. Then choose one of them above.

2. Access the new Line that was generated for the new User:

3. Replace the Interface entry for the Line with the desired SIP URI for your speeddial, e.g. SIP/2233435945@sip2sip.info. Then SAVE your new Line settings.

4. Dial 750 from an Extension on your XiVO PBX to try out Lenny using your new SIP URI.

A Better Way to Create SpeedDials with XiVO

We’ve gone through the XiVO GUI approach to demonstrate that it is indeed possible to create speeddials for SIP URIs. However, there is a better way unless you’re one of the naysayers that believes everything is better in a GUI. If you have dozens or even hundreds of speeddials to create, you may change your mind. The GUI approach could obviously become tedious. Instead, with one line of Asterisk dialplan code, you can create as many speeddials as you like keeping in mind that it’s your responsibility to assure that SIP URI extension numbers don’t conflict with existing extensions on your server. Insert a new section of code at the bottom of /etc/asterisk/extensions_extra.d/xivo-extrafeatures.conf and reload your dialplan: asterisk -rx "dialplan reload".

You can also insert this code from within the XiVO GUI itself: IPX Configuration → Configuration Files. Edit xivo-extrafeatures.conf and insert the following code snippet at the end of the file and Save your entries. The dialplan will be reloaded automatically.

Some of our favorites include the following:

;# // BEGIN SpeedDials
exten = 882,1,Dial(SIP/200901@login.zipdx.com)     ; V-U-C on Fridays at noon EST
exten = 8378,1,Dial(SIP/thetestcall@getonsip.com)  ; T-E-S-T everything VoIP
exten = 53669,1,Dial(SIP/2233435945@sip2sip.info)  ; L-E-N-N-Y
exten = 68742,1,Dial(SIP/0289304@zero-nine.biz)    ; M-U-S-I-C
exten = 3733411,1,Dial(SIP/411@ideasip.com)        ; F-R-E-E-4-1-1 Directory Asst
;# // END SpeedDials

Creating a SIP URI Address for Your XiVO PBX

Free calls to other folks is only half of the story, of course. You’re also going to want a way for people to call you without incurring charges for the calls. There are many SIP URI approaches for inbound calls. Most of them are not safe with Asterisk. Let me say that again. Most of them are not safe with Asterisk. The reason is because most of them force you to open SIP access to your server for everybody in the world. Unfortunately, that means they can not only call you, but they can also attempt to use your extensions and trunks to place very expensive calls to others. Don’t even think about opening the SIP floodgate by exposing port 5060 unless Bill Gates sends you a check every week. You’ve been warned!

Setting Up an iNum SIP URI Trunk with XiVO

The better and safer way to add SIP URI connectivity to your XiVO server is to first obtain a freely available iNum DID from one of the many providers that support iNum and then use that provider as a SIP intermediary. All SIP calls pass only over your registered trunk with your provider. Our favorites in no particular order are VoIP.ms, LocalPhone and CallCentric. There are many, many others. In order to obtain a free iNum DID, you will need an account with one of these providers. All require some sort of minimal deposit, but you usually can get back unused funds if you decide to close your account down the road. Our XiVO tutorials for VoIP.ms, LocalPhone, and CallCentric will walk you through creating your SIP account and registering it with your XiVO server. Then verify that your SIP account is registered:

asterisk -rx "sip show registry"

Configuring an iNum DID with VoIP.ms

Our trunk tutorials for LocalPhone and CallCentric will walk you through their setup procedures for iNUM DIDs. VoIP.ms provides more flexibility in redirecting trunks so let us quickly walk you through their procedure. Log in to your VoIP.ms account and then order your free iNum DID at this link. Your iNum DID then will appear in your DID Listing here. Write down your iNum DID which you’ll need in a minute to configure the XiVO side of things. Then click on the Edit DID icon beside your iNum DID and assign the DID to your registered Main Account or the SubAccount that you’ve already registered with XiVO. Be sure to use the same DID POP that you used when you registered your VoIP.ms account with XiVO. Don’t enable VoiceMail and set the ring time to 60 seconds just to keep things simple.

Configuring XiVO to Support Your iNum DID

Now for the XiVO part. Using a browser, log into the XiVO GUI. Navigate to IPX Configuration → Contexts → Default → Users. For VoIP.ms and LocalPhone, add a new Number Range starting and ending with your iNum DID. Then click Save. For CallCentric, do the same thing but substitute your CallCentric username which will be an 11-digit number starting with 1777.

Repeat the above in IPX Configuration → Contexts → from-extern (Incalls) → Users.

For CallCentric only, also click on the Incoming Calls tab and add a new Number Range. For the Starting value, use your 11-digit LocalPhone username. For the DID length, set it to 11. You do NOT need to include a Number Range ending value. Click Save when you’re finished.

For VoIP.ms, navigate to IPX Settings → Users. Then Add a new User for your iNum DID. In the General tab, name the User VoIP.ms iNum. In the Lines tab, provide your actual iNum DID number. This must be the same number you added to the Number Range in the Default context above. In the No Answer tab, set the Fail option to the Destination of your choice, e.g. an extension, a ring group, an IVR, etc. Then click Save.

For LocalPhone, navigate to Call Management → Incoming Calls and Add a new Inbound Route for your DID specifying the destination for the calls using your iNum DID number:

For CallCentric, navigate to Call Management → Incoming Calls and Add a new Inbound Route using your 11-digit CallCentric username as the DID. Then specify the destination for the calls and click Save.

Calling Your XiVO PBX Using Your iNum SIP URI

To receive SIP URI calls safely on your iNum DID, your SIP URI is your iNum DID number followed by @sip.inum.net, e.g. 883510012345678@sip.inum.net. Neither the identity of your XiVO PBX or your SIP service provider is ever exposed. Enjoy your safe, free calling!

Originally published: Monday, September 26, 2016


Need help with Asterisk? Come join the PBX in a Flash Forum.


Special Thanks to Our Generous Sponsors


FULL DISCLOSURE: ClearlyIP, Skyetel, Vitelity, DigitalOcean, Vultr, VoIP.ms, 3CX, Sangoma, TelecomsXchange and VitalPBX have provided financial support to Nerd Vittles and our open source projects through advertising, referral revenue, and/or merchandise. As an Amazon Associate and Best Buy Affiliate, we also earn from qualifying purchases. We’ve chosen these providers not the other way around. Our decisions are based upon their corporate reputation and the quality of their offerings and pricing. Our recommendations regarding technology are reached without regard to financial compensation except in situations in which comparable products at comparable pricing are available from multiple sources. In this limited case, we support our sponsors because our sponsors support us.

BOGO Bonaza: Enjoy state-of-the-art VoIP service with a $10 credit and half-price SIP service on up to $500 of Skyetel trunking with free number porting when you fund your Skyetel account. No limits on number of simultaneous calls. Quadruple data center redundancy. $25 monthly minimum spend required. Tutorial and sign up details are here.

The lynchpin of Incredible PBX 2020 and beyond is ClearlyIP components which bring management of FreePBX modules and SIP phone integration to a level never before available with any other Asterisk distribution. And now you can configure and reconfigure your new Incredible PBX phones from the convenience of the Incredible PBX GUI.

VitalPBX is perhaps the fastest-growing PBX offering based upon Asterisk with an installed presence in more than 100 countries worldwide. VitalPBX has generously provided a customized White Label version of Incredible PBX tailored for use with all Incredible PBX and VitalPBX custom applications. Follow this link for a free test drive!
 

Special Thanks to Vitelity. Vitelity is now Voyant Communications and has halted new registrations for the time being. Our special thanks to Vitelity for their unwavering financial support over many years and to the many Nerd Vittles readers who continue to enjoy the benefits of their service offerings. We will keep everyone posted on further developments.


Some Recent Nerd Vittles Articles of Interest…

The Gotcha-Free PBX: Harnessing SIP URIs for Free Worldwide Calling

We continue the Incredible PBX for Asterisk-GUI adventure today with a close look at SIP URIs, those email-like addresses that are the fundamental building blocks for VoIP technology. Consider this. If everyone in the world had a SIP address instead of a phone number, every call to every person in the world via the Internet would be free. That pretty much sums up why SIP URIs are important. The syntax for SIP URIs depends a bit upon your platform. In the Asterisk® world, they look like this: SIP/somenameORnumber@FQDN.yourdomain.com. On many SIP phones, you enter SIP URIs in the following format: sip:somenameORnumber@FQDN.yourdomain.com. Others use somenameORnumber@FQDN.yourdomain.com. Assuming you have a reliable Internet connection, once you have "dialed" a SIP URI, the destination SIP device will ring just as if they had a POTS phone. And Asterisk processes SIP URIs in much the same way as other calls originating from trunks. As noted, SIP URI calls of any duration to anywhere are free. And, of course, Incredible PBX is also free with No Gotchas!

In our original articles on Incredible PBX for Asterisk-GUI, we covered outbound calls to SIP URIs, and we’ll briefly review that procedure today. Then we’ll move on to setting up one or more SIP URIs for your own server so that you can receive incoming SIP URI calls. We’ll show you how to route them to any destination you like, both internal and external. We’ll also address the security implications of enabling SIP URI calling on your server. You don’t want the whole world calling into your server to make outbound calls on your nickel. We’ll also walk you through a safer SIP methodology in which you use a service provider as a SIP intermediary to better protect the security of your server. And finally, we’ll show you how to interconnect your new SIP URIs to real telephone numbers at zero cost. Then your friends without a SIP URI still can call you from any POTS or cellphone in the world.

SIP URI Calling with Incredible PBX for Asterisk-GUI

With one line of dialplan code, you can add Speed Dials for free SIP URI calling worldwide. The dialplan code is stored in the [CallingRule_SIP_URI] context in extensions_custom.conf. Just clone one of the existing entries, designate a speed dial number to connect to the SIP URI, and enter the SIP URI for the destination. Numerous SIP providers support assignment of SIP URI’s to existing DIDs for unlimited free calling from anywhere in the world. Here’s a sample using a speed dial code of 53669 (L-E-N-N-Y). Use it for your telemarketers: exten = 53669,1,Dial(SIP/2233435945@sip2sip.info).

Choosing a SIP URI Strategy with Incredible PBX for Asterisk-GUI

Before we actually create SIP URIs on your own server to receive anonymous calls, let’s walk through the available implementation strategies so that you can make an informed choice on how best to proceed. Keeping in mind that SIP URIs consist of an identifier and a fully-qualified domain name (FQDN) or IP address, one option is to use the same domain that you use for your company. We don’t recommend this approach because it makes it easy to guess where your SIP resources reside. Another option is to use a really obscure FQDN with your SIP URIs. Something like k43X20.mycompany.com or, for dynamic addresses, something like k43X20.dyndns.org makes more sense. In the next section, we’re going to lock down SIP access to your server to this FQDN so the more obscure the FQDN the safer you will be. Security through obscurity still works wonders. A third option is to use the IP address of your server instead of an FQDN. That’s a bad choice because of programs like SIPVicious that the bad guys use to scan the Internet for potential SIP targets to be hacked.

An alternative approach worth considering is to use a provider such as VoIP.ms as a SIP intermediary. In this scenario, you create a sub-account and assign an obscure extension number to that account. This in turn generates a SIP URI that can be used to connect to that account from your server by simply registering a VoIP.ms trunk in Incredible PBX. Once the trunk is registered, incoming SIP URI calls to your VoIP.ms sub-account will be forwarded (without cost) to your server without exposing Asterisk to SIP guest access at all. The wrinkle with this option is that VoIP.ms has often indicated that they plan to charge a reduced fee for these connections at some point. However, to date, they’ve never done it. If VoIP.ms shifts gears down the road, you obviously can as well. For the time being, we would encourage you to take advantage of this free service option. It remains our first choice for SIP URI implementation because there is no need to expose SIP resources on your server at all. VoIP.ms takes care of all the SIP security headaches leaving you to enjoy free calling. In the screenshot we’ve shown above, assuming your VoIP.ms account number was 12345, the SIP URI to connect to this sub-account would be 123458005551212@houston.voip.ms assuming you registered your trunk with the houston.voip.ms server.

Creating Your Own SIP URIs with Incredible PBX for Asterisk-GUI

The procedure for creating one or more SIP URIs on your own Incredible PBX server is straight-forward:

  1. For servers behind a hardware-based firewall, map UDP 5060 (SIP) to your server
  2. Enable allowguest access in [general] context of sip.conf
  3. Create desired SIP URIs in [public] context of extensions.conf

1. Unless your server is sitting on the public Internet without a hardware-based firewall, you’ll need to map UDP port 5060 (SIP) from the firewall to the private LAN address of your server. Otherwise incoming SIP calls will never reach Incredible PBX. Most routers have a Port Forwarding tab in which you designate the port to be forwarded, the type of port, and the destination IP address. Consult the manual for your router/firewall for detailed instructions.

2. Changing the allowguest setting in the [general] context of sip.conf is mandatory since the purpose of SIP URI calling is to accept calls from unregistered users. The risk, of course, is that anyone in the world with an Internet connection can attempt to connect to your server. More on that later. For now, issue this command after logging into your server as root:

sed -i 's|allowguest=no|allowguest=yes|' /etc/asterisk/sip.conf

Once you issue this command and restart Asterisk, the setup of Incredible PBX for Asterisk-GUI is to route anonymous SIP calls to the [public] context in extensions.conf. Only extensions in this context will be exposed to anonymous callers. This is important. NEVER change the destination context for these calls to one that provides unrestricted access to the calling resources on your server. The reason should be obvious. But, in case it isn’t, this would permit anonymous callers to use all of your trunks to place outbound calls to anywhere… on your nickel. $100,000 phone bills are the usual result.

3. There are two important facets in creating your own SIP URIs for anonymous access to your server. As touched upon previously, the first is choosing an obscure FQDN for your server. This is a really important layer of security for a couple of reasons: (1) your anonymous caller has to know the actual FQDN of your server in order to reach you and (2) in the next step we’re going to lock down your server to only allow anonymous SIP access from this FQDN. So choose carefully. The second consideration is deciding which server resources you wish to expose for SIP URI access. Do you wish to permit SIP URI calls only to a specific extension or ring group, or perhaps a custom IVR just for SIP URI callers, or perhaps a conference or DISA access (very dangerous)?

You can deploy more than one SIP URI. For each one, you’ll need a destination for the incoming call and an identifier or extension. Identifiers could be numeric, alphanumeric, or pure alpha characters. For example, 8005551212, joe6001, and accounting are all perfectly acceptable. The resultant SIP URI would be something like joe6001@k43X20.mycompany.com.

As noted, for each destination on your server that you wish to enable for SIP URI access, you add a line of dialplan code to the [public] context in extensions.conf. The syntax is identical to what you’ve previously used in routing incoming trunk calls to a destination except we’ll restrict connections to those matching the identifier you’ve chosen for each SIP URI. Here are some examples to get you started.

To route SIP URI accounting@k43X20.mycompany.com to Ring Group #1:
exten = accounting,n,Goto(ringroups-custom-1,s,1)

To route SIP URI joe6001@k43X20.mycompany.com to Extension 6001:
exten = joe6001,n,Goto(default,6001,1)

To route SIP URI demo@k43X20.mycompany.com to the Nerd Vittles demo IVR:
exten = demo,n,Goto(voicemenu-custom-2,s,1)

To route SIP URI lenny@k43X20.mycompany.com to an outside SIP URI:
exten = lenny,1,Dial(SIP/2233435945@sip2sip.info)

To route SIP URI conference@k43X20.mycompany.com to the default conference at extension 2663:
exten = conference,1,Goto(conf_bridge,2663,1)

To route SIP URI weather@k43X20.mycompany.com to the Weather by ZIP Code application:
exten = weather,1,Goto(CallingRule_extensions_custom,947,1)

To route SIP URI 800directory@k43X20.mycompany.com to Directory Assistance using Google Voice trunk:
exten = 800directory,1,Dial(Motif/GoogleVoice/18005551212@voice.google.com)

Securing Your Server with SIP URI Implementations

There are two important security steps once you have enabled anonymous SIP URI calling to your server. The first line of defense is to harden the IPtables Firewall to only permit anonymous SIP access to the specific FQDN you plan to use for your SIP URI callers. The second is to harden Asterisk to disallow requests for domains not serviced by your server.

1. Edit the IPv4 rules for your operating system. On the CentOS-compatible platforms, it’s /etc/sysconfig/iptables. On the Debian/Ubuntu/Raspbian platforms, it’s /etc/iptables/rules.v4. Toward the end of the file and just above the final fail2ban entries, insert the following code using your actual FQDN in the first line:

-A INPUT -p udp --dport 5060 -m string --string "@k43X20.mycompany.com" --algo bm -j ACCEPT
-A INPUT -p udp --dport 5060 -m string --string "REGISTER sip:" --algo bm -j DROP
-A INPUT -p udp --dport 5060 -m string --string "OPTIONS sip:" --algo bm -j DROP
-A INPUT -p udp -m udp --dport 5060 -j DROP

2. Run the following commands substituting your actual FQDN in the first line to lock down Asterisk to only your FQDN for anonymous SIP connections:

sed -i '/\\[general\\]/a ;domain=k43X20.mycompany.com' /etc/asterisk/sip.conf
sed -i '0,/;domain/s/;domain/domain/' /etc/asterisk/sip.conf
sed -i '0,/;allowtransfer=no/s/;allowtransfer=no/allowtransfer=no/' /etc/asterisk/sip.conf
sed -i '0,/; allowexternaldomains=no/s/; allowexternaldomains=no/allowexternaldomains=no/' /etc/asterisk/sip.conf

3. Restart your firewall: iptables-restart

4. Restart Asterisk: asterisk-restart

5. Done!

Interconnecting a SIP URI with a Free PSTN Phone Number

Wouldn’t it be nice if all your friends and business associates without SIP URI capability could still call you using a traditional PSTN number? Well, it’s your lucky day because www.ipkall.com provides just what you need, a free phone number in the Seattle area that you can connect to an existing SIP URI on your server.

When folks call the Seattle number, they will be connected to your server using whatever routing you chose for the SIP URI in the previous section. So sign up for a number, enter your email address and the SIP URI for the calls, and wait for the confirmation email identifying your new telephone number. The only catch is that you need to receive at least one call a month to keep the number. Aside from that, there are no restrictions on use of the PSTN numbers. Enjoy!


Don’t forget to List Yourself in Directory Assistance with your new IPkall PSTN number so everyone can find you by dialing 411. And be sure to add your new number to the Do Not Call Registry to block telemarketing calls.

Originally published: Wednesday, March 25, 2015


Support Issues. With any application as sophisticated as this one, you’re bound to have questions. Blog comments are a terrible place to handle support issues although we welcome general comments about our articles and software. If you have particular support issues, we encourage you to get actively involved in the PBX in a Flash Forums. It’s the best Asterisk tech support site in the business, and it’s all free! Please have a look and post your support questions there. Unlike some forums, ours is extremely friendly and is supported by literally hundreds of Asterisk gurus and thousands of users just like you. You won’t have to wait long for an answer to your question.


Need help with Asterisk? Visit the PBX in a Flash Forum.


Special Thanks to Our Generous Sponsors


FULL DISCLOSURE: ClearlyIP, Skyetel, Vitelity, DigitalOcean, Vultr, VoIP.ms, 3CX, Sangoma, TelecomsXchange and VitalPBX have provided financial support to Nerd Vittles and our open source projects through advertising, referral revenue, and/or merchandise. As an Amazon Associate and Best Buy Affiliate, we also earn from qualifying purchases. We’ve chosen these providers not the other way around. Our decisions are based upon their corporate reputation and the quality of their offerings and pricing. Our recommendations regarding technology are reached without regard to financial compensation except in situations in which comparable products at comparable pricing are available from multiple sources. In this limited case, we support our sponsors because our sponsors support us.

BOGO Bonaza: Enjoy state-of-the-art VoIP service with a $10 credit and half-price SIP service on up to $500 of Skyetel trunking with free number porting when you fund your Skyetel account. No limits on number of simultaneous calls. Quadruple data center redundancy. $25 monthly minimum spend required. Tutorial and sign up details are here.

The lynchpin of Incredible PBX 2020 and beyond is ClearlyIP components which bring management of FreePBX modules and SIP phone integration to a level never before available with any other Asterisk distribution. And now you can configure and reconfigure your new Incredible PBX phones from the convenience of the Incredible PBX GUI.

VitalPBX is perhaps the fastest-growing PBX offering based upon Asterisk with an installed presence in more than 100 countries worldwide. VitalPBX has generously provided a customized White Label version of Incredible PBX tailored for use with all Incredible PBX and VitalPBX custom applications. Follow this link for a free test drive!
 

Special Thanks to Vitelity. Vitelity is now Voyant Communications and has halted new registrations for the time being. Our special thanks to Vitelity for their unwavering financial support over many years and to the many Nerd Vittles readers who continue to enjoy the benefits of their service offerings. We will keep everyone posted on further developments.


Some Recent Nerd Vittles Articles of Interest…

Practicing Safe SIP: Adding SIP URI and Free DID Connectivity to Asterisk

Last year, we began our exploration of safe SIP options for Asterisk® by introducing a hybrid solution using VoIP.ms for a registered SIP trunk and IPkall for a free DID. Today, in addition to a free IPkall DID to accept incoming PSTN calls, we have a slightly different approach that provides a direct SIP URI address from Sip2Sip.info for your server. As with the original tutorial, today’s implementation preserves our Zero Internet Footprint™ design for total SIP insulation of your server from the Internet. And all of the components to deploy today’s solution are completely free.

PBX in a Flash™ has a long (safe) history in the VoIP community, and the major reason is that we constantly preach never directly exposing any ports on your Asterisk server to the Internet without implementing a WhiteList of safe IP addresses. This Zero Internet Footprint™ design keeps everybody out except a trusted, defined group on your WhiteList. For everyone else, they never see your server. So how do you receive calls?

You do it with phone numbers (DIDs) or SIP URIs tied to registered Google Voice, SIP, and IAX trunks from reputable providers. Because these trunks have constant registrations with safe service providers on the Internet, calls to these DIDs and SIP URIs can flow in and out of your server without exposing your server directly to the Internet. Callers still can contact you, but they do it through an intermediary with whom you have a registered SIP trunk. Thus, the SIP vulnerability (if there is any) remains with the SIP provider and never with your server directly.

For today’s tutorial, we’ll be using the latest and greatest PIAF-Green™ Virtual Machine featuring Asterisk 11 and FreePBX® 2.11. We also recommend installation of Incredible PBX™ 11 which includes Travelin’ Man™ 3 to provide secure WhiteList management for your Asterisk firewall. Here are links to the PIAF-Green VM with Incredible PBX 11 as well as the Travelin’ Man 3 tutorial to get you started. We recommend you configure this using a VirtualBox® virtual machine on your favorite desktop computer just to get comfortable with the setup. Then you can repeat the drill using a dedicated or cloud-based server once you’ve mastered the basics. All of today’s setup will work without making any adjustments to your hardware-based firewall which should be sitting between your desktop computer and the Internet.

Registering for a Sip2Sip Account. Once you have the VoIP platform in place with Asterisk 11, FreePBX 2.11, Incredible PBX 11, and Travelin’ Man 3, you’re ready to add a SIP trunk from Sip2Sip.info. Just sign up for a free account on their site leaving the Account Name field blank. They will email you your credentials. Click on the provided link in the email to access your new account at http://x.sip2sip.info. Your account name will consist of a 10-digit-number@sip2sip.info. To log in, use the default SIP address as shown and leave the password field blank. Then click Login Now. Immediately click on the settings tab, choose an 8-digit numeric password, disable your Voice Mailbox, and click the SAVE button. Your Sip2Sip account is now secure unless someone is lucky enough to guess your password from the 100 million possibilities. You’ll need your 10-digit SIP account number and password to set up your SIP trunk on your Asterisk 11 server in the next step so write them down and then log out of your Sip2Sip account!

FreePBX and Asterisk Configuration Overview. Using a web browser, log into FreePBX® on your server. We’ll need to create several items to get everything working. First, we’ll add a new SIP trunk with your Sip2Sip credentials to handle incoming calls. Second, we’ll add a Custom Trunk to handle outbound calls to Sip2Sip. Third, we’ll add an Inbound Route to process incoming calls. Fourth, we’ll add an Outbound Route so that you can make calls using your outbound Sip2Sip trunk. Calls to other Sip2Sip numbers are free. For the rest, you’ll pay a per minute fee. Whether to use the pay service is completely up to you! Finally, we’ll log into your server as root and add Sip2Sip to your IPtables WhiteList and make two manual adjustments to the Asterisk dialplan to accommodate Sip2Sip’s way of handling SIP calls. Then we’ll restart Asterisk, and you’re done.

  1. Connectivity -> Trunks -> Add SIP Trunk
  2. Connectivity -> Trunks -> Add Custom Trunk
  3. Connectivity -> Inbound Routes -> Add Incoming Route
  4. Connectivity -> Outbound Routes -> Add Route
  5. Enable Sip2Sip in your IPtables WhiteList
  6. Add srvlookup=yes in sip_general_custom.conf
  7. Set enable=yes in dnsmgr.conf
  8. Restart Asterisk: amportal restart

Adding Sip2Sip SIP Trunk. While logged into FreePBX 2.11, choose Connectivity -> Trunks -> Add SIP Trunk. Fill out the form like this using your Sip2Sip 10-digit number and password. Unlike some trunk setups, entering your actual 10-digit Sip2Sip number as the Outbound Caller ID is mandatory, or inbound calls will be rejected by your server. Replace 223XXXXXXX with your actual 10-digit Sip2Sip number in the five places shown below. Replace 12345678 with your actual Sip2Sip password in the two places shown below.

  1. Trunk Name: Sip2Sip
  2. Outbound Caller ID: 223XXXXXXX
  3. Dial Pattern: leave blank
  4. Trunk Name: sip2sip
  5. Trunk Details:
    • type=peer
    • canreinvite=no
    • nat=yes
    • qualify=yes
    • domain=sip2sip.info
    • fromdomain=sip2sip.info
    • outboundproxy=proxy.sipthor.net
    • fromuser=223XXXXXXX
    • defaultuser=223XXXXXXX
    • secret=12345678
    • insecure=invite
    • context=from-trunk
    • host=sip2sip.info&81.23.228.129&81.23.228.150&85.17.186.7
  6. Register String: 223XXXXXXX:12345678@sip2sip.info/223XXXXXXX

Adding Sip2Sip Custom Trunk for Outbound Calling. While logged into FreePBX 2.11, choose Connectivity -> Trunks -> Add Custom Trunk. Fill out the form like this using the entries below:

  1. Trunk Name: sip2sip-out
  2. Dialed Number Matched Pattern: 223NXXXXXX
  3. Custom Dial String: SIP/$OUTNUM$@sip2sip.info

Adding Inbound Route. Next you need to tell FreePBX how to process incoming calls from your Sip2Sip number. Choose Connectivity -> Inbound Routes -> Add Incoming Route and fill out the form to look like this. Change the destination to match whatever you prefer: an extension, ring group, IVR, etc. If you followed last week’s tutorial to install Lenny Encore, then you can choose Lenny as your destination as well.

Adding Outbound Route. Next you need to tell FreePBX how to process outbound calls to your Sip2Sip account. Choose Connectivity -> Outbound Routes -> Add Route and fill out the form to look like this. After you have saved your entries, make certain that you drag the sip2sip-out route to the top of your Outbound Route List (on the right side). Otherwise, 10-digit Sip2Sip calls may inadvertently be processed by one of your other trunks that handles 10-digit numbers. The 3333 and 4444 numbers are test accounts at Sip2Sip to enable you to try out connectivity.

Adding Sip2Sip to Your IPtables WhiteList. We’re assuming you already have installed Travelin’ Man 3 and secured your server by running /root/secure-iptables. If not, start there. Now we need to enable UDP SIP connectivity for Sip2Sip in your WhiteList by running the following commands while logged in as root:

/root/add-fqdn sip2sip sip2sip.info
/root/add-ip sip2sip1 81.23.228.129
/root/add-ip sip2sip2 81.23.228.150
/root/add-ip sip2sip3 85.17.186.7

Making Asterisk Dialplan Adjustments. While still logged into your server as root, issue the following commands to finish up enabling Sip2Sip URI support in Asterisk. The last command verifies that your Sip2Sip trunk is actually registered.

echo "enable=yes" >> /etc/asterisk/dnsmgr.conf
echo "srvlookup=yes" >> /etc/asterisk/sip_general_custom.conf
amportal restart
asterisk -rx "sip show registry"

Adding an IPkall DID for Your SIP URI. We’ve now completed all the steps necessary to receive incoming SIP URI calls using your new Sip2Sip URI: 323XXXXXXX@sip2sip.info. Anyone in the world can dial that SIP URI from a SIP phone, and the calls will be answered by your server. But suppose we’d also like folks to be able to pick up a Plain Old Telephone and call using Sip2Sip.info to route the incoming call through the SIP URI. Here’s the easy way to do it. Just sign up for a free DID at www.ipkall.com. After choosing an area code for your free number, you’ll be prompted for the following information. Here’s what you’d enter using today’s example:

  • Sip2Sip Phone Number: 323XXXXXXX
  • SIP Proxy: sip2sip.info
  • Email Address: your-email-address
  • Password: some-password-to-get-back-into-your-account

Once you’ve completed the form, submit it and wait for your new phone number to be delivered in your email. You should get it within a couple minutes so check your spam folder if you don’t see it. Congratulations! You’ve done everything you need to do for anyone to call you using either your Sip2Sip URI or your new DID number from IPkall.

It’s worth noting that IPkall recycles DIDs that aren’t used for 30 days. If you use Incredible PBX, the easiest way to assure you don’t lose your number is to set up a weekly recurring Telephone Reminder that calls your IPkall number.

Adding SIP URI Dialing with Your Own Domain. Thanks to a great tip from @w1ve on the PIAF Forum, you now can create free SIP URIs using your own domain. Here’s how.

Troubleshooting. If you experience intermittent congestion issues with attempted connections to your SIP URI, try the [from-sip-external] trick outlined in our PIAF Forum posting.

Add Free Calls to 40 Million Asterisk Servers with e164.org. While we’re on a roll of free calling, here’s a simple way to add free calling to 40 million Asterisk servers around the world. Just add your name and phone numbers to the e164.org registry at no cost and configure FreePBX with ENUM support. Then outbound calls to numbers in the e164 registry will always be free as well. The whole setup takes less than 10 minutes. Here’s how.

You already have a SIP URI for your Asterisk server from the Sip2Sip setup above. Now let’s get you signed up with an account on e164.org. Go to the web site and click the Sign Up tab. Go through the sign up drill and then log into your new account. Then click the Phone Numbers tab and add your IPkall phone number to e164. If you have additional DIDs, enter the area code and number for each of them. Then click the Next button. You’ll be warned about not having the number you’ve specified redirected to an IVR. If you already have this DID redirected to an IVR, change the routing temporarily to an extension that you can answer to obtain your PIN before you press Next to proceed. You’ll then be prompted for the SIP address to contact your server. Leave the default SIP protocol and plug in the address you were assigned by Sip2Sip. As soon as you click the Next button, your phone should start to ring, but there may not be a message when you answer. Hang up and wait for the second call within 15 minutes. It will include your PIN. Now click on the Phone Numbers tab and update your phone entry by choosing Enter PIN and typing your assigned PIN. Your phone number now has been activated with the e164 service. To complete the setup, you’ll want to click on the Do Not Call option and make your selections. You also can decide whether to list yourself in the ENUM White Pages directory.

Remember that the real purpose of this drill is to avoid charges when you place outbound calls to numbers in the ENUM directory. We merely added your numbers to e164.org so that others could benefit as well. So the final step before you can start saving money is to configure FreePBX to handle ENUM lookups for outbound calls from your server. One more observation may be helpful. You’ll recall that one of the limitations of FreePBX has always been that once an outbound route was chosen for a call, if the call was completed using the first destination trunk in that route, then the call processing ended there. ENUM adds a new wrinkle because we basically want to connect to ENUM to check for a free route and, if no matching entry is found, then we want the next trunk to process the call. As luck would have it, FreePBX has been tweaked to allow this scenario. All you have to do is create an ENUM trunk and then place it first in your sequence of trunks for each of your outbound routes. If an ENUM entry is found for the number you’re calling, the call will be routed as a free call with a direct SIP connection. Otherwise, the call processing will continue and the call will be routed using the next trunk specified in your outbound route.

There are two steps in FreePBX to implement ENUM. First, create a special ENUM trunk. Second, adjust your Outbound Routes to process outbound calls using the ENUM trunk first. Then the series of trunks you already have specified in each outbound route will be triggered if there is no ENUM path for your call. NOTE: You obviously wouldn’t do this for an emergency 911 outbound route.

In FreePBX, click Connectivity -> Trunks, Add ENUM Trunk. Enter your desired CallerID for these calls. Set a maximum number of channels, if desired, and then leave the other entries blank in most cases. Save your settings and reload your dialplan. Now click Connectivity -> Outbound Routes and adjust the sequence of trunks for each of your existing routes. Be sure to put ENUM in the top position of each desired route. Also make certain that all calls are dialed with a dial string of 1NXXNXXXXXX or NXXNXXXXXX with a Prepend entry of 1 as shown below. Enjoy!


Don’t forget to List Yourself in Directory Assistance so everyone can find you by dialing 411. And add your new number to the Do Not Call Registry to block telemarketing calls. Or just call 888-382-1222 from your new number.


Deals of the Week. There’s still one amazing deal on the street, but you’d better hurry. A new company called Copy.com is offering 20GB of free cloud storage with no restrictions on file size uploads (which are all too common with other free offers). Copy.com has free sync apps for Windows, Macs, and Linux systems. To take advantage of the offer, just click on our referral link here. We get 5GB of extra storage which will help avoid another PIAF Forum disaster.

Originally published: Monday, August 19, 2013


Need help with Asterisk? Visit the PBX in a Flash Forum.


Don’t miss the first-ever FreePBX World on August 27-28 at the Mandalay Bay in Las Vegas. For complete details, see this post on the FreePBX blog.


We are pleased to once again be able to offer Nerd Vittles’ readers a 20% discount on registration to attend this year’s 10th Anniversary AstriCon in Atlanta. Here’s the Nerd Vittles Discount Code: AC13NERD.


Special Thanks to Our Generous Sponsors


FULL DISCLOSURE: ClearlyIP, Skyetel, Vitelity, DigitalOcean, Vultr, VoIP.ms, 3CX, Sangoma, TelecomsXchange and VitalPBX have provided financial support to Nerd Vittles and our open source projects through advertising, referral revenue, and/or merchandise. As an Amazon Associate and Best Buy Affiliate, we also earn from qualifying purchases. We’ve chosen these providers not the other way around. Our decisions are based upon their corporate reputation and the quality of their offerings and pricing. Our recommendations regarding technology are reached without regard to financial compensation except in situations in which comparable products at comparable pricing are available from multiple sources. In this limited case, we support our sponsors because our sponsors support us.

BOGO Bonaza: Enjoy state-of-the-art VoIP service with a $10 credit and half-price SIP service on up to $500 of Skyetel trunking with free number porting when you fund your Skyetel account. No limits on number of simultaneous calls. Quadruple data center redundancy. $25 monthly minimum spend required. Tutorial and sign up details are here.

The lynchpin of Incredible PBX 2020 and beyond is ClearlyIP components which bring management of FreePBX modules and SIP phone integration to a level never before available with any other Asterisk distribution. And now you can configure and reconfigure your new Incredible PBX phones from the convenience of the Incredible PBX GUI.

VitalPBX is perhaps the fastest-growing PBX offering based upon Asterisk with an installed presence in more than 100 countries worldwide. VitalPBX has generously provided a customized White Label version of Incredible PBX tailored for use with all Incredible PBX and VitalPBX custom applications. Follow this link for a free test drive!
 

Special Thanks to Vitelity. Vitelity is now Voyant Communications and has halted new registrations for the time being. Our special thanks to Vitelity for their unwavering financial support over many years and to the many Nerd Vittles readers who continue to enjoy the benefits of their service offerings. We will keep everyone posted on further developments.


Some Recent Nerd Vittles Articles of Interest…

Practicing Safe SIP: Adding SIP URI Connectivity with a Zero Internet Footprint

PBX in a Flash™ has a long (safe) history in the VoIP community, and the major reason is that we constantly preach never directly exposing any ports on your Asterisk® server to the Internet without implementing a WhiteList of safe IP addresses. This Zero Internet Footprint™ design keeps everybody out except a trusted, defined group on your WhiteList. For everyone else, they never see your server. So how do you receive calls? You do it with phone numbers (DIDs) tied to registered Google Voice, SIP, and IAX trunks from reputable providers. Because these trunks have constant registrations with safe service providers on the Internet, calls to these DIDs can flow in and out of your server without exposing your server directly to the Internet.

The drawback of this design is that it rules out inbound SIP URI calls to your server, and these calls typically are free. If you do a lot of international business or have family in far away places, that matters. Using a SIP proxy with Asterisk means anybody with a SIP telephone or a SIP-enabled web app anywhere in the world can punch in a SIP URI such as 1234567@nerdvittles.com, and your phones start ringing.

Practice Safe SIP! Today we’ll show you how easy it is to set up a hybrid SIP URI facility for your server while totally preserving your server’s Zero Internet Footprint. It’s not quite free, but it’s close. If paying 6¢ an hour for incoming calls is too rich for your blood, then stop reading now. For us, it’s a small price to pay to sleep well and avoid a $100,000 phone bill because someone hacked your server through an anonymous SIP attack in the middle of the night. There’s more good news. You may not even be charged the 6¢ an hour tariff.

How It Works. Today’s design works like this. We’ll set up an account with VoIP.ms and then create a standard SIP subaccount. As part of that setup, you can create a random extension on their server and tie that extension to a SIP URI for your subaccount. On our server, we’ll create a new SIP trunk and register to the voip.ms SIP subaccount we just created. This gets us a safe tunnel to make and receive calls using this trunk OR the SIP URI we just created. With this 2-layer SIP design, we’re basically using voip.ms as our anonymous SIP firewall. They get to worry about anonymous SIP attacks, and we pay them 6¢ an hour for inbound SIP URI calls that they pass along and we choose to answer.

There are also some collateral benefits using the hybrid SIP URI approach. First, it means that, instead of paying $1 a month and a penny a minute for calls using an actual DID from voip.ms, you now can take advantage of IPkall’s free DIDs in Washington state. By signing up for one of these, you now have a regular phone number that people can call to reach your server without your having to pay a monthly fee for the DID. In this cellphone era, it doesn’t much matter what the area code of your number happens to be since nationwide cellphone calls are all priced the same. The only cost to you is 6¢ an hour for the inbound calls. Oddly enough, VoIP.ms hasn’t been charging for the calls at least during the last couple weeks of our testing. Don’t count on it forever, but it is good to see they are at least considering a different pricing structure for SIP URI calls.

There’s a security advantage with hybrid SIP URIs as well. By never activating auto-replenishment on a VoIP provider account, your maximum financial exposure if something goes horribly wrong is limited to the prepay balance in your account. Finally, for those that want multiple SIP URIs and multiple DIDs, nothing precludes your repeating this drill. Just add another subaccount to your voip.ms account. So let’s get started.

VoIP.ms Setup. Register for a new account at VoIP.ms if you don’t already have one. This gets you an account with an account number such as 1234567. Don’t ever use your main account. Instead, create a subaccount:

Create a username for this subaccount. It will be your account number, an underscore, and a name of your choosing (up to 12 characters). Make up a very secure password. These are the two pieces you will need to create a SIP trunk on your server so write them down. Leave CallerID Number blank. We can handle that on your Asterisk server. Be sure to select Asterisk for the Device Type. The remaining entries at the top of the form are self-explanatory. Just make your settings match ours.

The bottom section of the form needs to be filled out to create a SIP URI. Make up an extension number for this subaccount, 1010 in our example. Ignore the leading 10 which is only used to make calls between voip.ms subaccounts. This would mean your SIP URI for this subaccount is 12345671010@atlanta.voip.ms where 1234567 is your account number, 1010 is your extension, and atlanta.voip.ms is one of the voip.ms POPs. For the list of available POPs, go to Main Menu -> Account Settings -> Default DID Routing in your Customer Portal. Click Create Account when you’re finished and wait a minute for your settings to propagate to all of the voip.ms servers.

FreePBX 2.10 Setup. Using a web browser, log into FreePBX® on your server. We’ll need to create three items to get everything working. First, we’ll add a new SIP trunk with your voip.ms credentials. Second, we’ll add an Inbound Route to process incoming calls. Third, we’ll add an Outbound Route so that you can make calls using your voip.ms trunk.

  1. Connectivity -> Trunks -> Add SIP Trunk
  2. Connectivity -> Inbound Routes -> Add Incoming Route
  3. Connectivity -> Outbound Routes -> Add Route

Adding VoIP.ms SIP Trunk. While logged into FreePBX 2.10, choose Connectivity -> Trunks -> Add SIP Trunk. Fill out the form like this using your correct subacctname, subacctpassword, desired VoIP.ms host, and whatever 10-digit number you’d like your server to use to identify inbound calls from this VoIP.ms subaccount (12345671010 in the example below). If you plan to use this trunk for outbound calls, enter a CallerID number. Legally, it must be a number that you own, i.e. don’t use the White House number or you may get a call you don’t want. Also be aware that for outbound calls, VoIP.ms rejects 10-digit numbers so you must prepend a 1 to 10-digit calls destined for the U.S. and Canada.

  1. Trunk Name: VoIPms
  2. Outbound Caller ID: any number you own
  3. Dial Pattern: Prepend: 1  Match Pattern: NXXNXXXXXX
  4. Trunk Name: voipms
  5. Trunk Details:
    • canreinvite=nonat
    • nat=yes
    • context=from-trunk
    • host=atlanta.voip.ms
    • secret=yourpassword
    • type=friend
    • username=1234567_subacctname
    • disallow=all
    • allow=ulaw
    • fromuser=1234567_subacctname
    • trustrpid=yes
    • sendrpid=yes
    • insecure=port,invite
    • qualify=yes
  6. Register String: 1234567_subacctname:yourpassword@atlanta.voip.ms/12345671010

Finally, in Settings:SIP Settings, add the following entry at the bottom in the Other SIP Settings field: match_auth_username=yes. Save your changes and reload your dialplan when prompted.

Adding VoIP.ms Inbound Route. While logged into FreePBX 2.10, choose Connectivity -> Inbound Routes -> Add Incoming Route. The only trick to this is the DID Number you enter must match the 10-digit number you chose for the end of the SIP registration string in the last step. The numbers really don’t matter, but they must match because this is what FreePBX uses to identify calls as originating from this SIP Trunk. You use the Inbound Route to tell FreePBX how to route the incoming calls once they hit your PBX. For example, you could ring an extension, a ring group, or route the call to an IVR where the caller was given a list of choices from which to pick their own call routing option. Don’t put your CallerID Number in here or only calls from your number would be accepted! Here’s a typical setup to route the calls to an IVR. Leave the other options at their defaults.

  1. Description: VoIPms
  2. DID Number: 12345671010
  3. CallerID Number: leave blank
  4. CID Source: Caller ID Superfecta
  5. Destination:
    • IVR: nv-ivr

Adding VoIP.ms Outbound Route. How you set up the Outbound Route to handle outgoing calls depends upon what you already have in place. Unless you don’t already have outbound trunks on your PBX, our recommendation is to add a prefix to force certain calls to go out through your VoIP.ms trunk. For example, a caller might dial 9-1-404-555-1212 or 9-404-555-1212 to force the call out through VoIP.ms. We’ll strip off the 9 before passing the number to VoIP.ms, and our Trunk setup will take care of adding the 1 if only 10-digits are dialed. Here’s how to set that up. While logged into FreePBX 2.10, choose Connectivity -> Outbound Routes -> Add Route.

  1. Route Name: VoIPms
  2. Dial Pattern: Prefix: 9  Match Pattern: NXXNXXXXXX
  3. Trunk Sequence: 0 VoIPms

If you have a default Outbound Route that already uses another Trunk such as Google Voice or Vitelity, then you can add a little redundancy to your system by adding VoIPms as an additional option at the end of the Default Trunk Sequence. Then, if the primary outbound route is out of service, the calls will automatically be routed out through VoIP.ms.

Adding an IPkall DID for Your SIP URI. We’ve now completed all the steps necessary to receive incoming SIP URI calls using our example VoIP.ms SIP URI: 12345671010@atlanta.voip.ms. Anyone in the world can dial that SIP URI from a SIP phone, and the calls will be answered by our sample IVR, nv-ivr. But suppose we’d also like folks to be able to pick up a Plain Old Telephone and call us using VoIP.ms to route the incoming call through our SIP URI at the 6¢ per hour calling rate. Here’s the easy way to do it. Just sign up for a free DID at www.ipkall.com. After choosing an area code for your free number, you’ll be prompted for the following information. Here’s what you’d enter using today’s example:

  • SIP Phone Number: 12345671010
  • SIP Proxy: atlanta.voip.ms
  • Email Address: your-email-address
  • Password: some-password-to-get-back-into-your-account

Once you’ve completed the form, submit it and wait for your new phone number to be delivered in your email. You should get it within a couple minutes so check your spam folder if you don’t see it. Congratulations! You’ve done everything you need to do for anyone to call you using either your SIP URI or your new DID number from IPkall.

It’s worth noting that IPkall recycles DIDs that aren’t used for 30 days. If you use Incredible PBX, the easiest way to assure that you don’t lose your number is to set up a recurring Telephone Reminder that calls your own number once a week.

Free iNum DID. There’s another important benefit from signing up for a VoIP.ms account. You’re also eligible for a free iNum DID. This lets people around the world call you by dialing a local number in most countries. And iNum calls are always free with Google Voice. You can read all about how it works and how to set up your free iNum DID in this Nerd Vittles article.

Test Drive. The proof is in the pudding, as they say. So we invite you to take our SIP URI, iNum DID, and IPkall DID for a test drive. They’re all running on a $35 Raspberry Pi with Incredible PBX 3.3 with its Applications AutoAttendant. You can try a news, weather, or stock report as well as checking the current East Coast time. Or you can try a text-to-speech call from the AsteriDex phone book by choosing option 5 and saying one of the airlines in the default install, e.g. American Airlines. Enjoy!

  • SIP URI: 10159521010@raspi.mundy.org
  • iNum DID: 883510009901997
  • IPkall DID: 1-425-998-2778
  • GVoice DID: 1-843-284-6844

Don’t forget to List Yourself in Directory Assistance so everyone can find you by dialing 411. And add your new number to the Do Not Call Registry to block telemarketing calls. Or just call 888-382-1222 from your new number.

Originally published: Thursday, 10/11/12


Astricon 2012. Astricon 2012 will be in Atlanta at the Sheraton beginning October 23 through October 25. We hope to see many of you there. We called Atlanta home for over 25 years so we’d love to show you around. Be sure to tug on my sleeve and mention you’d like a free PIAF Thumb Drive. We’ll have a bunch of them to pass out to our loyal supporters. Nerd Vittles readers also can save 20% on your registration by using coupon code: AC12VIT.


Need help with Asterisk? Visit the PBX in a Flash Forum.


whos.amung.us If you’re wondering what your fellow man is reading on Nerd Vittles these days, wonder no more. Visit our new whos.amung.us statistical web site and check out what’s happening. It’s a terrific resource both for us and for you.


Special Thanks to Our Generous Sponsors


FULL DISCLOSURE: ClearlyIP, Skyetel, Vitelity, DigitalOcean, Vultr, VoIP.ms, 3CX, Sangoma, TelecomsXchange and VitalPBX have provided financial support to Nerd Vittles and our open source projects through advertising, referral revenue, and/or merchandise. As an Amazon Associate and Best Buy Affiliate, we also earn from qualifying purchases. We’ve chosen these providers not the other way around. Our decisions are based upon their corporate reputation and the quality of their offerings and pricing. Our recommendations regarding technology are reached without regard to financial compensation except in situations in which comparable products at comparable pricing are available from multiple sources. In this limited case, we support our sponsors because our sponsors support us.

BOGO Bonaza: Enjoy state-of-the-art VoIP service with a $10 credit and half-price SIP service on up to $500 of Skyetel trunking with free number porting when you fund your Skyetel account. No limits on number of simultaneous calls. Quadruple data center redundancy. $25 monthly minimum spend required. Tutorial and sign up details are here.

The lynchpin of Incredible PBX 2020 and beyond is ClearlyIP components which bring management of FreePBX modules and SIP phone integration to a level never before available with any other Asterisk distribution. And now you can configure and reconfigure your new Incredible PBX phones from the convenience of the Incredible PBX GUI.

VitalPBX is perhaps the fastest-growing PBX offering based upon Asterisk with an installed presence in more than 100 countries worldwide. VitalPBX has generously provided a customized White Label version of Incredible PBX tailored for use with all Incredible PBX and VitalPBX custom applications. Follow this link for a free test drive!
 

Special Thanks to Vitelity. Vitelity is now Voyant Communications and has halted new registrations for the time being. Our special thanks to Vitelity for their unwavering financial support over many years and to the many Nerd Vittles readers who continue to enjoy the benefits of their service offerings. We will keep everyone posted on further developments.


Some Recent Nerd Vittles Articles of Interest…

Interconnecting Incredible PBX Servers with PJsip


Much has been made of the lack of multi-tenant functionality with Asterisk® and FreePBX®. Today we’ll show you how to interconnect as many Asterisk servers as you like and make transparent calls between all of them at zero cost. Setup time is under 5 minutes per server. When you couple PBXs with distributed infrastructure and inexpensive cloud servers costing $25 or less a year and on-premise virtual machine platforms including Proxmox, VMware ESXi, VirtualBox, Windows 11 WSL, and Mac UTM, it makes little sense in terms of reliability and redundancy to put all your eggs in one basket with a MultiTenant telephony solution.

PJsip Interconnection Design

Our basic design goes like this. Create as many decentralized Incredible PBX platforms as you need to cover the various locations of your business. Whether that’s two cities or eighty-nine, the design is the same. Next, use the same extension design at every site. For example, in each location choose 3-digit extensions in the 100 range for management offices and the receptionist, in the 200 range for human resources, in the 300 range for IT services, and so on. Next, number your locations. For nine or fewer cities, use single digits. For up to 89, use two digits beginning with 10. We actually use the last octet of our server’s OpenVPN IP address for the dialing prefix. For our example, we’ll use 1 for the Atlanta office, 2 for Dallas, and 3 for Boston. When someone in Atlanta wishes to call the main human resources number in Dallas, the user would dial 2200. For Boston, they’d dial 3200. And, when someone in Dallas or Boston wishes to reach the main HR number in Atlanta, they’d dial 1200. Assuming the receptionist in each location has extension 100, callers in Dallas would dial 1100 for Atlanta and 3100 for Boston. Hopefully, you get the idea now. Sketch these out on a piece a paper until it all makes sense to you.

You’ll need static IP addresses for each of your Incredible PBX servers. But, if one or more of your servers are sitting behind a corporate firewall, that’s not a deal breaker. Simply set up an OpenVPN network and assign a private OpenVPN IP address to each server. Then use these OpenVPN IP addresses in interconnecting your servers rather than static, public IP addresses. OpenVPN addresses are automatically whitelisted in the Incredible PBX firewall. For other IP addresses, you’ll need to whitelist them using the add-ip utility in the /root folder of each of your PBXs. Be sure to also add the IP addresses of the servers to the ignoreip list in /etc/fail2ban/jail.conf. Note in our design that, for security reasons, PJsip trunks must be created on BOTH the sending and receiving PBXs before interconnected calls between the servers will successfully complete. You wouldn’t want strangers making PJsip calls through your servers. In the alternative, if you only want to enable outbound calls from one PBX to another, you can avoid creating a PJsip trunk on the destination server and instead enable Outbound Authentication on the originating server. In this case, you also will need to enter extension credentials from the destination server in the PJsip Username and Secret fields. But let’s continue on assuming you want calls to flow in both directions.

Using our 3-city example, let’s begin by configuring the Atlanta PBX using the FreePBX GUI. Login to the web interface as admin and navigate to Connectivity -> Trunks. We want to create two PJsip trunks, one to connect to Dallas and another to connect to Boston. Similarly, in Dallas, we’ll create PJsip trunks for Atlanta and Boston. And, in Boston, we’ll create PJsip trunks for Atlanta and Dallas.

Configuring PJsip Trunks For Each Location

On the Atlanta PBX, click the Add Trunk button and choose Add SIP (chan_pjsip) Trunk. For the first PJsip trunk, in the General tab, let’s keep it simple and enter Trunk Name as Dallas. Leave the remaining default settings and click the pjSIP Settings tab. Leave all of the default settings as they are in both the Advanced and Codecs tabs. In the General tab, change the Authentication and Registration settings to None. For the SIP Server IP address, enter the IP address (or OpenVPN address) of the Dallas server. For the SIP Server Port, enter 5061. Finally, change the Context entry to from-internal. That’s all the settings you’ll need. So click Submit and Apply Config when prompted. Repeat the drill for Boston.


Configuring Outbound Routes For Each Location

Next, we need to create two Outbound Routes for calls to Dallas and Boston. Navigate to Connectivity -> Outbound Routes. For each city, click Add Outbound Route. Name the Outbound Route using the city name, e.g. Dallas. Change the Time Zone, if required. For the Trunk Sequence, choose the Trunk with the matching City name from the pull-down menu. Next, click the Dial Patterns tab. Here you’ll need to decide which calls you want to permit between the Headquarters office and Dallas. For the Dallas extensions, you would enter 2 in the Prefix field and NXX in the Match Pattern field. If there are 4-digit numbers on the Dallas PBX that you want to enable for callers from Atlanta, you add another Dial Pattern with the 2 Prefix and NXXX for the Match Pattern. If you want callers from Atlanta to be able to use Outbound Routes on the Dallas PBX to make PSTN calls, you would add another Dial Pattern with the 2 Prefix and NXXNXXXXXX for the Match Pattern. Similar additions could be made for international calls assuming you allow them on your Dallas PBX. Once you’ve added the desired Match Patterns, click Submit and Apply Config when prompted. Repeat these steps to add an Outbound Route for Boston, and you’re finished on the Atlanta PBX.


Repeating the Setup Process in Other Cities

Now simply repeat the steps above on each of your PBXs. For PJsip trunks, you’ll need to create one for every other city in your operation. And, for Outbound Routes, do the same. Once all of your PJsip trunks are activated, you can verify functionality in the Asterisk CLI with this command: pjsip show aors. Once the Status for each city displays as Avail, you can begin making test calls between the servers using a phone connected to each PBX.

Originally published: Tuesday, May 16, 2023


Need help with Asterisk? Visit the VoIP-info Forum.


Special Thanks to Our Generous Sponsors


FULL DISCLOSURE: ClearlyIP, Skyetel, Vitelity, DigitalOcean, Vultr, VoIP.ms, 3CX, Sangoma, TelecomsXchange and VitalPBX have provided financial support to Nerd Vittles and our open source projects through advertising, referral revenue, and/or merchandise. As an Amazon Associate and Best Buy Affiliate, we also earn from qualifying purchases. We’ve chosen these providers not the other way around. Our decisions are based upon their corporate reputation and the quality of their offerings and pricing. Our recommendations regarding technology are reached without regard to financial compensation except in situations in which comparable products at comparable pricing are available from multiple sources. In this limited case, we support our sponsors because our sponsors support us.

BOGO Bonaza: Enjoy state-of-the-art VoIP service with a $10 credit and half-price SIP service on up to $500 of Skyetel trunking with free number porting when you fund your Skyetel account. No limits on number of simultaneous calls. Quadruple data center redundancy. $25 monthly minimum spend required. Tutorial and sign up details are here.

The lynchpin of Incredible PBX 2020 and beyond is ClearlyIP components which bring management of FreePBX modules and SIP phone integration to a level never before available with any other Asterisk distribution. And now you can configure and reconfigure your new Incredible PBX phones from the convenience of the Incredible PBX GUI.

VitalPBX is perhaps the fastest-growing PBX offering based upon Asterisk with an installed presence in more than 100 countries worldwide. VitalPBX has generously provided a customized White Label version of Incredible PBX tailored for use with all Incredible PBX and VitalPBX custom applications. Follow this link for a free test drive!
 

Special Thanks to Vitelity. Vitelity is now Voyant Communications and has halted new registrations for the time being. Our special thanks to Vitelity for their unwavering financial support over many years and to the many Nerd Vittles readers who continue to enjoy the benefits of their service offerings. We will keep everyone posted on further developments.


Interconnecting Asterisk Servers with PJsip and OpenVPN


It’s been several years since we discussed interconnecting Asterisk® servers so today we want to do a version refresh using PJsip Trunking. We also want to show you how easy it is to secure the communications path by setting up the trunks using OpenVPN connections. When we’re finished, you’ll have a FREE way to call between sites using FreePBX® Outbound Routes. Because Incredible PBX comes preconfigured with all the components you’ll need, we’ll use that platform to further simplify the deployment. We’ll be interconnecting two Asterisk servers today, but you can use the same methodology to connect numerous sites.

Deploying OpenVPN with Asterisk Servers

To begin, you’ll want to get all of the sites configured with a virtual private network using OpenVPN. Our tutorial will walk you through the process. Keep in mind that all current releases of Incredible PBX are preconfigured to let you drop in your OpenVPN client credentials by naming them incrediblepbx.ovpn and copying the file into the /etc directory. Rebooting your server will bring up the virtual private network with a 10.8.0.x IP address.

Configuring PJsip Trunks on Your Asterisk Servers

If you remember yesteryear’s knuckle drill configuring SIP or IAX trunks for Asterisk connectivity, you’re in for a pleasant surprise using PJsip trunking with FreePBX. Using the GUI, create a new PJsip trunk for every site to which you want to establish a connection. A similar PJsip trunk must be created on the other site as well. If you’re just interconnecting two servers, then using the City locations for the Trunk Names will suffice. But, if there are more than two servers, specify unique names for each end of every PJsip connection, e.g.

NewYork1 <-> London1
NewYork2 <-> Washington1
NewYork3 <-> Miami1
London2 <-> Washington2
London3 <-> Miami2
Washington3 <-> Miami3

For today, we’ll interconnect a server in New York and London, but we’ll plan for the future and use London1 for the Trunk Name on the New York server and NewYork1 for the Trunk Name on the London server.

Let’s begin by configuring the London1 trunk on the New York server. After entering the London1 Trunk Name in the General tab, click on the pjsip Settings tab. In the General tab, leave the defaults in the first four fields. Then change the Registration field to None. For the SIP Server field, enter the OpenVPN IP address of the London server, e.g. 10.8.0.2. Because we’re using Incredible PBX, the PJsip port is 5061 so enter that in the SIP Server Port field. If you’re using a different flavor of FreePBX, enter the appropriate port number for PJsip on your platform. Next, click on the Advanced tab and enter the London server’s OpenVPN address in the Match (Permit) field, e.g. 10.8.0.2. In the Codecs tab, make note of the enabled codecs and make certain that the entries match on all of your servers. Click the Submit button to save your settings and then reload your dialplan.

Now let’s configure the NewYork1 trunk on the London server. After entering the NewYork1 Trunk Name in the General tab, click on the pjsip Settings tab. In the General tab, leave the defaults in the first four fields. Then change the Registration field to None. For the SIP Server field, enter the OpenVPN IP address of the New York server, e.g. 10.8.0.1. Because we’re using Incredible PBX, the PJsip port is 5061 so enter that in the SIP Server Port field. If you’re using a different flavor of FreePBX, enter the appropriate port number for PJsip on your platform. Next, click on the Advanced tab and enter the New York server’s OpenVPN address in the Match (Permit) field, e.g. 10.8.0.1. In the Codecs tab, make certain that the entries match those on your New York server. Click the Submit button to save your settings and then reload your dialplan. Here’s how it looks in the FreePBX GUI:


Use Outbound Routes to Interconnect Extensions

To keep things simple, let’s assume both your New York and London servers have extensions 701-705. To call an extension on the other server, we will simply dial 9 and then the 3-digit extension, e.g. dialing 9701 on the New York server will ring 701 on the London server and dialing 9701 on the London server will ring 701 on the New York server.

Create an Outbound Route on the New York server called London specifying London1 for the Trunk Sequence in the Route Settings tab. In the Dial Patterns tab, enter 9 in the Prefix field and XXX for the Match Pattern. Click Submit to save your settings and then reload dialplan.


Create an Outbound Route on the London server called New York specifying NewYork1 for the Trunk Sequence in the Route Settings tab. In the Dial Patterns tab, enter 9 in the Prefix field and XXX for the Match Pattern. Click Submit to save your settings and then reload dialplan.

If you’re interconnecting more than two sites, then you probably will want to designate a specific Prefix for every City so that users can travel between sites and use the same methodology to reach the same extensions from every location.

You can test things out using softphones by registering 701 to an extension in New York and another to the 701 extension in London. Now you can place secure and FREE calls between the sites by dialing 9701 from each softphone. Enjoy!

Originally published: Monday, May 2, 2022


Need help with Asterisk? Visit the VoIP-info Forum.


Special Thanks to Our Generous Sponsors


FULL DISCLOSURE: ClearlyIP, Skyetel, Vitelity, DigitalOcean, Vultr, VoIP.ms, 3CX, Sangoma, TelecomsXchange and VitalPBX have provided financial support to Nerd Vittles and our open source projects through advertising, referral revenue, and/or merchandise. As an Amazon Associate and Best Buy Affiliate, we also earn from qualifying purchases. We’ve chosen these providers not the other way around. Our decisions are based upon their corporate reputation and the quality of their offerings and pricing. Our recommendations regarding technology are reached without regard to financial compensation except in situations in which comparable products at comparable pricing are available from multiple sources. In this limited case, we support our sponsors because our sponsors support us.

BOGO Bonaza: Enjoy state-of-the-art VoIP service with a $10 credit and half-price SIP service on up to $500 of Skyetel trunking with free number porting when you fund your Skyetel account. No limits on number of simultaneous calls. Quadruple data center redundancy. $25 monthly minimum spend required. Tutorial and sign up details are here.

The lynchpin of Incredible PBX 2020 and beyond is ClearlyIP components which bring management of FreePBX modules and SIP phone integration to a level never before available with any other Asterisk distribution. And now you can configure and reconfigure your new Incredible PBX phones from the convenience of the Incredible PBX GUI.

VitalPBX is perhaps the fastest-growing PBX offering based upon Asterisk with an installed presence in more than 100 countries worldwide. VitalPBX has generously provided a customized White Label version of Incredible PBX tailored for use with all Incredible PBX and VitalPBX custom applications. Follow this link for a free test drive!
 

Special Thanks to Vitelity. Vitelity is now Voyant Communications and has halted new registrations for the time being. Our special thanks to Vitelity for their unwavering financial support over many years and to the many Nerd Vittles readers who continue to enjoy the benefits of their service offerings. We will keep everyone posted on further developments.