

Another exciting week in the Asterisk® community with the introduction of Asterisk 1.8.2 last Friday. It's now the official PIAF-Purple payload so you can simply download the current ISO to take it for a spin. Most of the pesky bugs in Asterisk 1.8.0 and 1.8.1 now have been addressed. Let us know if you find some new ones.
While the Asterisk Dev Team has been hard at work on Asterisk 1.8.2, we've turned our attention to the cloud and VoIP virtualization. We have three new products to introduce today. The first lets you install PIAF-Purple with Asterisk 1.8.2 using a new OpenVZ template. The second lets you run Incredible PBX 1.8 as a virtual machine using the new PIAF-Purple 1.8.2 OpenVZ template. Finally, we'll show you how to run Incredible PBX 1.8 in the cloud with hosted VoIP service from RentPBX.com for $15 a month with a free local phone number and free Google Voice calling in the U.S. and Canada. So let's get started.
Using the OpenVZ PIAF-Purple Template. If you haven't heard of OpenVZ templates before, you've missed one of the real technological breakthroughs of the last decade. Rather than wading through the usual 30-minute ISO installation drill, with an OpenVZ template, all of the work is done for you. And it's quick. You can build a dozen PIAF-Purple systems using an OpenVZ template in about 15 minutes with a per system cost of less than $50. See Comment #2 below for an extra special Dell half-price server deal this week. And it's incredibly easy to then tie all of these systems together using either SIP or IAX trunks. Just follow our previous tutorial. For resellers and developers that want to try various Asterisk configurations before implementation and for trainers and others that want to host dedicated Asterisk systems for customers, the OpenVZ platform is a perfect fit. Read our original two-part article to get up to speed on Proxmox, virtualization, and IPtables with OpenVZ. Then continue on here.
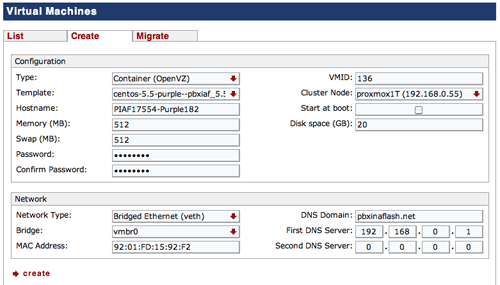
Thanks to Darrell Dillman (aka dad311 on the PIAF Forums), there already is a 64-bit OpenVZ template of PIAF-Purple with Asterisk 1.8.2. Just download the template to your Desktop and then, using the Proxmox console, choose Appliance Templates, Upload File to upload the OpenVZ template into your Proxmox server platform. Once installed, you can build Asterisk 1.8.2 virtual machines to your heart's content... in less than a minute apiece. Just choose Virtual Machine, Create to create a new virtual machine using the OpenVZ template you just uploaded. In the Configuration section, choose OpenVZ for the Type and pick your new OpenVZ template from the pulldown list. Fill in a Host Name, Disk Space maximum (in GB), and (root) Password. The other defaults should be fine. In the Network section of the form, change to the Bridged Ethernet (veth) option which means the VM will obtain its IP address from your DHCP server. Make sure your DNS settings are correct for your LAN. Here's how a typical OpenVZ creation form will look:
Once the image is created, start up the virtual machine, wait about 70 seconds for the system to load, and then click on Open VNC Console. Asterisk will be loaded and running. You can verify this on the status display. You can safely ignore the status messages pertaining to IPtables assuming iptables -nL shows that IPtables is functioning properly. With the exception of text-to-speech (TTS), you now have a PIAF-Purple base platform running Asterisk 1.8.2 and FreePBX 2.8. Be sure you always run it behind a hardware-based firewall with no port exposure to the Internet.
Before you do anything else, run passwd-master to secure the passwords for FreePBX GUI access to your system. Don't forget!
If you're planning to install Incredible PBX below or if you don't need text-to-speech on your system, you can skip this next step which gets 64-bit TTS installed. Otherwise, here are the commands to get it working:
cd /root
./install-flite
Note to Our Pioneers. To those that tested the new OpenVZ template this past week, THANK YOU! Be advised that we now have incorporated several of the recommended tweaks which were documented in the PIAF Forums. The install procedure outlined above explains the new behavior of the slightly improved OpenVZ template which now is available for download. We recommend you switch.
Asterisk CLI Change. Finally, just a heads up that (once again) the Asterisk Dev Team appears to have changed the default behavior of the Asterisk CLI. With Asterisk 1.8.2, if you make outbound calls after loading the CLI, you will notice that call progress no longer appears in the CLI. To restore the standard behavior (since Moses), issue the following command: core set verbose 3. 🙄

Installing Incredible PBX on OpenVZ Systems. We won't repeat the entire Incredible PBX article here. If you want the background on the product, read the latest article. To get everything working with an OpenVZ system, there are only three steps:
1. Set Up Your Google Voice Account
2. Run the Incredible PBX VM Installer
3. Configure a Softphone
Configuring Google Voice. You'll need a dedicated Google Voice account to support The Incredible PBX. The more obscure the username (with some embedded numbers), the better off you will be. This will keep folks from bombarding you with unsolicited Gtalk chat messages, and who knows what nefarious scheme will be discovered using Google messaging six months from now. So why take the chance. Keep this account a secret!
We've tested this extensively using an existing Gmail account, and inbound calling is just not reliable. The reason seems to be that Google always chooses Gmail chat as the inbound call destination if there are multiple registrations from the same IP address. So, be reasonable. Do it our way! Set up a dedicated Gmail and Google Voice account, and use it exclusively with The Incredible PBX. Google Voice no longer is by invitation only so, if you're in the U.S. or have a friend that is, head over to the Google Voice site and register. If you're living on another continent, see MisterQ's posting for some tips on getting set up.
You must choose a telephone number (aka DID) for your new account, or Google Voice calling will not work... in either direction. Google used to permit outbound Gtalk calls using a fake CallerID, but that obviously led to abuse so it's over! You also have to tie your Google Voice account to at least one working phone number as part of the initial setup process. Your cellphone number will work just fine. Don't skip this step either. Just enter the provided 2-digit confirmation code when you tell Google to place the test call to the phone number you entered. Once the number is registered, you can disable it if you'd like in Settings, Voice Setting, Phones. But...
IMPORTANT: Be sure to enable the Google Chat option as one of your phone destinations in Settings, Voice Setting, Phones. That's the destination we need for The Incredible PBX to work its magic! Otherwise, all inbound and outbound calls will fail. If you don't see this option, you may need to call up Gmail and enable Google Chat there first. Then go back to the Google Voice Settings.
While you're still in Google Voice Settings, click on the Calls tab. Make sure your settings match these:
- Call Screening - OFF
- Call Presentation - OFF
- Caller ID (In) - Display Caller's Number
- Caller ID (Out) - Don't Change Anything
- Do Not Disturb - OFF
Click Save Changes once you adjust your settings. Under the Voicemail tab, plug in your email address so you get notified of new voicemails. Down the road, receipt of a Google Voice voicemail will be a big hint that something has come unglued on your PBX.
Running The Incredible PBX Installer. Log into your server as root and issue the following commands to set up The Incredible PBX:
cd /root
rm incrediblepbx18-vm.x
wget http://incrediblepbx.com/incrediblepbx18-vm.x
chmod +x incredible*
./incrediblepbx18-vm.x
passwd-master
When The Incredible PBX install begins, you'll be prompted for the following:
Google Voice Account Name
Google Voice Password
Google Voice 10-digit Phone Number
Gmail Notification Address
FreePBX maint Password
The Google Voice Account Name is the Gmail address for your new dedicated account, e.g. joeschmo@gmail.com. Don't forget @gmail.com! The Google Voice Password is the password for this dedicated account. The Google Voice Phone Number is the 10-digit DID for this dedicated account. We need this if we ever need to go back to the return call methodology for outbound calling. For now, it's not necessary. But who knows what the future holds. 🙄 The Gmail Notification Address is the email address where you wish to receive alerts when incoming and outgoing Google Voice calls are placed using The Incredible PBX. And your FreePBX maint Password is the password you'll use to access FreePBX. You'll actually set it by running passwd-master after The Incredible PBX completes. We need this password to properly configure the CallerID Superfecta for you. By the way, none of this confidential information ever leaves your machine... just in case you were wondering.
Now have another 5-minute cup of coffee, and consider a modest donation to Nerd Vittles... for all of our hard work. 😉 You'll find a link at the top of the page. While you're waiting (and so you don't forget), go ahead and configure your hardware-based firewall to support Google Voice. See the next section for what's required. Without completing this firewall configuration step, no calls will work! When the installer finishes, READ THE SCREEN just for grins.
Here's a short video demonstration of the original Incredible PBX installer process. It still works just about the same way except there's no longer a second step to get things working.
One final word of caution is in order regardless of your choice of providers: Do NOT use special characters in any provider passwords, or nothing will work!
Before you do anything else, run passwd-master again to resecure the passwords for FreePBX GUI access to your system. Don't forget!
Firewall Configuration. We hope you've taken our advice and installed a hardware-based firewall in front of The Incredible PBX. It's your phone bill. You'll need to make one adjustment on the firewall. Map UDP 5222 traffic to the internal IP address of The Incredible PBX. This is the port that Google Voice uses for phone calls and Google chat. You can decipher the IP address of your server by logging into the server as root and typing status.
Extension Password Discovery. If you're too lazy to look up your extension 701 password using the FreePBX GUI, you can log into your server as root and issue the following command to obtain the password for extension 701 which we'll need to configure your softphone or color videophone in the next step:
mysql -uroot -ppassw0rd -e"select id,data from asterisk.sip where id='701' and keyword='secret'"
The result will look something like the following where 701 is the extension and 18016 is the randomly-generated extension password exclusively for your Incredible PBX:
+-----+-------+
id data
+-----+-------+
701 18016
+-----+-------+
Configuring a SIP Phone. There are hundreds of terrific SIP telephones and softphones for Asterisk-based systems. Once you get things humming along, you'll want a real SIP telephone such as the $50 Nortel color videophone we've recommended above. You'll also find lots of additional recommendations on Nerd Vittles and in the PBX in a Flash Forum. If you're like us, we want to make damn sure this stuff works before you shell out any money. So, for today, let's download a terrific (free) softphone to get you started. We recommend X-Lite because there are versions for Windows, Mac, and Linux. So download your favorite from this link. Install and run X-Lite on your Desktop. At the top of the phone, click on the Down Arrow and choose SIP Account Settings, Add. Enter the following information using your actual password for extension 701 and the actual IP address of your Incredible PBX server instead of 192.168.0.251. Click OK when finished. Your softphone should now show: Available.
Incredible PBX Test Flight. The proof is in the pudding as they say. So let's try two simple tests. First, let's place an outbound call. Using the softphone, dial your 10-digit cellphone number. Google Voice should transparently connect you. Answer the call and make sure you can send and receive voice on both phones. Second, from another phone, call the Google Voice number that you've dedicated to The Incredible PBX. Your softphone should begin ringing shortly. If not, make certain you are not logged into Google Chat on a Gmail account with these same credentials. If everything is working, congratulations!
Here's a brief video demonstration showing how to set up a softphone to use with your Incredible PBX, and it also walks you through several of the dozens of Asterisk applications included in your system.
Solving One-Way Audio Problems. If you experience one-way audio on some of your phone calls, you may need to adjust the settings in /etc/asterisk/sip_custom.conf. Just uncomment the first two lines by removing the semicolons. Then replace 173.15.238.123 with your public IP address, and replace 192.168.0.0 with the subnet address of your private network. There are similar settings in gtalk.conf that can be activated although we've never had to use them. In fact, we've never had to use any of these settings. After making these changes, save the file(s) and restart Asterisk: amportal restart.
Running Incredible PBX in the Cloud. We've saved the best for last today. For many folks, you may want to experiment with VoIP technology without making a hardware investment and without having to master the intricacies of managing your own server and network. That's what Cloud Computing is all about. And we've searched far and wide to find you the perfect platform. As with many of you, one of our top priorities is always cost. While many providers were willing to provide Nerd Vittles with a few sheckles for pitching their product, only one stepped forward with a price point that we think is irresistible. And, for the record, we waived any compensation other than a few test accounts to get things working properly, so that all of the savings could be passed on to you! So here's the deal. $15 a month gets you your own PIAF-Purple server in the cloud at RentPBX.com. Just use this coupon code: BACK10, pick an east coast or west coast server to host your new system, choose the PIAF-Purple 1.7.5.5.4 install option, set up a username and very secure password, and you're off to the races. Once your account is established, here's the 5-minute procedure to install the special RentPBX-edition of Incredible PBX to begin making free calls in the U.S. and Canada through Google Voice.
Begin by Configuring Google Voice as outlined above. Then log into your RentPBX account using SSH and the port assigned to your account. For Windows users, download Putty from here. The SSH command will look something like this:
ssh -p 21422 root@209.249.149.108
Issue the following commands to download and run The Incredible PBX installer for RentPBX:
cd /root
wget http://incrediblepbx.com/incrediblepbx18-rentpbx.x
chmod +x incrediblepbx18-rentpbx.x
./incrediblepbx18-rentpbx.x
passwd-master
Now just follow along in the Incredible PBX virtual machine tutorial which we've included above. Remember that your new Incredible PBX is sitting directly on the Internet! So don't forget to run passwd-master when you finish the install, or your system is vulnerable. Ours was attacked within minutes!
Securing Your RentPBX Server. With the exception of our WhiteList application, everything is working on your RentPBX server. While we continue to work on the WhiteList component (reread this section of the article in a week or so to get the latest updates), you need to secure your system to avoid endless hack attempts on your SIP resources. Here's how. First, write down the IP addresses of your RentPBX server and your home network. Second, print out your existing IPtables configuration. The file to print is /etc/sysconfig/iptables. Third, make a backup copy of the file. While logged into your server with SSH, the easiest way is like this:
cd /etc/sysconfig
cp iptables iptables.bak
Now we need to edit the iptables file itself: nano -w iptables. Then search for the line that contains 5060: Ctrl-W, 5060, Enter. At the beginning of this line, add # to comment out the line. With the cursor still on this line, press Ctrl-K then Ctrl-U twice. This will duplicate the line. Move to the second commented line and remove #. Use the right cursor to move across the line to --dport. Then insert the following using the IP address of your RentPBX server, e.g.
-s 229.149.129.248
Be sure there's at least one space before and after the new text. Now duplicate that line with Ctrl-K and Ctrl-U twice. Change the IP address on the second line to the public IP address of your home or office network. Repeat this process for every IP address where you intend to use a SIP phone connected to your RentPBX server. Make additional entries for your SIP providers as well. If you want to sleep better, you can make similar changes to the SSH port entry to restrict it to your home/office IP address. It's the line immediately above the 5060 entry. Ditto for port 80 which is web access. Be very careful here. A typo will lock you out of your own server! When you're finished, save the changes: Ctrl-X, Y, Enter. Then restart IPtables: service iptables restart.
As always, we strongly recommend that you not put all of your VoIP eggs in one basket. Google Voice does go down from time to time. Vitelity is a perfect complement because the costs are low and you only pay for the service you use. A discount sign up link is below. And Vitelity has contributed generously to both the Nerd Vittles and PBX in a Flash projects. So please support them. Enjoy!
Originally published: Monday, January 17, 2011
Need help with Asterisk? Visit the PBX in a Flash Forum.
Or Try the New, Free PBX in a Flash Conference Bridge.
whos.amung.us If you're wondering what your fellow man is reading on Nerd Vittles these days, wonder no more. Visit our new whos.amung.us statistical web site and check out what's happening. It's a terrific resource both for us and for you.
Special Thanks to Our Generous Sponsors
FULL DISCLOSURE: ClearlyIP, Skyetel, Vitelity, DigitalOcean, Vultr, VoIP.ms, 3CX, Sangoma, TelecomsXchange and VitalPBX have provided financial support to Nerd Vittles and our open source projects through advertising, referral revenue, and/or merchandise. As an Amazon Associate and Best Buy Affiliate, we also earn from qualifying purchases. We’ve chosen these providers not the other way around. Our decisions are based upon their corporate reputation and the quality of their offerings and pricing. Our recommendations regarding technology are reached without regard to financial compensation except in situations in which comparable products at comparable pricing are available from multiple sources. In this limited case, we support our sponsors because our sponsors support us.
BOGO Bonaza: Enjoy state-of-the-art VoIP service with a $10 credit and half-price SIP service on up to $500 of Skyetel trunking with free number porting when you fund your Skyetel account. No limits on number of simultaneous calls. Quadruple data center redundancy. $25 monthly minimum spend required. Tutorial and sign up details are here.
The lynchpin of Incredible PBX 2020 and beyond is ClearlyIP components which bring management of FreePBX modules and SIP phone integration to a level never before available with any other Asterisk distribution. And now you can configure and reconfigure your new Incredible PBX phones from the convenience of the Incredible PBX GUI.
VitalPBX is perhaps the fastest-growing PBX offering based upon Asterisk with an installed presence in more than 100 countries worldwide. VitalPBX has generously provided a customized White Label version of Incredible PBX tailored for use with all Incredible PBX and VitalPBX custom applications. Follow this link for a free test drive!
Special Thanks to Vitelity. Vitelity is now Voyant Communications and has halted new registrations for the time being. Our special thanks to Vitelity for their unwavering financial support over many years and to the many Nerd Vittles readers who continue to enjoy the benefits of their service offerings. We will keep everyone posted on further developments.
Some Recent Nerd Vittles Articles of Interest...
When will you guys be releasing an Amazon EC2 AMI? Would go perfect with their Free accounts: http://aws.amazon.com/free/
Just a heads up that Dell’s T110 with Intel® Xeon® X3430, 2.4 GHz, 8M Cache, 250GB SATA drive, 8GB RAM, and 10/100/1000 NIC is available for half price this week at $567 with Coupon: CCQ48QK2?Z1N2W
A major SIP security vulnerability was discovered in all versions of Asterisk today. You can read all about it here.
We have developed a script which will quickly patch your system and eliminate the problem. Log into your server as root and issue the following commands:
cd /root
wget http://incrediblepbx.com/sipfix
chmod +x sipfix
./sipfix
Please apply this patch immediately to protect your server!
New PIAF-Purple OpenVZ Template with SIP Security Patch Now Available at SourceForge.net.
I received this message this morning that some people in the Central part of the US may find of use.
==================
Dear xxx,
I would like to let you know that we have a new node available in Chicago. Based on your location, you may have better connection to this server. If you like to move, please let us know by file a ticket.
You need to backup the old server and restore your current configuration in the new server.
Please do not fell obligated to move. If you are happy where you are, please do stay.
A new Google Voice quirk appeared today. If you have problems receiving incoming calls, visit this thread on the PIAF Forums for the fix.
Hi Ward, Thanks for the work and for staying on top of things. I see that there are two incredible PBX installs, incrediblepbx18-vm.x and incrediblepbx18.x. Am I correct if I say the 1st one if for vmware installation since it ends with vm.x?
[WM: The -vm version is for all virtual machines especially those that are not behind a hardware-based firewall.
I’m really interested in implementing this as we already use Prxomox VE for virtualizing several other apps. But I have a question of the version. All of your guides recommend Proxmox 1.3 or 1.4. Is that the newest version of Proxmox that you recommend? I’ve read some posts mentioning problems installing Dahdi on new versions of Proxmox? Are those still around or is it safe to install Asterisk/Dahdi on Proxmox 1.7? Conferencing and call quality are really high on our priority list.