

As you probably know, Digium® announced that Skype for Asterisk® would not be available for sale or activation after July 26, 2011. Here we are in November. So what to do? If you're looking for a commercial solution, you're S.O.L. But, if you have a non-commercial PBX for personal use1, then keep reading. We'll walk you through, step-by-step, getting Skype integrated into your PBX in a Flash or Incredible PBX environment. It's easy, but it's a manual process. If you follow the steps below in order, you'll be up and running in about 15 minutes.
Prerequisites. For today's project, we're assuming you have an existing Incredible PBX server running CentOS 5.7. If not, here's our tutorial to get you up and running quickly. You'll also need a keyboard, mouse, and monitor. We strongly recommend a dedicated server such as an Atom-based PC. If you're using a virtual machine, then you'll need a sound card alternative. Try this: /sbin/modprobe snd-dummy.
UPDATE: We've revised this article a bit to accommodate PIAF2 with CentOS 6.2 and Incredible PBX 3. Keep in mind that Skype is a 32-bit application so we strongly recommend a 32-bit platform if reliability matters to you.
Step 1. For inbound Skype calling to work with other implementations including generic PBX in a Flash systems, you'll need to create a SIP URI for your Asterisk server: mothership@127.0.0.1. You do NOT need to expose the SIP port(s) of your Asterisk server to the Internet, and we strongly recommend that you don't! We've previously explained how to set up a SIP URI in this article. The Incredible PBX includes this SIP URI functionality out of the box.
Step 2. You'll also need Java 1.5. To see if it's included in your distribution, issue the following command: rpm -q jdk. If your particular Asterisk distribution doesn't have JAVA 1.5 or higher installed (rpm -q jdk), here's how to do it. Go to the Oracle Technology Network, sign up for a free Oracle web account and log in. While still logged in, accept the binary code license agreement, and click on this link to download jdk-6u12-linux-i586-rpm.bin. Then copy the file to /root on your Asterisk server. Make the file executable (chmod +x jdk-6u12-linux-i586-rpm.bin) and then run it. Scroll down the wordy license agreement AGAIN and type yes. Java 1.6 then will be installed on your system. Whew!
Step 3. You'll also obviously need a dedicated Skype account for your Asterisk server. If you don't have one to spare, download the Skype software for your Mac or Windows PC, and sign up for a free account. You can try out your account by calling our demo hotline: nerdvittles. Get this working on your Mac or PC before proceeding! Then be sure you log out and disable automatic logins on reboot, or you'll have a problem down the road with two machines trying to log in to a single Skype account.
Step 4. Now we're ready to install the remaining software components that your server will need to access Skype. Log into your Asterisk server as root and issue the following commands.
cd /root
mkdir skype
cd skype
wget http://download.skype.com/linux/skype_static-2.1.0.47.tar.bz2
tar jxvf skype_static*
yum -y install xorg-x11-server-Xvfb
yum -y install qt4
yum -y install xterm
yum -y install libXScrnSaver.i386 < == use this for CentOS 5.x #yum -y install libXScrnSaver <== use this for CentOS 6.x wget http://incrediblepbx.com/siptosis.tgz cd .. wget http://incrediblepbx.com/skype-start chmod +x skype-start cp skype-start skype/. cd / tar zxvf /root/skype/siptosis.tgz cd /root/skype
If you'd prefer to avoid all the typing, you can issue the following commands to download a script that will do all the heavy lifting for you. This is for CentOS 5.x systems only:
cd /root
wget http://incrediblepbx.com/skype-setup
chmod +x skype-setup
./skype-setup
For PIAF2 systems running CentOS 6.x, use this instead:
cd /root
wget http://incrediblepbx.com/skype-setup2
chmod +x skype-setup2
./skype-setup2
Step 5. Now there are a few steps to manually configure the software components so that the entire Skype startup process can be automated when your server boots in the future. To begin, you'll need to fire up X-Windows which puts your server in graphics mode. This is the only mode that Skype understands. While logged into your server as root, issue the following command: xinit
NOTE: If xinit won't start on your particular machine, you may need to create /etc/X11/xorg.conf. Here's a generic config file that should work fine for CentOS 5.x systems:
Section "ServerLayout"
Identifier "X.org Configured"
Screen 0 "Screen0" 0 0
EndSectionSection "Device"
Identifier "Card0"
Driver "vesa"
EndSectionSection "Screen"
Identifier "Screen0"
Device "Card0"
SubSection "Display"
Viewport 0 0
Depth 16
Modes "800x600"
EndSubSection
SubSection "Display"
Viewport 0 0
Depth 16
Modes "800x600"
EndSubSection
EndSection
For PIAF2 users, some have reported issues on Atom machines with seeing a display at all after xinit loads. If this happens to you, don't panic. Simply log into your server from a PC or MAC using SSH. Then run: vncserver :1. Set a password for VNC, and then use a VNC client on your PC or Mac to access VNC at the IP address of your server on display port 1. Now you can continue with Step 6, below.
Step 6. Now we're ready to start up Skype, and get it properly configured. There are two important requirements. First, we want to make sure your credentials are saved for automatic login in the future. And second, we want to configure Skype to run in a minimized state each time it restarts. To begin, click in the white graphics window on your screen using your mouse and issue these commands:
cd /root/skype/skype_static-2.1.0.47
./skype
Click on the Accept button to accept the Skype license agreement. Once Skype loads, enter your Skype Name and Password. Before clicking on Sign In, be sure to check the Automatic Sign In box so that you'll be logged in automatically in the future. Once you're logged in, click on the blue S in the lower left corner of the window to access the Skype Main Menu. Then click Options. When the General tab displays, check the box which says Start Skype minimised in the system tray. Then click the Apply button. To test things out, click on the Sound Device tab and then Make a Test Call. Once you're sure everything is working, click the Close button. Now click on the blue S again and click Quit to shut down Skype.
Step 7. Now we're ready to integrate Skype into the SipToSis middleware so that Asterisk can communicate with Skype. Issue the following commands to start Skype in background mode and then start SipToSis. Be sure to write down the PID for Skype in case we need to kill the app if something goes wrong.
./skype &
cd /siptosis
./SipToSis_linux
A message from Skype will pop up asking if you want to authorize external use of Skype. Before clicking Yes, be sure to click the Checkbox to Remember This Selection for future connections! When you click Yes, you'll see the SipToSis CLI indicating that it's waiting for a Skype call.
If you've installed this on an Incredible PBX, Skype should now be functional. From another Skype account, just call the Skype Name that you used to set this up, and your Asterisk extensions should start ringing. To test outbound Skype calling, use an X-Lite softphone connected to an extension on your Asterisk server and dial *echo123 to access Skype's call testing service or *nerdvittles to access our demo.
All that remains is to configure your server to automatically start Skype and SipToSis whenever your system is restarted. Here's how. Press Ctrl-Alt-F2 to get a new login prompt on your server. Log in as root and issue the following command:
echo "/root/skype-start" >> /etc/rc.d/rc.local
Now reboot your server and make sure everything is working.
Navigation Tips. Here are a few navigation tips for managing your Asterisk console on CentOS systems once Skype has been installed:
1. Ctrl-Alt-F2 gets you a new login prompt for your server
2. Ctrl-Alt-F7 gets you back to the SipToSis/Skype session. You can kill SipToSis by holding down Ctrl-C for several seconds. To find the Skype PID: pidof skype. To kill Skype: kill pid#. To restart Skype: skype & and to restart SipToSis, just issue the command again: ./SipToSis_Linux
3. Ctrl-Alt-F9 gets you to the Asterisk CLI.
Setting Up Speed Dials for Skype Friends. One of the wrinkles with Skype is that Skype uses names for its users rather than numbers. If you don't have a SIP URI-capable softphone, there's still an easy way to place calls to your Skype friends using FreePBX®. Just add a Speed Dial number to your FreePBX dialplan. Choose Extension, then select the Custom type, provide an Extension Number which is the Speed Dial number (this could actually spell your friend's name using a TouchTone phone), enter a Display Name for your friend, and add an optional SIP Alias. Then insert the following in the dial field replacing joeschmo with your friend's actual Skype name. Save your entries and reload the dialplan when prompted.
SIP/joeschmo@127.0.0.1:5070
Security Warning. One final note of caution. Do NOT expose UDP port 5070 to the Internet unless you first secure this port with a username and password to avoid Internet intruders using your gateway as a free Skype dialing platform! You do not need 5070 exposed to the Internet to implement today's gateway solution for inbound or outbound Skype calling from your Asterisk server so we recommend you keep it securely behind at least a hardware-based firewall.
FreePBX Design. For those not using Incredible PBX, here is the FreePBX setup that Incredible PBX uses and that we recommend. For outbound Skype calls, you have two choices.
1. To place a call to a regular phone number using SkypeOut (which costs you money), you'll simply dial 8 plus the area code and number. Our foreign friends will have to adjust their dialplans and /siptosis/SkypeOutDialingRules.props accordingly. Today's setup assumes 10-digit phone numbers!
2. To place a call to a Skype username using a softphone that supports SIP URI dialing such as X-Lite, you simply precede the Skype username with an asterisk, e.g. *echo123 will connect you to the Skype Call Testing Service or *nerdvittles will connect you to the Nerd Vittles Skype demo.
For incoming Skype calls, the default setup routes those calls to a SIP URI: mothership@127.0.0.1. Whether you point this URI to an extension, ring group, or IVR is up to you. In the default Incredible PBX build, the mothership URI is pointed to the Stealth AutoAttendant, an IVR that plays a welcoming message and then transfers the call to a ring group if no digit is pressed by the caller.
Configuring FreePBX. To put this setup in place, use a web browser to access FreePBX on your Asterisk server. You'll need to create a Custom Trunk and then an Outbound Route.
1. Choose Setup, Add Trunk, Add Custom Trunk. Fill in the form so that it looks like the following using your own CallerID number obviously:
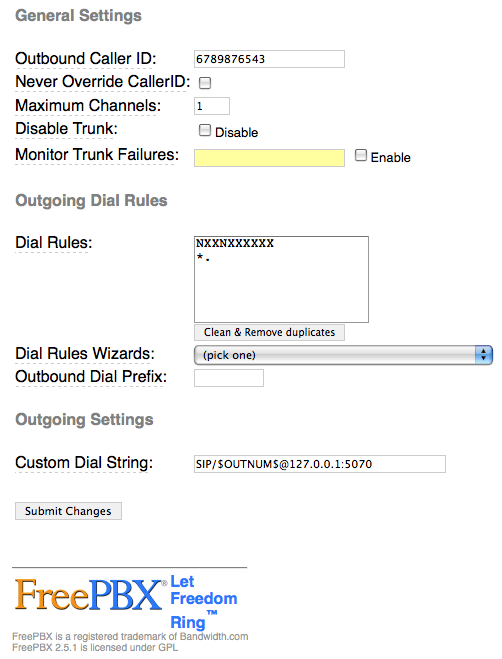
When you're finished, click the Submit Changes button and then reload the dialplan when prompted.
2. Next choose Setup, Outbound Routes, Add Route. Fill in the form so that it looks like this:
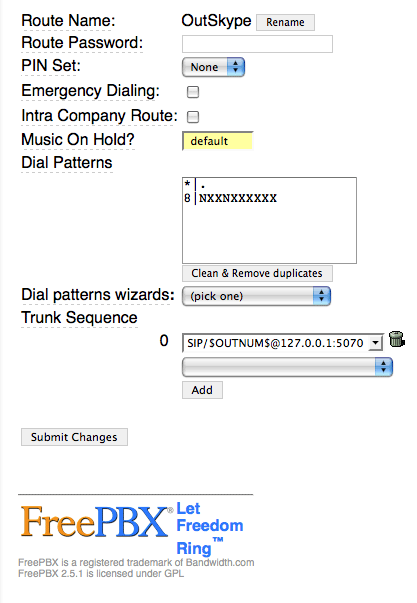
When you're finished, click the Submit Changes button. Be sure to move this new OutSkype route to the top position in your Outbound Routes listing in the right margin! Then reload the dialplan when prompted.
3. If you're not using Incredible PBX, add a new DayNight Control 1 option while you're still in FreePBX. Just specify where you want calls routed for Day mode and Night mode. Then, here's the easy way to activate SIP URI support on your Asterisk/FreePBX server. Copy the [from-sip-external] context from the extensions.conf file in /etc/asterisk. Now copy the content into extensions_override_freepbx.conf. Be sure to preserve the context name in brackets! On a FreePBX 2.8 system, make it look like the following. The additions we're making are shown in bold below:
[from-sip-external]
;give external sip users congestion and hangup
; Yes. This is _really_ meant to be _. - I know asterisk whinges about it, but
; I do know what I'm doing. This is correct.
exten => _.,1,NoOp(Received incoming SIP connection from unknown peer to ${EXTEN})
exten => _.,n,Set(DID=${IF($["${EXTEN:1:2}"=""]?s:${EXTEN})})
exten => _.,n,Goto(s,1)
exten => s,1,GotoIf($["${ALLOW_SIP_ANON}"="yes"]?from-trunk,${DID},1)
exten => mothership,1,Goto(app-daynight,1,1)
exten => s,n,Set(TIMEOUT(absolute)=15)
exten => s,n,Answer
exten => s,n,Wait(2)
exten => s,n,Playback(ss-noservice)
exten => s,n,Playtones(congestion)
exten => s,n,Congestion(5)
exten => h,1,NoOp(Hangup)
exten => i,1,NoOp(Invalid)
exten => t,1,NoOp(Timeout)
Finally, reload your Asterisk dialplan, and we're finished with Asterisk and FreePBX setup:
asterisk -rx "dialplan reload"
Fedora Builds. For those using recent Fedora builds, these systems have a full implementation of X-Windows and KDE. Just start the system in mode5 (graphics mode), log in, run Skype in one window and start up SipToSis in a terminal window using the commands in Step 7 above. Authorize external use of Skype when prompted.
Where To Go From Here. Well, those are the basics. You now can make one outbound Skype call at a time from your Asterisk server, and you can receive an inbound Skype call on any Asterisk extension when Skype users call your regular Skype name. If you want multiple Skype account support, then you'll need to do some tweaking. What you'll need is the STS Trunk Builder toolkit which is free, but proprietary. Enjoy!
Originally published: Tuesday, November 1, 2011
Great News! Google Plus is available to everyone. Sign up here and circle us. Click these links to view the Asterisk feed or PBX in a Flash feed on Google+.


Need help with Asterisk? Visit the PBX in a Flash Forum.
Or Try the New, Free PBX in a Flash Conference Bridge.
whos.amung.us If you're wondering what your fellow man is reading on Nerd Vittles these days, wonder no more. Visit our new whos.amung.us statistical web site and check out what's happening. It's a terrific resource both for us and for you.
Special Thanks to Our Generous Sponsors
FULL DISCLOSURE: ClearlyIP, Skyetel, Vitelity, DigitalOcean, Vultr, VoIP.ms, 3CX, Sangoma, TelecomsXchange and VitalPBX have provided financial support to Nerd Vittles and our open source projects through advertising, referral revenue, and/or merchandise. As an Amazon Associate and Best Buy Affiliate, we also earn from qualifying purchases. We’ve chosen these providers not the other way around. Our decisions are based upon their corporate reputation and the quality of their offerings and pricing. Our recommendations regarding technology are reached without regard to financial compensation except in situations in which comparable products at comparable pricing are available from multiple sources. In this limited case, we support our sponsors because our sponsors support us.
 BOGO Bonaza: Enjoy state-of-the-art VoIP service with a $10 credit and half-price SIP service on up to $500 of Skyetel trunking with free number porting when you fund your Skyetel account. No limits on number of simultaneous calls. Quadruple data center redundancy. $25 monthly minimum spend required. Tutorial and sign up details are here.
![]() The lynchpin of Incredible PBX 2020 and beyond is ClearlyIP components which bring management of FreePBX modules and SIP phone integration to a level never before available with any other Asterisk distribution. And now you can configure and reconfigure your new Incredible PBX phones from the convenience of the Incredible PBX GUI.
The lynchpin of Incredible PBX 2020 and beyond is ClearlyIP components which bring management of FreePBX modules and SIP phone integration to a level never before available with any other Asterisk distribution. And now you can configure and reconfigure your new Incredible PBX phones from the convenience of the Incredible PBX GUI.
 VitalPBX is perhaps the fastest-growing PBX offering based upon Asterisk with an installed presence in more than 100 countries worldwide. VitalPBX has generously provided a customized White Label version of Incredible PBX tailored for use with all Incredible PBX and VitalPBX custom applications. Follow this link for a free test drive!
 Special Thanks to Vitelity. Vitelity is now Voyant Communications and has halted new registrations for the time being. Our special thanks to Vitelity for their unwavering financial support over many years and to the many Nerd Vittles readers who continue to enjoy the benefits of their service offerings. We will keep everyone posted on further developments.
Some Recent Nerd Vittles Articles of Interest...
- Excerpt from the Skype Terms of Service: "Subscriptions are for individual use only. Each subscription is to be used by one person only and is not to be shared with any other user (whether via a PBX, call centre, computer or any other means). Each subscription is to be used for your own personal communication purposes only, to make calls to another individual. The use of the subscription for commercial gain, such as calling numbers specifically to generate income for yourself or others by placing such calls, is not permitted. Unusual call patterns may be considered indicative of such use and may result in us terminating your subscription and blocking your User Account in accordance with paragraph 11.2." [↩]


Some folks had a problem with the original siptosis download link. The download now has been added to a different server. Our apologies.
There is a little tricky to start skype on CentOS 6 x64.
Need to install some libs:
yum install libasound.so.2 libXv.so.1 libXss.so.1 libSM.so.6 libXi.so.6 libXrender.so.1 libXrandr.so.2 libfreetype.so.6 libfontconfig.so.1 libz.so.1 libgthread-2.0.so.0 libstdc++.so.6 libQtDBus.so.4 libQtGui.so.4 pulseaudio-libs.i686
When I recall siptosis , no skype authorization windows pops up….
It seems siptosis don’t run. Java and Skype are ok.
[WM: See this thread on the PIAF Forum for the latest updates.]
Also Skype authentication windows (at skype startup) stays idle even for 1 or 2 minutes before skype is usable
Next all skype use is ok. Any idea ??
[WM: See this thread on the PIAF Forum for the latest updates.]
give me voip sites similar to skype. where you can search and find people