
 We’ve pretty well documented how you can set up Bluetooth Proximity Detection using a bluetooth headset or cellphone with your Asterisk® PBX. Once configured, phone calls in your home or office can automatically be transferred to your cellphone whenever you take off carrying your bluetooth device. In our original articles, you’ll recall that we recommended a bluetooth headset as the ideal way to track your comings and goings at very little cost. But today, we want to add another bit of magic to the project and also give you something to tell Santa about. It’s the incredible Tom Tom Go, a portable GPS device that has the Garmin’s of the world shaking in their boots because this thing is so easy to use and just does everything right. Having endured absolutely terrible built-in GPS units in both Cadillac and Mercedes Benz automobiles and not-much-better Garmin units, take it from us. Buy a TomTom. Our Cadillac GPS had to be replaced four times and finally with a unit from a later 2005 Escalade before you could store a location and call it up without crashing the entire system. And GM wonders why they’re losing money. Worse yet, to put a name with a location using the Mercedes GPS still requires a trip to the manual. It’s that painful and unintuitive! So, when your friendly car dealer touts the built-in GPS devices in their automobiles, JUST SAY NO! We haven’t seen a built-in unit yet that doesn’t suck.
Some Hints for GPS manufacturers: Nobody wants a GPS that reproduces an entire paper street map on a 4 inch screen. We’re trying to figure out how to get somewhere! What’s important is the name of the street you’re on, the names of the next few cross streets, and how far to drive until the next turn. Which way to turn with a little advance warning is also a nice touch. And, by the way, we’re smart enough to know not to be fiddling with the GPS while the car is moving so don’t lock the damn unit when the car is moving. In case you haven’t heard, some cars can actually have more than one person riding in them at the same time. They’re called passengers, and they can even chew gum and operate a GPS while seated in the passenger seat. Bozos! Here’s the best hint of all: Go buy a TomTom for you and your company and copy what they’ve done.
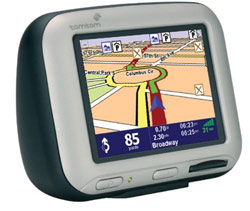
TomTom at a Glance. With the TomTom, you can either get the flash drive model 300 with the entire U.S. and Canada maps on a single chip, or there’s a hard disk version 700 which also gives you a hands-free speakerphone and phonebook for use with your compatible bluetooth cellphone. Treo 650 fans are SOL. Both TomTom models provide automatic route calculation and turn-by-turn directions through a built-in speaker. And, with either unit, you also can get traffic reports and the latest weather forecasts not to mention points of interest alerts showing where every "safety" camera is located in many European countries. If you can’t figure out how to use a TomTom in under 15 minutes, you need to stay away from anything that uses electricity. Yes, it’s that good. And all the TomTom units are Linux-based so you can download the source code and build your own GPS if that’s your thing. Circuit City will even let you try a TomTom for two weeks and return it for a full refund. So take them up on the offer. Then, if you decide to buy one, take the Circuit City unit back and buy it on the web. It’ll save you over $200! With the current $50 rebate and free U.S. traffic reports, the TomTom Go 300 can be purchased for under $500 with some careful shopping (HINT: PriceGrabber.com). See how nice we are! We could have encouraged you to click on the link below and actually make us a little money … but who needs it, right?
Using a TomTom for Proximity Detection. Once you have your TomTom Go device, you also can use it in our Bluetooth Proximity Detection system in lieu of a headset. Here’s how. Because the TomTom unit is designed to allow you to download weather reports and traffic information using your bluetooth-enabled cellphone, that, of course, means the TomTom unit talks bluetooth. So, just like your bluetooth headset, the only trick is discovering the MAC address of the TomTom’s built-in bluetooth adapter. The device is designed to operate on its internal battery for a day at a time. Thus it’s pretty simple to carry the unit to your Asterisk server and turn it on. Once it’s on, tap the screen once, tap the right arrow icon twice to move to the third page, and then tap TomTom Weather. When prompted whether to set up your wireless internet connection now, tap Yes. While logged into your Asterisk server, type hcitool scan and, presto, your TomTom unit will dutifully report its MAC address for all the world to see:
[root@asterisk1 tmp]# hcitool scan

Scanning ...

        00:0F:3D:4B:DF:E0       n/a
N/A doesn’t tell you much, but it’s your TomTom. Trust us on this one. Once you have this tidbit of information, simply edit your ruhome script and plug in the required information:
mainasteriskbox=192.168.0.118

deviceuser=TomTom

devicemac=00:0F:3D:4B:DF:E0
Now, when you drive your automobile into your garage, your home phones will come back to life. The only wrinkle, of course, is that you’ll need to leave your GPS unit powered on while you’re home. Otherwise, powering down the TomTom would tell your Asterisk server that you had departed again. Yeah, you’re right. It’s not ideal, but it did give us the opportunity to offer a great tip for your Christmas wish list. And it ought to get you thinking that this particular device is well-suited to integrate into your home automation system to turn on the lights and hot tub. With home automation system software such as Indigo and its AppleScript object model and dictionary or Salling Clicker, you don’t have to worry about the TomTom turning itself off in the garage because all we really need is the proximity "trigger" to alert Indigo to turn on the lights. Once on, you can program Indigo to define how long the lights stay on before automatically turning themselves off again. Problem solved.
Implementing Proximity Detection on a Single Asterisk@Home 2.1 Server. Our original articles on how to deploy a Bluetooth Proximity Detection System assumed you were using two Asterisk servers, one for phone calls and a second version 2 server for proximity detection. However, now that Asterisk@Home 2.1 is soup, we thought it would be helpful to show you how to run the entire system using a single Asterisk@Home 2.1 server. First, download the updated proximity detection software here. Once you unzip the file, you’ll note that there’s a new ruhome2 file. The only changes you’ll need to make from the original tutorial are to substitute the ruhome2 file for the original ruhome file and to copy homecheck.agi to /var/lib/asterisk/agi-bin on your Asterisk@Home 2.1 server. Don’t forget to reset the file permissions as previously explained. Once you make these two simple changes, the entire proximity detection system can be run from your one and only Asterisk@Home 2.1 server.
Manually Managing In and Out Status with a SIP Phone. We’ve also received several queries from readers asking for a simple way to turn off the proximity detection system and to manually manage your IN or OUT status using buttons on a SIP telephone. In other words, when you leave your home or office, you want to press a button on the phone to tell your Asterisk server whether you’re IN or OUT. Yes, you can do it on a per extension basis using *72, but the proximity detection system transfers all calls based upon the location of your bluetooth device. To do the same thing manually, first remove the ruhome application from your crontab by logging into your server as root and deleting that line (Ctrl-K) from your crontab file. Then save your changes: Ctrl-X, Y, Enter.
export EDITOR=nano

crontab -e
Then add the following code to the [from-internal-custom] context of your extensions_custom.conf file and reload Asterisk. Note that, in the code below, you’ll have to change the name of the file in the /tmp directory from WARD to whatever filename you’re currently using with your proximity detection system. This is the deviceuser variable in your ruhome script. You’ll also need to modify the permissions on this file after logging into your Asterisk server as root, or this won’t work: chmod 666 /tmp/WARD.
exten => 46,1,Answer  ; IN to deactivate call forwarding

exten => 46,2,Wait(1)

exten => 46,3,System(cp -f /var/lib/asterisk/agi-bin/notnull.file /tmp/WARD)

exten => 46,4,Playback(call-forwarding)

exten => 46,5,Playback(de-activated)

exten => 46,6,Wait(1)

exten => 46,7,Playback(goodbye)

exten => 46,8,Hangup
exten => 688,1,Answer ; OUT to activate call forwarding
exten => 688,2,Wait(1)
exten => 688,3,System(cp -f /var/lib/asterisk/agi-bin/null.file /tmp/WARD)
exten => 688,4,Playback(call-forwarding)
exten => 688,5,Playback(activated)
exten => 688,6,Wait(1)
exten => 688,7,Playback(goodbye)
exten => 688,8,Hangup
Once you make these changes, you can pick up any extension and dial IN (46) when you’re IN or OUT (688) when you’re away. You can also assign these "extensions" to buttons on almost any SIP telephone instrument if you want one-touch dialing.
Other Tutorials. There are numerous additional articles in this Asterisk HOW-TO series to keep you busy. You can read all of them by clicking here and scrolling down the page. We recommend reading at least the first four or five articles from the bottom up so that the learning curve is less painful. Then you can skip around to your heart’s content. There’s also an index of all the previous articles which you can review here.


These articles are simply amazing, and I’m pretty sure without them I would have given up a long time ago. Do you plan on revisiting the SIPURA-3000 and other settings available using it? I purchased two and used the exact setup in your article and while they perform, there are times when echos show up.
Perhaps an article on the best way to intergrate POTS into an asterisk server including hardware suggestions if the Sipura is as unreliable as it seems.
[WM: I’m not sure the SPA-3000 is unreliable. It’s just really quirky with minimal documentation. There is a pretty good FAQ on Sipura’s web site, but that’s about all. I’ll scratch around some more for configuration tips when I have a few days to kill.]
I am trying to decide whether to use an x86 or PPC for asterisk. since I have no old or spare parts, i am having to build one or buy one. I was using vmware to try out asterisk. I see from some tutorials that you hint at using macs. Are you using osx or a ppc linux variant like YDL? If so, are there any disadvantages (besides the hardware support) to using the mac mini vs a mini-itx. I am using sip and iax exclusively. As such how does that affect the newer mac minis (to which the modem has no drivers), they recommend staying away from newer models. in m y case, does that makes sense? are people using the macs at the same time or are they headless machines in a closet? thanks… your articles have been great.
[WM: Don’t use a Mac for Asterisk. None of the hardware cards work in the Mac, and you’re paying double for half the performance of an x86 PC. There’s also a lengthy delay in getting the most recent Asterisk version on the Mac platform. And finally, many of the great Asterisk add-on’s such as Asterisk@Home don’t work on the Mac platform. Our hardware recommendations are listed in the Nerd Vittles index article.]
Must be nice to run an asterisk blog and be able to afford an Escalade.
[WM: Are you kidding? Nobody can afford an Escalade.]
This could probably be extended (modified) in the future to support the detection of of RFID tags (Just glue one in your watch strap).
Great article.
Max
[WM: Yep. All we need now is an inexpensive RFID reader, and it’s a done deal.]
Great article. A couple of questions…
If the bluetooth headset is in use or being charged, hcitool does not find it. Thus the script updates as not present. Does anyone know how to get around this problem/issue? Or recommend a bluetooth headset that does not act in this way?
Thanks
As john pointed out, recharging my headset makes it go to sleep and disappear… since I charge it at home, it’s pretty useless for this application (I have a VERY cheap cell plan, so I’d use my cell all the time… except that I only get signal in the very top room of the house, and then only if I sit very still!)
However, not all cell phones turn off their Bluetooth. I have a BlackBerry 7100, which sucks as a cellphone and I plan to replace it soon… but the BT stays on all the time, which makes it perfect for proximity.
So give your cellphone a shot – it may be better than you thought.
Hi,
I’m trying to support a bluetooth phone as a trunk on trixbox. I’ve got the proximity working via the Nerd Vittels article (excellent, by the way).
I’ve looked at the instructions on
http://www.thetechguide.com/howto/asterisk/chanbluetooth.html
to generate chan_bluetooth.so for asterisk.
I see that this module is not included in Trixbox and recompiling asterisk is not an option on Trixbox, so how do I enable asterisk bluetooth support on Trixbox? I can load modules, but where can I get chan_bluetooth.so?
John
I just got done looking at the ruhome2 script and I have a suggestion. Instead of creating tmp files, I suggest that you put them into /etc/bluetooth/ or /var/bluetooth. Also, instead of copying files of 0 or 1 byte lengths from /root/, you can use ‘echo -n > file’ and ‘echo " > file’ to accomplish the same thing. The ‘-n’ option overwrites the file without a LF on the line, effectively creating a zero length file every time and echo is normally part of the shell, so there’s no extra jump to the file system. Once you do that, the only thing you need to change is the agi so that it looks in the new location.