

Today we’re pleased to introduce an updated OpenSIPS installer for Debian 10 featuring the latest release of OpenSIPS. Our previous tutorial with Debian 8 is now obsolete, an all-too-frequent occurrence in the open source world. Today’s open source SIP server lets you connect users to make and receive free as well as commercial calls worldwide. There’s excellent documentation making it easy to integrate into our existing Incredible PBX platform without hiring a consultant. It’s also straight-forward to secure without providing free phone service to every bad guy on the planet.
OpenSIPS is a multi-functional, multi-purpose signaling SIP server used by carriers, telecoms or ITSPs for solutions like Class4/5 Residential Platforms, Trunking / Wholesale, Enterprise / Virtual PBX Solutions, Session Border Controllers, Application Servers, Front-End Load Balancers, IMS Platforms, Call Centers, and many others. Source: opensips.org
We’ve often complained that the problem with many open source projects is that the developers get so focused on making money that they skimp on the documentation to encourage consulting work or participation in expensive conferences. We have found just the opposite with OpenSIPS. In fact, much of today’s implementation is based upon an excellent tutorial by the folks at PowerPBX. Down the road, if you find yourself in need of a consultant, their services would be a good place to start. What we’ve added to the PowerPBX design is security, support for clients behind NAT-based routers, and an integration scheme for Asterisk®, FreePBX®, and Incredible PBX® platforms so that you get the best of all worlds, a public facing SIP server with the UC feature set that most organizations expect. Last but not least, our turnkey GPLv2 installer will get you up and running in about 5 minutes.
Choosing an Appropriate Platform for OpenSIPS
Let’s begin by addressing the appropriate platform for an OpenSIPS server. The server needs to have a public IP address that is static, and the server should not be situated behind a NAT-based router. It only complicates things and is beyond the scope of what we plan to address. For those that are frequent visitors, you already know that we’ve been pushing everyone to kiss their local hardware goodbye and join the cloud revolution. When it comes to public-facing VoIP platforms like OpenSIPS, most of us don’t have a choice. You need a static IP address on the open Internet. And, for the sake of security, a KVM cloud platform is a must since older OpenVZ platforms don’t support the ipset component of IPtables which makes it easy to block hundreds of thousands of IP addresses without a performance hit on your server. Pure whitelist access simply isn’t an option if you wish to retain the functionality of a VoIP application such as OpenSIPS.
Ten to twenty gigabytes of disk space should be more than ample for OpenSIPS. The amount of RAM in your server depends upon the volume of calls your server will be handling. If it’s a dozen simultaneous calls then 1GB of RAM will suffice. If it’s 100,000 calls, then take a look at this article for tips on sizing your server. For today’s implementation, you’ll need a Debian 10 platform so a low-cost KVM provider including Digital Ocean, Vultr, and OVH should be fine.1
Choosing OpenSIPS Components to Deploy
We’ve divided up today’s tutorial into bite-sized pieces so that you can pick and choose where to stop implementing and start using. You do not need to have an Asterisk server to make and receive calls with OpenSIPS. However, OpenSIPS lacks voicemail and AutoAttendant/IVR components so, if those are a requirement, then you either need a VoIP service provider that offers them, or deploy a $50 Incredible PBX for the Raspberry Pi to add the missing pieces.
What OpenSIPS offers is a free server platform for worldwide SIP communications so that you, your friends, and business associates can call or connect from anywhere using freely available SIP softphones or any of dozens of SIP telephone instruments. We’ll stick with softphones for today, but hardware-based SIP telephones are equally simple to deploy.
This is not a criticism because it is one of the best tutorials we’ve ever used but, if you want to see how complex a typical OpenSIPS server deployment is, take a look at the PowerPBX tutorial we used as a starting point with OpenSIPS. We’ve compressed most of those procedures into a turnkey installer that only requires you to enter a MySQL root password of passw0rd (with a zero) once you have your Debian 10/64 platform up and running.
Deploying a Debian 10 Server Platform
Start by choosing a cloud provider that offers the 64-bit Debian 10 minimal platform as a deployment option. Most do. As noted, we recommend a KVM platform with support for ipset making it easy to block entire countries overrun with bad guys. Choose offerings with at least 1GB RAM and a 10GB drive to get started. Configure your Debian 10 server with a fully-qualified domain name (FQDN). This is critically important with our security design because we will assign all OpenSIPS users/extensions to this FQDN and reserve your server’s IP address purely for connections from service providers and Asterisk servers. This makes it all but impossible for anyone to hack into your server since most script kiddies launch attacks on IP addresses, not FQDNs. Using an unusual FQDN adds an extra layer of security, but that’s your call. If you lack the ability to assign FQDN aliases to a domain which you own, you can obtain a free FQDN from numerous sources including ChangeIP and point it to the IP address of your OpenSIPS server.
Installing OpenSIPS on a Debian 10 Server
Now the fun begins. Log into your Debian 8 server as root and issue the following commands to prepare for the OpenSIPS install:
cd /root
wget http://incrediblepbx.com/opensips3.tar.gz
tar zxvf opensips3.tar.gz
rm -f opensips3.tar.gz
Make sure you have logged into your Debian 10 server as root using SSH or Putty from a desktop PC that you will use to manage OpenSIPS with a browser. The reason is because this IP address automatically will be whitelisted in the OpenSIPS firewall as part of the install process. Otherwise, you will need to manually log into SSH and whitelist the IP address of your desktop PC using /root/add-ip each time you wish to access the OpenSIPS Control Panel since TCP port 80 (HTTP) is not exposed to the public Internet as a security precaution.
To begin the install, issue this command: /root/install
As the install progresses, you’ll first be prompted to choose the GRUB install device. Press the spacebar on the first entry. Then press TAB and ENTER. When prompted for the SSH configuration, choose "keep local version" and then press TAB and ENTER. For the MariaDB setup, press ENTER when prompted for the current password. Type N when prompted whether to switch to unix_socket authorization. Then type Y to change the root password. Be sure to use passw0rd (with a zero) as your MySQL password, or the install will fail. This is NOT a security risk unless your Debian 10 root user account is compromised. And, in that case, it won’t matter anyway since the MySQL password could easily be changed. Type Y to remove anonymous users. Type Y to disallow remote root logins. Type Y to reload the MySQL privilege tables.
Next you’ll be prompted to set your timezone and TZ entries. For East Coast U.S., it’s 2,49,1,1 then America/New_York. Later you’ll be prompted twice for the MySQL root password. You must enter passw0rd (with a zero). When the OpenSIPS status screen displays, type Q to exit the display. There are a couple of steps where you will be prompted for input. Correct responses are indicated before the various prompts. Pay particular attention when you are prompted to change the SSH port from TCP 22 to a port number in the 1000-2020 range as a security precaution. We recommend using the year you were born because it will be easy for you to remember. When the install finishes and you log out of your server, the next SSH login will look like this where XXXX is the SSH port you chose and yyy.yyy.yyy.yyy is the OpenSIPS server address: ssh -p XXXX root@yyy.yyy.yyy.yyy
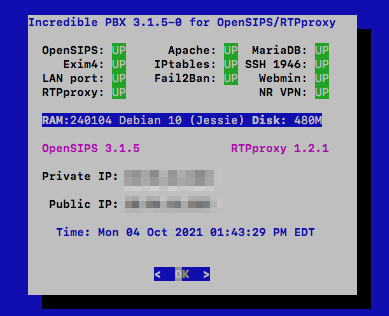
Although most of the configuration of your OpenSIPS server will be handled using a web browser and the OpenSIPS Control Panel GUI, we’ve included a few scripts in /root to assist with maintenance of your server platform. Here’s a brief summary of the script functions:
- pbxstatus – Status of your OpenSIPS server (image sample above)
- add-ip – Temporarily WhiteList IP address until next iptables-restart
- ban-ip – Permanently Ban an IP address
- unban-ip – Unban a previously banned IP address
- log-purge – Zero out all of the major Linux log files
- opensips-check – Assures OpenSIPS and RTPproxy are running (runs automatically)
- Fail2Ban BlackLists –
iptables -nL | grep -A100000 "opensips (" - IPset BlackList (KVM/OVZ7 platforms only) –
ipset list | sort
We secure your server in several ways: (1) by disguising the SSH port, (2) by locking down almost every port on your server with the IPtables firewall with the exception of the SIP ports, (3) by deploying Fail2Ban to scan your OpenSIPS log for errors and lock out attackers for an extended period of time, and (4) by deploying the IPset blacklist for KVM platforms. With this design, there is a symbiotic relationship between IPtables, Fail2Ban, and IPset. Therefore, it is critically important that you only restart these services using the iptables-restart command. NEVER issue other IPtables commands to restart or save your firewall settings.
Activating a SIP Server with OpenSIPS Control Panel
We don’t want to overload you on the first day with your new OpenSIPS 3 platform so we’ll walk you through the preliminary setup steps to create your SIP Domain. Then we’ll show you how to set up user accounts (also known as extensions). Finally we’ll walk you through setting up a trunk to make and receive calls from a commercial SIP provider. When we’re finished today, you’ll be able to make and receive calls using SIP URIs or DIDs which you have purchased from a provider. Then next week we’ll focus on integration of OpenSIPS with an Asterisk platform of your choice using Incredible PBX as an example. Once we’re finished, you’ll be able to handle user account registrations exclusively on your OpenSIPS server while leaving your Asterisk platform completely hidden from public exposure.
Logging into the OpenSIPS Control Panel
As deployed, the OpenSIPS Control Panel is accessible via web browser. As noted previously, HTTP Port 80 access is blocked by default unless the IP address of your desktop PC has been whitelisted either as part of the initial install or using the add-ip script in /root. Once your desktop PC’s IP address is whitelisted, point your browser to http://xxx.xxx.xxx.xxx/cp

The default Username is admin, and the default password is opensips. Once you’re logged in, immediately click on the Users icon in the upper-right corner of the dashboard. Then click the Edit Info pencil icon for user Admin and change your password. Click Save when done.
Creating Domains with OpenSIPS Control Panel
In the Left column of the Dashboard, you’ll see two tabs: Users and System. Click on the System tab to expose the available choices. Then choose the Domains option.
Domains are the essential building blocks in OpenSIPS. You can manage one or a hundred domains on a single OpenSIPS server, and each domain can have its own set of Users, Trunks/Gateways, and Dialplan rules. We’re actually going to create two domains, one for the IP Address of your OpenSIPS server and a second one for the FQDN of your OpenSIPS server. For added security, we will create all User accounts under the FQDN Domain. And we’ll reserve the IP Address Domain for DID Trunks/Gateways from registered, commercial SIP providers. This design allows attackers to attempt to register to accounts on your IP Address Domain until the cows come home, and they will never be successful because there are no existing SIP user accounts there. Keep it that way! With our OpenSIPS design, Fail2Ban will block attackers after a single failed registration attempt. And OpenSIPS itself will identify and block all SIP flood attacks using either Fail2Ban or IPset.
Now that you understand the design, let’s set up your domains. After choosing System -> Domains, enter the IP Address of your OpenSIPS server at the SIP Domain prompt. Then click Add New Domain followed by Reload on Server. Repeat the same steps to enter the fully-qualified domain name (FQDN) of your OpenSIPS server. When finished, you should see:
Creating Users with OpenSIPS Control Panel
We’ve already explained the security implications and reason for creating User accounts with your FQDN Domain only. Click on Users -> User Management -> Add New to get started. You can use Numbers (what we call Extensions in Asterisk) or Names. Our preference is to use Numbers for the User accounts and then to create Alias Names (as desired) for each User account. You can’t dial names from most SIP telephones. This also keeps the design similar to what many are used to in the Asterisk environment. A completed dialog would look something like the following. Use the Domain pull-down to choose your FQDN. Obviously, the passwords must be secure and must match. Then the Register button will be enabled to save. The actual Numbers used for Usernames are completely up to you.
Create at least a couple User accounts so that you can set up two SIP phones to call yourself and verify that everything is working. These User accounts become an integral part of the SIP URI to receive calls from any SIP phone in the world:
7701@opensips.yourdomain.com
Before you can actually answer an incoming call to your SIP URI, you’ll need to register the User account using either a softphone or SIP phone. We’ll do that next. But, first, let’s create an Alias to 7701 User so that folks can reach you by calling joe@opensips.yourdomain.com
Click on Users -> Alias Management -> Add New Alias to get started. Fill in the form using the example below. Make sure that you select your FQDN Domain using the pull-downs for BOTH the Domain and Alias Domain fields. Then click Add to save.
Registering a Softphone to an OpenSIPS User Account
There are literally dozens of free SIP soft phones from which to choose. We covered some of our favorites for every platform in previous articles. For our purposes today, we recommend you choose one of the Linphone softphones which are available for the PC, Mac, Linux, Android, and iOS platforms. We also recommend signing up for a free Linphone.org SIP account which doesn’t cost you anything. For today, we will be configuring the softphone to register to your new OpenSIPS server.
Once you have downloaded and installed the Linphone client, go into the Preferences menu and make the following changes. Some depend upon your calling platform.
- Audio Codecs: PCMU, G722, PCMA
- Video Codecs: VP8, H264
- Call Encryption: None
- DTMF: RFC2833 only
- Send InBand DTMF: OFF
- Send SIP INFO DTMF: OFF
- SIP UDP 5060: Enabled
- SIP TCP 5060: Enabled
- Allow IPv6: Disabled
Then set up a new SIP Proxy account: Username (7701), Password (as defined), Domain: your FQDN not IP address, Transport: UDP, Outbound Proxy: OFF, Stun Server: stun.linphone.org, ICE: ON, AVPF: OFF, Push Notification: ON, Country Code Prefix: 1 (if required by your commercial SIP provider), Register: YES, Account Enabled: YES. HINT: You can call Alias Names via SIP URI, but you can only register to a SIP account using its actual Username.
Avoiding Lockouts with NeoRouter VPN
By design, Fail2Ban is unforgiving when it comes to failed registrations. A single failed registration will get an IP address banned for a full week. The reason is because the new bad guy strategy is to hit your server once to determine whether anybody is home. Then the creep bombards you later with an endless stream of registration attempts. With our design, nobody will be home when they return. The bad news is a single failed registration attempt by you or your users will also trigger a ban. There are several workarounds. The easiest is to set up the NeoRouter client on each of your machines including your OpenSIPS server and use the 10.0.0.x private network for access. These IP addresses never get banned. Our previous tutorial will walk you through setting up a free NeoRouter server and installing the free NeoRouter clients on your machines. The client software already is installed and running on your OpenSIPS server. It only requires that you log in using nrclientcmd and register to your NeoRouter server to obtain a private IP address. The other option is to install OpenVPN. Our previous tutorial will walk you through that process. The advantage of OpenVPN is that it’s supported directly on many SIP telephone instruments. The 10.8.0.x addresses are already whitelisted by our OpenSIPS installer.
There are other options to unban an IP address which has accidentally been snagged. First, almost all of the cloud providers include a Console option in their web portals. Second, you can log into your server via SSH from any non-blacklisted IP address to remove the banned IP address. Once you’re logged in, simply run this command using the IP address you wish to unban: /root/unban-ip xxx.xxx.xxx.xxx
Choosing Commercial SIP Providers
Recall that you cannot register to a SIP alias on your OpenSIPS server. We’ll take advantage of this restriction in setting up incoming calls from commercial providers’ DIDs. To set up Trunks from commercial providers so that you can not only receive incoming calls but also make outbound calls over their PSTN network connections, you must use providers that support IP address authentication rather than a SIP registration. Many providers support this including our platinum sponsor, Skyetel, as well as providers such as VoIP.ms, Anveo Direct, V1VoIP, and many others. In our OpenSIPS design, you also can use DIDs from providers that support SIP URI forwarding such as CallCentric and LocalPhone; however, you are limited to receiving inbound calls only. VoIP communications really shines here because you don’t have to choose a single provider to meet all of your communications requirements.
Skyetel is by far the easiest provider to set up with OpenSIPS. See our earlier tutorial for a special offer that will get you half-price calling for up to $500. Effective 10/1/2023, $25/month minimum spend required. Once you’re registered on the Skyetel site, add a new EndPoint Group using the IP address of your OpenSIP server and designate UDP 5060 as the access port. Sign up for a DID and map it to the OpenSIPS Endpoint Group. Done. In the OpenSIPS Control Panel, navigate to System -> Dynamic Routing and click Add Gateway. Using the template below, create 5 Proxy gateways for the following Skyetel data centers:
- skyetel-NW 52.41.52.34
- skyetel-SW 52.8.201.128
- skyetel-NE 52.60.138.31
- skyetel-SE 50.17.48.216
- skyetel-EU 35.156.192.164
Begin by whitelisting the IP addresses of your SIP providers in /etc/iptables/rules.v4 just below the existing 10.8.0.0/24 rule. The entries should look like this:
-I INPUT -s 52.41.52.34 -j ACCEPT
Once you’ve entered IP addresses for your providers, issue the command: iptables-restart
Next, we need to create what Asterisk users know as an Outbound Route. This tells OpenSIPS to send dialed numbers in 11-digit format to Skyetel for termination. We’ve already created the Dial Plan rule for calling out by dialing 1 plus a 10-digit number. So, while you’re still in the Dynamic Routing section of the OpenSIPS Control Panel, click on the Rules tab at the top of the template. Then click Add Rule. Begin by clicking Add ID button and choosing Group ID 0. In the Prefix field, type 1. Now click the Add GW button 3 times after choosing the Skyetel gateways in the following order from the GW pull-down list: skyetel-nw, skyetel-sw, and skyetel-se. Those are the three currently operational Skyetel gateways. When you’re finished, your template should look like the following. Then click the Add button to save the new rule. Click Reload Server to load the new rule into OpenSIPS. Then repeat this procedure leaving the Prefix field blank so that you can make 10-digit calls as well.
Finally, we need to create what Asterisk users know as an Inbound Route. This tells OpenSIPS where to send incoming calls from our Skyetel DID. OpenSIPS handles inbound routes by defining a User Alias for the Username to which you want to route the incoming DID calls. Click on Users -> Alias Management -> Add New Alias to get started. Fill in the form using the following template and then click Add.
- Username: 7701 (the extension to which to route the incoming calls)
- Domain: opensips.xyz.com (the FQDN of your OpenSIPS server)
- Alias Username: 18435551212 (the 11-digit Skyetel DID)
- Alias Domain: 11.12.13.14 (the IP address of your OpenSIPS server)
- Alias Type: dbaliases
Introducing the VoIP Blacklist
We’ve always dreamed of an effective VoIP Blacklist, and many have tried. But the crowd-sourced VoIP Blacklist at voipbl.org is the real deal. Everybody can post entries (including the bad guys) and, magically, most of the illegitimate entries get sifted out before the next day’s list is released. The list gets populated every night while you sleep. Here are the steps to install the VoIP Blacklist with IPset:
apt update && apt install ipset iptables netfilter-persistent ipset-persistent iptables-persistent
cd /usr/local/sbin
wget http://incrediblepbx.com/voipbl-update
chmod +x voipbl-update
sed -i 's|fail2ban restart|fail2ban restart\n/usr/local/sbin/voipbl-update|' iptables-restart
iptables-restart
ipset list voipbl
ipset list voipbl | wc -l
Then create a cron job in /etc/crontab to run /usr/local/sbin/voipbl-update every day to update the VoIP blacklist.
1 4 * * * root /usr/local/sbin/voipbl-update > /dev/null 2>&1
Congratulations! You now have a functioning OpenSIPS 3 server that can process incoming calls from SIP URIs as well as DIDs. And you can make SIP URI and 11-digit PSTN calls using your SIP softphone that’s registered to your OpenSIPS server. See you next week. Enjoy!
Continue Reading: Best of Both Worlds: Safely Marrying Asterisk to OpenSIPS
Originally published: Monday, October 4, 2021
Need help with Asterisk? Visit the VoIP-info Forum.
Special Thanks to Our Generous Sponsors
FULL DISCLOSURE: ClearlyIP, Skyetel, Vitelity, DigitalOcean, Vultr, VoIP.ms, 3CX, Sangoma, TelecomsXchange and VitalPBX have provided financial support to Nerd Vittles and our open source projects through advertising, referral revenue, and/or merchandise. As an Amazon Associate and Best Buy Affiliate, we also earn from qualifying purchases. We’ve chosen these providers not the other way around. Our decisions are based upon their corporate reputation and the quality of their offerings and pricing. Our recommendations regarding technology are reached without regard to financial compensation except in situations in which comparable products at comparable pricing are available from multiple sources. In this limited case, we support our sponsors because our sponsors support us.
BOGO Bonaza: Enjoy state-of-the-art VoIP service with a $10 credit and half-price SIP service on up to $500 of Skyetel trunking with free number porting when you fund your Skyetel account. No limits on number of simultaneous calls. Quadruple data center redundancy. $25 monthly minimum spend required. Tutorial and sign up details are here.
The lynchpin of Incredible PBX 2020 and beyond is ClearlyIP components which bring management of FreePBX modules and SIP phone integration to a level never before available with any other Asterisk distribution. And now you can configure and reconfigure your new Incredible PBX phones from the convenience of the Incredible PBX GUI.
VitalPBX is perhaps the fastest-growing PBX offering based upon Asterisk with an installed presence in more than 100 countries worldwide. VitalPBX has generously provided a customized White Label version of Incredible PBX tailored for use with all Incredible PBX and VitalPBX custom applications. Follow this link for a free test drive!
Special Thanks to Vitelity. Vitelity is now Voyant Communications and has halted new registrations for the time being. Our special thanks to Vitelity for their unwavering financial support over many years and to the many Nerd Vittles readers who continue to enjoy the benefits of their service offerings. We will keep everyone posted on further developments.
- Nerd Vittles receives referral fees from some VoIP service providers to help cover the costs of our blog. We never recommend particular companies solely to generate commissions. We also test all services that we recommend. [↩]