

Asterisk® 13 will be 6 years old this October. That’s like three lifetimes in VoIP years. So let’s face it. It’s time to start making plans to move on up. The latest LTS version is Asterisk 16 which gets you another 4+ years with security fixes. We won’t dwell on the shortcomings of PJsip in Asterisk 13 and the fact that chanSIP is getting long in the tooth. So the sooner you migrate the better off you will be. Thanks to the latest FreePBX® 15 Backup & Restore module and some great tips from @DavidFoxworth and @Kenn10 on the PIAF Forum, 16-15 migration should be painless. We’re a little late with this week’s article because we wanted to finish the script to also let you migrate your Call Detail Records as well. Now it’s soup.
If you’re just getting started with Incredible PBX® 16-15 then you’ll get all of today’s additions as part of your initial install. Just follow our this tutorial. If you want to deploy Incredible PBX 16-15 as a public server on the Internet, this tutorial will walk you through that upgrade.
Beginning the Incredible PBX 13-13 Migration
For anyone that’s been involved with Asterisk and FreePBX, you already know what a pain it was to move from one release to another. It’s still not quite automatic, but it’s damn close. You can’t perform an in-place migration to move from Asterisk 13 and FreePBX 13 to Asteerisk 16 with FreePBX 15. So you’ll need to first bring up an Incredible PBX 16-15.1 platform that is separate and apart from your already functioning Incredible PBX 13-13.10 server. Once you’ve done that, use add-ip to whitelist the IP address of your 13-13 server on the 16-15 PBX and whitelist the IP address of your 16-15 server on the 13-13 PBX. This will make it easy to copy files between the two servers.
In addition to the whitelisting procedure above, there are three more steps to complete on the Incredible PBX 13-13 server. First, you’ll need to update the backup module:
cd /root
./gpl-install-fpbx backup
Next, login to the GUI as admin using a browser and make a backup of your FreePBX components. Access Admin -> Backup & Restore and click Backup Wizard. Give the backup a name and description: incrediblepbx. Choose to run the backup Monthly. Choose Yes for voicemails, recordings, and CDR data. Choose Email Notifications and enter your email address. For Remote Save, choose No. Your backup will be saved locally in /var/spool/asterisk/backup/incrediblepbx. Click Finish.
Click the Pencil icon under incrediblepbx Actions to edit the files to be backed up. Using the + icon, make your Items list look like the following:
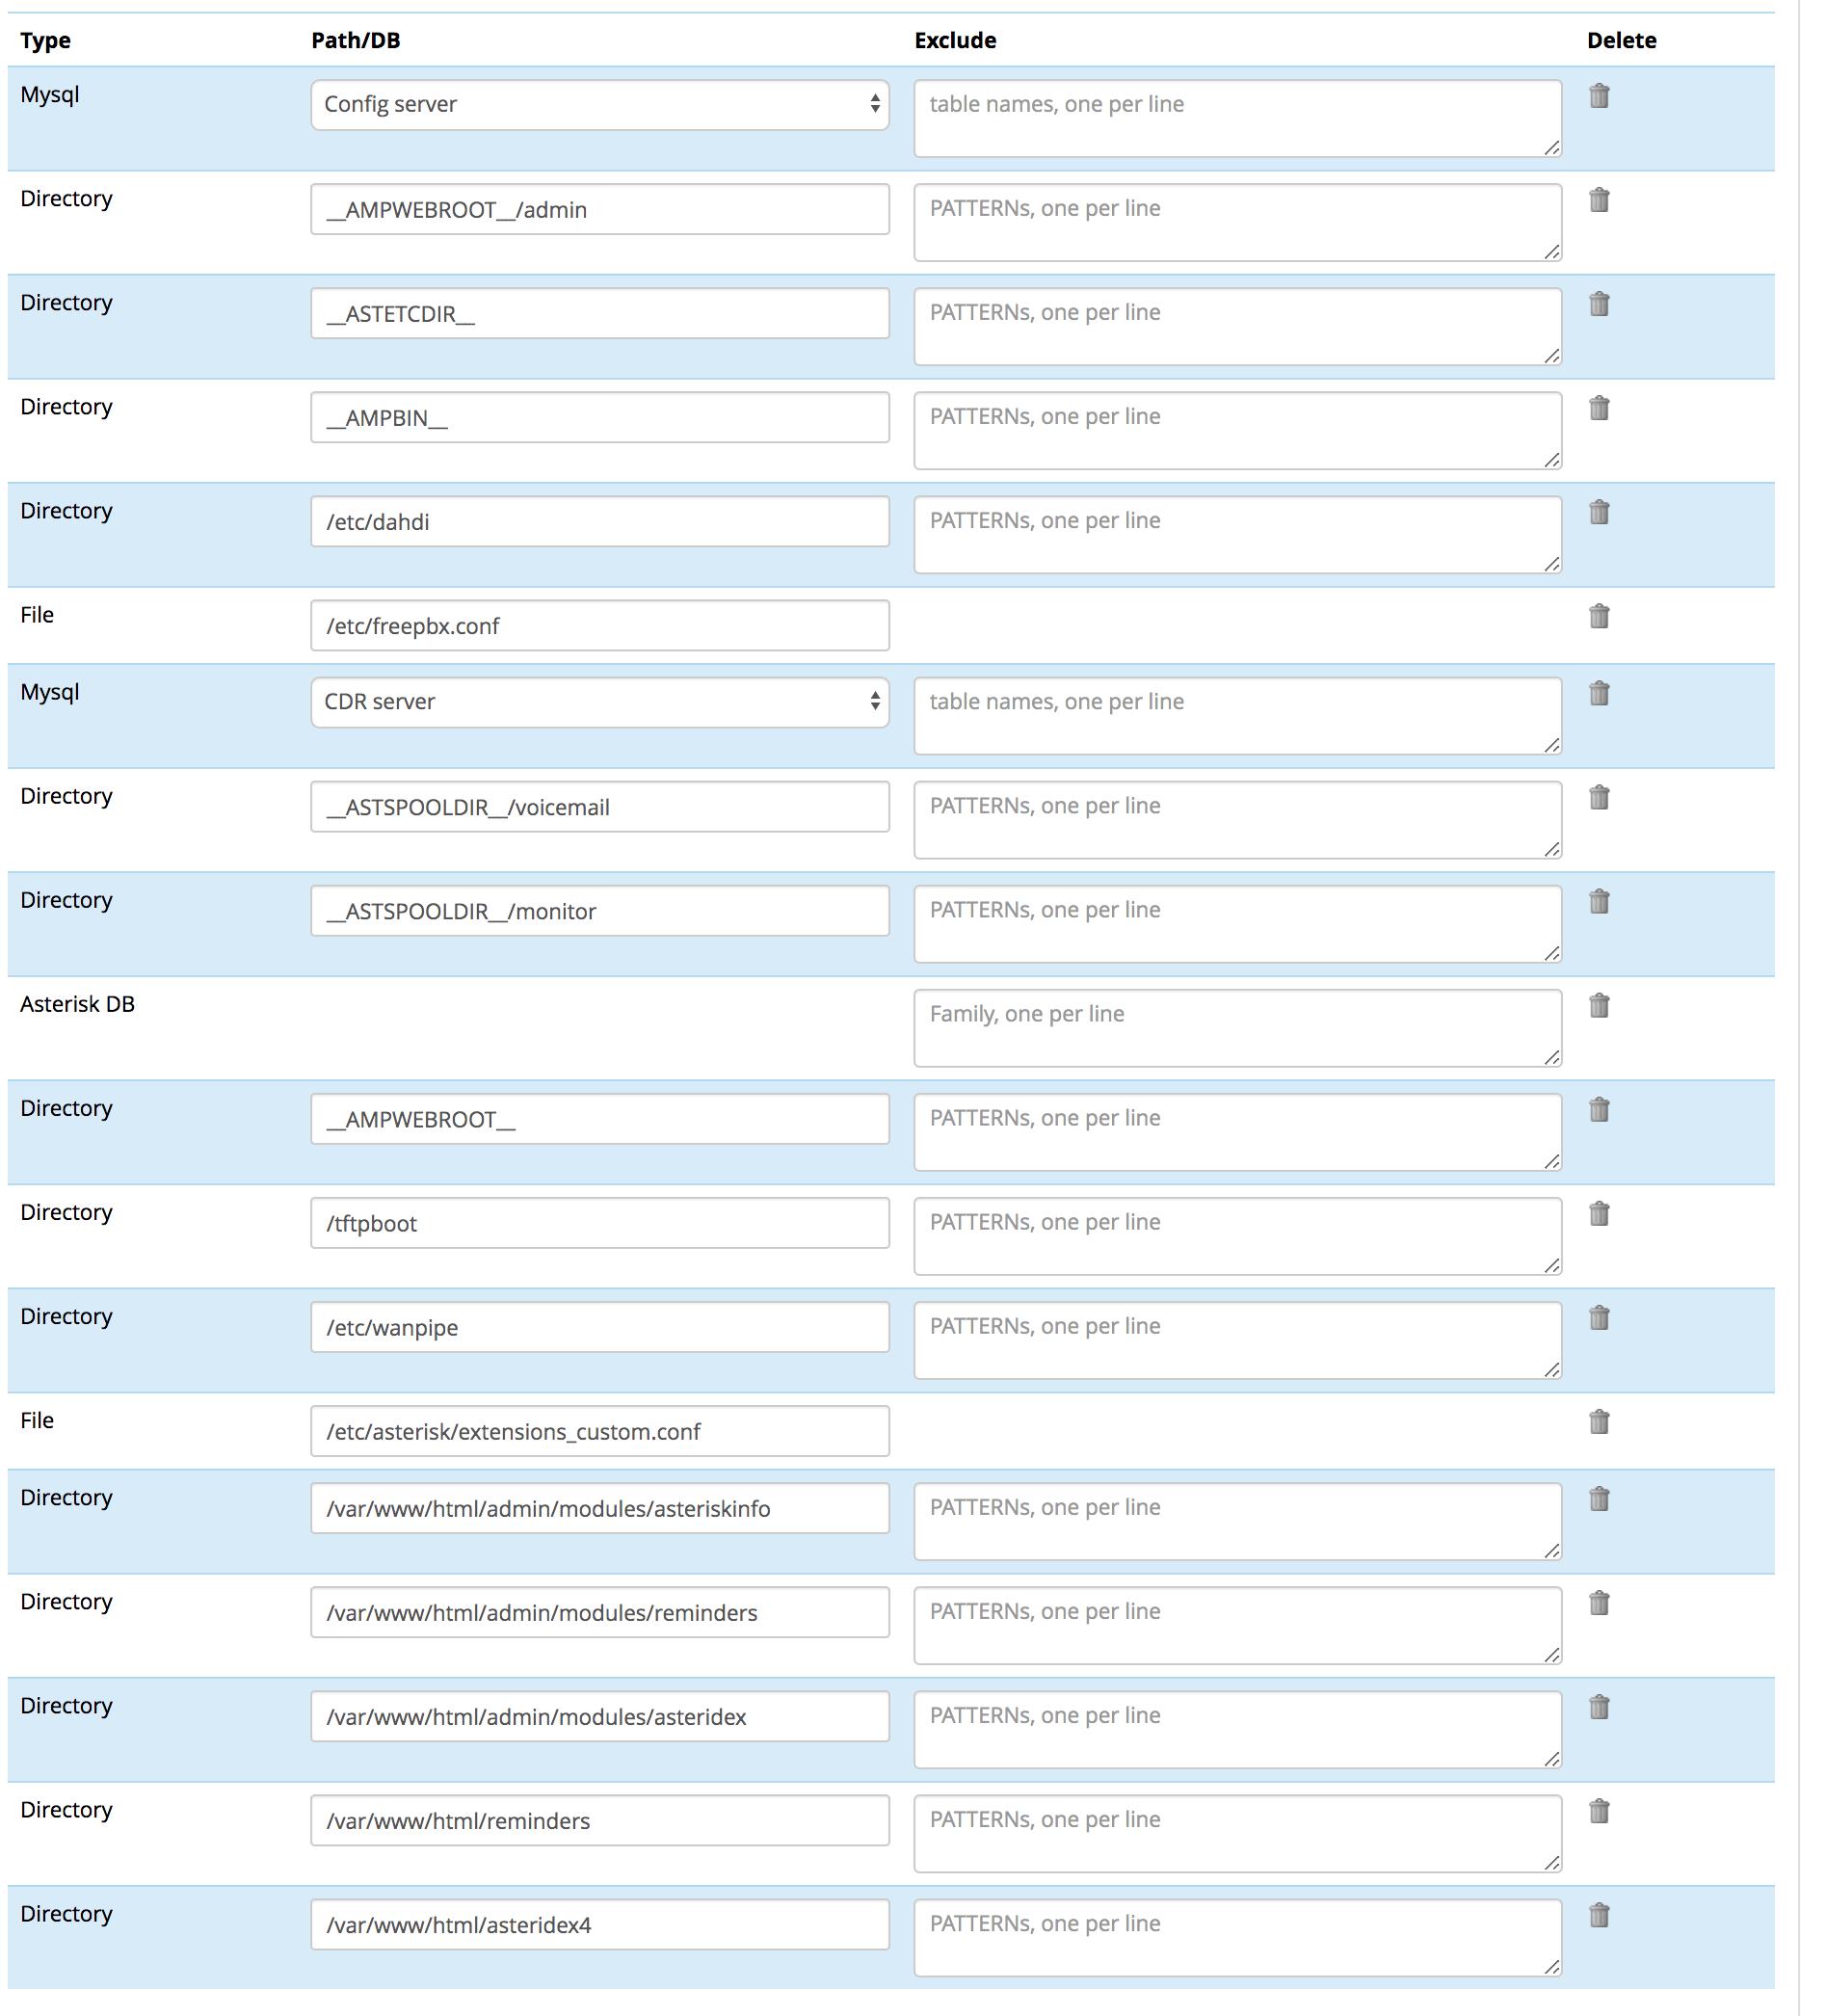
Click Save & Run button when you’ve made the necessary changes to kick off the backup. Unless you want monthly backups, you can click the trashcan icon under incrediblepbx Actions to remove the task we just created once the backup completes.
Copy the backup file from /var/spool/asterisk/backup/incrediblepbx to your desktop PC.
Finally, let’s back up your Call Detail Records (cdr/cel) which won’t get imported with the FreePBX 15 restore utility. Log in to the Linux CLI as root and issue the following commands to create the CDR backup and copy it to your 16-15 server. Replace the xx’s with the IP address of your 16-15 server.
cd /root
mysqldump -u root -ppassw0rd --single-transaction --quick \\
 --lock-tables=false asteriskcdrdb > asteriskcdr1313.sql
gzip asteriskcdr1313.sql
scp asteriskcdr1313.sql.gz root@xx.xx.xx.xx:/root/asteriskcdr1313.sql.gz
Restoring Your Data to Incredible PBX 16-15
Let’s begin on the Incredible PBX 16-15 server by logging into the Linux CLI as root. Issue the following commands to set up your server platform for the Incredible PBX 13-13 import. Unless you have just installed Incredible PBX 16-15 since 3 p.m. EDT today, be sure to perform all of the steps below. It won’t hurt to do it again just to be sure you have the latest and greatest code:
cd /root
wget http://incrediblepbx.com/newbackup16-15.tar.gz
tar zxvf newbackup16-15.tar.gz
rm -f newbackup16-15.tar.gz
./install-backup
Next, login to the GUI as admin using your favorite browser. The new FreePBX 15 backup module is still a little rough around the edges, but it will get the job done. And that’s what matters. From the FreePBX Dashboard, choose Admin -> Backup & Restore. Be prepared. It will blow up. Not to worry. Click the Back button on your browser once or twice to return to the FreePBX Dashboard. Now repeat the drill: Admin -> Backup & Restore. This time it will work. Now click the Restore tab. Click on Upload a Backup File and choose the backup file from your desktop. Once the backup is loaded, click RunRestore button to begin. When the whirring stops, there will be an error message. Ignore it. Don’t click anything just yet. Instead, drop down to the Linux CLI again and run: /root/restore-fix.
When it completes, return to the GUI and your browser, close the Restore dialog, and return to the Dashboard. Ignore the warning about Bind Ports. Click Settings->SIP Settings->SIP Settings (pj_sip) and scroll down to UDP. Click YES then Submit then Apply Config. We’re almost finished.
Return to the Linux CLI and run: /root/import-cdr1313 to import your 13-13 cdr and cel data. This will overwrite existing CDR data on your 16-15 server. If anyone needs to get it back, we’ll add the steps below in coming days. Stay tuned.
Known Issues with Incredible PBX 13-13 Imports
You now can use your browser to review your setup and verify that your 13-13 data came over. If you’re using CallerID Superfecta, you’ll need to enable it under Admin -> CID Superfecta. Next, access Applications -> Misc Applications and set the extension for Demo IVR to 3366. Save your settings and reload the dialplan when prompted. Be advised that Custom Destinations currently do not populate so you’ll need to cut-and-paste your entries from your 13-13 server. There should only be a few: Fax (HylaFax), Time of Day, and perhaps OutAnyWhere. OSS EndPoint Manager is not compatible with FreePBX 15 and will not be restored. Finally, verify that voicemail settings for your extensions got properly set. You may need to again enable voicemail, set a VM password, and configure email delivery of voicemails, if desired.
FIXED: Importing Ring Groups from 13-13 caused calls to fail unless Send Progress was set to No for each of the ring groups. This is no longer necessary. Voicemail data did not get restored properly. This has been fixed by running restore-fix script.
Managing CDR Data with Incredible PBX 16-15
Call Detail Records are stored in two tables in MySQL’s asteriskcdrdb database. Unlike in FreePBX 13, FreePBX 15 uses the InnoDB storage engine and a number of new fields in the cdr table so don’t attempt to merely restore your FreePBX 13 asteriskcdrdb database to FreePBX 15, or you will get a royal mess. Our conversion utility, import-cdr1313, makes it easy to migrate the data as explained above. What we didn’t do was restore any existing CDR data you may have already accumulated on your 16-15 server. But we did make a backup of the data which is stored in asteriskcdr1615new.sql. You can use this backup for two purposes. You can replace the CDR 13-13 data that we just imported with your original 16-15 data, or you can add your previous CDR 16-15 data to the 13-13 data. As stored, asteriskcdr1615new.sql will completely replace the existing contents of the asteriskcdrdb database using the command:
mysql -u root -ppassw0rd asteriskcdrdb < asteriskcdr1615new.sql
If you want to supplement the 13-13 CDR data that was imported with your previous 16-15 CDR data, it's a bit more complex. Begin by making a couple copies of the backup file and then we'll edit one of the new files:
cp asteriskcdr1615new.sql asteriskcdr1615bak.sql
cp asteriskcdr1615new.sql asteriskcdr1615supp.sql
nano -w asteriskcdr1615supp.sql
We need to delete two sections from the file. First, scroll down to Table structure for table `cdr`. Press Ctrl-K to cut (delete) every line until you reach Dumping data for table `cdr`. Second, scroll down further to Table structure for table `cel`. Press Ctrl-K to cut (delete) every line until you reach Dumping data for table `cel`. Now Save the modified file: Ctrl-X, Y, then ENTER. You now can append your previous 16-15 CDR data to the current CDR database with the following command:
mysql -u root -ppassw0rd asteriskcdrdb < asteriskcdr1615supp.sql
We're all human and sometimes mistakes are made. Not to worry. You can put Humpty back together again by starting with your original CDR database, adding the 13-13 CDR data again, and then supplementing it with your previous 16-15 data. Here's how.
mysql -u root -ppassw0rd asteriskcdrdb < asteriskcdr1615bak.sql
./import-cdr1313
cp asteriskcdr1615new.sql asteriskcdr1615supp.sql
# make required changes described above to asteriskcdr1615supp.sql
mysql -u root -ppassw0rd asteriskcdrdb < asteriskcdr1615supp.sql
Two other tips, and you'll be a CDR database expert. First, you can restore an empty (but functional) CDR database with this command:
mysql -u root -ppassw0rd asteriskcdrdb < asteriskcdrdb.sql
Finally, you can make a backup of your existing CDR database at any time with the command:
mysqldump -u root -ppassw0rd --single-transaction --quick \\
 --lock-tables=false asteriskcdrdb > asteriskcdr1615latest.sql
Originally published: Monday, July 29, 2019

Need help with Asterisk? Visit the VoIP-info Forum.
Special Thanks to Our Generous Sponsors
FULL DISCLOSURE: ClearlyIP, Skyetel, Vitelity, DigitalOcean, Vultr, VoIP.ms, 3CX, Sangoma, TelecomsXchange and VitalPBX have provided financial support to Nerd Vittles and our open source projects through advertising, referral revenue, and/or merchandise. As an Amazon Associate and Best Buy Affiliate, we also earn from qualifying purchases. We’ve chosen these providers not the other way around. Our decisions are based upon their corporate reputation and the quality of their offerings and pricing. Our recommendations regarding technology are reached without regard to financial compensation except in situations in which comparable products at comparable pricing are available from multiple sources. In this limited case, we support our sponsors because our sponsors support us.
BOGO Bonaza: Enjoy state-of-the-art VoIP service with a $10 credit and half-price SIP service on up to $500 of Skyetel trunking with free number porting when you fund your Skyetel account. No limits on number of simultaneous calls. Quadruple data center redundancy. $25 monthly minimum spend required. Tutorial and sign up details are here.
The lynchpin of Incredible PBX 2020 and beyond is ClearlyIP components which bring management of FreePBX modules and SIP phone integration to a level never before available with any other Asterisk distribution. And now you can configure and reconfigure your new Incredible PBX phones from the convenience of the Incredible PBX GUI.
VitalPBX is perhaps the fastest-growing PBX offering based upon Asterisk with an installed presence in more than 100 countries worldwide. VitalPBX has generously provided a customized White Label version of Incredible PBX tailored for use with all Incredible PBX and VitalPBX custom applications. Follow this link for a free test drive!
Special Thanks to Vitelity. Vitelity is now Voyant Communications and has halted new registrations for the time being. Our special thanks to Vitelity for their unwavering financial support over many years and to the many Nerd Vittles readers who continue to enjoy the benefits of their service offerings. We will keep everyone posted on further developments.