

It’s been more than a year since we last chatted about Cloud At Cost. Because they’re in the midst of yet another 50% off Fire Sale and to close out February with a bang, it seemed like a good time to take a fresh look at a terrific way to get started with Linux. For today’s $35 cloud project, we’re going to build a free WordPress server and a free commercial PBX compliments of 3CX. For what it’s worth, we’ve been running a PIAF5 server at CloudAtCost for more than four months without a single hiccup. It provides flawless Google Voice calling from either a connected SIP phone or from the 3CX Client running on a SIM-free Android phone or iPhone. See our recent article for tips on setting up a SIM-free mobile phone.
For those coming from the Windows World, Linux can be a little intimidating. Learning with a Cloud-based server presents its own challenges because of the security issues when your server sits on the public Internet. And then there’s the cost factor. Not everyone has several hundred dollars to buy hardware and, frankly, learning about Linux on a $35 Raspberry Pi can drive most folks to drink. So today we’ll show you another way. It’s not necessarily a better way. But it’s different, and it’s loads of fun for not much money. Today’s project takes about an hour, and you’ll have two terrific Linux applications to play with for life when we’re finished.
There’s lots to hate at Cloud At Cost, a Canadian provider that offers virtual machines in the cloud for a one-time fee with no recurring charges. For $35, you currently get two virtual machine platforms, and each has 512MB of RAM, 10GB of storage, and a gigabit Internet connection FOR LIFE. We haven’t seen a week go by when Cloud at Cost didn’t offer some sort of discount. Today it’s 50% off which brings the per server cost down to $17.50 each. That’s less than most lunches these days. If you don’t like half off and would prefer to wait for a better discount, check their Twitter feed every few days. So that’s the good news. But, if 99.999% reliability, performance, and excellent customer support are your must-haves, then look elsewhere. So why would anyone in their right mind sign up for a cloud solution that didn’t offer those things? Did we mention it’s $17.50 for a lifetime cloud server!
If you take our recommendation, you’ll need to go into this with the right attitude. It’s not going to be flawless perfection computing. It’s a sandbox on which to experiment with Linux, and VoIP, and Cloud Computing. Will your virtual machine disintegrate at some juncture? Maybe so. We’ve had about a third of ours fail at some point. But you can rebuild them easily, especially if you keep a backup. Our experience is that the first couple days are critical. If you start seeing sluggish performance which degenerates to zero, don’t waste your time. Take good notes as you go along, delete the virtual machine, and rebuild a new one. It won’t cost you a dime, and it’ll save you hours of frustration. We suspect that bad folks get onto some of the servers and delight in bringing the machines to their knees. So the quicker you cut your losses, the better off you will be. Is CloudAtCost a good solution for production use? Don’t risk it unless waterboarding is your favorite sport. It’s probably not gonna work, and you WILL be disappointed. Repeat after me: IT’S A SANDBOX!
Building a LAMP Server in the Cloud
Our first objective today is to show you how to build a rock-solid, secure Linux server in the Cloud with all the bells and whistles that make Linux the server platform of choice for almost every organization in the world. We’ll continue by showing you how to embellish the platform with WordPress to do something that’s special for you whether it’s your own blog like Nerd Vittles, or a school newspaper, or an on-line shopping site to sell comic books. The basic foundation for most Linux platforms is called a LAMP server which stands for Linux, Apache, MySQL, and PHP. Linux is an open source operating system that includes contributions from thousands of developers around the world. Apache is the web server platform on which most commercial businesses stake their reputation. MySQL is the open source database management system now owned by Oracle. If it’s good enough for Facebook, it’s good enough for you. And PHP is THE web-based programming language that will let you build almost any application using Linux, Apache, and MySQL.
So what’s the big deal? There are thousands of online tutorials that will show you how to build a LAMP server. For long time readers of Nerd Vittles, you already know that the component we continually stress is security. Without that, the rest really doesn’t matter. You’ll be building a platform for someone else to hijack and use for nefarious purposes. When we’re finished with today’s Project #1, you’ll have a cloud-based LAMP server that is totally invisible to the rest of the world with the exception of its web interface. And we’ll show you a simple way to reduce the exposure of that web interface to some of its most likely attackers. Will it be 100% secure? Nope. If you have a web server on the public Internet, it’s never going to be 100% secure because there’s always the chance of a software bug that nobody has yet discovered and corrected. THAT’S WHAT BACKUPS ARE FOR!
Creating a CentOS Machine in the Cloud
To get started, you’ve got to plunk down your $35 at Cloud at Cost. This buys you two server platforms while they’re cheap! Once you’ve paid the piper, they will send you credentials to log into the Cloud at Cost Management Portal. Change your password IMMEDIATELY after logging in. Just go to SETTINGS and follow your nose.
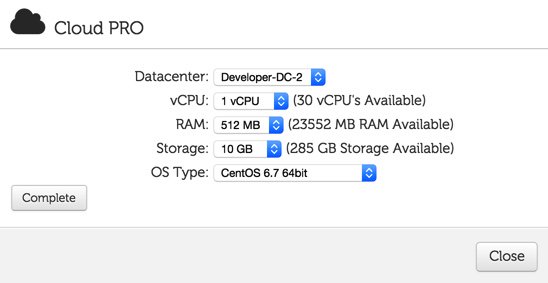
To create your first virtual machine, click on the CLOUDPRO button and click Add New Server. If you’ve only purchased the $17.50 CloudPRO 1 platform, then you’ll need all of the available resources shown in the pick list. Otherwise, choose 1 CPU, 512MB RAM, and 10GB storage for your first server. Leave CentOS 6.7 64bit selected as the OS Type and click Complete. Depending upon the type of special pricing that Cloud at Cost is offering when you sign up, the time to build your virtual machine can take anywhere from a minute to the better part of a day. We’ve learned to build new virtual machines at night, and they’re usually available for use by the next morning. Luckily, this slow performance does not impact existing virtual machines that already are running in their hosting facility.
Initial Configuration of Your CentOS 6 VM
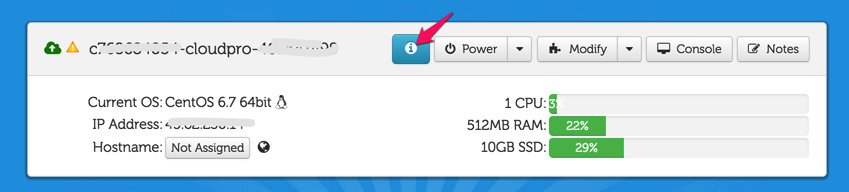
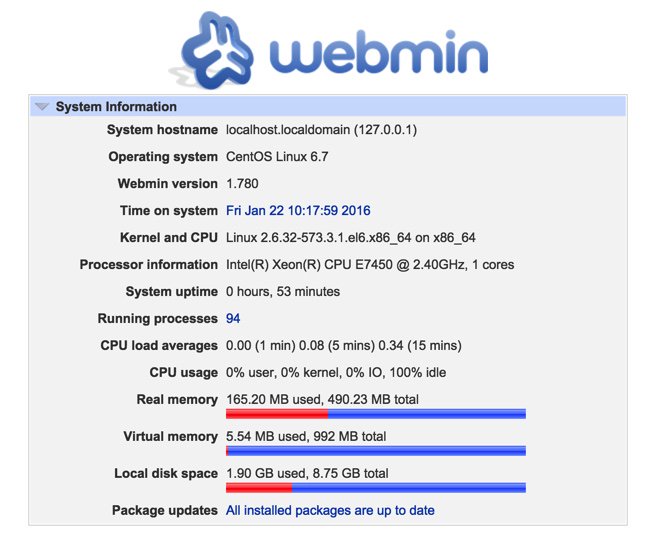
With a little luck, your virtual machine soon will appear in your Cloud at Cost Management Portal and look something like what’s shown above. The red arrow points to the i button you’ll need to click to decipher the password for your new virtual machine. You’ll need both the IP address and the password for your new virtual machine in order to log into the server which is now up and running with a barebones CentOS 6.7 operating system. Note the yellow caution flag. That’s telling you that Cloud at Cost will automatically shut down your server in a week to save (them) computing resources. You can change the setting to keep your server running 24/7. Click Modify, Change Run Mode, and select Normal – Leave Powered On. Click Continue and OK to save your new settings.

Finally, you’ll want to change the Host Name for your server to something more descriptive than c7…cloudpro.92… Click the Modify button again and click Rename Server to make the change. Your management portal then will show the new server name as shown above.
Logging into Your CentOS 6 VM
In order to configure and manage your new CentOS 6 virtual machine, you’ll need to log into the new server using either SSH or, for Windows users, Putty. After installing Putty, run it and log in to the IP address of your VM with username root and the password you deciphered above. On a Mac, open a Terminal session and issue a command like this using the actual IP address of your new virtual machine:
ssh root@12.34.56.78
Before you do anything else, reset your root password to something very secure: passwd
Installing the LAMP Server Basics
Now we’re ready to build your LAMP server platform. We’ve chopped this up into lots of little steps so we can explain what’s happening as we go along. There’s nothing hard about this, but we want to document the process so you can repeat it at any time. As we go along, just cut-and-paste each clump of code into your SSH or Putty session and review the results to make sure nothing comes unglued. If something does, the beauty of virtual machines is you can delete them instantly within your management portal and just start over whenever you like. So here we go…
We’ll begin by permanently turning off SELINUX which causes more problems than it solves. The first command turns it off instantly. The second line assures that it’ll stay off whenever you reboot your virtual machine.
setenforce 0
sed -i s/SELINUX=enforcing/SELINUX=disabled/g /etc/selinux/config
First, let’s address a couple of CloudAtCost quirks that may cause problems down the road. CloudAtCost has a nasty habit of not cleaning up after itself with fresh installs. The net result is your root password gets reset every time you reboot.
killall plymouthd
echo killall plymouthd >> /etc/rc.local
rm -f /etc/rc3.d/S97*
Now let’s bring CentOS 6.7 up to current CentOS 6.8 specs and add a few important applications:
yum -y update
yum -y install nano wget expect net-tools dialog git xz
yum -y install kernel-headers
yum -y install kernel-devel
reboot
After reboot, log back in as root. Now we’ll set up your Apache web server and configure it to start whenever you reboot your server:
yum -y install httpd
service httpd start
chkconfig httpd on
Next, let’s set up your MySQL server, bring it on line, and make sure it restarts after server reboots. Unless you plan to add Asterisk® and FreePBX® to your server down the road, you’ll want to uncomment the two commands that begin with # by removing the # symbol and replacing new-password with a very secure password for your root user account in MySQL. Be sure to run the last command to secure your server. After logging in, the correct answers are n,Y,Y,Y,Y.
yum -y install mysql mysql-server
service mysqld start
chkconfig mysqld on
#/usr/bin/mysqladmin -u root password 'new-password'
#/usr/bin/mysqladmin -u root -p -h localhost.localdomain password 'new-password'
mysql_secure_installation
Next, we’ll set up PHP and configure it to work with MySQL:
yum -y install php
yum -y install php-mysql
service httpd restart
Finally let’s get SendMail installed and configured. Insert your actual email address in the last line and send yourself a test message to be sure it’s working. Be sure to check your spam folder since the message will show a sender address of localhost which many email systems including Gmail automatically identify as spam.
yum -y install sendmail
rpm -e postfix
service sendmail restart
yum -y install mailx
echo "test" | mail -s testmessage youracctname@yourmailserver.com
Installing Supplemental Repositories
One of the beauties of Linux is not being totally dependent upon CentOS for all of your packaged applications. Let’s add a few other repositories that can be used when you need to add a special package that is not in the CentOS repository. Let’s start with EPEL. We’ll disable it by default and only use it when we need it.
yum -y install http://download.fedoraproject.org/pub/epel/6/x86_64/epel-release-6-8.noarch.rpm
sed -i 's|enabled=1|enabled=0|' /etc/yum.repos.d/epel.repo
We actually need the EPEL repo to install Fail2Ban for monitoring of attacks on certain Linux services such as SSH:
yum --enablerepo=epel install fail2ban -y
cd /etc
wget http://incrediblepbx.com/fail2ban-lamp.tar.gz
tar zxvf fail2ban-lamp.tar.gz
Another important repository is REMI. It is especially helpful if you decide to upgrade PHP from the default version 5.3 to one of the newer releases: 5.5 or 5.6. In this case, you’ll want to activate the specific repository to support the release you choose in /etc/yum.repos.d/remi-safe.repo.
yum -y install http://rpms.famillecollet.com/enterprise/remi-release-6.rpm
sed -i 's|enabled=1|enabled=0|' /etc/yum.repos.d/remi-safe.repo
One final repository to have on hand is RPMForge, now renamed RepoForge. We’ll use it in a bit to install a dynamic DNS update utility which you actually won’t need at CloudAtCost since your server is assigned a static IP address. But it’s handy to have in the event you wish to assign a free FQDN to your server anyway.
yum -y install http://incrediblepbx.com/rpmforge-release-0.5.3-1.el6.rf.x86_64.rpm
sed -i 's|enabled = 1|enabled = 0|' /etc/yum.repos.d/rpmforge.repo
Country Blocking with IPSET
We’ll use the EPEL repo to install ipset, a terrific addition to the IPtables Linux firewall that lets you quickly block entire countries from accessing your server:
yum --enablerepo=epel install ipset -y
Next, we’ll add a sample script that documents how the country blocking mechanism works with ipset. For a complete list of countries that can be blocked, go here. If you need a decoder badge to match abbreviations against country names, you’ll find it here. To add other countries, simply edit the shell script and clone lines 4-7 using the names of the countries and country zone files that you wish to add. Be sure to insert the new lines before the commands to restart iptables and fail2ban. This script will need to be run each time your server reboots and before IPtables is brought on line. We’ll handle that a little later.
echo "#\\!/bin/bash" > /etc/block-china.sh
echo " " >> /etc/block-china.sh
echo "cd /etc" >> /etc/block-china.sh
echo "ipset -N china hash:net" >> /etc/block-china.sh
echo "rm cn.zone" >> /etc/block-china.sh
echo "wget -P . http://www.ipdeny.com/ipblocks/data/countries/cn.zone" >> /etc/block-china.sh
echo "for i in \$(cat /etc/cn.zone ); do ipset -A china \$i; done" >> /etc/block-china.sh
echo "service iptables restart" >> /etc/block-china.sh
echo "service fail2ban restart" >> /etc/block-china.sh
sed -i 's|\\\\||' /etc/block-china.sh
chmod +x /etc/block-china.sh
Adding a Few Handy Utilities
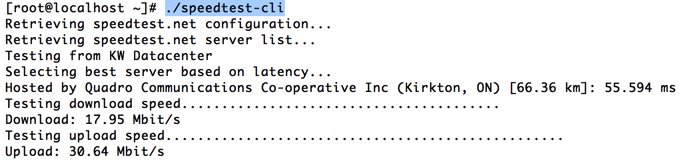
If you’re like us, you’ll want to test the speed of your Internet connection from time to time. Let’s install a free script that you can run at any time by logging into your server as root and issuing the command: /root/speedtest.py. Here were our results from last year. Running speedtest on a new server we built today showed a vast improvement in performance. Downloads were over ten times as fast, and upload speeds more than tripled. In fact, we now are using two CloudAtCost servers to host the old PIAF3 repositories.
cd /root
wget https://raw.githubusercontent.com/sivel/speedtest-cli/master/speedtest.py
chmod +x speedtest.py
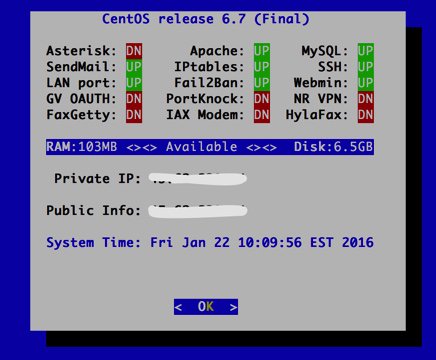
Next, let’s put in place a simple status display which will quickly tell you what’s running and what’s not. We’ve borrowed some GPL code from Incredible PBX to help you out. Run status-lamp at any time for a snapshot of your server.
cd /usr/local/sbin
wget http://incrediblepbx.com/status-lamp.tar.gz
tar zxvf status-lamp.tar.gz
rm -f status-lamp.tar.gz
sed -i 's|myip.pbxinaflash.com|myip.incrediblepbx.com|' /usr/local/sbin/status-lamp
Now we’ll put the Linux Swiss Army Knife in place. It’s called WebMin, and it provides a GUI to configure almost everything in Linux. Pick up a good WebMin book from your public library to get started. Once installed, you access WebMin from your browser at the IP address of your server on the default port of 10000: https://serverIPaddress:10000. It’s probably a good idea to change this port number and the commented out line shows how to do it with the new port being 9001 in the example. The way in which we typically configure the Linux firewall will block all access to WebMin except from an IP address which you have whitelisted, e.g. your home computer’s public IP address.
cd /root
yum -y install perl perl-Net-SSLeay openssl perl-IO-Tty
yum -y install http://prdownloads.sourceforge.net/webadmin/webmin-1.831-1.noarch.rpm
#sed -i 's|10000|9001|g' /etc/webmin/miniserv.conf
service webmin restart
chkconfig webmin on
Configuring the Linux IPtables Firewall
RULE #1: DON’T BUILD SERVERS EXPOSED TO THE INTERNET WITHOUT SECURITY!
As installed by CloudAtCost, your server provides ping and SSH access from a remote computer and nothing else. The good news: it’s pretty safe. The bad news: it can’t do anything useful for anybody because all web access to the server is blocked. We want to fix that, tighten up SSH access to restrict it to your IP address, and deploy country blocking to show you how.
As we implement the firewall changes, you need to be extremely careful in your typing so that you don’t accidentally lock yourself out of your own server. A typo in an IP address is all it takes. The good news is that, if you do lock yourself out, you still can gain access via the CloudAtCost Management Portal by clicking the Console button of your virtual machine. Because the console is on the physical machine and the lo interface is whitelisted, you can log in and disable the firewall temporarily: service iptables stop. Then fix the typo and restart the firewall: service iptables start.
First, let’s download the new IPtables config file into your root folder and take a look at it.
cd /root
wget http://incrediblepbx.com/iptables-lamp.tar.gz
tar zxvf iptables-lamp.tar.gz
Now edit the /root/iptables-lamp file by issuing the command: nano -w /root/iptables-lamp
You can scroll up and down through the file with Ctl-V and Ctl-Y. Cursor keys work as well. Once you make changes, save your work: Ctl-X, Y, ENTER. You’re now an expert with the nano text editor, an absolutely essential Linux tool.
Here’s what that file actually looks like:
*filter
:INPUT DROP [0:0]
:FORWARD ACCEPT [0:0]
:OUTPUT ACCEPT [0:0]
-A INPUT -p tcp -m tcp --tcp-flags ACK ACK -j ACCEPT
-A INPUT -m state --state ESTABLISHED,RELATED -j ACCEPT
-A INPUT -p icmp -j DROP
-A INPUT -i lo -j ACCEPT
-A INPUT -p tcp ! --syn -m state --state NEW -j DROP
-A INPUT -m state --state INVALID -j DROP
-A INPUT -p tcp -m tcp --tcp-flags FIN,SYN,RST,PSH,ACK,URG NONE -j DROP
-A INPUT -p tcp -m tcp --tcp-flags SYN,FIN SYN,FIN              -j DROP
-A INPUT -p tcp -m tcp --tcp-flags SYN,RST SYN,RST              -j DROP
-A INPUT -p tcp -m tcp --tcp-flags FIN,RST FIN,RST              -j DROP
-A INPUT -p tcp -m tcp --tcp-flags ACK,FIN FIN                  -j DROP
-A INPUT -p tcp -m tcp --tcp-flags ACK,URG URG                  -j DROP
-A INPUT -p tcp -m set --match-set china src                    -j DROP
-A INPUT -p udp -m udp --dport 53 -j ACCEPT
-A INPUT -p tcp -m tcp --dport 53 -j ACCEPT
-A INPUT -p tcp -m tcp --dport 113 -j ACCEPT
-A INPUT -p udp -m udp --dport 123 -j ACCEPT
-A INPUT -p tcp -m tcp --dport 123 -j ACCEPT
-A INPUT -m state --state NEW -m tcp -p tcp --dport 22 -j ACCEPT
#-A INPUT -s 12.34.56.78 -j ACCEPT
#-A INPUT -s yourFQDN.dyndns.org -j ACCEPT
-A INPUT -p tcp -m tcp --dport 80 -j ACCEPT
-A INPUT -j REJECT --reject-with icmp-host-prohibited
-A FORWARD -j REJECT --reject-with icmp-host-prohibited
COMMIT
Reminder: If you add another country to your block-china script, don’t forget to add a corresponding new country entry to your iptables file. See line 17 above that includes the word "china" for the syntax. There’s nothing much else to tweak except the two commented out (brown) lines that begin with #. First, remove the # symbol by moving the cursor to the right of the first one and hitting the backspace/delete key on your keyboard. Replace 12.34.56.78 with the public IP address of the computer from which you will be accessing your virtual machine. If you need multiple entries for multiple computers at different addresses, clone the line by pressing Ctrl-K and then Ctrl-U twice. Yes, we know. Some folks IP addresses change from time to time. In the next section, we’ll show you how to set up a Dynamic DNS entry with a utility that will keep track of your current IP address. In this case, uncomment the second commented line and replace yourFQDN.dyndns.org with your dynamic DNS address. Be very careful to assure that your FQDN is always on line. If the firewall cannot verify your DNS entry when it starts, the IPtables firewall will not start which means your server will be left unprotected. HINT: IP addresses are much safer because they are never verified.
Once you have your whitelisted addresses configured, comment out the port 22 line to keep the bad guys from trying to break into your server with SSH. Then save the file: Ctl-X, Y, ENTER. Next, issue the following commands to copy everything into place and restart the firewall.
mv /etc/sysconfig/iptables /etc/sysconfig/iptables.orig
cp -p /root/iptables-lamp /etc/sysconfig/iptables
echo "/etc/block-china.sh" >> /etc/rc.local
/etc/block-china.sh
Always, always, always check to be sure your firewall is functioning: iptables -nL. If you don’t see your desktop computer’s public IP address near the end of the listing, then the firewall is dead. status-lamp should also show IPtables down. Check for an error message which will tell you the problematic line so you can correct it.
Implementing Dynamic DNS Service
There are a number of free and paid Dynamic DNS providers. The way this works is you choose a fully-qualified domain name (FQDN) to identify your computer. Then you run a dynamic DNS update utility periodically from that computer. It reports back the current public IP address of your computer and your provider updates the IP address assigned to your FQDN if it has changed. In addition to supporting sites with ever changing IP addresses, it also allows you to permanently assign an FQDN to your computer or server so that it can be accessed without using a cryptic IP address.
If that computer happens to be an Incredible PBX server or a LAMP server that you’ve set up using this tutorial, then the following will get the DNS client update utility loaded using the RPM Forge repository that we previously installed:
yum --enablerepo=rpmforge install ddclient -y
Similar DNS update clients are available for Windows, Mac OS X, and many residential routers. Then it’s just a matter of plugging in the credentials for your dynamic DNS provider and your FQDN. In the case of the CentOS client, the config file is /etc/ddclient/ddclient.conf. Now reboot your server and pick up a good book on Linux to begin your adventure.
Now For Some Fun…
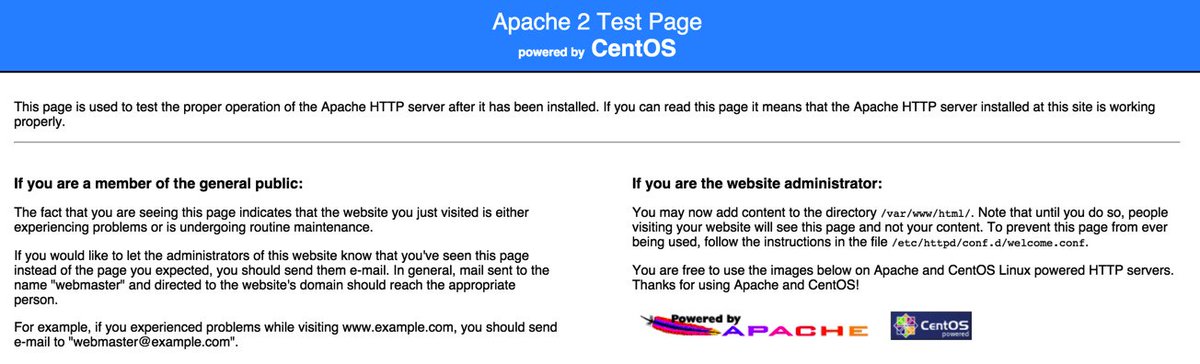
First, let’s check things out and make sure everything is working as it should. With your favorite web browser, visit the IP address of your new server. You should see the default Apache page:
Next, let’s be sure that PHP is working as it should. While still logged into your server as root using SSH or Putty, issue the following commands and make up some file name to replace test4567 in both lines. Be sure to keep the .php file name extension. Note to gurus: Yes, we know the second line below is unnecessary if you remove the space after the less than symbol in the first line. Unfortunately, WordPress forces the space into the display which left us no alternative.
echo "< ?php phpinfo(); ?>" > /var/www/html/test4567.php
sed -i 's|< |<|' /var/www/html/test4567.php
Now jump back to your web browser and access the new page you just created using the IP address of your server and the file name you made up: http://12.34.56.78/test4567.php
The PHPinfo listing will tell you everything you ever wanted to know about your web server setup including all of the PHP functions that have been enabled. That's why you want an obscure file name for the page. You obviously don't want to share that information with every bad guy on the planet. Remember. This is a public-facing web site that anyone on the Internet can access if they know or guess your IP address.

When you're ready to set up your own web site, just name it index.php and store the file in the /var/www/html directory of your server. In the meantime, issuing the following command will assure that anyone accessing your site gets a blank page until you're ready to begin your adventure:
echo " " > /var/www/html/index.php
Ready to learn PHP programming? There's no shortage of books to get you started.
Adding WordPress to Your LAMP Server
Where to begin with WordPress? What used to be a simple platform for bloggers has morphed into an all-purpose tool that makes building virtually any type of web site child's play. If you want to see what's possible, take a look at the templates and sample sites shown on WPZOOM. Unless you're an art major and savvy web designer, this will be the best $70 you ever spent. One of these templates will have your site up and running in minutes once we put the WordPress pieces in place. For the big spenders, $149 will give you access to over 50 gorgeous templates which you can download and use to your heart's content on multiple sites. And, no, your sites don't blow up after a year. You just can't download any additional templates or updates unless you renew your subscription. The other alternative is choose from thousands of templates that are provided across the Internet as well as in the WordPress application itself.
WordPress templates run the gamut from blogs to newsletters to photographer sites to e-commerce to business portfolios to video to travel to magazines to newspapers to education to food to recipes to restaurants and more. Whew! There literally is nothing you can't put together in minutes using a WordPress template. But, before you can begin, we need to get WordPress installed on your server. This is optional, of course. And, if you follow along and add WordPress, we've set it up in such a way that WordPress becomes the primary application for your site. Stated differently, when people use a browser to access your site, your WordPress template will immediately display. When we finish the basic WordPress setup and once you upload an image or two, you'll have a site that looks something like this:

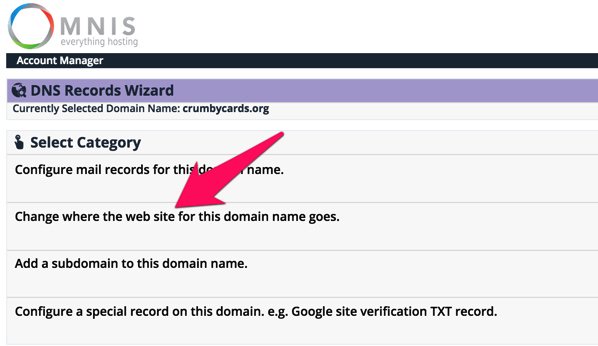
Before you begin, we strongly recommend that you acquire a domain for your site if you plan to use it for anything but experimentation. The reason is because it can be complicated to migrate a WordPress site from one location to another.1 Once you've acquired your domain, point the domain to the IP address of your new server. With a dirt cheap registrar such as Omnis.com, it's easy:
Now let's get started. To begin, we need to load the WordPress application onto your server:
cd /root
mkdir wordpress
cd wordpress
wget http://wordpress.org/latest.tar.gz
tar -xvzf latest.tar.gz -C /var/www/html
Next, we'll configure MySQL to support WordPress. We're assuming that you have NOT already created root passwords for MySQL. If you have, you'll need to add -pYourPassword to the various commands below immediately after root. There is no space between -p and your root password. Also edit the first line and make up a new password (replacing XYZ below) for the wordpress user account that will manage WordPress on your server before you cut and paste the code:
mysql -u root -e 'CREATE USER wordpress@localhost IDENTIFIED BY "XYZ";'
mysql -u root -e 'CREATE DATABASE wordpress;'
mysql -u root -e 'GRANT ALL ON wordpress.* TO wordpress@localhost;'
mysql -u root -e 'FLUSH PRIVILEGES;'
Next, we need to configure WordPress with your new MySQL credentials. Before you cut and paste, replace XYZ in the fourth line with the password you assigned in the preceding MySQL step:
cp /var/www/html/wordpress/wp-config-sample.php /var/www/html/wordpress/wp-config.php
sed -i 's|database_name_here|wordpress|' /var/www/html/wordpress/wp-config.php
sed -i 's|username_here|wordpress|' /var/www/html/wordpress/wp-config.php
sed -i 's|password_here|XYZ|' /var/www/html/wordpress/wp-config.php
chown -R apache:apache /var/www/html/wordpress
Before you forget, take a moment and create a very secure password for your MySQL root user accounts. Here are the commands. Just replace new-password with your new password before you cut and paste. Note that you also will be prompted for this password when you execute the second command because you will now have a root user password in place from executing the first command.
/usr/bin/mysqladmin -u root password 'new-password'
/usr/bin/mysqladmin -u root -p -h localhost.localdomain password 'new-password'
Finally, we need to modify your Apache web server to support WordPress as the primary application. Be sure to enter your actual email address in the third line before you cut and paste the code below:
echo " " >> /etc/httpd/conf/httpd.conf echo "" >> /etc/httpd/conf/httpd.conf echo 'ServerAdmin somebody@somedomain.com' >> /etc/httpd/conf/httpd.conf echo "DocumentRoot /var/www/html/wordpress" >> /etc/httpd/conf/httpd.conf echo "ServerName wordpress" >> /etc/httpd/conf/httpd.conf echo "ErrorLog /var/log/httpd/wordpress-error-log" >> /etc/httpd/conf/httpd.conf echo "CustomLog /var/log/httpd/wordpress-acces-log common" >> /etc/httpd/conf/httpd.conf echo " " >> /etc/httpd/conf/httpd.conf echo " " >> /etc/httpd/conf/httpd.conf service httpd restart
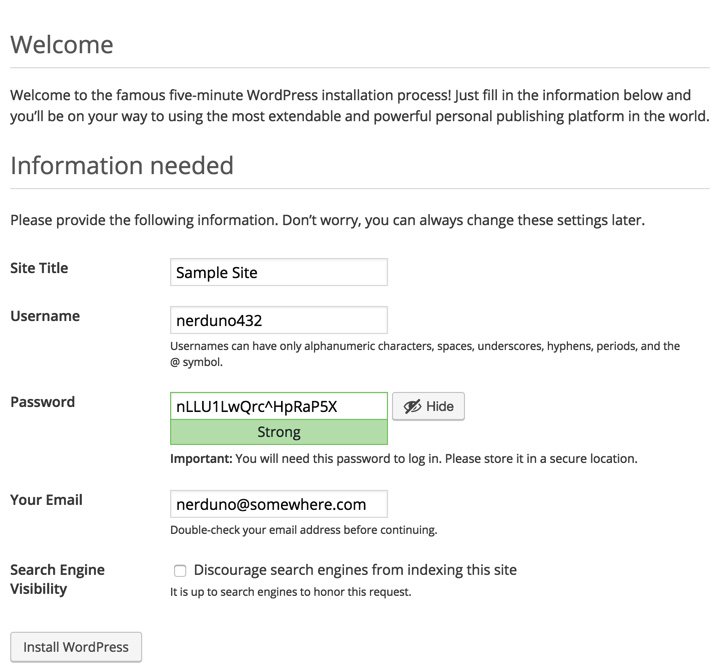
That should do it. Open a browser and navigate to the IP address of your server. You should be greeted with the following form. Fill in the blanks as desired. The account you're setting up will be the credentials you use to add and modify content on your WordPress site when you click Log In (as shown above). Make the username obscure and the password even more so. Remember, it's a public web site accessible worldwide! When you click Install WordPress, you'll be off to the races.
After your server whirs away for a minute or two, you will be greeted with the WordPress login prompt. With the username and password you entered above, you'll be ready to start configuring your WordPress site.

Once you're logged in, navigate to Appearance -> Themes and click Add New Theme. There's you will find literally hundreds of free WordPress templates that can be installed in a matter of seconds if WPZOOM is too rich for your blood. For a terrific all-purpose (free) theme, try Atahualpa. We'll leave our actual demo site running for a bit in case you want to explore and check out its performance. Installing and configuring the new theme took less than a minute:

A Final Word to the Wise. WordPress is relatively secure but new vulnerabilities are discovered regularly. Keep your templates, plug-ins, AND the WordPress application up to date at all times! The WordFence plug-in is a must-have. And we strongly recommend adding the following lines to your WordPress config file which then will let WordPress update everything automatically. Microsoft has given automatic updates a bad name, but in the case of WordPress, they work well.
echo "define('WP_AUTO_UPDATE_CORE', true);" >> /var/www/html/wordpress/wp-config.php
echo "add_filter( 'auto_update_plugin', '__return_true' );" >> /var/www/html/wordpress/wp-config.php
echo "add_filter( 'auto_update_theme', '__return_true' );" >> /var/www/html/wordpress/wp-config.php

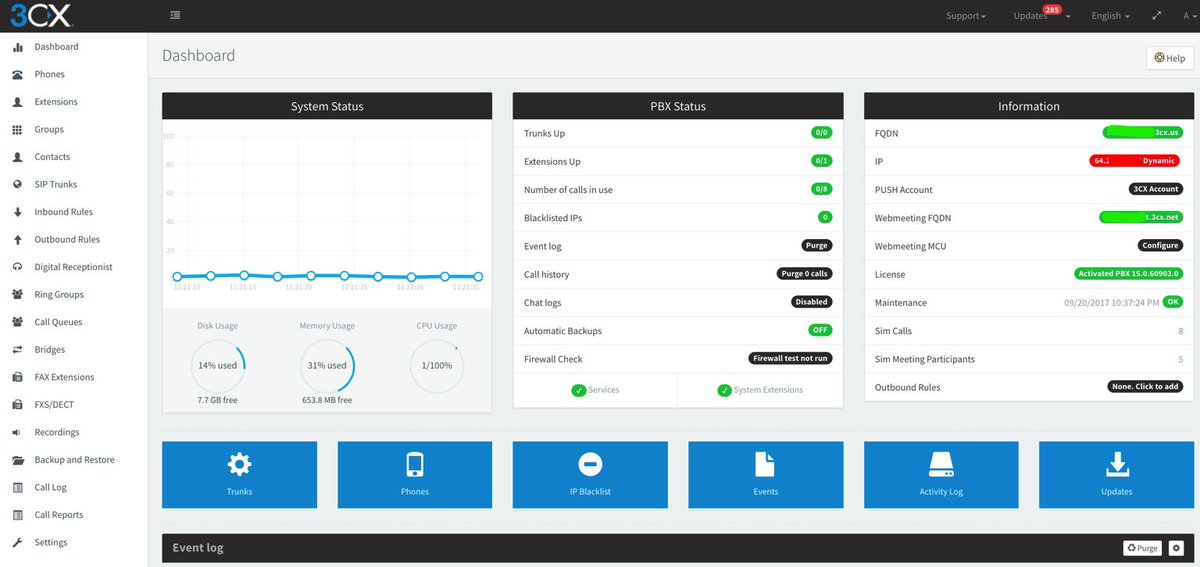
Building a 3CX Server in the Cloud
Now we're ready for our second cloud project. In less than 10 minutes, we're going to build a free 3CX commercial PBX using the remaining Cloud resources from our $35 purchase. To create your second virtual machine, click on the CLOUDPRO button in the CloudAtCost control panel and then click Add New Server. Choose 1 CPU, 512MB RAM, and 10GB storage for your second server. Choose Debian 8 64bit as the OS Type and click Complete.
Obtain a free license key for 3CX. Next, log in to your new Debian server as root using SSH or Putty and issue these commands. We'll begin by changing your root password.
NOTE: What appears as the fourth line below needs to be added to line #3!
passwd
wget -O- http://downloads.3cx.com/downloads/3cxpbx/public.key | apt-key add -
echo "deb http://downloads.3cx.com/downloads/3cxpbx/ /" | tee /etc/apt/sources.list.d/3cxpbx.list
apt-get update
rm -f /zang-debian.sh
apt-get -y install 3cxpbx
apt-get -y install sendmail sendmail-bin
When the initial setup finishes, choose the Web Interface Wizard and complete the install using your favorite web browser. Enter your 3CX license key when prompted. Make up a very secure Username and Password to access your 3CX portal. Specify that your IP address is Dynamic when prompted (even though it isn't). This tells 3CX to generate an FQDN for your server. Accept the default ports for HTTP (5000) and HTTPS (5001) access to your server. We recommend choosing 4-digit extensions numbers so you'll be ready for next week's project interconnecting your 3CX server to a Raspberry Pi for the best of both worlds. While logged into the 3CX management portal, adjust Settings → Email to Mail Server → 127.0.0.1 and Reply to → noreply@YourActual3CX-FQDN. Leave the other settings blank and click TEST then OK. Set up a SIP trunk with inbound and outbound call routes. Now download your favorite 3CX smartphone client, send yourself the Welcome Email for your default extension, and start calling. It really doesn't get much easier in the VoIP World. Come join the PIAF Forum if you need a helping hand!
Free Calling in the U.S. and Canada with PIAF5. We know our more frugal U.S. residents are wondering if there's a way to make free calls even with 3CX. You didn't really think there would be a release of PBX in a Flash without Google Voice support, did you? It's easy using the Simonics SIP to Google Voice gateway service. Setup time is about a minute, and the one-time cost is $4.99 using this Nerd Vittles link. Setup instructions for the 3CX side are straight-forward as well, and we've documented the procedure on the PIAF Forum.

Free Calling Worldwide with SIP URIs. There's another free calling option as well. PIAF5 and 3CX support worldwide SIP URI calling at no cost. As part of the PIAF5 install procedure, 3CX registers an FQDN for you with one of the 3CX domains if you indicate that your server has a dynamic IP address. Unless you really know what you're doing with DNS, it's a good idea to tell 3CX you have a dynamic IP address whether you do or not. Here's why. Once you have an assigned FQDN in the 3CX universe, one very slick feature is the ease with which you can publish a SIP URI address for any or all of your 3CX extensions thereby allowing PIAF5 users to receive calls from any SIP client worldwide at no cost. Setup takes less than a minute. It's as easy as 1-2-3. Here's how:
1. Login to the 3CX GUI and go to Settings → Network → FQDN. Tick "Allow calls from/to external SIP URIs" and make note of your FQDN, e.g. mypiaf5server.3cx.us. Click OK.
2. For an extension to enable (e.g. 001), go to Extensions → Edit 001 → Options → SIP ID and create any desired SIP URI alias for this extension, e.g. billybob. Click OK.
3. Anyone with a SIP client anywhere worldwide can now call extension 001 using SIP URI: billybob@mypiaf5server.3cx.us.
Special Thanks: Our special tip of the hat goes to a few web sites that we found helpful in putting this article together especially Unixmen and Matt Wilcox & friends and Programming-Review.
Originally published: Tuesday, February 28, 2017
9 Countries Have Never Visited Nerd Vittles. Got a Friend in Any of Them https://t.co/wMfmlhiQ9y #asterisk #freepbx pic.twitter.com/TPFGZbqWB6
— Ward Mundy (@NerdUno) April 22, 2016

Need help with Asterisk? Visit the PBX in a Flash Forum.
Special Thanks to Our Generous Sponsors
FULL DISCLOSURE: ClearlyIP, Skyetel, Vitelity, DigitalOcean, Vultr, VoIP.ms, 3CX, Sangoma, TelecomsXchange and VitalPBX have provided financial support to Nerd Vittles and our open source projects through advertising, referral revenue, and/or merchandise. As an Amazon Associate and Best Buy Affiliate, we also earn from qualifying purchases. We’ve chosen these providers not the other way around. Our decisions are based upon their corporate reputation and the quality of their offerings and pricing. Our recommendations regarding technology are reached without regard to financial compensation except in situations in which comparable products at comparable pricing are available from multiple sources. In this limited case, we support our sponsors because our sponsors support us.
 BOGO Bonaza: Enjoy state-of-the-art VoIP service with a $10 credit and half-price SIP service on up to $500 of Skyetel trunking with free number porting when you fund your Skyetel account. No limits on number of simultaneous calls. Quadruple data center redundancy. $25 monthly minimum spend required. Tutorial and sign up details are here.
![]() The lynchpin of Incredible PBX 2020 and beyond is ClearlyIP components which bring management of FreePBX modules and SIP phone integration to a level never before available with any other Asterisk distribution. And now you can configure and reconfigure your new Incredible PBX phones from the convenience of the Incredible PBX GUI.
The lynchpin of Incredible PBX 2020 and beyond is ClearlyIP components which bring management of FreePBX modules and SIP phone integration to a level never before available with any other Asterisk distribution. And now you can configure and reconfigure your new Incredible PBX phones from the convenience of the Incredible PBX GUI.
 VitalPBX is perhaps the fastest-growing PBX offering based upon Asterisk with an installed presence in more than 100 countries worldwide. VitalPBX has generously provided a customized White Label version of Incredible PBX tailored for use with all Incredible PBX and VitalPBX custom applications. Follow this link for a free test drive!
 Special Thanks to Vitelity. Vitelity is now Voyant Communications and has halted new registrations for the time being. Our special thanks to Vitelity for their unwavering financial support over many years and to the many Nerd Vittles readers who continue to enjoy the benefits of their service offerings. We will keep everyone posted on further developments.
Some Recent Nerd Vittles Articles of Interest...
- Should you ever have to migrate your WordPress site from one domain to another, here are two helpful tools to consider: the Automatic Domain Name Changer Plugin and our favorite: WordPress-Domain-Changer. [↩]


Just saw this write-up here at Nerdvittles telling of 50% off…so tried to see it at CAC.
Couldn’t find that – but the banner at their site now offers 80% off…OK, an even better deal ??
I’ll go for that, so I chose it and visited the linked page, and it brings this result:
Developer CloudPRO 3 $140.00=> $70.00
Which is 50% off as the article here says ?!?
Please, will someone clarify or provide a better link so that I may reach that offered 80% deal – or failing that, confirm that it is a typo & I’ll go for the lesser cost deal which seems to be one account with 2 IPs.
Thanks.
[WM: The article clearly indicates that the current discount is 50% off, not 80%. It also notes that if you want a better discount, you’ll have to wait for an announcement. Their web site still shows an ad for Black Friday which has long since passed.]