

Let’s face it. Virtual Machines are the future of server administration. Whether you prefer your own dedicated hardware or cloud-based resources managed by you or someone else, virtual platforms are the way to go. You get more bang for the buck out of your hardware by pooling resources for multiple tasks. VMware® and VirtualBox® make it easy. Today we’re pleased to introduce a summer refresh of our VMware build. It provides the latest Asterisk® 16 and FreePBX® 15 components and now includes Incredible Fax featuring HylaFax and AvantFax. All are built from source, and the install only takes a few minutes.
Just download the VMware tarball image from SourceForge to your desktop. Fire up your browser and login to your VMware Web Console. With a few mouse clicks, you’ll have a CentOS 7 platform in place with Incredible PBX® and Incredible Fax just a single keystroke away. It doesn’t get much easier. And, you get the very latest release of Asterisk 16 compiled from source code that you can actually examine, enhance, and share… just like the GPL license says.
Choosing a Virtual Machine Platform
Making the right deployment choice for your virtual machine platform depends upon a number of factors. We’ve already sung the praises of VirtualBox so we won’t repeat it here. VMware also is rock-solid and has been for decades. VMware typically runs on dedicated hardware. If you don’t have the funds for a hardware purchase to support your virtualization requirements, then VirtualBox on your desktop machine is a no-brainer. For many, however, some separation of the virtualization environment from your desktop computing environment is desirable. That choice is equally easy. VMware wins, hands down. Better yet, you can make snapshot backups of your virtual machines in seconds with a single button click. If you’ve wrestled with backups on standalone hardware with Linux, you’ll quickly appreciate the difference.
Getting Started with VMware ESXi
Many of you have VMware platforms already in place at work. For you, installing Incredible PBX 2020 is as simple as downloading the image to your desktop and importing it into your existing platform. Better yet, your system administrator can do it for you. If you’re new to VMware, here’s an easy way to get started, and the software won’t cost you a dime. VMware offers a couple of free products that will give you everything you need to run a robust VMware platform on relatively inexpensive hardware. The choice is up to you.
A Free VMware Platform for SOHO Apps
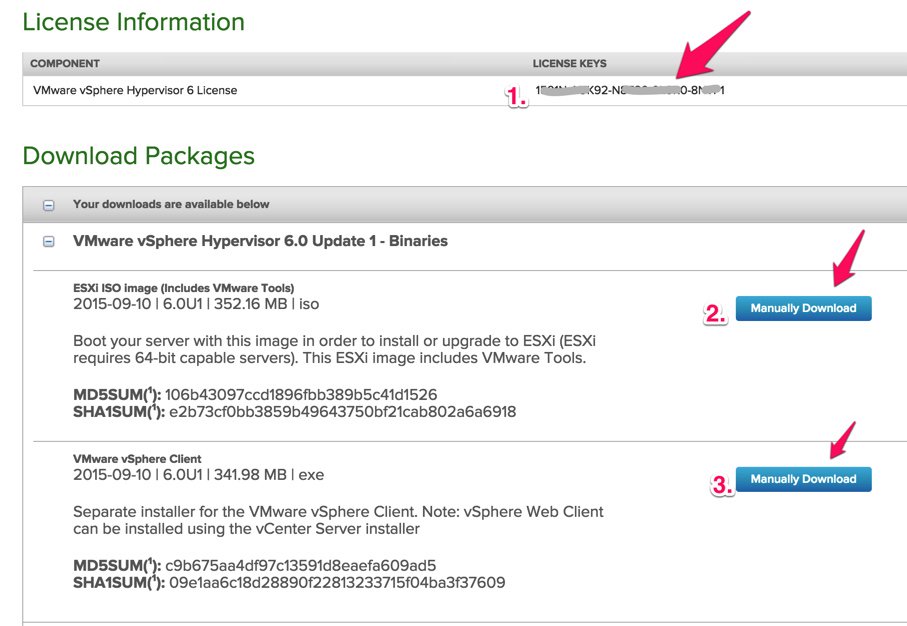
Before you can download the components for the free VMware ESXi platform, you’ll need to sign up for a free account at my.vmware.com. Once you’re signed up, log in and follow these simple steps to sign up for a free ESXi license key and download the ESXi version 6 software:
- Write down your assigned License Key
- Manually download the VMware vSphere Hypervisor 6.5 ISO
- Manually download the VMware vSphere Client 6.5
Next, burn the ISO to a CD/DVD and boot your dedicated VM hardware platform with it. Follow the instructions to complete the install. Next install the vSphere Client on a Windows computer, if desired. Don’t forget to add your ESXi License Key when you complete the installation. Once the ESXi server is up and running, you can stick the hardware on a shelf somewhere out of the way. You will rarely interact with it. That’s all handled using the VMware Web Console. Don’t forget to apply your License Key once VMware ESXi is up: Virtual Machines -> Licensing -> Apply License.
Installing the vSphere Web Client
Most of the feature set of the former Windows vSphere Client now is available from the convenience of your browser. Just point it to the IP address of your VMware server like this: https://ip-address/ui/.
Here’s how to install the vSphere Web Client:
1. Log into the console of your ESXi server as root using your root password.
2. Press F2 to Customized System.
3. Choose Troubleshooting Options.
4. Choose Enable SSH.
5. Using a Terminal window on a Mac or Linux machine or using Putty with Windows, log into the IP address of your ESXi server as root.
6. Issue the following commands to install the latest vSphere Web Client vib and disable http firewall blockage:
esxcli software vib install -v http://download3.vmware.com/software/vmw-tools/esxui/esxui-signed-latest.vib
esxcli network firewall ruleset set -e true -r httpClient
7. Using a web browser, login to the web client as root at https://ESXi-server-IP-address/ui/
8. Should you ever wish to remove the web client from your server:
esxcli software vib remove -n esx-ui
9. You may wish to disable SSH access when you’re finished. Just repeat steps 1-4 above.
Here’s what a typical Incredible PBX Virtual Machine looks like in the web client once you’ve added the VMware Tools to your virtual machine as documented below. There’s even a Console window.
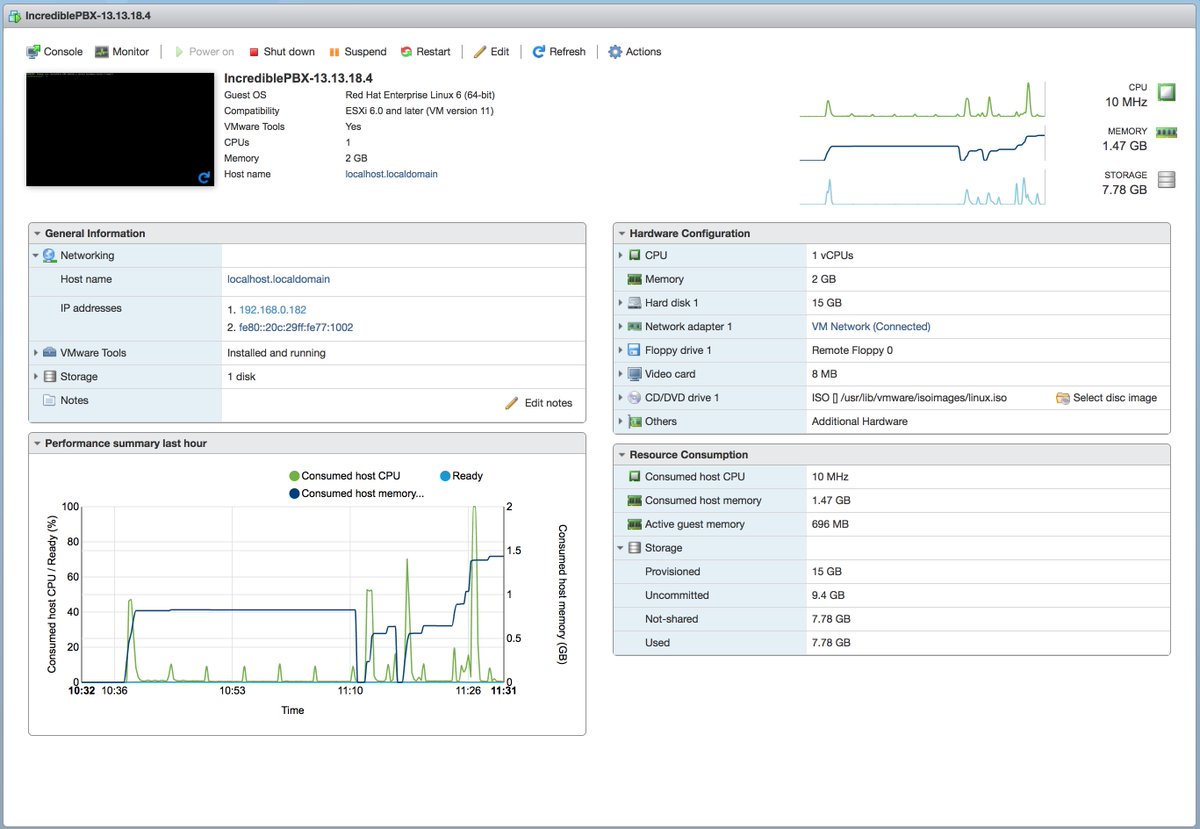
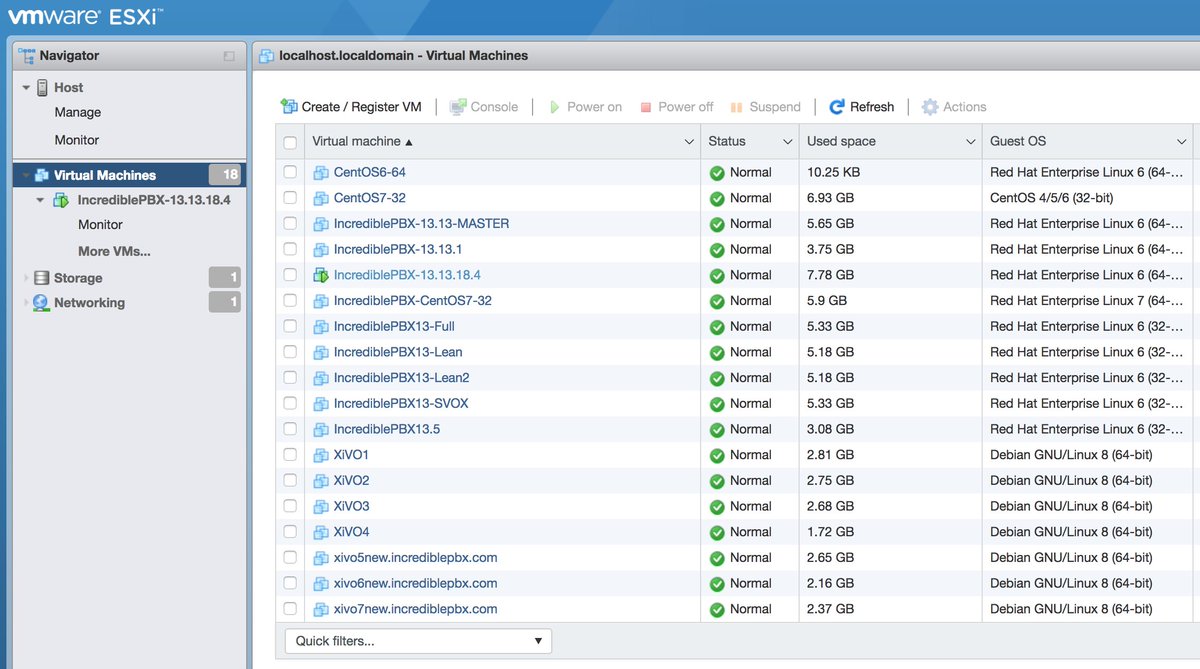
Under the Virtual Machines tab, you now can manage and add new VMs directly.
Installing VMware Tools in a Virtual Machine
If you plan to manage your virtual machines using the vSphere Web Client and a browser, then you definitely will want to install the VMware Tools in each of your virtual machines.
For ESXi 6.5, install the new GPL VMware open-vm-tools. Here’s how:
1. Start up your VM and login to the VM as root using SSH or Putty.
2. From the Linux CLI, issue the following commands:
yum -y install --enablerepo=epel open-vm-tools
reboot
Special thanks to John Borhek (@unsichtbarre on the PIAF Forum) for the VMware lessons. 🙂
Deploying the Incredible PBX Template

Deploying an Incredible PBX template only takes a few minutes, but first you need to download the Incredible PBX 2020 tarball template from SourceForge onto your Desktop PC. Then untar the tar.gz file which will create the IncrediblePBX folder with the VMware image components.
Once the Incredible PBX template components are on your desktop, here are the install steps:
1. Using a browser, login to the VMware Web Console using the root account you set up when you installed ESXi. Choose File, Deploy OVF/OVA Template.
2. Drag-and-drop the IncrediblePBX folder from your Desktop PC onto the web console.
3. Click Next.
4. Give the new Virtual Machine a name.
5. IMPORTANT: Choose Thin Provision option and click Next.
6. Review your entries and click Next to create the new Virtual Machine.
7. It only takes a few minutes to create the new Virtual Machine.
8. The Main Client window will redisplay and your new VM should now be shown in the left panel. (1) Click on it. (2) Then click the Green start icon. (3) Then click the Console Window icon.
9. When the VM’s Console Window opens, click in the window in the black area. Log into your virtual machine as root using the default password: password.
10. To complete the Incredible PBX 2020 setup, you will automatically be walked through the short installation procedure when you start the virtual machine. Following the automatic reboot, just log in a second time as root and the install will complete. We recommend using SSH for your second login so that your desktop PC gets whitelisted in the Incredible PBX firewall.
11. Set up the proper time zone for your server: /root/timezone-setup.
12. Reset admin passwords by running: ./admin-pw-change, ./apache-pw-change, and ./avantfax-pw-change.
13. Choose an email delivery address for your faxes: ./avantfax-email-change.
That should be enough tutorial for today. Enjoy your new VMware platform.
Continue Reading: Configuring Extensions, Trunks & Routes
Don’t Miss: Incredible PBX Application User’s Guide covering the 31 Whole Enchilada apps
Originally published: Monday, February 17, 2020 Updated: Sunday, August 16, 2020

Need help with Asterisk? Visit the VoIP-info Forum.
Special Thanks to Our Generous Sponsors
FULL DISCLOSURE: ClearlyIP, Skyetel, Vitelity, DigitalOcean, Vultr, VoIP.ms, 3CX, Sangoma, TelecomsXchange and VitalPBX have provided financial support to Nerd Vittles and our open source projects through advertising, referral revenue, and/or merchandise. As an Amazon Associate and Best Buy Affiliate, we also earn from qualifying purchases. We’ve chosen these providers not the other way around. Our decisions are based upon their corporate reputation and the quality of their offerings and pricing. Our recommendations regarding technology are reached without regard to financial compensation except in situations in which comparable products at comparable pricing are available from multiple sources. In this limited case, we support our sponsors because our sponsors support us.
 BOGO Bonaza: Enjoy state-of-the-art VoIP service with a $10 credit and half-price SIP service on up to $500 of Skyetel trunking with free number porting when you fund your Skyetel account. No limits on number of simultaneous calls. Quadruple data center redundancy. $25 monthly minimum spend required. Tutorial and sign up details are here.
![]() The lynchpin of Incredible PBX 2020 and beyond is ClearlyIP components which bring management of FreePBX modules and SIP phone integration to a level never before available with any other Asterisk distribution. And now you can configure and reconfigure your new Incredible PBX phones from the convenience of the Incredible PBX GUI.
The lynchpin of Incredible PBX 2020 and beyond is ClearlyIP components which bring management of FreePBX modules and SIP phone integration to a level never before available with any other Asterisk distribution. And now you can configure and reconfigure your new Incredible PBX phones from the convenience of the Incredible PBX GUI.
 VitalPBX is perhaps the fastest-growing PBX offering based upon Asterisk with an installed presence in more than 100 countries worldwide. VitalPBX has generously provided a customized White Label version of Incredible PBX tailored for use with all Incredible PBX and VitalPBX custom applications. Follow this link for a free test drive!
 Special Thanks to Vitelity. Vitelity is now Voyant Communications and has halted new registrations for the time being. Our special thanks to Vitelity for their unwavering financial support over many years and to the many Nerd Vittles readers who continue to enjoy the benefits of their service offerings. We will keep everyone posted on further developments.


