
We’ve just returned from a week in the Pacific Northwest teaching an Asterisk® course for an organization that wants to interconnect satellite offices using Asterisk servers. This coincided with a support request from one of America’s premier airlines which wants to do much the same thing for all of its reservation counters in airports situated in feeder cities around the country. Suffice it to say, PBX in a Flash in conjunction with Asterisk and Hamachi VPNs is perfectly suited to let anyone build these interconnected systems in minutes rather than months. In fact, with less than a day’s worth of introduction to Asterisk and PBX in a Flash, a group of 16 network administrators with no previous Asterisk experience did just that in a one-hour lab session during our training seminar last week. At the risk of (further) destroying our ability to earn a living, here’s how we did it.
Proxmox as a Training Tool. Before we get into the nitty gritty of actually interconnecting Asterisk servers with Hamachi VPNs, let us provide the free tip of the week for those of you that want to experiment with interconnecting Asterisk servers or for those that like to test various Asterisk scenarios without rebuilding servers all day long. There is no finer tool for this than the Proxmox Virtual Environment, a free and easy to use Open Source virtualization platform for running Virtual Appliances and Virtual Machines. With a sale-priced Dell T105 with a Quad Core AMD Opteron processor and 8 gigs of RAM, you’ll have a perfect platform to run about 16 simultaneous PBX in a Flash servers. The trick is finding the machines on sale for half price which is about every other week. Our lab system which matches this configuration was less than $600 with RAM purchased from a third party. You can save most of the shipping cost by using our coupon link in the right column to shop at Dell’s small business site.
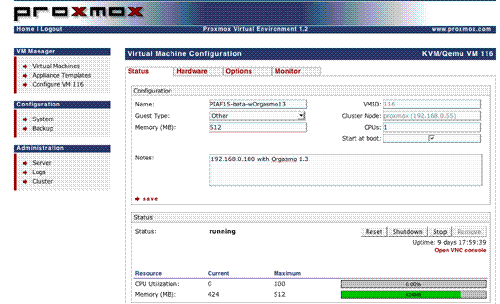
Proxmox lets you build virtual machines in two ways: OpenVZ templates or Qemu/KVM Templates and ISO images. While we intend to offer an OpenVZ template for PBX in a Flash soon, currently it’s easy to create your own ISO template using the standard PBX in a Flash ISO image. Once you’ve uploaded your ISO image into Proxmox, simply create a new virtual machine by giving it a name, specifying 512MB of RAM and a 30GB partition. In 10 seconds or less, your new VM will be ready to boot. Start your VM and then open the VNC console window within the Proxmox web interface and install PBX in a Flash just as if you were building a stand-alone machine. When the 15-minute install completes, run through the Orgasmatron Installer setup, and you’ll have your turnkey PBX in a Flash system ready for production in less than 30 minutes.
You don’t have to repeat this drill for every virtual machine. Instead, use the built-in Proxmox backup utility to make a backup image of what you built. Shut down the VM, create a /backup directory, and then schedule the compressed backup in the web browser. When the backup completes, you’ll have a backup image in /backup with a file name like this: vzdump-101.tgz.
To create a new virtual machine, you issue the following command while positioned in the /backup directory specifying the number for the new virtual machine:
vzdump --restore vzdump-101.tgz 102
In about 3 minutes, you’ll have a second virtual machine that’s a clone of the first one. Because it’s a true clone, it would obviously have the same MAC address for the virtual NIC. You don’t want that or all of your VMs would boot up using the same IP address. Using the Proxmox web interface, just edit the new VM 102 by switching from the Status tab to the Hardware tab, delete the existing Ethernet device, and then create a new Ethernet device under the hardware address list pulldown. This will create a new virtual NIC with a new MAC address. So, when you boot VM 102, it will be assigned a new IP address by your DHCP server. You can decipher the new IP address by opening the VNC console window for VM 102 after you boot it up. Now you’re an expert. You can create the additional Baker’s Dozen turnkey PBX in a Flash servers in about an hour. Start all of them up, and you’ve got an instant training facility and PBX in a Flash playground.
April, 2012 Update. See our new article for a current state-of-the-art VoIP VPN.
Creating Hamachi VPN. You obviously don’t need a virtual private network in order to interconnect Asterisk servers. But, as easy as the Hamachi VPN is to set up, especially with PBX in a Flash servers, why wouldn’t you want all of your inter-Asterisk communications secured and encrypted? In addition to the capacity limitation of the Proxmox server, there’s another reason we chose to build 16 PBX in a Flash VMs. That happens to be the number of servers you can interconnect with the Hamachi Virtual Private Network without incurring a charge.1 Why use the Hamachi VPN when OpenVPN is free with unlimited network connections and no strings? The short answer is it’s incredibly simple to set up without public and private key hassles, and it supports dynamic IP server addressing with zero configuration. We plan to cover OpenVPN in a subsequent article but, for many implementations, Hamachi VPNs offer a robust, flexible alternative that can be deployed in minutes.
If you’re not using PBX in a Flash, there are a million good Hamachi VPN tutorials available through a quick Google search. If you are using PBX in a Flash, we’ve done the work for you. With the Orgasmatron Installer build, you’ll find the Hamachi VPN installation script in /root/nv. For other PBX in a Flash systems, just download the install-hamachi.x script from here or, after logging into your server as root, issue the following commands:
wget http://pbxinaflash.net/source/hamachi/install-hamachi.x
chmod +x install-hamachi.x
./install-hamachi.x
Before beginning the Hamachi VPN install, it’s a good idea to make yourself a cheat sheet for the servers you plan to interconnect. We’re going to interconnect 3 servers today, but doing 16 is just more of the same. You’ll need a unique name for your virtual private network. Pick a name that distinguishes this VPN from others you may build down the road. For our example, we’re going to use piaf-vpn. Next, you need a very secure password for your VPN. We’re going to use password for demonstration purposes only. Finally, you need a unique nickname for each of your servers, e.g. piaf-server1, piaf-server2, and piaf-server3 for our example setup today.
For the first Hamachi install, we’ll need to create the new network. For the remaining installs, we’ll simply join the existing network. Keep in mind that you can only remove machines from the network using the same server that was used to create the other VPN accounts initially so build out your virtual private network by starting with your main server, piaf-server1 in our example.
To begin the Hamachi VPN install, run the script using the commands shown above. Type Y to agree to the installer license and then press the Enter key to kick off the install. For the piaf-server1 install, type N to create a new Hamachi network. For the remaining installs, you’d type J to join an existing Hamachi network. Enter the network name you chose above. For our sample, we used piaf-vpn. Type it twice when prompted. Now type your network password and then your nickname for this server when prompted to do so. Then standby while the Hamachi software is installed. It takes a few minutes depending upon the speed of your network connection. And remember, do NOT use our sample network name. Make up your own and don’t forget it. When the install completes, you can review the log if you’d like. Unless something has come unglued, Hamachi should now be running on your first server. Repeat the drill on your other servers.
The next step is to grab some of our scripts to make it easier to manage Hamachi on your servers.
cd /usr/local/bin

wget http://pbxinaflash.net/source/hamachi/hampiaf

wget http://pbxinaflash.net/source/hamachi/hamachi-servers

chmod +x ham*

cd /root

wget http://pbxinaflash.net/source/hamachi/hamachi.faq
The hamachi.faq document provides all of the commands you’ll need to manage Hamachi including the steps to start over with a totally new virtual private network. For now, let’s be sure your network is running. Type: hamachi-servers piaf-vpn using the network name you assigned to your own VPN. Then type it again, and it should display all of the servers on your VPN with their private VPN IP addresses:
root@pbx:~ $ hamachi-servers piaf-vpn
This server:
Identity 5.151.123.1
Nickname piaf-server1
AutoLogin yes
OnlineNet piaf-vpnGoing online in piaf-vpn .. failed, already online
Retrieving peers’ nicknames ..
* [piaf-vpn]
5.151.123.2 piaf-server2
5.151.123.3 piaf-server3
Finally, a word of caution about security. One of the drawbacks of the ease with which you can create Hamachi VPNs is the ease with which you can create Hamachi VPNs. Anyone that knows your network name and password can join your network with one simple command. You can kick them off from the main server where the VPN was created (hampiaf evict piaf-vpn 5.249.146.66), but you can’t keep them from joining. So, protect your network by making the password extremely secure. There currently is no way to change your network password. All you can do is create a new network with a new network name and a more secure password.
Interconnecting Asterisk Servers. Once your VPN is established and all of your servers are on line, then we’re ready to interconnect them with Asterisk and FreePBX. There are a number of ways to do this. For smaller networks, we’re going to show you the easy and secure way using IAX and the VPN you just created. As with the VPN setup, a cheat sheet comes in handy to avoid erroneous entries that would cause your calls between servers to fail. What we recommend is assigning and creating a block of extensions on each of your servers with different ranges of numbers. For example, we’re going to use four-digit extensions in the 1xxx range for piaf-server1, 2xxx for piaf-server2, and 3xxx for piaf-server3. The idea here is that the extensions are unique between your servers. This makes it easy to dial between offices without having to resort to dialing prefixes. So the first step in interconnecting your servers is to build the necessary extensions on each of your servers.
Now for the cheat sheet. Using the hamachi-servers tool above, decipher the VPN IP address of each of your servers and make a chart with the server names, the range of extension numbers, and the VPN IP address of each server. You’ll also need to think up a very secure password. We’re going to use the same one for all of the servers although you certainly don’t need to. So long as the password you choose is secure, there’s really no reason not to use the same one.
piaf-server1 1xxx 5.151.123.1 password
piaf-server2 2xxx 5.151.123.2 password
piaf-server3 3xxx 5.151.123.3 password
Creating Trunks. The next step is to create an IAX trunk on each server for each remaining server in your network. In our example, on piaf-server1, we’d want to create trunks for piaf-server2 and piaf-server3. On piaf-server2, we’d want to create trunks for piaf-server1 and piaf-server3. And so on.
NOTE: Because of a change in IAX design to fix a security issue that arose after this article was originally published, be sure to add the following line in the User Details of each trunk below:
requirecalltoken=no
On your first server (piaf-server1 in our example), using a web browser, open FreePBX and choose Admin, Setup, Trunks and then click Add IAX2 Trunk. Create the trunk to piaf-server2 with the following entries. Leave everything blank except the entries shown below:

While still on piaf-server1, repeat the process to create a trunk for piaf-server3:

On your second server (piaf-server2 in our example), using a web browser, open FreePBX and choose Admin, Setup, Trunks and then click Add IAX2 Trunk. Create the trunk to piaf-server1 with the following entries. Leave everything blank except the entries shown below:
While still on piaf-server2, repeat the process to create a trunk for piaf-server3:
On your third server (piaf-server3 in our example), using a web browser, open FreePBX and choose Admin, Setup, Trunks and then click Add IAX2 Trunk. Create the trunk to piaf-server1 with the following entries. Leave everything blank except the entries shown below:
While still on piaf-server3, repeat the process to create a trunk for piaf-server2:
Creating Outbound Routes. Now we need to tell Asterisk how to route the calls between the servers. In a nutshell, we want calls to extensions in the 1xxx range routed to extensions on piaf-server1, calls to 2xxx extensions routed to piaf-server2, and calls to 3xxx extensions routed to piaf-server3. On each server, create an outbound route for each of the remaining servers. Name the routes server1, server2, and server3 as appropriate. The critical pieces of information in each outbound route are the dial string (which should match the extensions on the server we’re connecting to) and the Trunk Sequence (which should be the appropriate IAX trunk for the server we’re connecting to).
On piaf-server1, we’d have a server2 outbound route with a Dial String of 2xxx and a Trunk Sequence of IAX2/piaf-server2. Then we’d have another server3 route with a Dial String of 3xxx and a Trunk Sequence of IAX2/piaf-server3. If you have a catch-all outbound route, be sure to move these routes above the catch-all in the right column. Then reload your dialplan.
On piaf-server2, we’d have a server1 outbound route with a Dial String of 1xxx and a Trunk Sequence of IAX2/piaf-server1. Then we’d have another server3 route with a Dial String of 3xxx and a Trunk Sequence of IAX2/piaf-server3. If you have a catch-all outbound route, be sure to move these routes above the catch-all in the right column. Then reload your dialplan.
On piaf-server3, we’d have a server1 outbound route with a Dial String of 1xxx and a Trunk Sequence of IAX2/piaf-server1. Then we’d have another server2 route with a Dial String of 2xxx and a Trunk Sequence of IAX2/piaf-server2. If you have a catch-all outbound route, be sure to move these routes above the catch-all in the right column. Then reload your dialplan.
If you’re setting this up with PRI or T1 connections between your servers, you might also want to specify at least secondary trunk sequences for each of the outbound routes to provide some redundancy. For example, on piaf-server1, you might want a secondary Trunk Sequence for server2 that specified IAX2/piaf-server3. Then, if the primary connection between server1 and server2 was down, Asterisk would attempt to complete calls to 2xxx extensions by routing them to server3 and then on to server2 from there. To the caller and call recipient, they’d never know that the direct link between server1 and server2 had failed.
Alternate routing might also be appropriate where you have more capacity between certain servers. For example, if you had a single T1 line between server1 and server3 but you had PRI connections between server1 and server2 and between server2 and server3, then it might make more sense to indirectly route 3xxx calls from server1 through server2 and then on to server3 rather than the direct route from server1 to server3. Enjoy!
Free DIDs While They Last. Sipgate is giving away a free U.S. DID with free incoming calls plus 200 free minutes for outbound calls. Better hurry. Here’s the trunk setup for FreePBX-based systems:
Trunk name: sipgate
type=peer
username=ACCTNO
fromuser=ACCTNO
secret=ACCTPW
context=from-trunk
host=sipgate.com
fromdomain=sipgate.com
insecure=very
caninvite=no
canreinvite=no
nat=no
disallow=all
allow=ulaw&alawRegistration Strong: ACCTNO:ACCTPW@sipgate.com/YOUR-DID-NUMBER
ACCTNO is the account number assigned to your sipgate account. ACCTPW is the password for your account. YOUR-DID-NUMBER is your 10-digit DID.
Finally create an inbound route using your actual 10-digit DID and assign a destination for the inbound calls.
Need help with Asterisk? Visit the PBX in a Flash Forum.
Or Try the New, Free PBX in a Flash Conference Bridge.
Twitter Magic. If you haven’t noticed the right margin of Nerd Vittles lately, we’ve added a new link to our Twitter feed. If you explore a little, you’ll discover that the user interface now brings you instant access to every Twitter feed from the convenience of the Nerd Vittles desktop. Enjoy!
whos.amung.us If you’re wondering what your fellow man is reading on Nerd Vittles these days, wonder no more. Visit our new whos.amung.us statistical web site and check out what’s happening. It’s a terrific resource both for us and for you.
Special Thanks to Our Generous Sponsors
FULL DISCLOSURE: ClearlyIP, Skyetel, Vitelity, DigitalOcean, Vultr, VoIP.ms, 3CX, Sangoma, TelecomsXchange and VitalPBX have provided financial support to Nerd Vittles and our open source projects through advertising, referral revenue, and/or merchandise. As an Amazon Associate and Best Buy Affiliate, we also earn from qualifying purchases. We’ve chosen these providers not the other way around. Our decisions are based upon their corporate reputation and the quality of their offerings and pricing. Our recommendations regarding technology are reached without regard to financial compensation except in situations in which comparable products at comparable pricing are available from multiple sources. In this limited case, we support our sponsors because our sponsors support us.
BOGO Bonaza: Enjoy state-of-the-art VoIP service with a $10 credit and half-price SIP service on up to $500 of Skyetel trunking with free number porting when you fund your Skyetel account. No limits on number of simultaneous calls. Quadruple data center redundancy. $25 monthly minimum spend required. Tutorial and sign up details are here.
The lynchpin of Incredible PBX 2020 and beyond is ClearlyIP components which bring management of FreePBX modules and SIP phone integration to a level never before available with any other Asterisk distribution. And now you can configure and reconfigure your new Incredible PBX phones from the convenience of the Incredible PBX GUI.
VitalPBX is perhaps the fastest-growing PBX offering based upon Asterisk with an installed presence in more than 100 countries worldwide. VitalPBX has generously provided a customized White Label version of Incredible PBX tailored for use with all Incredible PBX and VitalPBX custom applications. Follow this link for a free test drive!
Special Thanks to Vitelity. Vitelity is now Voyant Communications and has halted new registrations for the time being. Our special thanks to Vitelity for their unwavering financial support over many years and to the many Nerd Vittles readers who continue to enjoy the benefits of their service offerings. We will keep everyone posted on further developments.
Some Recent Nerd Vittles Articles of Interest…
- See comment #1 below. [↩]
I know you’ve fielded this concept endlessly since PiaF started playing with VPN’s, but with Hamachi’s purchase by logmein and "free only for personal use" policy with limited endpoints, would you be willing to consider OpenVPN if someone wrote a decent how-to specifically for PiaF machines?
Hamachi is now so ‘closed’, it gives even the most liberal ‘open source’ people the willies…
[WM: We’d love to see a good writeup of OpenVPN. We were unaware of the license changes in the newer Hamachi versions to which you refer. The version of Hamachi (0.9.9.9) that we recommend is available from thousands of different download sites and contains no such restriction. But thanks for bringing ‘the change’ to our attention. And thanks for the OpenVPN offer. We accept.]
The Hamachi 0.9.9.9 version available from many Linux download sites as well as LogMeIn’s own web site (which redirects to the original developer’s site) includes the following license:
I just downloaded the 0.9.9.9 version (from the LogMeIn link above which is freely available on Google) moments ago so it appears LogMeIn has decided not to apply the same licensing restrictions to version 0.9.9.9, even assuming they could.
Hello Ward.
I agree with Andy, but not perse about the licensing issue, but more about the 3rd party involved.
Should Hamachi’s network has a hickup, that’s a next complex in the already complex network (internet). That means, you’ll be down until Hamichi is back up and running (remember skype – we never expected them to be out for 3+ days)…
I have servers connected via OpenVPN, of which i took the writeups from the pbxinaflash forums..
On many occasions i saw your commented about openvpn, but still champion Hamachi in many of your articles.
Is there a special reason you champion Hamachi? OpenVPN vpn is just as easy to setup, can all be done via script also.
OpenVPN also has little more features than Hamachi, mainly that u can connect to the entire Network, hamachi can only connect to the PC it’s install on.
Think about this, you have a client, servers connected via OpenVPN, you connect to them via that server, VoIP telephones are on the same subnet as the OpenVPN, this means, via that VPN connection, you can route traffic to the VoiP phones, and http to them, and no need to have access to the Total Network (very good, if you only have the PBX contract, and not the contract for the entire network)
In the article VoIP Over VPN: Securely Interconnecting Asterisk Servers, you are using IAX trunks between the PBX servers. Why are you not using DUNDi? This provides a cleaner more manageable way to interconnect boxes and share resources. Just Curious.
[WM: Coming soon. Stay tuned.]
Has anyone had problems signing up for the free Sipgate account? I registered and clicked "send e-mail" a couple of times but never got the registration e-mail.
Signed up for Sipgate free account a few minutes prior to this post. Got the confirmation email just fine and got verified, but they only have phone numbers in California 415 area code right now, so skipped adding a number to my account. If they do what they claim, I’ll add a local area code number and give them a try. Til then, not even bothering to add the trunk.
During CeBIT’09 in Hannover, Germany we introdused a new version of our firmware for the IPxx series of PBX’s. Our new firmware scheduled to be released within the next few weeks is called VoIPtel SEq and has an integrated OpenVPN server. During CeBIT we demonstrated secure phonecalls between two SNOM 370’s passing through an IP01, a PBX the size of an ATA capable of 34 concurrent calls. The VoIPtel SEq firmware will make it easy to set up both secure lines as well as secure trunks between PBX’s.
The IPxx are small and inexpensive embedded devices using the Blackfin DSP as the only processor. Both hardware as well as firmware is open source.
Thanks for the "free tip of the week"!! Proxmox is great. If you do have an openvz template of piaf and want to share, I would like to use it 🙂
Currently we use 512Kbit/s B/W VPN service from VPN4VOIP company together with our Asterisk in PK to talk with our Asterisk PBX in US. Works pretty well. They reroute US IP to our PK PBX so make things are much simpler for us. Someone may wish to try this implementation, too.
Ward,
I can only drool over the thought of having a home in Balsam Mountain. Being a descendant of a Cherokee Indian makes me want to move to the mountains as well.
Impressive piece of information, let me elaborate more on VoIP. Voice over Internet Protocol has been around since many years. But due to lack of sufficient and affordable bandwidth it was not possible to carry carrier grade voice over Internet Protocol. But since the arrival of low cost internet bandwidth and new speech codecs such as G.729, G.723 which utilizes very low payload to carry carrier class voice it has recently been possible to leverage the true benefits of VoIP. G.723 codec utilizes only 6 Kbps (Kilo Bytes/sec) which is capable of maintaining a constant stream of data between peers and deliver carrier grade voice quality. Lets put this way if you have 8 Mbps internet connection, by using G.723 codec you can run upto 100 telephone lines with crystal clear and carrier grade voice quality. I am also a user of VoIP and have setup a small PBX at home. Since I have discovered VoIP I have never used traditional PSTN service.
Dear readers, if you have not yet tried VoIP I suggest that you try VoIP technology and I bet you will never want to use the traditional PSTN phone service ever again. VoIP has far more superior features to offer which traditional PSTN sadly cannot offer.
Also It has recently been possile to carry Video alongwith VoIP by using low payload video codecs. I cannot resist to tell you that by using T.38 passthrough and disabling VAD VoIP can carry FAX transmission, but beaware FAX T.38 passthrough will only work when using wide band protocols such as G.711, a-Law and u-Law.
By using ATA (Analog Telephone Adapter) which converts VoIP signals into traditional PSTN you can also using Dial-up modems to connect to various dialup services. I wont go in to the details what VoIP can offer, to cut my story short VoIP is a must to have product for every business and individual.
How VoIP Works
When we make a VoIP call, a communication channel is established between caller and called party over IP (Internet Protocol) which runs on top of computer data networks. A telephony conversation that takes place over VoIP are converted into binary data packets streams in real time and transmitted over data network, when these data packets arrive at the destination these are again converted into standard telephony conversation. This whole process of voice conversion into data, transmission and data conversion into back voice conversation takes place within less than few milliseconds. That is how a VoIP is call is transmitted over data networks. I hope that now you understand basics of how a VoIP call takes place.
What are speech codec’s and what role codec plays in VoIP?
Speech codec play a vital role in VoIP and codec determines the quality and cost of the call. Let me explain you what exactly VoIP codec’s are and how they work. You may have heard about data compression, or probably you have heard about air compressor which compresses a volume of air in enclosed container, VoIP codec’s are no different than a air compressor. Speech codec’s compresses voice into data packets and decompresses it upon arrival at destination. Some VoIP codec’s can compress huge amount of voice while maintaining QoS which means use this type of codec will cost less because it will consume just a fraction of data network. Some codec’s are just not capable of encoding huge amount of voice they simply consume huge amount of data networks bandwidth hence the cost goes up.
Following is a list of VoIP codec’s along with how much data network bandwidth they consume.
* AMR Codec
* BroadVoice Codec 16Kbps narrowband, and 32Kbps wideband
* GIPS Family – 13.3 Kbps and up
* GSM – 13 Kbps (full rate), 20ms frame size
* iLBC – 15Kbps,20ms frame size: 13.3 Kbps, 30ms frame size
* ITU G.711 – 64 Kbps, sample-based Also known as alaw/ulaw
* ITU G.722 – 48/56/64 Kbps ADPCM 7Khz audio bandwidth
* ITU G.722.1 – 24/32 Kbps 7Khz audio bandwidth (based on Polycom’s SIREN codec)
* ITU G.722.1C – 32 Kbps, a Polycom extension, 14Khz audio bandwidth
* ITU G.722.2 – 6.6Kbps to 23.85Kbps. Also known as AMR-WB. CELP 7Khz audio bandwidth
* ITU G.723.1 – 5.3/6.3 Kbps, 30ms frame size
* ITU G.726 – 16/24/32/40 Kbps
* ITU G.728 – 16 Kbps
* ITU G.729 – 8 Kbps, 10ms frame size
* Speex – 2.15 to 44.2 Kbps
* LPC10 – 2.5 Kbps
* DoD CELP – 4.8 Kbps
Switch to VoIP Today and you will never want to use traditional PSTN ever again.
Thanks
-Imran
For another approach to safely interconnecting Asterisk servers without the hassle of managing dynamic IP addresses or VPNs, see this thread for tips on implementing UserAgent Knocks with iptables.
Hay, what should we do if we centralize one asterisk pbx?
Forexample:
A, B and C are three asterisk Pbx.
A is centerlize asterisk box and A is connected to both B and C through sip trunk. If B wants to talk to C, it will be route through A..