
 The real payoff for installing that fancy Asterisk PBX in your basement comes when you’re on the road and want to make free phone calls either to or through your home system. There are probably a million ways to do this. Most of them are painful. This is particularly true with SIP-based telephones and all the problems associated with configuring NAT and firewalls and STUN servers. So, as usual, we’re going to take the low road and do things the easy way. We’ll give you one solution that really works … every time! When we’re finished, you’ll have a device about the size and weight of a pack of cigarettes to carry on your trip. And all you’ll need when you arrive at your destination is a 10/100 network connection with a cable and a plain old telephone with a plain old phone cord. Once you connect the two devices, you simply pick up the phone and dial calls just as if you were sitting in your kitchen at home. And incoming calls work just as if you had added another phone in your upstairs bedroom. It’ll even flash at you when you have voicemail waiting. For those with kids in college, this is the perfect addition for the dorm room if you want to avoid cellphone hell. And the one-time, non-recurring cost: under $100.
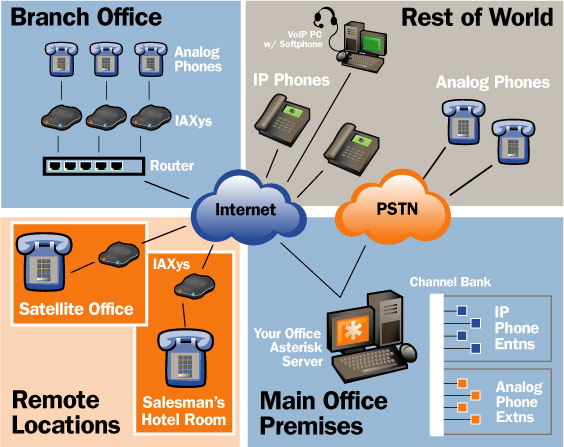
To make all this magic work, you’ll need to purchase Digium®’s S101I, affectionately known as the IAXy Version 2, a NAT-transparent, FXS device providing a POTS telephone interface to your Asterisk® PBX using an IAX connection. You can buy one directly from Digium, the makers of Asterisk, by going here. Be sure you order it with a power adapter for your particular country. Buying the device directly from Digium is an especially good idea because you can call them should you ever have a configuration problem. Hopefully you won’t after you finish reading this article.
IAXy IP Configuration. Once your IAXy arrives, it’s configuration time. First things first. You can download Digium’s installation guide or just keep reading for a bit more hand-holding. The device needs to be connected to a network that has a DHCP server so that an IP address is automatically handed out to the IAXy when you plug it in. Before you power up the unit, plug in a plain old telephone and connect the IAXy to your router using a 10/100 network cable. Then plug in the power adapter. The hardest part of this drill is probably figuring out what IP address was assigned to the device. On most routers, you can use a web browser to access the router configuration. Usually there’s an option to display Attached Devices. Typically, the last device you plug in gets the highest IP address so take a look and write it down. Write down the MAC address of the unit, too. Luckily, you can ping the IAXy to see whether it’s alive. So, from your desktop machine, ping the IP address you wrote down, e.g. ping 192.168.0.123. If you don’t get a reply, that’s the wrong number. Try another one. If you do get a reply, unplug the IAXy and ping the same IP address again. If you get a reply, that’s obviously not your IAXy because it’s unplugged so start over. If you don’t get a reply, you’ve got the right number. Now plug it back in and do it one last time to be sure you still have the same number. Before you forget, go into your router configuration now and permanently assign this IP address to the IAXy. It’s usually named something like Reserved IP Table, and you’ll find it in the LAN IP setup screen on most routers. Finally, if your Asterisk server is behind your router/firewall, you’ll need to open UDP Port 4569 on your router and map it to the private IP address of your Asterisk server, not your IAXy. On most routers, you’ll find port mapping under a heading of Services or Rules. IAX is not a common protocol so you may need to create it. Just name it IAX, specify UDP as the protocol, choose port 4569, and save your settings. Then add a rule that maps this IAX port to the private IP address of your Asterisk machine. Whew!
IAXy Provisioning Utility. One more knuckle drill, and then it’s pretty smooth sailing. This isn’t the Windows world so you’ll need to compile the IAXy provisioning utility on your particular flavor of Linux. We use this utility to actually configure the IAXy device. Nothing here is difficult. Just follow the steps in order. Go to your Asterisk server, switch to root user access, and issue the following commands to download and compile the source code for the IAXy provisioning utility:
$ cd /usr/src

$ export CVSROOT=:pserver:anoncvs@cvs.digium.com:/usr/cvsroot

$ cvs login (the password is anoncvs)

$ cvs co iaxyprov

$ cd iaxyprov

$ make

$ chmod 775 iaxyprov
Configuring Asterisk to Support IAXy. We need to take a break here an actually set up an extension for your IAXy device to use. If you’re using Asterisk@Home or at least the Asterisk Management Panel, go to AMP->Setup->Extensions and click Add Extension. Enter the following using whatever extension and password you prefer:
phone protocol: IAX2

extension number: 222

extension password: 1234

full name: IAXY
If you want to activate voice mail for this extension, choose Voicemail and Directory Enabled and make the VoiceMail Password match your extension password. If you want email delivery of your voicemail messages, fill in the appropriate blanks. Then save your settings by clicking Add Extension. Click the Red Bar to reload your Asterisk configuration.
IAXy Configuration File. The next step is to decide where you will be using your IAXy device. If it will always be outside your firewall, then we only need to configure the device to use the public IP address of your Asterisk machine. If it will always be inside your firewall, then we just need to assign the private IP address of your Asterisk machine (assuming it’s behind your router/firewall). If you want to be able to move the device inside and outside your firewall, then we need to assign two IP addresses: the public and private IP addresses of your Asterisk server. The only other gotcha here is that if your Internet Service Provider assigns you a dynamic IP address, you will need to reconfigure the public IP address of your IAXy device every time your ISP changes your dynamic address. There is no DynDNS support for the IAXy at this time.
We’re going to initially configure your IAXy device for use inside your firewall where your Asterisk server also lives. Then we can play with it to make sure it’s working. Then we’ll walk through the steps to change the configuration. The IAXy configuration file and the provisioning utility we built earlier live in the /etc/src/iaxyprov directory on your Asterisk machine. It’s a good idea to switch to root user access whenever you work here just to keep all the files protected from snoopy people. Let’s make a duplicate of the IAXy config file just in case something gets screwed up: cp /usr/src/iaxyprov/iaxy.conf.sample /usr/src/iaxyprov/iaxy.conf. Now open iaxy.conf using your favorite editor: nano iaxy.conf. It should look like this:
;

; IAXY Provisioning description

;

dhcp

;ip: 216.207.244.130

;netmask: 255.255.255.192

;gateway: 216.207.244.129

codec: ulaw

;codec: adpcm

server: 192.168.0.1

;altserver: 192.168.0.2

user: myuser

pass: mypass

register

;heartbeat

;debug

;

; Feature tuning (default is all enabled)

;
You only need to change three items in the file. For server, replace this IP address with the private IP address of your Asterisk server. For user, plug in the extension number you assigned to the IAXy. And for pass, enter the password you assigned to this extension. Save your changes and exit from the editor: Ctrl-X, y, enter. To actually load the configuraton into the IAXy, issue the following command using the IP address assigned to your IAXy:
./iaxyprov 192.168.0.100 iaxy.conf
If there is no error in your config file, you will get a screenful of feedback from the IAXy device within about 10 seconds. Just disconnect power to the IAXy and then reconnect it, and you’re in business. If you get nothing on the screen after issuing the above command, then there is an error in your config file or your IAXy device is not connected to the network with the IP address shown in the iaxyprov command line you entered. Check your work and try again.
Reprovisioning the IAXy. Loading a new configuration into the IAXy is easy now that you know the drill. It’s always a good idea to reset the IAXy to its factory default settings before loading a new configuration. Here’s how:
Once the IAXy is restored to its factory defaults, you simply repeat the configuration steps above to reprovision the unit. To use the unit on the outside of your firewall, edit the iaxy.conf file and change the server IP address to the public IP address of your Asterisk server. Save your change and then load the new settings with the same iaxyprov command line we used above (assuming your IAXy is still plugged in behind your firewall). Note that you will not be able to test the device behind your firewall so take the unit to a friend’s house (with broadband) and try it out with any plain old telephone. If you want to use the IAXy both inside and outside your firewall, we’ve had good luck simply plugging in both IP addresses. Leave your private IP address in the server line, and uncomment the altserver line by removing the leading semicolon. Then enter your public IP address here, and reprovision the unit as previously explained.
Asterisk Dialplan Quirk. If you’re used to ringing all your phones for incoming calls, you’ll quickly discover that the addition of an IAX phone device complicated things a bit. You can’t mix and match device types in a Dial command. For example, exten => 1234,1,Dial(IAX2/277&SIP/204,20,r) won’t work. There’s a simple way to get around this limitation. Use a ring group which includes both SIP devices and IAX2 devices such as the IAXy. The syntax for the Dial command would look like this assuming 299 was your Ring Group: Dial(local/299@from-internal,20,m).
Activating MD5 password encryption. One great addition to the version 2 IAXy was support for MD5 password encryption. If you’ll be using the device in public places or hotels, you’ll want to use this. One quick change in your Asterisk configuration is all that’s required. Using AMP->Maintenance->Config Edit, edit the iax.conf file. Just add the following line in the [general] section of the file:
auth=md5
Save your change and restart Asterisk, and you’re all set to hit the road. Enjoy!
Coming Attractions. We’ve been working on another web application using Asterisk that builds on our previous CallMe application. For lack of a better name, we call this one The Poor Man’s Rolodex. When it’s soup, it will let you create a protected web page with the names and phone numbers of all your favorite people and places. Making a selection on the web page passes a command to a PHP script that talks to your Asterisk PBX. It first rings one or more phones in your home or business. Only when the call is answered does it place an outgoing call to the person or place you selected on the web page. It then automatically connects them to the phone you picked up. If you happen to have GrandStream’s GXP-2000, you can even configure that phone to go off-hook and turn on the speakerphone when the incoming call from your ‘Rolodex’ arrives. In short, this little ditty will give you everything Microsoft’s TAPI gateway provides without any of Microsoft’s proprietary baggage.
Some Recent Nerd Vittles Articles of Interest…

The IAXy is a great device for sure! – Except of course when you arrive at a place/hotel that first captures your IP traffic until you sign into a web page and either a) pay for the connection (some hotels require this still) or b) at a minimum make you go through all the "I agree buttons" on their Bluesocket box (web page cpature) before it assigns a single IP to the machine that agreed.
Only solution I can think of so far is to either use a soft client, or bring along a USB->Ethernet so I have to hard wire ports on my powerbook and then set up Internet sharing 🙂 Then the powerbook accepts the capture, and then NATs out my phone connection. (I have not tested the latter)
Any other ideas?
My only issue with this particular setup is that you eat the only network port you have in the hotel. I know its a pain to carry more equipment but I also carry a Grandstream 486 and a tiny switch. This way I can use the Grandstream as my remote extension (when it works), plug in an IAXy, and plug in my laptop, or more often plug in a wireless access point so me an m colleges can all share one daily internet fee instead of us all having to pay for one. When someone comes out with an IAX extension with integrated router, and 4 port switch (with wireless access point?) oh what a happy day it will be.
Excellent article as always!
What are the best devices to connect 2 remote extensions to asterisk. I am considering either an IP phone or any IAX device to connect the branch office 2 extensions to the main office. Please suggest or share your experiances.
Digium have switched to using Subversion instead of CVS, and have updated the hostname where to get the code from. This is documented in their latest IAXy documentation, dated December 3rd 2006 (you can get it at http://digium.com/en/docs/S101I/Iaxy_Installation_Guide.pdf).
In short, the instructions for compiling the IAXy provisioning utility should be instead:
$ cd /usr/src
$ svn co http://svn.digium.com/svn/iaxyprov/trunk iaxyprov
$ cd iaxyprov
$ make
That’s it.
Thanks for all the cool * articles, Nerd Vittles!
Just got my first iaxy and stumbled upon this windows utility that automates the provisioning process. you can even save configurations and reload them as needed. Awesome stuff.
http://dacosta.dynip.com/asterisk/
Anybody know if the iaxy will support dynamic dns in the future?
This is a little bit off-topic but you just gave me an excellent idea..I am thinking that I can use remote access to log into one of the computers on my network that is all loaded up with VoIP software, and still use my own computer to make the calls..I was kind of handcuffed by hardware issues before but this just might do the trick!