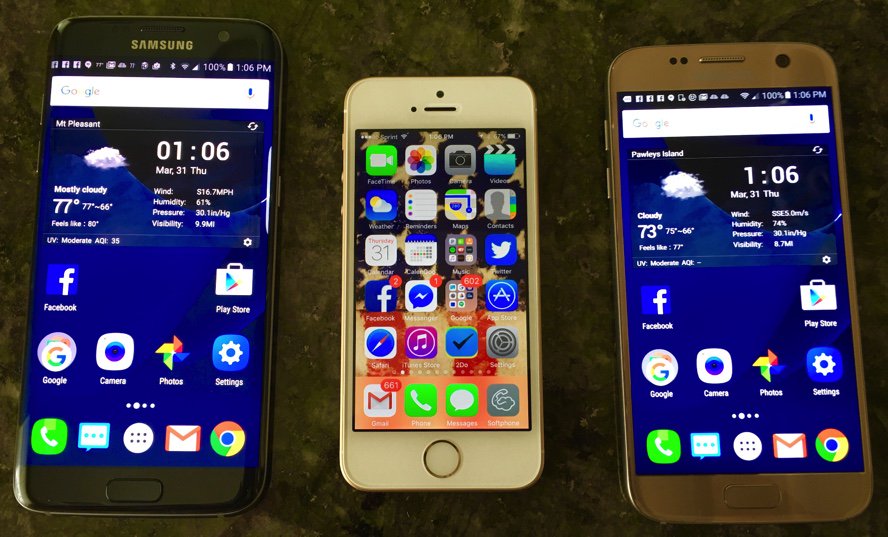
Home » Incredible PBX (Page 36)

Category Archives: Incredible PBX

The Most Versatile VoIP Provider: FREE PORTING

Mobile WiFi Shootout: Torture Testing the Best WiFi HotSpots for Your Vehicle

What a difference a few years make. Bringing Internet connectivity to those in a vehicle who need Internet access but lack cellular data connectivity now is at the top of virtually every Road Warrior’s Wish List. Today we embark on our first major road trip of 2016 to test mobile WiFi hotspots from the four major carriers in the United States: AT&T, Verizon, Sprint, and T-Mobile. We’ve decided to use a variety of devices with the carriers in order to give you a good picture of what’s now available in the marketplace. One reason we decided to mix apples and oranges was because few providers actually manufacture their own devices, and the actual manufacturers (Netgear and Novatel among others) tend to produce almost identical devices for every carrier.

You’ve got a number of options to set up a WiFi Hotspot in your vehicle. Here are the main ones:

  • Tethering through an existing Smartphone
  • Connecting through a dedicated MiFi device
  • Connecting through a 4G LTE router
  • Connecting through a vehicle’s 4G LTE service

As long as you’re paying by the byte, virtually all of the cellphone providers now support tethering on a wide variety of smartphones. The major drawbacks are you’ll want a high performance smartphone if you plan to use it for tethering. And tethering eats through battery life in a hurry. Unless your phone is connected to a charger or wireless charging pad in the vehicle, this can be problematic on a long trip.

Virtually all of the car manufacturers, domestic and foreign, now offer some sort of WiFi connectivity in their higher end vehicles. But you’ll typically pay a fee for their middleware plus the cost of your actual Internet usage using either your existing smartphone plan or a dedicated 4G connection in the vehicle. If you remember the price gouging on cellular calling directly from your vehicle, you’re going to love Mobile HotSpot pricing. It’s worse.

With the Audi Mobile Internet Plan, we can sum it up in five words: Hold On to Your Wallet!

Ford takes a different approach and uses your existing smartphone via Bluetooth as a Mobile HotSpot with SYNC® and MyFord Touch® (for a fee).

Chrysler’s UConnect® takes the Ford approach and is offered on about two dozen new vehicles including the popular Jeep Cherokee and Grand Cherokee.

Choosing WiFi Hotspot Platforms for Our Road Test

For AT&T, we’ve chosen the integrated hotspot that is featured in many of the latest GM vehicles from Chevy, Buick, GMC, and Cadillac. For the complete 2015 and 2016 vehicle list, visit this GM site. Yes, trucks are included. On a monthly hotspot plan through GM’s OnStar service, 5 gigs of data runs $50 whether you subscribe to OnStar or not. Another option is to purchase a bucket of data which must be used within a year (which won’t be difficult). That runs $150 for 10 gigs of data with OnStar, or $200 without an OnStar subscription. A third option is the daily plan which costs $5 for each 250MB of data. Luckily, there is a more sane option for those that already have an AT&T Value Plan for one or more phones. You can add the hotspot in your vehicle for $10 a month, and it uses your existing bucket of data from your plan. The AT&T unlimited data plans for those with DirecTV service are not available for vehicle hotspots or any other hotspots or tethering for that matter. The two main advantages of the GM approach over many of the competitors are you’re not dependent upon a smartphone for your hotspot and there is a cellular antenna mounted on your roof which will generally provide better performance.

StraightTalk’s Mobile HotSpot which also uses the AT&T network flunked on the basis of cost. $75 buys you 7GB of service for up to 60 days.

For Verizon, we’ll be using the Verizon 4G LTE Mobile Hotspot MiFi® 5510L (aka JetPack) from Novatel Wireless. An excellent review of the device is available at PC Mag. For those that travel internationally, you may prefer the 4620LE which reportedly has double the battery life. We leave ours plugged into a USB port in the car so battery life is not really a concern. We’ve previously written about Verizon’s grandfathered unlimited 4G data plans and, if you’re lucky enough to have one, this option can’t be beat. Otherwise, like all things Verizon, data plans are expensive. $100 gets you 10GB which must be used within two months. $60 gets you 5GB for use within the same period. Although pricey, it’s half the cost of the GM plan without OnStar. And, trust us, Road Warriors won’t have to worry about not using up their bucket of data in two months.

We’ve previously tested Verizon’s Tasman T1114 Verizon Wireless 4G LTE Broadband Router with Voice which is manufactured by Novatel. The main drawback of this device was that it required a 110 volt connection using a beefy 3 amp power brick. Our testing and that of PC Mag suggests it isn’t the best choice on the basis of performance either. Preliminary testing suggests the 5510L provides almost triple the data performance under identical conditions. And we found that to be true even after we added dual external antennas to the T1114. Don’t waste your money.

For Sprint, we initially chose one of their MVNOs, Karma Go. And we were looking forward to giving it a workout on the highway. But it was not meant to be. If you follow the trade rags, you know that they originally promised unlimited data with their WiFi hotspot for $50 a month. That lasted about 45 days, and they cut the data rate from 5 Mbit to 1.5 claiming that some folks were using too much data. Duh! That approach lasted about two more weeks, and they implemented a 15GB cap on 4G service with throttled service thereafter that would have you yearning for your old 28.8 modem. Generally speaking, Sprint’s network isn’t that bad from a performance standpoint IF you have service at all. But, in light of all the bad karma surrounding this service, we wouldn’t recommend it to anyone at this juncture. We returned our device within the 45 day trial period for a refund. We’d suggest you do the same. In its place, we’ll be trying out the RingPlus phone that we wrote about last week and that also uses the Sprint network. Unfortunately, our phone lacks tethering capability.

Boost Mobile’s MiFi offering which also uses the Sprint network didn’t make the cut either. It only supports 4G LTE which means you’re dead in the water once you’re out of range of a 4G LTE tower.

An unlimited* 4G LTE data service on the T-Mobile network which we first considered was MetroPCS at $60/month ($55/month on a Family Plan). However, MetroPCS pulls the same stunt as AT&T in the fine print of their so-called "unlimited" plan. It indicates that your service will be "deprioritized" after reaching 23GB of LTE data usage. That’s the new word for crippled and throttled which these providers just can’t quite bring themselves to say.

We saved the best for last. If you do have T-Mobile 4G service in your area (and most folks do as of the 2015 expansion), here’s a deal you can’t refuse. For $35 a month on the Simple Choice (post-paid) Plan, you get 6GB of data at 4G speeds and unlimited (throttled) data for the balance of the month. But there’s a silver lining with a 6GB or greater post-paid plan, you also get unlimited video streaming at DVD quality without additional cost for a couple dozen services including Netflix, Amazon Prime Video, ESPN, HBO, and numerous other providers. If you have kids and travel, this is a no-brainer! The complete list of BingeOn providers is available here. For our WiFi device, we chose the ZTE Z915 4G LTE Hotspot (above).

HINT: Use our referral link and we both get $25 when you sign up. 🙂

Data Usage in a Nutshell

Before we hit the road, let’s provide some points of reference on data usage. The simplest to understand is NetFlix. At their lowest streaming video rate, you will burn through .3GB per hour. At the medium SD rate, it’s .7GB per hour. At the best video HD rate, you’ll burn through 3GB per hour. And Ultra HD gobbles up 7GB per hour. You can set the playback rate in your account under Profile -> Playback Settings. At the very lowest data rate, you’ll get about 11 movies out of 5GB of data. With a 4G connection and the NetFlix automatic data settings, you’re unlikely to make it through 2 movies with a 5GB plan. So you’re well advised to hard-code your playback rate before you hit the road if your family is into movies… unless you choose the BingeOn option with T-Mobile.

A Few Words About T-Mobile’s Binge On Service

The reported Gotchas with the Binge On feature are that it’s a lower quality video stream and once you use up your 4G data allowance for the month, the Binge On feature ceases to function. So you’d want to carefully choose your plan and monitor your data usage to avoid any surprises. As for the quality of the video stream, we’ve read the complaints about this. But it’s a red herring in our testing. Video playback is at DVD quality, and we’re having a hard time believing most folks need something better for a ride in the car, particularly on smartphones and tablets. And we noticed no appreciable degradation even on a 13″ notebook. There’s also been some squealing that BingeOn violates the FCC’s Network Neutrality rule. Our reading of the rule suggests otherwise. First and foremost, BingeOn is an optional service. Any consumer that doesn’t want it can turn it off. Second, for anyone that has ever managed a network with limited bandwidth, the first thing you come to appreciate is the need to control streaming media content. T-Mobile is well within the network neutrality guidelines in doing so, and they’ve done it in a vendor-neutral manner by applying a throttling mechanism to all streaming content that can be identified as such. For those that use encrypted communications for streaming, T-Mobile has offered to work with them to find a way to identify their streaming content so that they, too, can be included in the BingeOn program. Others have suggested that providing video streaming for free while charging for data associated with web browsing also violates network neutrality. We believe the clear intent of the rule was to outlaw discrimination in favor of particular vendors with regard to similar types of Internet content. Any other interpretation would mean that services such as free calling and free text messaging would also violate network neutrality. While this might thrill the Bell Sisters (Verizon and AT&T), it’s difficult to see how this benefits any consumer using the Internet.

Ready, Set, Go: Let the Journey Begin

For our 300-mile trip today, we’ve chosen a travel path that provides a good mix of interstate highways and less traveled state highways. The topography ranges from flat terrain to sparsely populated mountain areas where cellphone towers are few and far between. In between, there are a few metropolitan areas including Charleston, Columbia, Spartanburg, and Asheville. These are mixed with tiny towns including Waynesville and Sylva, North Carolina near our destination. Interestingly, these small towns reportedly boast some of the best cellular data performance in the country. We shall see.

At the Nerd Vittles home base in Charleston, South Carolina, the data performance of the four major carriers is fairly consistent depending upon the time of day and day of the week. During business hours, a typical 4G LTE speed test looks something like this, not great but not that bad either. It’s certainly adequate for any type of activity one would typically need while traveling in a vehicle:

We’ll be heading up I-26 from Charleston for over three hours before making a left turn in Asheville, North Carolina to head west via the Great Smoky Mountain Expressway. During the 300 mile journey, we’ll have non-stop movies playing with our T-Mobile BingeOn account in the back seat while the other cellular services are used for more mundane (and less costly) tasks such as checking email and surfing the net. From point A to point B, it’s all four-lane highways or better, quite a change from 30 years ago. In fact, you can even make the trip in a Tesla with a one-hour free charging detour:

We’re big Spotify fans so most of our AT&T testing will involve listening to the latest Spotify playlists using Apple CarPlay. If the music hiccups, we’ll know we have an AT&T problem. From time to time, we’ll activate a WiFi network connection on our iPhone to check out performance of the Verizon and T-Mobile HotSpots. One of our travelers is a big Facebook gaming enthusiast and, to support that endeavor, we’ll configure her tablet to use the AT&T WiFi HotSpot built into the vehicle.

Mobile Internet Scorecard

Well, the results were pretty much what we expected. Sprint calling and T-Mobile streaming worked well along the interstates and went from bad to worse once we hit the state highways. AT&T and Verizon didn’t miss a beat door to door.

T-Mobile remains the best bargain for streaming unless you have an unlimited data plan without throttling. Even then, the cost difference is staggering. Our unlimited Verizon plan now runs over $100 a month while T-Mobile is a flat $35. There were some random hiccups in the T-Mobile streaming from time to time which we never experienced with Verizon. But you can’t beat the price! Both AT&T and Verizon have dramatically improved their "mountain coverage" in the past year. In the past, Verizon coverage at our cabin was non-existent and AT&T only worked by strategically placing your smartphone on the outdoor fireplace mantle. Now both have reliable 4G service. Our Verizon HotSpot provides consistent 10Mb download and 5 Mb upload speeds, about 5 times the performance of the DSL connection provided by the local telephone company.

Originally published: Monday, February 15, 2016


Special Thanks to Our Generous Sponsors


FULL DISCLOSURE: ClearlyIP, Skyetel, Vitelity, DigitalOcean, Vultr, VoIP.ms, 3CX, Sangoma, TelecomsXchange and VitalPBX have provided financial support to Nerd Vittles and our open source projects through advertising, referral revenue, and/or merchandise. As an Amazon Associate and Best Buy Affiliate, we also earn from qualifying purchases. We’ve chosen these providers not the other way around. Our decisions are based upon their corporate reputation and the quality of their offerings and pricing. Our recommendations regarding technology are reached without regard to financial compensation except in situations in which comparable products at comparable pricing are available from multiple sources. In this limited case, we support our sponsors because our sponsors support us.

BOGO Bonaza: Enjoy state-of-the-art VoIP service with a $10 credit and half-price SIP service on up to $500 of Skyetel trunking with free number porting when you fund your Skyetel account. No limits on number of simultaneous calls. Quadruple data center redundancy. $25 monthly minimum spend required. Tutorial and sign up details are here.

The lynchpin of Incredible PBX 2020 and beyond is ClearlyIP components which bring management of FreePBX modules and SIP phone integration to a level never before available with any other Asterisk distribution. And now you can configure and reconfigure your new Incredible PBX phones from the convenience of the Incredible PBX GUI.

VitalPBX is perhaps the fastest-growing PBX offering based upon Asterisk with an installed presence in more than 100 countries worldwide. VitalPBX has generously provided a customized White Label version of Incredible PBX tailored for use with all Incredible PBX and VitalPBX custom applications. Follow this link for a free test drive!
 

Special Thanks to Vitelity. Vitelity is now Voyant Communications and has halted new registrations for the time being. Our special thanks to Vitelity for their unwavering financial support over many years and to the many Nerd Vittles readers who continue to enjoy the benefits of their service offerings. We will keep everyone posted on further developments.


Some Recent Nerd Vittles Articles of Interest…

I Have A Dream: Free Cellular Service with Integrated Remote SIP Connectivity

As part of our Mobile Internet adventure this year, we’ve been scouring the countryside with two requirements in mind. First, we wanted a smartphone on which we could activate some type of free cellular service for making calls and sending text messages. Second, we wanted to integrate remote SIP connectivity using the same provider and phone number so that we could make and receive calls transparently using any SIP phone or Asterisk® server anywhere in the world. Sounds like a tall order, you say? Well, if you’ve enjoyed your Cloud@Cost Sandbox, you’re gonna love RingPlus!

Yes, you’ll have to buy a compatible cellphone, but there are thousands to choose from. And, yes, you’ll need Sprint service in your neighborhood. Then you’ll have to cough up $10 to activate your cellular account. RingPlus offers dozens of plans.1 We recommend the Michelangelo plan which best meets what we’re trying to accomplish today, but the choice is all yours.2 With the Michelangelo plan, you can make and receive 1,000 minutes of free calls a month to anywhere in the U.S. (calls to Canada are 3¢ a minute), you can send and receive 1,000 free text messages a month, and you can use 500MB of free data service every month. You also can use your same account credentials with any SIP phone, softphone, or Asterisk server anywhere in the world to make and receive phone calls transparently using the same phone number as your smartphone. In other words, you can travel anywhere and make and receive phone calls just as if you were sitting in Atlanta, Georgia dialing from your smartphone. The SIP calls are deducted from your free minutes. No cellular service required at all. Meet RingPlus!


So what’s the catch? How does RingPlus make money? Well, of course, they would prefer that you sign up for a plan with monthly fees. For those on the free plans, the only difference you will notice is an occasional ad which plays instead of a ring tone when you place outbound calls. This only occurs until the other party answers the call, and it can be all but eliminated by choosing a music selection in the RingPlus Radio feature in your RingPlus Dashboard.

Who are the ones most likely to use something like this? Well, for openers, all of your kids unless you like springing for a $500 phone and spending $40+ dollars a month for cellular service for each of them. One of the other real beauties of RingPlus is you can set up a whitelist of numbers that can be called from the phone. Blacklists are supported as well. It’s perfect for kids just getting started with a cellphone. A second potential user group would be those who travel outside the United States and prefer not to pay exorbitant roaming rates for calls. Using a SIP phone connected to your RingPlus account, all of the international calls suddenly are free. And the calls are delivered with the same CallerID number as calls placed from your actual smartphone. In fact, your smartphone doesn’t have to be in service at all. A third and perhaps most important use for us was to serve as a failover trunk on one or more Asterisk servers. When all else fails, you can route outbound calls to your RingPlus SIP trunk for free calling using your RingPlus account. Doesn’t get any better than that.

Official RingPlus WARNING: Starting April 17, 2016, per our carrier partner Sprint, Members and potential Members will no longer be able to activate prepaid devices which are not eligible under Sprint’s FED policies [Requires activation of prepaid phone on original Sprint MVNO network for at least one year!]. Such prepaid devices will no longer pass FED until actual eligibility date is met.

There are probably numerous ways to put all these pieces in place so that things function just as we’ve described. Today we’ll share with you the solution that actually worked for us. You can take it from there and avoid the thousands of horror stories about incompatible smartphones. Be advised that acquiring used cellphones or even incompatible cellphones is a very dangerous and expensive business. If you buy one that happens to be stolen, or that has a balance due on the account, or that is incompatible with RingPlus, then you’ve bought a tiny boat anchor and not much else. So, our best advice is buy one from the provider. That’s the one and only RingPlus, and the smartphones start at just under $100. Many Sprint post-paid phones also work, such as the new iPhone SE (Sprint Model) from any Apple Store.

If store employees will let you, find the Sprint postpaid phone that you like and look on the bottom of the box. There you will find the decimal value of the MEID. Log into http://nerd.bz/nvringplus and plug in the MEID to see if it is RingPlus compatible. If it passes, buy it. If it flunks, try another one. Whatever you do, DON’T BUY A PHONE IN AN OPENED BOX, AND DON’T OPEN THE BOX YET! Make certain there is a return policy in case things don’t work out as expected!

Funny story. The Radio Shack employees at our local store were very savvy and refused to let me look at the MEID claiming it was a security issue. Fair enough. Of course, they were also curious why I wanted a phone without letting them configure it. Once I told them the deal, they all wanted one, too. They asked for the link to the MEID verification site and said they’d do it for me. Once it worked, excitement broke out in the room with all the staff reading an early copy of this article. While Radio Shack typically charges a $35 restocking fee on cell phones, that fee is waived if you return the phone in an unopened box. So the only thing you’re wasting if they insist that you purchase the phone is a little bit of your time and a lot of Radio Shack employee time if, in fact, the MEID flunks the verification test.

Configuring Your Phone for RingPlus Service

Now sign up for a RingPlus free plan using the MEID and ICC ID you previously verified. Michelangelo is probably the best bet if you missed our Twitter tip this past weekend. Deposit $10 in your new account, and activate it. Log into your RingPlus Dashboard, click on your phone in the upper right frame, and choose Manage Device. Write down your MSID, your phone number, and MSL. Once your account is active, then and only then unbox and turn on your phone. Go through the minimal setup steps by choosing your Language and choosing an available WiFi network. During this setup, RingPlus should push a PRL update to your new phone, and it will reboot. Check in Settings -> General -> About Phone -> Status and see if you have a phone number. If so, you’re good to go. If not, open the Phone Dialer application and dial ##72786# which should force another PRL update to your phone with another reboot. When it finishes, check again for a phone number and place an outbound call.

Using a browser on your desktop computer, go back into the RingPlus Dashboard and sign in. Your phone device should show Active in the upper right corner of the screen. Click there and you’ll get a display like this:

While still in the Device Settings Menu, click on the WiFi FluidCall option to decipher your SIP credentials. You’ll need these to set up your SIP phone or a SIP trunk on your Asterisk server. Your username is your 10-digit phone number, the domain name is sip.ringplus.net, and the password is a system-generated entry which you can recreate whenever you like. That’s probably a very good idea whenever you use public WiFi services to make calls with your SIP phone or a softphone.

By the way, this isn’t some kludgy SIP-GSM gateway where the calls actually are routed out through your cellphone device. The RingPlus SIP gateway connects your SIP device directly to the Internet and simply uses your existing RingPlus CallerID to identify the calls. In short, you get the best of both worlds: a dirt cheap or free cellphone service plus a dirt cheap or free SIP trunk for use anywhere in the world.

Configuring a RingPlus SIP Trunk with Asterisk

If you’d like to set up your RingPlus number as a failover trunk on your Asterisk server, here is the setup that worked for us with Incredible PBX using your assigned 10-digit phone number for your username and fromuser settings and your assigned password for your secret. If you include a registration string and configure an inbound route using your RingPlus DID, then inbound calling will work as well. If you skip the registration step, then you can use the same RingPlus trunk on multiple Asterisk servers for emergency outbound calling. No firewall adjustments should be necessary.

There are all sorts of other magic tricks you can implement using the RingPlus API, but you probably won’t need any of the features in light of the robust SIP connectivity RingPlus provides to an existing Asterisk server where the feature set is virtually unlimited. Be advised that you must make a call out at least once every 60 days to keep your account active. The simple way to do this is to set up a monthly reminder using your RingPlus trunk. Schedule the reminder to call out once every month using Telephone Reminders in Incredible PBX.

RingPlus Gotcha Checklist

Free service wouldn’t be free without a few land mines. So here’s a checklist to keep things running smoothly without any problems down the road. First, link your account to one of the social media options (Twitter, Facebook, or LinkedIn) when you sign up for service. You’ll find the link on your Dashboard under the Your Social Networks icon. Second, make at least one outbound call a month on every line you activate. As noted, this can be accomplished automatically using the Telephone Reminders application in Incredible PBX. Third, keep a valid credit card on file in your account at all times. Fourth, keep a positive balance in your account for each phone that you activate to avoid automatic replenishment at the original rate when you signed up for your plan. Fifth, be mindful of the Domino Effect. With some plans, if you allow a related plan to end (for example, Queen of Hearts when you also have an Ace of Hearts plan), then your better plan will be demoted in its feature set. Enjoy the Free Ride!

Originally published: Monday, February 8, 2016


Need help with Asterisk? Visit the PBX in a Flash Forum.


Special Thanks to Our Generous Sponsors


FULL DISCLOSURE: ClearlyIP, Skyetel, Vitelity, DigitalOcean, Vultr, VoIP.ms, 3CX, Sangoma, TelecomsXchange and VitalPBX have provided financial support to Nerd Vittles and our open source projects through advertising, referral revenue, and/or merchandise. As an Amazon Associate and Best Buy Affiliate, we also earn from qualifying purchases. We’ve chosen these providers not the other way around. Our decisions are based upon their corporate reputation and the quality of their offerings and pricing. Our recommendations regarding technology are reached without regard to financial compensation except in situations in which comparable products at comparable pricing are available from multiple sources. In this limited case, we support our sponsors because our sponsors support us.

BOGO Bonaza: Enjoy state-of-the-art VoIP service with a $10 credit and half-price SIP service on up to $500 of Skyetel trunking with free number porting when you fund your Skyetel account. No limits on number of simultaneous calls. Quadruple data center redundancy. $25 monthly minimum spend required. Tutorial and sign up details are here.

The lynchpin of Incredible PBX 2020 and beyond is ClearlyIP components which bring management of FreePBX modules and SIP phone integration to a level never before available with any other Asterisk distribution. And now you can configure and reconfigure your new Incredible PBX phones from the convenience of the Incredible PBX GUI.

VitalPBX is perhaps the fastest-growing PBX offering based upon Asterisk with an installed presence in more than 100 countries worldwide. VitalPBX has generously provided a customized White Label version of Incredible PBX tailored for use with all Incredible PBX and VitalPBX custom applications. Follow this link for a free test drive!
 

Special Thanks to Vitelity. Vitelity is now Voyant Communications and has halted new registrations for the time being. Our special thanks to Vitelity for their unwavering financial support over many years and to the many Nerd Vittles readers who continue to enjoy the benefits of their service offerings. We will keep everyone posted on further developments.


Some Recent Nerd Vittles Articles of Interest…

  1. Be advised that future upgrades of these "free" plans may go away after February 15 unless you join the Member+ program, the cost of which changes almost weekly. This will not affect those that already are participating in the program according to RingPlus. []
  2. In case you’re curious, a plan equivalent to the free Michelangelo plan at RingPlus would run you $41.00 per month at Ting. Ouch! []

The Ultimate Linux Sandbox in the Cloud for Less Than a $35 Raspberry Pi 2


Every few years we like to drop back and take a fresh look at the best way to get started with Linux. For those coming from the Windows World, it can be a painful process. Learning with a Cloud-based server can be especially dangerous because of the security risks. And then there’s the cost factor. Not everyone has several hundred dollars to buy hardware and, frankly, learning about Linux on a $35 Raspberry Pi can drive most newbies to drink. So today we’ll show you another way. It’s not necessarily a better way. But it’s different, and it’s loads of fun for not much money. Today’s project only takes 30 minutes.

There’s lots to hate at Cloud At Cost, a Canadian provider that offers virtual machines in the cloud for a one-time fee with no recurring charges. For $35 or less, you get a virtual machine with 512MB of RAM, 10GB of storage, and a gigabit Internet connection FOR LIFE. We haven’t seen a week go by when Cloud at Cost didn’t offer some sort of discount. Today it’s 70% off with coupon code TAKE70 which brings the total cost down to $10.50. That’s less than a burger at Five Guys. That’s the good news. But, if security, 99.999% reliability, performance, and excellent customer support are your must-haves, then look elsewhere. So why would anyone in their right mind sign up for a cloud solution that didn’t offer those four things? Did we mention it’s $10.50 for a lifetime cloud server?

If you take our recommendation and plunk down your Alexander Hamilton, you’ll need to go into this with the right attitude. It’s not going to be flawless perfection computing. It’s a sandbox on which to experiment with Linux and Cloud Computing. Will your virtual machine disintegrate at some juncture? Probably. Our experience is that the first couple days are critical. If you start seeing sluggish performance which degenerates to zero, don’t waste your time. Take good notes as you go along, delete the virtual machine, and rebuild a new one. It won’t cost you a dime, and it’ll save you hours of frustration. We suspect that bad folks get onto some of the servers and delight in bringing the machines to their knees. So the quicker you cut your losses, the better off you will be. Is CloudAtCost a good solution for production use? Absolutely not so don’t try to fit a square peg in the round hole. It’s not gonna work, and you WILL be disappointed. You’ve been warned. Let’s get started. ENJOY THE RIDE!

Our objective today is to show you how to build a rock-solid, secure Linux server in the Cloud with all the bells and whistles that make Linux the server platform of choice for almost every organization in the world. We’ll finish up by showing you how to embellish the platform with WordPress to do something that’s special for you whether it’s your own blog like Nerd Vittles, or a school newspaper, or an on-line shopping site to sell comic books. The basic foundation for most Linux platforms is called a LAMP server which stands for Linux, Apache, MySQL, and PHP. Linux is an open source operating system that includes contributions from thousands of developers around the world. Apache is the web server platform on which most commercial businesses stake their reputation. MySQL is the open source database management system now owned by Oracle. If it’s good enough for Facebook, it’s good enough for you. And PHP is THE web-based programming language that will let you build almost any application using Linux, Apache, and MySQL.

So what’s the big deal? There are thousands of online tutorials that will show you how to build a LAMP server. For long time readers of Nerd Vittles, you already know that the component we continually stress is security. Without that, the rest really doesn’t matter. You’ll be building a platform for someone else to hijack and use for nefarious purposes. When we’re finished today, you’ll have a cloud-based server that is totally invisible to the rest of the world with the exception of its web interface. And we’ll show you a simple way to reduce the exposure of your web interface to some of its most likely attackers. Will it be 100% secure? Nope. If you have a web server on the public Internet, it’s never going to be 100% secure because there’s always the chance of a software bug that nobody has yet discovered and corrected. THAT’S WHAT BACKUPS ARE FOR!

Creating Your Virtual Machine Platform in the Cloud

To get started, you’ve got to plunk down your $10.50 at Cloud at Cost using coupon code TAKE70. Once you’ve paid the piper, they will send you credentials to log into the Cloud at Cost Management Portal. Change your password IMMEDIATELY after logging in. Just go to SETTINGS and follow your nose.

To create your virtual machine, click on the CLOUDPRO button and click Add New Server. If you’ve only purchased the $10.50 CloudPRO 1 platform, then you’ll need all of the available resources shown in the pick list. Leave CentOS 6.7 64bit selected as the OS Type and click Complete. Depending upon the type of special pricing that Cloud at Cost is offering when you sign up, the time to build your virtual machine can take anywhere from a minute to the better part of a day. We’ve learned to build new virtual machines at night, and they’re usually available for use by the next morning. Luckily, this slow performance does not impact existing virtual machines that already are running in their hosting facility.

Initial Configuration of Your CentOS 6.7 Virtual Machine

With a little luck, your virtual machine soon will appear in your Cloud at Cost Management Portal and look something like what’s shown above. The red arrow points to the i button you’ll need to click to decipher the password for your new virtual machine. You’ll need both the IP address and the password for your new virtual machine in order to log into the server which is now up and running with a barebones CentOS 6.7 operating system. Note the yellow caution flag. That’s telling you that Cloud at Cost will automatically shut down your server in a week to save (them) computing resources. You can change the setting to keep your server running 24/7. Click Modify, Change Run Mode, and select Normal – Leave Powered On. Click Continue and OK to save your new settings.

Finally, you’ll want to change the Host Name for your server to something more descriptive than c7…cloudpro.92… Click the Modify button again and click Rename Server to make the change. Your management portal then will show the new server name as shown above.

Logging into Your CentOS 6.7 Virtual Machine

In order to configure and manage your new CentOS 6.7 virtual machine, you’ll need to log into the new server using either SSH or, for Windows users, Putty. After installing Putty, run it and log in to the IP address of your VM with username root and the password you deciphered above. On a Mac, open a Terminal session and issue a command like this using the actual IP address of your new virtual machine:

ssh root@12.34.56.78

Before you do anything else, reset your root password to something very secure: passwd

Installing the LAMP Server Basics with CentOS 6.7

Now we’re ready to build your LAMP server platform. We’ve chopped this up into lots of little steps so we can explain what’s happening as we go along. There’s nothing hard about this, but we want to document the process so you can repeat it at any time. As we go along, just cut-and-paste each clump of code into your SSH or Putty session and review the results to make sure nothing comes unglued. If something does, the beauty of virtual machines is you can delete them instantly within your management portal and just start over whenever you like. So here we go…

We’ll begin by permanently turning off SELINUX which causes more problems than it solves. The first command turns it off instantly. The second line assures that it’ll stay off whenever you reboot your virtual machine.

setenforce 0
sed -i s/SELINUX=enforcing/SELINUX=disabled/g /etc/selinux/config

Now let’s bring CentOS 6.7 up to current specs and add a few important applications:

yum -y update
yum -y install nano wget expect net-tools dialog git xz
yum -y install kernel-headers
yum -y install kernel-devel
reboot

After reboot, log back in as root. Now we’ll set up your Apache web server and configure it to start whenever you reboot your server:

yum -y install httpd
service httpd start
chkconfig httpd on

Now let’s set up your MySQL server, bring it on line, and make sure it restarts after server reboots. Unless you plan to add Asterisk® and FreePBX® to your server down the road, you’ll want to uncomment the two commands that begin with # by removing the # symbol and replacing new-password with a very secure password for your root user account in MySQL. Be sure to run the last command to secure your server. After logging in, the correct answers are n,Y,Y,Y,Y.

yum -y install mysql mysql-server
service mysqld start
chkconfig mysqld on
#/usr/bin/mysqladmin -u root password 'new-password'
#/usr/bin/mysqladmin -u root -p -h localhost.localdomain password 'new-password'
mysql_secure_installation

Next, we’ll set up PHP and configure it to work with MySQL:

yum -y install php
yum -y install php-mysql
service httpd restart

Finally let’s get SendMail installed and configured. Insert your actual email address in the last line and send yourself a test message to be sure it’s working. Be sure to check your spam folder since the message will show a sender address of localhost which many email systems including Gmail automatically identify as spam.

yum -y install sendmail
rpm -e postfix
service sendmail restart
yum -y install mailx
echo "test" | mail -s testmessage youracctname@yourmailserver.com

Installing Supplemental Repositories for CentOS 6.7

One of the beauties of Linux is not being totally dependent upon CentOS for all of your packaged applications. Let’s add a few other repositories that can be used when you need to add a special package that is not in the CentOS repository. Let’s start with EPEL. We’ll disable it by default and only use it when we need it.

yum -y install http://download.fedoraproject.org/pub/epel/6/x86_64/epel-release-6-8.noarch.rpm
sed -i 's|enabled=1|enabled=0|' /etc/yum.repos.d/epel.repo

We actually need the EPEL repo to install Fail2Ban for monitoring of attacks on certain Linux services such as SSH:

yum --enablerepo=epel install fail2ban -y
cd /etc
wget http://incrediblepbx.com/fail2ban-lamp.tar.gz
tar zxvf fail2ban-lamp.tar.gz


We also need the EPEL repo to install ipset, a terrific addition to the IPtables Linux firewall that lets you quickly block entire countries from accessing your server:

yum --enablerepo=epel install ipset -y

Next, we’ll add a sample script that documents how the country blocking mechanism works with ipset.1 For a complete list of countries that can be blocked, go here. If you need a decoder badge to match abbreviations against country names, you’ll find it here. To add other countries, simply edit the shell script and clone lines 4-7 using the names of the countries and country zone files that you wish to add. Be sure to insert the new lines before the commands to restart iptables and fail2ban. This script will need to be run each time your server reboots and before IPtables is brought on line. We’ll handle that a little later.

echo "#\\!/bin/bash" > /etc/block-china.sh
echo " " >> /etc/block-china.sh
echo "cd /etc" >> /etc/block-china.sh
echo "ipset -N china hash:net" >> /etc/block-china.sh
echo "rm cn.zone" >> /etc/block-china.sh
echo "wget -P . http://www.ipdeny.com/ipblocks/data/countries/cn.zone" >> /etc/block-china.sh
echo "for i in \$(cat /etc/cn.zone ); do ipset -A china \$i; done" >> /etc/block-china.sh
echo "service iptables restart" >> /etc/block-china.sh
echo "service fail2ban restart" >> /etc/block-china.sh
sed -i 's|\\\\||' /etc/block-china.sh
chmod +x /etc/block-china.sh

Another important repository is REMI. It is especially helpful if you decide to upgrade PHP from the default version 5.3 to one of the newer releases: 5.5 or 5.6. In this case, you’ll want to activate the specific repository to support the release you choose in /etc/yum.repos.d/remi-safe.repo.

yum -y install http://rpms.famillecollet.com/enterprise/remi-release-6.rpm
sed -i 's|enabled=1|enabled=0|' /etc/yum.repos.d/remi-safe.repo

One final repository to have on hand is RPMForge, now renamed RepoForge. We’ll use it in a bit to install a dynamic DNS update utility which you actually won’t need at CloudAtCost since your server is assigned a static IP address. But it’s handy to have in the event you wish to assign a free FQDN to your server anyway.

yum -y install http://incrediblepbx.com/rpmforge-release-0.5.3-1.el6.rf.x86_64.rpm
sed -i 's|enabled = 1|enabled = 0|' /etc/yum.repos.d/rpmforge.repo

Adding a Few Utilities to Round Out Your LAMP Server Deployment

If you’re like us, you’ll want to test the speed of your Internet connection from time to time. Let’s install a free script that you can run at any time by logging into your server as root and issuing the command: /root/speedtest-cli

cd /root
wget https://raw.githubusercontent.com/sivel/speedtest-cli/master/speedtest.py
chmod +x speedtest.py

Next, let’s put in place a simple status display which will quickly tell you what’s running and what’s not. We’ve borrowed some GPL code from Incredible PBX to help you out. Run status-lamp at any time for a snapshot of your server.

cd /usr/local/sbin
wget http://incrediblepbx.com/status-lamp.tar.gz
tar zxvf status-lamp.tar.gz
rm -f status-lamp.tar.gz
sed -i 's|myip.pbxinaflash.com|myip.incrediblepbx.com|' /usr/local/sbin/status-lamp

Now we’ll put the Linux Swiss Army Knife in place. It’s called WebMin, and it provides a GUI to configure almost everything in Linux. Pick up a good WebMin book from your public library to get started. Once installed, you access WebMin from your browser at the IP address of your server on the default port of 10000: https://serverIPaddress:10000. It’s probably a good idea to change this port number and the commented out line shows how to do it with the new port being 9001 in the example. The way in which we typically configure the Linux firewall will block all access to WebMin except from an IP address which you have whitelisted, e.g. your home computer’s public IP address.

cd /root
yum -y install perl perl-Net-SSLeay openssl perl-IO-Tty
yum -y install http://prdownloads.sourceforge.net/webadmin/webmin-1.780-1.noarch.rpm
#sed -i 's|10000|9001|g' /etc/webmin/miniserv.conf
service webmin restart
chkconfig webmin on

Tweaking Your CloudAtCost Setup Improves Performance and Improves Security

Finally, let’s address a couple of CloudAtCost quirks that may cause problems down the road. CloudAtCost has a nasty habit of not cleaning up after itself with fresh installs. The net result is your root password gets reset every time you reboot.

killall plymouthd
echo killall plymouthd >> /etc/rc.local
rm -f /etc/rc3.d/S97*

With the exception of firewall configuration, which is so important that we’re covering it separately below, you now have completed the LAMP server installation. After completing the firewall steps in the next section, simply reboot your server and you’re ready to go.

The Most Important Step: Configuring the Linux IPtables Firewall

RULE #1: DON’T BUILD SERVERS EXPOSED TO THE INTERNET WITHOUT ROCK-SOLID SECURITY!

As installed by CloudAtCost, your server provides ping and SSH access from a remote computer and nothing else. The good news: it’s pretty safe. The bad news: it can’t do anything useful for anybody because all web access to the server is blocked. We want to fix that, tighten up SSH access to restrict it to your IP address, and deploy country blocking to show you how.

As we implement the firewall changes, you need to be extremely careful in your typing so that you don’t accidentally lock yourself out of your own server. A typo in an IP address is all it takes. The good news is that, if you do lock yourself out, you still can gain access via the CloudAtCost Management Portal by clicking the Console button of your virtual machine. Because the console is on the physical machine and the lo interface is whitelisted, you can log in and disable the firewall temporarily: service iptables stop. Then fix the typo and restart the firewall: service iptables start.

First, let’s download the new IPtables config file into your root folder and take a look at it.

cd /root
wget http://incrediblepbx.com/iptables-lamp.tar.gz
tar zxvf iptables-lamp.tar.gz

Now edit the /root/iptables-lamp file by issuing the command: nano -w /root/iptables-lamp

You can scroll up and down through the file with Ctl-V and Ctl-Y. Cursor keys work as well. Once you make changes, save your work: Ctl-X, Y, ENTER. You’re now an expert with the nano text editor, an absolutely essential Linux tool.

Here’s what that file actually looks like:

*filter
:INPUT DROP [0:0]
:FORWARD ACCEPT [0:0]
:OUTPUT ACCEPT [0:0]
-A INPUT -p tcp -m tcp --tcp-flags ACK ACK -j ACCEPT
-A INPUT -m state --state ESTABLISHED,RELATED -j ACCEPT
-A INPUT -p icmp -j DROP
-A INPUT -i lo -j ACCEPT
-A INPUT -p tcp ! --syn -m state --state NEW -j DROP
-A INPUT -m state --state INVALID -j DROP
-A INPUT -p tcp -m tcp --tcp-flags FIN,SYN,RST,PSH,ACK,URG NONE -j DROP
-A INPUT -p tcp -m tcp --tcp-flags SYN,FIN SYN,FIN              -j DROP
-A INPUT -p tcp -m tcp --tcp-flags SYN,RST SYN,RST              -j DROP
-A INPUT -p tcp -m tcp --tcp-flags FIN,RST FIN,RST              -j DROP
-A INPUT -p tcp -m tcp --tcp-flags ACK,FIN FIN                  -j DROP
-A INPUT -p tcp -m tcp --tcp-flags ACK,URG URG                  -j DROP
-A INPUT -p tcp -m set --match-set china src                    -j DROP
-A INPUT -p udp -m udp --dport 53 -j ACCEPT
-A INPUT -p tcp -m tcp --dport 53 -j ACCEPT
-A INPUT -p tcp -m tcp --dport 113 -j ACCEPT
-A INPUT -p udp -m udp --dport 123 -j ACCEPT
-A INPUT -p tcp -m tcp --dport 123 -j ACCEPT
-A INPUT -m state --state NEW -m tcp -p tcp --dport 22 -j ACCEPT
#-A INPUT -s 12.34.56.78 -j ACCEPT
#-A INPUT -s yourFQDN.dyndns.org -j ACCEPT
-A INPUT -p tcp -m tcp --dport 80 -j ACCEPT
-A INPUT -j REJECT --reject-with icmp-host-prohibited
-A FORWARD -j REJECT --reject-with icmp-host-prohibited
COMMIT

Reminder: If you add another country to your block-china script, don’t forget to add a corresponding new country entry to your iptables file. See line 17 above that includes the word "china" for the syntax. There’s nothing much else to tweak except the two commented out (brown) lines that begin with #. First, remove the # symbol by moving the cursor to the right of the first one and hitting the backspace/delete key on your keyboard. Replace 12.34.56.78 with the public IP address of the computer from which you will be accessing your virtual machine. If you need multiple entries for multiple computers at different addresses, clone the line by pressing Ctrl-K and then Ctrl-U twice. Yes, we know. Some folks IP addresses change from time to time. In the next section, we’ll show you how to set up a Dynamic DNS entry with a utility that will keep track of your current IP address. In this case, uncomment the second commented line and replace yourFQDN.dyndns.org with your dynamic DNS address. Be very careful to assure that your FQDN is always on line. If the firewall cannot verify your DNS entry when it starts, the IPtables firewall will not start which means your server will be left unprotected. HINT: IP addresses are much safer because they are never verified.

Once you have your addresses configured, save the file: Ctl-X, Y, ENTER. Then issue the following commands to copy everything into place and restart the firewall.

mv /etc/sysconfig/iptables /etc/sysconfig/iptables.orig
cp -p /root/iptables-lamp /etc/sysconfig/iptables
echo "/etc/block-china.sh" >> /etc/rc.local
/etc/block-china.sh

Always, always, always check to be sure your firewall is functioning: iptables -nL. If you don’t see your desktop computer’s public IP address near the end of the listing, then the firewall is dead. status-lamp should also show IPtables down. Check for an error message which will tell you the problematic line so you can correct it.

Implementing Dynamic DNS Service on Your Virtual Machine

There are a number of free and paid Dynamic DNS providers. The way this works is you choose a fully-qualified domain name (FQDN) to identify your computer. Then you run a dynamic DNS update utility periodically from that computer. It reports back the current public IP address of your computer and your provider updates the IP address assigned to your FQDN if it has changed. In addition to supporting sites with ever changing IP addresses, it also allows you to permanently assign an FQDN to your computer or server so that it can be accessed without using a cryptic IP address.

If that computer happens to be an Incredible PBX server or a LAMP server that you’ve set up using this tutorial, then the following will get the DNS client update utility loaded using the RPM Forge repository that we previously installed:

yum --enablerepo=rpmforge install ddclient -y

Similar DNS update clients are available for Windows, Mac OS X, and many residential routers. Then it’s just a matter of plugging in the credentials for your dynamic DNS provider and your FQDN. In the case of the CentOS client, the config file is /etc/ddclient/ddclient.conf. Now reboot your server and pick up a good book on Linux to begin your adventure.

Now For Some Fun…

First, let’s check things out and make sure everything is working as it should. With your favorite web browser, visit the IP address of your new server. You should see the default Apache page:

Next, let’s be sure that PHP is working as it should. While still logged into your server as root using SSH or Putty, issue the following commands and make up some file name to replace test4567 in both lines. Be sure to keep the .php file name extension. Note to gurus: Yes, we know the second line below is unnecessary if you remove the space after the less than symbol in the first line. Unfortunately, WordPress forces the space into the display which left us no alternative.

echo "< ?php phpinfo(); ?>" > /var/www/html/test4567.php
sed -i 's|< |<|' /var/www/html/test4567.php

Now jump back to your web browser and access the new page you just created using the IP address of your server and the file name you made up: http://12.34.56.78/test4567.php

The PHPinfo listing will tell you everything you ever wanted to know about your web server setup including all of the PHP functions that have been enabled. That's why you want an obscure file name for the page. You obviously don't want to share that information with every bad guy on the planet. Remember. This is a public-facing web site that anyone on the Internet can access if they know or guess your IP address.

When you're ready to set up your own web site, just name it index.php and store the file in the /var/www/html directory of your server. In the meantime, issuing the following command will assure that anyone accessing your site gets a blank page until you're ready to begin your adventure:

echo " " > /var/www/html/index.php

Ready to learn PHP programming? There's no shortage of books to get you started.

Adding WordPress to Your LAMP Server

Where to begin with WordPress? What used to be a simple platform for bloggers has morphed into an all-purpose tool that makes building virtually any type of web site child's play. If you want to see what's possible, take a look at the templates and sample sites shown on WPZOOM. Unless you're an art major and savvy web designer, this will be the best $70 you ever spent. One of these templates will have your site up and running in minutes once we put the WordPress pieces in place. For the big spenders, $149 will give you access to over 50 gorgeous templates which you can download and use to your heart's content on multiple sites. And, no, your sites don't blow up after a year. You just can't download any additional templates or updates unless you renew your subscription. The other alternative is choose from thousands of templates that are provided across the Internet as well as in the WordPress application itself.

WordPress templates run the gamut from blogs to newsletters to photographer sites to e-commerce to business portfolios to video to travel to magazines to newspapers to education to food to recipes to restaurants and more. Whew! There literally is nothing you can't put together in minutes using a WordPress template. But, before you can begin, we need to get WordPress installed on your server. This is optional, of course. And, if you follow along and add WordPress, we've set it up in such a way that WordPress becomes the primary application for your site. Stated differently, when people use a browser to access your site, your WordPress template will immediately display. When we finish the basic WordPress setup and once you upload an image or two, you'll have a site that looks something like this:

Before you begin, we strongly recommend that you acquire a domain for your site if you plan to use it for anything but experimentation. The reason is because it can be complicated to migrate a WordPress site from one location to another.2 Once you've acquired your domain, point the domain to the IP address of your new server. With a dirt cheap registrar such as Omnis.com, it's easy:

Now let's get started. To begin, we need to load the WordPress application onto your server:

cd /root
mkdir wordpress
cd wordpress
wget http://wordpress.org/latest.tar.gz
tar -xvzf latest.tar.gz -C /var/www/html

Next, we'll configure MySQL to support WordPress. We're assuming that you have NOT already created root passwords for MySQL. If you have, you'll need to add -pYourPassword to the various commands below immediately after root. There is no space between -p and your root password. Also edit the first line and make up a new password (replacing XYZ below) for the wordpress user account that will manage WordPress on your server before you cut and paste the code:

mysql -u root -e 'CREATE USER wordpress@localhost IDENTIFIED BY "XYZ";'
mysql -u root -e 'CREATE DATABASE wordpress;'
mysql -u root -e 'GRANT ALL ON wordpress.* TO wordpress@localhost;'
mysql -u root -e 'FLUSH PRIVILEGES;'

Next, we need to configure WordPress with your new MySQL credentials. Before you cut and paste, replace XYZ in the fourth line with the password you assigned in the preceding MySQL step:

cp /var/www/html/wordpress/wp-config-sample.php /var/www/html/wordpress/wp-config.php
sed -i 's|database_name_here|wordpress|' /var/www/html/wordpress/wp-config.php
sed -i 's|username_here|wordpress|' /var/www/html/wordpress/wp-config.php
sed -i 's|password_here|XYZ|' /var/www/html/wordpress/wp-config.php
chown -R apache:apache /var/www/html/wordpress

Before you forget, take a moment and create a very secure password for your MySQL root user accounts. Here are the commands. Just replace new-password with your new password before you cut and paste. Note that you also will be prompted for this password when you execute the second command because you will now have a root user password in place from executing the first command.

/usr/bin/mysqladmin -u root password 'new-password'
/usr/bin/mysqladmin -u root -p -h localhost.localdomain password 'new-password'

Finally, we need to modify your Apache web server to support WordPress as the primary application. Be sure to enter your actual email address in the third line before you cut and paste the code below:

echo " " >> /etc/httpd/conf/httpd.conf
echo "" >> /etc/httpd/conf/httpd.conf
echo 'ServerAdmin somebody@somedomain.com' >> /etc/httpd/conf/httpd.conf
echo "DocumentRoot /var/www/html/wordpress" >> /etc/httpd/conf/httpd.conf
echo "ServerName wordpress" >> /etc/httpd/conf/httpd.conf
echo "ErrorLog /var/log/httpd/wordpress-error-log" >> /etc/httpd/conf/httpd.conf
echo "CustomLog /var/log/httpd/wordpress-acces-log common" >> /etc/httpd/conf/httpd.conf
echo "" >> /etc/httpd/conf/httpd.conf
echo " " >> /etc/httpd/conf/httpd.conf
service httpd restart

That should do it. Open a browser and navigate to the IP address of your server. You should be greeted with the following form. Fill in the blanks as desired. The account you're setting up will be the credentials you use to add and modify content on your WordPress site when you click Log In (as shown above). Make the username obscure and the password even more so. Remember, it's a public web site accessible worldwide! When you click Install WordPress, you'll be off to the races.

After your server whirs away for a minute or two, you will be greeted with the WordPress login prompt. With the username and password you entered above, you'll be ready to start configuring your WordPress site.

Once you're logged in, navigate to Appearance -> Themes and click Add New Theme. There's you will find literally hundreds of free WordPress templates that can be installed in a matter of seconds if WPZOOM is too rich for your blood. For a terrific all-purpose (free) theme, try Atahualpa. We'll leave our actual demo site running for a bit in case you want to explore and check out its performance. Installing and configuring the new theme took less than a minute:

A Final Word to the Wise. WordPress is relatively secure but new vulnerabilities are discovered regularly. Keep your templates, plug-ins, AND the WordPress application up to date at all times! The WordFence plug-in is a must-have. And we strongly recommend adding the following lines to your WordPress config file which then will let WordPress update everything automatically. Microsoft has given automatic updates a bad name, but in the case of WordPress, they work well.

echo "define('WP_AUTO_UPDATE_CORE', true);" >> /var/www/html/wordpress/wp-config.php
echo "add_filter( 'auto_update_plugin', '__return_true' );" >> /var/www/html/wordpress/wp-config.php
echo "add_filter( 'auto_update_theme', '__return_true' );" >> /var/www/html/wordpress/wp-config.php

Special Thanks: Our special tip of the hat goes to a few web sites that we found helpful in putting this article together especially Unixmen and Matt Wilcox & friends and Programming-Review.

Wondering What to Build Next with your new $10.50 Server in the Sky? Check out the latest Nerd Vittles tutorial. Turn it into a VoIP server FOR LIFE with free calling to/from the U.S. and Canada. Call for free demo:


Originally published: Monday, January 25, 2016


Need help with Asterisk? Visit the PBX in a Flash Forum.


Special Thanks to Our Generous Sponsors


FULL DISCLOSURE: ClearlyIP, Skyetel, Vitelity, DigitalOcean, Vultr, VoIP.ms, 3CX, Sangoma, TelecomsXchange and VitalPBX have provided financial support to Nerd Vittles and our open source projects through advertising, referral revenue, and/or merchandise. As an Amazon Associate and Best Buy Affiliate, we also earn from qualifying purchases. We’ve chosen these providers not the other way around. Our decisions are based upon their corporate reputation and the quality of their offerings and pricing. Our recommendations regarding technology are reached without regard to financial compensation except in situations in which comparable products at comparable pricing are available from multiple sources. In this limited case, we support our sponsors because our sponsors support us.

BOGO Bonaza: Enjoy state-of-the-art VoIP service with a $10 credit and half-price SIP service on up to $500 of Skyetel trunking with free number porting when you fund your Skyetel account. No limits on number of simultaneous calls. Quadruple data center redundancy. $25 monthly minimum spend required. Tutorial and sign up details are here.

The lynchpin of Incredible PBX 2020 and beyond is ClearlyIP components which bring management of FreePBX modules and SIP phone integration to a level never before available with any other Asterisk distribution. And now you can configure and reconfigure your new Incredible PBX phones from the convenience of the Incredible PBX GUI.

VitalPBX is perhaps the fastest-growing PBX offering based upon Asterisk with an installed presence in more than 100 countries worldwide. VitalPBX has generously provided a customized White Label version of Incredible PBX tailored for use with all Incredible PBX and VitalPBX custom applications. Follow this link for a free test drive!
 

Special Thanks to Vitelity. Vitelity is now Voyant Communications and has halted new registrations for the time being. Our special thanks to Vitelity for their unwavering financial support over many years and to the many Nerd Vittles readers who continue to enjoy the benefits of their service offerings. We will keep everyone posted on further developments.


Some Recent Nerd Vittles Articles of Interest...

  1. It doesn't take long for the probing to begin. So watch your logs, look up the IP addresses to identify the countries, and block them unless you happen to be expecting visitors from that part of the world:
    [Sun Jan 24 00:36:12 2016] [error] [client 40.114.202.60] File does not exist: /var/www/html/wordpress/w00tw00t.at.blackhats.romanian.anti-sec:)
    [Sun Jan 24 00:36:12 2016] [error] [client 40.114.202.60] File does not exist: /var/www/html/wordpress/phpMyAdmin
    [Sun Jan 24 00:36:13 2016] [error] [client 40.114.202.60] File does not exist: /var/www/html/wordpress/phpmyadmin
    [Sun Jan 24 00:36:13 2016] [error] [client 40.114.202.60] File does not exist: /var/www/html/wordpress/pma
    [Sun Jan 24 00:36:13 2016] [error] [client 40.114.202.60] File does not exist: /var/www/html/wordpress/myadmin
    [Sun Jan 24 00:36:14 2016] [error] [client 40.114.202.60] File does not exist: /var/www/html/wordpress/MyAdmin
    [Mon Jan 25 00:29:29 2016] [error] [client 137.116.220.182] File does not exist: /var/www/html/wordpress/w00tw00t.at.blackhats.romanian.anti-sec:)
    [Mon Jan 25 00:29:29 2016] [error] [client 137.116.220.182] File does not exist: /var/www/html/wordpress/phpMyAdmin
    [Mon Jan 25 00:29:29 2016] [error] [client 137.116.220.182] File does not exist: /var/www/html/wordpress/phpmyadmin
    [Mon Jan 25 00:29:30 2016] [error] [client 137.116.220.182] File does not exist: /var/www/html/wordpress/pma
    [Mon Jan 25 00:29:30 2016] [error] [client 137.116.220.182] File does not exist: /var/www/html/wordpress/myadmin
    [Mon Jan 25 00:29:30 2016] [error] [client 137.116.220.182] File does not exist: /var/www/html/wordpress/MyAdmin
    []
  2. Should you ever have to migrate your WordPress site from one domain to another, here are two helpful tools to consider: the Automatic Domain Name Changer Plugin and the one we use, WordPress-Domain-Changer. []

Mobile Internet: The 2016 Road Warrior’s Guide to Choosing New Wheels


OK. We’re not going to bring Mobile Computing down to the teepee level, but we have decided to dedicate a column regularly to Mobile Internet developments in the marketplace. Of course, our major focus will remain the impact on unified communications and especially Asterisk®, FreeSWITCH™, PBX in a Flash™, and Incredible PBX™. The idea here is to document a design that lets road warriors travel with the same communications dexterity that they have at home or in the home office. In other words, our vision is a mobile computing environment that makes travel status transparent. Things that worked a certain way in the office should work similarly on the road or in the comfort of your Motel 6 suite. 🙂

To get 2016 started on the right foot, we want to lay out some of the technology that’s available to the road warrior who spends a significant amount of time in an automobile. Our objective today is to help you choose that next set of wheels, the proverbial perfect vehicle. We began documenting some of what we’re looking for in our December Mobile Internet column. Today we’ll follow up with more details and some real-world feedback. What we’ll be covering in coming months applies equally to those that travel for pleasure as well as those that do it for a living. Unless you prefer hiding in your Man Cave, we hope you’ll find something useful that makes travel away from your home office amenities easier and less intimidating.

Let’s begin by documenting some of our inexpensive must-haves. These can round out your vehicle shopping list without much impact on the cost of a vehicle: cup holders (lots of them), cigarette lighter connections (lots of them), USB ports (lots of them), and compartments especially those with access to power or USB ports. Another must have for us was a fold down table for the back seat. These come standard in Mercedes S Class sedans as well as the Jaguar XJ. For other vehicles, you’ll need to consider aftermarket options which is a little surprising when you consider that every airline seat has had fold down tables FOREVER. In their haste to roll out the latest gee whiz features, many car manufacturers have forgotten the basic essentials that make all of this technology useful. But there’s hope. General Motors is among those that have finally awakened to the 21st century. Our best advice is this. Before you get swept away by the self-parking car, take a quick look inside the cabin and consider whether the vehicle has the road warrior essentials.

Now for the fun stuff. Take a quick look at this AutoBytel article which ticks off some of the more interesting high tech features that are available in the marketplace today: GPS-linked temperature control, a sensor that provides a text alert if someone is hiding in your car, a collection of audio and visual alerts if the car senses that you are distracted or falling asleep at the wheel, self-parking vehicles, night vision with pedestrian detection, adaptive cruise control that adjusts your speed based upon the speed of the vehicle in front of you, blind spot detection that provides visual warnings on your side view mirrors when a vehicle is cruising along beside you at 70+ mph, lane departure warnings which include console alerts, buzzing your seat, or adjusting your steering wheel to guide you back into your lane. And, last but not least, the latest Tesla which can drive itself under certain highway conditions. In case you haven’t guessed, none of this technology comes cheap. Typically, the features first appear in the high end cars and require the purchase of even higher priced, factory-installed options. Then they trickle down to less costly vehicles as the price of the technology drops.

Here’s our two cents worth of advice on some of these features. We happen to live in the southeastern United States so we really don’t need a GPS to tell us to turn on the air conditioner. Almost any road warrior’s dream machine will have automatic temperature control. That’s as much technology as you need to stay cool in the summer and warm in the winter.

A sensor to tell us someone is hiding inside our car is another clever idea, but we much prefer a vehicle that can lock itself when you leave the vehicle or when you place the vehicle in motion. Newer GM vehicles can also sound an alarm if someone sticks a hand into your window while you’re stopped at a traffic light. Works great unless people are passing you things while parked in a carpool line.

If you’re a road warrior that does a lot of night driving, all of the high tech features you can find that help you drive and stay awake at the wheel are terrific additions. Not mentioned in the AutoBytel article is one of our favorites that’s actually been around for decades. The head-up display (HUD) appears on the lower part of the driver’s windshield. It shows information such as your speed and the speed limit without taking your eyes off the road. For the science behind it, see this article.

If you’re a road warrior that spends considerable time commuting in heavy traffic or driving on interstates, adaptive cruise control is the best invention since sliced bread. It doesn’t completely drive the car for you, but it reduces your need to stay 99.9% focused on what’s in front of you every second of the trip. You simply set the separation distance between your vehicle and the vehicle in front of you, and radar in your vehicle does the rest, adjusting your speed to keep you at or below the cruise control speed you set for your vehicle while preserving the spacing you predefined. Newer versions of adaptive cruise control include support for bringing your vehicle to a complete stop at traffic signals. The best testimonial we can provide is this. Once you have a vehicle with adaptive cruise control, you’ll never buy another vehicle without it. It’s that good!

Blind spot detection is another radar-based feature. Visual side view mirror alerts are provided whenever something is hiding in your vehicle’s blind spot. Of course, you can accomplish much the same thing by adding supplemental wide-view (blindspot) mirrors to your existing side view mirrors at considerably less cost. However, the radar-enhanced version typically is bundled with features such as adaptive cruise control and lane departure alerts so there is no additional cost for the convenience. Just be sure to test them for accuracy before dispensing with turning your head to check for vehicles. We’ve actually had a vehicle in which the sensors were incorrectly positioned. Merging into traffic without any visual warning of what’s beside you is a quick ticket to the body shop, both for the car and for you.

Lane departure alerts and autocorrection are equally important for those that spend endless hours on long stretches of boring highway. The other essential ingredient for every road warrior is the smartphone app, Waze. Between hazard alerts, speed trap notifications, and directions, it’s the single-most important traveling enhancement that’s come along in a very long time. Think of it as you free copilot. It can watch for things up ahead and alert you to problems before you actually encounter them. Because its data is based upon real-time data and feedback from thousands of road warriors, it has no equal in terms of accuracy. See our first article in this series for more details.

Wireless charging is another feature that has been touted by many of the Android device manufacturers. In the case of Samsung, the technology was available in the Galaxy Note 4 except for the back cover which can be replaced easily. Surprisingly, Apple has completely ignored it thus far. There are, of course, aftermarket cases that will bring wireless charging to any smartphone including the iPhones. Beginning with some 2014 models, General Motors, Chrysler, and Toyota began integrating wireless charging stations into the center consoles of some of their vehicles. By 2017, most car manufacturers probably will support it either as an included or add-on accessory.

No review of automotive technology would be complete without mention of Apple CarPlay and Android Auto, the two smartphone integration systems from America’s finest software development companies. One can only hope that the car manufacturers see the light and drop their insistence upon their own proprietary consoles. Both Apple CarPlay and Android Auto provide navigation, messaging, and numerous music platforms including Spotify, Pandora, Google Play Music, and Apple Music. Many newer vehicles offer one or the other, and some offer both. The systems also are available as aftermarket add-ons. For an excellent review of the two competing systems, take a look at this CNET review. Our only complaint with Apple CarPlay at the moment is the inability to add applications other than those that Apple has chosen for you. That means no Google Maps and no Waze, at least for now. For an excellent interview with the man behind both technologies at General Motors, see this article from The Verge.

So which vehicle did we choose for our Mobile Internet Lab? Well, come back next month and we’ll take you for a ride as we review the best WiFi Hotspots to complement that new set of wheels. We’ll consider offerings from Sprint, T-Mobile, Verizon, and AT&T so there will be something for almost everybody with a smartphone.

Originally published: Monday, January 18, 2016


Need help with Asterisk? Visit the PBX in a Flash Forum.


Special Thanks to Our Generous Sponsors


FULL DISCLOSURE: ClearlyIP, Skyetel, Vitelity, DigitalOcean, Vultr, VoIP.ms, 3CX, Sangoma, TelecomsXchange and VitalPBX have provided financial support to Nerd Vittles and our open source projects through advertising, referral revenue, and/or merchandise. As an Amazon Associate and Best Buy Affiliate, we also earn from qualifying purchases. We’ve chosen these providers not the other way around. Our decisions are based upon their corporate reputation and the quality of their offerings and pricing. Our recommendations regarding technology are reached without regard to financial compensation except in situations in which comparable products at comparable pricing are available from multiple sources. In this limited case, we support our sponsors because our sponsors support us.

BOGO Bonaza: Enjoy state-of-the-art VoIP service with a $10 credit and half-price SIP service on up to $500 of Skyetel trunking with free number porting when you fund your Skyetel account. No limits on number of simultaneous calls. Quadruple data center redundancy. $25 monthly minimum spend required. Tutorial and sign up details are here.

The lynchpin of Incredible PBX 2020 and beyond is ClearlyIP components which bring management of FreePBX modules and SIP phone integration to a level never before available with any other Asterisk distribution. And now you can configure and reconfigure your new Incredible PBX phones from the convenience of the Incredible PBX GUI.

VitalPBX is perhaps the fastest-growing PBX offering based upon Asterisk with an installed presence in more than 100 countries worldwide. VitalPBX has generously provided a customized White Label version of Incredible PBX tailored for use with all Incredible PBX and VitalPBX custom applications. Follow this link for a free test drive!
 

Special Thanks to Vitelity. Vitelity is now Voyant Communications and has halted new registrations for the time being. Our special thanks to Vitelity for their unwavering financial support over many years and to the many Nerd Vittles readers who continue to enjoy the benefits of their service offerings. We will keep everyone posted on further developments.


Some Recent Nerd Vittles Articles of Interest…

Mobile Internet: A 2015 Update on Caribbean Cruising and WiFi-Enabled Travel

We decided to spend Christmas a little differently this year and joined 10,000 of our closest friends on cruises to the Western Caribbean taking in Cozumel and Grand Cayman with a few extra days at sea. If you haven’t tried it, put it on your bucket list. Christmas week is a bargain and about 50% cheaper than the same cruise to ring in the new year. Rates start at about $300 per person for the 5-day cruise. You’d be hard-pressed to dine out for a week in your home town at those prices. Today we want to provide an update on the dramatic changes in Internet connectivity not only aboard ship but also in navigating 1,000 miles of highway to get there. Let’s start with the glamorous part.

Surfing the Internet Aboard Ship

What a difference a couple years has made. On previous cruises to Alaska and the Eastern Caribbean, Internet service was spotty at best and cost prohibitive on sea days. Typical connection rates were $25 or more per hour. You found yourself scrambling to find a bar with cheap Internet service every time you hit a port. But that was then. Here’s our 2015 update.

Carnival which owns the majority of the cruise ship companies (9 different brands) prides itself on making cruising affordable for almost any traveler. So we qualified. They’ve also revolutionized Internet service with rates on some ships (including ours) as low as $5 a day for unlimited (but basic) Internet connectivity. Here’s a typical pricing plan, but ours was even less expensive. $70 got us unlimited premium Internet service including Skype (one user at a time) for the entire 5-day cruise, and performance was surprisingly good, roughly triple the speed of the $5 a day plan and equivalent to or better than cellular 3G service regardless of the time of day. During early mornings, dinner hours, and when docked at a port, the speed difference from DSL was barely noticeable. Part of this is due to Carnival’s new hybrid Internet technology which blends satellite service with strategically placed Internet towers along your itinerary. The way it works is simple. You login with your account number and birthday, and you can stay logged in as long as you like. If another member of your family wishes to use the service, they simply login on a different device with the same account number and birthday. They’ll be prompted whether to bump you off. Clicking YES transfers the Internet connection to their device and terminates your connection. With three people, it worked amazingly well and was a wonderful testament to what it means to share. Complete details of the WiFi@Sea Internet program are available here. The rollout will be complete by the end of the first quarter in 2016.

We made roughly a dozen Skype calls to test the quality of the calls. With a couple of exceptions, the calls were roughly equivalent to what you would expect using a cable modem connection. With the two bad calls, it was obvious within a couple seconds, and the simple solution was to hang up and try again.

If you’re an Asterisk user, connectivity to an office or home server was easy by making a free call with Skype Connect which we documented just last week. Once connected to an AutoAttendant on the home server, using DISA to make secondary calls to other destinations at minimal cost was a no-brainer. The setup is simple, and we showed how to do it over 10 years ago. Today, it’s built into the GUI. We routed the incoming Skype calls to a Stealth AutoAttendant on the Asterisk server. By pressing an unannounced key during the welcome message, we were prompted for our DISA password. After entering it successfully, we were prompted for a number to dial. In our setup, this includes any number supported by our dialplan: local extensions, 10-digit NANPA numbers throughout the U.S., Canada, and 18 other north American countries as well as special dial codes to retrieve voicemails and other Asterisk functions.

Bottom Line: Do your homework before you book a cruise. Decide what your must-have’s for the cruise are and then compare prices.

Surfing the Internet from Your Car or Motorhome

The other eye-opener was the advances in cellular service along America’s interstates. 4G service now is available almost everywhere. Average download speeds were in the 20-40 Mb range. We used 7.18GB of data during 16 hours of travel. That works out to roughly a half gig per hour of travel with three users. YMMV! Funny how quickly 4G service rolled out once the (not so) Baby Bells got their monopoly back and could charge by the megabyte. We were one of the lucky ones to snag one of the few remaining Verizon unlimited data plans on eBay. Verizon now has tightened the screws and doesn’t allow transfer of the plans to others. But, if you’re one of the lucky ones that still pays over $100 a month for an unlimited data plan (Verizon just quietly raised the monthly charge by $20), then here’s some information for you. First, as part of the FCC’s 4G spectrum auction, bidders (Verizon in this case) were required to agree to the following condition as laid out in 47 C.F.R. 27.16:

(b) Use of devices and applications. Licensees offering service on spectrum subject to this section shall not deny, limit, or restrict the ability of their customers to use the devices and applications of their choice on the licensee’s C Block network, except:
(1) Insofar as such use would not be compliant with published technical standards reasonably necessary for the management or protection of the licensee’s network, or
(2) As required to comply with statute or applicable government regulation.

When Verizon won the auction, they reluctantly acknowledged a customer’s ability to move a SIM card from one device to another so long as the new device was on Verizon’s approved devices list. It doesn’t mean Verizon hasn’t dragged its feet on adding new approved devices, however. The important takeaway from this is that moving between approved devices appears to be safe even though there have been some reported problems. You’ll know whether you’re using a Verizon-approved device by examining your Verizon account to see if a picture of the new device shows up once you insert your SIM card.

So what does all of this have to do with surfing the Internet from your vehicle? Well, you have two choices. You can use your existing smartphone, enable tethering, and have multiple passengers surfing the Internet at 4G speeds with unlimited bandwidth. Or you can purchase a Verizon-approved Novatel T1114 4G Router on eBay and move your SIM card there for trips. Just be sure you buy one with the required 3.5W power adapter. Then add a $20 150W Power Inverter, and you’ve got a Mobile WiFi powerhouse plus a POTS phone connection… in your car.

If you’re one of the unlucky ones that doesn’t have an unlimited data plan with Verizon Wireless, there’s now another option if you live in an area with Sprint service. HINT: Sprint works great along most interstate highways in the United States. For $50 or less per month, you can set up a WiFi HotSpot in your vehicle with unlimited data using Karma Go. If you use our signup link, you get $10 off, and we get a $10 referral credit. There’s a 45-day money-back guarantee. For a great review of Karma Go, go here. And 2016 promises more choices with most new GM vehicles sporting an integrated WiFi HotSpot.


UPDATE: Karma Go this week began backing off from its unlimited Internet pledge. Seems these companies never learn the bait-and-switch lessons from those that preceded them… or they don’t want to. You can read all about it here.

1/18 UPDATE: Karma Go today announced that they were restoring the original 5 Gbit performance of the product but would cap usage at 15GB/month after which performance would be throttled to "speeds good enough for emailing and messaging."

NEWS FLASH: Beginning January 12, 2016, unlimited Internet plans return to AT&T Wireless for those that also subscribe to DirecTV or U-Verse. Details available here.

There’s more good news from our 1,000 mile travel adventure. We were late to this party, but what an awesome addition for those that travel for a living or just for vacations. If you’ve never tried Waze, add it to your smartphone right now! Not only do you get turn-by-turn directions to any destinations, but you also get road hazard alerts, automatic traffic rerouting to avoid bottlenecks, cheap gas price alerts, and… did we mention that in 1,000 miles it didn’t miss alerting us to every single speed trap. Police departments are government bureaucracies that have grown just like the rest of federal, state, and local government agencies. We counted nearly 100 police vehicles doing nothing but traffic enforcement. On 70 mile per hour Interstate highways, our unscientific survey showed that speeds increased to 75 miles per hour with no police presence compared to 69 miles per hour when a speed trap had been identified. It was readily apparent that truckers and frequent travelers have been using Waze long before us. What we kept asking ourselves was whether the cost of 100 police officers + 100 police cars + an enormous fuel bill was really worth it to slow folks down (momentarily) by 6 miles per hour. We hear a lot about government waste, but the police seem to get a pass on frugality by claiming they’re saving lives. We just didn’t see much of a correlation. It looked more like a game of cat and mouse. Happy New Year everybody. Don’t Drink and Drive!

Originally published: Monday, December 28, 2015


Need help with Asterisk? Visit the PBX in a Flash Forum.


Special Thanks to Our Generous Sponsors


FULL DISCLOSURE: ClearlyIP, Skyetel, Vitelity, DigitalOcean, Vultr, VoIP.ms, 3CX, Sangoma, TelecomsXchange and VitalPBX have provided financial support to Nerd Vittles and our open source projects through advertising, referral revenue, and/or merchandise. As an Amazon Associate and Best Buy Affiliate, we also earn from qualifying purchases. We’ve chosen these providers not the other way around. Our decisions are based upon their corporate reputation and the quality of their offerings and pricing. Our recommendations regarding technology are reached without regard to financial compensation except in situations in which comparable products at comparable pricing are available from multiple sources. In this limited case, we support our sponsors because our sponsors support us.

BOGO Bonaza: Enjoy state-of-the-art VoIP service with a $10 credit and half-price SIP service on up to $500 of Skyetel trunking with free number porting when you fund your Skyetel account. No limits on number of simultaneous calls. Quadruple data center redundancy. $25 monthly minimum spend required. Tutorial and sign up details are here.

The lynchpin of Incredible PBX 2020 and beyond is ClearlyIP components which bring management of FreePBX modules and SIP phone integration to a level never before available with any other Asterisk distribution. And now you can configure and reconfigure your new Incredible PBX phones from the convenience of the Incredible PBX GUI.

VitalPBX is perhaps the fastest-growing PBX offering based upon Asterisk with an installed presence in more than 100 countries worldwide. VitalPBX has generously provided a customized White Label version of Incredible PBX tailored for use with all Incredible PBX and VitalPBX custom applications. Follow this link for a free test drive!
 

Special Thanks to Vitelity. Vitelity is now Voyant Communications and has halted new registrations for the time being. Our special thanks to Vitelity for their unwavering financial support over many years and to the many Nerd Vittles readers who continue to enjoy the benefits of their service offerings. We will keep everyone posted on further developments.


Some Recent Nerd Vittles Articles of Interest…

Just in Time for Santa: Return of The Glory Days with Skype Connect for Asterisk?

You’ve been good boys and girls all year, and today we have some great news for Asterisk® lovers. Skype is back! Oh, if it were only that simple. But let’s revel in the good news for a bit. Microsoft introduced Skype Connect™ about 5 years ago. Now it’s a SIP interface to Skype. And today we’ll take a fresh look at whether it’s a good fit with Asterisk. Skype Connect is part of Skype Manager™, a carefully considered and beautiful product offering that showcases Microsoft’s UI design skills. After shelling out our weekly allowance to join the party, we were ready to go. Here’s a quick overview from Microsoft:

Skype Connect provides connectivity between your business and the Skype community. By adding Skype Connect to your existing SIP-enabled PBX, your business can save on communication costs with little or no additional upgrades required.

With Skype Connect, your business can make great value Skype calls and receive calls from your customers using your desk phones. Customers can also contact your business for free by using Skype from a browser with Skype buttons, by calling [not for free] the Skype business accounts associated with your SIP-enabled PBX, or [by placing PSTN calls to Skype Numbers you may have purchased].

In addition to an Asterisk server, here’s what you’ll need to get started. First things first, sign up for a Skype Manager account if you don’t already have one. It’s easy and it’s free. Once you’re signed up and logged in, you’re going to need a little cash in your Skype credit account to get things going. $30 will get you started but finish reading the article before you invest.

Configuring Skype Connect for Asterisk

To get started, click Features in the toolbar, choose Skype Connect and click Set up a SIP Profile. Give the profile a name "SOHO Inc." and click Next. Next, choose the number of Channels you need at $6.95 per month. A channel gets you one simultaneous call in or out of Skype. Two channels gets you one call in and one call out simultaneously for $13.90 per month. You can take it from there but, sorry, you can only buy 300 channels at this time. You can add the U.S. Minute Bundles, and we’ll explain that in a minute.

Don’t buy your channels just yet. For now, cancel out of the dialog by clicking Back. Microsoft will set up your profile anyway:

The money deposited into your Skype Manager account will be needed to fund Skype Connect in three separate ways: (1) monthly payments for Channels at $6.95 each, (2) monthly payments for Phone Numbers associated with those Channels at $6.30 each, and (3) allocation of funds in advance to pay for outbound calls from each profile you create. You’ll need at least one phone number (a.k.a. DID) to receive any inbound calls from POTS phones to the Skype Connect SIP account on your Asterisk server. You’ll also need at least one phone number before you can assign a CallerID to your outbound calls.1 Otherwise, they go out as Anonymous calls. Outgoing and incoming calls using traditional Skype Names are not supported.

Once you get your finances in order, it’s time to set up your SIP credentials for your new profile. Click on Authentication Details to display the dialog. Leave the Registration tab highlighted, and click on Generate a New Password, and a new SIP password will be sent to the email address you used to register when you set up your Skype Manager account.

Configuring Asterisk for Skype Connect

On your Asterisk server using your favorite GUI, create a new SkypeConnect SIP trunk with your CallerID and the number of channels you’ve paid for. For the Dialed Number Rule: Prepend: +1, Prefix: 759, Match Pattern: NXXNXXXXXX. Insert the following OutGoing Settings in PEER Details. Use skypeconnect for the peer name and your actual SIP user number and password from Microsoft:

username=990xxxxxxxxxxx
secret=YourRealPassword
type=peer
qualify=yes
insecure=invite
host=sip.skype.com
fromdomain=sip.skype.com
disallow=all
allow=ulaw
context=from-trunk
fromuser=990xxxxxxxxxxx

For the Register String, it’s your SIPusernumber:password@sip.skype.com/SIPusernumber

Finally, create an Incoming Route for your SIPusernumber and tell the GUI where to route the incoming calls. Create an Outbound Route for SkypeOut with a pattern of 759NXXNXXXXXX that points to your skypeconnect trunk. Calls can be placed by dialing the 759 prefix plus a 10-digit number. Adjust as necessary to meet your international requirements.

A Cost-Benefit Analysis of Skype Connect

If you’ve followed along so far and done the math for yourself, you’ve quickly discovered that Skype Connect’s beauty may only be skin deep depending upon your calling patterns. Let’s give Microsoft the benefit of the doubt and assume that they’re using first rate SIP trunks to carry your calls. Here’s our review of how Skype Connect stacks up to the competition.

Vitelity is one of our corporate sponsors. Their SIP trunking services are by no means the cheapest on the planet, but you get what you pay for so we’ll use them to compare prices against Skype Connect. For openers, if you haven’t figured it out already, Skype Connect doesn’t bear much resemblance to the Skype of yesteryear. It is essentially a pay-as-you-go SIP trunking service with very few of the historical benefits of Skype. None of the benefits are documented! According to Microsoft, no free calls except with Skype Buttons. This requires a web development effort and limits callers to browser-based phone calls, not exactly ideal. There’s another wrinkle. It doesn’t work. Skype URIs might, but we didn’t test it. No ability to call existing Skype users is supported except those that have purchased a $6.30/month telephone number to associate with their Skype account. And then you pay for the call… by the minute. There is a silver lining, however. By examining the Skype Connect logs, we discovered that Microsoft internally forwards incoming calls to DIDs back into Skype Connect account numbers before processing the calls. That suggested that Microsoft was using these account numbers for internal call routing. And, sure enough, that is the case. Although undocumented, existing Skype users can dial your Skype Connect account number with a + prefix, and the call will be connected to Skype Connect at no cost (see below). If your Skype Connect SIP trunk is registered to an Asterisk server, then the calls will flow directly into Asterisk.

Our attempts to apply a similar methodology using a remote SIP client, however, failed.2 Others have claimed it works or at least did at one time. Both direct calling approaches eliminate the need for Skype users on BOTH ends of a call to purchase dedicated phone numbers from Microsoft and to pay for long distance calls. The fact that Microsoft has chosen not to document this suggests that free Skype calling to Skype Connect using Skype clients may be short-lived. For today using Skype clients (only), calls will connect using our documented methodology.

Using the Nerd Vittles special Vitelity signup link below, $3.99 a month buys you a DID in your choice of area codes, unlimited incoming calls, and four channels. This means you can receive four simultaneous incoming calls without any caller receiving a busy signal. Now for the math. Identical service with Microsoft’s SIP trunking service and four channels would run you $34.10 per month, nearly 10 times the cost of Vitelity for comparable SIP service. That’s before you place your first outbound call.

Let’s consider some examples that factor into the outbound calling equation. For outbound calls, Microsoft wins if you only make tons of calls within the continental United States only. A U.S. bundle of 5,000 minutes runs $30 with Microsoft.3 That is a bargain at .6¢/min. if you use all 5,000 minutes every month. You can buy one bundle for each channel purchased. Vitelity’s rate to the continental U.S., Hawaii, and Canada is 1.44¢ per minute which works out to $72 for the same 5,000 minutes. Change the call mix to Canada only, and the Microsoft rate skyrockets to $115 while the Vitelity rate stays the same.

Using a more typical SOHO or home calling pattern of 2,000 outbound minutes a month, the Vitelity rate is $28.80 while Microsoft’s rate is $16. Combining the trunk charges, the Vitelity total comes to $32.75 while Microsoft comes in at $50.10. Translation: With the same trunks, channels, a single DID, and 2,000 minutes of outbound U.S. only calls, Vitelity saves you about a third of the monthly cost of the identical Microsoft configuration. For inbound only calling without factoring in free inbound Skype calls, Vitelity saves you 88%. For Canada calling with 2,000 minutes a month, Vitelity saves you about half.

Your actual costs obviously will vary depending upon the mix and number of simultaneous inbound/outbound calls as well as the origin and destination of the calls. For home and SOHO organizations, Skype Connect rarely will be your best choice unless you get a lot of calls from Skype users around the world. In that case, $6.95 a month for a Skype Connect channel (and nothing else) would be a bargain. For the most part, Microsoft’s focus seems to be larger organizations. For U.S.-based organizations that make substantial numbers of outbound calls to U.S. destinations, Skype Connect also could be financially attractive because of the U.S. calling bundles.

For an interesting look at Microsoft’s future in the telecom space, read this article.

Q: Is Skype Connect a good value?

A: It depends! Do the math. YMMV!

Originally published: Monday, December 21, 2015


Need help with Asterisk? Visit the PBX in a Flash Forum.


Special Thanks to Our Generous Sponsors


FULL DISCLOSURE: ClearlyIP, Skyetel, Vitelity, DigitalOcean, Vultr, VoIP.ms, 3CX, Sangoma, TelecomsXchange and VitalPBX have provided financial support to Nerd Vittles and our open source projects through advertising, referral revenue, and/or merchandise. As an Amazon Associate and Best Buy Affiliate, we also earn from qualifying purchases. We’ve chosen these providers not the other way around. Our decisions are based upon their corporate reputation and the quality of their offerings and pricing. Our recommendations regarding technology are reached without regard to financial compensation except in situations in which comparable products at comparable pricing are available from multiple sources. In this limited case, we support our sponsors because our sponsors support us.

BOGO Bonaza: Enjoy state-of-the-art VoIP service with a $10 credit and half-price SIP service on up to $500 of Skyetel trunking with free number porting when you fund your Skyetel account. No limits on number of simultaneous calls. Quadruple data center redundancy. $25 monthly minimum spend required. Tutorial and sign up details are here.

The lynchpin of Incredible PBX 2020 and beyond is ClearlyIP components which bring management of FreePBX modules and SIP phone integration to a level never before available with any other Asterisk distribution. And now you can configure and reconfigure your new Incredible PBX phones from the convenience of the Incredible PBX GUI.

VitalPBX is perhaps the fastest-growing PBX offering based upon Asterisk with an installed presence in more than 100 countries worldwide. VitalPBX has generously provided a customized White Label version of Incredible PBX tailored for use with all Incredible PBX and VitalPBX custom applications. Follow this link for a free test drive!
 

Special Thanks to Vitelity. Vitelity is now Voyant Communications and has halted new registrations for the time being. Our special thanks to Vitelity for their unwavering financial support over many years and to the many Nerd Vittles readers who continue to enjoy the benefits of their service offerings. We will keep everyone posted on further developments.


Some Recent Nerd Vittles Articles of Interest…

  1. According to this article, phone numbers registered to your company can also be used as a CallerID number. []
  2. Attempts to register using a free DID at IPkall also were unsuccessful. []
  3. In the fine print, Microsoft discloses that nearly 100 six-digit dialing prefixes in the U.S. are excluded from the bundle pricing. Download the User Guide here. []

Virtual Paradise: An Asterisk OVF Template for VMware and VirtualBox Fans

UPDATE: A newer Incredible PBX image for VMware is now available here.

Let’s face it. Virtual Machines are the future of server administration. Whether you prefer your own dedicated hardware or cloud-based resources managed by you or someone else, virtual platforms are the way to go. You get more bang for the buck out of your hardware by pooling resources for multiple tasks. Platforms such as VMware® and VirtualBox® make it easy.

What we were missing in the Asterisk® aggregation market was a simplified, open source installer that would let you deploy servers on the virtual platform of your choice without our having to maintain separate builds for each VM technology.

Today, we’re pleased to introduce the new Incredible PBX Unified Installer for VMware and VirtualBox with new OVF editions for Incredible PBX Full Enchilada as well as Lean & Mean. Download the OVF flavor of your choice to your desktop and fire up your favorite virtual machine GUI. With a few mouse clicks and a couple of minutes, you’ll have a Scientific Linux 6.7 platform in place with Incredible PBX just a single keystroke away. It doesn’t get any easier than that. And, unlike the static builds offered by the competition, with Incredible PBX you always get the very latest release of Asterisk 13 and the Incredible PBX GUI compiled on the fly from source code that you can actually examine, enhance, and share… just like the GPL license says. Feel free to compare our open source approach to Sangoma’s Gotcha Special. You have a very real choice!

July 20 NEWS FLASH: Google now has discontinued support of their XMPP interface to Google Voice so the latest CentOS/SL version of Incredible PBX (13-13.7) including the Incredible PBX ISO now incorporate NAF’s GVSIP interface to Google Voice. You can read all about it here. What has changed is you now add Google Voice trunks from the command line by running /root/gvsip-naf/install-gvsip. You can delete trunks by running /root/gvsip-naf/del-trunk. Once one or more trunks have been added, they are numbered GVSIP1 through GVSIPn. Using the GUI, you then add an Outbound Route and an Inbound Route for each trunk. You’ll need both your Google Voice 10-digit phone number and a Refresh Token to add a new trunk. This functionality is not yet available in the virtual machine builds, but you can easily add it. Once your virtual machine is up and running, head over to this GVSIP tutorial for step-by-step instructions. New virtual machine builds natively supporting GVSIP will be available soon.

Choosing a Virtual Machine Platform

Making the right deployment choice for your virtual machine platform depends upon a number of factors. We initially started out with Proxmox 4 which looked promising. After all, we had used and recommended earlier releases of Proxmox for many years until some security vulnerabilities caused us to look elsewhere. Those kernel issues are now a thing of the past, but Proxmox 4 introduced some new wrinkles. First, to stay current with software fixes and updates, you have to pay the piper by signing up for the annual support license. This turned out to be a deal breaker for a couple of reasons. It was expensive since it’s based upon the number of CPUs in your platform. In the case of the hardware shown below, that turned out to be 4 CPUs (by Proxmox’s calculation) which meant the annual support license would run nearly $400 per year. That buys an enormous number of virtual machines at Digital Ocean without having to babysit hardware at all. And, you get a $10 credit to try out the service just for signing up. We also ran into serious technical problems with Proxmox 4. While the server would run without hiccups for a day or so, connectivity failed regularly after that. A reboot would fix the problem for another day, and then it was more of the same. Whether this was a bug or a design choice to encourage paid software updates, we obviously don’t know. Regardless of the reason, we reluctantly concluded that Proxmox 4 wasn’t ready for production use.

That narrowed the selection to VMware or VirtualBox. VMware is rock-solid and has been for more than fifteen years. VirtualBox is equally good, but typically runs on a desktop computer rather than dedicated hardware. If you don’t have the funds for a hardware purchase to support your virtualization requirements, then VirtualBox is a no-brainer. For many, however, some separation of the virtualization environment from your desktop computing environment is desirable. And, again, the choice is a no-brainer. VMware wins that one, hands down.

Getting Started with VMware ESXi

Many of you have VMware platforms already in place at work. For you, installing Incredible PBX is as simple as downloading the OVF tarball to your desktop and importing it into your existing platform. If you’re new to VMware, here’s an easy way to get started, and the software won’t cost you a dime. VMware offers a couple of free products that will give you everything you need to run a robust VMware platform on relatively inexpensive hardware. Let’s start with the hardware.

A $500 VMware Platform for SOHO and Small Business Applications

You’re looking at all the components that make up the $500 Intel® NUC D54250WYK with a Core i5 dual-core processor, a 250GB mSATA drive, and 16GB of RAM. While you install the RAM and disk drive yourself, if you can unscrew 5 screws and have 5 minutes to spare, you can handle this.

Here’s how we started. Of course, you can adjust the components and the merchant to meet your own requirements. For us, Amazon1 works great, and the prices are competitive. Who else delivers on Sunday? Despite the notice that the computer would be here on Monday, we knew better. And sure enough it was in the box with the other Sunday goodies. We removed the four screws from the bottom feet of the computer, and the case opened easily. Next, we unscrewed the screw from the bottom of the motherboard that holds the SSD drive in place securely. Snap in the mSATA drive and the two memory sticks, replace the screws, and we were in business.

NEWS FLASH: The Intel NUC pictured above is the 4th Generation Core i5 device. Now the 5th Generation edition is an even better deal. See the sidebar for the NUC5i5RYK link.

A Free VMware Software Platform for SOHO and Small Business Applications

Before you can download either of the components for the free VMware ESXi platform, you’ll need to sign up for a free account at my.vmware.com. Once you’re signed up, log in and go to the ESXi 6 Download Center and sign up for a free ESXi license key:

  1. Write down your assigned License Key
  2. Manually download the VMware vSphere Hypervisor 6.0 Update 1 ISO
  3. Manually download the VMware vSphere Client 6.0U1

Next, burn the ISO to a CD/DVD and boot your dedicated VM hardware platform with it. Follow the instructions to complete the install. Next install the vSphere Client on a Windows computer. Don’t forget to add your ESXi License Key when you complete the installation. Once the ESXi server is up and running, you can stick the hardware on a shelf somewhere out of the way. You will rarely interact with it. That’s all handled using the VMware vSphere Client on your Windows Desktop. Yes, there is a web client as well, but you’ll have to pay for that one.

Deploying Incredible PBX OVF Templates with VMware vSphere Client

Deploying an Incredible PBX OVF template takes about two minutes, but first you need to download and unzip the desired Incredible PBX OVF templates from SourceForge onto your Windows Desktop.

Once you have the Incredible PBX OVF templates on your desktop, here are the deployment steps:

1. Login to the vSphere Client on your Windows Desktop using the root account you set up when you installed ESXi. Choose File, Deploy OVF Template.

2. Select the desired Incredible PBX .ovf template from your desktop PC after first unzipping the downloads.

3. Click Next.

4. Give the new Virtual Machine a name.

5. IMPORTANT: Choose Thin Provision option and click Next.

6. Review your entries and click Next to create the new Virtual Machine.

7. It takes about 2 minutes to create the new Virtual Machine.

8. The Main Client window will redisplay and your new VM should now be shown in the left panel. (1) Click on it. (2) Then click the Green start icon. (3) Click the Console Window icon.

9. When the VM’s Console Window opens, click in the window in the black area. Then press ENTER to kick off the Incredible PBX Phase 2 install. Review the Incredible PBX tutorial to get started.

Ctrl-Alt gets your mouse and keyboard out of the console window.

Installing the vSphere Web Client

If you’re lucky, you may not have a Windows machine. The downside is that the vSphere Client described above only works on the Windows platform. After hours of searching some of the most dreadful documentation on the planet, we finally uncovered a simple way to install the (experimental) vSphere Web Client. It is pure HTML5 with no Flash code! It’s also not ready for prime time. Most of the feature set looks pretty but doesn’t work if you have a free license. But it will give you an idea of where VMware is headed, and the bug reportedly will be fixed in the ESXi 6.0U2 release.

FYI: An easy way to apply License Key once it’s set up: Virtual Machines -> Licensing -> Apply License

1. Log into the console of your ESXi server as root using your root password.

2. Press F2 to Customized System.

3. Choose Troubleshooting Options.

4. Choose Enable SSH.

5. Using a Terminal window on a Mac or Linux machine or using Putty with Windows, log into the IP address of your ESXi server as root.

6. Issue the following command to install the vSphere Web Client vib:

esxcli software vib install -v http://download3.vmware.com/software/vmw-tools/esxui/esxui-2976804.vib

7. Using a web browser, login to the web client as root at https://ESXi-server-IP-address/ui

8. Should you ever wish to remove the web client from your server:

esxcli software vib remove -n esx-ui

9. Don’t forget to disable SSH access when you’re finished. Just repeat steps 1-4 above.

Installing Incredible PBX OVF Templates with VirtualBox

For those that opt for a desktop virtualization solution, there is no finer choice than VirtualBox. We’ve written about VirtualBox previously on Nerd Vittles so we won’t repeat the history here. If you need help setting it up, see this Nerd Vittles tutorial.

For today, we’ll show you how to take a VMware OVA template and build a VirtualBox VM:

1. Start up VirtualBox on your desktop.

2. Choose File, Import Appliance and select your Incredible PBX OVF template by clicking on the File Dialog icon. Click Continue when done.

3. In the Appliance Settings dialog, be sure "Reinitialize MAC Address of all network cards" is checked. Click Import.

4. Once the virtual machine is created, select it and click Settings. Name the VM in the General tab. Check Enable I/O APIC in the System tab. Set Video Memory to 16MB in the Display tab. Enable Audio and choose your sound card in the Audio tab. Enable Network and choose Bridged Network for Adapter 1 in the Network tab. Click OK to save your changes.

5. Click the Start icon to fire up your virtual machine. Press ENTER in the VM window to start Phase II of the Incredible PBX install.

6. Review the Incredible PBX tutorial to get started.

Initial Configuration of Incredible PBX

To complete the install, use SSH or putty to log into your VM as root. Default password: password. Then…

  • Change your root password immediately: passwd
  • Set your FreePBX admin password: /root/admin-pw-change
  • Set your web apps admin password: htpasswd /etc/pbx/wwwpasswd admin
  • Set your correct time zone: /root/timezone-setup
  • Add WhiteList entries to firewall if needed: /root/add-ip or /root/add-fqdn
  • Store PortKnocker credentials in a safe place: cat /root/knock.FAQ
  • Login to your NeoRouter VPN server if desired: /root/nrclientcmd
  • Run the Incredible Fax installer, if desired: /root/incrediblefax11.sh
  • Set your admin password for AvantFax: /root/avantfax-pw-change
  • Enable Google Voice OAUTH authentication support, if desired: http://nerd.bz/1JaO4ij (section 1b.)

Originally published: Monday, December 14, 2015


Support Issues. With any application as sophisticated as this one, you’re bound to have questions. Blog comments are a terrible place to handle support issues although we welcome general comments about our articles and software. If you have particular support issues, we encourage you to get actively involved in the PBX in a Flash Forums. It’s the best Asterisk tech support site in the business, and it’s all free! Please have a look and post your support questions there. Unlike some forums, ours is extremely friendly and is supported by literally hundreds of Asterisk gurus and thousands of users just like you. You won’t have to wait long for an answer to your question.


Need help with Asterisk? Visit the PBX in a Flash Forum.


Special Thanks to Our Generous Sponsors


FULL DISCLOSURE: ClearlyIP, Skyetel, Vitelity, DigitalOcean, Vultr, VoIP.ms, 3CX, Sangoma, TelecomsXchange and VitalPBX have provided financial support to Nerd Vittles and our open source projects through advertising, referral revenue, and/or merchandise. As an Amazon Associate and Best Buy Affiliate, we also earn from qualifying purchases. We’ve chosen these providers not the other way around. Our decisions are based upon their corporate reputation and the quality of their offerings and pricing. Our recommendations regarding technology are reached without regard to financial compensation except in situations in which comparable products at comparable pricing are available from multiple sources. In this limited case, we support our sponsors because our sponsors support us.

BOGO Bonaza: Enjoy state-of-the-art VoIP service with a $10 credit and half-price SIP service on up to $500 of Skyetel trunking with free number porting when you fund your Skyetel account. No limits on number of simultaneous calls. Quadruple data center redundancy. $25 monthly minimum spend required. Tutorial and sign up details are here.

The lynchpin of Incredible PBX 2020 and beyond is ClearlyIP components which bring management of FreePBX modules and SIP phone integration to a level never before available with any other Asterisk distribution. And now you can configure and reconfigure your new Incredible PBX phones from the convenience of the Incredible PBX GUI.

VitalPBX is perhaps the fastest-growing PBX offering based upon Asterisk with an installed presence in more than 100 countries worldwide. VitalPBX has generously provided a customized White Label version of Incredible PBX tailored for use with all Incredible PBX and VitalPBX custom applications. Follow this link for a free test drive!
 

Special Thanks to Vitelity. Vitelity is now Voyant Communications and has halted new registrations for the time being. Our special thanks to Vitelity for their unwavering financial support over many years and to the many Nerd Vittles readers who continue to enjoy the benefits of their service offerings. We will keep everyone posted on further developments.


Some Recent Nerd Vittles Articles of Interest…

  1. Some of our purchase links refer users to Amazon and other sites when we find their prices are competitive for the recommended products. Nerd Vittles receives a small referral fee from merchants to help cover the costs of our blog. We never recommend particular products solely to generate commissions. However, when pricing is comparable or availability is favorable, we support Amazon and other merchants because they support us. []

Rolling Your Own: Creating a Custom Incredible PBX ISO for Asterisk

We promised to provide the Incredible PBX 13.2 ISO build environment for those of you that wanted to learn how to roll your own ISO. Why would you want to do such thing? Well, we can think of a number of reasons. First, you may just want to learn how sh*t works. Or you may want to impress your boss by building a custom ISO with the corporate logo splattered all over the place. Then there are those that want to add a feature or function that we haven’t included yet so you can share your creation with your friends. For us, the motivation was to provide an Asterisk® aggregation that others could build upon without legal hassles about copyrights and trademarks… you know, a real open source project based upon the GPL license.

Regardless of your motivation, today’s your lucky day. We’re providing an exact duplicate of the build environment that was used to create the Incredible PBX 13.2 ISO. It’s released under the same GPL license that applies to the ISO itself. Copy it, enhance it, give it to your friends, and share your additions so that all of us can learn from you. In addition to the code, we’re actually going to document how to modify it and use it… you know, real instructions.


The Schmoozers were back in full force last week with one accusing us of "stealing" their code and another with this gem:


https://twitter.com/JamesFreePBX/status/672883656310972422

For the record, we use GPL code of others with full credit to the authors. That’s what the GPL and Asterisk aggregations have always been about. Let’s compare that to our Sangoma® friends who rip the covers off RedHat’s GPL ISO, brand it as their own, and then have the balls to distribute it as closed source code. Repeating a lie over and over doesn’t make it come true!


Getting Started. Before you can use today’s code, you’ll need a suitable platform on which to play. You’ve got a couple of choices. First, you can actually install Incredible PBX 13.2 using last week’s ISO. A second option is to build yourself a virtual machine or a cloud-based server with Scientific Linux 6.7 or even CentOS 6.7 minimal. We recommend 32-bit architecture because the Incredible PBX 3.2 ISO build environment as configured is 32-bit to assure maximum hardware compatibility. The server hardware platform doesn’t really matter. Cheaper means it takes a little longer, but you’ll get the same results.

Installing the Incredible PBX 13.2 ISO Build Environment. Once you have your server up and running, log in as root. This usually isn’t a good idea for a build environment, by the way. We’re doing it because we’re assuming you have a machine dedicated to just building ISOs on which to experiment. Issue these commands to put the ISO build platform in place:

cd /root
setenforce 0
yum -y install wget nano
wget http://incrediblepbx.com/create-ISO-new.tar.gz
tar zxvf create-ISO-new.tar.gz
rm -f create-ISO-new.tar.gz

Creating Your First ISO. Why waste time? Let’s actually build an Incredible PBX ISO to show you how easy it is. Issue the following command to kick off the process: /root/create-ISO-new. Depending upon your server’s specs, the whole build procedure should take a minute or two to complete. When it’s finished, you’ll have a shiny new ISO that can be burned to a DVD or USB thumb drive following the steps documented in our previous tutorial:

ls -all /root/kickstart_build/*.iso

-rw-r--r-- 1 root root 890241024 Nov 24 12:45 /root/kickstart_build/IncrediblePBX13.2.iso

ISO Design Overview. There are lots of ways to design an ISO architecture. We’ve chosen a hybrid approach with a two-phase install. When you first boot from the ISO installer, you get the operating system platform. The server then reboots, and Phase II downloads and then runs the latest Incredible PBX installer. Our main reason for choosing this design is that you don’t have to create a new ISO every time you make changes in the Incredible PBX installer. For those of you that remember the Asterisk@Home and trixbox days, this was a major shortcoming. The ISOs were released about every three to six months, and invariably a major glitch was discovered about a week after the new ISO was introduced. With our two-phase installer, slipstream changes are easy to implement by simply adding a line to the Incredible PBX install script. The ISO itself never has to be updated until a major operating system refresh is necessary.

Adding Packages to Your ISO. With Incredible PBX, RHEL 6.7-compatible packages are added to new servers in a couple of ways. First, there are packages actually included within the ISO itself that are loaded during Phase I of the install, i.e. when Scientific Linux 6.7 platform is installed. These packages must include all necessary dependencies. The kickstart process actually resolves and loads package dependencies as part of the Phase I ISO install procedure. Once the base install is completed, the end-user’s server reboots and then the Phase II install kicks off by downloading and running the Incredible PBX 13-12R installer. Additional RPM packages and a number of other applications in tarball format are downloaded and installed during this Phase II process. Today, we’ll show you how to modify both pieces of the ISO install procedure.

To add RPMs to the ISO itself, keep in mind that the new RPMs must match the architecture of the default build environment. In the case of Incredible PBX, it’s a 32-bit architecture which means you’ll need 32-bit versions of RPMs you wish to add. Otherwise, you will need to replace all of the packages in the build environment with their 64-bit cousins.

There are 3 steps to adding new packages to the ISO build environment.

First, create a temporary directory (/tmp/packages) to use for gathering up the RPMs to be added. This is so you can check your work without screwing up your build environment. To add an RPM, you first need to download it from a repository to your temporary directory. The syntax looks like this where NetworkManager is the name of the RPM you wish to install:

yum -y install --downloadonly --downloaddir=/tmp/packages NetworkManager

Second, move the RPMs from /tmp/packages into your build environment. This must include RPM package dependencies (as was the case when adding NetworkManager):

mv /tmp/packages/*.rpm /root/kickstart_build/isolinux/Packages/.

Third, add the names of your new RPMs to the kickstart config files (ks*.cfg) in /root/kickstart_build/isolinux. The package names go in the section of each kickstart file labeled %packages.

NOTE: You do not have to add the names of RPMs being added because of dependencies in step 3. You DO have to add the actual RPMs and RPM dependencies in step 2. For example, with NetworkManager, only NetworkManager itself needed to be added to the %packages list in the ks*.cfg config files. But the collection of NetworkManager RPMs and its dependencies for step 2 looked like this:

avahi-autoipd-0.6.25-15.el6.i686.rpm
dnsmasq-2.48-14.el6.i686.rpm
libdaemon-0.14-1.el6.i686.rpm
mobile-broadband-provider-info-1.20100122-4.el6.noarch.rpm
ModemManager-0.4.0-5.git20100628.el6.i686.rpm
NetworkManager-0.8.1-99.el6.i686.rpm
NetworkManager-glib-0.8.1-99.el6.i686.rpm
ppp-2.4.5-10.el6.i686.rpm
rp-pppoe-3.10-11.el6.i686.rpm
wpa_supplicant-0.7.3-6.el6.i686.rpm

Changing the ISO Default Boot Menu. Once you have burned the ISO to a DVD-ROM or USB flash drive and booted your server-to-be, a default kickstart menu will be presented: /root/kickstart_build/isolinux/isolinux.cfg. Edit it to customize the splash screen and make any desired changes in the screen title and options displayed to those using your ISO. WARNING: If you modify the ks*.cfg options in the file, you also will need to make similar modifications in the create-ISO-new build script as well as adding new matching ks config files in /root/kickstart_build/isolinux.

Modifying the Phase II ISO Install Procedure. The Phase I install setup already provided in the Incredible PBX ISO will work for any number of ISO requirements you might have because it provides a robust Scientific Linux 6.7 base platform. Now for the fun part. You can modify the Phase II install in any way you like by simply adjusting the download script and hosting it on your own public server.

The Phase II magic is housed in the %post section of the kickstart config files (ks*.cfg). The initial setup in this section will work for almost any setup. It addresses the quirks of getting a working network connection functioning on most server platforms. This got much more complicated with the introduction of UEFI on newer Intel-based servers. But we’ve addressed all of that. To customize the install to run your own Phase II script, you need only modify the last few lines of the %post section:

/bin/echo "cd /root" >> /tmp/firstboot
/bin/echo "/usr/bin/wget http://incrediblepbx.com/incrediblepbx13-12.2-centos.tar.gz" >> /tmp/firstboot
/bin/echo "/bin/tar zxvf incrediblepbx13-12.2-centos.tar.gz" >> /tmp/firstboot
/bin/echo "/bin/rm -f incrediblepbx13-12.2-centos.tar.gz" >> /tmp/firstboot
/bin/echo "./Inc*" >> /tmp/firstboot
/bin/chmod +x /tmp/firstboot
eject
%end

These last few lines tell the ISO installer where to find your Phase II script and manage the procedure for downloading it, untarring it, and then running it. To deploy your own Phase II install script, simply modify lines 2, 3, 4, and 5 above. In line 2, provide the public server location of your script in .tar.gz format. In line 3, untar the script in the /root folder of the new server. In line 4, remove the .tar.gz file after it’s been decompressed. In line 5, run the shell script included in your tarball. The remaining lines shown above should be preserved as shown. Once you finish making changes in ks.cfg, copy the %post section to your other kickstart config files and then rerun /root/create-ISO-new to build your new ISO. Enjoy!

Originally published: Friday, December 11, 2015


Support Issues. With any application as sophisticated as this one, you’re bound to have questions. Blog comments are a terrible place to handle support issues although we welcome general comments about our articles and software. If you have particular support issues, we encourage you to get actively involved in the PBX in a Flash Forums. It’s the best Asterisk tech support site in the business, and it’s all free! Please have a look and post your support questions there. Unlike some forums, ours is extremely friendly and is supported by literally hundreds of Asterisk gurus and thousands of users just like you. You won’t have to wait long for an answer to your question.


Need help with Asterisk? Visit the PBX in a Flash Forum.


Special Thanks to Our Generous Sponsors


FULL DISCLOSURE: ClearlyIP, Skyetel, Vitelity, DigitalOcean, Vultr, VoIP.ms, 3CX, Sangoma, TelecomsXchange and VitalPBX have provided financial support to Nerd Vittles and our open source projects through advertising, referral revenue, and/or merchandise. As an Amazon Associate and Best Buy Affiliate, we also earn from qualifying purchases. We’ve chosen these providers not the other way around. Our decisions are based upon their corporate reputation and the quality of their offerings and pricing. Our recommendations regarding technology are reached without regard to financial compensation except in situations in which comparable products at comparable pricing are available from multiple sources. In this limited case, we support our sponsors because our sponsors support us.

BOGO Bonaza: Enjoy state-of-the-art VoIP service with a $10 credit and half-price SIP service on up to $500 of Skyetel trunking with free number porting when you fund your Skyetel account. No limits on number of simultaneous calls. Quadruple data center redundancy. $25 monthly minimum spend required. Tutorial and sign up details are here.

The lynchpin of Incredible PBX 2020 and beyond is ClearlyIP components which bring management of FreePBX modules and SIP phone integration to a level never before available with any other Asterisk distribution. And now you can configure and reconfigure your new Incredible PBX phones from the convenience of the Incredible PBX GUI.

VitalPBX is perhaps the fastest-growing PBX offering based upon Asterisk with an installed presence in more than 100 countries worldwide. VitalPBX has generously provided a customized White Label version of Incredible PBX tailored for use with all Incredible PBX and VitalPBX custom applications. Follow this link for a free test drive!
 

Special Thanks to Vitelity. Vitelity is now Voyant Communications and has halted new registrations for the time being. Our special thanks to Vitelity for their unwavering financial support over many years and to the many Nerd Vittles readers who continue to enjoy the benefits of their service offerings. We will keep everyone posted on further developments.


Some Recent Nerd Vittles Articles of Interest…