Home » Posts tagged 'fax' (Page 9)

Tag Archives: fax

The Most Versatile VoIP Provider: FREE PORTING

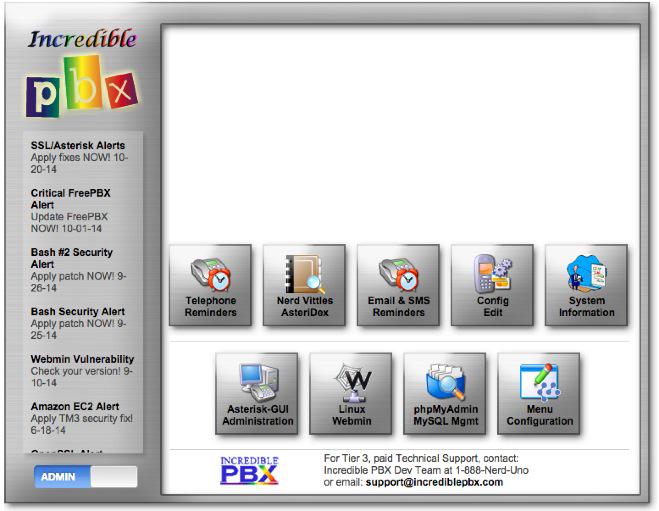
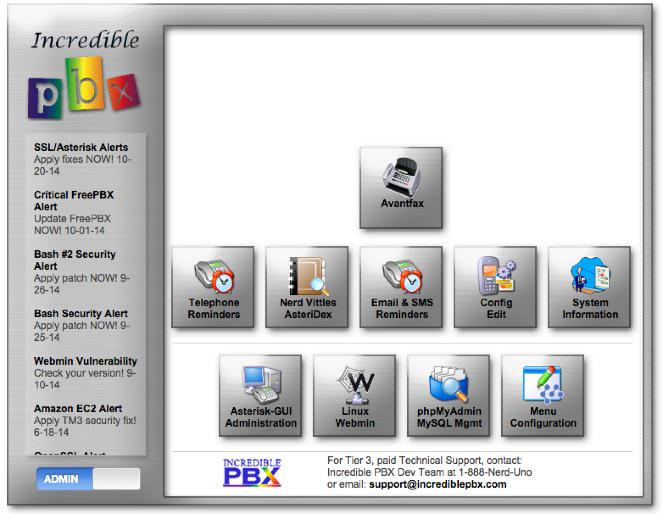
The Gotcha-Free PBX: Introducing Incredible PBX for Asterisk-GUI (Ubuntu)

WARNING: This version is no longer secure and use of it is strongly discouraged.

Remember the old adage that Rome wasn’t built in a day? Well, thanks to Mark Spencer and his team of incredibly talented programmers coupled with the modular design of Asterisk® and Asterisk-GUI, times have changed. It took about a month to put the CentOS version of Incredible PBX™ for Asterisk-GUI together. Today’s Ubuntu® version was created in one day! That should tell you all you need to know about the design. Better yet, with a cloud platform such as Digital Ocean,1 you can deploy Incredible PBX for Asterisk-GUI in about 15 minutes. Add another 5 minutes to configure some trunks and plug in a couple phones, and you’ll have a Gotcha-Free PBX in less time than it takes to wolf down a Waffle House breakfast.

We try to make new product tutorials stand on their own so you don’t have to jump around to figure everything out. But, if you’re generally familiar with the process of installing Incredible PBX, then this will be a walk in the park for you. Last week we released a tutorial covering all of the new Gotcha Free PBX applications, and that guide applies to today’s Ubuntu release as well. The names of a few components are different (such as the Incredible Fax installer), but functionally everything works in exactly the same way as the CentOS platform release. After all, that’s the beauty of the modular design.

Target Audience: Home or SOHO/SBO in need of a turnkey, Gotcha-Free PBX

Default Configuration: Asterisk 11 with enhanced Asterisk-GUI, Kennonsoft GUI, and NANPA dialplan

Platform: Ubuntu 14.04 (32/64-bit) running on Dedicated Server, Cloud-Based Server, or Virtual Machine

Minimum Memory: 512MB

Recommended Disk: 20GB+

Default Trunks: Google Voice, CallCentric, DIDlogic, Future-Nine, IPcomms, Les.net, Vitelity, VoIP.ms2

Feature Set: Fax, SMS messaging, VPN, Reminders, ConfBridge Conferencing, AsteriDex, Voicemail, Email, IVR, News, Weather, Voice Dialer, Wolfram Alpha, Today in History, TM3 Firewall WhiteList, Speed Dialer, iNUM and SIP URI (free) worldwide calling, OpenCNAM CallerID lookups, DISA, Call Forwarding, CSV CDRs

Administrator Utilities: Incredible Backup/Restore, Automatic Updater, Asterisk Upgrader, phpMyAdmin, Timezone Config, Plug-and-Play Trunk Configurator, WebMin, External IP Setup, Firewall WhiteList Tools

Getting Started with Incredible PBX for Asterisk-GUI (Ubuntu Edition)

Here’s a quick overview of the installation and setup process for Incredible PBX for Asterisk-GUI:

  1. Choose a Hardware Platform – Dedicated PC, Virtual Machine, or Cloud Provider
  2. Install a Linux Flavor – Install Ubuntu 14.04 Platform for Incredible PBX
  3. Download and Install Incredible PBX for Asterisk-GUI
  4. Install Incredible Fax for Asterisk-GUI (optional)
  5. Set Up Passwords for Incredible PBX for Asterisk-GUI
  6. Configure Trunks with Incredible PBX for Asterisk-GUI
  7. Connect a Softphone to Incredible PBX for Asterisk-GUI

1. Choose a Platform for Incredible PBX for Asterisk-GUI

Incredible PBX for Asterisk-GUI works equally well on dedicated hardware, a virtual machine, or a cloud-based server. Just be sure you’ve met the minimum requirements outlined above and that you have a sufficiently robust Internet connection to support 100Kb of download and upload bandwidth for each simultaneous call you wish to handle with your new PBX.

For Dedicated Hardware, we recommend an Atom-based PC of recent vintage with at least a 30GB drive and 4GB of RAM. That will take care of an office with 10-20 extensions and a half dozen or more simultaneous calls if you have the Internet bandwidth to support it.

For Virtual Machine Installs, we recommend Oracle’s VirtualBox platform which runs atop almost any operating system including Windows, Macs, Linux, and Solaris. Here’s a link to our original VirtualBox tutorial to get you started. We suggest allocating 1GB of RAM and at least a 20GB disk image to your virtual machine for best performance.

For Cloud-Based Servers, we recommend RentPBX, one of our financial supporters who also happens to size servers properly and restrict usage solely to VoIP. This avoids performance bottlenecks that cause problems with VoIP calls. If you’re just experimenting, then a 512MB Digital Ocean droplet is a cost-effective option at a cost of less than a penny an hour. In addition to a little referral revenue for Nerd Vittles, the nicest features of Digital Ocean are the availability of preconfigured CentOS images and a platform on which you can install Incredible PBX and be ready to start making calls very, very quickly. If you make a serious mistake during the install or setup, it’s a 30-second task to delete your droplet and create a new one. You’re only out a penny! And reloading Incredible PBX from scratch is never more than a 20-minute task. Remember to run the create-swapfile-DO script included in the Incredible PBX tarball before beginning your install to avoid out-of-memory conditions.

2. Install Ubuntu 14.04 Platform for Incredible PBX

For dedicated hardware installs, download the 32-bit or 64-bit Ubuntu 14.04 “Trusty Tahr” Minimal ISO. Burn it to a CD/DVD or thumb drive and boot your dedicated server from the image. Remember, you’ll be reformatting the drive in your server so pick a machine you don’t need for other purposes.

For virtual machine installs, download the same ISO and specify it as the boot drive for your virtual machine. If you’re using the VirtualBox platform, create a new virtual machine specifying either the 32-bit or 64-bit version of Ubuntu. Allocate 1024MB of RAM (512MB also works fine!) and at least 20GB of disk space using the default hard drive setup in all three steps. In Settings, click System and check Enable I/O APIC and uncheck Hardware Clock in UTC Time. Click Audio and Specify then Enable your sound card. Click Network and Enable Network Adapter for Adapter 1 and choose Bridged Adapter. Finally, in Storage, add the Ubuntu 14.04 mini.iso to your VirtualBox Storage Tree as shown below. Then click OK and start up your new virtual machine.

Here are the steps to get Ubuntu 14.04 set up on dedicated hardware or a virtual machine:
UBUNTU mini.iso install:
Choose language
Choose timezone
Detect keyboard
Hostname: incrediblepbx < continue >
Choose mirror for downloads
Confirm archive mirror
Leave proxy blank unless you need it < continue >
** couple minutes of whirring as initial components are loaded **
New user name: incredible < continue >
Account username: incredible < continue >
Account password: makeitsecure < continue >
Encrypt home directory < no >
Confirm time zone < yes >
Partition disks: Guided - use entire disk and set up LVM
Confirm disk to partition
Write changes to disks and configure LVM
Whole volume? < continue>
Write changes to disks < yes> < -- last chance to preserve your disk drive! ** about 15 minutes of whirring during base system install ** < no touchy anything>
** another 5 minutes of whirring during base software install ** < no touchy anything>
Upgrades? Install security updates automatically
** another 5 minutes of whirring during more software installs ** < no touchy anything>
Software selection: *Basic Ubuntu server (only!)
** another couple minutes of whirring during software installs ** < no touchy anything>
Grub boot loader: < yes>
UTC for system clock: < no>
Installation complete: < continue> after removing installation media
** on VirtualBox, PowerOff after reboot and remove [-] mini.iso from Storage Tree & restart VM
login as user: incredible
** enter user incredible's password **
sudo passwd
** enter incredible password again and then create secure root user password **
su root
** enter root password **
apt-get update
apt-get install ssh -y
sed -i 's|without-password|yes|' /etc/ssh/sshd_config
sed -i 's|yes"|without-password"|' /etc/ssh/sshd_config
sed -i 's|"quiet"|"quiet text"|' /etc/default/grub
update-grub
ifconfig
** write down the IP address of your server from ifconfig results
reboot
** login via SSH to continue **

For Cloud-based servers or virtual machines, typically the provider has done the hard work for you. Just choose either a 32-bit or 64-bit Ubuntu 14.04 platform with at least 512MB of RAM and 20GB of disk storage. If you have to roll your own from an ISO, just follow the steps above.

3. Install Incredible PBX on Your Ubuntu 14.04 Server

Adding Incredible PBX to a running Ubuntu 14.04 server is simple. To restate the obvious, your server needs a reliable Internet connection to proceed. Using SSH (or Putty on a Windows machine), log into your new server as root at the IP address you deciphered in the ifconfig step at the end of the Ubuntu install procedure above.

First, run the update and upgrade procedure for Ubuntu before you begin the install. This is especially important if using a cloud-based Ubuntu 14 server.

apt-get update && apt-get upgrade -y && reboot

WARNING: If you’re using a 512MB droplet at Digital Ocean, be advised that their Ubuntu setup does NOT include a swap file. This may cause serious problems when you run out of RAM. Uncomment ./create-swapfile-DO line below to create a 1GB swap file which will be activated whenever you exceed 90% RAM usage on Digital Ocean.

IMPORTANT: Before you begin the Incredible PBX install, expand your console window to at least 80×27, or the Asterisk compilation step may fail. If you’re in doubt about the window dimensions, just maximize the window to full-screen during the install process.

Now let’s begin the Incredible PBX install. Log back in as root and issue the following commands:

cd /root
wget http://incrediblepbx.com/incrediblepbx11guiU.tar.gz
tar zxvf incrediblepbx11guiU.tar.gz
#./create-swapfile-DO  #add this step for Digital Ocean droplets
rm -f incrediblepbx11guiU.tar.gz
sed -i 's|pbxinaflash.com|incrediblepbx.com|' IncrediblePBX11U-GUI.sh
./IncrediblePBX11U-GUI.sh

4. Install Incredible Fax for Asterisk-GUI (optional)

Administrators have been trying to stomp out faxing for at least two decades. Here’s a hint. It ain’t gonna happen. So go with the flow and add Gotcha-Free Faxing to your server. It’ll be there when you need it. And sooner or later, you’ll need it. This install script is simple enough for any monkey to complete. Run the script and enter the email address for delivery of your faxes. Then, if you’re in the U.S. or Canada, press the Enter key to accept every default entry during the HylaFax and AvantFax installation steps. For other countries, read the prompts and answer accordingly. When the installation finishes, reboot your server to bring faxing on line. Be sure to change your AvantFax admin password. By default, it is password. You can use the script included in the /root folder: avantfax-pw-change. REMINDER: Don’t forget to reboot your server!

cd /root
./incrediblefax11_ubuntu14.sh
./avantfax-pw-change
reboot

5. Initial Configuration of Incredible PBX for Asterisk-GUI

Incredible PBX is installed with the preconfigured IPtables Linux firewall already in place. It implements WhiteList Security to limit server access to connected LANs, your server’s IP address, your desktop computer’s IP address, and a few of our favorite SIP providers. You can add additional entries to this WhiteList whenever you like using the add-ip and add-fqdn tools in /root. There’s also an Apache security layer for our web applications. And, of course, Asterisk-GUI has its own security methodology using Asterisk’s manager.conf. Finally, we randomize extension and DISA passwords as part of the initial install process. Out of the starting gate, you won’t find a more secure VoIP server implementation anywhere. After all, it’s your phone bill.

Even with all of these layers of security, here are 10 Quick Steps to better safeguard your server. You only do this once, but failing to do it may lead to security issues you don’t want to have to deal with down the road. So DO IT NOW!

First, log into your server as root with your root password and do the following:

Make your root password very secure: passwd
Set your correct time zone: ./timezone-setup
Create admin password for web apps: htpasswd -b /etc/pbx/wwwpasswd admin newpassword
Make a copy of your other passwords: cat passwords.FAQ
Make a copy of your Knock codes: cat knock.FAQ
Decipher IP address and other info about your server: status

Second, log into your server as admin using a web browser pointed to your server’s IP address:

Click USERS tab in Incredible PBX GUI
Click Asterisk-GUI Administration
Log in as user: admin with password: password
Immediately change your admin password and login again

Log in to Asterisk-GUI again with your new password. Expand the options available in the GUI:

Options -> Advanced Options -> Show Advanced Options

Last but not least, Incredible PBX includes an automatic update utility which downloads important updates whenever you log into your server as root. We recommend you log in once a week to keep your server current. Now would be a good time to log out and back into your server at the Linux command line to bring your server up to current specs.

6. Configure Trunks with Incredible PBX for Asterisk-GUI

Now for the fun part. If this is your first VoIP adventure, be advised that this ain’t your grandma’s phone system. You need not and should not put all your eggs in one basket when it comes to telephone providers. In order to connect to Plain Old Telephones, you still need at least one provider. But there is nothing wrong with having several. And a provider that handles an outbound call (termination) need not be the same one that handles an incoming call (origination) and provides your phone number (DID). We cannot recommend Vitelity highly enough, and it’s not just because they have financially supported our projects for almost a decade. They’re as good as VoIP providers get, and we use lots of them. If you’re lucky enough to live in the U.S., you’d be crazy not to set up a Google Voice account. It’s free as are all phone calls to anywhere in the U.S. and Canada. The remaining preconfigured providers included in Incredible PBX for Asterisk-GUI are equally good, and we’ve used and continue to use almost all of them. So pick a few and sign up. You only pay for the calls you make with each provider so you have little to lose by choosing several. The PIAF Forum includes dozens of recommendations on VoIP providers if you want additional information.

With the preconfigured trunks in Incredible PBX for Asterisk-GUI, all you need are your credentials for each provider and the FQDN of their server. Log into Asterisk-GUI Administration as admin using a browser. From the System Status screen, click Incredible PBX Apps. Click on each provider you have chosen and fill in the blanks with your credentials. When you’ve saved all of your settings, log into your server as root via SSH and type: service asterisk restart or asterisk-restart. You can also issue the command in the Asterisk-GUI by choosing the Asterisk CLI tab3 in the left column. Doesn’t get any simpler!

Update: It should be noted that Incredible PBX for Asterisk-GUI also supports Anveo Direct trunks; however, they are configured differently because of the way Anveo handles the calls. You’ll need the PIN provided by Anveo to set up your trunk, and Anveo supports CallerID spoofing so you can enter any CallerID number for the trunk that you are authorized to use. You’ll find the Anveo Direct setup link in the Incredible PBX Apps tab. To route an outgoing call through Anveo trunk, dial 2 + any desired 10-digit number.

Here is the complete list of dialing prefixes and the trunks to which they are associated:

  • 1 – Google Voice
  • 2 – Anveo Direct
  • 3 – Future Nine
  • 4 – CallCentric
  • 5 – DIDlogic
  • 6 – IPcomms
  • 7 – Les.net
  • 8 – Vitelity
  • 9 – VoIP.ms

For free iNUM calling worldwide, the following dialing prefixes are supported in conjunction with the last seven digits of any destination iNUM DID. Free iNUM DIDs for your own PBX are available from both of these providers as well.

  • 0XXXXXXX – CallCentric
  • 90XXXXXXX – VoIP.ms

7. Configure a Softphone with Incredible PBX for Asterisk-GUI

We’re in the home stretch now. You can connect virtually any kind of telephone to your new Gotcha-Free PBX. Plain Old Phones require an analog telephone adapter (ATA) which can be a separate board in your computer from a company such as Digium. Or it can be a standalone SIP device such as ObiHai’s OBi100 or OBi110 (if you have a phone line from Ma Bell to hook up as well). SIP phones can be connected directly so long as they have an IP address. These could be hardware devices or software devices such as the YateClient softphone. We’ll start with a free one today so you can begin making calls. You can find dozens of recommendations for hardware-based SIP phones both on Nerd Vittles and the PIAF Forum when you’re ready to get serious about VoIP telephony.

We recommend YateClient which is free. Download it from here. Run YateClient once you’ve installed it and enter the credentials for the 6002 extension on Incredible PBX. You’ll need the IP address of your server plus your extension 6002 password. Choose Users -> 6002 and write down your SIP/IAX Password. You can also find it in /root/passwords.FAQ. Fill in the blanks using the IP address of your server, 6002 for your account name, and whatever password is assigned to the extension. Click OK to save your entries.

Once you are registered to extension 6002, close the Account window. Then click on YATE’s Telephony Tab and place some test calls to the numerous apps that are preconfigured on Incredible PBX. Dial a few of these to get started:

7001 - IVR Demo
123 - Reminders
947 - Weather by ZIP Code
951 - Yahoo News
*61 - Time of Day
TODAY - Today in History

If you are a Mac user, another great no-frills softphone is Telephone. Just download and install it from the Mac App Store.

Configuring Google Voice

If you want to use Google Voice, you’ll need a dedicated Google Voice account to support Incredible PBX. The more obscure the username (with some embedded numbers), the better off you will be. This will keep folks from bombarding you with unsolicited Gtalk chat messages, and who knows what nefarious scheme will be discovered using Google messaging six months from now. So keep this account a secret!

IMPORTANT: Be sure to enable the Google Chat option as one of your phone destinations in Settings, Voice Setting, Phones. That’s the destination we need for The Incredible PBX to work its magic! Otherwise, all inbound and outbound calls will fail. Good News! You’re in luck. Google has apparently had a change of heart on discontinuing Google Chat support so it’s enabled by default in all new Google Voice accounts. Once you’ve created a Gmail and Google Voice account, go to Google Voice Settings and click on the Calls tab. Make sure your settings match these:

  • Call ScreeningOFF
  • Call PresentationOFF
  • Caller ID (In)Display Caller’s Number
  • Caller ID (Out)Don’t Change Anything
  • Do Not DisturbOFF
  • Call Options (Enable Recording)OFF
  • Global Spam FilteringON

Click Save Changes once you’ve adjusted your settings. Under the Voicemail tab, plug in your email address so you get notified of new voicemails. Down the road, receipt of a Google Voice voicemail will be a big hint that something has come unglued on your PBX.

One final word of caution is in order regardless of your choice of providers: Do NOT use special characters in any provider passwords, or nothing will work!

Now you’re ready to configure your Google Voice account in Incredible PBX. You can do it from within Asterisk-GUI by choosing Google Voice within the Incredible PBX Apps tab. Once you entered your credentials, don’t forget to restart Asterisk, or Google Voice calls will fail. If you still have trouble placing or receiving calls, try these tips.

OK, Smarty Pants: Show Me the Beef!

We know what some of you are thinking. "What does a fast food worker really know about VoIP and Gotcha-Free PBXs?? Before I waste a bunch of time on this, show me the beef!" Fair enough. Sit by your phone and click the Call Me icon below. Type in a fake name and your real phone number. Click the Connect button, answer your phone when it rings, and press 1. You’ll be connected to the Incredible PBX IVR for Asterisk-GUI. Pick an option from the menu of choices and take the Incredible PBX apps for a spin on our dime… actually it’s Google’s dime. Everything you see and hear is part of what you get with Incredible PBX for Asterisk-GUI including the ability to set up your own click-to-dial web interface exactly like this one. The demo just happens to be running on our Mac desktop instead of yours. So… what are you waiting for? Click away and try Incredible PBX for yourself. And, by the way, nobody besides the NSA and Google will be monitoring your call. 😉


Nerd Vittles Demo IVR Options
1 – Call by Name (say “Delta Airlines” or “American Airlines” to try it out)
2 – MeetMe Conference (password is 1234)
3 – Wolfram Alpha (say “What planes are overhead?”)
4 – Lenny (The Telemarketer’s Worst Nightmare)
5 – Today’s News Headlines
6 – Weather Forecast (say the city and state, province, or country)
7 – Today in History
8 – Speak to a Real Person (or maybe just voicemail if we’re out)

Homework Assignment: Mastering the Asterisk-GUI

Now would be a good time to explore the Incredible PBX applications. Continue reading there. After you’ve played with the preconfigured features, it’s time to roll up your sleeves and learn about Asterisk-GUI and its powerful feature set. Here’s one word of warning. We mentioned that Incredible PBX was a hybrid system that combines some customized settings with the standard Asterisk-GUI interface. Before modifying existing settings for the default trunks, extensions, and default routes, take a look at the credentials* files in /etc/asterisk. If you modify any of these trunk entries or the Outgoing or Incoming Call Rules in Asterisk-GUI, you may break the Incredible PBX setup. So steer clear of that minefield until you know what you’re doing. Adding new extensions and additional trunks is perfectly fine and will not break anything.

Rather than reinvent the wheel, we’ll point you to some excellent tutorials that already exist. Start with Chapter 3 of Digium’s Asterisk Appliance™ Administrator Manual. Next, review Chapter 11 of The Asterisk Book (Second Edition). Finally, take a look at a couple of the tutorials that have been written by other companies that incorporated Asterisk-GUI into their hardware products, e.g. Yeastar’s MyPBX SOHO User Manual and Grandstream’s UCM6100 User Manual.

In the meantime, if you have questions, join the PBX in a Flash Forums and take advantage of our awesome collection of gurus. There’s an expert available on virtually any topic, and the price is right. As with Incredible PBX, it’s absolutely free.

We also are quickly building a collection of tutorials tailored specifically for Incredible PBX for Asterisk-GUI:

Enjoy your new Gotcha-Free PBX!

Just Released: The Gotcha-Free Incredible PBX Application User’s Guide

Originally published: Thursday, February 5, 2015


Support Issues. With any application as sophisticated as this one, you’re bound to have questions. Blog comments are a terrible place to handle support issues although we welcome general comments about our articles and software. If you have particular support issues, we encourage you to get actively involved in the PBX in a Flash Forums. It’s the best Asterisk tech support site in the business, and it’s all free! Please have a look and post your support questions there. Unlike some forums, ours is extremely friendly and is supported by literally hundreds of Asterisk gurus and thousands of users just like you. You won’t have to wait long for an answer to your question.


Need help with Asterisk? Visit the PBX in a Flash Forum.


Special Thanks to Our Generous Sponsors


FULL DISCLOSURE: ClearlyIP, Skyetel, Vitelity, DigitalOcean, Vultr, VoIP.ms, 3CX, Sangoma, TelecomsXchange and VitalPBX have provided financial support to Nerd Vittles and our open source projects through advertising, referral revenue, and/or merchandise. As an Amazon Associate and Best Buy Affiliate, we also earn from qualifying purchases. We’ve chosen these providers not the other way around. Our decisions are based upon their corporate reputation and the quality of their offerings and pricing. Our recommendations regarding technology are reached without regard to financial compensation except in situations in which comparable products at comparable pricing are available from multiple sources. In this limited case, we support our sponsors because our sponsors support us.

BOGO Bonaza: Enjoy state-of-the-art VoIP service with a $10 credit and half-price SIP service on up to $500 of Skyetel trunking with free number porting when you fund your Skyetel account. No limits on number of simultaneous calls. Quadruple data center redundancy. $25 monthly minimum spend required. Tutorial and sign up details are here.

The lynchpin of Incredible PBX 2020 and beyond is ClearlyIP components which bring management of FreePBX modules and SIP phone integration to a level never before available with any other Asterisk distribution. And now you can configure and reconfigure your new Incredible PBX phones from the convenience of the Incredible PBX GUI.

VitalPBX is perhaps the fastest-growing PBX offering based upon Asterisk with an installed presence in more than 100 countries worldwide. VitalPBX has generously provided a customized White Label version of Incredible PBX tailored for use with all Incredible PBX and VitalPBX custom applications. Follow this link for a free test drive!
 

Special Thanks to Vitelity. Vitelity is now Voyant Communications and has halted new registrations for the time being. Our special thanks to Vitelity for their unwavering financial support over many years and to the many Nerd Vittles readers who continue to enjoy the benefits of their service offerings. We will keep everyone posted on further developments.


Some Recent Nerd Vittles Articles of Interest…

  1. Nerd Vittles relies upon modest referral fees from some providers such as Digital Ocean to keep the lights on. But you get a free ride, too! Create an Ubuntu 14.04 (not 14.10!) 512MB droplet of the cheapest flavor ($5/mo.). A $10 credit will be added to your account when you sign up, and you can play with Incredible PBX on Digital Ocean’s nickel for a couple months risk-free. Add and delete droplets to your heart’s content and enjoy! []
  2. Vitelity and Google provide financial support to Nerd Vittles and the Incredible PBX project. []
  3. If, for some reason, the Asterisk CLI tab does not appear on your server, click Options -> Advanced Options -> Show Advanced Options. []

The Gotcha-Free PBX: Incredible PBX for Asterisk-GUI Application User’s Guide

For those just beginning the Incredible PBX™ for Asterisk-GUI adventure, start here. Once your system is up and running, you’ll be ready to kick the tires. And today we’ll cover the applications for Asterisk® that are included in Incredible PBX for Asterisk-GUI. Down the road a bit, we’ll provide an in-depth review of the Incredible PBX internals and how to tweak things under the covers to get the most out of Incredible PBX for Asterisk-GUI. We’re not planning to provide an Asterisk-GUI User’s Guide because a number of them already have been written. That doesn’t mean it’s not important. See last week’s homework assignment for the links. If you have questions, by all means post them on the PIAF Forum for some quick help.

If you’ve always loved Baskin-Robbins’ 31 Flavors of ice cream, then you’re in for a treat today with our special scoop.

Here’s our Table of Contents to the 31 Incredible PBX Applications for Asterisk-GUI with hotlinks plus some bonus apps for those that are still awake at the end of today’s adventure. You may want to print this for future reference.

  1. Checking System Status
  2. Enabling Speech Recognition
  3. Wolfram Alpha for Siri-like queries by phone*
  4. Automatic Update Utility
  5. Asterisk 11 Upgrade Utility
  6. Apache Authentication for Apps
  7. IPtables Firewall WhiteList
  8. PortKnocker Remote Access
  9. Travelin’ Man 4 Remote Access by Phone
  10. Conference Bridge
  11. CallerID Name (CNAM) Lookups
  12. Faxing with Incredible PBX
  13. Voicemail 101 with Incredible PBX
  14. Email Delivery of MP3 Voicemails
  15. Reconfiguring SendMail for SmartHosts
  16. SMS Blasting with Google Voice
  17. SMS Voice Messaging with Google Voice*
  18. SMS Messaging with VoIP.ms
  19. SIP URI Calling with Speed Dials
  20. IVR Demo of Incredible PBX Applications*
  21. Backup and Restore Options
  22. AsteriDex – The Poor Man’s Rolodex®
  23. Voice Dialing with AsteriDex*
  24. Speed Dialing with AsteriDex
  25. Scheduling Reminders by Phone or Web
  26. DISA Access with Incredible PBX
  27. Yahoo! News Headlines
  28. Weather Forecasts with Incredible PBX*
  29. ODBC Application Support
  30. Today in History
  31. Time of Day
  32. Harnessing SIP URIs for Free Worldwide Calling

* Requires Voice Recognition implementation. See #2 above.

1. Checking Current Status of Incredible PBX

There are several ways to check the status of your server. First, log into your server as root and type: status or pbxstatus

The second option is to use a browser to access your server. Choose the Admin menu. Then click Asterisk-GUI Administration. Once you log in, the System Status of your server, trunks, and extensions will be displayed.

Finally, with your browser, choose the Admin menu. Click System Information to bring up the terrific SysInfo application that’s included in Incredible PBX.

2. Adding Speech Recognition to Incredible PBX for Asterisk-GUI

Google changed the licensing of their speech recognition engine last year and now restricts use to "personal and development use." Assuming you qualify, the very first order of business is to enable speech recognition for your new PBX. Once enabled, the Incredible PBX feature set grows exponentially. You’ll have access to the Voice Dialer for AsteriDex, Worldwide Weather Reports where you can say the name of a city and state or province to get a weather forecast for almost anywhere, Wolfram Alpha for a Siri-like encyclopedia for your PBX, and Lefteris Zafiris’ speech recognition software to build additional Asterisk apps limited only by your imagination.

Here’s how to activate speech recognition on Incredible PBX. Don’t skip any steps!

1. Using an existing Google/Gmail account, you first must join the Chrome-Dev Group.

2. Using the same account, create a new Speech Recognition Project.

3. Click on your newly created project and choose APIs & auth.

4. Turn ON the Speech API by clicking on its Status button in the far right margin. HINT: If you forgot to complete Step #1, the Speech API option will be missing!

5. Click on Credentials in APIs & auth and choose Create New Key -> Server key. Leave the IP address restriction blank!

6. Write down your new API key or copy it to the clipboard.

7. Log into your server as root and issue the following command:

nano -w /var/lib/asterisk/agi-bin/speech-recog.agi

8. When the nano editor opens, go to line 70 of speech-recog.agi: my $key = "". Insert your API key from Step #6 above between the quotation marks and save the file: Ctrl-X, Y, then Enter.

Congratulations! Speech recognition is now available with Incredible PBX applications for Asterisk-GUI.

3. Using Wolfram Alpha with Incredible PBX for Asterisk-GUI

Ever wished your Asterisk server could harness the power of a 10,000 CPU Supercomputer to answer virtually any question you can dream up about the world we live in? Well, so long as it’s for non-commercial use, today’s your lucky day. Apple demonstrated with Siri™ just how amazing this technology can be by coupling Wolfram Alpha® to a speech-to-text engine on the iPhone. Now you can do much the same thing using voice recognition on the Incredible PBX for Asterisk-GUI.

Before using Wolfram Alpha from any phone connected to your PBX, you first must configure it by obtaining and adding a Wolfram Alpha application ID to Incredible PBX. Here are the simple steps:

1. Obtain your free Wolfram Alpha APP-ID here.

2. Log into your server as root and issue the following command:

nano -w /var/lib/asterisk/agi-bin/4747

3. When the nano editor opens, the top line of the file will look like this:

APPID="Your-Wolfram-Alpha-App-ID-Goes-Here"

4. Replace the text between the quotes with your APP_ID key from Step #1 above. Then save the file: Ctrl-X, Y, then Enter.

To use Wolfram Alpha, dial 4747 (that’s S-I-R-I backwards) from any extension.

Here are some sample queries to get you started:

Weather in Charleston South Carolina
Weather forecast for Washington D.C.
Next solar eclipse
Otis Redding
Define politician
Who won the 1969 Superbowl? (Broadway Joe)
What planes are flying overhead now?
Ham and cheese sandwich (nutritional information)
Holidays 2015 (summary of all holidays for 2015 with dates and DOW)
Medical University of South Carolina (history of MUSC)
Star Trek (show history, air dates, number of episodes, and more)
Apollo 11 (everything you ever wanted to know)
Cheapest Toaster (brand and price)
Battle of Gettysburg (sad day 🙂 )
Daylight Savings Time 2015 (date ranges and how to set your clocks)
Tablets by Samsung (pricing, models, and specs)
Doughnut (you don’t wanna know)
Snickers bar (ditto)
Weather (local weather at your server’s location)

4. Automatic Update Utility for Incredible PBX for Asterisk-GUI

A key security component of Incredible PBX is its Automatic Update Utility. Each time you log into your server as root, the Automatic Update Utility is run. It installs the latest fixes and security patches for your server. Don’t disable it! In fact, don’t delete anything from the /root folder. You’ll need all of it sooner or later.

We recommend you log into your server as root at least once a week to keep your server current. Ditto for the web interface to Incredible PBX. Insofar as security is concerned, we make a best effort to keep the components of Incredible PBX up to date. The Linux operating system was installed by you before the Incredible PBX install began. That’s a nice way of saying Linux security is primarily your responsibility. When an egregious Linux vulnerability comes along that we know about, we will try to notify you of the issue on the PIAF Forum and on the RSS Feed that is part of the Incredible PBX web GUI. Check the RSS Feed on the web GUI at least once a week as well. As a condition of use of the free Incredible PBX for Asterisk-GUI product, you accepted ultimate responsibility for the security and reliability of your server. None of this discussion changes any of that.

5. Asterisk 11 Upgrade Utility for Incredible PBX for Asterisk-GUI

We’ve included a script to upgrade Asterisk 11 to the latest version whenever you feel the urge. Before beginning the upgrade, log into your server as root using SSH and maximize the window. Otherwise, Asterisk may not compile properly. Then run the script: /root/upgrade-asterisk-to-current

6. Implementing Apache Authentication with Incredible PBX for Asterisk-GUI

With the exception of Asterisk-GUI and WebMin, all web-based applications included in Incredible PBX (including your trunk setups!) require successful Apache authentication to gain access. When you installed Incredible PBX, you should have created an admin account. If not, issue the following command using a secure password after logging in as root:

htpasswd -b /etc/pbx/wwwpasswd admin newpassword

With the exception of AsteriDex and Reminders, you gain access to other Incredible PBX applications with the admin Apache account. For the remaining apps, you may wish to (but don’t have to) assign different account names and passwords to various departments in your organization. To set up these accounts, use the syntax above substituting the name of the department for "admin" and the department password for "newpassword."

7. Managing the IPtables Linux Firewall and WhiteList

As installed, Incredible PBX for Asterisk-GUI includes a preconfigured, locked-down Linux firewall that restricts incoming IPv6 traffic to localhost and, via a WhiteList, limits incoming IPv4 traffic to your server’s public and private IP addresses, your desktop computer’s IP address (that was used for the install), private LAN and NeoRouter VPN traffic, and a collection of our favorite SIP providers. You can WhiteList additional IP addresses for additional providers or for SIP and IAX phones located outside your firewall. The following firewall management scripts are mostly installed in the /root directory:

  • ./add-ip — WhiteList an additional IP address or IP address range (CIDR)
  • ./add-fqdn — WhiteList a site using a fully-qualified domain name (FQDN)
  • ./del-acct — Remove previously designated entry from the WhiteList
  • ./ipchecker — Check whether specified FQDNs have changed & update IPtables
  • iptables-restart — Used exclusively to restart IPtables and test for failed FQDNs
  • iptables -nL — Check the current status of your IPtables firewall

IPtables can be manually configured (if you know what you’re doing) by editing iptables and ip6tables in /etc/sysconfig (CentOS) or rules.v4 and rules.v6 in /etc/iptables (Debian/Ubuntu). NEVER use traditional iptables commands such as iptables save to update your IPtables configuration, or you will permanently delete all of your FQDN entries! Instead, edit the files directly and then restart IPtables using iptables-restart. This protects the FQDN entries in your setup while also checking for invalid FQDN entries and removing them temporarily so that IPtables will successfully restart. If you use service iptables restart to restart IPtables and there happens to be an FQDN entry for a host that is either down or has disappeared, IPtables will fail to restart and your server will be left with NO firewall protection! The reason for this is the IPtables design which converts all FQDN entries to fixed IP addresses when it starts up. It’s also the reason we have to periodically check for changed FQDN entries using the ipchecker script with cron. For this to work properly, you will need to manually add your FQDN setups to the top of /etc/ipchecker by inserting the filenames of any add-fqdn entries you have created. For additional details, read our Travelin’ Man 3 tutorial.

8. PortKnocker Remote Access to Incredible PBX for Asterisk-GUI

IPtables is a powerful firewall that keeps the bad guys out. It also will keep legitimate users (including you) from gaining remote access to your server unless you had the forethought to WhiteList your remote IP address before you left on that family vacation. Unfortunately, you don’t always know your IP address in advance. And dynamic IP addresses assigned with hotel WiFi frequently change. To address this problem, Incredible PBX for Asterisk-GUI includes a preconfigured PortKnocker utility. This lets you send three secret "knocks" on random TCP ports to your server to tell it to let you in temporarily (until IPtables is again restarted).

For PortKnocker to work, you obviously need to know the secret knocks. You’ll find them in /root/knock.FAQ. Record them in your wallet or inside your suitcase for that rainy day! There are PortKnocker apps for almost all smartphones as well as for Windows, Mac, and Linux computers. Install your favorite AND test access before you leave town.

Finally, be aware that PortKnocker does not need any special access to your server to work; however, if your server is behind a hardware-based firewall, then you must map the three PortKnocker TCP ports to the private IP address of your server, or the knocks obviously will never get delivered to your server.

Review our PortKnocker tutorial for additional configuration tips.

9. Travelin’ Man 4 Remote Access to Incredible PBX for Asterisk-GUI (Dial TM4)

In addition to PortKnocker, Incredible PBX also includes a telephone-based solution to temporarily gain remote access to your server. This does require a bit of preplanning since you must create account credentials for the person to whom you wish to give remote access via a phone call. The complete tutorial for Travelin’ Man 4 is available on the PIAF Forum. All of the pieces already are in place on your server so skip down to the Configuration & Operation sections for details on implementation. The tutorial also covers the Administrator Utilities in /root/tm4 which let you set up remote user accounts.

10. Using the Conference Bridge in Incredible PBX (Dial C-O-N-F)


A new turnkey Asterisk 11 Conference Bridge has been added to Incredible PBX for Asterisk-GUI. A conference bridge allows a group of people to participate in a joint phone call. Typically, participants dial into a virtual meeting room from their own phone. This virtual meeting room supports dozens or even hundreds of participants depending upon server capacity.

You do not need a timing source for conferencing with Incredible PBX for Asterisk-GUI! Old-style Asterisk-GUI Conference Rooms which required a timing source are disabled.

To access the Conference Bridge, dial C-O-N-F (2663) from any phone connected to your server. Remote users can be added to a conference by providing a DID that points to an IVR which includes Conference Bridge access. Once connected to the conference bridge, a caller is prompted for the Conference Bridge PIN and his or her name. The user and admin passwords to access the Conference Bridge are randomized during the install.

To display Conference Bridge PINs, open Asterisk-GUI, choose Incredible PBX Apps, and click on Anveo Direct. The Miscellaneous Credentials Settings will all be displayed at the bottom of the screen including your Conference Bridge PINs.

To change Conference Bridge PINs, log into your server as root and edit the entries for CONF_USER_PIN and CONF_ADMIN_PIN: nano -w /etc/asterisk/credentials.conf. Then reload Asterisk: asterisk-reload.

11. CallerID Name (CNAM) Lookups with Incredible PBX for Asterisk-GUI

By default, Incredible PBX is configured to automatically provide OpenCNAM CallerID name lookups for the first ten calls received each hour. These lookups are only from cached entries in the OpenCNAM database; however, you can enable the commercial lookup service if desired. The cost is four tenths of a cent per successful query.

To enable the OpenCNAM Professional Tier, set up an account at OpenCNAM.com. Once you’ve obtained your credentials, edit the [cidlookup] context in /etc/asterisk/extensions_additional.conf. The second line includes this CURL command:

${CURL(https://api.opencnam.com/v2/phone/${CALLERID(num)}?format=pbx&ref=incrediblepbx)})

Add the following immediately after "incrediblepbx" replacing ACCOUNT_SID and AUTH_TOKEN with your actual credentials: &account_sid=ACCOUNT_SID&auth_token=AUTH_TOKEN

Finally, comment out the next 8 lines that begin with "exten => cidlookup_1,n" by inserting a semicolon at the start of each line. DO NOT comment out: exten => cidlookup_1,n,Return(). Save your changes and reload Asterisk: asterisk-reload.

;exten => cidlookup_1,n,Set(current_hour=${STRFTIME(,,%Y-%m-%d %H)})
;exten => cidlookup_1,n,Set(last_query_hour=${DB(cidlookup/opencnam_last_query_hour)})
;exten => cidlookup_1,n,Set(total_hourly_queries=${DB(cidlookup/opencnam_total_hourly_queries)})
;exten => cidlookup_1,n,ExecIf($["${last_query_hour}" != "${current_hour}"]?Set(DB(cidlookup/opencnam_total_hourly_queries)=0))
;exten => cidlookup_1,n,ExecIf($["${total_hourly_queries}" = ""]?Set(DB(cidlookup/opencnam_total_hourly_queries)=0))
;exten => cidlookup_1,n,Set(DB(cidlookup/opencnam_total_hourly_queries)=${MATH(${DB(cidlookup/opencnam_total_hourly_queries)}+1,i)})
;exten => cidlookup_1,n,ExecIf($[${DB(cidlookup/opencnam_total_hourly_queries)} >= 10]?System(${ASTVARLIBDIR}/bin/opencnam-alert.php))
;exten => cidlookup_1,n,Set(DB(cidlookup/opencnam_last_query_hour)=${current_hour})
exten => cidlookup_1,n,Return()

12. Faxing with Incredible PBX for Asterisk-GUI

If you added Incredible Fax to your server by running incrediblefax11-GUI.sh in the /root folder, then you’re in for a treat. As part of the install, you provided an email address for delivery of incoming faxes. That’s all the setup that is required to have incoming faxes sent to most of your DIDs delivered via SendMail in PDF format. The best way to figure out whether a particular provider supports fax technology on their DIDs is to send a test fax to yourself. FaxZERO lets you send 5 free faxes of up to 3 pages every day. Give it a whirl.

You also can send faxes using standard document types with the AvantFax web application. Log into AvantFax from the main Incredible PBX page by clicking on the AvantFax icon. Choose the Send a Fax option from the main menu, fill in the blanks, and attach your document. AvantFax uses the default dialplan documented in last week’s article so use the prefix desired to send the fax using your preferred provider. HINT: Google Voice does an excellent job with both incoming and outgoing faxes, and the calls are free in the U.S. and Canada.

Copies of all incoming faxes also are available for retrieval within AvantFax.

13. Voicemail 101 for Incredible PBX for Asterisk-GUI

Voicemail functionality is enabled on an extension-by-extension basis as part of the extension setup under the Users tab in Asterisk-GUI. Once enabled, you can set up your mailbox and retrieve your messages by dialing *98. You can leave a message for any extension without actually calling the extension. Just prepend * to any extension number before dialing, e.g. *6002. A number of the system settings for voicemail can be tweaked under the Voicemail tab in Asterisk-GUI. You also can automatically delete voicemails once they have been delivered by email under the Email Settings tab. Just follow your nose.

14. Email Delivery of MP3 Voicemails with Incredible PBX for Asterisk-GUI

Speaking of email delivery, your voicemails also can be delivered to any email address of your choosing. For every extension under the Users tab in Asterisk-GUI, simply add an Email Address in the Voicemail section of the form. With Incredible PBX, the voicemail message will be attached to the email in MP3 format so it’s suitable for playback with most email clients on desktop PCs, Macs, and smartphones. Be advised that some Internet service providers (such as Comcast) block downstream SMTP servers. You can check whether your outbound email is flowing by accessing WebMin (below) and choosing Servers -> SendMail Mail Server -> Mail Queue. If you find outbound mail is accumulating, then you’ll need to add your ISP’s SMTP server address as a SmartHost for SendMail as documented in the next section.

15. Reconfiguring SendMail for SmartHost SMTP Delivery Of Outgoing Emails

Many residential Internet service providers block downstream SMTP servers such as the SendMail server running with Incredible PBX for Asterisk-GUI. If you’re sending emails but they never arrive and you’ve checked your SPAM folder, then chances are your ISP is the culprit. The simple solution is to add your ISP’s SMTP server as a SmartHost for SendMail. This means outbound emails will be forwarded to your ISP for actual email transmission over the Internet. Here’s how. Edit /etc/mail/sendmail.cf and search for DS. Immediately after DS, add the FQDN of your ISP’s SMTP server, e.g. DSsmtp.comcrap.net (no spaces!). Save the file and then restart SendMail: service sendmail restart. Your email and voicemail messages with attachments should begin flowing without further delay.

Email from: Asterisk PBX asterisk@pbx.local...
"Nerd Vittles" at 8001234567 left a new voicemail message 1 for extension 6002 on Thursday, January 29, 2015 at 01:42:33 PM.

You can test email delivery by sending yourself a message from the Linux CLI:

echo "test" | mail -s testmessage yourname@somedomain.com

16. SMS Blasting with Google Voice and Incredible PBX for Asterisk-GUI

Out of the box, Incredible PBX supports SMS Message Blasting if you have a functioning Google Voice account set up. Before first use, you must add your credentials, address list, and text message to the SMS Blaster scripts in the /root folder.

In smsblast, insert your credentials:

GVACCT="yourname@gmail.com"
GVPASS="yourpassword"
MSGSUBJECT="Little League Alert"

In smslist.txt, insert one or more recipients for your message. These can be a combination of SMS addresses and email addresses and will be delivered accordingly.

NOTE: For most cellphone providers, you also can send an email message for SMS delivery by the provider. The complete list of providers is available here. Email messaging for SMS requires that you know the cellphone provider for your recipient while standard SMS messaging does not.

# In lieu of SMS number, email is also OK
8431234567 Doe John
mary@doe.com Doe Mary
8435551212@txt.att.net Mr T

In smsmsg.txt, enter the text message to be sent.

Once you have all three files configured, run the script: /root/smsblast.

17. Voice-Activated SMS Messaging with Incredible PBX (Dial S-M-S)

In addition to message blasting, you also can dial 767 from any extension and dictate an SMS message to send through your Google Voice account. When prompted for the destination, simply enter the 10-digit SMS number of the recipient.

18. SMS Messaging with VoIP.ms and Incredible PBX for Asterisk-GUI

Incredible PBX for Asterisk-GUI also supports SMS messaging through VoIP.ms if you have an account and an SMS-enabled DID. See the VoIP.ms wiki for setup info on the VoIP.ms side.

To install the VoIP.ms SMS scripts, follow these steps:

cd /root
mkdir sms-voip.ms
cd sms-voip.ms
wget http://incrediblepbx.com/voipms-SMS.tar.gz
tar zxvf voipms-SMS.tar.gz

Edit voipms-sms.php and insert your VoIP.ms number that supports SMS messaging (no spoofing allowed!):

$SMSsender="8005551212";

Edit class.voipms.php and insert your VoIP.ms API credentials:

    /*******************************************\
     *  VoIPms - API Credentials
    \*******************************************/
    var $api_username   = 'yourname@youremail.com';
    var $api_password   = 'yourpassword';

Send an SMS message through VoIP.ms with the following command where smsnumber is the 10-digit number of the SMS recipient and "sms message" is the text message surrounded by quotes:

/root/sms-voip.ms/voipms-sms.php smsnumber "sms message"

NOTE: VoIP.ms has indicated that sooner or later there will be a penny per message charge for SMS messages; however, as of today, they’re still free.

19. SIP URI Calling with Incredible PBX for Asterisk-GUI (Demo: Dial L-E-N-N-Y)

With one line of dialplan code, you can add Speed Dials for free SIP URI calling worldwide. The dialplan code is stored in the [CallingRule_SIP_URI] context in extensions_custom.conf. Just clone one of the existing entries, designate an extension to dial to connect to the SIP URI, and enter the SIP URI for the destination. Numerous SIP providers support assignment of SIP URI’s to DIDs for unlimited free calling from anywhere in the world. Here’s a sample using a speed dial code of 53669 that connects you to SIP URI 2233435945@sip2sip.info: exten = 53669,1,Dial(SIP/2233435945@sip2sip.info)

20. IVR Demo of Incredible PBX Applications (Dial 7001)

The easiest way to try out a number of the Incredible PBX applications is to take the IVR Demo for a spin. Just pick up any phone and dial 7001. The sample code for the IVR is available for review and modification in extensions.conf. Just search for 7001. You can create your own IVRs and AutoAttendants under the Voice Menus tab in Asterisk-GUI. There’s also a sample Stealth AutoAttendant available by dialing 7000. This plays a brief greeting and then rings Ring Group #1. During the greeting, you could configure the application to allow button presses to branch to other applications on your PBX, hence the Stealth name since the codes are not disclosed to callers.

21. Incredible Backup & Restore with Incredible PBX for Asterisk-GUI

Incredible Backup and Restore scripts are included in the /root folder. These scripts make and restore snapshots of the settings on your server and should be used in conjunction with a full system backup solution. Asterisk-GUI includes its own backup snapshots under the Backup tab.

22. AsteriDex – The Poor Man’s Rolodex

AsteriDex is a web-based phonebook application for Incredible PBX. You can access it from the main web menu. Scripts are also available to import your contacts from Outlook and Google Contacts.

23. Voice Dialing with AsteriDex (Dial 411)

If you have voice recognition enabled on your server, you can call anyone in your AsteriDex database by dialing 411.

24. Speed Dialing with AsteriDex (Dial 412 or 000+)

For those without voice recognition, Incredible PBX includes two speed dialing utilities. The first is accessed by dialing 412. Then enter any 3-digit dialcode from your AsteriDex database to complete the call. If you’d prefer to skip the intermediate step, dial 000 + the 3-digit speed dial code desired. The call will be placed immediately using your default outbound routes. For those using a version of Incredible PBX before February 2015, see this link for the 000 Speed Dial patch.

For a complete listing of your AsteriDex dial codes, execute this query:

mysql -u root -ppassw0rd asteridex -e "select name,dialcode from user1 order by name"

25. Telephone Reminders (Dial 123)

Incredible PBX includes a sophisticated reminders system that lets you schedule individual or recurring reminders using your phone by dialing 123 or a web browser. A complete tutorial is available here. For phone reminders, a password is required to access the reminder system. You’ll find your password in /root/passwords.FAQ. It can be changed in /etc/asterisk/credentials.conf. Typically, these reminders set up a return call at a scheduled time that then plays back either a recorded message or a TTS message generated from the text you entered in the browser application. Incredible PBX for Asterisk-GUI also includes a new addition that lets you schedule web reminders that are delivered by email or SMS message. Links to the web-based reminders applications are in the main Incredible PBX web menu.

26. DISA Access with Incredible PBX for Asterisk-GUI (Dial D-I-S-A)

Direct Inward System Access (aka DISA) is one of the great PBX inventions of the last 50 years. It’s also one of the most dangerous. It lets someone connect to your PBX and obtain dial tone to place an outbound call using your trunks… on your nickel. Typically, it is offered as an option with an IVR or AutoAttendant. The DISA extension is preconfigured with Incredible PBX on extension 3472 (D-I-S-A). Use requires a password. Your randomized password can be found in /root/passwords.FAQ. It can be changed in /etc/asterisk/credentials.conf. Make it very secure before exposing DISA access to the outside world!

27. Yahoo! News (Dial 951)

Yahoo! news headlines are available by dialing 951. The news option also is included in the sample IVR application.

28. Weather Forecasts by Phone (Dial 949 or Z-I-P)

If you have voice recognition enabled on your server, you can retrieve a weather report for most cities in the world by dialing 949 and saying the name of the city plus the state, province, or country. For PBXs without voice recognition, you can obtain a weather forecast for most zip codes by dialing 947 (Z-I-P) and entering the 5-digit zip code.

29. ODBC Application Support for Asterisk

If you’ve recently logged into your server as root, Automatic Update #4 added ODBC/MySQL application support for Asterisk. You can try out a few sample applications that are included to get you started. Dial 222 and enter 12345 for the employee number. This retrieves an employee name from the MySQL timeclock database using Asterisk. Dial 223 to retrieve an AsteriDex name and phone number by entering the 3-character dialcode. You then have the option of placing the call by pressing 1. Once you have created accounts for Travelin’ Man 4, you can dial 864 (T-M-4) to WhiteList an IP address for that account after entering the account number and matching PIN. Use the * key for periods in the IP address. The code for all of the samples is in the following files in /etc/asterisk: odbc.conf and func_odbc.conf. If you create new MySQL databases, remember to add corresponding entries in res_odbc.conf and /etc/odbc.ini. Then restart Asterisk: asterisk-restart.

30. Today in History (Dial T-O-D-A-Y)

It’s always interesting to find out what happened Today in History. And Incredible PBX now delivers it by phone. Just dial 86329 (T-O-D-A-Y) for a walk down memory lane.

31. Time of Day

Speaking of yesteryear, if you grew up dialing TI-4-1212 for the time of day, Ma Bell may have discontinued the service, but we haven’t. Now you can do it on your very own PBX. Just dial into the IVR (7001) and choose option 4.

But suppose you want your users to be able to dial in for the time directly by dialing extension 8463 (T-I-M-E). Well it’s easy. Just add one line to your Incredible PBX dialplan and then reload the dialplan.

sed -i '/CallingRule_extensions_custom/a exten => 8463,1,Goto(new-time,s,1)' /etc/asterisk/extensions_custom.conf
asterisk-reload

NOTE: Those with a Feb. 2015 or later version of Incredible PBX already have this feature.

Introducing WebMin: The Linux Swiss Army Knife

There is no finer Linux application than WebMin. There is no more dangerous Linux application than WebMin. You’ve been warned. We heartily recommend WebMin as a tool to LOOK at your server’s settings. We strongly discourage changing anything in WebMin unless you totally know what you are doing. This is especially true with management of Linux applications that make up the core of Incredible PBX: the Linux kernel, SendMail, IPtables, Apache, MySQL, PHP, and…

To access WebMin, click on the WebMin link in the main Incredible PBX web menu. The username is root. The password is your root password. WebMin has root privileges to your server. Reread paragraph 1 and act accordingly.

For an exhaustive tutorial on WebMin, download The Book of WebMin by Joe Cooper. For a more recent commercial offering, take a look at Michal Karzyński’s WebMin Administrator’s Cookbook.

Introducing phpMyAdmin: The MySQL Swiss Army Knife

The same caveats we expressed regarding WebMin apply to phpMyAdmin. It is a powerful tool for managing MySQL databases in the right hands. It is a dangerous tool in the wrong hands. Fortunately, Asterisk-GUI does not rely upon MySQL for anything, and we are phasing out the remaining Incredible PBX applications that still rely upon it. So there should be little need to use phpMyAdmin unless you are developing a customized database solution for your business. We’ve included phpMyAdmin just in case.

To access phpMyAdmin, click on the phpMyAdmin link in the main Incredible PBX web menu. For tutorials on phpMyAdmin, see the phpMyAdmin wiki. For an excellent commercial offering focused on the version of phpMyAdmin installed on your server, consider Mastering phpMyAdmin 3.4 for Effective MySQL Management by Marc Delisle.

Introducing SIP Gateways for Secure (and Free) Google Voice Calling

If you have difficulty finding the Google Chat option after setting up a new Google Voice account, follow this tutorial.

Enjoy your new Gotcha-Free PBX, and… Happy Groundhog’s Day! It’s always been one of the happiest days of the year around our house. It’s my mom’s birthday.

Originally published: Monday, February 2, 2015


Coming Next Week (with a little luck): The Gotcha-Free PBX Ubuntu Edition


Coming Soon: The Gotcha-Free PBX for the Raspberry Pi 2. Better hurry if you want one!


Support Issues. With any application as sophisticated as this one, you’re bound to have questions. Blog comments are a terrible place to handle support issues although we welcome general comments about our articles and software. If you have particular support issues, we encourage you to get actively involved in the PBX in a Flash Forums. It’s the best Asterisk tech support site in the business, and it’s all free! Please have a look and post your support questions there. Unlike some forums, ours is extremely friendly and is supported by literally hundreds of Asterisk gurus and thousands of users just like you. You won’t have to wait long for an answer to your question.


Need help with Asterisk? Visit the PBX in a Flash Forum.


Special Thanks to Our Generous Sponsors


FULL DISCLOSURE: ClearlyIP, Skyetel, Vitelity, DigitalOcean, Vultr, VoIP.ms, 3CX, Sangoma, TelecomsXchange and VitalPBX have provided financial support to Nerd Vittles and our open source projects through advertising, referral revenue, and/or merchandise. As an Amazon Associate and Best Buy Affiliate, we also earn from qualifying purchases. We’ve chosen these providers not the other way around. Our decisions are based upon their corporate reputation and the quality of their offerings and pricing. Our recommendations regarding technology are reached without regard to financial compensation except in situations in which comparable products at comparable pricing are available from multiple sources. In this limited case, we support our sponsors because our sponsors support us.

BOGO Bonaza: Enjoy state-of-the-art VoIP service with a $10 credit and half-price SIP service on up to $500 of Skyetel trunking with free number porting when you fund your Skyetel account. No limits on number of simultaneous calls. Quadruple data center redundancy. $25 monthly minimum spend required. Tutorial and sign up details are here.

The lynchpin of Incredible PBX 2020 and beyond is ClearlyIP components which bring management of FreePBX modules and SIP phone integration to a level never before available with any other Asterisk distribution. And now you can configure and reconfigure your new Incredible PBX phones from the convenience of the Incredible PBX GUI.

VitalPBX is perhaps the fastest-growing PBX offering based upon Asterisk with an installed presence in more than 100 countries worldwide. VitalPBX has generously provided a customized White Label version of Incredible PBX tailored for use with all Incredible PBX and VitalPBX custom applications. Follow this link for a free test drive!
 

Special Thanks to Vitelity. Vitelity is now Voyant Communications and has halted new registrations for the time being. Our special thanks to Vitelity for their unwavering financial support over many years and to the many Nerd Vittles readers who continue to enjoy the benefits of their service offerings. We will keep everyone posted on further developments.


Some Recent Nerd Vittles Articles of Interest…

The Gotcha-Free PBX: Introducing Incredible PBX for Asterisk-GUI (CentOS)


[iframe-popup id="5″]
To celebrate ITEXPO® this week, we’re back in the gift-giving mood. So today we’re pleased to introduce the first of several new turnkey VoIP solutions for the Asterisk® platform. Incredible PBX™ for Asterisk-GUI provides virtually the same feature set of applications for Asterisk as our previous releases. But this time around, you get a Gotcha-Free PBX with pure and honest open source GPL code. No patent, trademark, or copyright minefields to trip you up. Just abide by the clear GPL licensing terms and copy, embellish, and redistribute to your heart’s content. Incredible PBX for Asterisk-GUI is truly a lean, mean implementation designed to be frugal with memory and extremely versatile in terms of configuration.

One of our favorite Twitter detractors recently compared us to a fast food worker.1 We’ve been called worse so thanks. Keeping up with Five Guys ain’t easy. Leveraging the best open source components available and putting them together in such a way that the end result far exceeds the sum of its parts is the name of the game. We started by assembling the very best components for Asterisk we could find. Take it from a fast food worker, Mark Spencer’s Asterisk and Asterisk-GUI creations are anything but second-rate products. The GUI may not have made good business sense for Digium, but making money wasn’t the objective this time around. Our focus was building a better VoIP mousetrap and a Gotcha-Free PBX.

We began by dusting off Mark Spencer’s terrific GUI and giving it a facelift. We tweaked it for use with Asterisk 11 and Google Voice and ConfBridge. Then we preconfigured some SIP trunks from our favorite providers, added the best open source text-to-speech and voice recognition tools available from Lefteris Zafiris, and produced a VoIP solution and set of applications for home and SOHO businesses that’s ready to take and make calls in less time than refueling your vehicle. But why drive a Lincoln (and we’re being charitable) when an F-150 will get the job done? Unlike some other distros, you get the very latest version of Asterisk and Asterisk-GUI. Both are compiled from source on your hardware platform to maximize performance. The end result is the VoIP Trifecta… better, cheaper, and faster.

Since the early Windows® days, we haven’t been big fans of GUI-only interfaces. Let’s face it. Some things can be configured more efficiently with less chance for error using other tools. Incredible PBX takes advantage of this hybrid technology by offering the best of all worlds. Administrators can use a GUI where it makes sense and use a text editor or simple web form where it doesn’t. You can configure 8 VoIP trunks from 8 great providers in under 5 minutes. And there’s so much more…

Target Audience: Home or SOHO/SBO in need of a turnkey, Gotcha-Free PBX

Default Configuration: Asterisk 11 with enhanced Asterisk-GUI, Kennonsoft GUI, and NANPA dialplan

Platform: CentOS 6.5/6.6 running on Dedicated Server, Cloud-Based Server, or Virtual Machine

Minimum Memory: 512MB

Recommended Disk: 20GB+

Default Trunks: Google Voice, CallCentric, DIDlogic, Future-Nine, IPcomms, Les.net, Vitelity, VoIP.ms2

Feature Set: Fax, SMS messaging, VPN, Reminders, ConfBridge Conferencing, AsteriDex, Voicemail, Email, IVR, News, Weather, Voice Dialer, Wolfram Alpha, Today in History, TM3 Firewall WhiteList, Speed Dialer, iNUM and SIP URI (free) worldwide calling, OpenCNAM CallerID lookups, DISA, Call Forwarding, CSV CDRs

Administrator Utilities: Incredible Backup/Restore, Automatic Updater, Asterisk Upgrader, phpMyAdmin, Timezone Config, Plug-and-Play Trunk Configurator, WebMin, External IP Setup, Firewall WhiteList Tools

Getting Started with Incredible PBX for Asterisk-GUI (CentOS Edition)

Here’s a quick overview of the installation and setup process for Incredible PBX for Asterisk-GUI:

  1. Choose a Hardware Platform – Dedicated PC, Cloud Provider, or Virtual Machine
  2. Install a Linux Flavor – 32-bit or 64-bit CentOS 6.5 or Scientific Linux Minimal ISO (so far!)
  3. Download and Install Incredible PBX for Asterisk-GUI
  4. Install Incredible Fax for Asterisk-GUI (optional)
  5. Set Up Passwords for Incredible PBX for Asterisk-GUI
  6. Configure Trunks with Incredible PBX for Asterisk-GUI
  7. Connect a Softphone to Incredible PBX for Asterisk-GUI

1. Choose a Platform for Incredible PBX for Asterisk-GUI

Incredible PBX for Asterisk-GUI works equally well on dedicated hardware, a cloud-based server, or a virtual machine. Just be sure you’ve met the minimum requirements outlined above and that you have a sufficiently robust Internet connection to support 100Kb of download and upload bandwidth for each simultaneous call you wish to handle with your new PBX.

For Dedicated Hardware, we recommend an Atom-based PC of recent vintage with at least a 30GB drive and 4GB of RAM. That will take care of an office with 10-20 extensions and a half dozen or more simultaneous calls if you have the Internet bandwidth to support it.

For Cloud-Based Servers, we recommend RentPBX, one of our financial supporters who also happens to size servers properly and restrict usage solely to VoIP. This avoids performance bottlenecks that cause problems with VoIP calls. If you’re just experimenting, then a 512MB Digital Ocean droplet is a cost-effective option at a cost of less than a penny an hour. In addition to a little referral revenue for Nerd Vittles, the nicest features of Digital Ocean are the availability of preconfigured CentOS images and a platform on which you can install Incredible PBX and be ready to start making calls very, very quickly. If you make a serious mistake during the install or setup, it’s a 30-second task to delete your droplet and create a new one. You’re only out a penny! And reloading Incredible PBX from scratch is never more than a 20-minute task. Remember to run the create-swapfile-DO script included in the Incredible PBX tarball before beginning your install to avoid out-of-memory conditions.

For Virtual Machine Installs, we recommend Oracle’s VirtualBox platform which runs atop almost any operating system including Windows, Macs, Linux, and Solaris. Here’s a link to our original VirtualBox tutorial to get you started. We suggest allocating 1GB of RAM and at least a 20GB disk image to your virtual machine for best performance.

2. Install a Linux Flavor for Incredible PBX for Asterisk-GUI

To be clear, we plan to support many Linux flavors other than RedHat. But Rome wasn’t built in a day so hang in there. We’re flippin’ burgers as fast as we can. For today, you’ll need a 32-bit or 64-bit version of CentOS or Scientific Linux 6.5/6.6. On some platforms, you install 6.5. After the initial update and upgrade steps, you’ll end up with 6.6. There are many flavors of CentOS and Scientific Linux. For Incredible PBX, a minimal install is all you need.

NOTICE: Core dumps reportedly are being experienced loading Asterisk on the 32-bit platform. We’re investigating. For the moment, stick with 64-bit installs until this message disappears.

With dedicated hardware, begin by downloading the 32-bit or 64-bit CentOS 6.6 minimal ISO. Boot your server with the ISO, and begin the install. Here are the simplest installation steps:

Choose Language and Click Continue
Click: Install Destination (do not change anything!)
Click: Done
Click: Network & Hostname
Click: ON
Click: Done
Click: Begin Installation
Click: Root Password: password, password, Click Done twice
Wait for Minimal Software Install and Setup to finish
Click: Reboot

With most cloud-based providers, you simply choose the CentOS 6.5 platform in creating your initial image. 512MB of RAM is plenty so long as you have a swap file. Within a minute or two, you’re ready to boot up the server.

For VirtualBox, download the Scientific Linux 6.6 minimal install .ova image from SourceForge. Then double-click on the image to load it into VirtualBox. Enable Audio and configure Network with Bridge Adapter in Settings. Then start the virtual machine. Default password for root is password.

With VirtualBox, you can skip this step. For everyone else, log into your server as root and issue the following commands to put the basic pieces in place and to reconfigure your Ethernet port as eth0. On some platforms, some of the commands may generate errors. Don’t worry about it! Just make a note of your IP address so you can log back in with SSH from a desktop computer to begin the Incredible PBX install.

For CentOS/Scientific Linux 6.5 minimal install:

setenforce 0
yum -y upgrade
yum -y install net-tools nano wget
ifconfig
sed -i 's|quiet|quiet net.ifnames=0 biosdevdame=0|' /etc/default/grub
grub2-mkconfig -o /boot/grub2/grub.cfg
wget http://incrediblepbx.com/update-kernel-devel
chmod +x update-kernel-devel
./update-kernel-devel
reboot

For CentOS/Scientific Linux 6.6 minimal install:

setenforce 0
yum -y upgrade
yum -y install net-tools nano wget
ifconfig
reboot

3. Download and Install Incredible PBX for Asterisk-GUI


Before beginning the install, make sure your terminal window size is at least 80 characters wide and 27 lines high.

Otherwise, Asterisk will not compile properly. UPDATE: This has been resolved in the latest Incredible PBX installer so terminal window expansion is no longer required.

cd /root
yum -y install wget
wget http://incrediblepbx.com/incrediblepbx11gui.tar.gz
tar zxvf incrediblepbx11gui.tar.gz
#./create-swapfile-DO  #add this step for Digital Ocean droplets
rm -f incrediblepbx11gui.tar.gz
sed -i 's|pbxinaflash.com|incrediblepbx.com|' IncrediblePBX11-GUI.sh
sed -i 's|pkgs.repoforge.org/rpmforge-release|incrediblepbx.com|' IncrediblePBX11-GUI.sh
sed -i 's|https://iksemel.googlecode.com/files|http://pkgs.fedoraproject.org/repo/pkgs/iksemel/iksemel-1.4.tar.gz/532e77181694f87ad5eb59435d11c1ca|' IncrediblePBX11-GUI.sh
./IncrediblePBX11-GUI.sh
sed -i 's|myip.pbxinaflash.com|myip.incrediblepbx.com|' /usr/local/sbin/status

4. Install Incredible Fax for Asterisk-GUI (optional)

Administrators have been trying to stomp out faxing for at least two decades. Here’s a hint. It ain’t gonna happen. So go with the flow and add Gotcha-Free Faxing to your server. It’ll be there when you need it. And sooner or later, you’ll need it. This install script is simple enough for any monkey to complete. Run the script and enter the email address for delivery of your faxes. Then, if you’re in the U.S. or Canada, press the Enter key to accept every default entry during the HylaFax and AvantFax installation steps. For other countries, read the prompts and answer accordingly. When the installation finishes, reboot your server to bring faxing on line. Be sure to change your AvantFax admin password. By default, it is password. You can use the script included in the /root folder: avantfax-pw-change. REMINDER: Don’t forget to reboot your server!

cd /root
./incrediblefax11-GUI.sh
./avantfax-pw-change
reboot

Troubleshooting: If your IAXmodems don’t display with a green IDLE notation in the AvantFax GUI, you may need to restart them once more. After a second reboot, all should be well. The restart command is /root/iaxmodem-restart.

5. Initial Configuration of Incredible PBX for Asterisk-GUI

Incredible PBX is installed with the preconfigured IPtables Linux firewall already in place. It implements WhiteList Security to limit server access to connected LANs, your server’s IP address, your desktop computer’s IP address, and a few of our favorite SIP providers. You can add additional entries to this WhiteList whenever you like using the add-ip and add-fqdn tools in /root. There’s also an Apache security layer for our web applications. And, of course, Asterisk-GUI has its own security methodology using Asterisk’s manager.conf. Finally, we randomize extension and DISA passwords as part of the initial install process. Out of the starting gate, you won’t find a more secure VoIP server implementation anywhere. After all, it’s your phone bill.

Even with all of these layers of security, here are 10 Quick Steps to better safeguard your server. You only do this once, but failing to do it may lead to security issues you don’t want to have to deal with down the road. So DO IT NOW!

First, log into your server as root with your root password and do the following:

Make your root password very secure: passwd
Set your correct time zone: ./timezone-setup
Create admin password for web apps: htpasswd -b /etc/pbx/wwwpasswd admin newpassword
Make a copy of your other passwords: cat passwords.FAQ
Make a copy of your Knock codes: cat knock.FAQ
Decipher IP address and other info about your server: status

Second, log into your server as admin using a web browser pointed to your server’s IP address:

Click USERS tab in Incredible PBX GUI
Click Asterisk-GUI Administration
Log in as user: admin with password: password
Immediately change your admin password and login again

Log in to Asterisk-GUI again with your new password. Expand the options available in the GUI:

Options -> Advanced Options -> Show Advanced Options

Last but not least, Incredible PBX includes an automatic update utility which downloads important updates whenever you log into your server as root. We recommend you log in once a week to keep your server current. Now would be a good time to log out and back into your server at the Linux command line to bring your server up to current specs.

6. Configure Trunks with Incredible PBX for Asterisk-GUI

Now for the fun part. If this is your first VoIP adventure, be advised that this ain’t your grandma’s phone system. You need not and should not put all your eggs in one basket when it comes to telephone providers. In order to connect to Plain Old Telephones, you still need at least one provider. But there is nothing wrong with having several. And a provider that handles an outbound call (termination) need not be the same one that handles an incoming call (origination) and provides your phone number (DID). We cannot recommend Vitelity highly enough, and it’s not just because they have financially supported our projects for almost a decade. They’re as good as VoIP providers get, and we use lots of them. If you’re lucky enough to live in the U.S., you’d be crazy not to set up a Google Voice account. It’s free as are all phone calls to anywhere in the U.S. and Canada. The remaining preconfigured providers included in Incredible PBX for Asterisk-GUI are equally good, and we’ve used and continue to use almost all of them. So pick a few and sign up. You only pay for the calls you make with each provider so you have little to lose by choosing several. The PIAF Forum includes dozens of recommendations on VoIP providers if you want additional information.

With the preconfigured trunks in Incredible PBX for Asterisk-GUI, all you need are your credentials for each provider and the FQDN of their server. Log into Asterisk-GUI Administration as admin using a browser. From the System Status screen, click Incredible PBX Apps. Click on each provider you have chosen and fill in the blanks with your credentials. When you’ve saved all of your settings, log into your server as root via SSH and type: service asterisk restart or asterisk-restart. You can also issue the command in the Asterisk-GUI by choosing the Asterisk CLI tab3 in the left column. Doesn’t get any simpler!

Update: It should be noted that Incredible PBX for Asterisk-GUI also supports Anveo Direct trunks; however, they are configured differently because of the way Anveo handles the calls. You’ll need the PIN provided by Anveo to set up your trunk, and Anveo supports CallerID spoofing so you can enter any CallerID number for the trunk that you are authorized to use. You’ll find the Anveo Direct setup link in the Incredible PBX Apps tab. To route an outgoing call through Anveo trunk, dial 2 + any desired 10-digit number.

Here is the complete list of dialing prefixes and the trunks to which they are associated:

  • 1 – Google Voice
  • 2 – Anveo Direct
  • 3 – Future Nine
  • 4 – CallCentric
  • 5 – DIDlogic
  • 6 – IPcomms
  • 7 – Les.net
  • 8 – Vitelity
  • 9 – VoIP.ms

For free iNUM calling worldwide, the following dialing prefixes are supported in conjunction with the last seven digits of any destination iNUM DID. Free iNUM DIDs for your own PBX are available from both of these providers as well.

  • 0XXXXXXX – CallCentric
  • 90XXXXXXX – VoIP.ms

7. Configure a Softphone with Incredible PBX for Asterisk-GUI

We’re in the home stretch now. You can connect virtually any kind of telephone to your new Gotcha-Free PBX. Plain Old Phones require an analog telephone adapter (ATA) which can be a separate board in your computer from a company such as Digium. Or it can be a standalone SIP device such as ObiHai’s OBi100 or OBi110 (if you have a phone line from Ma Bell to hook up as well). SIP phones can be connected directly so long as they have an IP address. These could be hardware devices or software devices such as the YateClient softphone. We’ll start with a free one today so you can begin making calls. You can find dozens of recommendations for hardware-based SIP phones both on Nerd Vittles and the PIAF Forum when you’re ready to get serious about VoIP telephony.

We recommend YateClient which is free. Download it from here. Run YateClient once you’ve installed it and enter the credentials for the 6002 extension on Incredible PBX. You’ll need the IP address of your server plus your extension 6002 password. Choose Users -> 6002 and write down your SIP/IAX Password. You can also find it in /root/passwords.FAQ. Fill in the blanks using the IP address of your server, 6002 for your account name, and whatever password is assigned to the extension. Click OK to save your entries.

Once you are registered to extension 6002, close the Account window. Then click on YATE’s Telephony Tab and place some test calls to the numerous apps that are preconfigured on Incredible PBX. Dial a few of these to get started:

7001 - IVR Demo
123 - Reminders
947 - Weather by ZIP Code
951 - Yahoo News
*61 - Time of Day
TODAY - Today in History

If you are a Mac user, another great no-frills softphone is Telephone. Just download and install it from the Mac App Store.

Configuring Google Voice

If you want to use Google Voice, you’ll need a dedicated Google Voice account to support Incredible PBX. The more obscure the username (with some embedded numbers), the better off you will be. This will keep folks from bombarding you with unsolicited Gtalk chat messages, and who knows what nefarious scheme will be discovered using Google messaging six months from now. So keep this account a secret!

IMPORTANT: Be sure to enable the Google Chat option as one of your phone destinations in Settings, Voice Setting, Phones. That’s the destination we need for The Incredible PBX to work its magic! Otherwise, all inbound and outbound calls will fail. Good News! You’re in luck. Google has apparently had a change of heart on discontinuing Google Chat support so it’s enabled by default in all new Google Voice accounts. Once you’ve created a Gmail and Google Voice account, go to Google Voice Settings and click on the Calls tab. Make sure your settings match these:

  • Call ScreeningOFF
  • Call PresentationOFF
  • Caller ID (In)Display Caller’s Number
  • Caller ID (Out)Don’t Change Anything
  • Do Not DisturbOFF
  • Call Options (Enable Recording)OFF
  • Global Spam FilteringON

Click Save Changes once you’ve adjusted your settings. Under the Voicemail tab, plug in your email address so you get notified of new voicemails. Down the road, receipt of a Google Voice voicemail will be a big hint that something has come unglued on your PBX.

One final word of caution is in order regardless of your choice of providers: Do NOT use special characters in any provider passwords, or nothing will work!

Now you’re ready to configure your Google Voice account in Incredible PBX. You can do it from within Asterisk-GUI by choosing Google Voice within the Incredible PBX Apps tab. Once you entered your credentials, don’t forget to restart Asterisk, or Google Voice calls will fail. If you still have trouble placing or receiving calls, try these tips.

OK, Smarty Pants: Show Me the Beef!

We know what some of you are thinking. "What does a fast food worker really know about VoIP and Gotcha-Free PBXs?? Before I waste a bunch of time on this, show me the beef!" Fair enough. Sit by your phone and click the Call Me icon below. Type in a fake name and your real phone number. Click the Connect button, answer your phone when it rings, and press 1. You’ll be connected to the Incredible PBX IVR for Asterisk-GUI. Pick an option from the menu of choices and take the Incredible PBX apps for a spin on our dime… actually it’s Google’s dime. Everything you see and hear is part of what you get with Incredible PBX for Asterisk-GUI including the ability to set up your own click-to-dial web interface exactly like this one. The demo just happens to be running on our Mac desktop instead of yours. So… what are you waiting for? Click away and try Incredible PBX for yourself. And, by the way, nobody besides the NSA and Google will be monitoring your call. 😉


Nerd Vittles Demo IVR Options
1 – Call by Name (say “Delta Airlines” or “American Airlines” to try it out)
2 – MeetMe Conference (password is 1234)
3 – Wolfram Alpha (say “What planes are overhead?”)
4 – Lenny (The Telemarketer’s Worst Nightmare)
5 – Today’s News Headlines
6 – Weather Forecast (say the city and state, province, or country)
7 – Today in History
8 – Speak to a Real Person (or maybe just voicemail if we’re out)

Homework Assignment: Mastering the Asterisk-GUI

We’ll have more to say about the Incredible PBX applications next week. In the meantime, you have some homework. You need to learn all about Asterisk-GUI and how to make the best use of its powerful feature set. Here’s one word of warning. We mentioned that Incredible PBX was a hybrid system that combines some customized settings with the standard Asterisk-GUI interface. Before modifying existing settings for the default trunks, extensions, and default routes, take a look at the credentials* files in /etc/asterisk. If you modify any of these trunk entries or the Outgoing or Incoming Call Rules in Asterisk-GUI, you may break the Incredible PBX setup. So steer clear of that minefield until you know what you’re doing. Adding new extensions and additional trunks is perfectly fine and will not break anything.

Rather than reinvent the wheel, we’ll point you to some excellent tutorials that already have been written. Start with Chapter 3 of Digium’s Asterisk Appliance™ Administrator Manual. Next, review Chapter 11 of The Asterisk Book (Second Edition). Finally, take a look at a couple of the tutorials that have been written by other companies that incorporated Asterisk-GUI into their hardware products, e.g. Yeastar’s MyPBX SOHO User Manual and Grandstream’s UCM6100 User Manual. Then check back with us next week for Chapter 2.

In the meantime, if you have questions, join the PBX in a Flash Forums and take advantage of our awesome collection of gurus. There’s an expert available on virtually any topic, and the price is right. As with Incredible PBX, it’s absolutely free.

We also are quickly building a collection of tutorials tailored specifically for Incredible PBX for Asterisk-GUI:

Enjoy your new Gotcha-Free PBX!

Just Released: The Gotcha-Free Incredible PBX Application User’s Guide

Originally published: Monday, January 26, 2015


Support Issues. With any application as sophisticated as this one, you’re bound to have questions. Blog comments are a terrible place to handle support issues although we welcome general comments about our articles and software. If you have particular support issues, we encourage you to get actively involved in the PBX in a Flash Forums. It’s the best Asterisk tech support site in the business, and it’s all free! Please have a look and post your support questions there. Unlike some forums, ours is extremely friendly and is supported by literally hundreds of Asterisk gurus and thousands of users just like you. You won’t have to wait long for an answer to your question.


Need help with Asterisk? Visit the PBX in a Flash Forum.


Special Thanks to Our Generous Sponsors


FULL DISCLOSURE: ClearlyIP, Skyetel, Vitelity, DigitalOcean, Vultr, VoIP.ms, 3CX, Sangoma, TelecomsXchange and VitalPBX have provided financial support to Nerd Vittles and our open source projects through advertising, referral revenue, and/or merchandise. As an Amazon Associate and Best Buy Affiliate, we also earn from qualifying purchases. We’ve chosen these providers not the other way around. Our decisions are based upon their corporate reputation and the quality of their offerings and pricing. Our recommendations regarding technology are reached without regard to financial compensation except in situations in which comparable products at comparable pricing are available from multiple sources. In this limited case, we support our sponsors because our sponsors support us.

BOGO Bonaza: Enjoy state-of-the-art VoIP service with a $10 credit and half-price SIP service on up to $500 of Skyetel trunking with free number porting when you fund your Skyetel account. No limits on number of simultaneous calls. Quadruple data center redundancy. $25 monthly minimum spend required. Tutorial and sign up details are here.

The lynchpin of Incredible PBX 2020 and beyond is ClearlyIP components which bring management of FreePBX modules and SIP phone integration to a level never before available with any other Asterisk distribution. And now you can configure and reconfigure your new Incredible PBX phones from the convenience of the Incredible PBX GUI.

VitalPBX is perhaps the fastest-growing PBX offering based upon Asterisk with an installed presence in more than 100 countries worldwide. VitalPBX has generously provided a customized White Label version of Incredible PBX tailored for use with all Incredible PBX and VitalPBX custom applications. Follow this link for a free test drive!
 

Special Thanks to Vitelity. Vitelity is now Voyant Communications and has halted new registrations for the time being. Our special thanks to Vitelity for their unwavering financial support over many years and to the many Nerd Vittles readers who continue to enjoy the benefits of their service offerings. We will keep everyone posted on further developments.


Some Recent Nerd Vittles Articles of Interest…

  1. What made the comment all the more humorous was the fact that it was made by a person who has bounced from company to company to company in the VoIP industry, not unlike the plight of many fast food workers. Takes one to know one, I suppose. []
  2. Vitelity and Google provide financial support to Nerd Vittles and the Incredible PBX project. []
  3. If, for some reason, the Asterisk CLI tab does not appear on your server, click Options -> Advanced Options -> Show Advanced Options. []

30 Minutes to Paradise: Incredible PBX for Ubuntu 14.04 is Ready for Primetime

A few months ago, we introduced a preview of Incredible PBX for Ubuntu 14. And now we’re pleased to release the latest production-ready version with all the bells and whistles including Incredible Fax featuring HylaFax and AvantFax.

Introducing Incredible PBX 11 for Ubuntu 14.04

Today’s plan is to build a production-ready version of Incredible PBX with Ubuntu 14.04 that mimics the functionality of our previous builds with literally dozens of turnkey applications that show off the very best features of Asterisk®. If you believe in the open source community, this build is for you. No strings, no gotchas, and no quirky licenses!

Six months ago, we could barely spell Ubuntu. Then an enterprising young programmer named Eric Teeter shot us a script to install Ubuntu with Asterisk and FreePBX® and encouraged us to embellish it and to share the results with our Nerd Vittles audience. Having rarely met an operating system we didn’t like, we jumped at the opportunity knowing full well that Billy Chia at Digium and Tony Lewis at Schmooze Com had reported impressive results with Ubuntu years ago. It seemed like a good fit for Incredible PBX as well. Unlike CentOS, Ubuntu also was a platform that was easily transferable to the new $50 BeagleBone Black and the CuBox-i.

Our special thanks to Lefteris Zafiris for cleaning up all of the text-to-speech incompatibilities with Ubuntu. Within minutes from the other side of the world, Lefteris had logged into our Ubuntu Server in the Cloud and tamed the TTS beast. If ever there was an unsung hero in the Asterisk community, it’s Lefteris Zafiris. He has single-handedly kept all of the speech applications humming along through countless versions of Asterisk. We would have quit long ago without his untiring assistance. Thank you (again), Lefteris, for coming to the rescue.

Building an Ubuntu 14.04 Platform for Incredible PBX

As a result of the trademark and copyright morass, we’ve steered away from the bundled operating system in favor of a methodology that relies upon you to put in place the operating system platform on which to run PBX in a Flash or Incredible PBX. The good news is it’s easy! With many cloud-based providers1, you can simply click a button to choose your favorite OS flavor and within minutes, you’re ready to go. With many virtual machine platforms such as VirtualBox, it’s equally simple to find a pre-built Ubuntu 14.04 image or roll your own.

If you’re new to VoIP or to Nerd Vittles, here’s our best piece of advice. Don’t take our word for anything! Try it for yourself in the Cloud! You can build an Ubuntu 14.04 image on Digital Ocean in under one minute and install Incredible PBX for Ubuntu 14.04 in about 15 minutes. Then try it out for two full months. It won’t cost you a dime. Use our referral link to sign up for an account. Enter a valid credit card to verify you’re who you say you are. Create an Ubuntu 14.04 (not 14.10!) 512MB droplet of the cheapest flavor ($5/mo.). Go to the Billing section of the site, and enter the following promo code: UBUNTUDROPLET. That’s all there is to it. A $10 credit will be added to your account, and you can play to your heart’s content. Delete droplets, add droplets, and enjoy the free ride!

For today, we’ll walk you through building your own stand-alone server using the Ubuntu 14.04 mini.iso. If you’re using Digital Ocean in the Cloud, skip down to Installing Incredible PBX 11. If you’re using your own hardware, to get started, download the 32-bit or 64-bit Ubuntu 14.04 "Trusty Tahr" Minimal ISO from here. Then burn it to a CD/DVD or thumb drive and boot your dedicated server from the image. Remember, you’ll be reformatting the drive in your server so pick a machine you don’t need for other purposes.

For those that would prefer to build your Ubuntu 14.04 Wonder Machine using VirtualBox on any Windows, Mac, or existing Linux Desktop, here are the simple steps. Create a new virtual machine specifying either the 32-bit or 64-bit version of Ubuntu. Allocate 1024MB of RAM (512MB also works fine!) and at least 20GB of disk space using the default hard drive setup in all three steps. In Settings, click System and check Enable I/O APIC and uncheck Hardware Clock in UTC Time. Click Audio and Specify then Enable your sound card. Click Network and Enable Network Adapter for Adapter 1 and choose Bridged Adapter. Finally, in Storage, add the Ubuntu 14.04 mini.iso to your VirtualBox Storage Tree as shown below. Then click OK and start up your new virtual machine. Simple!

Here are the steps to get Ubuntu 14.04 humming on your new server or virtual machine once you’ve booted up. If you can bake cookies from a recipe, you can do this:

UBUNTU mini.iso install:
Choose language
Choose timezone
Detect keyboard
Hostname: incrediblepbx < continue >
Choose mirror for downloads
Confirm archive mirror
Leave proxy blank unless you need it
< continue >
** couple minutes of whirring as initial components are loaded **
New user name: incredible
< continue >
Account username: incredible
< continue >
Account password: makeitsecure
< continue >
Encrypt home directory < no >
Confirm time zone < yes >
Partition disks: Guided - use entire disk and set up LVM
Confirm disk to partition
Write changes to disks and configure LVM
Whole volume? < continue>
Write changes to disks < yes> < -- last chance to preserve your disk drive!
** about 15 minutes of whirring during base system install ** < no touchy anything>
** another 5 minutes of whirring during base software install ** < no touchy anything>
Upgrades? Install security updates automatically
** another 5 minutes of whirring during more software installs ** < no touchy anything>
Software selection: *Basic Ubuntu server (only!)
** another couple minutes of whirring during software installs ** < no touchy anything>
Grub boot loader: < yes>
UTC for system clock: < no>
Installation complete: < continue> after removing installation media
** on VirtualBox, PowerOff after reboot and remove [-] mini.iso from Storage Tree & restart VM
login as user: incredible
** enter user incredible's password **
sudo passwd
** enter incredible password again and then create secure root user password **
su root
** enter root password **
apt-get update
apt-get install ssh -y
sed -i 's|without-password|yes|' /etc/ssh/sshd_config
sed -i 's|yes"|without-password"|' /etc/ssh/sshd_config
sed -i 's|"quiet"|"quiet text"|' /etc/default/grub
update-grub
ifconfig
** write down the IP address of your server from ifconfig results
reboot
** login via SSH to continue **

Installing Incredible PBX on Your Ubuntu 14.04 Server

Adding Incredible PBX to a running Ubuntu 14.04 server is a walk in the park. To restate the obvious, your server needs a reliable Internet connection to proceed. Using SSH (or Putty on a Windows machine), log into your new server as root at the IP address you deciphered in the ifconfig step at the end of the Ubuntu install procedure above. First, make sure to run the update step for Ubuntu before you begin the install. This is especially important if using a cloud-based Ubuntu 14 server.

apt-get update && apt-get upgrade -y && reboot

WARNING: If you’re using a 512MB droplet at Digital Ocean, be advised that their Ubuntu setup does NOT include a swap file. This may cause serious problems when you run out of RAM. Uncomment ./create-swapfile-DO line below to create a 1GB swap file which will be activated whenever you exceed 90% RAM usage on Digital Ocean.

Now let’s begin the Incredible PBX install. Log back in as root and issue the following commands:

cd /root
wget http://incrediblepbx.com/incrediblepbx11.4.ubuntu14.tar.gz
tar zxvf incrediblepbx*
#./create-swapfile-DO
./Incredible*

Once you have agreed to the license agreement and terms of use, press Enter and go have a 30-minute cup of coffee. The Incredible PBX installer runs unattended so find something to do for a bit unless you just like watching code compile. When you see "Have a nice day", your installation is complete. Write down your admin password for FreePBX as well as your three "knock" ports for PortKnocker. If you forget them, you can reset your admin password by running /root/admin-pw-change. And you can retrieve your PortKnocker setup like this: cat /root/knock.FAQ.

Log out and back in as root and you should be greeted with a status display that looks something like this:

You can access the Asterisk CLI by typing: asterisk -rvvvvvvvvvv

You can access the FreePBX GUI using your favorite web browser to configure your server. Just enter the IP address shown in the status display. The default username is admin with the randomized password you wrote down above. If desired, you can change them in FreePBX Administration by clicking Admin -> Administrators -> admin. Enter a new password and click Submit Changes then Apply Config. Now edit extension 701 so you can figure out (or change) the randomized passwords that were set up for default 701 extension and voicemail: Applications -> Extensions -> 701.

Setting Up a Soft Phone to Use with Incredible PBX

Now you’re ready to set up a telephone so that you can play with Incredible PBX. We recommend YateClient which is free. Download it from here. Run YateClient once you’ve installed it and enter the credentials for the 701 extension on Incredible PBX. You’ll need the IP address of your server plus your extension 701 password. Choose Settings -> Accounts and click the New button. Fill in the blanks using the IP address of your server, 701 for your account name, and whatever password you created for the extension. Click OK.

Once you are registered to extension 701, close the Account window. Then click on YATE’s Telephony Tab and place some test calls to the numerous apps that are preconfigured on Incredible PBX. Dial a few of these to get started:

123 - Reminders
222 - ODBC Demo (use acct: 12345)
947 - Weather by ZIP Code
951 - Yahoo News
*61 - Time of Day
*68 - Wakeup Call
TODAY - Today in History

Now you’re ready to connect to the telephones in the rest of the world. If you live in the U.S., the easiest way (at least for now) is to use an existing (free) Google Voice account. Google has threatened to shut this down but as this is written, it still works with previously set up Google Voice accounts. The more desirable long-term solution is to choose several SIP providers and set up redundant trunks for your incoming and outbound calls. The PIAF Forum includes dozens of recommendations to get you started.

Configuring Google Voice

If you want to use Google Voice, you’ll need a dedicated Google Voice account to support Incredible PBX. If you want to use the inbound fax capabilities of Incredible Fax 11, then you’ll need an additional Google Voice line that can be routed to the FAX custom destination using FreePBX. The more obscure the username (with some embedded numbers), the better off you will be. This will keep folks from bombarding you with unsolicited Gtalk chat messages, and who knows what nefarious scheme will be discovered using Google messaging six months from now. So keep this account a secret!

We’ve tested this extensively using an existing Google Voice account, and inbound calling is just not reliable. The reason seems to be that Google always chooses Gmail chat as the inbound call destination if there are multiple registrations from the same IP address. So, be reasonable. Do it our way! Use a previously configured and dedicated Gmail and Google Voice account, and use it exclusively with Incredible PBX 11.

IMPORTANT: Be sure to enable the Google Chat option as one of your phone destinations in Settings, Voice Setting, Phones. That’s the destination we need for The Incredible PBX to work its magic! Otherwise, all inbound and outbound calls will fail. If you don’t see this option, you’re probably out of luck. Google has disabled the option in newly created accounts as well as some old ones that had Google Chat disabled. Now go back to the Google Voice Settings.

While you’re still in Google Voice Settings, click on the Calls tab. Make sure your settings match these:

  • Call ScreeningOFF
  • Call PresentationOFF
  • Caller ID (In)Display Caller’s Number
  • Caller ID (Out)Don’t Change Anything
  • Do Not DisturbOFF
  • Call Options (Enable Recording)OFF
  • Global Spam FilteringON

Click Save Changes once you adjust your settings. Under the Voicemail tab, plug in your email address so you get notified of new voicemails. Down the road, receipt of a Google Voice voicemail will be a big hint that something has come unglued on your PBX.

One final word of caution is in order regardless of your choice of providers: Do NOT use special characters in any provider passwords, or nothing will work!

Now you’re ready to set up your Google Voice trunk in FreePBX. After logging into FreePBX with your browser, click the Connectivity tab and choose Google Voice/Motif. To Add a new Google Voice account, just fill out the form. Do NOT check the third box or incoming calls will never ring!

IMPORTANT LAST STEP: Google Voice will not work unless you restart Asterisk from the Linux command line at this juncture. Using SSH, log into your server as root and issue the following command: amportal restart.

If you have trouble getting Google Voice to work (especially if you have previously used your Google Voice account from a different IP address), try this Google Voice Reset Procedure. It usually fixes connectivity problems. If it still doesn’t work, enable Less Secure Apps using this Google tool.

Troubleshooting Audio and DTMF Problems

You can avoid one-way audio on calls and touchtones that don’t work with these simple settings in FreePBX: Settings -> Asterisk SIP Settings. Just plug in your public IP address and your private IP subnet. Then set ULAW as the only Audio Codec.

Adding Speech Recognition to Incredible PBX

To support many of our applications, Incredible PBX has included Google’s speech recognition service for years. These applications include Weather Reports by City (949), AsteriDex Voice Dialing by Name (411), and Wolfram Alpha for Asterisk (4747), all of which use Lefteris Zafiris’ terrific speech-recog AGI script. Unfortunately (for some), Google now has tightened up the terms of use for their free speech recognition service. Now you can only use it for "personal and development use." If you meet those criteria, keep reading. Here’s how to activate speech recognition on Incredible PBX. Don’t skip any steps!

1. Using an existing Google/Gmail account to join the Chrome-Dev Group.

2. Using the same account, create a new Speech Recognition Project.

3. Click on your newly created project and choose APIs & auth.

4. Turn ON Speech API by clicking on its Status button in the far right margin.

5. Click on Credentials in APIs & auth and choose Create New Key -> Server key. Leave the IP address restriction blank!

6. Write down your new API key or copy it to the clipboard.

7. Log into your server as root and issue the following commands:

# for Ubuntu and Debian platforms
apt-get clean
apt-get install libjson-perl flac -y
# for RedHat and CentOS platforms
yum -y install perl-JSON
# for all Linux platforms
cd /var/lib/asterisk/agi-bin
mv speech-recog.agi speech-recog.last.agi
wget --no-check-certificate https://raw.githubusercontent.com/zaf/asterisk-speech-recog/master/speech-recog.agi
chown asterisk:asterisk speech*
chmod 775 speech*
nano -w speech-recog.agi

8. When the nano editor opens, go to line 70 of speech-recog.agi: my $key = "". Insert your API key from Step #6 above between the quotation marks and save the file: Ctrl-X, Y, then Enter.

Now you’re ready to try out the speech recognition apps. Dial 949 and say the name of a city and state/province/country to get a current weather forecast from Yahoo. Dial 411 and say "American Airlines" to be connected to American.

To use Wolfram Alpha by phone, you first must install it. Obtain your free Wolfram Alpha APP-ID here. Then run the one-click installer: /root/wolfram/wolframalpha-oneclick.sh. Insert your APP-ID when prompted. Now dial 4747 to access Wolfram Alpha by phone and enter your query, e.g. "What planes are overhead." Read the Nerd Vittles tutorial for additional examples and tips.

A Few Words about the Incredible PBX Security Model for Ubuntu

Incredible PBX for Ubuntu 14 is our most secure turnkey PBX implementation, ever. As configured, it is protected by both Fail2Ban and a hardened configuration of the IPtables Linux firewall. As configured, nobody can access your PBX without your credentials AND an IP address that is either on your private network or that matches the IP address of your server or the PC from which you installed Incredible PBX. Incredible PBX is preconfigured to let you connect to many of the leading SIP hosting providers without additional firewall tweaking.

You can whitelist additional IP addresses for remote access in several ways. First, you can use the command-line utilities: /root/add-ip and /root/add-fqdn. You can also remove whitelisted IP addresses by running /root/del-acct. Second, you can dial into extension 864 (or use a DID pointed to extension 864 aka TM4) and enter an IP address to whitelist. Before Travelin’ Man 4 will work, you’ll need to add credentials for each caller using the tools in /root/tm4. You must add at least one account before dial-in whitelisting will be enabled. Third, you can temporarily whitelist an IP address by successfully executing the PortKnocker 3-knock code established for your server. You’ll find the details and the codes in /root/knock.FAQ. Be advised that IP addresses whitelisted with PortKnocker (only!) go away whenever your server is rebooted or the IPtables firewall is restarted. For further information on the PortKnocker technology and available clients for iOS and Android devices, review the Nerd Vittles tutorial.

HINT: The reason that storing your PortKnocker codes in a safe place is essential is because it may be your only available way to gain access to your server if your IP address changes. You obviously can’t use the command-line tools to whitelist a new IP address if you cannot gain access to your server at the new IP address.

We always recommend you also add an extra layer of protection by running your server behind a hardware-based firewall with no Internet port exposure, but that’s your call. If you use a hardware-based firewall, be sure to map the three PortKnocker ports to the internal IP address of your server!

The NeoRouter VPN client also is included for rock-solid, secure connectivity for remote users. Read our previous tutorial for setup instructions.

As one would expect, the IPtables firewall is a complex piece of software. If you need assistance configuring it, visit the PIAF Forum for some friendly assistance.

Adding Incredible Fax 11 to Your Server

Once you’ve completed the Incredible PBX install, log out and log back in to load the latest automatic updates. Then reboot. Now you’re ready to continue your adventure by installing Incredible Fax 11 for Ubuntu. Special thanks to Josh North for all his hard work on this! The latest download includes the Incredible Fax 11 installer. So just run the script:

cd /root
./incrediblefax11_ubuntu14.sh

Accept all of the defaults during the installation process. IMPORTANT: Once you complete the install, reboot your server. After rebooting, log into FreePBX -> Module Admin and enable the AvantFax module. When you log out of FreePBX, there now will be an option for AvantFax on the FreePBX login screen. Choose it and enter admin:password to login and change your default password. You also can set your AvantFax admin password by logging into the Linux CLI and… /root/avantfax-pw-change.

Incredible Backup and Restore

We’re pleased to introduce our latest backup and restore utilities for Incredible PBX. Running /root/incrediblebackup will create a backup image of your server in /tmp. This backup image then can be copied to any other medium desired for storage. To restore it to another Incredible PBX 11 server, simply copy the image to a server running Asterisk 11 and FreePBX 2.11 and run /root/incrediblerestore. Doesn’t get much simpler than that.

NEWS FLASH: More good news. If you decide you’d prefer another Linux platform, Incredible Backup and Restore will now let you migrate from one operating system to another. For details on the procedure, see this message thread.

Incredible PBX Automatic Update Utility

Every time you log into your server as root, Incredible PBX will ping the IncrediblePBX.com web site to determine whether one or more updates are available to bring your server up to current specs. We recommend you log in at least once a week just in case some new security vulnerability should come along.

In the meantime, we encourage you to sign up for an account on the PIAF Forum and join the discussion. In addition to providing first-class, free support, we think you’ll enjoy the camaraderie. Come join us!

Originally published: Monday, June 30, 2014    Updated: Wednesday, January 7, 2015


Support Issues. With any application as sophisticated as this one, you’re bound to have questions. Blog comments are a terrible place to handle support issues although we welcome general comments about our articles and software. If you have particular support issues, we encourage you to get actively involved in the PBX in a Flash Forums. It’s the best Asterisk tech support site in the business, and it’s all free! Please have a look and post your support questions there. Unlike some forums, ours is extremely friendly and is supported by literally hundreds of Asterisk gurus and thousands of users just like you. You won’t have to wait long for an answer to your question.


Need help with Asterisk? Visit the PBX in a Flash Forum.


Special Thanks to Our Generous Sponsors


FULL DISCLOSURE: ClearlyIP, Skyetel, Vitelity, DigitalOcean, Vultr, VoIP.ms, 3CX, Sangoma, TelecomsXchange and VitalPBX have provided financial support to Nerd Vittles and our open source projects through advertising, referral revenue, and/or merchandise. As an Amazon Associate and Best Buy Affiliate, we also earn from qualifying purchases. We’ve chosen these providers not the other way around. Our decisions are based upon their corporate reputation and the quality of their offerings and pricing. Our recommendations regarding technology are reached without regard to financial compensation except in situations in which comparable products at comparable pricing are available from multiple sources. In this limited case, we support our sponsors because our sponsors support us.

BOGO Bonaza: Enjoy state-of-the-art VoIP service with a $10 credit and half-price SIP service on up to $500 of Skyetel trunking with free number porting when you fund your Skyetel account. No limits on number of simultaneous calls. Quadruple data center redundancy. $25 monthly minimum spend required. Tutorial and sign up details are here.

The lynchpin of Incredible PBX 2020 and beyond is ClearlyIP components which bring management of FreePBX modules and SIP phone integration to a level never before available with any other Asterisk distribution. And now you can configure and reconfigure your new Incredible PBX phones from the convenience of the Incredible PBX GUI.

VitalPBX is perhaps the fastest-growing PBX offering based upon Asterisk with an installed presence in more than 100 countries worldwide. VitalPBX has generously provided a customized White Label version of Incredible PBX tailored for use with all Incredible PBX and VitalPBX custom applications. Follow this link for a free test drive!
 

Special Thanks to Vitelity. Vitelity is now Voyant Communications and has halted new registrations for the time being. Our special thanks to Vitelity for their unwavering financial support over many years and to the many Nerd Vittles readers who continue to enjoy the benefits of their service offerings. We will keep everyone posted on further developments.


Some Recent Nerd Vittles Articles of Interest…

  1. With some providers including ones linked in this article, Nerd Vittles receives referral fees which assist in keeping the Nerd Vittles lights burning brightly. []

Midnight Madness: Introducing Incredible PBX 12 with Asterisk 12 and FreePBX

[iframe-popup id="4″]
The number "12″ always has held mystical prominence in our culture and so it is with Asterisk®. Just over 12 months ago, Digium first introduced Asterisk 12 at AstriCon in Atlanta and heralded a major change in the direction of the product. It was more than a wholesale revamping of the Asterisk feature set. There was a revolutionary new development methodology thanks to the untiring efforts of Matt Jordan and his incredibly talented development team. Unlike Asterisk releases of old, there were no serious breakages in existing applications and, where there were changes, they were carefully documented for all the world to see. Thank you, Matt & Co.

The release of Asterisk 12 also set in motion the development of FreePBX® 12 by the equally talented FreePBX Dev Team. What began as an effort simply to integrate all of the new components in Asterisk 12 quickly evolved into a major rewrite of the graphical user interface for Asterisk, no small feat given its history of starts and stops spanning nearly a decade of development. Just last week, FreePBX 12 was pronounced stable and production ready. If you thought Asterisk 12 was revolutionary, just wait until you try FreePBX 12. Simply amazing work by the FreePBX Development Team. Thank you.

While PBX in a Flash has offered a preview edition of Asterisk 12 and FreePBX 12 for quite a while, we’ve held off releasing the stand-alone Incredible PBX 12 for a number of reasons. First and foremost, we wanted Incredible PBX 12 to remain pure open source to point the way for others that want to enhance Asterisk 12 and FreePBX 12. Second, there were more than a few rough edges with both products that simply needed some time to evolve. The one year anniversary of Asterisk 12 and the stable release of FreePBX 12 seemed a fitting occasion to add our turnkey implementation of Incredible PBX to the mix.

The real beauty of Incredible PBX: there is no smoke and there are no mirrors. What you see is what you get. You begin with a base install of the Linux operating system. And then the open source Incredible PBX installer adds all of the pieces to integrate air-tight security with Asterisk 12, FreePBX 12, text-to-speech technology and dozens of applications for Asterisk into a seamless platform for either experimentation or production use. You can review the source code and embellish it as you see fit! Protecting your deployment is the IPtables firewall with a WhiteList for authorized user access coupled with Fail2Ban to monitor access attempts. This isn’t merely a security toolkit. Your server is actually locked down from the moment you complete the Incredible PBX install. Authorizing additional users is accomplished using simple administrator scripts. Or end-users can employ PortKnocker and Travelin’ Man 4 to simplify remote access. Automatic updates for security fixes and enhancements are an integral component of Incredible PBX. If the security alerts of the past month haven’t convinced you that updates are critically important, you probably should stop hosting your own PBX. Backups and restores also are simple. And the complete open source feature set of both Asterisk and FreePBX is activated to facilitate your development efforts. In short, you gain nothing by installing the individual components yourself, and you may lose a lot. With Incredible PBX, the heavy lifting has all been done for you with documented, open source code that makes it simple to add your own tweaks as desired. That’s what open source is all about!

We’ve chosen Ubuntu 14.04 as the platform on which to begin the Incredible PBX 12 adventure. More releases will follow in due course. But Ubuntu 14.04 is an extremely stable and well-supported LTS release of Linux that warrants a careful look. After all, the primary objective here is a stable telephony platform. The Ubuntu 14.04 LTS platform offers that in spades.

Building an Ubuntu 14.04 Platform for Incredible PBX 12

As a result of the trademark and copyright morass, we’ve steered away from the bundled operating system in favor of a methodology that relies upon you to put in place the operating system platform on which to run PBX in a Flash or Incredible PBX. The good news is it’s easy! With many cloud-based providers1, you can simply click a button to choose your favorite OS flavor and within minutes, you’re ready to go. With many virtual machine platforms such as VirtualBox, it’s equally simple to find a pre-built Ubuntu 14.04 image or roll your own.

If you’re new to VoIP or to Nerd Vittles, here’s our best piece of advice. Don’t take our word for anything! Try it for yourself in the Cloud! You can build an Ubuntu 14.04 image on Digital Ocean in under one minute and install Incredible PBX 12 for Ubuntu 14.04 in under 30 minutes. Then try it out for two full months. It won’t cost you a dime. Use our referral link to sign up for an account. Enter a valid credit card to verify you’re who you say you are. Create an Ubuntu 14.04 (not 14.10!) 512MB droplet of the cheapest flavor ($5/mo.). Go to the Billing section of the site, and enter the following promo code: UBUNTUDROPLET. That’s all there is to it. A $10 credit will be added to your account, and you can play to your heart’s content. Delete droplets, add droplets, and enjoy the free ride!

For today, we’ll walk you through building your own stand-alone server using the Ubuntu 14.04 mini.iso. If you’re using Digital Ocean in the Cloud, skip down to Installing Incredible PBX 12. If you’re using your own hardware, to get started, download the 32-bit or 64-bit Ubuntu 14.04 "Trusty Tahr" Minimal ISO from here. Then burn it to a CD/DVD or thumb drive and boot your dedicated server from the image. Remember, you’ll be reformatting the drive in your server so pick a machine you don’t need for other purposes.

For those that would prefer to build your Ubuntu 14.04 Wonder Machine using VirtualBox on any Windows, Mac, or existing Linux Desktop, here are the simple steps. Create a new virtual machine specifying either the 32-bit or 64-bit version of Ubuntu. Allocate 1024MB of RAM (512MB also works fine!) and at least 20GB of disk space using the default hard drive setup in all three steps. In Settings, click System and check Enable I/O APIC and uncheck Hardware Clock in UTC Time. Click Audio and Specify then Enable your sound card. Click Network and Enable Network Adapter for Adapter 1 and choose Bridged Adapter. Finally, in Storage, add the Ubuntu 14.04 mini.iso to your VirtualBox Storage Tree as shown below. Then click OK and start up your new virtual machine. Simple!

Here are the steps to get Ubuntu 14.04 humming on your new server or virtual machine once you’ve booted up. If you can bake cookies from a recipe, you can do this:

UBUNTU mini.iso install:
Choose language
Choose timezone
Detect keyboard
Hostname: incrediblepbx < continue >
Choose mirror for downloads
Confirm archive mirror
Leave proxy blank unless you need it
< continue >
** couple minutes of whirring as initial components are loaded **
New user name: incredible
< continue >
Account username: incredible
< continue >
Account password: makeitsecure
< continue >
Encrypt home directory < no >
Confirm time zone < yes >
Partition disks: Guided - use entire disk and set up LVM
Confirm disk to partition
Write changes to disks and configure LVM
Whole volume? < continue>
Write changes to disks < yes> < -- last chance to preserve your disk drive!
** about 15 minutes of whirring during base system install ** < no touchy anything>
** another 5 minutes of whirring during base software install ** < no touchy anything>
Upgrades? Install security updates automatically
** another 5 minutes of whirring during more software installs ** < no touchy anything>
Software selection: *Basic Ubuntu server (only!)
** another couple minutes of whirring during software installs ** < no touchy anything>
Grub boot loader: < yes>
UTC for system clock: < no>
Installation complete: < continue> after removing installation media
** on VirtualBox, PowerOff after reboot and remove [-] mini.iso from Storage Tree & restart VM
login as user: incredible
** enter user incredible's password **
sudo passwd
** enter incredible password again and then create secure root user password **
su root
** enter root password **
apt-get update
apt-get install ssh -y
sed -i 's|without-password|yes|' /etc/ssh/sshd_config
sed -i 's|yes"|without-password"|' /etc/ssh/sshd_config
ifconfig
** write down the IP address of your server from ifconfig results
reboot
** login via SSH to continue **

Installing Incredible PBX 12 on Your Ubuntu 14.04 Server

Adding Incredible PBX 12 to a running Ubuntu 14.04 server is a walk in the park. To restate the obvious, your server needs a reliable Internet connection to proceed. Using SSH (or Putty on a Windows machine), log into your new server as root at the IP address you deciphered in the ifconfig step at the end of the Ubuntu install procedure above.

WARNING: If you’re using a 512MB droplet at Digital Ocean, be advised that their Ubuntu setup does NOT include a swap file. This may cause serious problems when you run out of RAM. Uncomment ./create-swapfile-DO line below to create a 1GB swap file which will be activated whenever you exceed 90% RAM usage on Digital Ocean.

Now let’s begin the Incredible PBX 12 install. Log back in as root and issue the following commands:

cd /root
wget http://incrediblepbx.com/incrediblepbx12.tar.gz
tar zxvf incrediblepbx12.tar.gz
rm incrediblepbx12.tar.gz
#./create-swapfile-DO
./IncrediblePBX12.sh

The installer will first upgrade your Ubuntu 14.04 build to the latest modules. Then it will reboot. Rerun the installer again to kick off the Incredible PBX 12 installation process. Once you have agreed to the license agreement and terms of use, press Enter and go have a 30-minute cup of coffee. The Incredible PBX 12 installer runs unattended so find something to do for a bit unless you just like watching code compile. When you see "Have a nice day", your installation is complete. Write down your your three "knock" ports for PortKnocker. You can retrieve your PortKnocker setup like this: cat /root/knock.FAQ. Next, set your admin password for FreePBX 12 by running /root/admin-pw-change. Set your correct time zone by running /root/timezone-setup. To be sure your FreePBX module signatures are current, issue the following two commands:

amportal a ma refreshsignatures
amportal a r

Log out and back in as root and the automatic update utility will bring your system current with security fixes and enhancements. Then you will be greeted with a status display shown at the top of this article.

You can access the Asterisk 12 CLI by typing: asterisk -rvvvvvvvvvv

You can access the FreePBX 12 GUI using your favorite web browser to configure your server. Just enter the IP address shown in the status display. The default username is admin with the admin password you set up above. If desired, you also can change it in FreePBX Administration by clicking Admin -> Administrators -> admin. Enter a new password and click Submit Changes then Apply Config. Now edit extension 701 so you can figure out (or change) the randomized passwords that were set up for default 701 extension and voicemail: Applications -> Extensions -> 701.

Setting Up a Soft Phone to Use with Incredible PBX

Now you’re ready to set up a telephone so that you can play with Incredible PBX 12. We recommend YateClient which is free. Download it from here. Run YateClient once you’ve installed it and enter the credentials for the 701 extension on Incredible PBX. You’ll need the IP address of your server plus your extension 701 password. Choose Settings -> Accounts and click the New button. Fill in the blanks using the IP address of your server, 701 for your account name, and whatever password you created for the extension. Click OK.

Once you are registered to extension 701, close the Account window. Then click on YATE’s Telephony Tab and place some test calls to the numerous apps that are preconfigured on Incredible PBX. Dial a few of these to get started:

123 - Reminders
222 - ODBC Demo (use acct: 12345)
947 - Weather by ZIP Code
951 - Yahoo News
*61 - Time of Day
*68 - Wakeup Call
TODAY - Today in History

Now you’re ready to connect to the telephones in the rest of the world. If you live in the U.S., the easiest way (at least for now) is to use an existing (free) Google Voice account. Google has threatened to shut this down but as this is written, it still works with previously set up Google Voice accounts. The more desirable long-term solution is to choose several SIP providers and set up redundant trunks for your incoming and outbound calls. The PIAF Forum includes dozens of recommendations to get you started.

Configuring Google Voice

If you want to use Google Voice, you’ll need a dedicated Google Voice account to support Incredible PBX 12. If you want to use the inbound fax capabilities of Incredible Fax, then you’ll need an additional Google Voice line that can be routed to the FAX custom destination using FreePBX. The more obscure the username (with some embedded numbers), the better off you will be. This will keep folks from bombarding you with unsolicited Gtalk chat messages, and who knows what nefarious scheme will be discovered using Google messaging six months from now. So keep this account a secret!

We’ve tested this extensively using an existing Google Voice account, and inbound calling is just not reliable. The reason seems to be that Google always chooses Gmail chat as the inbound call destination if there are multiple registrations from the same IP address. So, be reasonable. Do it our way! Use a previously configured and dedicated Gmail and Google Voice account, and use it exclusively with Incredible PBX 12.

IMPORTANT: Be sure to enable the Google Chat option as one of your phone destinations in Settings, Voice Setting, Phones. That’s the destination we need for The Incredible PBX to work its magic! Otherwise, all inbound and outbound calls will fail. If you don’t see this option, you’re probably out of luck. Google has disabled the option in newly created accounts as well as some old ones that had Google Chat disabled. Now go back to the Google Voice Settings.

While you’re still in Google Voice Settings, click on the Calls tab. Make sure your settings match these:

  • Call ScreeningOFF
  • Call PresentationOFF
  • Caller ID (In)Display Caller’s Number
  • Caller ID (Out)Don’t Change Anything
  • Do Not DisturbOFF
  • Call Options (Enable Recording)OFF
  • Global Spam FilteringON

Click Save Changes once you adjust your settings. Under the Voicemail tab, plug in your email address so you get notified of new voicemails. Down the road, receipt of a Google Voice voicemail will be a big hint that something has come unglued on your PBX.

One final word of caution is in order regardless of your choice of providers: Do NOT use special characters in any provider passwords, or nothing will work!

Now you’re ready to set up your Google Voice trunk in FreePBX 12. After logging into FreePBX with your browser, click the Connectivity tab and choose Google Voice/Motif. To Add a new Google Voice account, just fill out the form. If you want unanswered calls to be routed to Google Voice for transcription, check the box. Be advised that IVR calls typically are not "answered" so check that box as well if you plan to use an IVR to respond to incoming Google Voice calls.

IMPORTANT LAST STEP: Google Voice will not work unless you restart Asterisk from the Linux command line at this juncture. Using SSH, log into your server as root and issue the following command: amportal restart.

If you have trouble getting Google Voice to work (especially if you have previously used your Google Voice account from a different IP address), try this Google Voice Reset Procedure. It usually fixes connectivity problems. If it still doesn’t work, enable Less Secure Apps using this Google tool.

Troubleshooting Audio and DTMF Problems

You can avoid one-way audio on calls and touchtones that don’t work with these simple settings in FreePBX: Settings -> Asterisk SIP Settings. Just plug in your public IP address and your private IP subnet. Then set ULAW as the only Audio Codec.

Adding Speech Recognition to Incredible PBX 12

To support many of our applications, Incredible PBX has included Google’s speech recognition service for years. These applications include Weather Reports by City (949), AsteriDex Voice Dialing by Name (411), and Wolfram Alpha for Asterisk (4747), all of which use Lefteris Zafiris’ terrific speech-recog AGI script. Unfortunately (for some), Google now has tightened up the terms of use for their free speech recognition service. Now you can only use it for "personal and development use." If you meet those criteria, keep reading. Here’s how to activate speech recognition on Incredible PBX. Don’t skip any steps!

1. Using an existing Google/Gmail account to join the Chrome-Dev Group.

2. Using the same account, create a new Speech Recognition Project.

3. Click on your newly created project and choose APIs & auth.

4. Turn ON Speech API by clicking on its Status button in the far right margin.

5. Click on Credentials in APIs & auth and choose Create New Key -> Server key. Leave the IP address restriction blank!

6. Write down your new API key or copy it to the clipboard.

7. Log into your server as root and issue the following commands:

# for Ubuntu and Debian platforms
apt-get clean
apt-get install libjson-perl flac -y
# for RedHat and CentOS platforms
# yum -y install perl-JSON
# for all Linux platforms
cd /var/lib/asterisk/agi-bin
mv speech-recog.agi speech-recog.last.agi
wget --no-check-certificate https://raw.githubusercontent.com/zaf/asterisk-speech-recog/master/speech-recog.agi
chown asterisk:asterisk speech*
chmod 775 speech*
nano -w speech-recog.agi

8. When the nano editor opens, go to line 70 of speech-recog.agi: my $key = "". Insert your API key from Step #6 above between the quotation marks and save the file: Ctrl-X, Y, then Enter.

Now you’re ready to try out the speech recognition apps. Dial 949 and say the name of a city and state/province/country to get a current weather forecast from Yahoo. Dial 411 and say "American Airlines" to be connected to American.

To use Wolfram Alpha by phone, you first must install it. Obtain your free Wolfram Alpha APP-ID here. Then run the one-click installer: /root/wolfram/wolframalpha-oneclick.sh. Insert your APP-ID when prompted. Now dial 4747 to access Wolfram Alpha by phone and enter your query, e.g. "What planes are overhead." Read the Nerd Vittles tutorial for additional examples and tips.

A Few Words about the Incredible PBX 12 Security Model for Ubuntu

Incredible PBX 12 for Ubuntu 14.04 is an extremely secure turnkey PBX implementation. As configured, it is protected by both Fail2Ban and a hardened configuration of the IPtables Linux firewall. As installed, nobody can access your PBX without your credentials AND an IP address that is either on your private network or that matches the IP address of your server or the PC from which you installed Incredible PBX. Incredible PBX 12 is preconfigured to let you connect to many of the leading SIP hosting providers without additional firewall tweaking.

You can whitelist additional IP addresses for remote access in several ways. First, you can use the command-line utilities: /root/add-ip and /root/add-fqdn. You can also remove whitelisted IP addresses by running /root/del-acct. Second, you can dial into extension 864 (or use a DID pointed to extension 864 aka TM4) and enter an IP address to whitelist. Before Travelin’ Man 4 will work, you’ll need to add credentials for each caller using the tools in /root/tm4. You must add at least one account before dial-in whitelisting will be enabled. Third, you can temporarily whitelist an IP address by successfully executing the PortKnocker 3-knock code established for your server. You’ll find the details and the codes in /root/knock.FAQ. Be advised that IP addresses whitelisted with PortKnocker (only!) go away whenever your server is rebooted or the IPtables firewall is restarted. For further information on the PortKnocker technology and available clients for iOS and Android devices, review the Nerd Vittles tutorial.

HINT: The reason that storing your PortKnocker codes in a safe place is essential is because it may be your only available way to gain access to your server if your IP address changes. You obviously can’t use the command-line tools to whitelist a new IP address if you cannot gain access to your server at the new IP address.

We always recommend you also add an extra layer of protection by running your server behind a hardware-based firewall with no Internet port exposure, but that’s your call. If you use a hardware-based firewall, be sure to map the three PortKnocker ports to the internal IP address of your server!

The NeoRouter VPN client also is included for rock-solid, secure connectivity for remote users. Read our previous tutorial for setup instructions.

As one would expect, the IPtables firewall is a complex piece of software. If you need assistance configuring it, visit the PIAF Forum for some friendly assistance.

Incredible Backup and Restore

We’re pleased to introduce our latest backup and restore utilities for Incredible PBX. Running /root/incrediblebackup will create a backup image of your server in /tmp. This backup image then can be copied to any other medium desired for storage. To restore it to another Incredible PBX 12 server, simply copy the image to a server running Asterisk 12 and FreePBX 12 and run /root/incrediblerestore. Doesn’t get much simpler than that.

A Word About FreePBX Module Signatures

FreePBX 12 has implemented a new checksum mechanism to assure that modules are intact. Special thanks to the FreePBX Development Team for their work in extending this feature to modules outside the FreePBX-support modules. If other modules (other than ODBC configuration files) show invalid or missing signatures, you should do some investigating promptly!

Adding Incredible Fax to Your Server

Once you’ve completed the Incredible PBX install, log out and log back in to load the latest automatic updates. Then reboot. Now you’re ready to continue your adventure by installing Incredible Fax for Ubuntu. Special thanks to Josh North for all his hard work on this!

cd /root
rm incrediblefax11_ubuntu14.sh
wget http://incrediblepbx.com/incrediblefax11_ubuntu14.sh
chmod +x incrediblefax11_ubuntu14.sh
./incrediblefax11_ubuntu14.sh

Just plug in your email address for delivery of your incoming faxes in PDF format. Then accept all of the defaults during the installation process. Once you complete the install, reboot your server. Then log in as root again and set your AvantFax admin password: /root/avantfax-pw-change. Now you can access both FreePBX 12 and AvantFax by pointing your browser to the IP address of your server. Please note that we’ve had problems logging into AvantFax with some versions of the Chrome browser. Works great with Firefox!

Next, log into FreePBX and set an Inbound Route for incoming faxes to Custom Destination: Fax (hylafax). Then try sending a fax to the phone number and be sure it arrives in your email.

You also can try enabling fax detection with any Google Voice number. Just edit the inbound route for the DID and make it look like this:

Incredible PBX 12 Automatic Update Utility

Every time you log into your server as root, Incredible PBX 12 will ping the IncrediblePBX.com web site to determine whether one or more updates are available to bring your server up to current specs. We recommend you log in at least once a week just in case some new security vulnerability should come along (again).

Where To Go Next?

Once you get Incredible PBX installed, you’ll want to read up on the dozens of applications for Asterisk which are included in the Incredible PBX feature set. We’ve previously covered this in a separate article for the Raspberry Pi platform, but the applications are the same. Here’s a link to the tutorials.

You can follow updates to Incredible PBX 12 in this thread on the PIAF Forum.

We would also encourage you to sign up for an account on the PIAF Forum and join the discussion. In addition to providing first-class, free support, we think you’ll enjoy the camaraderie. Come join us!

Originally published: Monday, November 3, 2014 Updated: Monday, December 1, 2014


Support Issues. With any application as sophisticated as this one, you’re bound to have questions. Blog comments are a terrible place to handle support issues although we welcome general comments about our articles and software. If you have particular support issues, we encourage you to get actively involved in the PBX in a Flash Forums. It’s the best Asterisk tech support site in the business, and it’s all free! Please have a look and post your support questions there. Unlike some forums, ours is extremely friendly and is supported by literally hundreds of Asterisk gurus and thousands of users just like you. You won’t have to wait long for an answer to your question.


Need help with Asterisk? Visit the PBX in a Flash Forum.


Special Thanks to Our Generous Sponsors


FULL DISCLOSURE: ClearlyIP, Skyetel, Vitelity, DigitalOcean, Vultr, VoIP.ms, 3CX, Sangoma, TelecomsXchange and VitalPBX have provided financial support to Nerd Vittles and our open source projects through advertising, referral revenue, and/or merchandise. As an Amazon Associate and Best Buy Affiliate, we also earn from qualifying purchases. We’ve chosen these providers not the other way around. Our decisions are based upon their corporate reputation and the quality of their offerings and pricing. Our recommendations regarding technology are reached without regard to financial compensation except in situations in which comparable products at comparable pricing are available from multiple sources. In this limited case, we support our sponsors because our sponsors support us.

BOGO Bonaza: Enjoy state-of-the-art VoIP service with a $10 credit and half-price SIP service on up to $500 of Skyetel trunking with free number porting when you fund your Skyetel account. No limits on number of simultaneous calls. Quadruple data center redundancy. $25 monthly minimum spend required. Tutorial and sign up details are here.

The lynchpin of Incredible PBX 2020 and beyond is ClearlyIP components which bring management of FreePBX modules and SIP phone integration to a level never before available with any other Asterisk distribution. And now you can configure and reconfigure your new Incredible PBX phones from the convenience of the Incredible PBX GUI.

VitalPBX is perhaps the fastest-growing PBX offering based upon Asterisk with an installed presence in more than 100 countries worldwide. VitalPBX has generously provided a customized White Label version of Incredible PBX tailored for use with all Incredible PBX and VitalPBX custom applications. Follow this link for a free test drive!
 

Special Thanks to Vitelity. Vitelity is now Voyant Communications and has halted new registrations for the time being. Our special thanks to Vitelity for their unwavering financial support over many years and to the many Nerd Vittles readers who continue to enjoy the benefits of their service offerings. We will keep everyone posted on further developments.


Some Recent Nerd Vittles Articles of Interest…

  1. With some providers including ones linked in this article, Nerd Vittles receives referral fees which assist in keeping the Nerd Vittles lights burning brightly. []

Hardware Device of the Year: Meet the CuBox-i with Incredible PBX for Ubuntu

It’s been many years since we’ve written back-to-back articles about the same device. That should tell you how really special the CuBox-i is. After two weeks of 14-hour days developing the new Incredible PBX platform for CuBox, we are thrilled to crown this jewel as Nerd Vittles Hardware Device of the Year. Flawless design, incredible performance, tiny size, feature-rich components, minimal power consumption, and completely silent operation are merely the tip of the iceberg with this 2x2x2 cubic zircon. On the $130 CuBox-i4PRO, there’s a Quad Core processor, 2 gigs of RAM, a 10/100/1000 Ethernet port, a 1080p HDMI port, two powered USB 2 ports, an eSATA II port for an external drive, a realtime clock with backup battery, an Optical S/PDIF Audio Out port, a microSD port, an infrared receiver and transmitter, WiFi 11n, and Bluetooth plus a power adapter to match either American or European power sources. Whew! And here’s the best part. Everything works while squeezed in a tiny case that’s a third the size of Rubic’s Cube.

A SOHO Swiss Army Knife That Fits in Your Cupholder: Voice, Fax, SMS, TTS, Email, PBX, Incredible!

Did we mention it’s a near perfect VoIP platform for any home office or small business? Well, it is. And everything we’ve learned about Asterisk® and FreePBX® and Internet security over the past decade is rolled into today’s release of our crown jewel edition of Incredible PBX™ for the CuBox. First, you’ll need to purchase one and we strongly recommend the CuBox-i4PRO with its Quad Core ARM processor and built-in WiFi and Bluetooth. In the U.S, there’s NewEgg or NewEgg (10% off on i4PRO with promo code SW829NE10 = $117 until 9/4). In the U.K, there’s NewIT. For everyone else, you can buy directly from SolidRun, the creator.

Before we dive into Incredible PBX, we want to express our deepest appreciation to Zhando and Josh North of PIAF Forum fame. Zhando’s pioneering efforts with Ubuntu and Incredible PBX on the CuBox platform and Josh North’s morphing of Incredible Fax for deployment with Ubuntu paved the way for everything you’re about to read. It reinforces the spectacular results which can be achieved in the open source community when a talented group of even a few folks put their heads together. The Ubuntu developers and the tens of thousands of open source contributors from around the world also deserve a well-earned tip of the hat for producing a Linux platform that is rock-solid reliable and incredibly versatile. Nearly 1,000 open source packages are included in the latest Incredible PBX build. Click on the link to view the package list in PDF format and prepare to be amazed. We couldn’t have done it without all of you!

Introducing Incredible PBX 11.12.0 for the CuBox-i4PRO

If you’re new to Asterisk and the world of VoIP telephony, let us take a moment and explain how Incredible PBX fits into the puzzle. For lack of a better term, Incredible PBX on the CuBox platform is a turnkey aggregation in a bootable image that is based upon a superset of Ubuntu 14 packages plus Asterisk, the FreePBX GUI, and a sizable collection of applications for the Asterisk platform. You download a tarball, decompress it, write the image file to a microSD card, insert the card into your CuBox-i, and presto! You’ve got a turnkey PBX. Add credentials for a trunk or two to make and receive calls, connect some phones, and your whole office will come alive with a versatile PBX platform that used to cost organizations hundreds of thousands of dollars. What’s included in Incredible PBX? Glad you asked. Here’s a 3-minute video showcasing a few of our favorite Incredible PBX text-to-speech applications:


The Incredible PBX 11 Inventory. Here’s the current feature set on the CuBox platform. It’s the most robust ever! In addition to its superset of nearly 1,000 Ubuntu 14 packages, Asterisk 11, and FreePBX 2.11 with Apache, SendMail, MySQL, PHP, phpMyAdmin, Fail2Ban, WebMin, and the IPtables Linux firewall, check out these additions:

A Few Words About Security. Thanks to its Zero Internet Footprint™ design, Incredible PBX is different. It remains the most secure Asterisk-based PBX around. What this means is Incredible PBX has been engineered to sit anywhere, either behind a NAT-based, hardware firewall or directly on the Internet. No device other than those on your private LAN, a few of the major (trusted) SIP providers around the world, and those that you authorize on your WhiteList can even see your server. Additional IP addresses can be added to the WhiteList in three ways:

  1. An administrator registers new IP addresses using add-ip or add-fqdn from the Linux CLI
  2. A remote user sends the (correct) randomized PortKnock code assigned to your CuBox
  3. A remote user dials in from a standard telephone to register a new remote IP address

Read about this $100,000 VoIP phone bill, and you’ll better appreciate why WhiteList-based server security has become absolutely essential. WhiteList Security means only those devices with a registered IP address in your WhiteList can get to your server’s resources. To the NSA and everyone else, your server doesn’t even show up on the radar. Their only way to contact you is a POTS telephone using your published phone number. Our complete tutorial on Travelin’ Man 3 is available here. With Incredible PBX for CuBox, it’s installed and preconfigured.

Installing Incredible PBX 11.12.0 on the CuBox-i

There are five simple steps to get Incredible PBX up and running on your CuBox:

  1. Purchase a storage device
  2. Download Incredible PBX image
  3. Untar the image on your desktop
  4. Burn the image to a microSD card
  5. Insert microSD card in CuBox and boot

Choosing a Storage Platform. Unless you plan to run your server with an external eSATA hard drive (CuBox-i4PRO tutorial here), the first step is to purchase a suitable microSD card. We recommend at least a 32GB Class 10 card from Transcend, SanDisk, or Kingston. All of them are under $20 on Amazon and most include free 2-day shipping for Prime customers. If using an eSATA drive, you still need a microSD card to boot up, but any 4GB or 8GB card will suffice.1

Downloading Incredible PBX for CuBox. From your favorite desktop computer, download the latest build of Incredible PBX from SourceForge. Depending upon your network connection and the SourceForge mirror, it can take awhile. It’s a whopping 1.3GB!

Untarring Incredible PBX for CuBox. Depending upon your desktop platform, untarring incrediblepbx.4.cubox.U14.latest.tar.gz is as simple as double-clicking on it in the Downloads folder (on a Mac). On the Windows platform, here are 3 utilities that will do the job. On a Linux desktop, open a Terminal window and…

tar zxvf incrediblepbx.4.cubox.U14.latest.tar.gz

Burning the Incredible PBX image to microSD. Once you’ve untarred the file, you’ll find two scripts that make burning the image to a microSD card simple if you’re on a Mac or Linux desktop. On a Windows machine, it’s a little more complicated. Most SD cards come preformatted with a DOS partition so your Windows machine should recognize the microSD card when it’s inserted. If not, format the card using a utility such as SD Card Formatter. Next, you’ll need Win32 Disk Imager to burn cubox.img to your card. Once the image has been transferred, gracefully unmount the card from your desktop, and then remove the card from the SD card adapter.

Booting Incredible PBX on the CuBox. Insert the microSD card (electronics side up) into your CuBox-i. Then apply power to the CuBox after connecting a USB keyboard, HDMI monitor, and Ethernet cable to a network with Internet connectivity that can also hand out DHCP addresses. Log into Incredible PBX as root with cubox as your password. Your SSH credentials, Asterisk DUNDI secrets, logs, and network connection options will be initialized and then your server will reboot. You may need to hit the Enter key once or twice during the SSH credentials initialization to move things along. And, with some SD cards, you may find yourself waiting an eternity for the promised reboot. After seeing the "rebooting" message, count to ten. If your server still hasn’t rebooted, remove and reapply power. This quirk goes away after the first reboot.

After the reboot, log in again as root with password: cubox. Your firewall setup will be initialized to lock down your whitelist to your server’s public and private IP addresses AND the IP address of the machine from which you’re logging in. All of your FreePBX passwords will be randomized and your secret PortKnocker codes will be generated. The whole process only takes a few seconds.

When the second pass configuration is complete, you will be greeted by a welcoming message. STOP and read it. It has loads of important information about your server’s configuration and your next steps. Press ENTER to review status:

The Next 10 Steps. Before you do anything else, complete the following steps. It only takes a minute to secure and properly configure your server:

  1. Change your root password: passwd
  2. Change your FreePBX admin password: /root/admin-pw-change
  3. Set your correct time zone: /root/timezone-setup
  4. Expand partition to match microSD card size: /root/resize-partition
  5. Add any desired IP addresses to WhiteList: /root/add-ip
  6. Put PortKnocker credentials in a safe place: cat /root/knock.FAQ
  7. Change AvantFax admin password: /root/avantfax-pw-change
  8. Set Email Address for Incoming Faxes: /root/avantfax-email-dest
  9. Check status to be sure everything is working: status
  10. If using an eSATA external drive, do the migration drill (note the free disk space in status above)

A Few Important Tips. Every operating system and service provider has their quirks. Ask Bill Gates! Ubuntu and especially Comcast are no different. Fortunately, with Ubuntu, it’s a very short list.

1. Use the following commands (only!) to shutdown and restart your server: halt and reboot. These commands are reworked in Incredible PBX to gracefully shutdown important services so that files don’t get damaged. Please use them!

2. If you ever want to move your server to a different network, complete these three simple steps before you leave your existing network. This will trigger a new Phase I update (outlined above) and set the default network back to wired eth0 using DHCP the next time you boot your server.

touch /etc/update_hostconfig
/root/enable-eth0-only
# press Ctrl-C when prompted to reboot. then type:
halt

3. You really do need email connectivity to get the most out of Incredible PBX. It’s the way you receive important notifications from FreePBX, and it’s also how faxes and voicemail messages are delivered. From the Linux CLI, test your server to be sure you can send emails reliably:

echo "test" | mail -s testmessage yourname@gmail.com

After checking your spam folder, if you really didn’t get the email, it may be that your service provider is blocking downstream SMTP traffic. You can use your provider’s SMTP server as a smarthost to send out mail with SendMail. Just edit /etc/mail/sendmail.cf, search for DS, and add the provider’s SMTP server address immediately after it (no spaces!), e.g. DSsmtp.comcast.net or DSsmtp.knology.net. Then restart SendMail: service sendmail restart.

Once you’ve logged into FreePBX below, be sure to set your default email address in the right margin of Admin -> Module Admin and save your entry. This will assure receipt of timely notifications of FreePBX updates for your server.

4. If you’re sure you’ll never need remote access in an emergency, you can disable PortKnocker at startup and save about 5% of your processing cycles. Our complete PortKnocker tutorial is available here. To disable startup on boot, issue the following command from the Linux CLI:

update-rc.d -f knockd disable

5. The same applies to WebMin. We actually introduced one of the first tutorials for WebMin… over 9 years ago. A word to the wise: WebMin is a terrific tool for looking at stuff about your system. But be very careful making system changes with WebMin. You usually will break some of the customized settings in Incredible PBX. This is particularly true in the case of the IPtables firewall. To access WebMin, use a browser and the actual IP address of your server to go to: https://12.34.56.78:9001. Log in as root with your root password. To disable automatic startup of WebMin on boot:

update-rc.d -f webmin disable

Setting Up WiFi with the CuBox-i4PRO

This may sound simple now, but two weeks ago it was quite a different story. For those with a CuBox-i4Pro, WiFi is built into the hardware. The trick was getting it to work. Well, with Incredible PBX, it does. In the /root folder, you’ll find several self-explanatory scripts to do the heavy lifting for you. For options 2 and 3, you’ll need the SSID of the WiFi network you’ll be using as well as the SSID password.

  1. enable-eth0-only (the default setting)
  2. enable-wifi-eth0 (enables both but eth0 works with Asterisk)
  3. enable-wifi-only (runs your server purely on WiFi)

Getting Started with VoIP and FreePBX

Up to now, all of your time has been spent using the Linux CLI. That will be a rarity once you get this far. Henceforth, 90% of your time setting up Incredible PBX will be done using the FreePBX GUI and your favorite web browser. To access it, just point to the IP address of your server. status will tell you the address if you’ve forgotten it. The main control panel looks like this:

As configured, the default user account for both FreePBX and AvantFax administration is admin. The passwords are whatever you set in steps #2 and #7 above. As configured, email delivery of faxes with AvantFax is automatic so no further setup is required other than setting a delivery mechanism for faxes within FreePBX.

For those new to Asterisk and FreePBX, here’s a brief primer on what needs to happen before you can make and receive calls. If you have an existing Google Voice account or a smartphone that’s less than 2 years old, lucky you. This gets you a phone number for your PBX so people can call you. And it provides a vehicle to place calls to plain old telephones at little or no cost.

If you don’t have a Google Voice account or a shiny new smartphone, then you will need to purchase a SIP trunk from one of the numerous vendors around the world. Our favorite (because they provide terrific service at a modest price AND provide financial support to the Nerd Vittles, PBX in a Flash, and Incredible PBX projects) is Vitelity. Their special rates and a link for a discount are included at the end of today’s article.

Unlike POTS phone service from Ma Bell, the SIP World is a little different. First, you don’t need to put all your eggs in one basket. A trunk that gets you a phone number for incoming calls need not be with the same vendor that provides a trunk to place outbound calls. In fact, you may want multiple trunks for outbound calls just to have some redundancy. A list of our favorites in the U.S. and Canada is available on the PIAF Forum. Of course, there also are providers that offer all-you-can-eat calling plans. Two of our favorites are Vestalink and Future-Nine.

You’ll also need a softphone or SIP phone to actually place and receive calls. YATE makes a free softphone for PCs, Macs, and Linux machines so download your favorite and install it on your desktop.

Phones connect to extensions in FreePBX to work with Incredible PBX. Extensions talk to trunks (like Google Voice) to make and receive calls. FreePBX uses outbound routes to direct outgoing calls from extensions to trunks, and FreePBX uses inbound routes to route incoming calls from trunks to extensions to make your phones ring. In a nutshell, that’s how a PBX works.

There are lots of bells and whistles that you can explore down the road including voicemail, conferencing, IVRs, autoattendants, paging, intercoms, CallerID lookups, announcements, DISA, call parking and pickup, queues, ring groups, and on and on. And then there’s all of the Incredible PBX applications which are covered separately in this Nerd Vittles article. Once you’re comfortable with one server, you or your company will want some more. This Nerd Vittles article will walk you through interconnecting them into a seamless mesh network so that you can call from one office to another transparently. Yes, those articles were written for the Raspberry Pi. But the beauty of Incredible PBX is that it runs identically on virtually every server platform.

Here’s our 10-Step Checklist to Getting Started with FreePBX:

1. Setting Up Google Voice. If you want free calling in the U.S. and Canada, then you’ll need an existing Google Voice account that includes the Google Chat feature. You’ll need one dedicated to Incredible PBX, or it won’t work. Log out after setting up the new Google Voice account! Also note that Google Voice may cease to function at any time after May 15, 2014. You can read all about it here.

  • Log into existing Google Voice account
  • Enable Google Chat as Phone Destination
  • Configure Google Voice Calls Settings:
    • Call ScreeningOFF
    • Call PresentationOFF
    • Caller ID (In)Display Caller’s Number
    • Caller ID (Out)Don’t Change Anything
    • Do Not DisturbOFF
    • Call Options (Enable Recording)OFF
    • Global Spam FilteringON

  • Place test call in and out using GMail Call Phone
  • Log out of your Google Voice account

2. Activating a Google Voice Trunk. To create a Trunk in FreePBX to handle calls to and from Google Voice, you’ll need three pieces of information from the Google Voice account you set up above: the 10-digit Google Voice phone number, your Google Voice account name, and your Google Voice password. Choose Connectivity -> Google Voice (Motif) from the FreePBX GUI. The following form will appear:

Fill in the blanks with your information and check only the top 2 boxes. If your Google Voice account name ends in @gmail.com, leave that out. Otherwise, include the full email address. Then click Submit Changes and Apply Config.

There’s one more step or your Google Voice account won’t work reliably with Incredible PBX! From the Linux command prompt while logged into your server as root, restart Asterisk: amportal restart

3. Setting a Destination for Incoming Calls and Managing Faxes. Now that you’ve created your Google Voice Trunk, we need to tell FreePBX how to process inbound calls when someone dials your Google Voice number. There are any number of choices. You could simply ring an extension. Or you could ring multiple extensions by first creating a Ring Group which is just a list of extension numbers. Or you could direct incoming calls to an Interactive Voice Response (IVR) system. By default, Incredible PBX is configured to route all incoming calls to extension 701. You can change the setting whenever you like by choosing Connectivity -> Inbound Routes -> Default. In the Set Destination section of the form, change the target destination from the pull-down lists.

If you want your default inbound route to also handle incoming faxes, then go to the Fax Detect section of the Default inbound route. Change Detect Faxes to Yes. Change Fax Detection Type to SIP. Leave the Detection Time setting at 4. And change the Fax Destination to Custom Destinations: Fax (Hylafax). To Send Faxes, open AvantFax in FreePBX’s Other pulldown menu.

Always click Submit and then click Apply Config to save new settings in FreePBX.

4. Activating a Smartphone Trunk Using Bluetooth. One of the more exotic features of Incredible PBX on the CuBox platform is the ability to add your smartphone as an Asterisk trunk using Bluetooth. We’ve written a short recipe to get things working. So have a look at our Bluetooth tutorial and see if you’re up for the challenge. Moral of the story: the newer the cellphone, the better.

The LG G3 is the best of the lot, at least of the numerous cellphones we tested. Even better is an LG G3 paired with StraightTalk’s (AT&T-hosted) unlimited talk, text, and data plan for $45 a month. With Samsung smartphones older than a Galaxy S4, don’t waste your time. Ditto with Apple iPhones other than perhaps the very latest. Our iPhone 4S failed miserably. We gave up on Apple phones after that. Someday I’ll test my daughter’s 5c and report back.

5. Activating Additional Trunks with FreePBX. As we mentioned, there are lots of SIP providers to choose from. Once you have signed up for service, configuring the trunk is easy. Here is a quick Cheat Sheet courtesy of Kristian Hare, who translated our original setups into a spreadsheet. Just click on the image below to open it in a new window. Then click on the redisplayed image to enlarge it. The left and right cursor keys will move you around in the image. Click on the image again to shrink it.

6. Changing Extension Passwords. From the main FreePBX GUI, choose Applications -> Extensions. Then click on 701 in the Extension List on the right side of your display. You’ll see a form that looks like this:

For now, we only need to make a few changes. First, you need a very secure password for both the extension itself and your voicemail account for this extension. The extension secret needs to be a combination of letters and numbers. The Voicemail Password needs to be all numbers, preferably six or more. Replace the existing password entries with your own (very secure) entries. You also need to lock down this extension so that it is only accessible from devices on your private LAN. You do that with the deny and permit entries which currently are filled with zeroes. Leave the deny entry the way it is which tells Incredible PBX to block everybody except those allowed in the permit entry below. For the permit, we need the first three octets of your private LAN address, e.g. if your LAN is 192.168.0.something then the permit entry will be 192.168.0.0/255.255.255.0.

Finally, you need to plug in your actual email address in the Voicemail section so that voicemails can be delivered to you when someone leaves a message. You can also include a pager email address if you want a text message alert with incoming voicemails. If you want the voicemails to automatically be deleted from the server after they are emailed to you (a good idea considering the disk storage limitations of your microSD card), change the Delete Voicemail option from No to Yes. That’s it. Now save your settings by clicking the Submit button. Then reload the dialplan by clicking on the red prompt when it appears.

In case you’re curious, unless you’ve chosen to automatically delete voicemails after emailing them, you can retrieve your voicemails by dialing *98701 from any extension on your phone system. You’ll be prompted to enter the voicemail password you set up. In addition to managing your voicemails, you’ll also be given the opportunity to either return the call to the number of the person that called or to transfer the voicemail to another extension’s voicemail box. And you can always leave a voicemail for someone by dialing their extension number preceded by an asterisk, e.g. *701 would let someone leave you a voicemail without actually calling you.

7. Eliminating Audio and DTMF Problems. You can avoid one-way audio on calls and touchtones that don’t work with these simple settings in FreePBX: Settings -> Asterisk SIP Settings. Just plug in your public IP address and your private IP subnet. Then set ULAW as the only Audio Codec.

8. Configuring Your YATE Softphone. As we mentioned, the easiest way to get started with Incredible PBX is to set up a free YATE softphone on your Desktop computer. Versions are available at no cost for Macs, PCs, and Linux machines. Just download the appropriate one and install it from this link. Once installed, it’s a simple matter to plug in your extension 701 credentials and start making calls. Run the application and choose Settings -> Accounts and click the New button. Fill in the blanks using the IP address of Incredible PBX, 701 for your account name, and whatever password you created for the extension. Click OK.

Once you are registered to extension 701, close the Account window. Then click on YATE’s Telephony Tab and place your first call. It’s that easy!

9. Configuring CallerID Superfecta. In order to match names with phone numbers, Incredible PBX includes a FreePBX application named CallerID Superfecta. Out of the box, Incredible PBX will work fine if you remember to activate CallerID Superfecta whenever you create a new Inbound Route. The CNAM entries also will be displayed in your CDR reports. For those not in the United States, you may prefer to use a lookup source for your numbers other than the ones preconfigured in CallerID Superfecta. You will find all of the available modules on the POSSA GitHub site. Just download the ones desired into /var/www/html/admin/superfecta/sources and then activate the desired sources in Admin -> CID Superfecta -> Default. You can test your results and the performance using the Debug facility that’s built into the module.

10. Adding Speech Recognition for Incredible Applications. We used to include Google’s Speech-to-Text service in Incredible PBX builds. Unfortunately, Google has changed the rules a bit. Assuming your server still meets the "personal and development" standard, you can obtain an API key from Google and reactivate speech-to-text functionality for many of the Incredible PBX applications including Weather Reports by City (949), AsteriDex Voice Dialing by Name (411), SMS Dictator (767), and Wolfram Alpha for Asterisk (4747). To activate the STT service, just complete the steps in our tutorial. Then sign up for a Wolfram Alpha App ID (tutorial here), and run the following install scripts:

/root/wolfram/wolframalpha-oneclick.sh
/root/smsdictator/sms-dictator.sh

Enabling SAMBA Windows Networking with Ubuntu

It only takes a minute to enable SAMBA Windows Networking on your CuBox. We’ve reproduced our quick tutorial to show you how. Just follow the steps below to interconnect Incredible PBX with all the other computers on your LAN.

apt-get -y install samba samba-common python-glade2 system-config-samba
cd /etc/samba
mv smb.conf smb.orig.conf
wget http://incrediblepbx.com/samba-ubuntu.tar.gz
tar zxvf samba-ubuntu.tar.gz
rm *.tar.gz
sed -i '/# End of Trusted Provider Section/r '/etc/samba/smb.iptables'' /etc/iptables/rules.v4
iptables-restart
service smbd restart
service nmbd restart
sed -i 's|/usr/local/sbin/amportal restart|service smbd restart\\nservice nmbd restart\\n/usr/local/sbin/amportal restart|' /etc/rc.local
# set up root password for SAMBA access with full RW privileges
smbpasswd -a root

Incredible Backup and Restore

Once you have everything configured, it’s time to take a snapshot of your system and store it in a safe place. The new Incredible Backup lets you do that. From the Linux CLI, login as root and run: /root/incrediblebackup. The backup image will be saved to the /tmp folder and can be copied to a different server easily. To restore the backup to another system, you simply bring the other system up to the same version of Asterisk (11) and FreePBX (2.11), and then run /root/incrediblerestore with your backed up image. It’s the cheapest insurance you can buy! For detailed instructions on restoring backups, see this thread on the PIAF Forum.


Don’t forget to List Yourself in Directory Assistance so everyone can find you by dialing 411. And add your new number to the Do Not Call Registry to block telemarketing calls. Or just call 888-382-1222 from your new number.

Originally published: Monday, September 1, 2014


Support Issues. With any application as sophisticated as this one, you’re bound to have questions. Blog comments are a terrible place to handle support issues although we welcome general comments about our articles and software. If you have particular support issues, we encourage you to get actively involved in the PBX in a Flash Forums. It’s the best Asterisk tech support site in the business, and it’s all free! Please have a look and post your support questions there. Our forum is extremely friendly and is supported by literally hundreds of Asterisk gurus.


Need help with Asterisk? Visit the PBX in a Flash Forum.


Special Thanks to Our Generous Sponsors


FULL DISCLOSURE: ClearlyIP, Skyetel, Vitelity, DigitalOcean, Vultr, VoIP.ms, 3CX, Sangoma, TelecomsXchange and VitalPBX have provided financial support to Nerd Vittles and our open source projects through advertising, referral revenue, and/or merchandise. As an Amazon Associate and Best Buy Affiliate, we also earn from qualifying purchases. We’ve chosen these providers not the other way around. Our decisions are based upon their corporate reputation and the quality of their offerings and pricing. Our recommendations regarding technology are reached without regard to financial compensation except in situations in which comparable products at comparable pricing are available from multiple sources. In this limited case, we support our sponsors because our sponsors support us.

BOGO Bonaza: Enjoy state-of-the-art VoIP service with a $10 credit and half-price SIP service on up to $500 of Skyetel trunking with free number porting when you fund your Skyetel account. No limits on number of simultaneous calls. Quadruple data center redundancy. $25 monthly minimum spend required. Tutorial and sign up details are here.

The lynchpin of Incredible PBX 2020 and beyond is ClearlyIP components which bring management of FreePBX modules and SIP phone integration to a level never before available with any other Asterisk distribution. And now you can configure and reconfigure your new Incredible PBX phones from the convenience of the Incredible PBX GUI.

VitalPBX is perhaps the fastest-growing PBX offering based upon Asterisk with an installed presence in more than 100 countries worldwide. VitalPBX has generously provided a customized White Label version of Incredible PBX tailored for use with all Incredible PBX and VitalPBX custom applications. Follow this link for a free test drive!
 

Special Thanks to Vitelity. Vitelity is now Voyant Communications and has halted new registrations for the time being. Our special thanks to Vitelity for their unwavering financial support over many years and to the many Nerd Vittles readers who continue to enjoy the benefits of their service offerings. We will keep everyone posted on further developments.


Some Recent Nerd Vittles Articles of Interest…

  1. Some of our links refer users to Amazon or other service providers when we find their prices are competitive for the recommended products. Nerd Vittles receives a small referral fee from these providers to help cover the costs of our blog. We never recommend particular products solely to generate commissions. However, when pricing is comparable or availability is favorable, we support these providers because they support us. []

Twofer Tuesday: Incredible PBX for RasPBX on BeagleBone Black and Raspberry Pi


We never were big fans of unfinished projects. And with Festivus behind us and Christmas tomorrow, it seemed only fitting to celebrate with a Twofer Tuesday Encore. Whether you like ’em or hate ’em, Google’s free text-to-speech engine is a big deal. It’s as close to perfect as any commercial product you can buy. So getting it to work with the BeagleBone® Black was really important for those of us that believe the BeagleBone Black is a near perfect telephony platform for home users and SOHO businesses. With this week’s release of Incredible PBX™ 4.11.3 for the RasPBX™, the GoogleTTS engine finally is available in all its glory on both the Raspberry Pi® and BeagleBone Black platforms. At $45 and sporting a "Made in the USA" moniker, the BeagleBone’s only real competition is the Raspberry Pi which has roughly a third the performance for VoIP-related tasks. Finding a BeagleBone Black has not been the easiest thing to accomplish either. They have sprung up five or six times over the past two weeks only to be snarfed up in a couple of hours. We have a PIAF Forum thread that will keep you apprised of the latest sightings or just follow us on Twitter. As with the early days of the Raspberry Pi, price gouging is alive and well so we’ll leave it to you to decide what your budget can tolerate. Our recommendation is hold your nose and pay the extra $15. The BeagleBone Black is worth it!

NEWS FLASH: The all-new Incredible PBX release for Raspberry Pi 2 is now available.

There’s more Black news this week as well. PIAF-Black™ now ushers in the next generation of Asterisk® with the official release of Asterisk 12.0.0. You can download the latest 32-bit or 64-bit PIAF™ ISOs from SourceForge. Then pick your favorite flavor of Asterisk to install. It’s that easy! New torrents were released this week as well thanks to our good friend, Isaac McDonald. Torrents are available for the latest PIAF 2.0.6.5.0 ISOs as well as two virtual machine builds for PIAF-Green™ with FreePBX™ 2.11 and Incredible PBX 11. Just visit the PIAF web site to grab your favorite torrent. Merry Christmas everybody!

For long time Nerd Vittles readers, you may recall that we built the original Incredible PBX™ for Raspberry Pi® (aka Incredible Pi) using much of the development platform pioneered by Gernot Bauer of RasPBX™ fame. In the early days of Gernot’s project, we just couldn’t get the necessary pieces in place on his platform to support Incredible PBX so we temporarily forked his terrific work in order to get Incredible Pi out the door quickly. That was then, and this is now as they say. RasPBX has grown in popularity because of the untiring efforts of Gernot & Co. in continually improving the platform. And six months ago, RasPBX was ported to the BeagleBone Black. Don’t be misled by its tiny footprint. The BeagleBone Black1 provides nearly triple the performance of a $35 Raspberry Pi for an extra $10 to $25 hardware investment depending upon where you buy the board. The rainbow case is a few cents more. 😉

Let us cut to the chase. Run, don’t walk, to buy a BeagleBone Black! It’s that good. If Amazon is sold out, here is a link to other suppliers. See also this thread on the PIAF Forum for the latest availability news. In terms of performance, we would be hard-pressed to distinguish the BeagleBone Black’s performance from an identical Asterisk® and FreePBX®-based system running on the Intel® Atom® platform. The performance boost is that dramatic. So a few weeks ago we decided to take another look at the RasPBX platforms with the goal of porting Incredible PBX in much the same way that we currently provide the add-on for PBX in a Flash™ builds. The advantage for us is that it gets us out of the hardware business and lets us concentrate on building better VoIP application software. The advantage for you is it gives you additional choices, and they’re all still free!


UPDATE: Good News and More Good News. Everything covered below works flawlessly on the Raspberry Pi and BeagleBone Black platforms. On the Beaglebone Black hardware, everything works except GoogleTTS, and our friend, Lefteris Zafiris, will have a fix soon. GoogleTTS goes through the motions of converting text to speech, but the output is a constant high-pitched beep. For the short term, on the BeagleBone Black, we’ve substituted Flite for GoogleTTS until there is a fix. Soon with a little luck! We’ve also added an experimental IPtables Firewall WhiteList to the BeagleBone Black platform. Please read this thread on the PIAF Forum for details and keep us apprised of your progress. The complexity of the GoogleTTS fix for the BeagleBone Black made it an unsuitable candidate for the automatic update utility. Our apologies. We’ve set up a demo IVR application so you can check out the performance of Incredible PBX on the BeagleBone Black for yourself.

Nerd Vittles Demo IVR Options
1 – Call by Name (say "Delta Airlines" or "American Airlines" to try it out)
2 – MeetMe Conference (password is 1234)
3 – Wolfram Alpha (say "What planes are overhead?")
4 – Lenny (The Telemarketer’s Worst Nightmare)
5 – Today’s News Headlines
6 – Weather Forecast (say the city and state, province, or country)
7 – Today in History
8 – Speak to a Real Person (or maybe just voicemail if we’re out)

Overview of Incredible PBX for RasPBX. Let’s quickly run down the new feature set for Incredible PBX 4.11.3 on the RasPBX platform. With the demise of Google Voice less than six months away, we thought it was important to begin offering some additional choices. With this build, you’ll have a dozen preconfigured VoIP trunks from the best providers in the business to choose from. Most offer outbound calls in the U.S. and Canada for a penny or less per minute. And many offer DID trunks with unlimited inbound calls for under $5 a month. Several offer free SIP URIs, or free U.S. DIDs, or free iNum DIDs for unlimited free calling worldwide. You’ll find lots of tips and suggestions in the Providers section of the PIAF™ Forum. Once you’ve signed up with one or more providers, all you have to do is plug in your credentials and enable the desired trunks in FreePBX. It only takes a few seconds.

We also wanted to provide a robust collection of Asterisk applications that let you bring up a fully-functional, feature-rich VoIP platform in a matter of minutes. As with all Incredible PBX builds, this release activates the Flite text-to-speech engine as well as Google’s TTS and STT interfaces. The Baker’s Dozen VoIP applications we’ve chosen for this initial release include free CallerID Name lookups for incoming calls, Voice Dialing with speech-to-text (STT) capability as well as Speed Dials, Yahoo News and Weather reports with text-to-speech (TTS) translation of the Yahoo news feeds, Weather Reports by ZIP code from the National Weather Service, MeetMe conferencing by simply dialing an extension, Telephone Reminders and Hotel-Style Wakeup Calls (both accessible by phone or via FreePBX GUI), Today in History, SMS messaging, Wolfram Alpha, and our versatile AsteriDex contacts database. We’ve also integrated the Incredible PBX automatic update service into the RasPBX build. Just log into your server once in a while, and the rest is automagic. You also get email delivery of voicemails in MP3 format so that you can play back your messages with almost any email client. Finally, there’s a new status application to tell you everything you want to know about your RasPBX server in a single screen.

Getting Started. Incredible PBX for RasPBX is basically a scripted installer. It assumes you already have a functioning RasPBX device. The only gotcha is your RasPBX system needs to be freshly created with no customization. This is important because, as part of the installation procedure, Incredible PBX loads a 15MB image snapshot that overwrites all of your Asterisk, FreePBX, and MySQL configurations. If you have previously customized your setup or added features such as faxing, those will get wiped out during the Incredible PBX installation process. Bottom Line: Start by creating a new RasPBX SD image for use with Incredible PBX. Boot RasPBX and log in as root. Download and run the Incredible PBX installer. Once the Incredible PBX install is complete, customize your new system as desired. While nothing is 100% bullet-proof, we’ve taken pains to design Incredible PBX in such a way that it can coexist with future updates to RasPBX deployed through the raspbx-upgrade utility. And Incredible PBX has its own update utility, update-my-raspbx, which is run automatically when you log into your server as root. Finally, we are confident that this new Incredible PBX release is stable; however, it is version 1.0 software and should be treated as such at least through the end of 2013. Please report any bugs you discover on the PIAF Forum, and we will attempt to provide timely fixes.

Installing Incredible PBX. As noted, we’re assuming you already have created a fresh SD card with your RasPBX image. If not, start with the first four steps only of the excellent tutorials for the Raspberry Pi or BeagleBone Black. Next, boot your system from the SD card and log in with username root and password raspberry or beaglebone depending upon your hardware platform. Be sure you have a working Internet connection for your hardware. Then proceed with the Incredible PBX installation procedure below:

cd /
wget http://incrediblepbx.com/incrediblepbx11-raspbx.gz
gunzip incrediblepbx11-raspbx.gz
chmod +x incrediblepbx11-raspbx
./incrediblepbx11-raspbx

Hang around for the first couple minutes of the install. You’ll be prompted to type a Y as part of the raspbx-upgrade procedure. Once you get past that prompt, you can go have a cup of coffee while the installation procedure continues. It takes about 15-30 minutes to complete depending upon the speed of your Internet connection. Once the base install finishes, the update-passwords script will be launched. It’s imperative that you reset all of your passwords with very secure passwords immediately. This includes the root password, the FreePBX and ARI admin passwords, the extension 701 password, the extension 701 voicemail password, the email delivery address for extension 701, and the telephone reminders password for scheduling reminders by phone. Just fill in the blanks, and the script will do the heavy lifting.

Asterisk Security. Once the Incredible PBX install completes, what you still have is an Incredibly Insecure PBX. Unless you’ve already done so, make certain that Incredible PBX is repositioned behind a hardware-based firewall with no Internet port exposure! This is very important. Neither Asterisk nor FreePBX was designed for direct exposure to the Internet. Before you do anything else, read our Primer on Asterisk Security. Remember, it’s your phone bill.

UPDATE: Travelin’ Man 3 Now Implemented. Beginning with Incredible PBX 4.11.3, IPtables WhiteList security was added to the RasPBX BeagleBone Black platform. And version 4.11.4 released on 1-4-14 added it to the Raspberry Pi edition of RasPBX as well. For the nuts and bolts of how the IPtables firewall and WhiteLists work, read the Travelin’ Man 3 tutorial. Do NOT install the application! It’s already there. We still recommend that you always run your server behind a hardware-based firewall. Travelin’ Man 3 just adds an extra layer of protection. Think of it as a second condom without the pain. 😉

As initially configured, IPtables is set up to allow all incoming and outgoing traffic. It will display as DN in the status display. You have a couple of options. If you only want to allow incoming traffic from phones and users on your private LAN while permitting registered SIP and IAX trunk connections from anywhere, then log into your server as root and execute this command:

cp /root/iptables.lanonly /etc/network/iptables

If you want to further lock down your server and manage all external connections from outside your LAN, run: /root/secure-iptables. As configured, IPtables never blocks internal LAN traffic. By running secure-iptables, you get to set one "safe" external IP address for access to your server in addition to automatically configuring the safe IP addresses of a dozen SIP providers. You then can add additional IP addresses to your WhiteList by running /root/add-ip or /root/add-fqdn. You can delete providers with /root/del-acct. Check the status of your IPtables setup at any time with this command: iptables-status. Restart/reload IPtables settings using only this command: iptables-restart. If you use the traditional IPtables reload procedure, you will permanently erase any fully-qualified domain names in your IPtables configuration and convert them (permanently) to IP addresses. Don’t do it! Always use iptables-restart. Never erase files in /root with the .iptables extension. This is how Travelin’ Man 3 keeps track of your WhiteList entries so that you can delete as desired. For further details, read the Travelin’ Man 3 article.

Overclocking the Raspberry Pi. On the Raspberry Pi platform only, to enable overclocking at your own risk, run: raspi-config. Overclocking works for us. YMMV! The key is a good power supply. Even though the kernel now monitors CPU temperature and manages overclocking, it’s always nice to see for yourself. To monitor the CPU temperature, just run the status program which provides a current snapshot anytime.

Resizing an SD Card. On both the BeagleBone Black and Raspberry Pi platforms, you can resize (expand) the default partition to accommodate a larger SD card. On the Raspberry Pi, the default partition is 4GB. On the BeagleBone Black, it’s only 2GB. To resize the partition to make use of a larger SD card on a Raspberry Pi, choose the resize option after running raspi-config. Then reboot. The BeagleBone Black is a different beast. While we don’t recommend it, you can actually run Incredible PBX using the internal 2GB eMMC memory board rather than an external Micro SD card. Gernot’s documentation will walk you through how to do it. While it is screaming fast compared to an SD card, you’ll only have 371MB of breathing room so it means constant monitoring of your log files and minimal use of functions that consume disk space. Or you could create a cron job to run daily and use a script like ours:
#!/bin/bash
cd /var/log/asterisk
touch empty.log
chmod 664 empty.log
chown asterisk:asterisk empty.log
cp empty.log freepbx_dbug
cp empty.log freepbx_debug
cp empty.log freepbx.log
cp empty.log full
cd ..
rm *.0*
rm *.1*
rm /tmp/ggl*

We much prefer at least an 8GB Type 4 SD card for Incredible PBX. On the BeagleBone Black, we’ve added the resize-partition script in the /root folder. Just run it after booting from your Micro SD card.

Setting Up Google Voice. If you want free calling in the U.S. and Canada for the next five months, then you’ll need a Google Voice account, and you’ll need one dedicated to Incredible PBX, or it won’t work. Log out after setting up the new Google Voice account! Also note that Google Voice will cease to function on May 15, 2014. Read all about it here.

  • Register for Google Voice account (no funky characters in your password!)
  • Enable Google Chat as Phone Destination
  • Configure Google Voice Calls Settings:
    • Call ScreeningOFF
    • Call PresentationOFF
    • Caller ID (In)Display Caller’s Number
    • Caller ID (Out)Don’t Change Anything
    • Do Not DisturbOFF
    • Call Options (Enable Recording)OFF
    • Global Spam FilteringON

  • Place test call in and out using GMail Call Phone

Accessing Incredible PBX By GUI. You don’t have to be a Linux guru to use Incredible PBX. In fact, we’re just about finished with the Linux command prompt, but stay logged in until we finish a few more steps below. Most of your configuration of Incredible PBX will be performed using the FreePBX Web GUI.

If you’re new to Asterisk and FreePBX, here’s the one paragraph primer on what needs to happen before you can make free calls with Google Voice. You’ll obviously need a free Google Voice account. This gets you a phone number for people to call you and a vehicle to place calls to plain old telephones throughout the U.S. and Canada at no cost. You’ll also need a softphone or SIP phone to actually place and receive calls. YATE makes a free softphone for PCs, Macs, and Linux machines so download your favorite and install it on your desktop. Phones connect to extensions in FreePBX to work with Incredible PBX. Extensions talk to trunks (like Google Voice) to make and receive calls. FreePBX uses outbound routes to direct outgoing calls from extensions to trunks, and FreePBX uses inbound routes to route incoming calls from trunks to extensions to make your phones ring. In a nutshell, that’s how a PBX works. There are lots of bells and whistles that you can explore down the road.

Let’s get started. Using a browser, enter the IP address of your server or just use http://raspbx.local as the address. Choose FreePBX Administration. When prompted for a username and password, use admin for the username and whatever FreePBX password you set up when you initially configured your server above. If you ever forget your credentials, just run /root/update-passwords again to reset them.

Changing FreePBX admin Password and Default Email. From the main FreePBX GUI, click Admin => Administrators. Click on admin user in the far-right column. Enter a new Password and click Submit Changes button. We did this in update-passwords, but now you’ll know how to do it from with the FreePBX GUI as well. Click Apply Config button. Be sure to set your default email address in the right margin of Admin -> Module Admin and save your entry. By doing this, you’ll get periodic notices of FreePBX updates. It’s a good idea to stay current with these. They are generally well tested before release.

Activating a Google Voice Trunk. To create a Trunk in FreePBX to handle calls to and from Google Voice, you’ll need three pieces of information from the Google Voice account you set up above: the 10-digit Google Voice phone number, your Google Voice account name, and your Google Voice password. Choose Connectivity -> Google Voice (Motif) from the FreePBX GUI. The following form will appear:

Fill in the blanks with your information and check only the top 2 boxes. If your Google Voice account name ends in @gmail.com, leave that out. Otherwise, include the full email address. Then click Submit Changes and Apply Config.

There’s one more step or your Google Voice account won’t work reliably with Incredible PBX! From the Linux command prompt while logged into your server as root, restart Asterisk: amportal restart

Setting a Destination for Incoming Calls. Now that you’ve created your Google Voice Trunk, we need to tell FreePBX how to process inbound calls when someone dials your Google Voice number. There are any number of choices. You could simply ring an extension such as 700 which we’ve already set up for you. Or you could ring multiple extensions by first creating a Ring Group which is just a list of extension numbers. Or you could direct incoming calls to an Interactive Voice Response (IVR) system.

By default, Incredible PBX is configured to route all incoming calls to extension 701. You can change this whenever you like by choosing Connectivity -> Inbound Routes -> Default. In the Set Destination section of the form, change the target to your desired destination for the incoming calls. Then click Submit and Apply Config.

Changing Extension Passwords. From the main FreePBX GUI, choose Applications -> Extensions. Then click on 701 in the Extension List on the right side of your display. You’ll see a form that looks like this:

We’ve already made these changes using update-passwords, but here’s how to do it in the FreePBX GUI. The extension secret needs to be a combination of letters and numbers. The Voicemail Password needs to be all numbers, preferably six or more. Replace the existing passwords with your own (very secure) entries. You also need to lock down this extension so that it is only accessible from devices on your private LAN. You do that with the deny and permit entries which currently are filled with zeroes. Leave the deny entry the way it is which tells Incredible PBX to block everybody except those allowed in the permit entry below. For the permit, we need the first three octets of your private LAN address, e.g. if your LAN is 192.168.0.something then the permit entry will be 192.168.0.0/255.255.255.0.

Finally, you need to insert your actual email address in the Voicemail section so that voicemails can be delivered to you when someone leaves a message. You can also include a pager email address if you want a text message alert with incoming voicemails. If you want the voicemails to automatically be deleted from the server after they are emailed to you (a good idea considering the disk storage limitations of an SDHC card), change the Delete Voicemail option from No to Yes. That’s it. Now save your settings by clicking the Submit button. Then reload the dialplan by clicking on the red prompt when it appears.

In case you’re curious, unless you’ve chosen to automatically delete voicemails after emailing them, you can retrieve your voicemails for extension 701 by dialing *98701 from any extension on your phone system. You’ll be prompted to enter the voicemail password you set up. And you can leave a voicemail for someone by dialing their extension number preceded by an asterisk, e.g. *701 would let someone leave you a voicemail without actually calling you.

Eliminating Audio and DTMF Problems. You can avoid one-way audio on calls and touchtones that don’t work with these simple settings in FreePBX: Settings -> Asterisk SIP Settings. Just plug in your public IP address and your private IP subnet. Then set ULAW as the only Audio Codec.

Setting Up a Desktop Softphone. Incredible PBX supports all kinds of telephones, but we’ll start with the easy (free) one today. You can move on to "real phones" once you’re smitten with the VoIP bug. For today, you’ll need to download a softphone to your desktop PC or Mac.

As we mentioned, the easiest way to get started with Incredible PBX is to set up a YATE softphone on your Desktop computer. Versions are available at no cost for Macs, PCs, and Linux machines. Just download the appropriate one and install it from this link. Once installed, it’s a simple matter to plug in your extension 701 credentials and start making calls. Run the application and choose Settings -> Accounts and click the New button. Fill in the blanks using the IP address of Incredible PBX, 701 for your account name, and whatever password you created for the extension. Click OK.

Once you are registered to extension 701, close the Account window. Then click on YATE’s Telephony Tab and place your first call. It’s that easy!

Incredible Trunks. When you’re ready to try some other SIP providers, we’ve done the hard work for you by providing the setups for a dozen terrific providers. All you have to do is sign up for service on their sites, enable the desired Trunks in FreePBX, and plug in your credentials. Here is a quick Cheat Sheet courtesy of Kristian Hare, who translated the Incredible PBX setups into a spreadsheet. Just click on the image below to open it in a new window. Then click on the redisplayed image to enlarge it.

Adding WiFi Support. This is covered on Gernot’s web site, but we’ll address it just for ease of reference. The most important detail is don’t get creative with your choice of USB WiFi adapters. The Edimax EW-7811Un works so use it. It’s about $10 from Amazon with free 2-day Prime shipping. Next, edit /etc/network/interfaces and add the following lines using the name of your WiFi network as well as your password "in quotes":

auto wlan0
allow-hotplug wlan0
iface wlan0 inet dhcp
wpa-ssid your-ssid-here-no-quotes
wpa-psk "your-passphrase-here-with-quotes"

Next, reboot your server and login as root. Your USB WiFi adapter should be lit. Running ifconfig should display an IP address for wlan0. ifdown eth0 will shut down your wired connection. Then restart Asterisk to switch to WiFi: amportal restart.

Shutting Down Your Server. Last but not least, never just pull the plug when you want to shut down your server, or you may end up with corrupted MySQL databases. Then nothing will run. Instead, log into your server as root, and issue the following commands: amportal stop and then shutdown -h now.

The Incredible PBX 4.11.3 Software Collection

Now for the fun stuff. For most folks getting started with Asterisk and FreePBX, the steepest learning curve is moving from a functioning system to one that can actually do cool stuff. Text-to-speech and speech-to-text applications and IVRs and call management and conferencing and click to dial and SMS messaging and faxing are what separate the men from the boys on the Asterisk playing field. And that’s where Incredible PBX really shines. You don’t have to do anything but choose the apps you want to deploy for yourself or your users. Everything is already in place. If you don’t use it, it doesn’t consume any computing resources. So it’s not like the bloatware of decades ago that was always sitting in memory wasting your computing cycles. Here’s a quick thumbnail on each of the applications that’s included in Incredible PBX for RasPBX. You can include almost all of these applications in your IVRs so that callers can make a selection from a list of menu choices. We’ve included the appropriate FreePBX links below. On many of the apps, we’ve also included links to Nerd Vittles or PIAF Forum tutorials for more detailed documentation when you need it.

News Headlines from Yahoo

How It Works. Dial 951. Listen to latest news headlines from Yahoo.

Prerequisites: Uses preconfigured Google TTS.

Setup Required: None

IVR/Dialplan Integration: Misc Destination -> News Headlines

Worldwide Weather Forecasts by City from Yahoo

How It Works. Dial 949. Say the name of a city and state/country for weather report desired. Press #. Listen.

Prerequisites: Uses preconfigured Google STT for query and Google TTS for playback.

Setup Required: None

IVR/Dialplan Integration: Misc Destination -> Weather by City

Worldwide Weather Forecasts by City from Weather Underground

How It Works. Dial 949. Say the name of a city and state/country for weather report desired. Press #. Listen.

Prerequisites: Requires free Weather Underground API key. Uses preconfigured Google STT for query and Google TTS for playback.

Setup Required: Obtain free Weather Underground API key. In /var/lib/asterisk/agi-bin, insert your API key in $apikey of nv-weather-underground.php. Copy nv-weather-underground.php to nv-weather-google.php. Replaces Yahoo Weather by City and provides best available free weather reports.

Limitations. Free account supports up to 10 calls per minute and up to 500 calls per day.

IVR/Dialplan Integration: Misc Destination -> Weather by City

U.S. Weather Forecasts by ZIP Code from National Weather Service

How It Works. Dial 947 (Z-I-P). Enter 5-digit ZIP code for weather report desired. Listen.

Prerequisites: Uses preconfigured Flite TTS to deliver weather report.

Setup Required: None

IVR/Dialplan Integration: Misc Destination -> Weather by ZIP

Today in History from HistoryOrb.com

How It Works. Dial 86329 (T-O-D-A-Y). Listen to today’s important events in history.

Prerequisites: Uses preconfigured Flite and Google TTS to deliver report.

Setup Required: None

IVR/Dialplan Integration: Misc Destination -> Today in History

Schedule Reminders by Phone and Web

How It Works. Dial 123. Enter password. Schedule a reminder or recurring reminder.

Web Interface. FreePBX -> Other -> Reminders to schedule, review, or delete existing reminders.

Prerequisites: Requires configuration of password with /root/update-passwords.

Setup Required: None. Complete tutorial available here.

IVR/Dialplan Integration: Misc Destination -> Reminders

Hotel-Style Wakeup Calls

How It Works. Dial *68. Schedule a wakeup call just like in the hotel.

Web Interface. FreePBX -> Applications -> Wake Up Calls to schedule and configure wakeup calls.

Prerequisites: None.

Setup Required: None. Complete tutorial available here.

IVR/Dialplan Integration: Misc Destination -> Wakeup Calls

Time of Day

How It Works. Dial *61. Check the time just like in the Ma Bell era.

Prerequisites: None.

Setup Required: None.

IVR/Dialplan Integration: Misc Destination -> Time of Day

AsteriDex Phone Book and RoboDialer

How It Works. Open AsteriDex. Populate entries. Set click-to-dial extension. Click on person/company to call. Answer ringing call on your designated click-to-dial extension. Wait for called party to be connected.

Web Interface. FreePBX -> Other -> AsteriDex to update directory and to place click-to-dial calls.

Prerequisites: Populate the AsteriDex directory with your favorite people and places to call.

Setup Required: Complete tutorial for AsteriDex is available here. Import Google Contacts. Import Outlook Contacts. Import from Exchange Server. Import Mac Address Book or CSV Contacts.

AsteriDex Voice Dialer

How It Works. Dial 411. Say the name of person or company to call. Entry is looked up from AsteriDex and called.

Web Interface. FreePBX -> Other -> AsteriDex to update directory and to place click-to-dial calls.

Prerequisites: Populate the AsteriDex directory with your favorite people and places to call. Uses Google STT.

Setup Required: None. Complete tutorial for AsteriDex is available here.

IVR/Dialplan Integration: Misc Destination -> Voice Dialer

AsteriDex Speed Dialing Duo

How It Works. Dial 412. Enter Speed Dial code of person/company. Entry is looked up from AsteriDex and called.

Alternative. Dial 000 + Speed Dial code. Entry is looked up from AsteriDex and called.

Web Interface. FreePBX -> Other -> AsteriDex to update directory and to place click-to-dial calls.

Prerequisites: Populate the AsteriDex directory with your favorite people and places to call. Include a DialCode for speed dial.

Setup Required: None. Complete tutorial for AsteriDex is available here.

IVR/Dialplan Integration: Misc Destination -> Call by Code

SMS Dictator

How It Works. Dial 767 (S-M-S). Say either the name of an AsteriDex entry or enter an SMS phone number to call. Dictate a message to be sent via Google SMS. Your message is converted to text and delivered via Google SMS.

Prerequisites: Requires Google Voice account and SMS Dictator setup. Uses preconfigured Google STT.

Setup Required: Before first use, sign up for a Google Voice account that can be dedicated to Incredible PBX use. Run install-smsdictator.sh in /root to configure SMS Dictator with your credentials. Complete documentation available here. May cease to function on May 15, 2014.

IVR/Dialplan Integration: Misc Destination -> SMS Dictator

SMS Message Blasting

How It Works. Run the smsblast script in /root to deliver an SMS text message stored in smsmsg.txt to all of the SMS recipients configured in smslist.txt.

Prerequisites: Requires Google Voice account and SMS Blaster setup.

Setup Required: Before first use, sign up for a Google Voice account that can be dedicated to Incredible PBX use. Untar smsblast.tgz in /root: tar zxvf smsblast.tgz. Edit smsblast and insert your Google Voice credentials. Edit smsmsg.txt and type your SMS message to be sent. Edit smslist.txt and prepare your SMS message recipient list. Then run smsblast to deliver your messages. May cease to function on May 15, 2014.

Wolfram Alpha

How It Works. Dial 4747. Say your query for Wolfram Alpha. Examples here. Listen to results.

Prerequisites: Requires free Wolfram Alpha account and setup. Uses preconfigured Google STT and Flite.

Limitations: Free account restricted to 2,000 queries per month.

Setup Required: Before first use, sign up for a Wolfram Alpha account and obtain AppID. Then configure Wolfram Alpha with your credentials by running install-wolframalpha.sh in /root. Complete documentation available here.

IVR/Dialplan Integration: Misc Destination -> Wolfram Alpha

MeetMe Conferencing

How It Works. Dial 2663 (C-O-N-F). Enter user or admin PIN for conference room. Participate in conference call.

Prerequisites: None.

Setup Required: Configure your participant and admin PINs: FreePBX -> Applications -> Conferences -> 2663

IVR/Dialplan Integration: Conferences -> 2663

Telemarketers and Old Girl Friends: Meet Lenny

How It Works. Dial 53669 (L-E-N-N-Y). An entertaining solution for SPAM calls. Also configured as destination for callers on your BlackList.

Prerequisites: None. Read all about Lenny here.

Setup Required: Add 10-digit numbers of spammers to Admin -> Blacklist or dial *32 to BlackList your last caller.

IVR/Dialplan Integration: Extension -> 53669

HylaFax/AvantFax Fax Server

How It Works. Dial 329 (F-A-X). Faxing already is available as a module in RasPBX. You can send faxes to Incredible PBX using almost any SIP or Google Voice DID that you’ve dedicated to faxing.

Prerequisites: Read the Fax Gateway tutorial on Gernot’s web site.

Setup Required: After installing Incredible PBX, run the install-fax script to set up the HylaFax/AvantFax servers. When prompted whether to add an extension, type Y. We recommend 329 for the extension number. It spells F-A-X and makes it easy for everyone to remember the dedicated fax extension on your system. Specify an email address for delivery of the incoming faxes. Switch to FreePBX and add an Incoming Route for the DID that you’ve dedicated to incoming faxes. Specify 329 as the destination. To add additional fax numbers with additional email destinations, run add-fax-extension.

IVR/Dialplan Integration: Extension -> 329

Bluetooth Proximity Detection

Finally, if you really want to impress your friends, buy yourself a cheap Bluetooth adapter and set up a Proximity Detection System that will forward your Asterisk calls to your cellphone when you’re away from your desk. This Nerd Vittles article will walk you through the quick setup process. Before you begin, just install bluez on your Raspberry Pi or BeagleBone Black: apt-get install bluez.

A Word About Flite TTS

We’ve included FLITE as the generic text-to-speech engine for Asterisk. The quality of Google TTS is much better, but we never know how long Google apps will continue to function. Because FLITE is actually integrated into Asterisk, it is susceptible to breakage if a RasPBX upgrade installs a new release of Asterisk. If this happens, you’ll know when FLITE goes silent. You can also run the following command from the Linux command prompt to check it. If you don’t get a page of FLITE information, it’s broken. 🙂

asterisk -rx "core show application like flite"

Don’t fret if FLITE breaks. Here’s how to fix it:

cd /usr/src/flite
make clean
make
make install
amportal restart

A Word About MySQL

To eliminate the need to maintain separate versions of Incredible PBX for RasPBX on the Raspberry Pi and BeagleBone Black platforms, we’ve changed the MySQL password on both platforms to raspberry. Originally, beaglebone was the assigned password on the BeagleBone Black RasPBX implementation.


Support Issues. With any application as sophisticated as this one, you’re bound to have questions. Blog comments are a terrible place to handle support issues although we welcome general comments about our articles and software. If you have particular support issues, we encourage you to get actively involved in the PBX in a Flash Forums. It’s the best Asterisk tech support site in the business, and it’s all free! Please have a look and post your support questions there. Unlike some forums, ours is extremely friendly and is supported by literally hundreds of Asterisk gurus and thousands of ordinary users just like you. You won’t have to wait long for a courteous response.

Originally published: Tuesday, December 10, 2013    Updated: Tuesday, December 24, 2013


Need help with Asterisk? Visit the PBX in a Flash Forum.


Special Thanks to Our Generous Sponsors


FULL DISCLOSURE: ClearlyIP, Skyetel, Vitelity, DigitalOcean, Vultr, VoIP.ms, 3CX, Sangoma, TelecomsXchange and VitalPBX have provided financial support to Nerd Vittles and our open source projects through advertising, referral revenue, and/or merchandise. As an Amazon Associate and Best Buy Affiliate, we also earn from qualifying purchases. We’ve chosen these providers not the other way around. Our decisions are based upon their corporate reputation and the quality of their offerings and pricing. Our recommendations regarding technology are reached without regard to financial compensation except in situations in which comparable products at comparable pricing are available from multiple sources. In this limited case, we support our sponsors because our sponsors support us.

BOGO Bonaza: Enjoy state-of-the-art VoIP service with a $10 credit and half-price SIP service on up to $500 of Skyetel trunking with free number porting when you fund your Skyetel account. No limits on number of simultaneous calls. Quadruple data center redundancy. $25 monthly minimum spend required. Tutorial and sign up details are here.

The lynchpin of Incredible PBX 2020 and beyond is ClearlyIP components which bring management of FreePBX modules and SIP phone integration to a level never before available with any other Asterisk distribution. And now you can configure and reconfigure your new Incredible PBX phones from the convenience of the Incredible PBX GUI.

VitalPBX is perhaps the fastest-growing PBX offering based upon Asterisk with an installed presence in more than 100 countries worldwide. VitalPBX has generously provided a customized White Label version of Incredible PBX tailored for use with all Incredible PBX and VitalPBX custom applications. Follow this link for a free test drive!
 

Special Thanks to Vitelity. Vitelity is now Voyant Communications and has halted new registrations for the time being. Our special thanks to Vitelity for their unwavering financial support over many years and to the many Nerd Vittles readers who continue to enjoy the benefits of their service offerings. We will keep everyone posted on further developments.


Some Recent Nerd Vittles Articles of Interest…

  1. Many of our purchase links refer users to Amazon when we find their prices are competitive for the recommended products. Nerd Vittles receives a small referral fee from Amazon to help cover the costs of our blog. We never recommend particular products solely to generate Amazon commissions. However, when pricing is comparable or availability is favorable, we support Amazon because Amazon supports us. []

The 5-Minute PBX: Incredible PBX 11 and Incredible Fax Get a Facelift

With the release of PBX in a Flash™ 2.0.6.4.4 last week, it seemed only fitting to reintroduce our one-click wonder that takes advantage of the latest and greatest feature sets in both Asterisk® 11 and FreePBX® 2.11. Incredible PBX™ 11 gives you the best of all worlds plus all of the very best, preconfigured Asterisk applications we could find. And the installer together with all of the apps are pure open source so you can learn how to build a system like this for yourself if that happens to be your thing. Installation is a breeze. Set up a new PBX in a Flash™ 2.0.6.4.4 server with PIAF-Green and FreePBX 2.11, download the Incredible PBX 11 installer, and five minutes later you’re ready to begin your VoIP adventure. And it’s all FREE!
 

News Flash: Incredible PBX 11 and Incredible Fax also are available for the $35 Raspberry Pi.

So what’s included? Dozens of upgraded Asterisk Apps. 9-Layer Security. 20 Preconfigured VoIP Provider Trunks. 1-Click Installers for Asterisk.everything. Certified Asterisk support. All-new Google Voice connectivity with Asterisk Motif. Voice-enabled SMS messaging and script-based SMS message blasting. Incredible PBX Automatic Update Utility. Incredible Fax™ 11 delivers free faxing with HylaFax™ and AvantFax®. And Incredible PBX and Incredible Fax are now GPL2-licensed.

The Incredible PBX 11 Inventory. For those that have never heard of The Incredible PBX, here’s the current 11.0 feature set in addition to the base install of PBX in a Flash with the CentOS 6.4, Asterisk 11, FreePBX 2.11, and Apache, SendMail, MySQL, PHP, phpMyAdmin, IPtables Linux firewall, Fail2Ban, and WebMin. Incredible Fax, NeoRouter and PPTP VPNs, and all sorts of backup solutions are still just one command away and may be installed using the scripts included with Incredible PBX 11 and PBX in a Flash. Type help-pbx and browse /root for dozens of one-click install scripts.

And then there’s the Incredible Freebie! As they say, "Never look a gift horse in the mouth." What began as a kludgey, dual-call, dual-provider Google Voice implementation to take advantage of Google’s free PSTN calling in the U.S. and Canada with Asterisk 1.4 and 1.6 is now a zippy-quick, Gtalk-based calling platform that rivals the best SIP-to-SIP calls on the planet. The Incredible PBX Google Voice implementation provides virtually instantaneous PSTN connections to almost anybody, anywhere. Trust us! Except for the price which is still free, you’ll never know you weren’t connected via Ma Bell’s overpriced long-distance lines and neither will the Little Mrs.

To get started, download the latest PBX in a Flash 2.0.6.4.4 ISO from SourceForge, burn to then boot from the PIAF2 CD, choose the PIAF-Green option to load Asterisk 11, and pick FreePBX 2.11 when prompted. Take a look at the PIAF Quick Start Guide for step-by-step installation instructions. Once the PIAF2 install is completed, just download and run the new Incredible PBX 11 installer.

A Few Words About Security. Thanks to its Zero Internet Footprint™ design, Incredible PBX is different. It remains the most secure Asterisk-based PBX around. What this means is The Incredible PBX has been engineered to sit safely behind a NAT-based, hardware firewall with no Internet port exposure to your actual server. For those needing remote telephone support, Incredible PBX optionally loads Travelin’ Man 2 and 3 for you so your IPtables Linux Firewall can be either self-managed by end-users or set up with predefined IP addresses and FQDNs for all of your remote sites. Read about this Asterisk SIP vulnerability. Then you’ll understand why WhiteList-based server security has become absolutely essential. WhiteList Security means only those devices with a registered IP address in your WhiteList can get to your server’s resources. To the NSA and everyone else, your server doesn’t even exist. Their only way to connect to you is with a POTS telephone and your published phone number. Can you hear me now?

For those with multiple servers to interconnect, we’ve provided one-click installers for not one but two VPN solutions: NeoRouter and PPTP. Suffice it to say, Incredible PBX has Security in Spades™: customized IPtables Linux Firewall, Fail2Ban tweaked for Asterisk security monitoring, FreePBX Extension Lockdown by IP address, randomized FreePBX extension passwords, Travelin’ Man 2 and 3 WhiteList Security, multiple VPN solutions for encrypted server-to-server communications, plus a bottom-up design focused on flawless operation behind a hardware-based firewall. You won’t find a more secure Personal Branch Exchange™ at any price.

Here’s the Incredible PBX 9-Layer Security Model:

Prerequisites. Here’s what we recommend to get started properly:

We’ve shifted gears on our recommended Atom platform for PIAF2 after excellent results with both the single-core and dual-core Atom kits manufactured by Foxconn (pictured on the left below). That’s the dLink Gaming Router on the right. Seems kinda silly to spend twice as much for a machine that you can build yourself in under 5 minutes. Basically you remove four screws, insert a Phillips screwdriver in one of the holes and gently pry the cover away from the box. Then you pop off the back by inserting a small flat-blade screwdriver, remove four more screws, slide in a solid-state drive (SSD) and a 4GB stick of notebook computer RAM, and you’re done in a couple minutes. Replace the screws and the cover, and you have a perfect PIAF2 platform with terrific performance and no moving parts for about $200. The link above will take you to the PIAF Forum thread for these machines. They go on sale almost weekly. See the right column of Nerd Vittles (just below our tweets) for this week’s special at Amazon. The dual-core Atom box typically is under $150. It could easily handle an office with 50+ employees sitting on a bookshelf with an Internet connection (wired or wireless!). No noise. Very little heat. Low power requirements. Perfect!

Installing Incredible PBX 11. The installation process is simple. Here are the 3 Easy Steps to Free Calling, and The Incredible PBX will be ready to receive and make free U.S./Canada calls immediately:

1. Install PIAF-Green with FreePBX 2.11 using PIAF2 ISO or PIAF-Green VM
2. Run Incredible PBX 11 installer
3. Configure Google Voice and a softphone or SIP phone

Configuring Google Voice. If you plan to use Google Voice, you’ll need a dedicated Google Voice account to support Incredible PBX 11. If you want to use the inbound fax capabilities of Incredible Fax 11, then you’ll need an additional Google Voice line that can be routed to the FAX custom destination using FreePBX. The more obscure the username (with some embedded numbers), the better off you will be. This will keep folks from bombarding you with unsolicited Gtalk chat messages, and who knows what nefarious scheme will be discovered using Google messaging six months from now. So keep this account a secret!

We’ve tested this extensively using an existing Gmail account, and inbound calling is just not reliable. The reason seems to be that Google always chooses Gmail chat as the inbound call destination if there are multiple registrations from the same IP address. So, be reasonable. Do it our way! Set up a dedicated Gmail and Google Voice account, and use it exclusively with Incredible PBX 11. It’s free at least through 2013. Google Voice no longer is by invitation only so, if you’re in the U.S. or have a friend that is, head over to the Google Voice site and register.

You must choose a telephone number (aka DID) for your new account, or Google Voice calling will not work… in either direction. Google used to permit outbound Gtalk calls using a fake CallerID, but that obviously led to abuse so it’s over! You also have to tie your Google Voice account to at least one working phone number as part of the initial setup process. Your cellphone number will work just fine. Don’t skip this step either. Just enter the provided 2-digit confirmation code when you tell Google to place the test call to the phone number you entered. Once the number is registered, you can disable it if you’d like in Settings, Voice Setting, Phones. But…

IMPORTANT: Be sure to enable the Google Chat option as one of your phone destinations in Settings, Voice Setting, Phones. That’s the destination we need for The Incredible PBX to work its magic! Otherwise, all inbound and outbound calls will fail. If you don’t see this option, you may need to call up Gmail and enable Google Chat there first. Then go back to the Google Voice Settings.

While you’re still in Google Voice Settings, click on the Calls tab. Make sure your settings match these:

  • Call ScreeningOFF
  • Call PresentationOFF
  • Caller ID (In)Display Caller’s Number
  • Caller ID (Out)Don’t Change Anything
  • Do Not DisturbOFF
  • Call Options (Enable Recording)OFF
  • Global Spam FilteringON

Click Save Changes once you adjust your settings. Under the Voicemail tab, plug in your email address so you get notified of new voicemails. Down the road, receipt of a Google Voice voicemail will be a big hint that something has come unglued on your PBX.

Incredible PBX 11 Installation. Log into your server as root and issue the following commands to run The Incredible PBX 4 installer:

cd /root
wget http://incrediblepbx.com/incrediblepbx11.gz
gunzip incrediblepbx11.gz
chmod +x incrediblepbx11
./incrediblepbx11

Now have a quick cup of coffee while the installer works its magic. While you’re waiting just make sure that you’ve heeded our advice and installed your server behind a hardware-based firewall. No ports need to be opened on your firewall to support Incredible PBX. Leave it that way!

One final word of caution is in order regardless of your choice of providers: Do NOT use special characters in any provider passwords, or nothing will work!

[purehtml id=10]


FINAL STEPS. Once the Incredible PBX 11 install completes, there are two optional steps for those that will have remote phones or users outside your firewall. Install both Travelin’ Man 2 and 3 for an ultra-secure system.

Logging in to FreePBX 2.11. Using a web browser, you access the FreePBX GUI by pointing your browser to the IP address of Incredible PBX 11. Click on the Users tab. It will change to Admin. Now click the FreePBX Admin button. When prompted for a username, it’s maint. When prompted for the password, it’s whatever you set up as your maint password when you installed PBX in a Flash. If you forget it, you can always reset it by logging into your server as root and running passwd-master.

Configuring Google Voice Trunks in FreePBX. All trunk configurations now are managed within FreePBX, including Google Voice. This makes it easy to customize your Incredible PBX to meet your specific needs. If you plan to use Google Voice, here’s how to quickly configure one or more Google Voice trunks within FreePBX. After logging into FreePBX with your browser, click the Connectivity tab and choose Google Voice/Motif. To Add a new Google Voice account, just fill out the form. Do NOT check the third box or incoming calls will never ring!

While you’re still in FreePBX, choose Applications, Extensions, and click on the 701 extension. Write down your extension and voicemail passwords. You’ll need them to configure a phone in a minute.

IMPORTANT LAST STEP: Google Voice will not work unless you restart Asterisk from the Linux command line at this juncture. Using SSH, log into your server as root and issue the following command: amportal restart.

Incredible Fax 11 Installation. If you want the added convenience of having your Incredible PBX double as a free fax machine, run /root/incrediblefax11.sh after the Incredible PBX 4 install completes. Plug in your email address for delivery of incoming faxes and enter your home area code when prompted. For every other prompt, just press the Enter key. If you’d like to also add the optional OCR utility, just choose it when prompted. For complete documentation, see this Nerd Vittles article. Don’t forget that a REBOOT OF YOUR SERVER is required when the install is finished, or faxing won’t work! Then log in through the PIAF GUI using maint:password. You’ll find the AvantFax GUI on the Admin menu.

Also be sure to set up a second, dedicated Google Voice number if you want support for inbound faxing. Once the Google Voice credentials are configured in FreePBX for the additional Google Voice line, simply add an Inbound Route for this DID to point to the Custom Destination: Fax (Hylafax). This comes preconfigured with Incredible PBX 11.

Eliminating Audio and DTMF Problems. You can avoid one-way audio on calls and touchtones that don’t work with these simple settings in FreePBX: Settings -> Asterisk SIP Settings. Just plug in your public IP address and your private IP subnet. Then set ULAW as the only Audio Codec.

Setting Up a Desktop Softphone. PBX in a Flash supports all kinds of telephones, but we’ll start with the easy (free) one today. You can move on to "real phones" once you’re smitten with the VoIP bug. For today, you’ll need to download a softphone to your desktop PC or Mac.

The easiest way to get started is to set up a YATE softphone on your Desktop computer. Versions are available at no cost for Macs, PCs, and Linux machines. Just download the appropriate one and install it from this link. Once installed, it’s a simple matter to plug in your extension credentials and start making calls. Run the application and choose Settings -> Accounts and click the New button. Fill in the blanks using the IP address of your server, 201 for your account name, and whatever password you created for the extension. Click OK.

Once you are registered to extension 701, close the Account window. Then click on YATE’s Telephony Tab and place your first call. It’s that easy!

Incredible PBX Test Flight. The proof is in the pudding as they say. So let’s try two simple tests. First, let’s place an outbound call. Using the softphone, dial your 10-digit cellphone number. Google Voice should transparently connect you. Answer the call and make sure you can send and receive voice on both phones. Second, from another phone, call the Google Voice number that you’ve dedicated to The Incredible PBX. Your softphone should begin ringing shortly. The call will be answered by the Nerd Vittles sample IVR. You can explore all of the preconfigured options at your leisure.

Learn First. Explore Second. Even though the installation process has been completed, we strongly recommend you do some reading before you begin your VoIP adventure. VoIP PBX systems have become a favorite target of the hackers and crackers around the world and, unless you have an unlimited bank account, you need to take some time learning where the minefields are in today’s VoIP world. Start by reading our Primer on Asterisk Security. We’ve secured all of your passwords except your root password and your passwd-master password. We’re assuming you’ve put very secure passwords on those accounts as if your phone bill depended upon it. It does! There’s loads of additional documentation on the PBX in a Flash documentation web site.

Incredible PBX 11 Automatic Update Utility. With Incredible PBX 11, we’ve introduced a new automatic update utility to assist in keeping your system current and secure. It runs each time you log into your server as root. The first ten updates are at no cost. You then can elect to continue the service by subscribing to the update service which is available for a modest $20 for the remainder of calendar year 2013. Whether you subscribe or not, new releases of PBX in a Flash and Incredible PBX will always be free! This simply is a way for us to recover our costs in providing a service that many of our users have asked for. We hope you like it.

Choosing VoIP Providers. Nothing beats free when it comes to long distance calls. But nothing lasts forever. And, in the VoIP World, redundancy is dirt cheap. So we strongly recommend you set up another account with Vitelity using our special link below. This gives your PBX a secondary way to communicate with every telephone in the world, and it also gets you a second real phone number for your new system… so that people can call you. Here’s how it works. You pay Vitelity a deposit for phone service. They then will bill you $3.99 a month for your new phone number. This $3.99 also covers the cost of unlimited inbound calls (two at a time) delivered to your PBX for the month. For outbound calls, you pay by the minute and the cost is determined by where you’re calling. If you’re in the U.S., outbound calls to anywhere in the U.S. are a little over a penny a minute. If you change your mind about Vitelity and want a refund of the balance in your account, all you have to do is ask. The trunks for Vitelity already are preconfigured with The Incredible PBX. Just insert your credentials using FreePBX and uncheck the Disable Trunk checkbox. Then add the Vitelity trunk as the third destination for your default outbound route. That’s it. Congratulations! You now have a totally redundant phone system.

Incredible PBX 11 includes preconfigured trunk setups for all of your favorite trunk providers. Just plug in your credentials and activate the trunks you need. In less than a minute, you’re done. Here’s the Incredible PBX Top 20 Trunk List with some reasons why these providers made our short list:

  • AxVoice ($14.99/mo. Business Plan; $16.58/mo. Unlimited Calls to 45 Countries)
  • CallCentric (Good International Calling Rates)
  • DIDforSale (20 channels per DID; unlimited DID calls for $8.99/mo.)
  • ENUM
  • FlowRoute (Good International Calling Rates)
  • FreeNum
  • Future-Nine (Supports CallerID Spoofing)
  • Google Voice (Free DIDs and free U.S./Canada calling)
  • IPkall (Free SIP/IAX DIDs)
  • Les.net (Supports CallerID Spoofing; very low rates)
  • LocalPhone (Dirt-cheap DIDs and calling rates worldwide; Free iNum DID)
  • Simon Telephonics (Free SIP-to-GoogleVoice Gateway)
  • SIPgate (Free residential DIDs sometimes)
  • Skype (Free Skype-to-Skype calls worldwide)
  • Teliax (Unlimited inbound DID $5/mo.)
  • Vitelity (Our supporter and the Best in the Business!)
  • VoIPms (CallerID spoofing; Free iNum calling; Very low rates)
  • VoIPMyWay (Residential Unlimited: $15.50/mo. Business Unlimited: $40/mo.)
  • VoIPStreet (Free DID)

Configuring Email. You’re going to want to be notified when updates are available for FreePBX, and you may also want notifications when new voicemails arrive. Everything already is set up for you except actually entering your email notification address. Using a web browser, open the FreePBX GUI by pointing your browser to the IP address of your Incredible PBX. Then click Administration and choose FreePBX. To set your email address for FreePBX updates, go to Admin -> Module Admin and click on the shield on the right margin. To configure emails to notify you of incoming voicemails, go to Applications -> Extensions -> 701 and scroll to the bottom of the screen. Then follow your nose. Be sure to reload FreePBX when prompted after saving your changes.

A Final Word About Security. In case you couldn’t tell, security matters to us, and it should matter to you. Not only is the safety of your system at stake but also your wallet and the safety of other folks’ systems. Unless you subscribe to the new Automatic Update Utility, our only means of alerting you to security issues which arise is through the RSS Feed that we maintain for the PBX in a Flash project. This feed is prominently displayed in the web GUI which you can access with any browser pointed to the IP address of your server. Check It Daily! Or add our RSS Feed to your favorite RSS Reader. We also recommend you follow @NerdUno on Twitter. We’ll keep you entertained and provide immediate notification of security problems that we hear about. Finally, visit the PIAF Forums regularly. You’ll be surprised what you can learn in 10 minutes of browsing. Be safe!

Kicking the Tires. OK. That’s enough tutorial for today. Let’s play. Using your new softphone, begin your adventure by dialing these extensions:

  • D-E-M-O – Incredible PBX Demo (running on your PBX)
  • T-I-D-E – Get today’s tides and lunar schedule for any U.S. port
  • 4-1-1 – Phonebook lookup/dialer with AsteriDex
  • C-O-N-F – Set up a MeetMe Conference on the fly (PIN: 1234)
  • 1-2-3 – Schedule regular/recurring reminder (PW: 12345678)
  • 2-2-2 – ODBC/Timeclock Lookup Demo (Empl No: 12345)
  • 2-2-3 – ODBC/AsteriDex Lookup Demo (Code: AME)
  • 3-3-3 – Look up a definition for any word or term
  • 9-4-9 – Weather forecast for any city in the world
  • 9-5-0 – Retrieve stock report by stock symbol
  • 9-5-1 – Latest Google News headlines
  • Dial *68 – Schedule a hotel-style wakeup call from any extension

Don’t forget to List Yourself in Directory Assistance so everyone can find you by dialing 411. And add your new number to the Do Not Call Registry to block telemarketing calls. Or just call 888-382-1222 from your new number.

Deals of the Week. There are a couple of amazing deals still on the street, but you’d better hurry. First, for new customers, Sangoma is offering a board of your choice from a very impressive list at 75% off. For details, see this thread on the PIAF Forum. Second, a new company called Copy.com is offering 20GB of free cloud storage with no restrictions on file size uploads (which are all too common with other free offers). Copy.com has free sync apps for Windows, Macs, and Linux systems. To take advantage of the offer, just click on our referral link here. We get 5GB of extra storage, too, which will help avoid another PIAF Forum disaster.

Originally published: Tuesday, June 18, 2013


Need help with Asterisk? Visit the PBX in a Flash Forum.


Don’t miss the first-ever FreePBX World on August 27-28 at the Mandalay Bay in Las Vegas. For complete details, see this post on the FreePBX blog.


We are pleased to once again be able to offer Nerd Vittles’ readers a 20% discount on registration to attend this year’s 10th Anniversary AstriCon in Atlanta. And, if you hurry, you also can take advantage of the early bird registration discount. Here’s the Nerd Vittles Discount Code: AC13NERD.


Special Thanks to Our Generous Sponsors


FULL DISCLOSURE: ClearlyIP, Skyetel, Vitelity, DigitalOcean, Vultr, VoIP.ms, 3CX, Sangoma, TelecomsXchange and VitalPBX have provided financial support to Nerd Vittles and our open source projects through advertising, referral revenue, and/or merchandise. As an Amazon Associate and Best Buy Affiliate, we also earn from qualifying purchases. We’ve chosen these providers not the other way around. Our decisions are based upon their corporate reputation and the quality of their offerings and pricing. Our recommendations regarding technology are reached without regard to financial compensation except in situations in which comparable products at comparable pricing are available from multiple sources. In this limited case, we support our sponsors because our sponsors support us.

BOGO Bonaza: Enjoy state-of-the-art VoIP service with a $10 credit and half-price SIP service on up to $500 of Skyetel trunking with free number porting when you fund your Skyetel account. No limits on number of simultaneous calls. Quadruple data center redundancy. $25 monthly minimum spend required. Tutorial and sign up details are here.

The lynchpin of Incredible PBX 2020 and beyond is ClearlyIP components which bring management of FreePBX modules and SIP phone integration to a level never before available with any other Asterisk distribution. And now you can configure and reconfigure your new Incredible PBX phones from the convenience of the Incredible PBX GUI.

VitalPBX is perhaps the fastest-growing PBX offering based upon Asterisk with an installed presence in more than 100 countries worldwide. VitalPBX has generously provided a customized White Label version of Incredible PBX tailored for use with all Incredible PBX and VitalPBX custom applications. Follow this link for a free test drive!
 

Special Thanks to Vitelity. Vitelity is now Voyant Communications and has halted new registrations for the time being. Our special thanks to Vitelity for their unwavering financial support over many years and to the many Nerd Vittles readers who continue to enjoy the benefits of their service offerings. We will keep everyone posted on further developments.


Some Recent Nerd Vittles Articles of Interest…