

A few months ago, we introduced a preview of Incredible PBX for Ubuntu 14. And now we’re pleased to release the latest production-ready version with all the bells and whistles including Incredible Fax featuring HylaFax and AvantFax.
Introducing Incredible PBX 11 for Ubuntu 14.04
Today’s plan is to build a production-ready version of Incredible PBX with Ubuntu 14.04 that mimics the functionality of our previous builds with literally dozens of turnkey applications that show off the very best features of Asterisk®. If you believe in the open source community, this build is for you. No strings, no gotchas, and no quirky licenses!
Six months ago, we could barely spell Ubuntu. Then an enterprising young programmer named Eric Teeter shot us a script to install Ubuntu with Asterisk and FreePBX® and encouraged us to embellish it and to share the results with our Nerd Vittles audience. Having rarely met an operating system we didn’t like, we jumped at the opportunity knowing full well that Billy Chia at Digium and Tony Lewis at Schmooze Com had reported impressive results with Ubuntu years ago. It seemed like a good fit for Incredible PBX as well. Unlike CentOS, Ubuntu also was a platform that was easily transferable to the new $50 BeagleBone Black and the CuBox-i.
Our special thanks to Lefteris Zafiris for cleaning up all of the text-to-speech incompatibilities with Ubuntu. Within minutes from the other side of the world, Lefteris had logged into our Ubuntu Server in the Cloud and tamed the TTS beast. If ever there was an unsung hero in the Asterisk community, it’s Lefteris Zafiris. He has single-handedly kept all of the speech applications humming along through countless versions of Asterisk. We would have quit long ago without his untiring assistance. Thank you (again), Lefteris, for coming to the rescue.
Building an Ubuntu 14.04 Platform for Incredible PBX
As a result of the trademark and copyright morass, we’ve steered away from the bundled operating system in favor of a methodology that relies upon you to put in place the operating system platform on which to run PBX in a Flash or Incredible PBX. The good news is it’s easy! With many cloud-based providers1, you can simply click a button to choose your favorite OS flavor and within minutes, you’re ready to go. With many virtual machine platforms such as VirtualBox, it’s equally simple to find a pre-built Ubuntu 14.04 image or roll your own.
If you’re new to VoIP or to Nerd Vittles, here’s our best piece of advice. Don’t take our word for anything! Try it for yourself in the Cloud! You can build an Ubuntu 14.04 image on Digital Ocean in under one minute and install Incredible PBX for Ubuntu 14.04 in about 15 minutes. Then try it out for two full months. It won’t cost you a dime. Use our referral link to sign up for an account. Enter a valid credit card to verify you’re who you say you are. Create an Ubuntu 14.04 (not 14.10!) 512MB droplet of the cheapest flavor ($5/mo.). Go to the Billing section of the site, and enter the following promo code: UBUNTUDROPLET. That’s all there is to it. A $10 credit will be added to your account, and you can play to your heart’s content. Delete droplets, add droplets, and enjoy the free ride!
For today, we’ll walk you through building your own stand-alone server using the Ubuntu 14.04 mini.iso. If you’re using Digital Ocean in the Cloud, skip down to Installing Incredible PBX 11. If you’re using your own hardware, to get started, download the 32-bit or 64-bit Ubuntu 14.04 "Trusty Tahr" Minimal ISO from here. Then burn it to a CD/DVD or thumb drive and boot your dedicated server from the image. Remember, you’ll be reformatting the drive in your server so pick a machine you don’t need for other purposes.
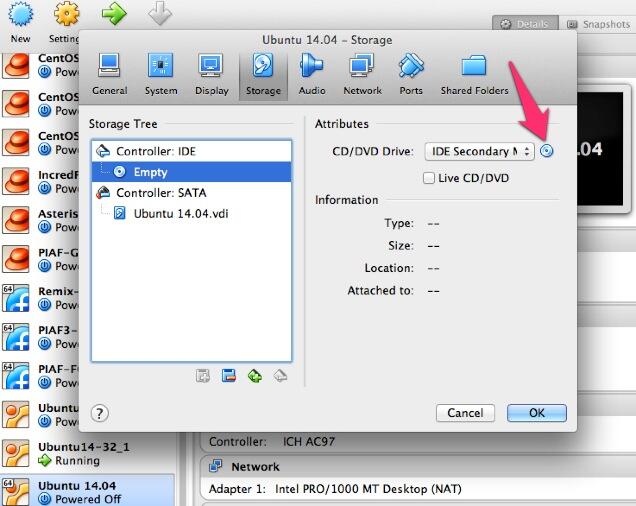
For those that would prefer to build your Ubuntu 14.04 Wonder Machine using VirtualBox on any Windows, Mac, or existing Linux Desktop, here are the simple steps. Create a new virtual machine specifying either the 32-bit or 64-bit version of Ubuntu. Allocate 1024MB of RAM (512MB also works fine!) and at least 20GB of disk space using the default hard drive setup in all three steps. In Settings, click System and check Enable I/O APIC and uncheck Hardware Clock in UTC Time. Click Audio and Specify then Enable your sound card. Click Network and Enable Network Adapter for Adapter 1 and choose Bridged Adapter. Finally, in Storage, add the Ubuntu 14.04 mini.iso to your VirtualBox Storage Tree as shown below. Then click OK and start up your new virtual machine. Simple!
Here are the steps to get Ubuntu 14.04 humming on your new server or virtual machine once you’ve booted up. If you can bake cookies from a recipe, you can do this:
UBUNTU mini.iso install:
Choose language
Choose timezone
Detect keyboard
Hostname: incrediblepbx < continue >
Choose mirror for downloads
Confirm archive mirror
Leave proxy blank unless you need it < continue >
** couple minutes of whirring as initial components are loaded **
New user name: incredible < continue >
Account username: incredible < continue >
Account password: makeitsecure
Encrypt home directory < no >
Confirm time zone < yes >
Partition disks: Guided - use entire disk and set up LVM
Confirm disk to partition
Write changes to disks and configure LVM
Whole volume? < continue>
Write changes to disks < yes> < -- last chance to preserve your disk drive!
** about 15 minutes of whirring during base system install ** < no touchy anything>
** another 5 minutes of whirring during base software install ** < no touchy anything>
Upgrades? Install security updates automatically
** another 5 minutes of whirring during more software installs ** < no touchy anything>
Software selection: *Basic Ubuntu server (only!)
** another couple minutes of whirring during software installs ** < no touchy anything>
Grub boot loader: < yes>
UTC for system clock: < no>
Installation complete: < continue> after removing installation media
** on VirtualBox, PowerOff after reboot and remove [-] mini.iso from Storage Tree & restart VM
login as user: incredible
** enter user incredible's password **
sudo passwd
** enter incredible password again and then create secure root user password **
su root
** enter root password **
apt-get update
apt-get install ssh -y
sed -i 's|without-password|yes|' /etc/ssh/sshd_config
sed -i 's|yes"|without-password"|' /etc/ssh/sshd_config
sed -i 's|"quiet"|"quiet text"|' /etc/default/grub
update-grub
ifconfig
** write down the IP address of your server from ifconfig results
reboot
** login via SSH to continue **
Installing Incredible PBX on Your Ubuntu 14.04 Server
Adding Incredible PBX to a running Ubuntu 14.04 server is a walk in the park. To restate the obvious, your server needs a reliable Internet connection to proceed. Using SSH (or Putty on a Windows machine), log into your new server as root at the IP address you deciphered in the ifconfig step at the end of the Ubuntu install procedure above. First, make sure to run the update step for Ubuntu before you begin the install. This is especially important if using a cloud-based Ubuntu 14 server.
apt-get update && apt-get upgrade -y && reboot
WARNING: If you’re using a 512MB droplet at Digital Ocean, be advised that their Ubuntu setup does NOT include a swap file. This may cause serious problems when you run out of RAM. Uncomment ./create-swapfile-DO line below to create a 1GB swap file which will be activated whenever you exceed 90% RAM usage on Digital Ocean.
Now let’s begin the Incredible PBX install. Log back in as root and issue the following commands:
cd /root
wget http://incrediblepbx.com/incrediblepbx11.4.ubuntu14.tar.gz
tar zxvf incrediblepbx*
#./create-swapfile-DO
./Incredible*
Once you have agreed to the license agreement and terms of use, press Enter and go have a 30-minute cup of coffee. The Incredible PBX installer runs unattended so find something to do for a bit unless you just like watching code compile. When you see "Have a nice day", your installation is complete. Write down your admin password for FreePBX as well as your three "knock" ports for PortKnocker. If you forget them, you can reset your admin password by running /root/admin-pw-change. And you can retrieve your PortKnocker setup like this: cat /root/knock.FAQ.
Log out and back in as root and you should be greeted with a status display that looks something like this:
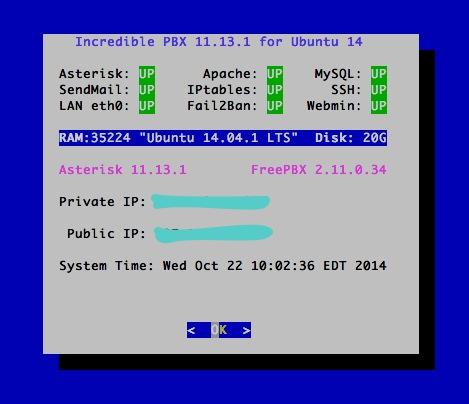
You can access the Asterisk CLI by typing: asterisk -rvvvvvvvvvv
You can access the FreePBX GUI using your favorite web browser to configure your server. Just enter the IP address shown in the status display. The default username is admin with the randomized password you wrote down above. If desired, you can change them in FreePBX Administration by clicking Admin -> Administrators -> admin. Enter a new password and click Submit Changes then Apply Config. Now edit extension 701 so you can figure out (or change) the randomized passwords that were set up for default 701 extension and voicemail: Applications -> Extensions -> 701.

Setting Up a Soft Phone to Use with Incredible PBX
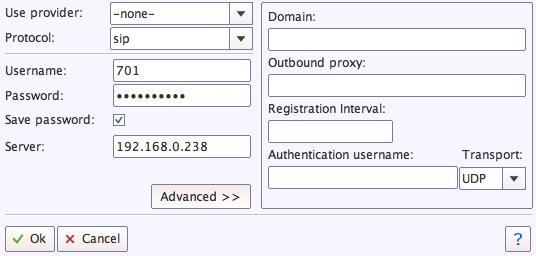
Now you’re ready to set up a telephone so that you can play with Incredible PBX. We recommend YateClient which is free. Download it from here. Run YateClient once you’ve installed it and enter the credentials for the 701 extension on Incredible PBX. You’ll need the IP address of your server plus your extension 701 password. Choose Settings -> Accounts and click the New button. Fill in the blanks using the IP address of your server, 701 for your account name, and whatever password you created for the extension. Click OK.
Once you are registered to extension 701, close the Account window. Then click on YATE’s Telephony Tab and place some test calls to the numerous apps that are preconfigured on Incredible PBX. Dial a few of these to get started:
123 - Reminders

222 - ODBC Demo (use acct: 12345)

947 - Weather by ZIP Code

951 - Yahoo News

*61 - Time of Day

*68 - Wakeup Call

TODAY - Today in History
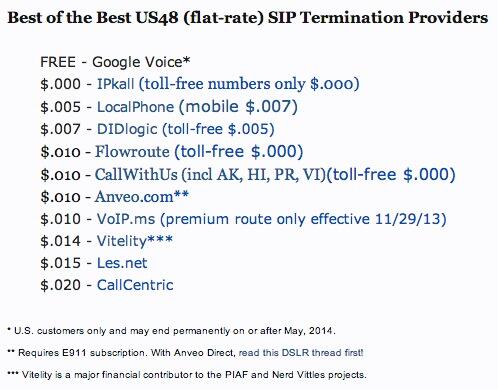
Now you’re ready to connect to the telephones in the rest of the world. If you live in the U.S., the easiest way (at least for now) is to use an existing (free) Google Voice account. Google has threatened to shut this down but as this is written, it still works with previously set up Google Voice accounts. The more desirable long-term solution is to choose several SIP providers and set up redundant trunks for your incoming and outbound calls. The PIAF Forum includes dozens of recommendations to get you started.
Configuring Google Voice
If you want to use Google Voice, you’ll need a dedicated Google Voice account to support Incredible PBX. If you want to use the inbound fax capabilities of Incredible Fax 11, then you’ll need an additional Google Voice line that can be routed to the FAX custom destination using FreePBX. The more obscure the username (with some embedded numbers), the better off you will be. This will keep folks from bombarding you with unsolicited Gtalk chat messages, and who knows what nefarious scheme will be discovered using Google messaging six months from now. So keep this account a secret!
We’ve tested this extensively using an existing Google Voice account, and inbound calling is just not reliable. The reason seems to be that Google always chooses Gmail chat as the inbound call destination if there are multiple registrations from the same IP address. So, be reasonable. Do it our way! Use a previously configured and dedicated Gmail and Google Voice account, and use it exclusively with Incredible PBX 11.
IMPORTANT: Be sure to enable the Google Chat option as one of your phone destinations in Settings, Voice Setting, Phones. That’s the destination we need for The Incredible PBX to work its magic! Otherwise, all inbound and outbound calls will fail. If you don’t see this option, you’re probably out of luck. Google has disabled the option in newly created accounts as well as some old ones that had Google Chat disabled. Now go back to the Google Voice Settings.
While you’re still in Google Voice Settings, click on the Calls tab. Make sure your settings match these:
- Call Screening – OFF
- Call Presentation – OFF
- Caller ID (In) – Display Caller’s Number
- Caller ID (Out) – Don’t Change Anything
- Do Not Disturb – OFF
- Call Options (Enable Recording) – OFF
- Global Spam Filtering – ON
Click Save Changes once you adjust your settings. Under the Voicemail tab, plug in your email address so you get notified of new voicemails. Down the road, receipt of a Google Voice voicemail will be a big hint that something has come unglued on your PBX.
One final word of caution is in order regardless of your choice of providers: Do NOT use special characters in any provider passwords, or nothing will work!
Now you’re ready to set up your Google Voice trunk in FreePBX. After logging into FreePBX with your browser, click the Connectivity tab and choose Google Voice/Motif. To Add a new Google Voice account, just fill out the form. Do NOT check the third box or incoming calls will never ring!
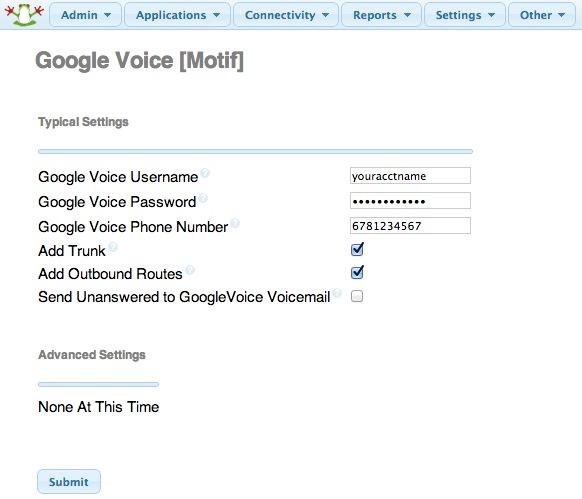
IMPORTANT LAST STEP: Google Voice will not work unless you restart Asterisk from the Linux command line at this juncture. Using SSH, log into your server as root and issue the following command: amportal restart.
If you have trouble getting Google Voice to work (especially if you have previously used your Google Voice account from a different IP address), try this Google Voice Reset Procedure. It usually fixes connectivity problems. If it still doesn’t work, enable Less Secure Apps using this Google tool.
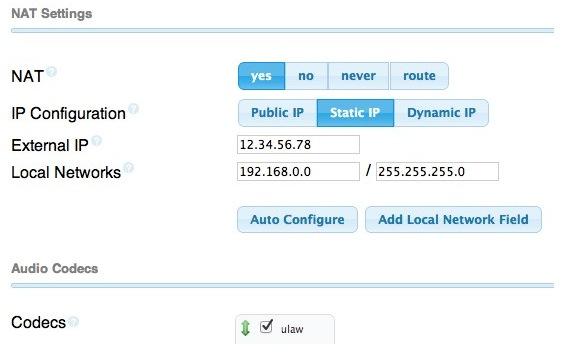
Troubleshooting Audio and DTMF Problems
You can avoid one-way audio on calls and touchtones that don’t work with these simple settings in FreePBX: Settings -> Asterisk SIP Settings. Just plug in your public IP address and your private IP subnet. Then set ULAW as the only Audio Codec.
Adding Speech Recognition to Incredible PBX
To support many of our applications, Incredible PBX has included Google’s speech recognition service for years. These applications include Weather Reports by City (949), AsteriDex Voice Dialing by Name (411), and Wolfram Alpha for Asterisk (4747), all of which use Lefteris Zafiris’ terrific speech-recog AGI script. Unfortunately (for some), Google now has tightened up the terms of use for their free speech recognition service. Now you can only use it for "personal and development use." If you meet those criteria, keep reading. Here’s how to activate speech recognition on Incredible PBX. Don’t skip any steps!
1. Using an existing Google/Gmail account to join the Chrome-Dev Group.
2. Using the same account, create a new Speech Recognition Project.

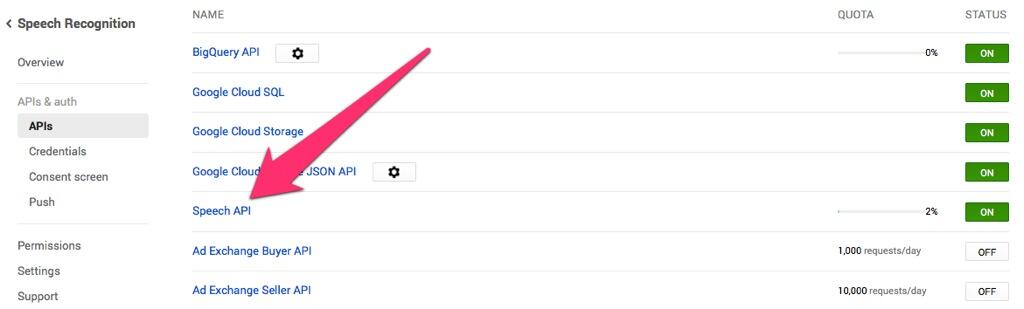
3. Click on your newly created project and choose APIs & auth.
4. Turn ON Speech API by clicking on its Status button in the far right margin.
5. Click on Credentials in APIs & auth and choose Create New Key -> Server key. Leave the IP address restriction blank!
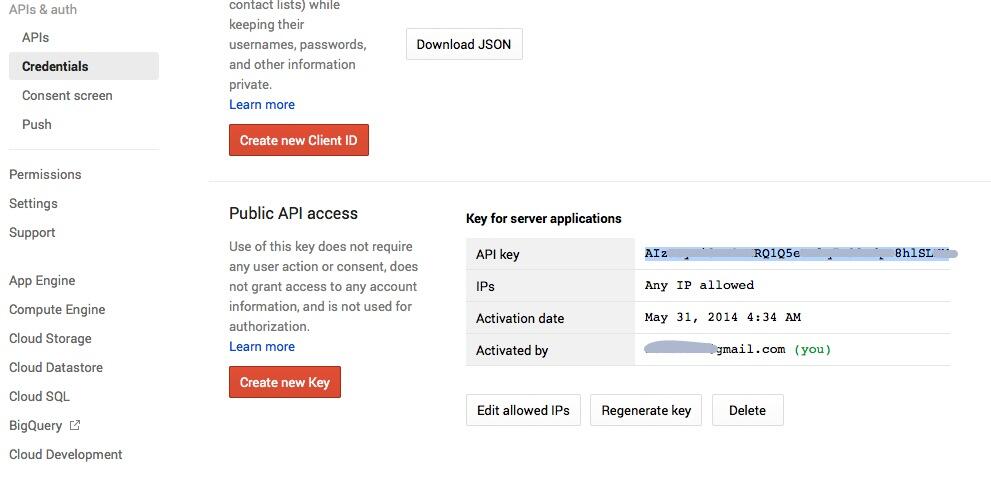
6. Write down your new API key or copy it to the clipboard.
7. Log into your server as root and issue the following commands:
# for Ubuntu and Debian platforms
apt-get clean
apt-get install libjson-perl flac -y
# for RedHat and CentOS platforms
yum -y install perl-JSON
# for all Linux platforms
cd /var/lib/asterisk/agi-bin
mv speech-recog.agi speech-recog.last.agi
wget --no-check-certificate https://raw.githubusercontent.com/zaf/asterisk-speech-recog/master/speech-recog.agi
chown asterisk:asterisk speech*
chmod 775 speech*
nano -w speech-recog.agi
8. When the nano editor opens, go to line 70 of speech-recog.agi: my $key = "". Insert your API key from Step #6 above between the quotation marks and save the file: Ctrl-X, Y, then Enter.
Now you’re ready to try out the speech recognition apps. Dial 949 and say the name of a city and state/province/country to get a current weather forecast from Yahoo. Dial 411 and say "American Airlines" to be connected to American.
To use Wolfram Alpha by phone, you first must install it. Obtain your free Wolfram Alpha APP-ID here. Then run the one-click installer: /root/wolfram/wolframalpha-oneclick.sh. Insert your APP-ID when prompted. Now dial 4747 to access Wolfram Alpha by phone and enter your query, e.g. "What planes are overhead." Read the Nerd Vittles tutorial for additional examples and tips.
A Few Words about the Incredible PBX Security Model for Ubuntu
Incredible PBX for Ubuntu 14 is our most secure turnkey PBX implementation, ever. As configured, it is protected by both Fail2Ban and a hardened configuration of the IPtables Linux firewall. As configured, nobody can access your PBX without  your credentials AND
  an IP address that is either on your private network or that matches the IP address of your server or the PC from which you installed Incredible PBX. Incredible PBX is preconfigured to let you connect to many of the leading SIP hosting providers without additional firewall tweaking.
You can whitelist additional IP addresses for remote access in several ways. First, you can use the command-line utilities: /root/add-ip and /root/add-fqdn. You can also remove whitelisted IP addresses by running /root/del-acct. Second, you can dial into extension 864 (or use a DID pointed to extension 864 aka TM4) and enter an IP address to whitelist. Before Travelin’ Man 4 will work, you’ll need to add credentials for each caller using the tools in /root/tm4. You must add at least one account before dial-in whitelisting will be enabled. Third, you can temporarily whitelist an IP address by successfully executing the PortKnocker 3-knock code established for your server. You’ll find the details and the codes in /root/knock.FAQ. Be advised that IP addresses whitelisted with PortKnocker (only!) go away whenever your server is rebooted or the IPtables firewall is restarted. For further information on the PortKnocker technology and available clients for iOS and Android devices, review the Nerd Vittles tutorial.
HINT: The reason that storing your PortKnocker codes in a safe place is essential is because it may be your only available way to gain access to your server if your IP address changes. You obviously can’t use the command-line tools to whitelist a new IP address if you cannot gain access to your server at the new IP address.
We always recommend you also add an extra layer of protection by running your server behind a hardware-based firewall with no Internet port exposure, but that’s your call. If you use a hardware-based firewall, be sure to map the three PortKnocker ports to the internal IP address of your server!
The NeoRouter VPN client also is included for rock-solid, secure connectivity for remote users. Read our previous tutorial for setup instructions.
As one would expect, the IPtables firewall is a complex piece of software. If you need assistance configuring it, visit the PIAF Forum for some friendly assistance.
Adding Incredible Fax 11 to Your Server
Once you’ve completed the Incredible PBX install, log out and log back in to load the latest automatic updates. Then reboot. Now you’re ready to continue your adventure by installing Incredible Fax 11 for Ubuntu. Special thanks to Josh North for all his hard work on this! The latest download includes the Incredible Fax 11 installer. So just run the script:
cd /root
./incrediblefax11_ubuntu14.sh
Accept all of the defaults during the installation process. IMPORTANT: Once you complete the install, reboot your server. After rebooting, log into FreePBX -> Module Admin and enable the AvantFax module. When you log out of FreePBX, there now will be an option for AvantFax on the FreePBX login screen. Choose it and enter admin:password to login and change your default password. You also can set your AvantFax admin password by logging into the Linux CLI and… /root/avantfax-pw-change.
Incredible Backup and Restore
We’re pleased to introduce our latest backup and restore utilities for Incredible PBX. Running /root/incrediblebackup will create a backup image of your server in /tmp. This backup image then can be copied to any other medium desired for storage. To restore it to another Incredible PBX 11 server, simply copy the image to a server running Asterisk 11 and FreePBX 2.11 and run /root/incrediblerestore. Doesn’t get much simpler than that.
NEWS FLASH: More good news. If you decide you’d prefer another Linux platform, Incredible Backup and Restore will now let you migrate from one operating system to another. For details on the procedure, see this message thread.
Incredible PBX Automatic Update Utility
Every time you log into your server as root, Incredible PBX will ping the IncrediblePBX.com web site to determine whether one or more updates are available to bring your server up to current specs. We recommend you log in at least once a week just in case some new security vulnerability should come along.
In the meantime, we encourage you to sign up for an account on the PIAF Forum and join the discussion. In addition to providing first-class, free support, we think you’ll enjoy the camaraderie. Come join us!
Originally published: Monday, June 30, 2014 Updated: Wednesday, January 7, 2015
 Support Issues. With any application as sophisticated as this one, you’re bound to have questions. Blog comments are a terrible place to handle support issues although we welcome general comments about our articles and software. If you have particular support issues, we encourage you to get actively involved in the PBX in a Flash Forums. It’s the best Asterisk tech support site in the business, and it’s all free! Please have a look and post your support questions there. Unlike some forums, ours is extremely friendly and is supported by literally hundreds of Asterisk gurus and thousands of users just like you. You won’t have to wait long for an answer to your question.

Need help with Asterisk? Visit the PBX in a Flash Forum.
Special Thanks to Our Generous Sponsors
FULL DISCLOSURE: ClearlyIP, Skyetel, Vitelity, DigitalOcean, Vultr, VoIP.ms, 3CX, Sangoma, TelecomsXchange and VitalPBX have provided financial support to Nerd Vittles and our open source projects through advertising, referral revenue, and/or merchandise. As an Amazon Associate and Best Buy Affiliate, we also earn from qualifying purchases. We’ve chosen these providers not the other way around. Our decisions are based upon their corporate reputation and the quality of their offerings and pricing. Our recommendations regarding technology are reached without regard to financial compensation except in situations in which comparable products at comparable pricing are available from multiple sources. In this limited case, we support our sponsors because our sponsors support us.
 BOGO Bonaza: Enjoy state-of-the-art VoIP service with a $10 credit and half-price SIP service on up to $500 of Skyetel trunking with free number porting when you fund your Skyetel account. No limits on number of simultaneous calls. Quadruple data center redundancy. $25 monthly minimum spend required. Tutorial and sign up details are here.
![]() The lynchpin of Incredible PBX 2020 and beyond is ClearlyIP components which bring management of FreePBX modules and SIP phone integration to a level never before available with any other Asterisk distribution. And now you can configure and reconfigure your new Incredible PBX phones from the convenience of the Incredible PBX GUI.
The lynchpin of Incredible PBX 2020 and beyond is ClearlyIP components which bring management of FreePBX modules and SIP phone integration to a level never before available with any other Asterisk distribution. And now you can configure and reconfigure your new Incredible PBX phones from the convenience of the Incredible PBX GUI.
 VitalPBX is perhaps the fastest-growing PBX offering based upon Asterisk with an installed presence in more than 100 countries worldwide. VitalPBX has generously provided a customized White Label version of Incredible PBX tailored for use with all Incredible PBX and VitalPBX custom applications. Follow this link for a free test drive!
 Special Thanks to Vitelity. Vitelity is now Voyant Communications and has halted new registrations for the time being. Our special thanks to Vitelity for their unwavering financial support over many years and to the many Nerd Vittles readers who continue to enjoy the benefits of their service offerings. We will keep everyone posted on further developments.
Some Recent Nerd Vittles Articles of Interest…
- With some providers including ones linked in this article, Nerd Vittles receives referral fees which assist in keeping the Nerd Vittles lights burning brightly. [↩]


See what happens when your (Me) too stupid to say no!
If you want to completely automate the upgrades go to https://help.ubuntu.com/10.04/serverguide/automatic-updates.html this explains how to do it. It can be set to email when it has installed updates. Sorry I’m lazy and forgetful!
Glad to see all my efforts go to good use!
A quick fix to allow PHP5.5+ to accept both the PHP short tag and the long tag ( <? vs. <?php ):
/etc/php.ini:
short_open_tag = On
Restart Apache and done.
I tried your installation instructions on a pre-built ubuntu 14 server in the cloud and it does not function. I’m guessing there are some prerequisites to the server instance including php and mysql being installed.
I cannot run (or even find) the asterisk binary but any attempt to rerun the installation scripts results in a message "Incredible PBX is already installed."
Can I recover from this?
[WM: You didn’t mention which cloud provider you were using. Works flawlessly on Digital Ocean. We would need a good bit more information to troubleshoot what went wrong. That’s what the PIAF Forum is there for. We install the LAMP stack as part of the Incredible PBX installation procedure so that’s not the problem. You can attempt to rerun the installer and see where the install is failing. Just delete /etc/pbx/.incredible, and you’re good to go. ]
So glad to see Ubuntu available for PBX in a Flash! Thanks Ward 🙂
I seem to be unable to find Google’s Speech Recognition in the api-list.
Any ideas, whether it is still available for new users at all?
[WM: It is still available, but the license has changed a bit. Read the Adding Speech Recognition tutorial in this article. It will walk you through setting it up. Did you skip the first step??
Came to the site to see if PIAF was being supported on CentOS7 and found out the great news that I can now have all Ubuntu VMs on my servers.
Still don’t understand why setting up and maintaining a ppa repository would not be a better approach. Yes, you mentioned the preference to compiling Asterisk from source but is it really a smart tradeoff to lose all the great work a package manager can offer for free – fast security updates included?
[WM: Nothing in our build precludes enabling automatic security updates with Ubuntu. And Incredible PBX handles automatic security updates for Asterisk and any other problems we spot.]
‘The Incredible PBX installer runs unattended so find something to do for the next 30 minutes unless you just like watching code compile. When you see “Have a nice day”, your installation is complete.’
In between the above stages, I get a load of questions I don’t know the answer to:
‘Enter your USERNAME to connect to the ‘asterisk’ database:
Enter your PASSWORD to connect to the ‘asterisk’ database:
Enter the hostname of the ‘asterisk’ database:
Enter a USERNAME to connect to the Asterisk Manager interface:
Enter a PASSWORD to connect to the Asterisk Manager interface:’
Is this normal behaviour, and if so, what am I supposed to be entering?
[WM: Sounds like you’re either using the wrong version of Ubuntu or you skipped the initial (required) update, upgrade, and reboot steps. Follow the tutorial exactly, and you shouldn’t have any problems. Still works as advertised for us.]
The Google Voice section still mentions FAX capabilities, but I don’t see how I can use Incredible Fax on the Ubuntu installation with the method on this page. Is that just leftover from a copy/paste from other tutorials or am I missing something?
[WM: Thanks for the heads up, Josh. We’ll have a look. Running a little low on people with paddles at the moment, but we’ll get it squared away… soon. Ubuntu is still very much a testing platform. If you need a production-ready system, switch to Incredible PBX with PIAF-Green and FreePBX 2.11 on the CentOS 6.5 platform.]
Thanks so much for the reply! It’s purely experimental for me currently, my production clients use a mix of "real" PIAF or custom asterisk boxes, quite frankly the only reason I am testing this version is that I prefer Apt to Yum 🙂
I might see if I can play around with porting over incredfax over the next couple of weekends on my own for kicks.
Thanks for all your work on this!
[WM: Thanks, Josh. Wrestling with Incredible Fax would be a huge help. Come join the forum!]
I installed the preview. How can I upgrade without reinstalling/reconfiguring everything? Do I simply run your new installer?
[WM: Download and untar Incredible Backup 11 for Ubuntu, make a backup, and copy it from /tmp to your desktop. Install the newest version, copy the backup image to /tmp, and run /root/incrediblerestore.]
Waiting for approval at the forum. So I’ll try here.
First, thank you for developing this ubuntu install of incrediblepbx.. I much prefer this over the old CentOS implementation.
I’ve been messing with this ubuntu installation on a cubox-i2ex for my simple soho installation. It’s looking promising..
While I’ve been studying the hiccups on the cubox-i, I’ve been using the ubuntu preview on an x86 box – two providers, handful of extensions.. Been pretty good so far.
One problem on BOTH platforms that is driving me nuts: the install scripts breaks the OS reboot/shutdown. Short of cycling power, I can’t reboot or shutdown either the x86 or arm boxes. Anyone experience this? Suggestions?
[WM: Try this!]
Ward,
Thanks for the tip. It seems to work. That one was driving me crazy..
Looking through the install script – it downloads knockd from the debian repos. Why not just use the Ubuntu trusty universe repo?
No need then to dl libpcap and test for 32/64 bit..
[WM: Thank you for the tip! As time permits, we’ll rework it to incorporate your suggestion.]
Awesome installation of piaf on ubuntu!
I see above some people are confused between updates and upgrades.
After installing 14.04 you recommend the following command as root:
apt-get update && apt-get upgrade -y && reboot
This works fine for those using an older version of ubuntu.
However, when 14.10 is released in October, the upgrade typically breaks lots of stuff, and very likely will break Incredible PBX also.
I suggest you put a caveat about the October upgrade to 14.10 – and give people a heads up.
[WM: Thanks, Anthony. Still an Ubuntu newbie here. We’ll update the article and remove the upgrade component. We initially had problems, but it may have been because we didn’t run update or upgrade. In any case, you’re absolutely right. We’ve learned the hard way with CentOS upgrades. No need to reinvent the wheel.]
Awesome!! Glad to see this guide!
Unfortunately, I tried to run the install on a Digital Ocean droplet that I host my web applications on and ran into some problems.
I tried the brand new Vultr.com hosting solution, fired up a new VPS for 5 bucks and better specs than D.O., and voila — the install worked flawlessly.
FYI, the problem I ran into on D.O. had to do with PHP loading a blank page when visiting my IP. Probably because of my own preconfigurations though.
Thanks again.
how can i connect multiple pbx (like branch offices) ??
[WM: Visit the PIAF Forum. There are numerous ways.]
Hello,
Sorry if I am confused. Is fax available (specifically on the rentpbx version of Incredible Pbx for Ubuntu 14) I see references on the CuBox Ubuntu, and of course in the Incredible PBX 11… but am stumped as to installation on what i have. I saw an earlier note to consider piaf green/centos… but not sure if that was specific to fax or something else…. Thanks!!!
[WM: It’s still experimental but Josh North appears to have tamed the fax beast on Ubuntu. Here’s the link.]
I am wondering if this will work with a web server installed as well on the computer. I am running a web server using Ubuntu server 14.04.
I have tried freepbx but crashed and never played nice with my setup, So i had to restore my server.
[WM: Not a good idea to do web hosting and VoIP telephony on the same box.]
After the installation, i can only login to webmin and not the the gui. Is there something i have to do or is it running on a non standard port? Thanks.
[WM: Take another look at the tutorial. Did you set up an admin password??]
I noticed that the IPTables allow access from 10.0.0.0/8 and 192.168.0.0/16 but 172.16.0.0/12 is not allowed. Is it easy to add a whole subnet?
WM: We disabled this because of a reported problem on Amazon EC2. But it’s easy to enable it again. Just issue the following commands. Or you could add a subnet directly by editing /etc/iptables/rules.v4 and restarting IPtables. Just be sure to use our iptables-restart script so that IPtables doesn’t end up disabled if you make a coding error!
sed -i 's|#-A INPUT -s 172.16.0.0/12|-A INPUT -s 172.16.0.0/12|' /etc/iptables/rules.v4

iptables-restart
Just a heads up that Ubuntu has released 14.10. For the time being, stick with 14.04 LTS. There are a few wrinkles to iron out with 14.10.