Home » Posts tagged 'gvoice' (Page 4)

Tag Archives: gvoice

The Most Versatile VoIP Provider: FREE PORTING

Happy New ISO: Incredible PBX 13-13 ISO Is Here

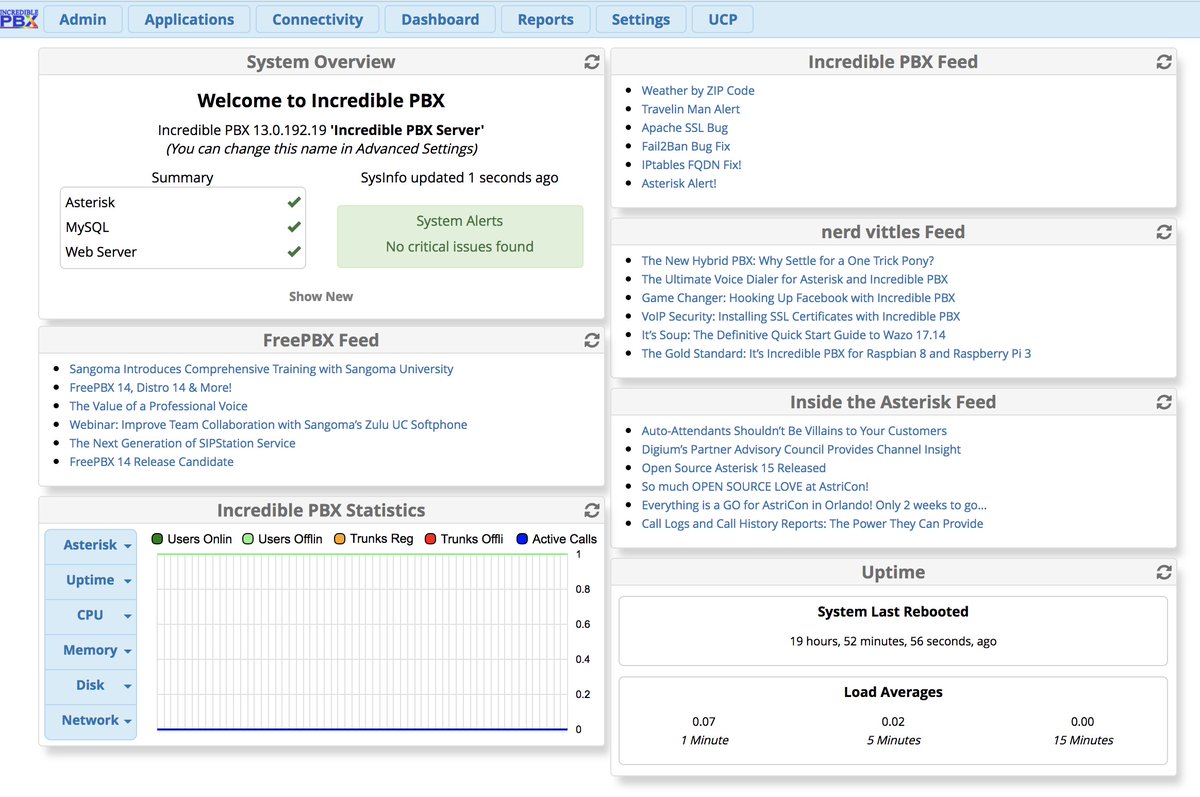
We’re pleased to introduce the new, 64-bit Incredible PBX 13-13 ISO featuring the latest release of Asterisk® 13 and your favorite FreePBX® 13 GPL modules. Like its predecessor, it’s 100% open source and GPL code. The new Incredible PBX 13-13 ISO can be burned to either a DVD-ROM or a 1GB or larger USB flash drive using a Mac, a Windows PC, or almost any Linux machine. And, unlike some other distros, you’re more than welcome to share our code and the ISO with all of your friends and business associates. In fact, next week we’re releasing the new Incredible PBX build platform for those of you that want to roll your own ISO. Share your enhancements and tweaks or make a customized ISO for just your company and pass it around. We’d be delighted. And our previous tutorial will even show you how to set up and maintain your own Cloud Repository for Incredible PBX.

July 20 NEWS FLASH: Google now has discontinued support of their XMPP interface to Google Voice so the latest CentOS/SL versions of Incredible PBX 13-13 (including the Incredible PBX ISO) now incorporate NAF’s GVSIP interface to Google Voice. You can read all about it here. What has changed is you now add Google Voice trunks from the command line by running /root/gvsip-naf/install-gvsip. You can delete trunks by running /root/gvsip-naf/del-trunk. Once one or more trunks have been added, they are numbered GVSIP1 through GVSIPn. Using the GUI, you then add an Outbound Route and an Inbound Route for each trunk. You’ll need both your Google Voice 10-digit phone number and a Refresh Token to add a new trunk. This article will be updated in coming days to incorporate all of the latest changes which are documented in the referenced GVSIP tutorial.

Introducing the Incredible PBX 13-13 ISO

Overview. The Incredible PBX installation process couldn’t be easier. Download IncrediblePBX13-13.iso from SourceForge. Burn the ISO to a DVD-ROM or USB thumb drive. Four different methods are outlined below. There’s lots of great hardware for about $200. Or, if you have an old PC lying around, that’ll work, too. Boot up the dedicated machine on which you want to install Incredible PBX. Choose whether you prefer the Incredible PBX Whole Enchilada with 31+ applications for Asterisk or the Lean & Mean version which is pure Asterisk compiled on the fly from source. Press the ENTER key. Choose your time zone, create a really secure root password, and have a coffee break. When Scientific Linux 6.9 has been installed, your server will reboot. Accept the Incredible PBX license agreement and press the ENTER key. Go to lunch and, when you return, you should be good to go. Finish reading this tutorial to add the finishing touches and secure your server. Then read the Incredible PBX Application User’s Guide to learn all about the dozens of FREE applications for Asterisk® that are included in the Enchilada build. DONE!

Let us take a moment to explain the Incredible PBX installation process using this ISO. We don’t hide stuff in our ISO or play games with your security. We don’t give ourselves or our application any secret permissions. There are just two steps to an Incredible PBX ISO install. When the install begins, it loads pure Scientific Linux 6.9 onto your server,1 not some homegrown concoction using proprietary repositories. Your server then reboots. After restarting, the very latest copy of the Incredible PBX 13-13 installer is downloaded and run (see the actual source code of the script below). You’ll find the source code for the Incredible PBX installer in your /root directory after the install is completed: IncrediblePBX-13-13R.sh. You’ll also find some other helpful scripts in /root including the optional (free) Incredible Fax installer. If you ever have a question about what was installed on your server, feel free to examine the source code of our installers or post a note on the PIAF Forum. It’s unencrypted GPL2 code. You’re free to use it, enhance it, and share it.

%post
###############################################################
#
# Post Script - this script runs on Incredible PBX server
# immediately after Scientific Linux 6.9 install finishes
#
###############################################################
/usr/sbin/ntpdate -su pool.ntp.org
rpm -e readahead
/bin/sed -i 's|rhgb quiet||' /boot/grub/grub.conf
/bin/echo "/tmp/firstboot" >> /etc/rc.d/rc.local
/bin/echo "#!/bin/bash" > /tmp/firstboot
/bin/echo " " >> /tmp/firstboot
/bin/echo "/etc/init.d/network restart" >> /tmp/firstboot
/bin/echo "wait" >> /tmp/firstboot
/bin/echo "export PATH=/usr/local/sbin:/usr/local/bin:/sbin:/bin:/usr/sbin:/usr/bin" >> /tmp/firstboot
/bin/echo "cd /root" >> /tmp/firstboot
/bin/echo "/usr/bin/wget http://incrediblepbx.com/favicon.ico" >> /tmp/firstboot
/bin/echo "if [ ! -f favicon.ico ]; then" >> /tmp/firstboot
/bin/echo " /bin/echo ' '" >> /tmp/firstboot
/bin/echo " /bin/echo 'WARNING: Network may be down. Download failed.'" >> /tmp/firstboot
/bin/echo " if [ ! -f /tmp/firstboot.msg ]; then" >> /tmp/firstboot
/bin/echo "  /bin/rpm -e NetworkManager" >> /tmp/firstboot
/bin/echo "  /bin/echo nameserver 8.8.8.8 >> /etc/resolv.conf" >> /tmp/firstboot
/bin/echo "  /bin/echo nameserver 8.8.4.4 >> /etc/resolv.conf" >> /tmp/firstboot
/bin/echo "  /bin/touch /tmp/firstboot.msg" >> /tmp/firstboot
/bin/echo "  /bin/echo 'Fix applied. Rebooting. One moment please...'" >> /tmp/firstboot
/bin/echo "  /usr/bin/reboot" >> /tmp/firstboot
/bin/echo "  exit" >> /tmp/firstboot
/bin/echo " fi" >> /tmp/firstboot
/bin/echo " echo 'We are going to exit now. What to do next:'" >> /tmp/firstboot
/bin/echo " echo ' '" >> /tmp/firstboot
/bin/echo " echo '**** WRITE THESE NEXT 6 STEPS DOWN... ****'" >> /tmp/firstboot
/bin/echo " echo ' '" >> /tmp/firstboot
/bin/echo " echo '1. Log into your server as root.'" >> /tmp/firstboot
/bin/echo " echo '2. Try this command: ping -c 1 incrediblepbx.com'" >> /tmp/firstboot
/bin/echo " echo '3. If it fails, fix your network and repeat ping test.'" >> /tmp/firstboot
/bin/echo " echo '     HINT: Before retest, try this: ifup eth0'" >> /tmp/firstboot
/bin/echo " echo '4. If it still fails: yum install NetworkManager. Then repeat ping test.'" >> /tmp/firstboot
/bin/echo " echo '5. When ping is successful, you may proceed.'" >> /tmp/firstboot
/bin/echo " echo '6. To continue install, run: /tmp/firstboot'" >> /tmp/firstboot
/bin/echo " echo ' '" >> /tmp/firstboot
/bin/echo " read -p 'Press RETURN key now to exit and login.'" >> /tmp/firstboot
/bin/echo " exit" >> /tmp/firstboot
/bin/echo "fi" >> /tmp/firstboot
/bin/echo "cd /root" >> /tmp/firstboot
/bin/echo "sed -i 's|NO_DM |NO_DM rhgb quiet|' /boot/grub/grub.conf" >> /tmp/firstboot
/bin/echo "/bin/touch incrediblepbx-install-log.txt" >> /tmp/firstboot
/bin/echo "/bin/touch oauth" >> /tmp/firstboot
/bin/echo "/usr/bin/wget http://incrediblepbx.com/incrediblepbx-13-13-LEAN.tar.gz" >> /tmp/firstboot
/bin/echo "/bin/tar zxvf incrediblepbx-13-13-LEAN.tar.gz" >> /tmp/firstboot
/bin/echo "/bin/rm -f incrediblepbx-13-13-LEAN.tar.gz" >> /tmp/firstboot
/bin/echo "sed -i '/firstboot/d' /etc/rc.d/rc.local" >> /tmp/firstboot
/bin/echo "./Inc*" >> /tmp/firstboot
/bin/echo "./Enc*" >> /tmp/firstboot
/bin/chmod +x /tmp/firstboot
eject
%end

Incredible PBX 13-13 ISO Installation Guide

Downloading the Incredible PBX 13-13 ISO. On the machine you’ll be using to create your installation media, download IncrediblePBX13-13.iso from SourceForge.

Burning a DVD-ROM from the ISO. If your server platform doesn’t have USB support, then burn the ISO to a DVD using a Mac or Windows machine.

Creating a USB Flash Drive Installer. If your server platform has USB ports, you have three ways to move the Incredible PBX 13-13 ISO to a 1GB or larger flash drive. You can use a Windows PC, a Mac, or a Linux machine to create the USB thumb drive installer.

Creating a USB Flash Drive Installer with a Windows PC. In order to create a USB thumb drive using an ISO image, you’ll first need to install Rufus. It’s free. Once you’ve installed it, insert a blank USB thumb drive and run Rufus. Make your settings look like what’s shown above. Be very careful in choosing your Device. You don’t want to accidentally erase the wrong drive on your Windows machine. The correct choice is the USB thumb drive you just inserted. Don’t guess!! Step 2 is choosing the IncrediblePBX13-13.iso file that you downloaded from SourceForge. Step 3 is clicking Start. The ISOHybrid Window will be presented. Step 4 is changing the default setting to "Write in DD image mode." Step 5 is pressing OK. In a few minutes, your ISO image transfer to the USB flash drive will be finished. Give it 15 seconds just to be safe. Then remove the USB thumb drive and you’re ready to begin the install on your dedicated Incredible PBX server.

Creating a USB Flash Drive Installer with a Mac. To create a USB thumb drive using an ISO image on a Mac, first insert the USB thumb drive and partition it with a single MS-DOS partition using Disk Utility. Next, open a Terminal window and issue the command: diskutil list. Review the device names and find the one that matches the size of your thumb drive. It will be something like /dev/disk9. Again, be careful. You don’t want to accidentally erase the wrong drive on your Mac! Next, change to the directory into which you downloaded IncrediblePBX13-13.iso, e.g. cd Desktop. Now issue the following commands substituting the actual device name for /dev/disk9 below:

diskutil unmountDisk /dev/disk9
sudo dd if=IncrediblePBX13-13.iso bs=1m of=/dev/disk9
sudo sync
diskutil eject /dev/disk9

When the install completes, remove the USB thumb drive and you’re ready to begin the install on your dedicated Incredible PBX server. NOTE: There will be no feedback during the dd step above. It can take 15 minutes or more depending upon the horsepower of your Mac. Be patient!

Creating a USB Flash Drive Installer on a Linux machine. To create a USB thumb drive using an ISO image on a Linux machine, first log into your server as root. Insert a blank USB thumb drive. From the CLI, decipher the device name of your thumb drive: fdisk -l. The device name will be something like /dev/sdb. Be careful. You don’t want to accidentally erase the wrong drive on your Linux server! Change to the directory into which you downloaded IncrediblePBX13-13.iso, e.g. cd /root. To transfer the ISO to your thumb drive, issue the following commands replacing /dev/sdb with the actual device name for your thumb drive in lines 1 and 3 below:

dd if=IncrediblePBX13-13.iso bs=4M of=/dev/sdb
sync
udisks --detach /dev/sdb

When the install completes, remove the USB thumb drive and you’re ready to begin the install on your dedicated Incredible PBX server. NOTE: There will be no feedback during the dd step above. It can take 5 to 15 minutes depending upon the horsepower of your Linux machine.

Kicking Off the Incredible PBX 13-13 Install. Now we’re ready to install Incredible PBX 13-13 on your dedicated server platform. Simply insert the DVD-ROM or USB thumb drive in your server-to-be and boot. During the POST boot process, press the function key that displays a Boot Device Menu and choose your DVD-ROM drive or USB device. When the Incredible PBX 13-13 installation menu displays, choose the Default Install for Full Enchilada and press ENTER. Choose your time zone, create a really secure root password, and have a coffee break. When Scientific Linux 6.9 has been installed, your server will reboot. Accept the Incredible PBX license agreement and press the ENTER key. Go to lunch and, when you return, you should be good to go. When the installation finishes, reboot your server and log in as root to apply the last minute updates for Incredible PBX.

To complete the install, perform the following from the Linux CLI while logged in as root:

  • Change your passwords: /root/update-passwords
  • Set your correct time zone: /root/timezone-setup
  • Add WhiteList entries to firewall if needed: /root/add-ip or /root/add-fqdn
  • Store PortKnocker credentials in a safe place: cat /root/knock.FAQ
  • *** THE REMAINING FEATURES ARE OPTIONAL ADDITIONS ***
  • Login to your NeoRouter VPN server: /root/nrclientcmd
  • To enable free faxing: /root/incrediblefax13.sh
  • Set admin password for AvantFax: /root/avantfax-pw-change
  • To enable PPTP VPN: /root/pptp-install

Managing Incredible PBX with a Browser

Most of your time initially configuring and managing your server will be spent using the web-based tools provided with Incredible PBX. Using any modern browser, go to the IP address of your server as shown in the status display above. This will bring up the login screen for the PBX Admin GUI. The default username is admin and the password is what you set during the final installation steps above. Once the Incredible PBX GUI appears, edit extension 701 so you can figure out (or change) the randomized passwords that were set up for your 701 extension and voicemail account: Applications -> Extensions -> 701. If you’re behind a hardware-based firewall, verify the NAT setting is set to YES.

Setting Up a Soft Phone for Incredible PBX

Now you’re ready to set up a telephone so that you can play with Incredible PBX. We recommend YateClient which is free. Download it from here. Run YateClient once you’ve installed it and enter the credentials for the 701 extension on Incredible PBX. You’ll need the IP address of your server plus your extension 701 password. Choose Settings -> Accounts and click the New button. Fill in the blanks using the IP address of your server, 701 for your account name, and whatever password you created for the extension. Click OK.

Once you are registered to extension 701, close the Account window. Then click on YATE’s Telephony Tab and place some test calls to the numerous apps that are preconfigured on Incredible PBX. Dial a few of these to get started:


DEMO - Allison's IVR Demo
947 - Weather by ZIP Code
951 - Yahoo News
*61 - Time of Day
*68 - Wakeup Call
TODAY - Today in History

Now you’re ready to connect to the telephones in the rest of the world. If you live in the U.S., the easiest way (at least for now) is to set up a free Google Voice account. Your server is automatically configured for OAUTH authentication. The Incredible PBX 13-13 tutorial will walk you through the Google Voice setup procedure. The PIAF Forum includes dozens of recommendations to get you started.

Troubleshooting Audio and DTMF Problems

You can avoid one-way audio on calls and touchtones that don’t work with these simple settings in the GUI: Settings -> Asterisk SIP Settings. Just plug in your public IP address and your private IP subnet. Then set ULAW as the only Audio Codec.

A Few Words About Our Security Model

Incredible PBX for Scientific Linux joins our previous builds as our most secure turnkey PBX implementation. As configured, it is protected by both Fail2Ban and a hardened configuration of the IPtables Linux firewall. The latest release also includes Port Knocker for simple, secure access from any remote computer or smartphone. You can get up to speed on how the technology works by reading the Nerd Vittles tutorial. Your Port Knocker credentials are stored in /root/knock.FAQ together with activation instructions for your server and mobile devices. The NeoRouter VPN client also is included for rock-solid, secure connectivity to remote users. Read our previous tutorial for setup instructions. As configured, nobody can access your PBX without your credentials AND an IP address that is either on your private network or that matches the IP address of your server or the PC from which you installed Incredible PBX. You can whitelist additional IP addresses by running the command-line utility /root/add-ip. You can remove whitelisted IP addresses by running /root/del-acct. Incredible PBX is preconfigured to let you connect to many of the leading SIP hosting providers without additional firewall tweaking. We always recommend you also add an extra layer of protection by running your server behind a hardware-based firewall with no Internet port exposure, but that’s your call. And it’s your phone bill. 😉

The IPtables firewall is a complex piece of software. If you need assistance with configuring it, visit the PIAF Forum for some friendly assistance.

Incredible PBX Automatic Update Utility

Every time you log into your server as root, Incredible PBX will ping the IncrediblePBX.com web site to determine whether one or more updates are available to bring your server up to current specs. We recommend you log in at least once a week just in case some new security vulnerability should come along. We originally had planned to make our fortune off update fees, but we changed our mind. So… ignore the language in some earlier builds, contributions to our projects are PURELY VOLUNTARY. No one will be breaking down your door for a donation.

We also encourage you to sign up for an account on the PIAF Forum and join the discussion. In addition to providing first-class, free support, we think you’ll enjoy the camaraderie.

Incredible PBX Wholesale Providers Access

Nerd Vittles has negotiated a special offer that gives you instant access to 300+ wholesale carriers around the globe. In lieu of paying the $650 annual fee for the service, a 13% wholesale surcharge is assessed to cover operational costs of TelecomsXchange. In addition, TelecomsXchange has generously offered to contribute a portion of the surcharge to support the Incredible PBX open source project. See this Nerd Vittles tutorial for installation instructions and signup details.

Incredible PBX Application Users Guide

Your next stop ought to be learning about the three dozen applications included in Incredible PBX. We’ve put together this tutorial to get you started. There’s also a great tutorial to walk you through initial configuration of extensions, trunks, and routes. Enjoy!

Originally published: Monday, January 8, 2018


Support Issues. With any application as sophisticated as this one, you’re bound to have questions. Blog comments are a terrible place to handle support issues although we welcome general comments about our articles and software. If you have particular support issues, we encourage you to get actively involved in the PBX in a Flash Forums. It’s the best Asterisk tech support site in the business, and it’s all free! Please have a look and post your support questions there. Unlike some forums, ours is extremely friendly and is supported by literally hundreds of Asterisk gurus and thousands of users just like you. You won’t have to wait long for an answer to your question.


NEW YEAR’S TREAT: If you could use one or more free DIDs in the U.S. with unlimited inbound calls and unlimited simultaneous channels, then today’s your lucky day. TelecomsXChange and Bluebird Communications have a few hundred thousand DIDs to give away so you better hurry. You have your choice of DID locations including New York, New Jersey, California, Texas, and Iowa. The DIDs support Voice, Fax, Video, and even Text Messaging (by request). The only requirement at your end is a dedicated IP address for your VoIP server. Once you receive your welcome email with your number, be sure to whitelist the provider’s IP address in your firewall. For Incredible PBX servers, use add-ip to whitelist the UDP SIP port, 5060, using the IP address provided in your welcoming email.

Here’s the link to order your DIDs.

Your DID Trunk Setup in your favorite GUI should look like this:

Trunk Name: IPC
Peer Details:
type=friend
qualify=yes
host={IP address provided in welcome email}
context=from-trunk

Your Inbound Route should specify the 11-digit DID beginning with a 1. Enjoy!


Special Thanks to Our Generous Sponsors


FULL DISCLOSURE: ClearlyIP, Skyetel, Vitelity, DigitalOcean, Vultr, VoIP.ms, 3CX, Sangoma, TelecomsXchange and VitalPBX have provided financial support to Nerd Vittles and our open source projects through advertising, referral revenue, and/or merchandise. As an Amazon Associate and Best Buy Affiliate, we also earn from qualifying purchases. We’ve chosen these providers not the other way around. Our decisions are based upon their corporate reputation and the quality of their offerings and pricing. Our recommendations regarding technology are reached without regard to financial compensation except in situations in which comparable products at comparable pricing are available from multiple sources. In this limited case, we support our sponsors because our sponsors support us.

BOGO Bonaza: Enjoy state-of-the-art VoIP service with a $10 credit and half-price SIP service on up to $500 of Skyetel trunking with free number porting when you fund your Skyetel account. No limits on number of simultaneous calls. Quadruple data center redundancy. $25 monthly minimum spend required. Tutorial and sign up details are here.

The lynchpin of Incredible PBX 2020 and beyond is ClearlyIP components which bring management of FreePBX modules and SIP phone integration to a level never before available with any other Asterisk distribution. And now you can configure and reconfigure your new Incredible PBX phones from the convenience of the Incredible PBX GUI.

VitalPBX is perhaps the fastest-growing PBX offering based upon Asterisk with an installed presence in more than 100 countries worldwide. VitalPBX has generously provided a customized White Label version of Incredible PBX tailored for use with all Incredible PBX and VitalPBX custom applications. Follow this link for a free test drive!
 

Special Thanks to Vitelity. Vitelity is now Voyant Communications and has halted new registrations for the time being. Our special thanks to Vitelity for their unwavering financial support over many years and to the many Nerd Vittles readers who continue to enjoy the benefits of their service offerings. We will keep everyone posted on further developments.


Some Recent Nerd Vittles Articles of Interest…

  1. If you’re wondering what packages are installed with Scientific Linux, come back next week and download the entire Incredible PBX ISO build environment. The 1,000+ packages installed on your server are included in the build platform itself. Feel free to add to them or change them to your heart’s content. We don’t have a million dollar staff. That’s why we depend upon folks like you to offer suggestions and enhancements. In short, we treat Incredible PBX like a real open source project. Come join the fun! []

Beginner’s Navigation Guide to VoIP PBXs and Nerd Vittles

Here at Nerd Vittles, we cover a lot of VoIP territory over the course of a year. To kick off the new year, we thought it might be helpful for those just beginning their VoIP adventure to sketch out the VoIP lay of the land for you. We’re assuming that you came to our site because you wanted a VoIP solution that gives you something to play with and to learn from. That’s not for everybody, and there are less flexible, turnkey VoIP solutions that function pretty much like a toaster. At the top of that short list would be the Ooma Telo and OBi200. Both offer (almost) free calling in the U.S. and Canada.

Keep in mind that all of us started as beginners so there’s no reason to be intimidated if you choose to deploy your own PBX. We’ve gotten a dozen years of enjoyment out of our adventures with VoIP telephony, and there’s no reason you can’t do the same. Let’s begin.

Choosing a Hardware Platform for Your VoIP PBX

First, you’ll need to choose a platform for your VoIP-based PBX: dedicated hardware, virtual machine, or cloud-based PBX. In no small part, this choice depends upon the target audience for your PBX. If it’s for home use or a SOHO business, a $35 Raspberry Pi may suffice. On the other hand, if your PBX will be supporting more than a dozen users or more than a handful of simultaneous calls, we’d look elsewhere. Many of Intel’s Atom-based PCs work very well. And a VirtualBox virtual PBX running atop an iMac or beefy Dell PC can support dozens of users if you have the necessary Internet bandwidth to handle your call volume. Cloud-based servers come in all shapes and sizes as well. As prices have plummeted, cloud solutions have become our favorite. For $3 to $6 a month, you now can host your PBX in the cloud with automatic image backups of your entire server every week. If you’re willing to forfeit backups, here is a cloud solution that will only set you back about a dollar a month. If your server is primarily for business use, we strongly recommend our Platinum Sponsor, RentPBX, that offers dozens of VoIP choices for $14.99 a month with coupon code: NOGOTCHAS.

Choosing the Best PBX to Meet Your Requirements

Once you’ve nailed down your hardware platform, the next step is choosing an operating system and PBX to support your individual requirements. As you might have guessed, there are dozens from which to choose. In both the open source and commercial PBX world, most systems require a specific version of Linux so your operating system choice typically is dependent upon the PBX you choose. In the open source world, the PBX learning curve is often related to the feature set being offered. More sophisticated feature sets typically have a steeper learning curve. If you’re just getting started with VoIP and you want a platform for learning, experimenting, or home use, you can’t beat Incredible PBX 13-13 Whole Enchilada. It was designed by us to be a turnkey PBX for first-time users with rock-solid security and all of the features you will ever need. It includes 31 applications for Asterisk® that cover every imaginable function that can be performed with a telephone including faxing, voice dialing, SMS messaging, wakeup calls and telephone reminders, free calling, conferencing, text-to-speech applications such as News Headlines and Weather Forecasts, Wolfram Alpha for Siri-like queries, plus all the usual PBX features: blacklists, call forwarding, call waiting, call transfer, call parking, call recording, intercom, voicemail including voicemail transcription with email delivery, IVRs, paging, AutoAttendants, DISA, and many more.

If you’re an experienced Asterisk developer that just wants a lean PBX where you can customize it to meet individual customer’s requirements, then Incredible PBX 13-13 Lean should be just the ticket. All of its components are configurable including Asterisk which can be recompiled from the included source code.

At the sophisticated end of the spectrum is Incredible PBX for Wazo which is based upon the Wazo PBX, an Asterisk 15 realtime implementation with full support for High Availability redundancy, multi-party videoconferencing, WebRTC, and automatic nightly backups. It includes API libraries from which you literally can build your own customized PBX from the ground up. The Incredible PBX feature set provides a platform with virtually identical applications to those found in Incredible PBX 13-13.

Sandwiched in between Incredible PBX 13-13 and Incredible PBX for Wazo is Incredible PBX 13 for Issabel. Issabel is an enhanced fork of the previous Elastix 4.0 PBX. The 2018 release includes Asterisk 13, the LTS version of the Asterisk platform. With the new Incredible PBX 13 add-on, you get the best of all worlds with Google Voice support and dozens of applications for Asterisk. Issabel provides a Unified Communications platform that is second to none in the open source world.

Thus far, all of our recommendations have been to open source, GPL-licensed PBX platforms. But you’d be making a mistake to limit your search for business telephony platforms to open source offerings. Our corporate sponsor, 3CX, offers a full year of their commercial PBX running in the Google Cloud at no cost. It’s incredibly simple to install and configure. And the beauty of the 3CX commercial platform is it can scale to any size as your business grows. And the 3CX feature set can be expanded geometrically as your business requirements mature. We added free text-to-speech applications for News and Weather reports just last week. Our favorite open source deployment strategy is to install a 3CX PBX alongside Incredible PBX which yields literally the best of both worlds. The 3CX clients for Windows and Macs, Android, and iOS make VoIP telephony available from anywhere with a couple of button clicks, and 3CX users experience none of the traditional communications problems that invariably crop up on platforms deployed by novice VoIP users running Asterisk.

Getting Started with Extensions, Trunks, and Routes

The Big 3 when it comes to PBX configuration are extensions, trunks, and routes. Extensions carry calls between phones on the PBX and other phones either inside or outside your home or office. Trunks actually provide the links between your PBX and the outside telephony world. Inbound routes tell your PBX where to send incoming calls while Outbound routes tell your PBX which trunk to use when calls are made to numbers outside your PBX. We’ve covered this in more detail including dozens of trunk setups in this Nerd Vittles tutorial.

Making Free U.S./Canada Calls within the United States

There are three ways to make free calls using your PBX. If you’re in the United States, you can use Google Voice to make free calls to the U.S. and Canada if your PBX supports Google Voice trunks, e.g. Incredible PBX 13-13 Whole Enchilada and Incredible PBX for Issabel. An alternative, if your PBX does not directly support Google Voice trunks, e.g. Incredible PBX for Wazo and 3CX, is to use the Simonics SIP to Google Voice Gateway service. For Nerd Vittles users, there is a one-time $4.99 signup fee with no additional charges ever. Whether you live in the U.S or not, all the PBXs we’ve covered today can make free SIP calls to anyone in the world that has a SIP URI address and a SIP phone. Most SIP softphones are free.

Mastering the Incredible PBX Feature Set

Incredible PBX 13-13 Application User’s Guide

Configuring the Travelin’ Man 3 Firewall

All Incredible PBX servers include a firewall that is configured automatically as part of the installation process. On the 3CX platform, you’ll need to add the Travelin’ Man 3 firewall after installing your 3CX PBX. Here’s how:

3CX in the Cloud: 8 Great Ways to Secure Your Server

Configuring a Firewall WhiteList:

WhiteListing Users with Travelin’ Man 3 and IPtables Firewall

Learning to Build Effective IVRs

Interactive Voice Response (IVR) systems and AutoAttendants are the bread-and-butter applications for businesses. If you’ve ever called a business and actually spoken to a live person without encountering an IVR, lucky you! But, believe it or not, IVRs can actually be a useful tool including our Stealth AutoAttendant which lets you intercept incoming calls with a greeting which provides a slight delay to allow the caller (or you) to reroute the call to a specific destination before the default destination kicks in. Nerd Vittles and the Incredible PBX offerings provide all of the tools you’ll need to build any type of IVR imaginable. Mastering Allison Smith’s Top 15 is an excellent starting point.

Harnessing Nerd Vittles Resources

Google is your friend when it comes to finding tutorials of interest in the VoIP world. To narrow searches to just Nerd Vittles, use the following syntax:

stealth autoattendant site:nerdvittles.com

And the Nerd Vittles site itself provides several powerful ways to drill down into topics of interest. In the upper right column of any article, you’ll find a search function which will return a list of matching articles to peruse. At the bottom of every article, check out the all-new Articles of Interest section of Nerd Vittles arranged by topic. Also in the right column of Nerd Vittles, you’ll find a listing of Categories with Nerd Vittles articles conveniently grouped by topic. And, finally, you can quickly jump to the lead article on every major Incredible PBX implementation in the color-coded tabs labeled: GPL VOIP SOLUTIONS FOR ALL.

Happy New Year!

Originally published: Monday, January 1, 2018


Support Issues. With any application as sophisticated as a VoIP PBX, you’re bound to have questions. Blog comments are a terrible place to handle support issues although we welcome general comments about our articles and software. If you have particular support issues, we encourage you to get actively involved in the PBX in a Flash Forums. It’s the best Asterisk tech support site in the business, and it’s all free! Please have a look and post your support questions there. Unlike some forums, ours is extremely friendly and is supported by literally hundreds of Asterisk and 3CX gurus and thousands of users just like you. You won’t have to wait long for an answer to your question.


NEW YEAR’S TREAT: If you could use one or more free DIDs in the U.S. with unlimited inbound calls and unlimited simultaneous channels, then today’s your lucky day. TelecomsXChange and Bluebird Communications have a few hundred thousand DIDs to give away so you better hurry. You have your choice of DID locations including New York, New Jersey, California, Texas, and Iowa. The DIDs support Voice, Fax, Video, and even Text Messaging (by request). The only requirement at your end is a dedicated IP address for your VoIP server. Once you receive your welcome email with your number, be sure to whitelist the provider’s IP address in your firewall. For Incredible PBX servers, use add-ip to whitelist the UDP SIP port, 5060, using the IP address provided in your welcoming email.

Here’s the link to order your DIDs.

Your DID Trunk Setup in your favorite GUI should look like this:

Trunk Name: IPC
Peer Details:
type=friend
qualify=yes
host={IP address provided in welcome email}
context=from-trunk

Your Inbound Route should specify the 11-digit DID beginning with a 1. Enjoy!


Need help with Asterisk or 3CX? Visit the PBX in a Flash Forum.


Special Thanks to Our Generous Sponsors


FULL DISCLOSURE: ClearlyIP, Skyetel, Vitelity, DigitalOcean, Vultr, VoIP.ms, 3CX, Sangoma, TelecomsXchange and VitalPBX have provided financial support to Nerd Vittles and our open source projects through advertising, referral revenue, and/or merchandise. As an Amazon Associate and Best Buy Affiliate, we also earn from qualifying purchases. We’ve chosen these providers not the other way around. Our decisions are based upon their corporate reputation and the quality of their offerings and pricing. Our recommendations regarding technology are reached without regard to financial compensation except in situations in which comparable products at comparable pricing are available from multiple sources. In this limited case, we support our sponsors because our sponsors support us.

BOGO Bonaza: Enjoy state-of-the-art VoIP service with a $10 credit and half-price SIP service on up to $500 of Skyetel trunking with free number porting when you fund your Skyetel account. No limits on number of simultaneous calls. Quadruple data center redundancy. $25 monthly minimum spend required. Tutorial and sign up details are here.

The lynchpin of Incredible PBX 2020 and beyond is ClearlyIP components which bring management of FreePBX modules and SIP phone integration to a level never before available with any other Asterisk distribution. And now you can configure and reconfigure your new Incredible PBX phones from the convenience of the Incredible PBX GUI.

VitalPBX is perhaps the fastest-growing PBX offering based upon Asterisk with an installed presence in more than 100 countries worldwide. VitalPBX has generously provided a customized White Label version of Incredible PBX tailored for use with all Incredible PBX and VitalPBX custom applications. Follow this link for a free test drive!
 

Special Thanks to Vitelity. Vitelity is now Voyant Communications and has halted new registrations for the time being. Our special thanks to Vitelity for their unwavering financial support over many years and to the many Nerd Vittles readers who continue to enjoy the benefits of their service offerings. We will keep everyone posted on further developments.


Some Recent Nerd Vittles Articles of Interest…

Free Calling Returns with Incredible PBX 15 for Wazo


Since we began our XiVO/Wazo adventure 18 months ago, the most requested feature has been direct support for Google Voice with OAuth 2 authentication. For those in the United States, it remains the cheapest VoIP solution on the planet with unlimited free calls in the U.S. and Canada. When Wazo migrated to Asterisk® 15, the Asterisk platform natively supported Google Voice, but there was no direct support in either Wazo or Incredible PBX. Instead, over the past couple months, we’ve had Google Voice functionality through Simonics SIP to Google Voice Gateway. Well, today’s a new day. We’re pleased to announce Google Voice is back!

Overview. If you’re new to Google Voice, here’s how the installation scenario goes. First, you set up a Gmail account at gmail.com. Next, you create a Google Voice account. Then, you configure Google Voice for use with Asterisk®. Next, you obtain your Google Voice OAuth 2 Refresh Token which becomes your password to use in configuring Google Voice on the Wazo platform. Next, using SSH or Putty, you log into your Wazo server as root and run the add-gvtrunk script to get your Google Voice credentials set up in Wazo. Finally, you log into the Wazo GUI with a browser and set up a custom trunk as well as an outgoing and incoming route for Google Voice calls. To add more Google Voice trunks, you simply repeat the drill. You now should have a perfectly functioning, free VoIP platform compliments of Google and Sylvain Boily and his development team. Start by deploying Incredible PBX 15 for Wazo.

Configuring Google Voice for Wazo

If you’re one of the five people on Earth that does not yet have a Gmail account, start there. Once you’ve set up your Gmail account and logged in, open a new browser tab to access the Google Voice site. Accept the Google Terms and Privacy Policy. Then choose a new Phone Number in your favorite area code. NOTE: Before Google will assign you a number, you must enter an existing U.S. phone number to verify your identity and location as well as to use for initially forwarding calls. Once your account is set up, you will get an email asking that you verify your email address.

Google continues to tighten up on obtaining more than one Google Voice number from the same computer or the same IP address. If this is a problem for you, here’s a workaround. From your smartphone, install the Google Voice app from iPhone App Store or Google’s Play Store. Then open the app and login to your new Google account. Choose your new Google Voice number when prompted and provide a cell number with SMS as your callback number for verification. Once the number is verified, log out of Google Voice. Do NOT make any calls. Now head back to your PC’s browser and login to http://google.com/voice. You will be presented with the new Google Voice interface which does not include the Google Chat option. But fear not. At least for now there’s still a way to get there. After you have set up your new phone number and opened the Google Voice interface, click on the 3 vertical dots in the left sidebar (it’s labeled More). When it opens, click Legacy Google Voice in the sidebar. That will return you to the old UI. Now click on the Gear icon (upper right) and choose Settings. Make sure the Google Chat option is selected and disable forwarding calls to whatever default phone number you set up.

Next, click on the Calls tab. Make sure your settings match these:

  • Call ScreeningOFF
  • Call PresentationOFF
  • Caller ID (In)Display Caller’s Number
  • Caller ID (Out)Don’t Change Anything
  • Do Not DisturbOFF
  • Call Options (Enable Recording)OFF
  • Global Spam FilteringON

Under the Voicemail tab, plug in your email address so you get notified of new voicemails. Then click Save Settings. Down the road, receipt of a Google Voice voicemail will be a big hint that something has come unglued on your PBX.

One final word of caution is in order regardless of your choice of providers: Do NOT use special characters in your Google Voice password, and don’t enable two-step authentication.

Now it’s time to obtain your OAuth 2 credentials. Even though it’s a bit more work on the front end, the good news is you won’t have to worry about your Google Voice trunks failing when Google phases out plain-text passwords. The other good news is you won’t be passing your plain-text Google Voice credentials across the Internet for everyone in the world to see.

Obtaining Your Google Voice OAuth 2 Credentials

While you’re still logged into your Google Voice account, you need to obtain a refresh_token which is what you’ll use instead of a password when setting up your Google Voice account with XiVO. Here’s how.

1. Be sure you are still logged into your Google Voice account. If not, log back in at https://voice.google.com.

2. In a separate browser tab, go to the Google OAUTH Playground using your browser while still logged into your Google Voice account.

3. Once logged in to Google OAUTH Playground, click on the Gear icon in upper right corner (as shown below).

  3a. Check the box: Use your own OAuth credentials

  3b. Enter Incredible PBX OAuth Client ID:

466295438629-prpknsovs0b8gjfcrs0sn04s9hgn8j3d.apps.googleusercontent.com

  3c. Enter Incredible PBX OAuth Client secret: 4ewzJaCx275clcT4i4Hfxqo2

  3d. Click Close

4. Click Step 1: Select and Authorize APIs (as shown below)

  4a. In OAUTH Scope field, enter: https://www.googleapis.com/auth/googletalk

  4b. Click Authorize APIs (blue) button.

With a recent Google change, you then will be prompted to choose your Google account again. Click on the same account name that you logged into in Step #1. You then will be prompted whether to allow Google to view and send Chat messages. Click Allow.

5. Click Step 2: Exchange authorization code for tokens

  5a. Click Exchange authorization code for tokens (blue) button

  5b. When the tokens have been generated, Step 2 will close.

6. Reopen Step 2 and copy your Refresh_Token. This is the "password" you will need to enter (together with your Gmail account name and 10-digit GV phone number) when you add your GV trunk with the add-gvtrunk script. Store this refresh_token in a safe place. Google doesn’t permanently store it!

7. Authorization tokens NEVER expire! If you ever need to remove your authorization tokens, go here and delete Incredible PBX Google Voice OAUTH entry by clicking on it and choosing DELETE option.

Switch back to your Gmail account and click on the Phone icon at the bottom of the window to place one test call. Once you successfully place a call, you can log out of Google Voice and Gmail.

Yes, this is a convoluted process. Setting up a secure computing environment often is. Just follow the steps and don’t skip any. It’s easy once you get the hang of it. And you’ll sleep better.

Downloading and Installing Google Voice with OAuth 2

Installs of Incredible PBX 15 for Wazo beginning December 7 already have the necessary components in place to support Google Voice. If you have an earlier installation of Incredible PBX 15 for Wazo, you can easily upgrade your server to support Google Voice. Simply log into your server’s Linux CLI as root using SSH or Putty and issue the following commands:

cd /root
wget http://incrediblepbx.com/gvtrunk15.tar.gz
tar zxvf gvtrunk15.tar.gz
rm -f gvtrunk15.tar.gz

If you’re upgrading Wazo from a release before 17.15, you can follow the usual upgrade steps after first removing your existing Google Voice trunks from the configuration. Start by copying your Google Voice credentials from /etc/asterisk/oauth_xmpp.conf. Next, delete the following file: /etc/asterisk/extensions_extra.d/gv.conf. Then perform the upgrade:

cd /root
cp -pr /etc/postfix /root
cp -p /etc/nginx/sites-enabled/xivo /root
echo "noload => res_xmpp_oauth.so" >> /etc/asterisk/modules.conf
xivo-dist wazo-17.17
apt-get update
/etc/init.d/netfilter-persistent stop
wazo-upgrade
iptables-restart
# put the Incredible PBX web add-ons back in place
cd /
wget http://incrediblepbx.com/incredible-nginx.tar.gz
tar zxvf incredible-nginx.tar.gz
rm -f incredible-nginx.tar.gz
ln -s /etc/nginx/locations/https-available/01_incrediblepbx /etc/nginx/locations/https-enabled/.
cd /etc/nginx
wget http://incrediblepbx.com/nginx-config.tar.gz
tar zxvf nginx-config.tar.gz
rm -f /etc/nginx/sites-enabled/default
cp -p /root/xivo /etc/nginx/sites-enabled
/etc/init.d/nginx restart
cp -pr /root/postfix /etc
/etc/init.d/postfix restart
sed -i 's|fr|us|' /etc/asterisk/indications.d/99-general.conf
/etc/init.d/asterisk restart

Initial Google Voice OAuth Trunk Setup with Wazo

Now it’s time to create your Google Voice OAuth 2 trunk to use with Wazo. Log back into the Linux CLI as root. Be sure you have your 10-digit Google Voice phone number, your Google account name without @gmail.com, and your Refresh Token from the previous step. Then run the script to add your Google Voice trunk:

cd /root
./add-gvtrunk

Plug in your Google Voice phone number, your account name (without @gmail.com), and refresh token when prompted. Check your work carefully. When the install finishes, fire up your favorite browser to finish the setup using the settings displayed in the Linux CLI.

Configuring Wazo for Google Voice OAuth

From a browser pointed to your server’s IP address, log in to Wazo as root with your GUI password.

Choose Services.IPBX.Trunk Management.Customized. Click on + Add to create a new custom trunk. Configure the trunk using the settings provided in the previous step. Click the Save button when finished. The Trunk Name will be your actual gmailname (without @gmail.com). Interface will be Motif/gmailname (using your actual Gmail name). Interface suffix will be @voice.google.com. And the Context will be Outcalls (to-extern).

Next, choose Services.IPBX.Call Management.Incoming Calls. Click on + Add to create a new inbound route for your Google Voice DID. This is where you tell Wazo how to route calls placed to your Google Voice number. For your DID, enter your 10-digit Google Voice number. For the Context, choose Incalls (from-extern). Then choose from the pick lists to select a Destination and Redirect option for the incoming calls. It could be an extension, a ring group, a conference room, or an IVR. Click Save when you’re finished.

Finally, choose Services.IPBX.Call Management.Outgoing Calls. Click on + Add to create a new outbound route. Under the General tab, configure the route as shown below using a Name of out_gmailname (using your actual Gmail name). The Context should be Outcalls (to-extern). The Preprocess subroutine should be subr-gv-outcall. And the desired Custom Trunk should be dragged left to the selected column:

Under the Exten tab, add the desired 10-digit Exten string that users will dial to place a call through the Google Voice trunk. Trim off any prefix (such as 9) that you assigned to the dial string using the Stripnum setting. Then click the Save button.

For example, for a first trunk, you might choose NXXNXXXXXX as the Exten with a Stripnum of 0. This would tell Wazo to route all 10-digit calls to this Custom GV Trunk. For a second Google Voice trunk, you might choose 9NXXNXXXXXX with a Stripnum of 1. This would tell Wazo to route 11-digit calls with a 9 prefix to this Custom Trunk AND to strip off the first digit (9) before sending the 10-digit call to Google Voice.

SMS Messaging with Google Voice

Incredible PBX implementations include a separate Python-based component called pygooglevoice that allows SMS messaging using a Google Voice account. You’ll find the SMS Dictator and SMS message blasting scripts in the /root folder of your server. Be advised that the gvoice script used to send these SMS messages does NOT use OAuth 2 authentication and requires your traditional Google Voice account name and password. Because it uses plain text, you probably will experience failures using gvoice unless your PBX is housed on the same server from which you traditionally access this account. The workaround is to do the following immediately before attempting to use SMS messaging with Google Voice. Using a browser, log into the Gmail account that corresponds to the account you plan to use for SMS messaging. In a separate tab of your browser while still logged into Gmail, go to the following link and enable Less Secure Apps for this account. In a third tab, go to the following link and activate the Google Reset Procedure. Now, from the Linux CLI on your PBX, attempt to login to gvoice using your Gmail account name including @gmail.com AND your plain-text Gmail password. If it succeeds, you’re good to go and can now use the SMS messaging tools. Type quit to exit from gvoice. Google normally follows up insecure access attempts with an email requesting that you confirm this is a "safe IP address" for your account. If you fail to respond to that email, you probably will need to repeat this exercise every time you attempt to use SMS messaging.

Taking Google Voice for a Test Drive

That completes the Google Voice setup. You now should be able to place a call using your Google Voice trunk by dialing any 10-digit number. And calls placed to your Google Voice number should ring at the inbound destination you chose above.

If you have additional Google Voice trunks, simply run /root/add-gvtrunk again and insert the new credentials.

If you ever need to delete a Google Voice account, just run /root/del-gvtrunk with the name of the Google Voice trunk to delete. Enjoy your free phone service!

Originally published: Monday, December 11, 2016


Support Issues. With any application as sophisticated as this one, you’re bound to have questions. Blog comments are a terrible place to handle support issues although we welcome general comments about our articles and software. If you have particular support issues, we encourage you to get actively involved in the PBX in a Flash Forums. It’s the best Asterisk tech support site in the business, and it’s all free! Please have a look and post your support questions there. Unlike some forums, ours is extremely friendly and is supported by literally hundreds of Asterisk and Wazo gurus and thousands of users just like you. You won’t have to wait long for an answer to your question.


Need help with Asterisk or Wazo? Visit the PBX in a Flash Forum.


Special Thanks to Our Generous Sponsors


FULL DISCLOSURE: ClearlyIP, Skyetel, Vitelity, DigitalOcean, Vultr, VoIP.ms, 3CX, Sangoma, TelecomsXchange and VitalPBX have provided financial support to Nerd Vittles and our open source projects through advertising, referral revenue, and/or merchandise. As an Amazon Associate and Best Buy Affiliate, we also earn from qualifying purchases. We’ve chosen these providers not the other way around. Our decisions are based upon their corporate reputation and the quality of their offerings and pricing. Our recommendations regarding technology are reached without regard to financial compensation except in situations in which comparable products at comparable pricing are available from multiple sources. In this limited case, we support our sponsors because our sponsors support us.

BOGO Bonaza: Enjoy state-of-the-art VoIP service with a $10 credit and half-price SIP service on up to $500 of Skyetel trunking with free number porting when you fund your Skyetel account. No limits on number of simultaneous calls. Quadruple data center redundancy. $25 monthly minimum spend required. Tutorial and sign up details are here.

The lynchpin of Incredible PBX 2020 and beyond is ClearlyIP components which bring management of FreePBX modules and SIP phone integration to a level never before available with any other Asterisk distribution. And now you can configure and reconfigure your new Incredible PBX phones from the convenience of the Incredible PBX GUI.

VitalPBX is perhaps the fastest-growing PBX offering based upon Asterisk with an installed presence in more than 100 countries worldwide. VitalPBX has generously provided a customized White Label version of Incredible PBX tailored for use with all Incredible PBX and VitalPBX custom applications. Follow this link for a free test drive!
 

Special Thanks to Vitelity. Vitelity is now Voyant Communications and has halted new registrations for the time being. Our special thanks to Vitelity for their unwavering financial support over many years and to the many Nerd Vittles readers who continue to enjoy the benefits of their service offerings. We will keep everyone posted on further developments.


Some Recent Nerd Vittles Articles of Interest…

It’s Soup: The Definitive Quick Start Guide to Wazo 17.17

Today we’re pleased to introduce Wazo 17.17, the latest iteration in the Wazo fork of XiVO. Twelve years in the making with the same development team, Wazo 17.17 is really something special. It’s the latest release featuring Asterisk® 15 with multi-party videoconferencing and also includes a new easy-to-use WebRTC feature and support for Asterisk FollowMe Roaming. We are pleased to announce that this release of Wazo 17.17 using the latest Incredible PBX 15 installer for Asterisk 15 now supports native Google Voice trunks with OAuth 2. Of course, all of your favorite Incredible PBX add-ons are ready as well. What follows is a new soup-to-nuts tutorial covering everything you need to know to get started with Incredible PBX for Wazo 17.17.

Wazo 17.17 enhances the brand new user interface to complement Wazo’s existing GUI. Revolutionary is probably the best way to describe its design. The reason is that it is generated using pure API calls to the Wazo engine. What that means to the administrator is you can tweak it, enhance it, replace it, or build additional functionality into your UI using the same API calls that the Wazo developers employed to build these components. This is obviously the first of many iterations that will be released in coming months, but it gives you an opportunity to kick the tires. Once you complete the installation process which follows, simply use a browser to log into the IP address of your server at the following link: https://serverIP/admin/. To begin, login with your root GUI credentials and click Plugins to display available options (pictured above). Then install each of the following plugins to begin: Users, Extensions, Contexts, and Devices. The remaining plugins are optional; however, the following plugins are not yet operational: Outcalls and Trunks. The Parking Lots and Switchboard plugins are functional but do not yet show existing setups configured through the legacy GUI. Additional tips and getting started tips are available here and here.

If you’ve been following along in our XiVO adventure with Incredible PBX last year, then you already know that there were a significant number of configuration hoops to jump through once the base install was finished. While these steps are well documented in the original Incredible PBX for XiVO tutorial, there still were plenty of opportunities for typos and skipping steps. Any misstep could spell the difference in a perfectly functioning PBX and one that couldn’t make or receive calls. So we introduced XiVO Snapshots, and today we bring the same technology to the Wazo platform as well.

A Wazo Snapshot is just what the name implies. It’s a snapshot of a working Wazo PBX that has virtually everything already configured: SIP settings that work with Asterisk®, a SIP extension that works with a SIP phone plus your cellphone, a SIP extension preconfigured for WebRTC that uses the new Opus codec, SIP and Google Voice trunk setups for many of the major commercial providers, and default inbound and outbound routes to ease the task of routing calls into and out of your PBX. Basically, you plug in your credentials from your favorite provider after running the Incredible PBX for Wazo installer, tell Wazo how to route the calls, and you’re done. You can have a stable and functional PBX making calls to anywhere in the world in a matter of minutes. Then you can review our numerous tutorials to add additional bells and whistles while actually using your Wazo PBX while you learn.

Incredible PBX for Wazo Installation Overview

Before we roll up our sleeves and walk you through the installation process, we wanted to provide a quick summary of the 10 Basic Steps in setting up Incredible PBX for Wazo. By the way, the whole process takes less than an hour!

  1. Set Up Desired PBX Platform: Stand-alone PC, Virtual Machine, or Cloud-Based Server
  2. Run the Incredible PBX for Wazo installer
  3. Set Up One or More SIP or Google Voice Trunks for Your PBX
  4. Tell Wazo Where to Direct Incoming Calls from Each Trunk
  5. Tell Wazo Which Trunk to Use for Every Outbound Calling Digit Sequence
  6. Set Up a SoftPhone or WebRTC Phone (or both)
  7. Decide Whether to Activate Simultaneous Ringing on your Cellphone
  8. Add Google Speech Recognition Key (if desired)
  9. Activate DISA with Incredible PBX for Wazo (if desired)
  10. Test Drive Incredible PBX for Wazo

1. Incredible PBX for Wazo Hardware Platform Setup

NOTE: Ignore references to Debian 9 in the platform setup tutorials. Debian 9 is not quite ready yet so stick with Debian 8.

The first step is to choose your hardware platform and decide whether you want to babysit a server and network or leave those tasks to others. We’ve taken the guesswork out of the setups documented below. Five of the options are cloud providers, each of whom provides a generous discount to let you kick the tires. So click on the links below to review the terms and our walkthrough of the setup process on each platform.

2. Running the Incredible PBX for Wazo Installer

Once you have your hardware platform up and running, the rest of the initial setup process is easy. Simply download and run the Incredible PBX for Wazo installer. On some platforms, it first updates Debian 8 to current specs and reboots. Then log back in and rerun the installer a second time if you are prompted to do so.

cd /root
wget http://incrediblepbx.com/IncrediblePBX15-Wazo.sh
chmod +x IncrediblePBX15-Wazo.sh
./IncrediblePBX15-Wazo.sh


3. Setting Up SIP and Google Voice Trunks with Wazo

When the installation is finished, you can make toll-free calls in the U.S. and Canada without doing anything except dialing "1″ and the 10-digit number from any phone connected to your server. For other calls, there are two steps in setting up trunks to use with Incredible PBX. First, you have to sign up with the provider of your choice and obtain trunk credentials. These typically include the FQDN of the provider’s server as well as your username and password to use for access to that server. Second, you have to configure a trunk on the Incredible PBX for Wazo server so that you can make or receive calls outside of your PBX. As with the platform tutorials, we have taken the guesswork out of the trunk setup procedure for roughly a dozen respected providers around the globe. In addition, Wazo Snapshots goes a step further and actually creates the trunks for you, minus your credentials, as part of the initial Incredible PBX install.

For Google Voice trunks with Incredible PBX 15, log into your server as root and run ./add-gvtrunk. When prompted, insert your 10-digit Google Voice number, your Google Voice email address and your OAuth 2 token. The native Google Voice OAuth tutorial explains how to obtain it.

For the other providers, review the setup procedure below and then edit the preconfigured trunk for that provider by logging into the Wazo web GUI and choosing IPX → Trunk Management → SIP Protocol. Edit the setup for your provider (as shown above) and fill in your credentials and CallerID number in the General tab. Activate the trunk in the Register tab after again filling in your credentials. Save your settings when finished. No additional configuration for these providers is required using the Incredible PBX for Wazo Snapshot.

4. Directing Incoming Calls from Wazo Trunks

Registered Wazo trunks typically include a DID number. With the exception of CallCentric, this is the number that callers would dial to reach your PBX. With CallCentric, it’s the 11-digit account number of your account, e.g. 17771234567. In the Wazo web GUI, we use IPX → Call Management → Incoming Calls to create inbound routes for every DID and trunk associated with your PBX. Two sample DIDs have been preconfigured to show you how to route calls to an extension or to an IVR. To use these, simply edit their settings and change the DID to match your trunk. Or you can create new incoming routes to send calls to dozens of other destinations on your PBX.

5. Routing Outgoing Calls from Wazo to Providers

Outgoing calls from extensions on your Wazo PBX must be routed to a trunk provider to reach call destinations outside your PBX. Outgoing call routing is managed in IPX → Call Management → Outgoing Calls. You tell Wazo which trunk provider to use in the General tab. Then you assign a Calling Digit Sequence to this provider in the Exten tab. For example, if NXXNXXXXXX were assigned to Vitelity, this would tell Wazo to send calls to Vitelity if the caller dialed a 10-digit number. Wazo has the flexibility to add and remove digits from a dialed number as part of the outbound call routing process. For example, you might want callers to dial 48NXXNXXXXXX to send calls to a Google Voice trunk where 48 spells "GV" on the phone keypad. We obviously don’t want to send the entire dial string to Google Voice so we tell Wazo to strip the first 2 digits (48) from the number before routing the call out your Google Voice trunk. We’ve included two examples in the Wazo Snapshot to get you started. Skype Connect (shown below) is an example showing how to strip digits and also add digits before sending a call on its way:


6. Setting Up a Softphone & WebRTC with Wazo

If you’re a Mac user, you’re lucky (and smart). Download and install Telephone from the Mac App Store. Start up the application and choose Telephone:Preference:Accounts. Click on the + icon to add a new account. To set up your softphone, you need 3 pieces of information: the IP address of your server (Domain), and your Username and Password. In the World of Wazo, you’ll find these under IPBX → Services → Lines. Just click on the Pencil icon beside the extension to which you want to connect. Now copy or cut-and-paste your Username and Password into the Accounts dialog of the Telephone app. Click Done when you’re finished, and your new softphone will come to life and should show Available. Dial the IVR (4871) to try things out. With Telephone, you can use over two dozen soft phones simultaneously on your desktop.

For everyone else, we recommend the YateClient softphone which is free. Download it from here. Run YateClient once you’ve installed it and enter the credentials for the Wazo Line. You’ll need the IP address of your server plus your Line username and password associated with the 701 extension. On the Wazo platform, do NOT use an actual extension number for your username with Wazo. Go to IPBX Settings → Lines to decipher the appropriate username and password for the desired extension. Click OK to save your entries.


WebRTC allows you to use your Chrome or Firefox browser as a softphone. Extension 701 comes preconfigured for WebRTC access with Incredible PBX for Wazo. It shares the same password as the Line associated with extension 701, but the username is 701 rather than the username associated with the Line. You can decipher the password by accessing the Wazo Web GUI and then IPBX → Services → Users → Incredible PBX → XiVO Client Password. Or log into your server as root using SSH or Putty and run: /root/show-701-pw. Wazo introduces several new features to WebRTC including support for the awesome new Opus codec plus voicemail management and even Gravatar support. It’s all preconfigured!

Special Note: Beginning with version 17.02 of Wazo, WebRTC is fully integrated with NGINX on your server, and a simplified method for configuring WebRTC users has been added. When you create a new User account, simply choose the SIP (WebRTC) Protocol when creating a new user account, and all of the Advanced Line options required to support WebRTC will be preconfigured for you.

To use WebRTC, you no longer need to accept the different SSL certificates associated with the WebRTC app. From your browser, go to the following site and click on each link to accept the certificates. Once you’ve completed this process, simply visit the Wazo WebRTC site.

Before logging in, click on the Gear icon in the lower right corner and then click on the Pencil icon to edit your Settings. Fill in the public IP address of your Wazo server and specify 443 for the Port. Leave the Backend field blank and click Save. Now login to your WebRTC account with Username 701. The Password is the one you obtained running show-701-pw. The IP Address (if required) is the address of your Wazo PBX.

Implementing FollowMe Roaming with a CellPhone

In addition to ringing your SIP extension when incoming calls arrive, Wazo 17.17 can also ring your cellphone simultaneously. This obviously requires at least one outbound trunk. If that trunk provider also supports CallerID spoofing, then Wazo will pass the CallerID number of the caller rather than the DID associated with the trunk. Incredible PBX for Wazo comes with cellphone support for extension 702 ready to go. To enable it, access the Wazo Web GUI and go to IPBX → Services → Users → Incredible PBX and insert your Mobile Phone Number using the same dial string format associated with the trunk you wish to use to place the calls to your cellphone. You then can answer the incoming calls on either your cellphone or the registered SIP phone. If you answer on your cellphone, you will be prompted whether you wish to accept the call. If you press 1 after observing the CallerID, the caller will be connected. If you decline, the caller will be routed to the Wazo voicemail account of the extension.

8. Activating Voice Recognition for Wazo

Google has changed the licensing of their speech recognition engine about as many times as you change diapers on a newborn baby. Today’s rule restricts use to “personal and development use.” Assuming you qualify, the very first order of business is to enable speech recognition for your Wazo PBX. Once enabled, the Incredible PBX feature set grows exponentially. You’ll ultimately have access to the Voice Dialer for AsteriDex, Worldwide Weather Reports where you can say the name of a city and state or province to get a weather forecast for almost anywhere, Wolfram Alpha for a Siri-like encyclopedia for your PBX, and Lefteris Zafiris’ speech recognition software to build additional Asterisk apps limited only by your imagination. And, rumor has it, Google is about to announce new licensing terms, but we’re not there yet. To try out the Voice Dialer in today’s demo IVR, you’ll need to obtain a license key from Google. This Nerd Vittles tutorial will walk you through that process. Add your key to /var/lib/asterisk/agi-bin/speech-recog.agi on line 72.

9. Adding DISA Support to Your Wazo PBX

If you’re new to PBX lingo, DISA stands for Direct Inward System Access. As the name implies, it lets you make calls from outside your PBX using the call resources inside your PBX. This gives anybody with your DISA credentials the ability to make calls through your PBX on your nickel. It probably ranks up there as the most abused and one of the most loved features of the modern PBX.

There are three ways to implement DISA with Incredible PBX for Wazo. You can continue reading this section for our custom implementation with two-step authentication. There also are two native Wazo methods for implementing DISA using a PIN for security. First, you can dedicate a DID to incoming DISA calls. Or you can add a DISA option to an existing IVR. Both methods are documented in our tutorial on the PIAF Forum.

We prefer two-step authentication with DISA to make it harder for the bad guys. First, the outside phone number has to match the whitelist of numbers authorized to use your DISA service. And, second, you have to supply the DISA password for your server before you get dialtone to place an outbound call. Ultimately, of course, the monkey is on your back to create a very secure DISA password and to change it regularly. If all this sounds too scary, don’t install DISA on your PBX.

1. To get started, edit /root/disa-xivo.txt. When the editor opens the dialplan code, move the cursor down to the following line:

exten => 3472,n,GotoIf($["${CALLERID(number)}"="701"]?disago1)  ; Good guy

2. Clone the line by pressing Ctrl-K and then Ctrl-U. Add copies of the line by pressing Ctrl-U again for each phone number you’d like to whitelist so that the caller can access DISA on your server. Now edit each line and replace 701 with the 10-digit number to be whitelisted.

3. Move the cursor down to the following line and replace 12341234 with the 8-digit numeric password that callers will have to enter to access DISA on your server:

exten => 3472,n,GotoIf($["${MYCODE}" = "12341234"]?disago2:bad,1)

4. Save the dialplan changes by pressing Ctrl-X, then Y, then ENTER.

5. Now copy the dialplan code into your Wazo setup, remove any previous copies of the code, and restart Asterisk:

cd /root
sed -i '\:// BEGIN DISA:,\:// END DISA\:d' /etc/asterisk/extensions_extra.d/xivo-extrafeatures.conf
cat disa-xivo.txt >> /etc/asterisk/extensions_extra.d/xivo-extrafeatures.conf
/etc/init.d/asterisk reload

6. The traditional way to access DISA is to add it as an undisclosed option in an IVR that is assigned to one of your inbound trunks (DIDs). For the demo IVR that is installed, edit the ivr-1.conf configuration file and change the "option 0″ line so that it looks like this. Then SAVE your changes.

exten => 0,1(ivrsel-0),Dial(Local/3472@default)

7. Adjust the inbound calls route of one of your DIDs to point to the demo IVR by changing the destination to Customized with the following Command:

Goto(ivr-1,s,1)

A sample is included in the Wazo Snapshot. Here’s how ours looks for the Demo IVR:


8. Now you should be able to call your DID and choose option 0 to access DISA assuming you have whitelisted the number from which you are calling. When prompted, enter the DISA password you assigned and press #. You then should be able to dial a 10-digit number to make an outside call from within your PBX.

SECURITY HINT: Whenever you implement a new IVR on your PBX, it’s always a good idea to call in from an outside number 13 TIMES and try every key from your phone to make sure there is no unanticipated hole in your setup. Be sure to also let the IVR timeout to see what result you get.

10. NEW: Travelin’ Man 3 WhiteList Firewall

All new installs of Incredible PBX for Wazo include the newly enhanced and preconfigured IPtables Firewall featuring Travelin’ Man 3. Please read the new tutorial when you have a few minutes. It documents how to enable access to your server for remote phones and traveling users.

PortKnocker previously let a remote user ping the server with a 3-digit code to temporarily add the remote user’s IP address to the IPtables Firewall WhiteList so that the user could gain remote access. We now are adding the ability to let end-users make successful PortKnocks permanent just as if an administrator had used add-ip on the server to add an IP address. Administrators still can remove these entries using del-acct although you will have to know the date and time that the entry was added. The file names consist of timestamp.iptables in /root and the additions are made to the custom WhiteList in /usr/local/sbin/iptables-custom. To enable permanent PortKnocker additions, simply run this command while logged into your server as root: iptables-knock activate.

11. Test Drive Incredible PBX for Wazo

To give you a good idea of what to expect with Incredible PBX for Wazo, just pick up a phone and dial any toll-free number in the U.S. and Canada using a 1 prefix. We’ve also set up a sample IVR using voice prompts from Allison. Try it out from any phone on your PBX by dialing 4871 (IVR1):

Nerd Vittles Demo IVR Options
1 – Call by Name (say "Delta Airlines" or "American Airlines" to try it out)
2 – MeetMe Conference
3 – Wolfram Alpha (Coming Soon!)
4 – Lenny (The Telemarketer’s Worst Nightmare)
5 – Today’s News Headlines
6 – Weather Forecast (enter a 5-digit ZIP code)
7 – Today in History (Coming Soon!)
8 – Speak to a Real Person (or maybe just Lenny if we’re out)

What To Do and Where to Go Next?

Here are a boatload of projects to get you started exploring Wazo on your own. Just plug the keywords into the search bar at the top of Nerd Vittles to find numerous tutorials covering the topics or simply follow our links. Unless there is an asterisk (*) the components already are in place so do NOT reinstall them. Just read the previous tutorials to learn how to configure each component. Be sure to also join the PIAF Forum to keep track of the latest tips and tricks with Wazo. There’s a treasure trove of information that awaits.

Wazo and Incredible PBX Dial Code Cheat Sheets

Complete Wazo documentation is available here. But here are two cheat sheets in PDF format for Wazo Star Codes and Incredible PBX Dial Codes.

Published: Wednesday, December 14, 2016  Last Updated: Monday, December 12, 2017


Don’t forget to List Yourself in Directory Assistance so everyone can find you by dialing 411. And add your new number to the Do Not Call Registry to block telemarketing calls. Or just call 888-382-1222 from your new number.


Need help with Asterisk? Visit the PBX in a Flash Forum.


Special Thanks to Our Generous Sponsors


FULL DISCLOSURE: ClearlyIP, Skyetel, Vitelity, DigitalOcean, Vultr, VoIP.ms, 3CX, Sangoma, TelecomsXchange and VitalPBX have provided financial support to Nerd Vittles and our open source projects through advertising, referral revenue, and/or merchandise. As an Amazon Associate and Best Buy Affiliate, we also earn from qualifying purchases. We’ve chosen these providers not the other way around. Our decisions are based upon their corporate reputation and the quality of their offerings and pricing. Our recommendations regarding technology are reached without regard to financial compensation except in situations in which comparable products at comparable pricing are available from multiple sources. In this limited case, we support our sponsors because our sponsors support us.

BOGO Bonaza: Enjoy state-of-the-art VoIP service with a $10 credit and half-price SIP service on up to $500 of Skyetel trunking with free number porting when you fund your Skyetel account. No limits on number of simultaneous calls. Quadruple data center redundancy. $25 monthly minimum spend required. Tutorial and sign up details are here.

The lynchpin of Incredible PBX 2020 and beyond is ClearlyIP components which bring management of FreePBX modules and SIP phone integration to a level never before available with any other Asterisk distribution. And now you can configure and reconfigure your new Incredible PBX phones from the convenience of the Incredible PBX GUI.

VitalPBX is perhaps the fastest-growing PBX offering based upon Asterisk with an installed presence in more than 100 countries worldwide. VitalPBX has generously provided a customized White Label version of Incredible PBX tailored for use with all Incredible PBX and VitalPBX custom applications. Follow this link for a free test drive!
 

Special Thanks to Vitelity. Vitelity is now Voyant Communications and has halted new registrations for the time being. Our special thanks to Vitelity for their unwavering financial support over many years and to the many Nerd Vittles readers who continue to enjoy the benefits of their service offerings. We will keep everyone posted on further developments.


Incredible PBX 13-13 Application User’s Guide

For those just beginning the Incredible PBX® 13-13 adventure, start here. Once your system is up and running, you’ll be ready to kick the tires. And today we’ll cover the applications for Asterisk® that are included in the latest and greatest Incredible PBX Whole Enchilada. If you have questions, post them on the PIAF Forum for some quick and friendly assistance.

Here’s a Table of Contents to the Incredible PBX 13-13 Applications with hotlinks. Enjoy!

  1. Checking System Status
  2. Enabling Speech Recognition for Asterisk
  3. Wolfram Alpha for Siri-like queries by phone*
  4. Automatic Update Utility
  5. Resetting Incredible PBX Passwords
  6. Apache Authentication for Apps
  7. IPtables Firewall WhiteList
  8. PortKnocker Remote Access
  9. Travelin’ Man 4 Remote Access by Phone
  10. Conference Bridge
  11. CallerID Name (CNAM) Lookups
  12. Faxing with Incredible PBX
  13. Voicemail 101 with Incredible PBX
  14. Email Delivery of MP3 Voicemails
  15. Reconfiguring SendMail for SmartHosts
  16. SMS Blasting with Google Voice
  17. SMS Voice Messaging with Google Voice*
  18. SMS Messaging with VoIP.ms
  19. SIP URI Calling with Speed Dials
  20. IVR Demo of Incredible PBX Applications*
  21. Backup and Restore Options
  22. AsteriDex – The Poor Man’s Rolodex®
  23. Voice Dialing with AsteriDex*
  24. Speed Dialing with AsteriDex
  25. Scheduling Reminders by Phone or Web
  26. DISA Access with Incredible PBX
  27. Yahoo! News Headlines
  28. Weather Forecasts with Incredible PBX*
  29. ODBC Application Support
  30. Today in History
  31. Time of Day

* Requires Voice Recognition implementation. See #2 above.

1. Checking Current Status of Incredible PBX

There are several ways to check the status of your server. First, log into your server as root and type: status or pbxstatus. You can even add the default phone number for your server by inserting it in /etc/pbx/.phone.

The second option is to use a browser to access your server. Choose the Incredible PBX Admin option after pointing a browser to the IP address of your server:

Once you log in with your admin password, the Dashboard of your server will display the status of trunks, users, and active calls on your server. In addition, you can review the latest news and security alerts from the RSS Feeds of Nerd Vittles, Incredible PBX, FreePBX®, and Asterisk. For additional status information, choose Reports:Asterisk Info.

2. Adding Speech Recognition to Asterisk

Google changed the licensing of their speech recognition engine last year and now restricts use to "personal and development use." Assuming you qualify, the very first order of business is to enable speech recognition for your new PBX. We no longer recommend Google Speech Recognition because of the licensing issues and Google’s propensity to break things regularly. Instead, we recommend IBM’s Speech Recognition and TTS engines. For most users, there will be no cost. And the services are second to none. For a complete installation and setup tutorial, see our original article on Incredible PBX 13-13. Once speech recognition is enabled, the Incredible PBX feature set grows exponentially. You’ll have access to the Voice Dialer for AsteriDex as well as SMS Voice Messaging and Wolfram Alpha for a Siri-like encyclopedia.

NOV. 1 UPDATE: IBM has moved the goal posts effective December 1, 2018:

Here’s how to activate Google speech recognition on Incredible PBX if you choose not to use the IBM solution. Don’t skip any steps!

1. Using an existing Google/Gmail account, you first must join the Chrome-Dev Group.

2. Using the same account, create a new Speech Recognition Project.

3. Click on your newly created project and choose APIs & auth.

4. Turn ON the Speech API by clicking on its Status button in the far right margin. HINT: If you forgot to complete Step #1, the Speech API option will be missing!

5. Click on Credentials in APIs & auth and choose Create New Key -> Server key. Leave the IP address restriction blank!

6. Write down your new API key or copy it to the clipboard.

7. Log into your server as root and issue the following command:

nano -w /var/lib/asterisk/agi-bin/speech-recog.agi

8. When the nano editor opens, go to line 70 of speech-recog.agi: my $key = "". Insert your API key from Step #6 above between the quotation marks and save the file: Ctrl-X, Y, then Enter.

3. Using Wolfram Alpha with Incredible PBX

Ever wished your Asterisk server could harness the power of a 10,000 CPU Supercomputer to answer virtually any question you can dream up about the world we live in? Well, so long as it’s for non-commercial use, today’s your lucky day. Apple demonstrated with Siri™ just how amazing this technology can be by coupling Wolfram Alpha® to a speech-to-text engine on the iPhone. Now you can do much the same thing using voice recognition on the Incredible PBX for Asterisk-GUI.

Before using Wolfram Alpha from any phone connected to your PBX, you first must configure it by obtaining and adding a Wolfram Alpha application ID to Incredible PBX. Here are the simple steps:

1. Obtain your free Wolfram Alpha APP-ID here.

2. Log into your server as root and issue the following command:

nano -w /var/lib/asterisk/agi-bin/wolfram.sh

3. When the nano editor opens, insert your IBM STT and Wolfram APP-ID credentials in the spaces provided. Then save the file.

To use Wolfram Alpha, dial 4747 (that’s S-I-R-I backwards) from any extension.

Here are some sample queries to get you started:

Weather in Charleston South Carolina
Weather forecast for Washington D.C.
Next solar eclipse
Otis Redding
Define politician
Who won the 1969 Superbowl? (Broadway Joe)
What planes are flying overhead now?
Ham and cheese sandwich (nutritional information)
Holidays 2015 (summary of all holidays for 2015 with dates and DOW)
Medical University of South Carolina (history of MUSC)
Star Trek (show history, air dates, number of episodes, and more)
Apollo 11 (everything you ever wanted to know)
Cheapest Toaster (brand and price)
Battle of Gettysburg (sad day 🙂 )
Daylight Savings Time 2015 (date ranges and how to set your clocks)
Tablets by Samsung (pricing, models, and specs)
Doughnut (you don’t wanna know)
Snickers bar (ditto)
Weather (local weather at your server’s location)

4. Automatic Update Utility for Incredible PBX

A key security component of Incredible PBX is its Automatic Update Utility. Each time you log into your server as root, the Automatic Update Utility is run. It installs the latest fixes and security patches for your server. Don’t disable it! In fact, don’t delete anything from the /root folder. You’ll need all of it sooner or later.

We recommend you log into your server as root at least once a week to keep your server current. Ditto for the web interface to Incredible PBX. Insofar as security is concerned, we make a best effort to keep the components of Incredible PBX up to date. The Linux operating system was installed by you before the Incredible PBX install began. That’s a nice way of saying Linux security is primarily your responsibility. When an egregious Linux vulnerability comes along that we know about, we will try to notify you of the issue on the PIAF Forum and on the RSS Feed that is part of the Incredible PBX GUI. Check the RSS Feeds at least once a week as well. As a condition of use of the free Incredible PBX product, you accepted ultimate responsibility for the security and reliability of your server. None of this discussion changes any of that.

5. Resetting Incredible PBX Passwords

Yes. It happens to all of us. We forget our passwords. Incredible PBX includes a convenient utility that lets you reset many of the passwords associated with Incredible PBX. Just log into your server as root and issue the command: /root/update-passwords

To reset Incredible PBX GUI admin password, issue command: /root/admin-pw-change

To reset the AvantFax admin password which is accessible within the Incredible PBX GUI, issue the following command: /root/avantfax-pw-change

6. Apache Authentication with Incredible PBX

With the exception of the Admin GUI and WebMin, all web-based applications included in Incredible PBX require successful Apache authentication to gain access. When you installed Incredible PBX, you should have created an admin account for Apache. If not, issue the following command using a secure password after logging in as root:

htpasswd -cb /etc/pbx/wwwpasswd admin newpassword

With the exception of AsteriDex and Reminders, you gain access to other Incredible PBX applications with the admin Apache account. For the remaining apps, you may wish to (but don’t have to) assign different account names and passwords to various departments in your organization. To set up these accounts, use the syntax above substituting the name of the department for "admin" and the department password for "newpassword."

7. Managing the IPtables Linux Firewall

As installed, Incredible PBX includes a preconfigured, locked-down Linux firewall that restricts incoming IPv6 traffic to localhost and, via a Travelin’ Man 3 WhiteList application, limits incoming IPv4 traffic to your server’s public and private IP addresses, your desktop computer’s IP address (that was used for the install), private LAN and NeoRouter VPN traffic, and a collection of our favorite VoIP providers. You can WhiteList additional IP addresses for additional providers or for SIP and IAX phones located outside your firewall. The following firewall management scripts are accessible from the /root directory:

  • ./add-ip — WhiteList an additional IP address or IP address range (CIDR)
  • ./add-fqdn — WhiteList a site using a fully-qualified domain name (FQDN)
  • ./del-acct — Remove previously designated entry from the WhiteList
  • ./ipchecker — Check whether specified FQDNs have changed & update IPtables
  • iptables-restart — Used exclusively to restart IPtables and test for failed FQDNs
  • iptables -nL — Check the current status of your IPtables firewall

IPtables can be manually configured (if you know what you’re doing) by editing iptables and ip6tables in /etc/sysconfig. Additional IPtables rules are included and managed in /usr/local/sbin/iptables-custom. NEVER use traditional iptables commands such as iptables save to update your IPtables configuration, or you will permanently delete all of your FQDN entries! Instead, use the provided utilities to whitelist additional sites and then restart IPtables using iptables-restart. This protects the FQDN entries in your setup while also checking for invalid FQDN entries and removing them temporarily so that IPtables will successfully restart. If you use service iptables restart to restart IPtables and there happens to be an FQDN entry for a host that is either down or has disappeared, IPtables will fail to restart and your server will be left with NO firewall protection! Using the traditional IPtables mechanisms also will disable Fail2Ban. Incredible PBX periodically checks for changed FQDN entries using the ipchecker script configured in /etc/crontab.

If you elect to integrate Facebook into your Incredible PBX setup, you will need to manually uncomment the last 3 lines in /usr/local/sbin/iptables-custom in order to whitelist the Facebook servers. Then restart the firewall: iptables-restart

WARNING: By default, Incredible PBX whitelists all of the non-routable LAN subnets including 10.0.0.0/8, 172.16.0.0/12, and 192.168.0.0/16. If you elect to install Incredible PBX in the Amazon Cloud, be advised that Amazon treats the 172.16.0.0/12 subnet as routable IP addresses. This means that anyone in the Amazon Cloud (including the bad guys) will have direct access to your server. While they still need a password or vulnerability to gain access, it nevertheless exposes your server to needless hacking attempts. We strongly recommend that you comment out the 172.16.0.0/12 entry in /usr/local/sbin/iptables-custom if you intend to deploy your server in the Amazon Cloud. Then restart the firewall: iptables-restart

8. PortKnocker Remote Access

IPtables is a powerful firewall that keeps the bad guys out. It also will keep legitimate users (including you) from gaining remote access to your server unless you had the forethought to WhiteList your remote IP address before you left on that family vacation. Unfortunately, you don’t always know your IP address in advance. And dynamic IP addresses assigned with hotel WiFi frequently change. To address this problem, Incredible PBX includes a preconfigured PortKnocker utility. This lets you send three secret "knocks" on random TCP ports to your server to tell it to let you in either temporarily (until IPtables is restarted) or permanently.

To reconfigure PortKnocker to permanently whitelist IP addresses from which you issue a successful knock, login as root and issue the command: iptables-knock activate

For PortKnocker to work, you obviously need to know the secret knocks. You’ll find them in /root/knock.FAQ. Record them in your wallet or inside your suitcase for that rainy day! There are PortKnocker apps for almost all smartphones as well as for Windows, Mac, and Linux computers. Install your favorite AND test access before you leave town. You can change the ports by editing /etc/knockd.conf. Then restart PortKnocker: service knockd restart

Finally, be aware that PortKnocker does not need any special access to your server to work; however, if your server is behind a hardware-based firewall, then you must map the three PortKnocker TCP ports to the private IP address of your server, or the knocks obviously will never get delivered to your server.

If you installed Incredible PBX on a cloud platform, then your server may use a network port other than eth0. Typically, it’s venet0:0 on OpenVZ servers. You can decipher the name of your network port for your public IP address by issuing the command: ifconfig. In this case, the config file needs to be modified and then PortKnocker needs to be restarted. Edit /etc/sysconfig/knockd and insert the following: OPTIONS="-i venet0:0". Restart PortKnocker with the command: service knockd restart

Review our PortKnocker tutorial for additional configuration tips.

9. Travelin’ Man 4 Remote Access (dial TM4)

In addition to PortKnocker, Incredible PBX also includes a telephone-based solution to temporarily gain remote access to your server. This does require a bit of preplanning since you must create account credentials for the person to whom you wish to give remote access via a phone call. The complete tutorial for Travelin’ Man 4 is available on the PIAF Forum. All of the pieces already are in place on your server so skip down to the Configuration & Operation sections for details on implementation. The tutorial also covers the Administrator Utilities in /root/tm4 which let you set up remote user accounts.

10. Using the Conference Bridge (dial CONF)

A new turnkey Asterisk 13 Conference Bridge has been added to Incredible PBX. A conference bridge allows a group of people to participate in a joint phone call. Typically, participants dial into a virtual meeting room from their own phone. This virtual meeting room supports dozens or even hundreds of participants depending upon server capacity.

You do not need a timing source for conferencing with Incredible PBX! Old-style Asterisk Conference Rooms which required a timing source are disabled.

To access the Conference Bridge, dial C-O-N-F (2663) from any phone connected to your server. Remote users can be added to a conference by providing a DID that points to an IVR which includes Conference Bridge access. Once connected to the conference bridge, a caller is prompted for the Conference Bridge PIN and his or her name. You can decipher or modify the user and admin passwords to access the Conference Bridge in the Incredible PBX GUI: Applications:Conferences. Then edit 2663 and review the User and Admin PINs.

11. CallerID Name (CNAM) Lookups

By default, Incredible PBX is configured to automatically provide OpenCNAM CallerID name lookups for the first ten calls received each hour. These lookups are only from cached entries in the OpenCNAM database; however, you can enable the commercial lookup service if desired. The cost is four tenths of a cent per successful query.

To enable the OpenCNAM Professional Tier, set up an account at OpenCNAM.com. Once you’ve obtained your credentials, edit the OpenCNAM entry in Admin:CID Superfecta:Default. You may also wish to enable AsteriDex lookups and move the scheme to the top of your list of lookup schemes.

To activate CallerID Superfecta for incoming calls, edit each of your Inbound Routes and Enable Superfecta Lookup with the Default Scheme in the Other tab.

12. Faxing with Incredible PBX

If you can press the ENTER key 25 times, you are fully capable of installing Incredible Fax on your new server. Log into your server as root and run /root/incrediblefax13.sh. Provide an email address for delivery of incoming faxes and press ENTER each time you are prompted to make a selection. Once you reboot your server, you’re all set. As part of the install, you provided an email address for delivery of incoming faxes. That’s all the setup that is required to have incoming faxes sent to most of your DIDs delivered via SendMail in PDF format. The best way to figure out whether a particular provider supports fax technology on their DIDs is to send a test fax to yourself. FaxZERO lets you send 5 free faxes of up to 3 pages every day. Give it a whirl.

You also can send faxes using standard document types with the AvantFax web application. Log into AvantFax from the main Incredible PBX GUI by clicking on the AvantFax icon. The default credentials are admin:password. Choose the Send a Fax option from the main menu, fill in the blanks, and attach your document. AvantFax uses the default dialplan so use the prefix desired to send the fax using your preferred provider. HINT: Google Voice does an excellent job with both incoming and outgoing faxes, and the calls are free in the U.S. and Canada.

With the latest release of Incredible PBX 13-13, fax recognition is supported on incoming calls. Edit each of your Inbound Routes and enable Detect Faxes with Detection Type=SIP, Fax Ring=Yes, Fax Detection Time=4, and Fax Destination=Custom Destination:Fax (HylaFax) in the Fax tab.

Copies of all incoming faxes also are available for retrieval within AvantFax.

13. Voicemail 101 for Incredible PBX

Voicemail functionality is enabled on an extension-by-extension basis as part of the extension setup under the Voicemail tab. Once enabled, you can set up your mailbox and retrieve your messages by dialing *97 from the mailbox extension, or dial *98 to retrieve messages from any extension. Shortcut dialing is also supported, e.g. *98707 would retrieve messages for extension 707. You can leave a message for or forward calls to any extension’s mailbox without actually calling the extension. Just prepend * to any extension number before dialing, e.g. *701. A number of the system settings for voicemail can be tweaked under the Voicemail tab as well. For example, you can automatically delete voicemails once they have been delivered by email. Voicemail Blasting to multiple mailboxes is also supported. Just choose this option under the Applications tab and follow your nose.

14. Email Delivery of MP3 Voicemails

Speaking of email delivery, your voicemails also can be delivered to any email address of your choosing. For every extension under the Voicemail tab for the Extension, simply add an Email Address and enable the Email Attachment. With Incredible PBX, the voicemail message will be attached to the email in MP3 format so it’s suitable for playback with most email clients on desktop PCs, Macs, and smartphones. Be advised that some Internet service providers (such as Comcast) block downstream SMTP servers. You can check whether your outbound email is flowing by accessing WebMin (below) and choosing Servers -> SendMail Mail Server -> Mail Queue. Or you can issue the following command using your destination email address:

echo "test" | mail -s testmessage your-name@your-email-provider.com

If you find outbound mail is accumulating after checking in WebMin, then you’ll need to add your ISP’s SMTP server address as a SmartHost for SendMail as documented in the next section.

15. Reconfiguring SendMail for a SmartHost

Many residential Internet service providers block downstream SMTP servers such as the SendMail server running with Incredible PBX. If you’re sending emails but they never arrive and you’ve checked your SPAM folder, then chances are your ISP is the culprit. The simple solution is to add your ISP’s SMTP server as a SmartHost for SendMail. This means outbound emails will be forwarded to your ISP for actual email transmission over the Internet. Here’s how. Edit /etc/mail/sendmail.cf and search for DS. Immediately after DS, add the FQDN of your ISP’s SMTP server, e.g. DSsmtp.comcrap.net (no spaces!). Save the file and then restart SendMail: service sendmail restart. Your email and voicemail messages with attachments should begin flowing without further delay.

16. SMS Blasting with Google Voice

Out of the box, Incredible PBX supports SMS Message Blasting if you have a functioning Google Voice account set up. Before first use, you must add your credentials, address list, and text message to the SMS Blaster scripts in the /root folder.

In smsblast, insert your credentials:

GVACCT="yourname@gmail.com"
GVPASS="yourpassword"
MSGSUBJECT="Little League Alert"

In smslist.txt, insert one or more recipients for your message. These can be a combination of SMS addresses and email addresses and will be delivered accordingly.

NOTE: For most cellphone providers, you also can send an email message for SMS delivery by the provider. The complete list of providers is available here. Email messaging for SMS requires that you know the cellphone provider for your recipient while standard SMS messaging does not.

# In lieu of SMS number, email is also OK
8431234567 Doe John
mary@doe.com Doe Mary
8435551212@txt.att.net Mr T

In smsmsg.txt, enter the text message to be sent.

Once you have all three files configured, run the script: /root/smsblast.

NOTE: Google has tightened security for using plain-text Google Voice passwords as this application and the next one require. Before you begin, log into your server as root and issue the following command: gvoice. Try logging in with your Google Voice credentials including @gmail.com in your username. If the login fails, perform the following steps using a web browser after logging into the same Google account: (1) Perform the Google Voice Reset Procedure. (2) Enable Less Secure Apps using this Google tool. Then immediately try logging in to gvoice from the CLI again.

17. Voice-Activated SMS Messaging (dial SMS)

In addition to message blasting, you also can dial 767 from any extension and dictate an SMS message to send through your Google Voice account. When prompted for the destination, simply enter the 10-digit SMS number of the recipient. This new implementation of SMS Dictator requires both Google Voice and IBM STT credentials. Follow this tutorial to get started with the latest code.

18. SMS Messaging with VoIP.ms

Incredible PBX for Asterisk-GUI also supports SMS messaging through VoIP.ms if you have an account and an SMS-enabled DID. See the VoIP.ms wiki for setup info on the VoIP.ms side.

To install the VoIP.ms SMS scripts, follow these steps:

cd /root
mkdir sms-voip.ms
cd sms-voip.ms
wget http://incrediblepbx.com/voipms-SMS.tar.gz
tar zxvf voipms-SMS.tar.gz

Edit voipms-sms.php and insert your VoIP.ms number that supports SMS messaging (no spoofing allowed!):

$SMSsender="8005551212";

Edit class.voipms.php and insert your VoIP.ms API credentials:

    /*******************************************\
     *  VoIPms - API Credentials
    \*******************************************/
    var $api_username   = 'yourname@youremail.com';
    var $api_password   = 'yourpassword';

Send an SMS message through VoIP.ms with the following command where smsnumber is the 10-digit number of the SMS recipient and "sms message" is the text message surrounded by quotes:

/root/sms-voip.ms/voipms-sms.php smsnumber "sms message"

NOTE: VoIP.ms has indicated that sooner or later there will be a penny per message charge for SMS messages; however, as of today, they’re still free.

19. SIP URI Calling with Incredible PBX

With one line of dialplan code, you can add Speed Dials for free SIP URI calling worldwide. The dialplan code is stored in the [CallingRule_SIP_URI] context in extensions_custom.conf. Just clone one of the existing entries, designate an extension to dial to connect to the SIP URI, and enter the SIP URI for the destination. Numerous SIP providers support assignment of SIP URI’s to DIDs for unlimited free calling from anywhere in the world. Here’s a sample using a speed dial code of 53669 that connects you to SIP URI 2233435945@sip2sip.info: exten = 53669,1,Dial(SIP/2233435945@sip2sip.info)

20. IVR Demo of Incredible PBX Apps

The easiest way to try out a number of the Incredible PBX applications is to take the IVR Demo for a spin. Just pick up any phone and dial 3366 (D-E-M-O). The sample code for the IVR is available for review and modification in the IVR section of the GUI. There’s also a sample Stealth AutoAttendant. This plays a brief greeting and then rings an extension or ring group. During the greeting, you could configure the application to allow button presses to branch to other applications on your PBX, hence the Stealth name since the codes are not disclosed to callers.

21. Backup & Restore with Incredible PBX

Incredible Backup and Restore scripts are still under development for Incredible PBX 13-13 because of recent changes in Asterisk. If backups are important to you, we strongly recommend you consider a $2.50/month cloud server at Vultr using our referral code. For an additional 50 cents per month, you get weekly image backups of your server that can be restored with a couple of button clicks. It’s the cheapest insurance you can buy for your PBX!

22. AsteriDex – The Poor Man’s Rolodex

AsteriDex is a web-based phonebook application for Incredible PBX. You can access it from the main web menu. Scripts are also available to import your contacts from Outlook and Google Contacts.

23. Voice Dialing with AsteriDex (dial 411)

If you have voice recognition enabled on your server, you can call anyone in your AsteriDex database by dialing 411.

24. Speed Dialing with AsteriDex (dial 000+)

For those without voice recognition, Incredible PBX includes two speed dialing utilities. The first is accessed by dialing 412. Then enter any 3-digit dialcode from your AsteriDex database to complete the call. If you’d prefer to skip the intermediate step, dial 000 + the 3-digit speed dial code desired. The call will be placed immediately using your default outbound routes.

For a complete listing of your AsteriDex dial codes, execute this query:

mysql -u root -ppassw0rd asteridex -e "select name,dialcode from user1 order by name"

To automatically generate the 3-digit speed dial codes for everyone in your AsteriDex database using the first three letters of each name, run the following script from your web browser: http://your-server-ip/asteridex4/dialcode.php.

25. Telephone Reminders (dial 123)

Incredible PBX includes a sophisticated reminders system that lets you schedule individual or recurring reminders using your phone by dialing 123 or a web browser. A complete tutorial is available here. For phone reminders, a password is required to access the reminder system. Typically, these reminders set up a return call at a scheduled time that then plays back either a recorded message or a TTS message generated from the text you entered in the browser application. Incredible PBX also includes a new addition that lets you schedule web reminders that are delivered by email or SMS message.

26. DISA Access with Incredible PBX

Direct Inward System Access (aka DISA) is one of the great PBX inventions of the last 50 years. It’s also one of the most dangerous. It lets someone connect to your PBX and obtain dial tone to place an outbound call using your trunks… on your nickel. Typically, it is offered as an option with an IVR or AutoAttendant. The DISA extension is not preconfigured with Incredible PBX; however, you can easily set it up in the GUI by choosing Applications:DISA. Make up a very secure PIN before exposing DISA access to the outside world. It’s your phone bill.

27. Yahoo! News (Dial 951)

Yahoo! news headlines are available by dialing 951. The news option also is included in the sample IVR application.

28. Weather Forecasts by Phone (dial 947)

You can obtain a current weather forecast for most zip codes by dialing 947 (Z-I-P) and entering the 5-digit zip code.

29. ODBC Application Support for Asterisk

If you’ve recently logged into your server as root, Automatic Update #4 added ODBC/MySQL application support for Asterisk. You can try out a few sample applications that are included to get you started. Dial 222 and enter 12345 for the employee number. This retrieves an employee name from the MySQL timeclock database using Asterisk. Dial 223 to retrieve an AsteriDex name and phone number by entering the 3-character dialcode. You then have the option of placing the call by pressing 1. Once you have created accounts for Travelin’ Man 4, you can dial 864 (T-M-4) to WhiteList an IP address for that account after entering the account number and matching PIN. Use the * key for periods in the IP address.

30. Today in History (Dial T-O-D-A-Y)

It’s always interesting to find out what happened Today in History. And Incredible PBX now delivers it by phone. Just dial 86329 (T-O-D-A-Y) for a walk down memory lane.

31. Time of Day

Speaking of yesteryear, if you grew up dialing TI-4-1212 for the time of day, Ma Bell may have discontinued the service, but we haven’t. Now you can do it on your very own PBX.

If you want your users to be able to dial in for the time directly by dialing extension, here’s how. In the GUI, choose Admin:Custom Destinations:Add Destination. Set up a Time of Day description with a target of new-time,s,1 and save your entry. Now Enable an Application:Misc Application:Add Application with a Feature Code of 8463, Time of Day description, and point it to Custom Destination:Time of Day. Save your entry and then dial 8463 (T-I-M-E) for the Time of Day.

WebMin: The Linux Swiss Army Knife

There is no finer Linux application than WebMin. There is no more dangerous Linux application than WebMin. You’ve been warned. We heartily recommend WebMin as a tool to LOOK at your server’s settings. We strongly discourage changing anything in WebMin unless you totally know what you are doing. This is especially true with management of Linux applications that make up the core of Incredible PBX: the Linux kernel, SendMail, IPtables, Apache, MySQL, PHP, and…

To access WebMin, visit the following link with a web browser using the actual IP address of your server: https://ip-address:9001/. The username is root. The password is your root password. WebMin has root privileges to your server. Reread paragraph 1 and act accordingly.

For an exhaustive tutorial on WebMin, download The Book of WebMin by Joe Cooper. For a more recent commercial offering, take a look at Michal Karzyński’s WebMin Administrator’s Cookbook.

Enjoy your new Gotcha-Free PBX, and… Happy Cyber Monday! It’s always been one of the happiest days of the year around our office.

Check out the new Incredible PBX 13-13 ISO. Complete tutorial available here.

Originally published: Monday, November 27, 2017


Support Issues. With any application as sophisticated as this one, you’re bound to have questions. Blog comments are a terrible place to handle support issues although we welcome general comments about our articles and software. If you have particular support issues, we encourage you to get actively involved in the PBX in a Flash Forums. It’s the best Asterisk tech support site in the business, and it’s all free! Please have a look and post your support questions there. Unlike some forums, ours is extremely friendly and is supported by literally hundreds of Asterisk gurus and thousands of users just like you. You won’t have to wait long for an answer to your question.


NEW YEAR’S TREAT: If you could use one or more free DIDs in the U.S. with unlimited inbound calls and unlimited simultaneous channels, then today’s your lucky day. TelecomsXChange and Bluebird Communications have a few hundred thousand DIDs to give away so you better hurry. You have your choice of DID locations including New York, New Jersey, California, Texas, and Iowa. The DIDs support Voice, Fax, Video, and even Text Messaging (by request). The only requirement at your end is a dedicated IP address for your VoIP server. Once you receive your welcome email with your number, be sure to whitelist the provider’s IP address in your firewall. For Incredible PBX servers, use add-ip to whitelist the UDP SIP port, 5060, using the IP address provided in your welcoming email.

Here’s the link to order your DIDs.

Your DID Trunk Setup in your favorite GUI should look like this:

Trunk Name: IPC
Peer Details:
type=friend
qualify=yes
host={IP address provided in welcome email}
context=from-trunk

Your Inbound Route should specify the 11-digit DID beginning with a 1. Enjoy!


Need help with Asterisk? Visit the PBX in a Flash Forum.


Special Thanks to Our Generous Sponsors


FULL DISCLOSURE: ClearlyIP, Skyetel, Vitelity, DigitalOcean, Vultr, VoIP.ms, 3CX, Sangoma, TelecomsXchange and VitalPBX have provided financial support to Nerd Vittles and our open source projects through advertising, referral revenue, and/or merchandise. As an Amazon Associate and Best Buy Affiliate, we also earn from qualifying purchases. We’ve chosen these providers not the other way around. Our decisions are based upon their corporate reputation and the quality of their offerings and pricing. Our recommendations regarding technology are reached without regard to financial compensation except in situations in which comparable products at comparable pricing are available from multiple sources. In this limited case, we support our sponsors because our sponsors support us.

BOGO Bonaza: Enjoy state-of-the-art VoIP service with a $10 credit and half-price SIP service on up to $500 of Skyetel trunking with free number porting when you fund your Skyetel account. No limits on number of simultaneous calls. Quadruple data center redundancy. $25 monthly minimum spend required. Tutorial and sign up details are here.

The lynchpin of Incredible PBX 2020 and beyond is ClearlyIP components which bring management of FreePBX modules and SIP phone integration to a level never before available with any other Asterisk distribution. And now you can configure and reconfigure your new Incredible PBX phones from the convenience of the Incredible PBX GUI.

VitalPBX is perhaps the fastest-growing PBX offering based upon Asterisk with an installed presence in more than 100 countries worldwide. VitalPBX has generously provided a customized White Label version of Incredible PBX tailored for use with all Incredible PBX and VitalPBX custom applications. Follow this link for a free test drive!
 

Special Thanks to Vitelity. Vitelity is now Voyant Communications and has halted new registrations for the time being. Our special thanks to Vitelity for their unwavering financial support over many years and to the many Nerd Vittles readers who continue to enjoy the benefits of their service offerings. We will keep everyone posted on further developments.


Some Recent Nerd Vittles Articles of Interest…

Back to Basics: Configuring Extensions, Trunks & Routes

With last week’s release of Incredible PBX 13-13 Lean with Asterisk® 13 and FreePBX® 13 GPL modules, it seemed like an opportune time to revisit the initial setup process of an Asterisk-based PBX. Configuring extensions, trunks, and routes are the fundamental steps in successfully interconnecting your PBX to the telecommunications network. So today we’ll walk through the initial setup process in some detail for those that are just getting started. And we think old-timers may find some hidden nuggets in the exercise as well.

Overview of the Initial Asterisk Setup Process

For those new to PBXs, here’s a two paragraph summary of how Voice over IP (VoIP) works. Phones connected to your PBX are registered with Extensions so that they can make and receive calls. When a PBX user picks up a phone and dials a number, an Outbound Route tells the PBX which Trunk to use to place the call based upon established dialing rules. Unless the dialed number is a local extension, a Trunk registered with some service provider accepts the call, and the PBX sends the call to that provider. The provider then routes the call to its destination where the recipient’s phone rings to announce the incoming call. When the recipient picks up the phone, the conversation begins.

Looking at things from the other end, when a caller somewhere in the world wishes to reach you, the caller picks up a telephone and dials a number known as a DID that is assigned to you by a provider with whom you have established service. When the provider receives the call to your DID, it routes the call to your PBX based upon destination information you established with the provider. Your PBX receives the call with information identifying the DID of the call as well as the CallerID name and number of the caller. An Inbound Route on your PBX then determines where to send the call based upon that DID and CallerID information. Typically, a call is routed to an Extension, a group of Extensions known as a Ring Group, or an IVR or AutoAttendant giving the caller choices on routing the call to the desired destination. Once the call is routed to an Extension, the PBX rings the phone registered to that Extension. When you pick up the phone, the conversation begins.

Configuring Asterisk to Support NAT-Based Routing

With a VoIP server, many PBXs and Extensions are housed behind a NAT-based router that is found in most homes and businesses. These routers assign private IP addresses that are not accessible from the Internet. This causes SIP routing headaches because there are actually two legs to every call, one on the private IP address of your server or extension and another on the public Internet with an entirely different IP address. Routers supposedly handle this handoff of the call using Network Address Translation (NAT) and SIP ALG. With Asterisk-based PBXs, we want the PBX itself to handle the NAT chores so it is critically important to do three things when setting up your PBX. First, turn off SIP ALG on every router used by your PBX and every extension connected to your PBX. Second, tell your PBX about your public and private IP address setup. Step #2 is done in the Incredible PBX GUI with a browser. Login as admin and choose Settings:Asterisk SIP Settings. In the NAT Settings section of the form, click Detect Network Settings. Make sure your public and private IP addresses are correctly listed. Then click Submit and reload your dialplan when prompted. Failure to perform BOTH of these steps typically results in calls with one-way audio, i.e. where either you or the called party can’t hear the other party in the conversation. The third rule to remember is to always configure SIP Extensions on your PBX with NAT Mode=YES. This is rarely harmful and failure to configure SIP extensions in this way typically causes one-way audio in calls as well. IAX extensions avoid NAT issues.

Configuring Extensions with Incredible PBX GUI

Extensions are created using the Incredible PBX GUI: Applications:Extensions. Many SIP phones expect extensions to communicate on UDP port 5060. If this is the case with your SIP phone or softphone, then always create Chan_SIP extensions which communicate on UDP 5060. If your SIP phone or softphone provide port flexibility, then you have a choice in the type of SIP extension to create: Chan_SIP or the more versatile PJSIP. Just remember to always configure SIP extensions with NAT Mode=YES in the Advanced tab. If your VoIP phones or softphones support IAX connectivity, you may wish to consider IAX extensions which avoid NAT problems.

When you create a new Extension, a new entry is automatically created in the PBX Internal Directory. If you wish to allow individual users to manage their extensions or use the WebRTC softphone, then you will also have to create a (very) secure password for User Control Panel (UCP) access. Choose Admin:User Management and click on the key icon of the desired extension to assign a password for UCP and WebRTC access.

Configuring SIP Phones with Incredible PBX GUI

SIP phones and softphones typically require three pieces of information: the IP address of your server, the extension number, and the extension password. If you’re using a PJSIP extension, you also will need to change the port to UDP 5061. If your server is behind a NAT-based router, SIP phones also behind the same router need to use the private LAN address rather than the public IP address. If the SIP phones are outside the router protecting the PBX, then use the public IP address and make certain that you also map ports 5060 and 5061 from your router to the private LAN address of your PBX.

The PIAF Forum can provide you with helpful information in choosing high quality SIP phones. Yealink phones are highly recommended with minimal issues. Cisco phones are the most difficult to configure. Insofar as free softphones, we recommend the Zoiper 3 offerings for Windows, Mac, iOS, and Android. Zoiper 5 still is experiencing some growing pains. A key advantage of the Zoiper softphone is it supports IAX extensions which eliminate the NAT issues entirely. On the Mac platform, we also recommend the Telephone app which is available in the App Store. For SRTP communications, use Grandstream Wave.

Configuring Trunks with Incredible PBX GUI

Perhaps the most difficult component to configure in the PBX is the Trunk. Almost every provider has a different way of doing things. We’ve taken some of the torture out of the exercise by providing a script which will configure settings for dozens of providers in seconds. Once installed, all you need to do is edit the desired Trunk (Connectivity:Trunks), change the Disable Trunk entry to No, and insert your credentials in both the PEER Details and Registration string of the SIP Settings Outgoing and Incoming tabs.

To install the Trunk setups on your PBX, log into your server as root and issue the following commands only once:

cd /root
wget http://incrediblepbx.com/create-sample-trunks.tar.gz
tar zxvf create-sample-trunks.tar.gz
rm create-sample-trunks.tar.gz
./create-sample-trunks

Incredible PBX Wholesale Providers Access

Nerd Vittles has negotiated a special offer that gives you instant access to 300+ wholesale carriers around the globe. In lieu of paying the $650 annual fee for the service, a 13% wholesale surcharge is assessed to cover operational costs of TelecomsXchange. In addition, TelecomsXchange has generously offered to contribute a portion of the surcharge to support the Incredible PBX open source project. See this Nerd Vittles tutorial for installation instructions and signup details.

Configuring Google Voice with Incredible PBX GUI

The advantage of Google Voice trunks for those of you in the United States is that all of your calls within the U.S. and Canada are free. You can’t beat the price, and it has worked reliably for many, many years. There are three different ways to set up Google Voice trunks with Incredible PBX. For a one-time fee of $4.99 with this coupon, you can use the Simonics GV/SIP gateway to configure a Google Voice account using OAuth 2 authentication. Then just set up the Simonics SIP trunk on your PBX to point to the Simonics gateway. A second option is to choose the (recommended) OAuth 2 authentication method for Google Voice when you initially install Incredible PBX 13-13. Finally, you can choose plain-text passwords for Google Voice when you set up Incredible PBX. The drawback of this last option is Google has hinted that they may discontinue support of plain-text passwords.


Here are the initial setup steps on the Google side:

1. Set up a dedicated Gmail and Google Voice account to use exclusively for this Google Voice setup on your PBX. Head over to the Google Voice site and register. You’ll need to provide a U.S. phone number to verify your account by either text message or phone call.


2. Once you have verified your account by entering your verification code, you’ll get a welcome message from Mr. Google. Click Continue to Google Voice.


3. Provide an existing U.S. phone number for verification. It can be the same one you used to set up your Google account in step #1.


4. Once your phone number has been verified, choose a DID in the area code of your choice.


Special Note: Google continues to tighten up on obtaining more than one Google Voice number from the same computer or the same IP address. If this is a problem for you, here’s a workaround. From your smartphone, install the Google Voice app from iPhone App Store or Google’s Play Store. Then open the app and login to your new Google account. Choose your new Google Voice number when prompted and provide a cell number with SMS as your callback number for verification. Once the number is verified, log out of Google Voice. Do NOT make any calls. Now head back to your PC’s browser and login to https://voice.google.com. You will be presented with the new Google Voice interface which does not include the Google Chat option. But fear not. At least for now there’s still a way to get there. After you have set up your new phone number and opened the Google Voice interface, click on the 3 vertical dots in the left sidebar (it’s labeled More). When it opens, click Legacy Google Voice in the sidebar. That will return you to the old UI. Now click on the Gear icon (upper right) and choose Settings. Make sure the Google Chat option is selected and disable forwarding calls to whatever default phone number you set up.

5. When your DID has been assigned, click the More icon at the bottom of the left column of the Google Voice desktop. Click Legacy Google Voice. Now click the Settings icon on your legacy Google Voice desktop. Make certain that Forward Calls to Google chat is checked and disable calls to your forwarding number. Click on the Calls tab and select Call Screening:OFF, CallerID (Incoming):Display Caller’s Number, and Global Spam Filtering:checked. The remaining entries should be blank.

6. Google Voice configuration is now complete. Sign out of your Google Voice account.


The Simonics GV-SIP Gateway Solution. Here’s the quick thumbnail of the steps to put all the pieces in place. First, we set up a Google Voice account at Google as documented above. Next, we’ll set up an account at the Simonics site to link our Google Voice account to the Simonics SIP Gateway. Then we’ll plug our Simonics SIP credentials into the preconfigured Simonics trunk on Incredible PBX. Finally, we’ll add Incoming and Outgoing Routes to tell Incredible PBX how to process Google Voice calls.

Now you’re ready to set up an account on the Simonics site. With this Nerd Vittles link, there’s a one-time fee of $4.99.

1. Start by registering your new Google account.

2. After paying the $4.99 registration fee via PayPal, proceed through the setup process to link your Google Voice account and 11-digit Google Voice phone number to the Simonics SIP Gateway.

3. You then will be provided your SIP username and password as well as the gateway address, gvgw.simonics.com, to use in building your SIP trunk on your PBX.


4. If your SIP credentials ever get compromised, regenerate your password by logging back into the Simonics GW site.

Now it’s time to configure your Simonics trunk in Incredible PBX. Start by logging into the web interface as admin with your admin password from above. Click Connectivity:Trunks and choose the Simonics trunk in the PBX Configuration menu. The Simonics trunk template will display:

1. Untick the Disable Trunk check box.

2. In Outbound CallerID, insert your 10-digit Google Voice number.

3. In username, insert GV1 followed by your 10-digit Google Voice number.

4. In secret, insert your Simonics SIP password.

5. In the Registration String, insert GV1 followed by your 10-digit Google Voice number followed by a colon (:)

6. In the Registration String after the colon, insert your Simonics SIP password.

7. In the tail of the Registration String after the slash (/), insert your 10-digit Google Voice number.

8. Click Submit Changes and then Reload the Dialplan when prompted.


Configuring GV Trunk with Motif in the GUI. If you elect to configure your Google Voice trunk natively using the Incredible PBX GUI, you first will need to obtain a Refresh_Token if you elected to use OAuth 2 authentication.

1. Be sure you are still logged into your Google Voice account. If not, log back in at https://voice.google.com.

2. In a separate browser tab, go to the Google OAUTH Playground using your browser while still logged into your Google Voice account.

3. Once logged in to Google OAUTH Playground, click on the Gear icon in upper right corner (as shown below).

  3a. Check the box: Use your own OAuth credentials
  3b. Enter Incredible PBX OAuth Client ID:

466295438629-prpknsovs0b8gjfcrs0sn04s9hgn8j3d.apps.googleusercontent.com

  3c. Enter Incredible PBX OAuth Client secret: 4ewzJaCx275clcT4i4Hfxqo2
  3d. Click Close

4. Click Step 1: Select and Authorize APIs (as shown below)

  4a. In OAUTH Scope field, enter: https://www.googleapis.com/auth/googletalk
  4b. Click Authorize APIs (blue) button.

5. Click Step 2: Exchange authorization code for tokens

  5a. Click Exchange authorization code for tokens (blue) button

  5b. When the tokens have been generated, Step 2 will close.

6. Reopen Step 2 and copy your Refresh_Token. This is the "password" you will need to enter (together with your Gmail account name and 10-digit GV phone number) when you add your GV trunk in the Incredible PBX GUI. Store this refresh_token in a safe place. Google doesn’t permanently store it!

7. Authorization tokens NEVER expire! If you ever need to remove your authorization tokens, go here and delete Incredible PBX Google Voice OAUTH entry by clicking on it and choosing DELETE option.

Switch back to your Gmail account and click on the Phone icon at the bottom of the window to place one test call. Once you successfully place a call, you can log out of Google Voice and Gmail.

Yes, this is a convoluted process. Setting up a secure computing environment often is. Just follow the steps and don’t skip any. It’s easy once you get the hang of it. And you’ll sleep better.

Now you’re ready to configure your Google Voice account in Incredible PBX. You do it from within the Incredible PBX GUI by choosing Connectivity:Google Voice. Just plug in your Google Voice Username, enter your refresh_token from Step #6 above as your Google Voice Password, enter your 10-digit Google Voice Phone Number, and check the first two boxes: Add Trunk and Add Outbound Routes. Then click Submit and Apply Settings to save your new entries.

If you elected to use plain-text passwords for Google Voice, simply skip obtaining OAuth 2 credentials and substitute your plain-text password for the refresh_token when you create the Google Voice trunk above. If you have trouble getting Google Voice to work using a plain-text password, try this Google Voice Reset Procedure. It usually fixes connectivity problems. If it still doesn’t work, enable Less Secure Apps using this Google tool.

IMPORTANT: Once you’ve entered your credentials, you MUST restart Asterisk from the Linux command line, or Google Voice calls will fail: amportal restart

Configuring Outbound Routes in Incredible PBX GUI

Outbound Routes serve a couple of purposes. First, they assure that calls placed by users of your PBX are routed out through an appropriate trunk to reach their destination in the least costly manner. Second, they serve as a security mechanism by either blocking or restricting certain calls by requiring a PIN to complete the calls. For example, if you only permit 10-digit calls and route all of those calls out through a Google Voice trunk, there is zero risk of running up an exorbitant phone bill because of unauthorized calls unless you’ve deposited a lot of money in your Google Voice account. This raises another important security tip. Never authorize recurring charges on credit cards registered with your VoIP providers and, if possible, place pricing limits on calls with your providers. If a bad guy were to break into your PBX, you don’t want to give the intruder a blank check to make unauthorized calls. And you certainly don’t want to join the $100,000 Phone Bill Club.

To create outbound routes in the Incredible PBX GUI, navigate to Connectivity:Outbound Routes and click Add Outbound Route. In the Route Settings tab, give the Outbound Route a name and choose one or more trunks to use for the outbound calls. In the Dial Patterns tab, specify the dial strings that must be matched to use this Outbound Route. NXXNXXXXXX would require only 10-digit numbers with the first and fourth digits being a number between 2 and 9. Note that Outbound Routes are searched from the top entry to the bottom until there is a match. Make certain that you order your routes correctly and then place test calls watching the Asterisk CLI to make sure the calls are routed as you intended.

Configuring Inbound Routes in Incredible PBX GUI

Inbound Routes, as the name implies, are used to direct incoming calls to a specific destination. That destination could be an extension, a ring group, an IVR or AutoAttendant, or even a conference or DISA extension to place outbound calls (hopefully with a very secure password). Inbound Routes can be identified by DID, CallerID number, or both. To create Inbound Routes, choose Connectivity:Inbound Routes and then click Add Inbound Route. Provide at least a Description for the route, a DID to be matched, and the Destination for the incoming calls that match. If you only want certain callers to be able to reach certain extensions, add a CallerID number to your matching criteria. You can add Call Recording and CallerID CNAM Lookups under the Other tab.

Bug Fix for Incredible Fax Installer

If you installed Incredible PBX 13-13 during the past week, be advised that removal of a GitHub repo will prevent the Incredible Fax installer in /root from completing successfully. Here’s the fix:

sed -i 's|joshnorth|wardmundy|' /root/incrediblefax11.sh

Also note that, with the Incredible PBX 13-13 Lean install, you must manually create a Custom Destination using the GUI. This is the destination to use for receipt of incoming faxes. The settings for the new Custom Destination should look like this:

target -> custom-fax-iaxmodem,s,1
label  -> Fax (HylaFax)
return -> no

You now have a functioning PBX. Down the road, we’ll tackle some of the more esoteric features of Asterisk so… Stay Tuned!

Published: Monday, October 30, 2017  


NEW YEAR’S TREAT: If you could use one or more free DIDs in the U.S. with unlimited inbound calls and unlimited simultaneous channels, then today’s your lucky day. TelecomsXChange and Bluebird Communications have a few hundred thousand DIDs to give away so you better hurry. You have your choice of DID locations including New York, New Jersey, California, Texas, and Iowa. The DIDs support Voice, Fax, Video, and even Text Messaging (by request). The only requirement at your end is a dedicated IP address for your VoIP server. Once you receive your welcome email with your number, be sure to whitelist the provider’s IP address in your firewall. For Incredible PBX servers, use add-ip to whitelist the UDP SIP port, 5060, using the IP address provided in your welcoming email.

Here’s the link to order your DIDs.

Your DID Trunk Setup in your favorite GUI should look like this:

Trunk Name: IPC
Peer Details:
type=friend
qualify=yes
host={IP address provided in welcome email}
context=from-trunk

Your Inbound Route should specify the 11-digit DID beginning with a 1. Enjoy!


Need help with Asterisk? Visit the PBX in a Flash Forum.


Special Thanks to Our Generous Sponsors


FULL DISCLOSURE: ClearlyIP, Skyetel, Vitelity, DigitalOcean, Vultr, VoIP.ms, 3CX, Sangoma, TelecomsXchange and VitalPBX have provided financial support to Nerd Vittles and our open source projects through advertising, referral revenue, and/or merchandise. As an Amazon Associate and Best Buy Affiliate, we also earn from qualifying purchases. We’ve chosen these providers not the other way around. Our decisions are based upon their corporate reputation and the quality of their offerings and pricing. Our recommendations regarding technology are reached without regard to financial compensation except in situations in which comparable products at comparable pricing are available from multiple sources. In this limited case, we support our sponsors because our sponsors support us.

BOGO Bonaza: Enjoy state-of-the-art VoIP service with a $10 credit and half-price SIP service on up to $500 of Skyetel trunking with free number porting when you fund your Skyetel account. No limits on number of simultaneous calls. Quadruple data center redundancy. $25 monthly minimum spend required. Tutorial and sign up details are here.

The lynchpin of Incredible PBX 2020 and beyond is ClearlyIP components which bring management of FreePBX modules and SIP phone integration to a level never before available with any other Asterisk distribution. And now you can configure and reconfigure your new Incredible PBX phones from the convenience of the Incredible PBX GUI.

VitalPBX is perhaps the fastest-growing PBX offering based upon Asterisk with an installed presence in more than 100 countries worldwide. VitalPBX has generously provided a customized White Label version of Incredible PBX tailored for use with all Incredible PBX and VitalPBX custom applications. Follow this link for a free test drive!
 

Special Thanks to Vitelity. Vitelity is now Voyant Communications and has halted new registrations for the time being. Our special thanks to Vitelity for their unwavering financial support over many years and to the many Nerd Vittles readers who continue to enjoy the benefits of their service offerings. We will keep everyone posted on further developments.


Some Recent Nerd Vittles Articles of Interest…

Sneak Peek: Incredible PBX with FreePBX 13 GPL Modules


[iframe-popup id="4″]
As many of you know, the Asterisk® 13.16 and 13.17 releases caused serious breakage with FreePBX® 12 GPL deployments. These have been resolved in the new Asterisk 13.18 release candidate, but it prompted us to do a little exploring for alternatives while many of you were partying at AstriCon in Orlando last week. To give credit where credit is due, the Sangoma developers have made some impressive improvements with their FreePBX 13 release. And now we’re pleased to introduce a preview of the new Incredible PBX 13-13 platform featuring almost all of the FreePBX 13 GPL modules. For those that prefer lean and mean implementations of Asterisk, this preview edition is for you. You get the latest version of Asterisk compiled from source, and you get a base install of the FreePBX 13 GPL modules. The only preconfigured component in the build is the Travelin’ Man 3 firewall which locks down your server to trusted providers and IP addresses which you authorize.

We would hasten to add that Incredible PBX 13-13 is still a work in progress. Changes and improvements are released almost daily. If you don’t have that pioneering spirit, then you may wish to hold off for a few more weeks until all of the kinks have been worked out. Having said that, part of the fun of participating in the open source community is rolling up your sleeves and trying out new things. Offering your suggestions as we move along almost always yields a better end product both for you and the rest of the open source community. While we don’t ordinarily recommend deployment of preview editions for production systems, it’s worth noting that both Asterisk 13 and FreePBX 13 have a lot of miles on them and are generally regarded as the production-ready platforms for serious deployments.

So let’s get started. You can install Incredible PBX 13-13 Lean on a dedicated server, on a virtual machine platform such as VirtualBox, or a Cloud-based server such as Vultr. We recommend a minimum 1GB of RAM although you can get away with 512MB of RAM if you also create a swapfile. We’ve provided a script to do it for you. Depending upon the number of users your server will be supporting, we recommend a disk capacity of 10-30 GB. Last but not least, you need a reliable Internet connection.

Before you can install Incredible PBX 13-13 Lean, you’ll need a basic Linux platform. For this build, you can start by deploying a minimal install of CentOS 6 or 7. The Incredible PBX installer will load all of the necessary components to support Asterisk and FreePBX as well as future Incredible PBX applications.

Installing a Base CentOS Operating System

Let’s begin by installing 64-bit CentOS 6.9 or 7 on your favorite hardware or Desktop. Or you may prefer to use a Cloud provider1 that already offers a preconfigured CentOS image. Two reasons we prefer Vultr are (1) Incredible PBX runs fine on their least costly $2.50/mo. platform and (2) for an extra 50 cents a month, you can add automatic backups to your server platform. In you’re using a Cloud platform, you can skip the rest of this section. Just choose CentOS 6 or 7 as the default operating system for your cloud-based server.

For those using a dedicated hardware platform or wishing to install CentOS as a virtual machine, the drill is the same. Start by downloading the 64-bit CentOS 6.9 minimal ISO or the CentOS 7 minimal ISO. Burn the ISO to a DVD unless you’ll be booting from the ISO on a virtual machine platform such as VirtualBox. On virtual platforms, we recommend at least 1GB RAM and a 20GB dedicated drive. For VirtualBox, here are the settings:

Type: Linux
Version: RedHat 64-bit
RAM: 1024MB
Default Drive Options with 10GB+ space
Create
Settings->System: Enable IO APIC and Disable HW Clock (leave rest alone)
Settings->Audio: Enable
Settings->Network: Enable, Bridged
Settings->Storage: Far right CD icon (choose your ISO)
Start

Boot your server with the ISO, and start the CentOS install. Here are the simplest installation steps:

Choose Language and Click Continue
Click: Install Destination (do not change anything!)
Click: Done
Click: Network & Hostname
Click: ON
Click: Done
Click: Begin Installation
Click: Root Password: password, password, Click Done twice
Wait for Minimal Software Install and Setup to finish
Click: Reboot

Installing Incredible PBX 13-13 Lean Preview

Once you have CentOS up and running, log into your server as root and issue the following commands to kick off the Incredible PBX install. It’s a two-step process. First, the installer will bring your version of CentOS up to current specs and load the necessary packages to support Asterisk and FreePBX. The first stage setup takes about 10-15 minutes.

cd /root
yum -y install net-tools nano wget tar
wget http://incrediblepbx.com/incrediblepbx-13-13-LEAN.tar.gz
tar zxvf incrediblepbx-13-13-LEAN.tar.gz
rm -f incrediblepbx-13-13-LEAN.tar.gz
./create-swapfile-DO
./IncrediblePBX-13-13.sh

When the base install finishes, your server will reboot. Simply log back in as root and run the installer a second time using an SSH terminal or Putty. You’ll be prompted whether to implement Google Voice plain text or OAuth 2 passwords. OAuth is strongly recommended. Make your selection, and the installer will work its magic. Come back in 15 minutes.

./IncrediblePBX-13-13.sh

Reboot one final time when the installer finishes the setup, and your server should be ready to go. Log back in as root. This will kick off the Automatic Update Utility to load any last minute additions, bug fixes, and security patches. After the status menu displays, run the following apps to set a very secure admin password for web access to the GUI and to choose your default time zone:

/root/admin-pw-change
/root/timezone-setup

WebMin is also installed and configured as part of the base install. The root password for access is the same as your Linux root password. We strongly recommend that you not use WebMin to make configuration changes to your server. You may inadvertently damage the operation of your server beyond repair. WebMin is an excellent tool to LOOK at how your server is configured. When used for that purpose, we highly recommend WebMin as a way to become familiar with your Linux configuration.

Using the Incredible PBX 13-13 Web GUI

Most of the configuration of your PBX will be performed using the web-based Incredible PBX GUI with its FreePBX 13 GPL modules. Use a browser pointed to the IP address of your server and choose Incredible PBX Admin. Log in as admin with the password you configured in the previous step. HINT: You can always change it if you happen to forget it.

To get a basic system set up so that you can make and receive calls, you’ll need to add a VoIP trunk, create one or more extensions, set up an inbound route to send incoming calls to an extension, and set up an outbound route to send calls placed from your extension to a VoIP trunk that connects to telephones in the real world. You’ll also need a SIP phone or softphone to use as an extension on your PBX. Our previous tutorial will walk you through this setup procedure. Over the years, we’ve built a number of command line utilities including a script to preconfigure SIP trunks for more than a dozen providers in seconds. You’ll find links to all of them here. Come join the discussion on the PIAF Forum and enjoy the ride!

Now Serving: The Incredible PBX 13-13 Whole Enchilada Upgrade

Continue Reading: Configuring Extensions, Trunks & Routes

Published: Monday, October 23, 2017  


Need help with Asterisk? Visit the PBX in a Flash Forum.


Special Thanks to Our Generous Sponsors


FULL DISCLOSURE: ClearlyIP, Skyetel, Vitelity, DigitalOcean, Vultr, VoIP.ms, 3CX, Sangoma, TelecomsXchange and VitalPBX have provided financial support to Nerd Vittles and our open source projects through advertising, referral revenue, and/or merchandise. As an Amazon Associate and Best Buy Affiliate, we also earn from qualifying purchases. We’ve chosen these providers not the other way around. Our decisions are based upon their corporate reputation and the quality of their offerings and pricing. Our recommendations regarding technology are reached without regard to financial compensation except in situations in which comparable products at comparable pricing are available from multiple sources. In this limited case, we support our sponsors because our sponsors support us.

BOGO Bonaza: Enjoy state-of-the-art VoIP service with a $10 credit and half-price SIP service on up to $500 of Skyetel trunking with free number porting when you fund your Skyetel account. No limits on number of simultaneous calls. Quadruple data center redundancy. $25 monthly minimum spend required. Tutorial and sign up details are here.

The lynchpin of Incredible PBX 2020 and beyond is ClearlyIP components which bring management of FreePBX modules and SIP phone integration to a level never before available with any other Asterisk distribution. And now you can configure and reconfigure your new Incredible PBX phones from the convenience of the Incredible PBX GUI.

VitalPBX is perhaps the fastest-growing PBX offering based upon Asterisk with an installed presence in more than 100 countries worldwide. VitalPBX has generously provided a customized White Label version of Incredible PBX tailored for use with all Incredible PBX and VitalPBX custom applications. Follow this link for a free test drive!
 

Special Thanks to Vitelity. Vitelity is now Voyant Communications and has halted new registrations for the time being. Our special thanks to Vitelity for their unwavering financial support over many years and to the many Nerd Vittles readers who continue to enjoy the benefits of their service offerings. We will keep everyone posted on further developments.


Some Recent Nerd Vittles Articles of Interest…

  1. Some of our links refer users to Amazon or other service providers when we find their prices are competitive for the recommended products. Nerd Vittles receives a small referral fee from these providers to help cover the costs of our blog. We never recommend particular products solely to generate commissions. However, when pricing is comparable or availability is favorable, we support these providers because they support us. []

The New Hybrid PBX: Why Settle for a One Trick Pony?


Let’s face it. It’s hard not to like the application development flexibility that Asterisk® offers, especially if you’re part of an organization that has very specific telephony needs. But the price you pay for "free" and putting all of your eggs in the Asterisk basket is painful. Here are a few of the hurdles that come to mind: security, NAT, one-way audio, remote users, CRM support, conferencing, painful upgrades to address frequent bug fixes, and, more generally, telephone management and support. We love Asterisk, but…

Most folks don’t buy all of their cars or groceries or computer software from a single company. So why do it with your phone system when you can take advantage of the best of all worlds, open source and commercial? To us, that’s the compelling case for integrating a 3CX commercial PBX into your Asterisk infrastructure. It’s a new iteration of what we used to call a hybrid PBX. And you can do it without cost for a full year to kick the 3CX tires and provide your mobile users with transparent phone service regardless of where they are roaming. Using the special Nerd Vittles signup link, you get a custom version of 3CX that supports 4 simultaneous calls, 10-user web meetings, unlimited trunks, and 10 or more extensions. After the first year, you can either spring for less than $100 a year to maintain the 3CX free PBX platform and mobile clients with pain-free updates, or you can upgrade to a more robust 3CX Pro commercial offering with a much expanded feature set including call center technology and seamless CRM integration with MS Exchange, Salesforce, Microsoft Dynamics, Microsoft Outlook, Office 365, Google Contacts, Exact Online, Freshdesk, Datev, Zendesk, Nutshell, vtiger, EBP, Insightly, amoCRM, Bitrix24 and Act. What’s not to like?

If you’re a frequent Nerd Vittles visitor, you already know that the 3CX clients for iOS, Android, Windows, and Macs are one of our favorite telephony apps of all time. The ease with which the 3CX client can be configured with a single click on an email attachment is revolutionary. And, once configured, the fact that you never again experience a NAT problem with a SIP call is nothing short of miraculous. As we’ve previously mentioned, the 3CX Client provides a nearly perfect mobile client for those that rely upon Asterisk. Now 3CX is poised to release an even easier configuration procedure for their mobile clients in update 2 for version 15.5. Simply log into your 3CX web client on a PC or Mac and choose the Settings:QR Code option from the menu bar. 3CX will present a QR code to activate the 3CX Client for your smartphone. Scan it using the 3CX Client app on your smartphone and, presto, your phone is instantly provisioned. It doesn’t get any easier than this…


Let’s spend a little time reviewing our favorite Hybrid PBX setup. In this scenario which is perfect for small businesses with a mobile workforce, the setup looks like this. An Asterisk server is deployed to manage company trunks including Google Voice, voicemail, IVRs, custom apps, and extensions for every employee. Then we add a 3CX free PBX, interconnect it with the Asterisk PBX, and assign a 3CX extension for every employee. The 3CX extensions will all tie back to the employee extensions on the Asterisk PBX. It obviously simplifies things if you keep your number schemes consistent. For example, extension 7000 on the Asterisk PBX could be matched to extension 000 on the 3CX PBX. Then we set up outbound trunks on both the Asterisk PBX and 3CX to dial a 9 prefix to reach extensions on the other PBX. So dialing 9000 on the Asterisk PBX would connect the caller to extension 000 on the 3CX PBX. On the 3CX side, dialing 9000 would connect the caller to extension 7000 on the Asterisk PBX in our example. And, of course, 3CX Clients can reach any number worldwide using Asterisk outbound trunks by dialing a 9 prefix and then the long distance number. Our previous tutorials will walk you through setting this up with Incredible PBX® 13, Issabel™, any FreePBX®-based PBX, or even Wazo. Once you complete the 5-minute setup, mobile users can take advantage of all the powerful features on any 3CX Client platform while still receiving their incoming calls from the Asterisk-based office PBX by simply forwarding their extension to their matching 9XXX destination on the 3CX platform. This will ring their 3CX Client anywhere in the world with nothing but a Wi-Fi connection! And it’s a free call.


Published: Monday, October 16, 2017  


Need help with Asterisk? Visit the PBX in a Flash Forum.


Special Thanks to Our Generous Sponsors


FULL DISCLOSURE: ClearlyIP, Skyetel, Vitelity, DigitalOcean, Vultr, VoIP.ms, 3CX, Sangoma, TelecomsXchange and VitalPBX have provided financial support to Nerd Vittles and our open source projects through advertising, referral revenue, and/or merchandise. As an Amazon Associate and Best Buy Affiliate, we also earn from qualifying purchases. We’ve chosen these providers not the other way around. Our decisions are based upon their corporate reputation and the quality of their offerings and pricing. Our recommendations regarding technology are reached without regard to financial compensation except in situations in which comparable products at comparable pricing are available from multiple sources. In this limited case, we support our sponsors because our sponsors support us.

BOGO Bonaza: Enjoy state-of-the-art VoIP service with a $10 credit and half-price SIP service on up to $500 of Skyetel trunking with free number porting when you fund your Skyetel account. No limits on number of simultaneous calls. Quadruple data center redundancy. $25 monthly minimum spend required. Tutorial and sign up details are here.

The lynchpin of Incredible PBX 2020 and beyond is ClearlyIP components which bring management of FreePBX modules and SIP phone integration to a level never before available with any other Asterisk distribution. And now you can configure and reconfigure your new Incredible PBX phones from the convenience of the Incredible PBX GUI.

VitalPBX is perhaps the fastest-growing PBX offering based upon Asterisk with an installed presence in more than 100 countries worldwide. VitalPBX has generously provided a customized White Label version of Incredible PBX tailored for use with all Incredible PBX and VitalPBX custom applications. Follow this link for a free test drive!
 

Special Thanks to Vitelity. Vitelity is now Voyant Communications and has halted new registrations for the time being. Our special thanks to Vitelity for their unwavering financial support over many years and to the many Nerd Vittles readers who continue to enjoy the benefits of their service offerings. We will keep everyone posted on further developments.


Some Recent Nerd Vittles Articles of Interest…