Home » Posts tagged 'IncrediblePBX' (Page 41)
Tag Archives: IncrediblePBX
The Gotcha-Free PBX: Incredible PBX for Asterisk-GUI Application User’s Guide
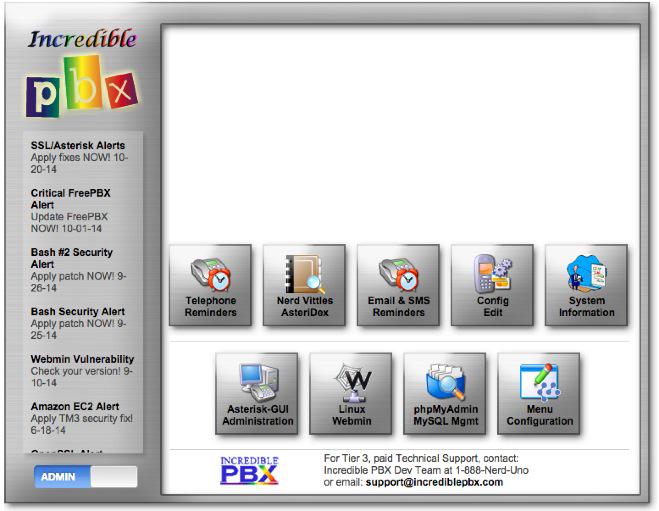
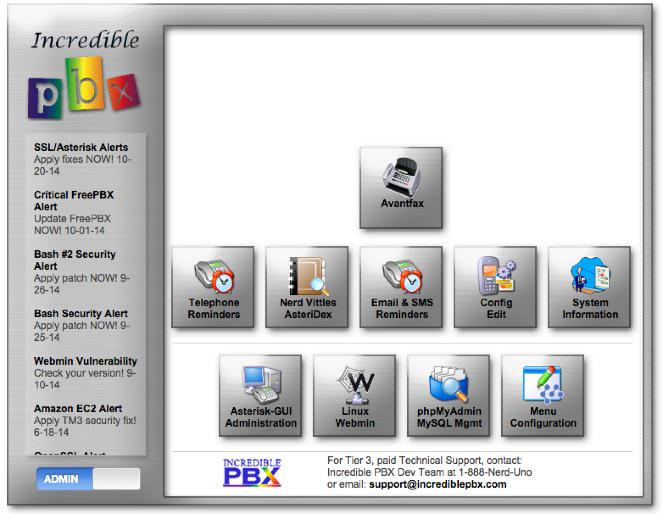
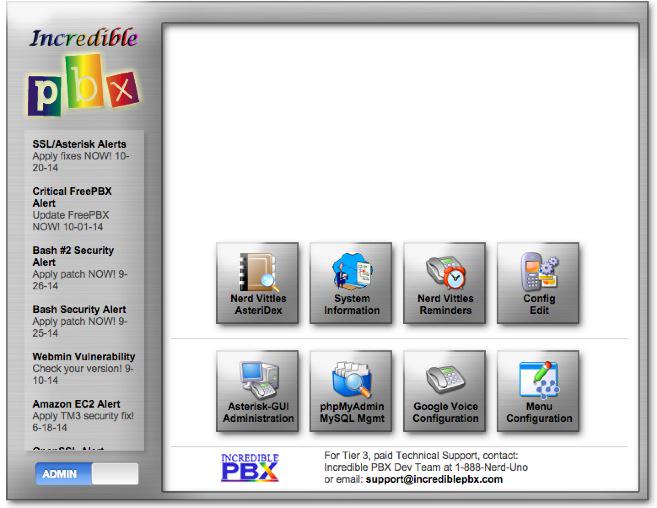
For those just beginning the Incredible PBX™ for Asterisk-GUI adventure, start here. Once your system is up and running, you’ll be ready to kick the tires. And today we’ll cover the applications for Asterisk® that are included in Incredible PBX for Asterisk-GUI. Down the road a bit, we’ll provide an in-depth review of the Incredible PBX internals and how to tweak things under the covers to get the most out of Incredible PBX for Asterisk-GUI. We’re not planning to provide an Asterisk-GUI User’s Guide because a number of them already have been written. That doesn’t mean it’s not important. See last week’s homework assignment for the links. If you have questions, by all means post them on the PIAF Forum for some quick help.
If you’ve always loved Baskin-Robbins’ 31 Flavors of ice cream, then you’re in for a treat today with our special scoop.
Here’s our Table of Contents to the 31 Incredible PBX Applications for Asterisk-GUI with hotlinks plus some bonus apps for those that are still awake at the end of today’s adventure. You may want to print this for future reference.
- Checking System Status
- Enabling Speech Recognition
- Wolfram Alpha for Siri-like queries by phone*
- Automatic Update Utility
- Asterisk 11 Upgrade Utility
- Apache Authentication for Apps
- IPtables Firewall WhiteList
- PortKnocker Remote Access
- Travelin’ Man 4 Remote Access by Phone
- Conference Bridge
- CallerID Name (CNAM) Lookups
- Faxing with Incredible PBX
- Voicemail 101 with Incredible PBX
- Email Delivery of MP3 Voicemails
- Reconfiguring SendMail for SmartHosts
- SMS Blasting with Google Voice
- SMS Voice Messaging with Google Voice*
- SMS Messaging with VoIP.ms
- SIP URI Calling with Speed Dials
- IVR Demo of Incredible PBX Applications*
- Backup and Restore Options
- AsteriDex – The Poor Man’s Rolodex®
- Voice Dialing with AsteriDex*
- Speed Dialing with AsteriDex
- Scheduling Reminders by Phone or Web
- DISA Access with Incredible PBX
- Yahoo! News Headlines
- Weather Forecasts with Incredible PBX*
- ODBC Application Support
- Today in History
- Time of Day
- Harnessing SIP URIs for Free Worldwide Calling
* Requires Voice Recognition implementation. See #2 above.
1. Checking Current Status of Incredible PBX
There are several ways to check the status of your server. First, log into your server as root and type: status
or pbxstatus
The second option is to use a browser to access your server. Choose the Admin menu. Then click Asterisk-GUI Administration. Once you log in, the System Status of your server, trunks, and extensions will be displayed.
Finally, with your browser, choose the Admin menu. Click System Information to bring up the terrific SysInfo application that’s included in Incredible PBX.
2. Adding Speech Recognition to Incredible PBX for Asterisk-GUI
Google changed the licensing of their speech recognition engine last year and now restricts use to "personal and development use." Assuming you qualify, the very first order of business is to enable speech recognition for your new PBX. Once enabled, the Incredible PBX feature set grows exponentially. You’ll have access to the Voice Dialer for AsteriDex, Worldwide Weather Reports where you can say the name of a city and state or province to get a weather forecast for almost anywhere, Wolfram Alpha for a Siri-like encyclopedia for your PBX, and Lefteris Zafiris’ speech recognition software to build additional Asterisk apps limited only by your imagination.
Here’s how to activate speech recognition on Incredible PBX. Don’t skip any steps!
1. Using an existing Google/Gmail account, you first must join the Chrome-Dev Group.
2. Using the same account, create a new Speech Recognition Project.
3. Click on your newly created project and choose APIs & auth.
4. Turn ON the Speech API by clicking on its Status button in the far right margin. HINT: If you forgot to complete Step #1, the Speech API option will be missing!
5. Click on Credentials in APIs & auth and choose Create New Key -> Server key. Leave the IP address restriction blank!
6. Write down your new API key or copy it to the clipboard.
7. Log into your server as root and issue the following command:
nano -w /var/lib/asterisk/agi-bin/speech-recog.agi
8. When the nano editor opens, go to line 70 of speech-recog.agi: my $key = ""
. Insert your API key from Step #6 above between the quotation marks and save the file: Ctrl-X, Y, then Enter.
Congratulations! Speech recognition is now available with Incredible PBX applications for Asterisk-GUI.
3. Using Wolfram Alpha with Incredible PBX for Asterisk-GUI
Ever wished your Asterisk server could harness the power of a 10,000 CPU Supercomputer to answer virtually any question you can dream up about the world we live in? Well, so long as it’s for non-commercial use, today’s your lucky day. Apple demonstrated with Siri™ just how amazing this technology can be by coupling Wolfram Alpha® to a speech-to-text engine on the iPhone. Now you can do much the same thing using voice recognition on the Incredible PBX for Asterisk-GUI.
Before using Wolfram Alpha from any phone connected to your PBX, you first must configure it by obtaining and adding a Wolfram Alpha application ID to Incredible PBX. Here are the simple steps:
1. Obtain your free Wolfram Alpha APP-ID here.
2. Log into your server as root and issue the following command:
nano -w /var/lib/asterisk/agi-bin/4747
3. When the nano editor opens, the top line of the file will look like this:
APPID="Your-Wolfram-Alpha-App-ID-Goes-Here"
4. Replace the text between the quotes with your APP_ID key from Step #1 above. Then save the file: Ctrl-X, Y, then Enter.
To use Wolfram Alpha, dial 4747 (that’s S-I-R-I backwards) from any extension.
Here are some sample queries to get you started:
Weather in Charleston South Carolina
Weather forecast for Washington D.C.
Next solar eclipse
Otis Redding
Define politician
Who won the 1969 Superbowl? (Broadway Joe)
What planes are flying overhead now?
Ham and cheese sandwich (nutritional information)
Holidays 2015 (summary of all holidays for 2015 with dates and DOW)
Medical University of South Carolina (history of MUSC)
Star Trek (show history, air dates, number of episodes, and more)
Apollo 11 (everything you ever wanted to know)
Cheapest Toaster (brand and price)
Battle of Gettysburg (sad day 🙂 )
Daylight Savings Time 2015 (date ranges and how to set your clocks)
Tablets by Samsung (pricing, models, and specs)
Doughnut (you don’t wanna know)
Snickers bar (ditto)
Weather (local weather at your server’s location)
4. Automatic Update Utility for Incredible PBX for Asterisk-GUI
A key security component of Incredible PBX is its Automatic Update Utility. Each time you log into your server as root, the Automatic Update Utility is run. It installs the latest fixes and security patches for your server. Don’t disable it! In fact, don’t delete anything from the /root folder. You’ll need all of it sooner or later.
We recommend you log into your server as root at least once a week to keep your server current. Ditto for the web interface to Incredible PBX. Insofar as security is concerned, we make a best effort to keep the components of Incredible PBX up to date. The Linux operating system was installed by you before the Incredible PBX install began. That’s a nice way of saying Linux security is primarily your responsibility. When an egregious Linux vulnerability comes along that we know about, we will try to notify you of the issue on the PIAF Forum and on the RSS Feed that is part of the Incredible PBX web GUI. Check the RSS Feed on the web GUI at least once a week as well. As a condition of use of the free Incredible PBX for Asterisk-GUI product, you accepted ultimate responsibility for the security and reliability of your server. None of this discussion changes any of that.
5. Asterisk 11 Upgrade Utility for Incredible PBX for Asterisk-GUI
We’ve included a script to upgrade Asterisk 11 to the latest version whenever you feel the urge. Before beginning the upgrade, log into your server as root using SSH and maximize the window. Otherwise, Asterisk may not compile properly. Then run the script: /root/upgrade-asterisk-to-current
6. Implementing Apache Authentication with Incredible PBX for Asterisk-GUI
With the exception of Asterisk-GUI and WebMin, all web-based applications included in Incredible PBX (including your trunk setups!) require successful Apache authentication to gain access. When you installed Incredible PBX, you should have created an admin account. If not, issue the following command using a secure password after logging in as root:
htpasswd -b /etc/pbx/wwwpasswd admin newpassword
With the exception of AsteriDex and Reminders, you gain access to other Incredible PBX applications with the admin Apache account. For the remaining apps, you may wish to (but don’t have to) assign different account names and passwords to various departments in your organization. To set up these accounts, use the syntax above substituting the name of the department for "admin" and the department password for "newpassword."
7. Managing the IPtables Linux Firewall and WhiteList
As installed, Incredible PBX for Asterisk-GUI includes a preconfigured, locked-down Linux firewall that restricts incoming IPv6 traffic to localhost and, via a WhiteList, limits incoming IPv4 traffic to your server’s public and private IP addresses, your desktop computer’s IP address (that was used for the install), private LAN and NeoRouter VPN traffic, and a collection of our favorite SIP providers. You can WhiteList additional IP addresses for additional providers or for SIP and IAX phones located outside your firewall. The following firewall management scripts are mostly installed in the /root directory:
- ./add-ip — WhiteList an additional IP address or IP address range (CIDR)
- ./add-fqdn — WhiteList a site using a fully-qualified domain name (FQDN)
- ./del-acct — Remove previously designated entry from the WhiteList
- ./ipchecker — Check whether specified FQDNs have changed & update IPtables
- iptables-restart — Used exclusively to restart IPtables and test for failed FQDNs
- iptables -nL — Check the current status of your IPtables firewall
IPtables can be manually configured (if you know what you’re doing) by editing iptables and ip6tables in /etc/sysconfig (CentOS) or rules.v4 and rules.v6 in /etc/iptables (Debian/Ubuntu). NEVER use traditional iptables commands such as iptables save to update your IPtables configuration, or you will permanently delete all of your FQDN entries! Instead, edit the files directly and then restart IPtables using iptables-restart. This protects the FQDN entries in your setup while also checking for invalid FQDN entries and removing them temporarily so that IPtables will successfully restart. If you use service iptables restart to restart IPtables and there happens to be an FQDN entry for a host that is either down or has disappeared, IPtables will fail to restart and your server will be left with NO firewall protection! The reason for this is the IPtables design which converts all FQDN entries to fixed IP addresses when it starts up. It’s also the reason we have to periodically check for changed FQDN entries using the ipchecker script with cron. For this to work properly, you will need to manually add your FQDN setups to the top of /etc/ipchecker by inserting the filenames of any add-fqdn entries you have created. For additional details, read our Travelin’ Man 3 tutorial.
8. PortKnocker Remote Access to Incredible PBX for Asterisk-GUI
IPtables is a powerful firewall that keeps the bad guys out. It also will keep legitimate users (including you) from gaining remote access to your server unless you had the forethought to WhiteList your remote IP address before you left on that family vacation. Unfortunately, you don’t always know your IP address in advance. And dynamic IP addresses assigned with hotel WiFi frequently change. To address this problem, Incredible PBX for Asterisk-GUI includes a preconfigured PortKnocker utility. This lets you send three secret "knocks" on random TCP ports to your server to tell it to let you in temporarily (until IPtables is again restarted).
For PortKnocker to work, you obviously need to know the secret knocks. You’ll find them in /root/knock.FAQ. Record them in your wallet or inside your suitcase for that rainy day! There are PortKnocker apps for almost all smartphones as well as for Windows, Mac, and Linux computers. Install your favorite AND test access before you leave town.
Finally, be aware that PortKnocker does not need any special access to your server to work; however, if your server is behind a hardware-based firewall, then you must map the three PortKnocker TCP ports to the private IP address of your server, or the knocks obviously will never get delivered to your server.
Review our PortKnocker tutorial for additional configuration tips.
9. Travelin’ Man 4 Remote Access to Incredible PBX for Asterisk-GUI (Dial TM4)
In addition to PortKnocker, Incredible PBX also includes a telephone-based solution to temporarily gain remote access to your server. This does require a bit of preplanning since you must create account credentials for the person to whom you wish to give remote access via a phone call. The complete tutorial for Travelin’ Man 4 is available on the PIAF Forum. All of the pieces already are in place on your server so skip down to the Configuration & Operation sections for details on implementation. The tutorial also covers the Administrator Utilities in /root/tm4 which let you set up remote user accounts.
10. Using the Conference Bridge in Incredible PBX (Dial C-O-N-F)
A new turnkey Asterisk 11 Conference Bridge has been added to Incredible PBX for Asterisk-GUI. A conference bridge allows a group of people to participate in a joint phone call. Typically, participants dial into a virtual meeting room from their own phone. This virtual meeting room supports dozens or even hundreds of participants depending upon server capacity.
You do not need a timing source for conferencing with Incredible PBX for Asterisk-GUI! Old-style Asterisk-GUI Conference Rooms which required a timing source are disabled.
To access the Conference Bridge, dial C-O-N-F (2663) from any phone connected to your server. Remote users can be added to a conference by providing a DID that points to an IVR which includes Conference Bridge access. Once connected to the conference bridge, a caller is prompted for the Conference Bridge PIN and his or her name. The user and admin passwords to access the Conference Bridge are randomized during the install.
To display Conference Bridge PINs, open Asterisk-GUI, choose Incredible PBX Apps, and click on Anveo Direct. The Miscellaneous Credentials Settings will all be displayed at the bottom of the screen including your Conference Bridge PINs.
To change Conference Bridge PINs, log into your server as root and edit the entries for CONF_USER_PIN and CONF_ADMIN_PIN: nano -w /etc/asterisk/credentials.conf. Then reload Asterisk: asterisk-reload.
11. CallerID Name (CNAM) Lookups with Incredible PBX for Asterisk-GUI
By default, Incredible PBX is configured to automatically provide OpenCNAM CallerID name lookups for the first ten calls received each hour. These lookups are only from cached entries in the OpenCNAM database; however, you can enable the commercial lookup service if desired. The cost is four tenths of a cent per successful query.
To enable the OpenCNAM Professional Tier, set up an account at OpenCNAM.com. Once you’ve obtained your credentials, edit the [cidlookup] context in /etc/asterisk/extensions_additional.conf. The second line includes this CURL command:
${CURL(https://api.opencnam.com/v2/phone/${CALLERID(num)}?format=pbx&ref=incrediblepbx)})
Add the following immediately after "incrediblepbx" replacing ACCOUNT_SID and AUTH_TOKEN with your actual credentials: &account_sid=ACCOUNT_SID&auth_token=AUTH_TOKEN
Finally, comment out the next 8 lines that begin with "exten => cidlookup_1,n" by inserting a semicolon at the start of each line. DO NOT comment out: exten => cidlookup_1,n,Return(). Save your changes and reload Asterisk: asterisk-reload.
;exten => cidlookup_1,n,Set(current_hour=${STRFTIME(,,%Y-%m-%d %H)}) ;exten => cidlookup_1,n,Set(last_query_hour=${DB(cidlookup/opencnam_last_query_hour)}) ;exten => cidlookup_1,n,Set(total_hourly_queries=${DB(cidlookup/opencnam_total_hourly_queries)}) ;exten => cidlookup_1,n,ExecIf($["${last_query_hour}" != "${current_hour}"]?Set(DB(cidlookup/opencnam_total_hourly_queries)=0)) ;exten => cidlookup_1,n,ExecIf($["${total_hourly_queries}" = ""]?Set(DB(cidlookup/opencnam_total_hourly_queries)=0)) ;exten => cidlookup_1,n,Set(DB(cidlookup/opencnam_total_hourly_queries)=${MATH(${DB(cidlookup/opencnam_total_hourly_queries)}+1,i)}) ;exten => cidlookup_1,n,ExecIf($[${DB(cidlookup/opencnam_total_hourly_queries)} >= 10]?System(${ASTVARLIBDIR}/bin/opencnam-alert.php)) ;exten => cidlookup_1,n,Set(DB(cidlookup/opencnam_last_query_hour)=${current_hour}) exten => cidlookup_1,n,Return()
12. Faxing with Incredible PBX for Asterisk-GUI
If you added Incredible Fax to your server by running incrediblefax11-GUI.sh in the /root folder, then you’re in for a treat. As part of the install, you provided an email address for delivery of incoming faxes. That’s all the setup that is required to have incoming faxes sent to most of your DIDs delivered via SendMail in PDF format. The best way to figure out whether a particular provider supports fax technology on their DIDs is to send a test fax to yourself. FaxZERO lets you send 5 free faxes of up to 3 pages every day. Give it a whirl.
You also can send faxes using standard document types with the AvantFax web application. Log into AvantFax from the main Incredible PBX page by clicking on the AvantFax icon. Choose the Send a Fax option from the main menu, fill in the blanks, and attach your document. AvantFax uses the default dialplan documented in last week’s article so use the prefix desired to send the fax using your preferred provider. HINT: Google Voice does an excellent job with both incoming and outgoing faxes, and the calls are free in the U.S. and Canada.
Copies of all incoming faxes also are available for retrieval within AvantFax.
13. Voicemail 101 for Incredible PBX for Asterisk-GUI
Voicemail functionality is enabled on an extension-by-extension basis as part of the extension setup under the Users tab in Asterisk-GUI. Once enabled, you can set up your mailbox and retrieve your messages by dialing *98. You can leave a message for any extension without actually calling the extension. Just prepend * to any extension number before dialing, e.g. *6002. A number of the system settings for voicemail can be tweaked under the Voicemail tab in Asterisk-GUI. You also can automatically delete voicemails once they have been delivered by email under the Email Settings tab. Just follow your nose.
14. Email Delivery of MP3 Voicemails with Incredible PBX for Asterisk-GUI
Speaking of email delivery, your voicemails also can be delivered to any email address of your choosing. For every extension under the Users tab in Asterisk-GUI, simply add an Email Address in the Voicemail section of the form. With Incredible PBX, the voicemail message will be attached to the email in MP3 format so it’s suitable for playback with most email clients on desktop PCs, Macs, and smartphones. Be advised that some Internet service providers (such as Comcast) block downstream SMTP servers. You can check whether your outbound email is flowing by accessing WebMin (below) and choosing Servers -> SendMail Mail Server -> Mail Queue. If you find outbound mail is accumulating, then you’ll need to add your ISP’s SMTP server address as a SmartHost for SendMail as documented in the next section.
15. Reconfiguring SendMail for SmartHost SMTP Delivery Of Outgoing Emails
Many residential Internet service providers block downstream SMTP servers such as the SendMail server running with Incredible PBX for Asterisk-GUI. If you’re sending emails but they never arrive and you’ve checked your SPAM folder, then chances are your ISP is the culprit. The simple solution is to add your ISP’s SMTP server as a SmartHost for SendMail. This means outbound emails will be forwarded to your ISP for actual email transmission over the Internet. Here’s how. Edit /etc/mail/sendmail.cf and search for DS. Immediately after DS, add the FQDN of your ISP’s SMTP server, e.g. DSsmtp.comcrap.net (no spaces!). Save the file and then restart SendMail: service sendmail restart. Your email and voicemail messages with attachments should begin flowing without further delay.
Email from: Asterisk PBX asterisk@pbx.local... "Nerd Vittles" at 8001234567 left a new voicemail message 1 for extension 6002 on Thursday, January 29, 2015 at 01:42:33 PM.
You can test email delivery by sending yourself a message from the Linux CLI:
echo "test" | mail -s testmessage yourname@somedomain.com
16. SMS Blasting with Google Voice and Incredible PBX for Asterisk-GUI
Out of the box, Incredible PBX supports SMS Message Blasting if you have a functioning Google Voice account set up. Before first use, you must add your credentials, address list, and text message to the SMS Blaster scripts in the /root folder.
In smsblast, insert your credentials:
GVACCT="yourname@gmail.com" GVPASS="yourpassword" MSGSUBJECT="Little League Alert"
In smslist.txt, insert one or more recipients for your message. These can be a combination of SMS addresses and email addresses and will be delivered accordingly.
NOTE: For most cellphone providers, you also can send an email message for SMS delivery by the provider. The complete list of providers is available here. Email messaging for SMS requires that you know the cellphone provider for your recipient while standard SMS messaging does not.
# In lieu of SMS number, email is also OK 8431234567 Doe John mary@doe.com Doe Mary 8435551212@txt.att.net Mr T
In smsmsg.txt, enter the text message to be sent.
Once you have all three files configured, run the script: /root/smsblast.
17. Voice-Activated SMS Messaging with Incredible PBX (Dial S-M-S)
In addition to message blasting, you also can dial 767 from any extension and dictate an SMS message to send through your Google Voice account. When prompted for the destination, simply enter the 10-digit SMS number of the recipient.
18. SMS Messaging with VoIP.ms and Incredible PBX for Asterisk-GUI
Incredible PBX for Asterisk-GUI also supports SMS messaging through VoIP.ms if you have an account and an SMS-enabled DID. See the VoIP.ms wiki for setup info on the VoIP.ms side.
To install the VoIP.ms SMS scripts, follow these steps:
cd /root mkdir sms-voip.ms cd sms-voip.ms wget http://incrediblepbx.com/voipms-SMS.tar.gz tar zxvf voipms-SMS.tar.gz
Edit voipms-sms.php and insert your VoIP.ms number that supports SMS messaging (no spoofing allowed!):
$SMSsender="8005551212";
Edit class.voipms.php and insert your VoIP.ms API credentials:
/*******************************************\ * VoIPms - API Credentials \*******************************************/ var $api_username = 'yourname@youremail.com'; var $api_password = 'yourpassword';
Send an SMS message through VoIP.ms with the following command where smsnumber is the 10-digit number of the SMS recipient and "sms message" is the text message surrounded by quotes:
/root/sms-voip.ms/voipms-sms.php smsnumber "sms message"
NOTE: VoIP.ms has indicated that sooner or later there will be a penny per message charge for SMS messages; however, as of today, they’re still free.
19. SIP URI Calling with Incredible PBX for Asterisk-GUI (Demo: Dial L-E-N-N-Y)
With one line of dialplan code, you can add Speed Dials for free SIP URI calling worldwide. The dialplan code is stored in the [CallingRule_SIP_URI] context in extensions_custom.conf. Just clone one of the existing entries, designate an extension to dial to connect to the SIP URI, and enter the SIP URI for the destination. Numerous SIP providers support assignment of SIP URI’s to DIDs for unlimited free calling from anywhere in the world. Here’s a sample using a speed dial code of 53669 that connects you to SIP URI 2233435945@sip2sip.info: exten = 53669,1,Dial(SIP/2233435945@sip2sip.info)
20. IVR Demo of Incredible PBX Applications (Dial 7001)
The easiest way to try out a number of the Incredible PBX applications is to take the IVR Demo for a spin. Just pick up any phone and dial 7001. The sample code for the IVR is available for review and modification in extensions.conf. Just search for 7001. You can create your own IVRs and AutoAttendants under the Voice Menus tab in Asterisk-GUI. There’s also a sample Stealth AutoAttendant available by dialing 7000. This plays a brief greeting and then rings Ring Group #1. During the greeting, you could configure the application to allow button presses to branch to other applications on your PBX, hence the Stealth name since the codes are not disclosed to callers.
21. Incredible Backup & Restore with Incredible PBX for Asterisk-GUI
Incredible Backup and Restore scripts are included in the /root folder. These scripts make and restore snapshots of the settings on your server and should be used in conjunction with a full system backup solution. Asterisk-GUI includes its own backup snapshots under the Backup tab.
22. AsteriDex – The Poor Man’s Rolodex
AsteriDex is a web-based phonebook application for Incredible PBX. You can access it from the main web menu. Scripts are also available to import your contacts from Outlook and Google Contacts.
23. Voice Dialing with AsteriDex (Dial 411)
If you have voice recognition enabled on your server, you can call anyone in your AsteriDex database by dialing 411.
24. Speed Dialing with AsteriDex (Dial 412 or 000+)
For those without voice recognition, Incredible PBX includes two speed dialing utilities. The first is accessed by dialing 412. Then enter any 3-digit dialcode from your AsteriDex database to complete the call. If you’d prefer to skip the intermediate step, dial 000 + the 3-digit speed dial code desired. The call will be placed immediately using your default outbound routes. For those using a version of Incredible PBX before February 2015, see this link for the 000 Speed Dial patch.
For a complete listing of your AsteriDex dial codes, execute this query:
mysql -u root -ppassw0rd asteridex -e "select name,dialcode from user1 order by name"
25. Telephone Reminders (Dial 123)
Incredible PBX includes a sophisticated reminders system that lets you schedule individual or recurring reminders using your phone by dialing 123 or a web browser. A complete tutorial is available here. For phone reminders, a password is required to access the reminder system. You’ll find your password in /root/passwords.FAQ. It can be changed in /etc/asterisk/credentials.conf. Typically, these reminders set up a return call at a scheduled time that then plays back either a recorded message or a TTS message generated from the text you entered in the browser application. Incredible PBX for Asterisk-GUI also includes a new addition that lets you schedule web reminders that are delivered by email or SMS message. Links to the web-based reminders applications are in the main Incredible PBX web menu.
26. DISA Access with Incredible PBX for Asterisk-GUI (Dial D-I-S-A)
Direct Inward System Access (aka DISA) is one of the great PBX inventions of the last 50 years. It’s also one of the most dangerous. It lets someone connect to your PBX and obtain dial tone to place an outbound call using your trunks… on your nickel. Typically, it is offered as an option with an IVR or AutoAttendant. The DISA extension is preconfigured with Incredible PBX on extension 3472 (D-I-S-A). Use requires a password. Your randomized password can be found in /root/passwords.FAQ. It can be changed in /etc/asterisk/credentials.conf. Make it very secure before exposing DISA access to the outside world!
27. Yahoo! News (Dial 951)
Yahoo! news headlines are available by dialing 951. The news option also is included in the sample IVR application.
28. Weather Forecasts by Phone (Dial 949 or Z-I-P)
If you have voice recognition enabled on your server, you can retrieve a weather report for most cities in the world by dialing 949 and saying the name of the city plus the state, province, or country. For PBXs without voice recognition, you can obtain a weather forecast for most zip codes by dialing 947 (Z-I-P) and entering the 5-digit zip code.
29. ODBC Application Support for Asterisk
If you’ve recently logged into your server as root, Automatic Update #4 added ODBC/MySQL application support for Asterisk. You can try out a few sample applications that are included to get you started. Dial 222 and enter 12345 for the employee number. This retrieves an employee name from the MySQL timeclock database using Asterisk. Dial 223 to retrieve an AsteriDex name and phone number by entering the 3-character dialcode. You then have the option of placing the call by pressing 1. Once you have created accounts for Travelin’ Man 4, you can dial 864 (T-M-4) to WhiteList an IP address for that account after entering the account number and matching PIN. Use the * key for periods in the IP address. The code for all of the samples is in the following files in /etc/asterisk: odbc.conf and func_odbc.conf. If you create new MySQL databases, remember to add corresponding entries in res_odbc.conf and /etc/odbc.ini. Then restart Asterisk: asterisk-restart.
30. Today in History (Dial T-O-D-A-Y)
It’s always interesting to find out what happened Today in History. And Incredible PBX now delivers it by phone. Just dial 86329 (T-O-D-A-Y) for a walk down memory lane.
31. Time of Day
Speaking of yesteryear, if you grew up dialing TI-4-1212 for the time of day, Ma Bell may have discontinued the service, but we haven’t. Now you can do it on your very own PBX. Just dial into the IVR (7001) and choose option 4.
But suppose you want your users to be able to dial in for the time directly by dialing extension 8463 (T-I-M-E). Well it’s easy. Just add one line to your Incredible PBX dialplan and then reload the dialplan.
sed -i '/CallingRule_extensions_custom/a exten => 8463,1,Goto(new-time,s,1)' /etc/asterisk/extensions_custom.conf asterisk-reload
NOTE: Those with a Feb. 2015 or later version of Incredible PBX already have this feature.
Introducing WebMin: The Linux Swiss Army Knife
There is no finer Linux application than WebMin. There is no more dangerous Linux application than WebMin. You’ve been warned. We heartily recommend WebMin as a tool to LOOK at your server’s settings. We strongly discourage changing anything in WebMin unless you totally know what you are doing. This is especially true with management of Linux applications that make up the core of Incredible PBX: the Linux kernel, SendMail, IPtables, Apache, MySQL, PHP, and…
To access WebMin, click on the WebMin link in the main Incredible PBX web menu. The username is root. The password is your root password. WebMin has root privileges to your server. Reread paragraph 1 and act accordingly.
For an exhaustive tutorial on WebMin, download The Book of WebMin by Joe Cooper. For a more recent commercial offering, take a look at Michal Karzyński’s WebMin Administrator’s Cookbook.
Introducing phpMyAdmin: The MySQL Swiss Army Knife
The same caveats we expressed regarding WebMin apply to phpMyAdmin. It is a powerful tool for managing MySQL databases in the right hands. It is a dangerous tool in the wrong hands. Fortunately, Asterisk-GUI does not rely upon MySQL for anything, and we are phasing out the remaining Incredible PBX applications that still rely upon it. So there should be little need to use phpMyAdmin unless you are developing a customized database solution for your business. We’ve included phpMyAdmin just in case.
To access phpMyAdmin, click on the phpMyAdmin link in the main Incredible PBX web menu. For tutorials on phpMyAdmin, see the phpMyAdmin wiki. For an excellent commercial offering focused on the version of phpMyAdmin installed on your server, consider Mastering phpMyAdmin 3.4 for Effective MySQL Management by Marc Delisle.
Introducing SIP Gateways for Secure (and Free) Google Voice Calling
If you have difficulty finding the Google Chat option after setting up a new Google Voice account, follow this tutorial.
Enjoy your new Gotcha-Free PBX, and… Happy Groundhog’s Day! It’s always been one of the happiest days of the year around our house. It’s my mom’s birthday.
Originally published: Monday, February 2, 2015
Coming Next Week (with a little luck): The Gotcha-Free PBX Ubuntu Edition
Coming Soon: The Gotcha-Free PBX for the Raspberry Pi 2. Better hurry if you want one!
Support Issues. With any application as sophisticated as this one, you’re bound to have questions. Blog comments are a terrible place to handle support issues although we welcome general comments about our articles and software. If you have particular support issues, we encourage you to get actively involved in the PBX in a Flash Forums. It’s the best Asterisk tech support site in the business, and it’s all free! Please have a look and post your support questions there. Unlike some forums, ours is extremely friendly and is supported by literally hundreds of Asterisk gurus and thousands of users just like you. You won’t have to wait long for an answer to your question.
Need help with Asterisk? Visit the PBX in a Flash Forum.
Special Thanks to Our Generous Sponsors
FULL DISCLOSURE: ClearlyIP, Skyetel, Vitelity, DigitalOcean, Vultr, VoIP.ms, 3CX, Sangoma, TelecomsXchange and VitalPBX have provided financial support to Nerd Vittles and our open source projects through advertising, referral revenue, and/or merchandise. As an Amazon Associate and Best Buy Affiliate, we also earn from qualifying purchases. We’ve chosen these providers not the other way around. Our decisions are based upon their corporate reputation and the quality of their offerings and pricing. Our recommendations regarding technology are reached without regard to financial compensation except in situations in which comparable products at comparable pricing are available from multiple sources. In this limited case, we support our sponsors because our sponsors support us.
BOGO Bonaza: Enjoy state-of-the-art VoIP service with a $10 credit and half-price SIP service on up to $500 of Skyetel trunking with free number porting when you fund your Skyetel account. No limits on number of simultaneous calls. Quadruple data center redundancy. $25 monthly minimum spend required. Tutorial and sign up details are here.
The lynchpin of Incredible PBX 2020 and beyond is ClearlyIP components which bring management of FreePBX modules and SIP phone integration to a level never before available with any other Asterisk distribution. And now you can configure and reconfigure your new Incredible PBX phones from the convenience of the Incredible PBX GUI.
VitalPBX is perhaps the fastest-growing PBX offering based upon Asterisk with an installed presence in more than 100 countries worldwide. VitalPBX has generously provided a customized White Label version of Incredible PBX tailored for use with all Incredible PBX and VitalPBX custom applications. Follow this link for a free test drive!
Special Thanks to Vitelity. Vitelity is now Voyant Communications and has halted new registrations for the time being. Our special thanks to Vitelity for their unwavering financial support over many years and to the many Nerd Vittles readers who continue to enjoy the benefits of their service offerings. We will keep everyone posted on further developments.
Some Recent Nerd Vittles Articles of Interest…
The Gotcha-Free PBX: Introducing Incredible PBX for Asterisk-GUI (CentOS)
[iframe-popup id="5″]
To celebrate ITEXPO® this week, we’re back in the gift-giving mood. So today we’re pleased to introduce the first of several new turnkey VoIP solutions for the Asterisk® platform. Incredible PBX™ for Asterisk-GUI provides virtually the same feature set of applications for Asterisk as our previous releases. But this time around, you get a Gotcha-Free PBX with pure and honest open source GPL code. No patent, trademark, or copyright minefields to trip you up. Just abide by the clear GPL licensing terms and copy, embellish, and redistribute to your heart’s content. Incredible PBX for Asterisk-GUI is truly a lean, mean implementation designed to be frugal with memory and extremely versatile in terms of configuration.
One of our favorite Twitter detractors recently compared us to a fast food worker.1 We’ve been called worse so thanks. Keeping up with Five Guys ain’t easy. Leveraging the best open source components available and putting them together in such a way that the end result far exceeds the sum of its parts is the name of the game. We started by assembling the very best components for Asterisk we could find. Take it from a fast food worker, Mark Spencer’s Asterisk and Asterisk-GUI creations are anything but second-rate products. The GUI may not have made good business sense for Digium, but making money wasn’t the objective this time around. Our focus was building a better VoIP mousetrap and a Gotcha-Free PBX.
We began by dusting off Mark Spencer’s terrific GUI and giving it a facelift. We tweaked it for use with Asterisk 11 and Google Voice and ConfBridge. Then we preconfigured some SIP trunks from our favorite providers, added the best open source text-to-speech and voice recognition tools available from Lefteris Zafiris, and produced a VoIP solution and set of applications for home and SOHO businesses that’s ready to take and make calls in less time than refueling your vehicle. But why drive a Lincoln (and we’re being charitable) when an F-150 will get the job done? Unlike some other distros, you get the very latest version of Asterisk and Asterisk-GUI. Both are compiled from source on your hardware platform to maximize performance. The end result is the VoIP Trifecta… better, cheaper, and faster.
Since the early Windows® days, we haven’t been big fans of GUI-only interfaces. Let’s face it. Some things can be configured more efficiently with less chance for error using other tools. Incredible PBX takes advantage of this hybrid technology by offering the best of all worlds. Administrators can use a GUI where it makes sense and use a text editor or simple web form where it doesn’t. You can configure 8 VoIP trunks from 8 great providers in under 5 minutes. And there’s so much more…
Target Audience: Home or SOHO/SBO in need of a turnkey, Gotcha-Free PBX Default Configuration: Asterisk 11 with enhanced Asterisk-GUI, Kennonsoft GUI, and NANPA dialplan Platform: CentOS 6.5/6.6 running on Dedicated Server, Cloud-Based Server, or Virtual Machine Minimum Memory: 512MB Recommended Disk: 20GB+ Default Trunks: Google Voice, CallCentric, DIDlogic, Future-Nine, IPcomms, Les.net, Vitelity, VoIP.ms2 Feature Set: Fax, SMS messaging, VPN, Reminders, ConfBridge Conferencing, AsteriDex, Voicemail, Email, IVR, News, Weather, Voice Dialer, Wolfram Alpha, Today in History, TM3 Firewall WhiteList, Speed Dialer, iNUM and SIP URI (free) worldwide calling, OpenCNAM CallerID lookups, DISA, Call Forwarding, CSV CDRs Administrator Utilities: Incredible Backup/Restore, Automatic Updater, Asterisk Upgrader, phpMyAdmin, Timezone Config, Plug-and-Play Trunk Configurator, WebMin, External IP Setup, Firewall WhiteList Tools |
Getting Started with Incredible PBX for Asterisk-GUI (CentOS Edition)
Here’s a quick overview of the installation and setup process for Incredible PBX for Asterisk-GUI:
- Choose a Hardware Platform – Dedicated PC, Cloud Provider, or Virtual Machine
- Install a Linux Flavor – 32-bit or 64-bit CentOS 6.5 or Scientific Linux Minimal ISO (so far!)
- Download and Install Incredible PBX for Asterisk-GUI
- Install Incredible Fax for Asterisk-GUI (optional)
- Set Up Passwords for Incredible PBX for Asterisk-GUI
- Configure Trunks with Incredible PBX for Asterisk-GUI
- Connect a Softphone to Incredible PBX for Asterisk-GUI
1. Choose a Platform for Incredible PBX for Asterisk-GUI
Incredible PBX for Asterisk-GUI works equally well on dedicated hardware, a cloud-based server, or a virtual machine. Just be sure you’ve met the minimum requirements outlined above and that you have a sufficiently robust Internet connection to support 100Kb of download and upload bandwidth for each simultaneous call you wish to handle with your new PBX.
For Dedicated Hardware, we recommend an Atom-based PC of recent vintage with at least a 30GB drive and 4GB of RAM. That will take care of an office with 10-20 extensions and a half dozen or more simultaneous calls if you have the Internet bandwidth to support it.
For Cloud-Based Servers, we recommend RentPBX, one of our financial supporters who also happens to size servers properly and restrict usage solely to VoIP. This avoids performance bottlenecks that cause problems with VoIP calls. If you’re just experimenting, then a 512MB Digital Ocean droplet is a cost-effective option at a cost of less than a penny an hour. In addition to a little referral revenue for Nerd Vittles, the nicest features of Digital Ocean are the availability of preconfigured CentOS images and a platform on which you can install Incredible PBX and be ready to start making calls very, very quickly. If you make a serious mistake during the install or setup, it’s a 30-second task to delete your droplet and create a new one. You’re only out a penny! And reloading Incredible PBX from scratch is never more than a 20-minute task. Remember to run the create-swapfile-DO script included in the Incredible PBX tarball before beginning your install to avoid out-of-memory conditions.
For Virtual Machine Installs, we recommend Oracle’s VirtualBox platform which runs atop almost any operating system including Windows, Macs, Linux, and Solaris. Here’s a link to our original VirtualBox tutorial to get you started. We suggest allocating 1GB of RAM and at least a 20GB disk image to your virtual machine for best performance.
2. Install a Linux Flavor for Incredible PBX for Asterisk-GUI
To be clear, we plan to support many Linux flavors other than RedHat. But Rome wasn’t built in a day so hang in there. We’re flippin’ burgers as fast as we can. For today, you’ll need a 32-bit or 64-bit version of CentOS or Scientific Linux 6.5/6.6. On some platforms, you install 6.5. After the initial update and upgrade steps, you’ll end up with 6.6. There are many flavors of CentOS and Scientific Linux. For Incredible PBX, a minimal install is all you need.
NOTICE: Core dumps reportedly are being experienced loading Asterisk on the 32-bit platform. We’re investigating. For the moment, stick with 64-bit installs until this message disappears.
With dedicated hardware, begin by downloading the 32-bit or 64-bit CentOS 6.6 minimal ISO. Boot your server with the ISO, and begin the install. Here are the simplest installation steps:
Choose Language and Click Continue
Click: Install Destination (do not change anything!)
Click: Done
Click: Network & Hostname
Click: ON
Click: Done
Click: Begin Installation
Click: Root Password: password, password, Click Done twice
Wait for Minimal Software Install and Setup to finish
Click: Reboot
With most cloud-based providers, you simply choose the CentOS 6.5 platform in creating your initial image. 512MB of RAM is plenty so long as you have a swap file. Within a minute or two, you’re ready to boot up the server.
For VirtualBox, download the Scientific Linux 6.6 minimal install .ova image from SourceForge. Then double-click on the image to load it into VirtualBox. Enable Audio and configure Network with Bridge Adapter in Settings. Then start the virtual machine. Default password for root is password.
With VirtualBox, you can skip this step. For everyone else, log into your server as root and issue the following commands to put the basic pieces in place and to reconfigure your Ethernet port as eth0. On some platforms, some of the commands may generate errors. Don’t worry about it! Just make a note of your IP address so you can log back in with SSH from a desktop computer to begin the Incredible PBX install.
For CentOS/Scientific Linux 6.5 minimal install:
setenforce 0 yum -y upgrade yum -y install net-tools nano wget ifconfig sed -i 's|quiet|quiet net.ifnames=0 biosdevdame=0|' /etc/default/grub grub2-mkconfig -o /boot/grub2/grub.cfg wget http://incrediblepbx.com/update-kernel-devel chmod +x update-kernel-devel ./update-kernel-devel reboot
For CentOS/Scientific Linux 6.6 minimal install:
setenforce 0 yum -y upgrade yum -y install net-tools nano wget ifconfig reboot
3. Download and Install Incredible PBX for Asterisk-GUI
Before beginning the install, make sure your terminal window size is at least 80 characters wide and 27 lines high.
Otherwise, Asterisk will not compile properly. UPDATE: This has been resolved in the latest Incredible PBX installer so terminal window expansion is no longer required.
cd /root yum -y install wget wget http://incrediblepbx.com/incrediblepbx11gui.tar.gz tar zxvf incrediblepbx11gui.tar.gz #./create-swapfile-DO #add this step for Digital Ocean droplets rm -f incrediblepbx11gui.tar.gz sed -i 's|pbxinaflash.com|incrediblepbx.com|' IncrediblePBX11-GUI.sh sed -i 's|pkgs.repoforge.org/rpmforge-release|incrediblepbx.com|' IncrediblePBX11-GUI.sh sed -i 's|https://iksemel.googlecode.com/files|http://pkgs.fedoraproject.org/repo/pkgs/iksemel/iksemel-1.4.tar.gz/532e77181694f87ad5eb59435d11c1ca|' IncrediblePBX11-GUI.sh ./IncrediblePBX11-GUI.sh ./IncrediblePBX11-GUI.sh sed -i 's|myip.pbxinaflash.com|myip.incrediblepbx.com|' /usr/local/sbin/status
4. Install Incredible Fax for Asterisk-GUI (optional)
Administrators have been trying to stomp out faxing for at least two decades. Here’s a hint. It ain’t gonna happen. So go with the flow and add Gotcha-Free Faxing to your server. It’ll be there when you need it. And sooner or later, you’ll need it. This install script is simple enough for any monkey to complete. Run the script and enter the email address for delivery of your faxes. Then, if you’re in the U.S. or Canada, press the Enter key to accept every default entry during the HylaFax and AvantFax installation steps. For other countries, read the prompts and answer accordingly. When the installation finishes, reboot your server to bring faxing on line. Be sure to change your AvantFax admin password. By default, it is password. You can use the script included in the /root folder: avantfax-pw-change. REMINDER: Don’t forget to reboot your server!
cd /root ./incrediblefax11-GUI.sh ./avantfax-pw-change reboot
Troubleshooting: If your IAXmodems don’t display with a green IDLE notation in the AvantFax GUI, you may need to restart them once more. After a second reboot, all should be well. The restart command is /root/iaxmodem-restart.
5. Initial Configuration of Incredible PBX for Asterisk-GUI
Incredible PBX is installed with the preconfigured IPtables Linux firewall already in place. It implements WhiteList Security to limit server access to connected LANs, your server’s IP address, your desktop computer’s IP address, and a few of our favorite SIP providers. You can add additional entries to this WhiteList whenever you like using the add-ip and add-fqdn tools in /root. There’s also an Apache security layer for our web applications. And, of course, Asterisk-GUI has its own security methodology using Asterisk’s manager.conf. Finally, we randomize extension and DISA passwords as part of the initial install process. Out of the starting gate, you won’t find a more secure VoIP server implementation anywhere. After all, it’s your phone bill.
Even with all of these layers of security, here are 10 Quick Steps to better safeguard your server. You only do this once, but failing to do it may lead to security issues you don’t want to have to deal with down the road. So DO IT NOW!
First, log into your server as root with your root password and do the following:
Make your root password very secure: passwd
Set your correct time zone: ./timezone-setup
Create admin password for web apps: htpasswd -b /etc/pbx/wwwpasswd admin newpassword
Make a copy of your other passwords: cat passwords.FAQ
Make a copy of your Knock codes: cat knock.FAQ
Decipher IP address and other info about your server: status
Second, log into your server as admin using a web browser pointed to your server’s IP address:
Click USERS tab in Incredible PBX GUI
Click Asterisk-GUI Administration
Log in as user: admin with password: password
Immediately change your admin password and login again
Log in to Asterisk-GUI again with your new password. Expand the options available in the GUI:
Options -> Advanced Options -> Show Advanced Options
Last but not least, Incredible PBX includes an automatic update utility which downloads important updates whenever you log into your server as root. We recommend you log in once a week to keep your server current. Now would be a good time to log out and back into your server at the Linux command line to bring your server up to current specs.
6. Configure Trunks with Incredible PBX for Asterisk-GUI
Now for the fun part. If this is your first VoIP adventure, be advised that this ain’t your grandma’s phone system. You need not and should not put all your eggs in one basket when it comes to telephone providers. In order to connect to Plain Old Telephones, you still need at least one provider. But there is nothing wrong with having several. And a provider that handles an outbound call (termination) need not be the same one that handles an incoming call (origination) and provides your phone number (DID). We cannot recommend Vitelity highly enough, and it’s not just because they have financially supported our projects for almost a decade. They’re as good as VoIP providers get, and we use lots of them. If you’re lucky enough to live in the U.S., you’d be crazy not to set up a Google Voice account. It’s free as are all phone calls to anywhere in the U.S. and Canada. The remaining preconfigured providers included in Incredible PBX for Asterisk-GUI are equally good, and we’ve used and continue to use almost all of them. So pick a few and sign up. You only pay for the calls you make with each provider so you have little to lose by choosing several. The PIAF Forum includes dozens of recommendations on VoIP providers if you want additional information.
With the preconfigured trunks in Incredible PBX for Asterisk-GUI, all you need are your credentials for each provider and the FQDN of their server. Log into Asterisk-GUI Administration as admin using a browser. From the System Status screen, click Incredible PBX Apps. Click on each provider you have chosen and fill in the blanks with your credentials. When you’ve saved all of your settings, log into your server as root via SSH and type: service asterisk restart or asterisk-restart. You can also issue the command in the Asterisk-GUI by choosing the Asterisk CLI tab3 in the left column. Doesn’t get any simpler!
Update: It should be noted that Incredible PBX for Asterisk-GUI also supports Anveo Direct trunks; however, they are configured differently because of the way Anveo handles the calls. You’ll need the PIN provided by Anveo to set up your trunk, and Anveo supports CallerID spoofing so you can enter any CallerID number for the trunk that you are authorized to use. You’ll find the Anveo Direct setup link in the Incredible PBX Apps tab. To route an outgoing call through Anveo trunk, dial 2 + any desired 10-digit number.
Here is the complete list of dialing prefixes and the trunks to which they are associated:
- 1 – Google Voice
- 2 – Anveo Direct
- 3 – Future Nine
- 4 – CallCentric
- 5 – DIDlogic
- 6 – IPcomms
- 7 – Les.net
- 8 – Vitelity
- 9 – VoIP.ms
For free iNUM calling worldwide, the following dialing prefixes are supported in conjunction with the last seven digits of any destination iNUM DID. Free iNUM DIDs for your own PBX are available from both of these providers as well.
- 0XXXXXXX – CallCentric
- 90XXXXXXX – VoIP.ms
7. Configure a Softphone with Incredible PBX for Asterisk-GUI
We’re in the home stretch now. You can connect virtually any kind of telephone to your new Gotcha-Free PBX. Plain Old Phones require an analog telephone adapter (ATA) which can be a separate board in your computer from a company such as Digium. Or it can be a standalone SIP device such as ObiHai’s OBi100 or OBi110 (if you have a phone line from Ma Bell to hook up as well). SIP phones can be connected directly so long as they have an IP address. These could be hardware devices or software devices such as the YateClient softphone. We’ll start with a free one today so you can begin making calls. You can find dozens of recommendations for hardware-based SIP phones both on Nerd Vittles and the PIAF Forum when you’re ready to get serious about VoIP telephony.
We recommend YateClient which is free. Download it from here. Run YateClient once you’ve installed it and enter the credentials for the 6002 extension on Incredible PBX. You’ll need the IP address of your server plus your extension 6002 password. Choose Users -> 6002 and write down your SIP/IAX Password. You can also find it in /root/passwords.FAQ. Fill in the blanks using the IP address of your server, 6002 for your account name, and whatever password is assigned to the extension. Click OK to save your entries.
Once you are registered to extension 6002, close the Account window. Then click on YATE’s Telephony Tab and place some test calls to the numerous apps that are preconfigured on Incredible PBX. Dial a few of these to get started:
7001 - IVR Demo
123 - Reminders
947 - Weather by ZIP Code
951 - Yahoo News
*61 - Time of Day
TODAY - Today in History
If you are a Mac user, another great no-frills softphone is Telephone. Just download and install it from the Mac App Store.
Configuring Google Voice
If you want to use Google Voice, you’ll need a dedicated Google Voice account to support Incredible PBX. The more obscure the username (with some embedded numbers), the better off you will be. This will keep folks from bombarding you with unsolicited Gtalk chat messages, and who knows what nefarious scheme will be discovered using Google messaging six months from now. So keep this account a secret!
IMPORTANT: Be sure to enable the Google Chat option as one of your phone destinations in Settings, Voice Setting, Phones. That’s the destination we need for The Incredible PBX to work its magic! Otherwise, all inbound and outbound calls will fail. Good News! You’re in luck. Google has apparently had a change of heart on discontinuing Google Chat support so it’s enabled by default in all new Google Voice accounts. Once you’ve created a Gmail and Google Voice account, go to Google Voice Settings and click on the Calls tab. Make sure your settings match these:
- Call Screening – OFF
- Call Presentation – OFF
- Caller ID (In) – Display Caller’s Number
- Caller ID (Out) – Don’t Change Anything
- Do Not Disturb – OFF
- Call Options (Enable Recording) – OFF
- Global Spam Filtering – ON
Click Save Changes once you’ve adjusted your settings. Under the Voicemail tab, plug in your email address so you get notified of new voicemails. Down the road, receipt of a Google Voice voicemail will be a big hint that something has come unglued on your PBX.
One final word of caution is in order regardless of your choice of providers: Do NOT use special characters in any provider passwords, or nothing will work!
Now you’re ready to configure your Google Voice account in Incredible PBX. You can do it from within Asterisk-GUI by choosing Google Voice within the Incredible PBX Apps tab. Once you entered your credentials, don’t forget to restart Asterisk, or Google Voice calls will fail. If you still have trouble placing or receiving calls, try these tips.
OK, Smarty Pants: Show Me the Beef!
We know what some of you are thinking. "What does a fast food worker really know about VoIP and Gotcha-Free PBXs?? Before I waste a bunch of time on this, show me the beef!" Fair enough. Sit by your phone and click the Call Me icon below. Type in a fake name and your real phone number. Click the Connect button, answer your phone when it rings, and press 1. You’ll be connected to the Incredible PBX IVR for Asterisk-GUI. Pick an option from the menu of choices and take the Incredible PBX apps for a spin on our dime… actually it’s Google’s dime. Everything you see and hear is part of what you get with Incredible PBX for Asterisk-GUI including the ability to set up your own click-to-dial web interface exactly like this one. The demo just happens to be running on our Mac desktop instead of yours. So… what are you waiting for? Click away and try Incredible PBX for yourself. And, by the way, nobody besides the NSA and Google will be monitoring your call. 😉
Nerd Vittles Demo IVR Options
1 – Call by Name (say “Delta Airlines” or “American Airlines” to try it out)
2 – MeetMe Conference (password is 1234)
3 – Wolfram Alpha (say “What planes are overhead?”)
4 – Lenny (The Telemarketer’s Worst Nightmare)
5 – Today’s News Headlines
6 – Weather Forecast (say the city and state, province, or country)
7 – Today in History
8 – Speak to a Real Person (or maybe just voicemail if we’re out)
Homework Assignment: Mastering the Asterisk-GUI
We’ll have more to say about the Incredible PBX applications next week. In the meantime, you have some homework. You need to learn all about Asterisk-GUI and how to make the best use of its powerful feature set. Here’s one word of warning. We mentioned that Incredible PBX was a hybrid system that combines some customized settings with the standard Asterisk-GUI interface. Before modifying existing settings for the default trunks, extensions, and default routes, take a look at the credentials* files in /etc/asterisk. If you modify any of these trunk entries or the Outgoing or Incoming Call Rules in Asterisk-GUI, you may break the Incredible PBX setup. So steer clear of that minefield until you know what you’re doing. Adding new extensions and additional trunks is perfectly fine and will not break anything.
Rather than reinvent the wheel, we’ll point you to some excellent tutorials that already have been written. Start with Chapter 3 of Digium’s Asterisk Appliance™ Administrator Manual. Next, review Chapter 11 of The Asterisk Book (Second Edition). Finally, take a look at a couple of the tutorials that have been written by other companies that incorporated Asterisk-GUI into their hardware products, e.g. Yeastar’s MyPBX SOHO User Manual and Grandstream’s UCM6100 User Manual. Then check back with us next week for Chapter 2.
In the meantime, if you have questions, join the PBX in a Flash Forums and take advantage of our awesome collection of gurus. There’s an expert available on virtually any topic, and the price is right. As with Incredible PBX, it’s absolutely free.
We also are quickly building a collection of tutorials tailored specifically for Incredible PBX for Asterisk-GUI:
- Gotcha-Free PBX: Scripts 101
- Gotcha-Free PBX: Inbound Call Routing
- Gotcha-Free PBX: Outbound Call Routing
- Gotcha-Free PBX: Add-a-Trunk
- Gotcha-Free PBX: SMTP Mail Relay with SendMail or PostFix
- Gotcha-Free PBX: Music on Hold
- Gotcha-Free PBX: Changing TTS Engine
- Gotcha-Free PBX: Voicemail with Email Attachments
- Gotcha-Free PBX: Telephone and Web Reminders
- Gotcha-Free PBX: Sending Faxes
- Gotcha-Free PBX: VMobile Extension
- Gotcha-Free PBX: Anveo Direct
- Gotcha-Free PBX: Google Voice
- Gotcha-Free PBX: Voice Menus Setup
- Gotcha-Free PBX: Harnessing SIP URIs for Free Worldwide Calling
Enjoy your new Gotcha-Free PBX!
Just Released: The Gotcha-Free Incredible PBX Application User’s Guide
Originally published: Monday, January 26, 2015
Support Issues. With any application as sophisticated as this one, you’re bound to have questions. Blog comments are a terrible place to handle support issues although we welcome general comments about our articles and software. If you have particular support issues, we encourage you to get actively involved in the PBX in a Flash Forums. It’s the best Asterisk tech support site in the business, and it’s all free! Please have a look and post your support questions there. Unlike some forums, ours is extremely friendly and is supported by literally hundreds of Asterisk gurus and thousands of users just like you. You won’t have to wait long for an answer to your question.
Need help with Asterisk? Visit the PBX in a Flash Forum.
Special Thanks to Our Generous Sponsors
FULL DISCLOSURE: ClearlyIP, Skyetel, Vitelity, DigitalOcean, Vultr, VoIP.ms, 3CX, Sangoma, TelecomsXchange and VitalPBX have provided financial support to Nerd Vittles and our open source projects through advertising, referral revenue, and/or merchandise. As an Amazon Associate and Best Buy Affiliate, we also earn from qualifying purchases. We’ve chosen these providers not the other way around. Our decisions are based upon their corporate reputation and the quality of their offerings and pricing. Our recommendations regarding technology are reached without regard to financial compensation except in situations in which comparable products at comparable pricing are available from multiple sources. In this limited case, we support our sponsors because our sponsors support us.
BOGO Bonaza: Enjoy state-of-the-art VoIP service with a $10 credit and half-price SIP service on up to $500 of Skyetel trunking with free number porting when you fund your Skyetel account. No limits on number of simultaneous calls. Quadruple data center redundancy. $25 monthly minimum spend required. Tutorial and sign up details are here.
The lynchpin of Incredible PBX 2020 and beyond is ClearlyIP components which bring management of FreePBX modules and SIP phone integration to a level never before available with any other Asterisk distribution. And now you can configure and reconfigure your new Incredible PBX phones from the convenience of the Incredible PBX GUI.
VitalPBX is perhaps the fastest-growing PBX offering based upon Asterisk with an installed presence in more than 100 countries worldwide. VitalPBX has generously provided a customized White Label version of Incredible PBX tailored for use with all Incredible PBX and VitalPBX custom applications. Follow this link for a free test drive!
Special Thanks to Vitelity. Vitelity is now Voyant Communications and has halted new registrations for the time being. Our special thanks to Vitelity for their unwavering financial support over many years and to the many Nerd Vittles readers who continue to enjoy the benefits of their service offerings. We will keep everyone posted on further developments.
Some Recent Nerd Vittles Articles of Interest…
- What made the comment all the more humorous was the fact that it was made by a person who has bounced from company to company to company in the VoIP industry, not unlike the plight of many fast food workers. Takes one to know one, I suppose. [↩]
- Vitelity and Google provide financial support to Nerd Vittles and the Incredible PBX project. [↩]
- If, for some reason, the Asterisk CLI tab does not appear on your server, click Options -> Advanced Options -> Show Advanced Options. [↩]
We Have a Dream, Too: The Return of (Gotcha-free) Open Source GPL Software
History repeats itself. That’s the timeless old saying, and we have a theory about that. The reason history repeats itself is because most folks never spent much time studying history so they didn’t learn from the mistakes and greed of those that preceded them. Here’s our brief history lesson on technology and what we’ve learned about choosing a pumpkin.
With a Single Pumpkin Provider, Expect to Take Home a Crappy Pumpkin!
Let’s turn back the clock 30 years, shall we? It was 1985. IBM had just introduced the PC/AT. Hewlett Packard was on the verge of releasing the LaserJet printer. The typical office had a dedicated word processing machine from one of a handful of very rich companies. The PC software world had their new Big Three: dBASE III, WordPerfect, and Lotus 1-2-3. Life was good! Copy-protection was still a sparkle in the eye of many software companies, and shrink-wrap licensing agreements were just beginning to keep law firms busy. You may recall that IBM introduced the IBM PC just four years earlier, and DOS 1.0 was released for $30 with the source code for the operating system in the loose leaf notebook. How quickly things would change. The cassette player adapter was no longer viewed as the storage device of choice. Meet the 20MB hard drive!
It didn’t take long for most of these companies to forget what made them household names. With the notable exception of IBM and WordPerfect, it was all about copy protection, a concept that made it almost impossible for major companies and the government to deploy PCs. There was no Internet or Intranet, and there were no networks or email, just dial-up bulletin board systems using state-of-the-art 1200 baud Hayes modems. If you wanted to deploy software at multiple sites, you mailed floppy disks and crossed your fingers. Meet Sneakernet!
At the time, I was building a new PC-based case management system in Atlanta for the 95 bankruptcy courts that were scattered across hundreds of cities in the United States. These courts were literally buried in paperwork from lawyers. It was not uncommon to wait years before your case was scheduled for a hearing. The Administrative Office of U.S. Courts in Washington was deploying mainframe-based bankruptcy software to a handful of courts each year. Thanks to the IBM PC/AT and HP LaserJet printer, we revolutionized case processing in the bankruptcy courts in less than a year. Backlogs quickly disappeared as the bankruptcy courts spit out more paper than even the lawyers could handle.
The major wrinkle in rolling out a PC-based solution wasn’t the lack of hardware and tools. It was copy-protection. Luckily, there was The Lone Victor, a college-dropout whiz kid that worked for one of the big banks headquartered in Atlanta. Because his bank was a beta site for all of the major PC software, he typically cracked the copyright protection schemes and published the fixes on the local BBS the same day the software was released to the public. This meant DBMS software could be purchased and distributed by mail without having to visit hundreds of sites to manually install the basic software components needed to run application software. The courts were not yet following the business playbook so shrink-wrap licensing agreements were non-existent. The theory that violating a license agreement meant you were violating a copyright had not yet been concocted. And the Bigwigs in California were dumbfounded that their costly, (failsafe) copy protection schemes were cracked on Day 1 of each new software release. The identity of The Lone Victor was never exposed… until now. Just kidding!
It was also the beginning of the shareware era. People were tired of paying exorbitant prices for buggy, copy-protected PC software that was rushed to market to cash in on the PC Gold Rush. We were fortunate enough to be amongst several dozen developers that participated in the Association of Shareware Professionals and set some standards for this revolutionary new industry. Our dBASE III clone, WAMPUM, became an overnight hit thanks to an article in the 800-page tabloid of the time, Computer Shopper. I still remember driving home from a weekend trip to find our mailbox literally spilling over into the street with checks from people that had just discovered the magic of shareware. WAMPUM is still available by the way and runs swimmingly on VirtualBox.
The history lesson here could not be more clear. All of these commercial companies and banks viewed themselves as invulnerable because every one of them dominated a particular niche in the marketplace. Could life possibly get any better? Of course, you know the rest of the story. Not a single one remains in the PC business today. All the Big Banks of the 80’s and all the dedicated word processors and their larger-than-life corporate sponsors are pretty much gone as well.
If you have a teenage son or daughter, take a look at what they use today for messaging and communications. That’s a pretty big hint about the chances that today’s VoIP solutions will still be around even 10 years from now. It’s History 101.
As Grandma used to say, "Never get too big for your britches." When you start resting on your laurels and believing you’re too big to fail, along comes another whiz kid to build a better mousetrap. Yes, we have a dream, too.
With a Single Pumpkin Provider, Expect to Take Home a Crappy Pumpkin!
Pardon our repetition! So what does all of this have to do with Asterisk® and 2015? Well, take another look at last week’s article. Asterisk has a strong open source competitor in FreeSwitch. Without FreeSwitch, we doubt you ever would have seen a product as ambitious as Asterisk 12. The competition has been healthy for both companies AND for those of us that actually use the software. But, in the GUI department, we’re back to the era in which a single product dominates this essential market category. Their way or the highway is the comment we hear over and over from frustrated users. We ended up in this predicament because Digium folded the tent on Asterisk-GUI because of the purchase of a (better) commercial GUI, Switchvox. It actually makes money for the company. Did it mean Asterisk-GUI was flawed? Not at all. In fact, our experimentation suggests quite the opposite. Asterisk-GUI is a better mousetrap in many ways, but development wasn’t generating revenue and was costing Digium manpower money that could be put to better use with a financial return on investment. In case you haven’t noticed, all of the major open source VoIP companies now have commercial VoIP hardware and software offerings. Invariably, open source offerings morph into loss leaders or marketing tools to channel customers to commercial products. That’s what most for-profit companies have had to do to stay afloat. But there’s a right way and a wrong way to go about it, and that’s what last week’s article was all about.
The simple solution to fix market dominance is CHOICES. When you put all your eggs in one basket, we all know what happens. And it has. We’re working very hard to bring more choices and some new players and alternatives to the Asterisk community. We hope you’ll be reading about more of them here… soon. What would happen if there were an open source offering of a Switchvox-like product? What would happen if there were an open source offering of a drag-and-drop GUI for a realtime version of Asterisk? Do we have a crystal ball? Not at all. Do we like to dream of the possibilities and what they would mean to the future of Asterisk and the VoIP community? Absolutely.
In the meantime, do your part. Try out some alternatives. We’re doing our part by bringing them to you with Incredible PBX. It provides a compelling feature set of add-on applications and development tools for Asterisk including text-to-speech, voice recognition, Google Voice free calling and SMS messaging, free fax support, and simplified tools for configuration of Asterisk trunks, extensions, and dialplan code. Initially, the focus of Incredible PBX and PBX in a Flash was broadening the operating system platforms on which Asterisk could be run. In addition to CentOS, we released versions for Fedora, Scientific Linux, Ubuntu, and Debian. Next came virtual machine editions for the Cloud and even for Windows and Macs. Then we tackled tiny hardware platforms to make Asterisk more accessible to a much broader range of users. This included the Raspberry Pi, BeagleBone Black, CuBox-i, and even the PogoPlug. When you can run Asterisk reliably on a $15 to $50 piece of hardware, it’s a big deal.
And that brings us to 2015. Our focus this year is providing a CHOICE of options for actual configuration of Asterisk. We also want to broaden the base from English to support for other languages and countries. Not everyone in the world has a 10-digit phone number. And not everyone needs a product as complex as FreePBX® to set up a VoIP server for their home or business. If all you need is a secure VoIP phone system with SIP phones to make economical phone calls with a high-tech feature set of IVRs, auto-attendants, voicemail, email, SMS messaging, faxes, and smartphone integration, then there are numerous alternatives without the overhead of maintaining and managing a complex database management system, a mail server, a web server, a firewall, and literally hundreds of other Linux applications that many probably never knew were running on their server in the first place.
Does it mean we’re dropping support for FreePBX? Not at all. There’s still hope with new ownership. Does it mean you’re nuts to only consider an Asterisk-based server that includes FreePBX? Absolutely. So what’s out there?? Starting next week, we’ll begin introducing new versions of Incredible PBX for the Asterisk-GUI, for Elastix 3.0 Multi-Tenant, for Gemeinschaft, and…
The best is yet to come. Stay tuned!
Originally published: Monday, January 19, 2015
Need help with Asterisk? Visit the PBX in a Flash Forum.
Special Thanks to Our Generous Sponsors
FULL DISCLOSURE: ClearlyIP, Skyetel, Vitelity, DigitalOcean, Vultr, VoIP.ms, 3CX, Sangoma, TelecomsXchange and VitalPBX have provided financial support to Nerd Vittles and our open source projects through advertising, referral revenue, and/or merchandise. As an Amazon Associate and Best Buy Affiliate, we also earn from qualifying purchases. We’ve chosen these providers not the other way around. Our decisions are based upon their corporate reputation and the quality of their offerings and pricing. Our recommendations regarding technology are reached without regard to financial compensation except in situations in which comparable products at comparable pricing are available from multiple sources. In this limited case, we support our sponsors because our sponsors support us.
BOGO Bonaza: Enjoy state-of-the-art VoIP service with a $10 credit and half-price SIP service on up to $500 of Skyetel trunking with free number porting when you fund your Skyetel account. No limits on number of simultaneous calls. Quadruple data center redundancy. $25 monthly minimum spend required. Tutorial and sign up details are here.
The lynchpin of Incredible PBX 2020 and beyond is ClearlyIP components which bring management of FreePBX modules and SIP phone integration to a level never before available with any other Asterisk distribution. And now you can configure and reconfigure your new Incredible PBX phones from the convenience of the Incredible PBX GUI.
VitalPBX is perhaps the fastest-growing PBX offering based upon Asterisk with an installed presence in more than 100 countries worldwide. VitalPBX has generously provided a customized White Label version of Incredible PBX tailored for use with all Incredible PBX and VitalPBX custom applications. Follow this link for a free test drive!
Special Thanks to Vitelity. Vitelity is now Voyant Communications and has halted new registrations for the time being. Our special thanks to Vitelity for their unwavering financial support over many years and to the many Nerd Vittles readers who continue to enjoy the benefits of their service offerings. We will keep everyone posted on further developments.
Some Recent Nerd Vittles Articles of Interest…
30 Minutes to Paradise: Incredible PBX for Ubuntu 14.04 is Ready for Primetime
A few months ago, we introduced a preview of Incredible PBX for Ubuntu 14. And now we’re pleased to release the latest production-ready version with all the bells and whistles including Incredible Fax featuring HylaFax and AvantFax.
Introducing Incredible PBX 11 for Ubuntu 14.04
Today’s plan is to build a production-ready version of Incredible PBX with Ubuntu 14.04 that mimics the functionality of our previous builds with literally dozens of turnkey applications that show off the very best features of Asterisk®. If you believe in the open source community, this build is for you. No strings, no gotchas, and no quirky licenses!
Six months ago, we could barely spell Ubuntu. Then an enterprising young programmer named Eric Teeter shot us a script to install Ubuntu with Asterisk and FreePBX® and encouraged us to embellish it and to share the results with our Nerd Vittles audience. Having rarely met an operating system we didn’t like, we jumped at the opportunity knowing full well that Billy Chia at Digium and Tony Lewis at Schmooze Com had reported impressive results with Ubuntu years ago. It seemed like a good fit for Incredible PBX as well. Unlike CentOS, Ubuntu also was a platform that was easily transferable to the new $50 BeagleBone Black and the CuBox-i.
Our special thanks to Lefteris Zafiris for cleaning up all of the text-to-speech incompatibilities with Ubuntu. Within minutes from the other side of the world, Lefteris had logged into our Ubuntu Server in the Cloud and tamed the TTS beast. If ever there was an unsung hero in the Asterisk community, it’s Lefteris Zafiris. He has single-handedly kept all of the speech applications humming along through countless versions of Asterisk. We would have quit long ago without his untiring assistance. Thank you (again), Lefteris, for coming to the rescue.
Building an Ubuntu 14.04 Platform for Incredible PBX
As a result of the trademark and copyright morass, we’ve steered away from the bundled operating system in favor of a methodology that relies upon you to put in place the operating system platform on which to run PBX in a Flash or Incredible PBX. The good news is it’s easy! With many cloud-based providers1, you can simply click a button to choose your favorite OS flavor and within minutes, you’re ready to go. With many virtual machine platforms such as VirtualBox, it’s equally simple to find a pre-built Ubuntu 14.04 image or roll your own.
If you’re new to VoIP or to Nerd Vittles, here’s our best piece of advice. Don’t take our word for anything! Try it for yourself in the Cloud! You can build an Ubuntu 14.04 image on Digital Ocean in under one minute and install Incredible PBX for Ubuntu 14.04 in about 15 minutes. Then try it out for two full months. It won’t cost you a dime. Use our referral link to sign up for an account. Enter a valid credit card to verify you’re who you say you are. Create an Ubuntu 14.04 (not 14.10!) 512MB droplet of the cheapest flavor ($5/mo.). Go to the Billing section of the site, and enter the following promo code: UBUNTUDROPLET. That’s all there is to it. A $10 credit will be added to your account, and you can play to your heart’s content. Delete droplets, add droplets, and enjoy the free ride!
For today, we’ll walk you through building your own stand-alone server using the Ubuntu 14.04 mini.iso. If you’re using Digital Ocean in the Cloud, skip down to Installing Incredible PBX 11. If you’re using your own hardware, to get started, download the 32-bit or 64-bit Ubuntu 14.04 "Trusty Tahr" Minimal ISO from here. Then burn it to a CD/DVD or thumb drive and boot your dedicated server from the image. Remember, you’ll be reformatting the drive in your server so pick a machine you don’t need for other purposes.
For those that would prefer to build your Ubuntu 14.04 Wonder Machine using VirtualBox on any Windows, Mac, or existing Linux Desktop, here are the simple steps. Create a new virtual machine specifying either the 32-bit or 64-bit version of Ubuntu. Allocate 1024MB of RAM (512MB also works fine!) and at least 20GB of disk space using the default hard drive setup in all three steps. In Settings, click System and check Enable I/O APIC and uncheck Hardware Clock in UTC Time. Click Audio and Specify then Enable your sound card. Click Network and Enable Network Adapter for Adapter 1 and choose Bridged Adapter. Finally, in Storage, add the Ubuntu 14.04 mini.iso to your VirtualBox Storage Tree as shown below. Then click OK and start up your new virtual machine. Simple!
Here are the steps to get Ubuntu 14.04 humming on your new server or virtual machine once you’ve booted up. If you can bake cookies from a recipe, you can do this:
UBUNTU mini.iso install:
Choose language
Choose timezone
Detect keyboard
Hostname: incrediblepbx < continue >
Choose mirror for downloads
Confirm archive mirror
Leave proxy blank unless you need it < continue >
** couple minutes of whirring as initial components are loaded **
New user name: incredible < continue >
Account username: incredible < continue >
Account password: makeitsecure
Encrypt home directory < no >
Confirm time zone < yes >
Partition disks: Guided - use entire disk and set up LVM
Confirm disk to partition
Write changes to disks and configure LVM
Whole volume? < continue>
Write changes to disks < yes> < -- last chance to preserve your disk drive!
** about 15 minutes of whirring during base system install ** < no touchy anything>
** another 5 minutes of whirring during base software install ** < no touchy anything>
Upgrades? Install security updates automatically
** another 5 minutes of whirring during more software installs ** < no touchy anything>
Software selection: *Basic Ubuntu server (only!)
** another couple minutes of whirring during software installs ** < no touchy anything>
Grub boot loader: < yes>
UTC for system clock: < no>
Installation complete: < continue> after removing installation media
** on VirtualBox, PowerOff after reboot and remove [-] mini.iso from Storage Tree & restart VM
login as user: incredible
** enter user incredible's password **
sudo passwd
** enter incredible password again and then create secure root user password **
su root
** enter root password **
apt-get update
apt-get install ssh -y
sed -i 's|without-password|yes|' /etc/ssh/sshd_config
sed -i 's|yes"|without-password"|' /etc/ssh/sshd_config
sed -i 's|"quiet"|"quiet text"|' /etc/default/grub
update-grub
ifconfig
** write down the IP address of your server from ifconfig results
reboot
** login via SSH to continue **
Installing Incredible PBX on Your Ubuntu 14.04 Server
Adding Incredible PBX to a running Ubuntu 14.04 server is a walk in the park. To restate the obvious, your server needs a reliable Internet connection to proceed. Using SSH (or Putty on a Windows machine), log into your new server as root at the IP address you deciphered in the ifconfig step at the end of the Ubuntu install procedure above. First, make sure to run the update step for Ubuntu before you begin the install. This is especially important if using a cloud-based Ubuntu 14 server.
apt-get update && apt-get upgrade -y && reboot
WARNING: If you’re using a 512MB droplet at Digital Ocean, be advised that their Ubuntu setup does NOT include a swap file. This may cause serious problems when you run out of RAM. Uncomment ./create-swapfile-DO line below to create a 1GB swap file which will be activated whenever you exceed 90% RAM usage on Digital Ocean.
Now let’s begin the Incredible PBX install. Log back in as root and issue the following commands:
cd /root wget http://incrediblepbx.com/incrediblepbx11.4.ubuntu14.tar.gz tar zxvf incrediblepbx* #./create-swapfile-DO ./Incredible*
Once you have agreed to the license agreement and terms of use, press Enter and go have a 30-minute cup of coffee. The Incredible PBX installer runs unattended so find something to do for a bit unless you just like watching code compile. When you see "Have a nice day", your installation is complete. Write down your admin password for FreePBX as well as your three "knock" ports for PortKnocker. If you forget them, you can reset your admin password by running /root/admin-pw-change. And you can retrieve your PortKnocker setup like this: cat /root/knock.FAQ.
Log out and back in as root and you should be greeted with a status display that looks something like this:
You can access the Asterisk CLI by typing: asterisk -rvvvvvvvvvv
You can access the FreePBX GUI using your favorite web browser to configure your server. Just enter the IP address shown in the status display. The default username is admin with the randomized password you wrote down above. If desired, you can change them in FreePBX Administration by clicking Admin -> Administrators -> admin. Enter a new password and click Submit Changes then Apply Config. Now edit extension 701 so you can figure out (or change) the randomized passwords that were set up for default 701 extension and voicemail: Applications -> Extensions -> 701.
Setting Up a Soft Phone to Use with Incredible PBX
Now you’re ready to set up a telephone so that you can play with Incredible PBX. We recommend YateClient which is free. Download it from here. Run YateClient once you’ve installed it and enter the credentials for the 701 extension on Incredible PBX. You’ll need the IP address of your server plus your extension 701 password. Choose Settings -> Accounts and click the New button. Fill in the blanks using the IP address of your server, 701 for your account name, and whatever password you created for the extension. Click OK.
Once you are registered to extension 701, close the Account window. Then click on YATE’s Telephony Tab and place some test calls to the numerous apps that are preconfigured on Incredible PBX. Dial a few of these to get started:
123 - Reminders
222 - ODBC Demo (use acct: 12345)
947 - Weather by ZIP Code
951 - Yahoo News
*61 - Time of Day
*68 - Wakeup Call
TODAY - Today in History
Now you’re ready to connect to the telephones in the rest of the world. If you live in the U.S., the easiest way (at least for now) is to use an existing (free) Google Voice account. Google has threatened to shut this down but as this is written, it still works with previously set up Google Voice accounts. The more desirable long-term solution is to choose several SIP providers and set up redundant trunks for your incoming and outbound calls. The PIAF Forum includes dozens of recommendations to get you started.
Configuring Google Voice
If you want to use Google Voice, you’ll need a dedicated Google Voice account to support Incredible PBX. If you want to use the inbound fax capabilities of Incredible Fax 11, then you’ll need an additional Google Voice line that can be routed to the FAX custom destination using FreePBX. The more obscure the username (with some embedded numbers), the better off you will be. This will keep folks from bombarding you with unsolicited Gtalk chat messages, and who knows what nefarious scheme will be discovered using Google messaging six months from now. So keep this account a secret!
We’ve tested this extensively using an existing Google Voice account, and inbound calling is just not reliable. The reason seems to be that Google always chooses Gmail chat as the inbound call destination if there are multiple registrations from the same IP address. So, be reasonable. Do it our way! Use a previously configured and dedicated Gmail and Google Voice account, and use it exclusively with Incredible PBX 11.
IMPORTANT: Be sure to enable the Google Chat option as one of your phone destinations in Settings, Voice Setting, Phones. That’s the destination we need for The Incredible PBX to work its magic! Otherwise, all inbound and outbound calls will fail. If you don’t see this option, you’re probably out of luck. Google has disabled the option in newly created accounts as well as some old ones that had Google Chat disabled. Now go back to the Google Voice Settings.
While you’re still in Google Voice Settings, click on the Calls tab. Make sure your settings match these:
- Call Screening – OFF
- Call Presentation – OFF
- Caller ID (In) – Display Caller’s Number
- Caller ID (Out) – Don’t Change Anything
- Do Not Disturb – OFF
- Call Options (Enable Recording) – OFF
- Global Spam Filtering – ON
Click Save Changes once you adjust your settings. Under the Voicemail tab, plug in your email address so you get notified of new voicemails. Down the road, receipt of a Google Voice voicemail will be a big hint that something has come unglued on your PBX.
One final word of caution is in order regardless of your choice of providers: Do NOT use special characters in any provider passwords, or nothing will work!
Now you’re ready to set up your Google Voice trunk in FreePBX. After logging into FreePBX with your browser, click the Connectivity tab and choose Google Voice/Motif. To Add a new Google Voice account, just fill out the form. Do NOT check the third box or incoming calls will never ring!
IMPORTANT LAST STEP: Google Voice will not work unless you restart Asterisk from the Linux command line at this juncture. Using SSH, log into your server as root and issue the following command: amportal restart.
If you have trouble getting Google Voice to work (especially if you have previously used your Google Voice account from a different IP address), try this Google Voice Reset Procedure. It usually fixes connectivity problems. If it still doesn’t work, enable Less Secure Apps using this Google tool.
Troubleshooting Audio and DTMF Problems
You can avoid one-way audio on calls and touchtones that don’t work with these simple settings in FreePBX: Settings -> Asterisk SIP Settings. Just plug in your public IP address and your private IP subnet. Then set ULAW as the only Audio Codec.
Adding Speech Recognition to Incredible PBX
To support many of our applications, Incredible PBX has included Google’s speech recognition service for years. These applications include Weather Reports by City (949), AsteriDex Voice Dialing by Name (411), and Wolfram Alpha for Asterisk (4747), all of which use Lefteris Zafiris’ terrific speech-recog AGI script. Unfortunately (for some), Google now has tightened up the terms of use for their free speech recognition service. Now you can only use it for "personal and development use." If you meet those criteria, keep reading. Here’s how to activate speech recognition on Incredible PBX. Don’t skip any steps!
1. Using an existing Google/Gmail account to join the Chrome-Dev Group.
2. Using the same account, create a new Speech Recognition Project.
3. Click on your newly created project and choose APIs & auth.
4. Turn ON Speech API by clicking on its Status button in the far right margin.
5. Click on Credentials in APIs & auth and choose Create New Key -> Server key. Leave the IP address restriction blank!
6. Write down your new API key or copy it to the clipboard.
7. Log into your server as root and issue the following commands:
# for Ubuntu and Debian platforms apt-get clean apt-get install libjson-perl flac -y # for RedHat and CentOS platforms yum -y install perl-JSON # for all Linux platforms cd /var/lib/asterisk/agi-bin mv speech-recog.agi speech-recog.last.agi wget --no-check-certificate https://raw.githubusercontent.com/zaf/asterisk-speech-recog/master/speech-recog.agi chown asterisk:asterisk speech* chmod 775 speech* nano -w speech-recog.agi
8. When the nano editor opens, go to line 70 of speech-recog.agi: my $key = ""
. Insert your API key from Step #6 above between the quotation marks and save the file: Ctrl-X, Y, then Enter.
Now you’re ready to try out the speech recognition apps. Dial 949 and say the name of a city and state/province/country to get a current weather forecast from Yahoo. Dial 411 and say "American Airlines" to be connected to American.
To use Wolfram Alpha by phone, you first must install it. Obtain your free Wolfram Alpha APP-ID here. Then run the one-click installer: /root/wolfram/wolframalpha-oneclick.sh. Insert your APP-ID when prompted. Now dial 4747 to access Wolfram Alpha by phone and enter your query, e.g. "What planes are overhead." Read the Nerd Vittles tutorial for additional examples and tips.
A Few Words about the Incredible PBX Security Model for Ubuntu
Incredible PBX for Ubuntu 14 is our most secure turnkey PBX implementation, ever. As configured, it is protected by both Fail2Ban and a hardened configuration of the IPtables Linux firewall. As configured, nobody can access your PBX without your credentials AND
an IP address that is either on your private network or that matches the IP address of your server or the PC from which you installed Incredible PBX. Incredible PBX is preconfigured to let you connect to many of the leading SIP hosting providers without additional firewall tweaking.
You can whitelist additional IP addresses for remote access in several ways. First, you can use the command-line utilities: /root/add-ip and /root/add-fqdn. You can also remove whitelisted IP addresses by running /root/del-acct. Second, you can dial into extension 864 (or use a DID pointed to extension 864 aka TM4) and enter an IP address to whitelist. Before Travelin’ Man 4 will work, you’ll need to add credentials for each caller using the tools in /root/tm4. You must add at least one account before dial-in whitelisting will be enabled. Third, you can temporarily whitelist an IP address by successfully executing the PortKnocker 3-knock code established for your server. You’ll find the details and the codes in /root/knock.FAQ. Be advised that IP addresses whitelisted with PortKnocker (only!) go away whenever your server is rebooted or the IPtables firewall is restarted. For further information on the PortKnocker technology and available clients for iOS and Android devices, review the Nerd Vittles tutorial.
HINT: The reason that storing your PortKnocker codes in a safe place is essential is because it may be your only available way to gain access to your server if your IP address changes. You obviously can’t use the command-line tools to whitelist a new IP address if you cannot gain access to your server at the new IP address.
We always recommend you also add an extra layer of protection by running your server behind a hardware-based firewall with no Internet port exposure, but that’s your call. If you use a hardware-based firewall, be sure to map the three PortKnocker ports to the internal IP address of your server!
The NeoRouter VPN client also is included for rock-solid, secure connectivity for remote users. Read our previous tutorial for setup instructions.
As one would expect, the IPtables firewall is a complex piece of software. If you need assistance configuring it, visit the PIAF Forum for some friendly assistance.
Adding Incredible Fax 11 to Your Server
Once you’ve completed the Incredible PBX install, log out and log back in to load the latest automatic updates. Then reboot. Now you’re ready to continue your adventure by installing Incredible Fax 11 for Ubuntu. Special thanks to Josh North for all his hard work on this! The latest download includes the Incredible Fax 11 installer. So just run the script:
cd /root ./incrediblefax11_ubuntu14.sh
Accept all of the defaults during the installation process. IMPORTANT: Once you complete the install, reboot your server. After rebooting, log into FreePBX -> Module Admin and enable the AvantFax module. When you log out of FreePBX, there now will be an option for AvantFax on the FreePBX login screen. Choose it and enter admin:password to login and change your default password. You also can set your AvantFax admin password by logging into the Linux CLI and… /root/avantfax-pw-change.
Incredible Backup and Restore
We’re pleased to introduce our latest backup and restore utilities for Incredible PBX. Running /root/incrediblebackup will create a backup image of your server in /tmp. This backup image then can be copied to any other medium desired for storage. To restore it to another Incredible PBX 11 server, simply copy the image to a server running Asterisk 11 and FreePBX 2.11 and run /root/incrediblerestore. Doesn’t get much simpler than that.
NEWS FLASH: More good news. If you decide you’d prefer another Linux platform, Incredible Backup and Restore will now let you migrate from one operating system to another. For details on the procedure, see this message thread.
Incredible PBX Automatic Update Utility
Every time you log into your server as root, Incredible PBX will ping the IncrediblePBX.com web site to determine whether one or more updates are available to bring your server up to current specs. We recommend you log in at least once a week just in case some new security vulnerability should come along.
In the meantime, we encourage you to sign up for an account on the PIAF Forum and join the discussion. In addition to providing first-class, free support, we think you’ll enjoy the camaraderie. Come join us!
Originally published: Monday, June 30, 2014 Updated: Wednesday, January 7, 2015
Support Issues. With any application as sophisticated as this one, you’re bound to have questions. Blog comments are a terrible place to handle support issues although we welcome general comments about our articles and software. If you have particular support issues, we encourage you to get actively involved in the PBX in a Flash Forums. It’s the best Asterisk tech support site in the business, and it’s all free! Please have a look and post your support questions there. Unlike some forums, ours is extremely friendly and is supported by literally hundreds of Asterisk gurus and thousands of users just like you. You won’t have to wait long for an answer to your question.
Need help with Asterisk? Visit the PBX in a Flash Forum.
Special Thanks to Our Generous Sponsors
FULL DISCLOSURE: ClearlyIP, Skyetel, Vitelity, DigitalOcean, Vultr, VoIP.ms, 3CX, Sangoma, TelecomsXchange and VitalPBX have provided financial support to Nerd Vittles and our open source projects through advertising, referral revenue, and/or merchandise. As an Amazon Associate and Best Buy Affiliate, we also earn from qualifying purchases. We’ve chosen these providers not the other way around. Our decisions are based upon their corporate reputation and the quality of their offerings and pricing. Our recommendations regarding technology are reached without regard to financial compensation except in situations in which comparable products at comparable pricing are available from multiple sources. In this limited case, we support our sponsors because our sponsors support us.
BOGO Bonaza: Enjoy state-of-the-art VoIP service with a $10 credit and half-price SIP service on up to $500 of Skyetel trunking with free number porting when you fund your Skyetel account. No limits on number of simultaneous calls. Quadruple data center redundancy. $25 monthly minimum spend required. Tutorial and sign up details are here.
The lynchpin of Incredible PBX 2020 and beyond is ClearlyIP components which bring management of FreePBX modules and SIP phone integration to a level never before available with any other Asterisk distribution. And now you can configure and reconfigure your new Incredible PBX phones from the convenience of the Incredible PBX GUI.
VitalPBX is perhaps the fastest-growing PBX offering based upon Asterisk with an installed presence in more than 100 countries worldwide. VitalPBX has generously provided a customized White Label version of Incredible PBX tailored for use with all Incredible PBX and VitalPBX custom applications. Follow this link for a free test drive!
Special Thanks to Vitelity. Vitelity is now Voyant Communications and has halted new registrations for the time being. Our special thanks to Vitelity for their unwavering financial support over many years and to the many Nerd Vittles readers who continue to enjoy the benefits of their service offerings. We will keep everyone posted on further developments.
Some Recent Nerd Vittles Articles of Interest…
- With some providers including ones linked in this article, Nerd Vittles receives referral fees which assist in keeping the Nerd Vittles lights burning brightly. [↩]
Lessons Learned: Getting Started in the Billion Dollar VoIP Business
So you’ve built a few VoIP PBXs for your neighbors and your friends’ small businesses. And now you want to make a living doing it full time. After all, it wasn’t that hard to get started since all of the VoIP software was practically free, and the hardware investment was only a few hundred bucks. But now your friends need a way to make reliable phone calls every day, and they want someone to call when the phones don’t work. Welcome to the VoIP Business! Our objective today is to paint you a picture of what actually lies ahead in the Asterisk® and FreePBX® business so that you don’t get blindsided.
Lesson #1. Asterisk is a business run by Digium to make money for the corporation. FreePBX is a business run by Schmooze Com to make money for the corporation. Both companies do this in several ways. They sell hardware. They sell commercial software. They sell hosted phone service. They sell phone trunks to make and receive phone calls. And they sell support. The lifeblood of these companies is paying customers, lots of them. There’s nothing necessarily sinister about any of this. It’s the way all corporations work.
Lesson #2. You can’t do it all. You may be a super salesman, a talented programmer, or a great customer service guy. But you’re probably not all three. And, if you have a family, the rest of them probably don’t want the phones ringing off the hook starting at dinner time until 2 a.m. every morning. There’s a reason corporations charge a pretty penny for support. Somebody has to be there during dinner time and at 2 a.m. to answer the phone calls and solve the problems.
Lesson #3. Your friends are cheap frugal. They’d prefer to pay nothing for their phone system, and they’d prefer to pay nothing when they need to call you to fix it. You’re a nice guy so you don’t want to leave your friends in the lurch when you decide to take that Christmas ski trip. What to do? Hire an outside company to provide your support. Heh! Keep reading.
Lesson #4. The stark reality at the corporate end of the VoIP business is RECURRING REVENUE. They can’t stay afloat just selling hardware and software. Once folks have bought it, the company either needs new paying customers or a way to keep existing customers paying to keep the lights on. There are three options: hosted phone service, phone trunks, and support.
If you’ve done your homework, you know that you can buy incoming phone lines for your PBXs at a monthly cost of a few bucks. Or you can stick with Ma Bell for incoming trunks and up the monthly cost by a factor of ten in exchange for reliability and support. Outgoing phone calls can be made for a penny or two a minute to all but the most exotic and remote areas of the world. Or you can use trunks provided by Ma Bell or Comcast or Time Warner for ten times the monthly cost. Then there are the so-called unlimited trunks from companies such as Digium and Schmooze Com. For $20+ to $25+ per month, you get the ability to make or receive several thousand minutes of calls each month so long as the calls arrive one at a time. If you want to make or receive multiple calls simultaneously, multiply the cost for each simultaneous call by twenty to twenty-five bucks depending upon your provider choice. All of a sudden, Ma Bell isn’t looking that expensive, is she?
Lesson #5. When you’ve grown your user base to the point that you don’t want to lose your customers, be careful in choosing a company to provide your support. If they happen to be in the same business as you (and they probably are), ask yourself this question. Would you send your girlfriend alone on a two-week cruise with any of your male buddies? Didn’t think so. Reread Lesson #1.
To be continued… Happy New Year!!
Originally published: Monday, December 29, 2014
Need help with Asterisk? Visit the PBX in a Flash Forum.
Special Thanks to Our Generous Sponsors
FULL DISCLOSURE: ClearlyIP, Skyetel, Vitelity, DigitalOcean, Vultr, VoIP.ms, 3CX, Sangoma, TelecomsXchange and VitalPBX have provided financial support to Nerd Vittles and our open source projects through advertising, referral revenue, and/or merchandise. As an Amazon Associate and Best Buy Affiliate, we also earn from qualifying purchases. We’ve chosen these providers not the other way around. Our decisions are based upon their corporate reputation and the quality of their offerings and pricing. Our recommendations regarding technology are reached without regard to financial compensation except in situations in which comparable products at comparable pricing are available from multiple sources. In this limited case, we support our sponsors because our sponsors support us.
BOGO Bonaza: Enjoy state-of-the-art VoIP service with a $10 credit and half-price SIP service on up to $500 of Skyetel trunking with free number porting when you fund your Skyetel account. No limits on number of simultaneous calls. Quadruple data center redundancy. $25 monthly minimum spend required. Tutorial and sign up details are here.
The lynchpin of Incredible PBX 2020 and beyond is ClearlyIP components which bring management of FreePBX modules and SIP phone integration to a level never before available with any other Asterisk distribution. And now you can configure and reconfigure your new Incredible PBX phones from the convenience of the Incredible PBX GUI.
VitalPBX is perhaps the fastest-growing PBX offering based upon Asterisk with an installed presence in more than 100 countries worldwide. VitalPBX has generously provided a customized White Label version of Incredible PBX tailored for use with all Incredible PBX and VitalPBX custom applications. Follow this link for a free test drive!
Special Thanks to Vitelity. Vitelity is now Voyant Communications and has halted new registrations for the time being. Our special thanks to Vitelity for their unwavering financial support over many years and to the many Nerd Vittles readers who continue to enjoy the benefits of their service offerings. We will keep everyone posted on further developments.
Some Recent Nerd Vittles Articles of Interest…
Santa’s Technology Roundup: The Best Products of 2014 with Some Surprises
Once a year we like to pause and take a look back at 10 technology products that really grabbed our attention. 2014 will be remembered as a spectacular year. So here’s what made the Nerd Vittles short list for 2014…
Smartphone of the Year: It’s a 5-Way Tie
And the winners in no particular order… Galaxy Note 4, iPhone 6+, LG G3, HTC One M8, and Moto X.1 So which should you choose if you can only have one? Visit AndroidHeadlines.com for a detailed feature comparison. You can’t go wrong with any of them. In our family, there’s one of almost all of them.
Desktop Computer of the Year: Apple’s 27‑inch iMac with Retina 5K display
If you work with a computer for a living, there is no competition. It scales to any feature set you may need. Run, don’t walk, to your nearest Apple Store and get in line. We waited two months for ours!
Portable Computer of the Year: Apple’s MacBook Air with Retina Display
Hah. Just kidding. It would have been the hands-down favorite in 2014 except for one minor detail. It hasn’t been released… yet. If you absolutely have to have a retina display-quality notebook, then you’ll have to settle for the slightly thicker Macbook Pro this Christmas. For us, we’re waiting for 2015 and what will surely be the MacBook Air with Retina Display.
Tablet of the Year: iPad Air 2
If you’re starting to think we’re charter members of the Apple FanBoy Club, then you haven’t been following Nerd Vittles for very long. We can be one of their harshest critics. But the bottom line is that Apple products are compelling because of their tight integration to Apple’s closed society. If you’re a member of that club, then you’ll want the iPad Air 2 to add to your collection. It’s a terrific tablet at a compelling price.
Multimedia Device of the Year: Roku 3
If you’re into Netflix and Amazon Prime and movies, nobody needs to tell you that the streaming device hardware market is a crowded place. The Roku 3 isn’t the cheapest device in the market, but it’s still the one we always drop into our suitcase when we hit the road. It’s simple to configure and supports WiFi almost anywhere. It just works!
VoIP Product of the Year: Vitelity’s vMobile
It’s taken a few starts and stops to get the kinks out, but Vitelity’s vMobile smartphone is a truly revolutionary offering. It provides seamless integration of the smartphone into your PBX infrastructure. The phone becomes "just another extension" on your PBX except the device is 100% mobile which means it works with WiFi or it works anywhere Sprint has a tower. For any organization with staff that travels, this is a must-have device. Anything you can do with a traditional PBX extension, you can do with your smartphone using the vMobile technology. It’s the hands-down winner as VoIP Product of the Year. Use our special signup link and help support the Nerd Vittles, PBX in a Flash, and Incredible PBX projects.
VoIP SOHO Hardware of the Year: CuBox-i
We’ve tested lots of small footprint hardware in search of the perfect VOIP platform for the home or SOHO office. The search is over. The hands-down winner is the CuBox-i. It’s tiny, powerful, quiet, and has every feature you could possibly want in a VoIP server. Read our full review here. They’re 25% at NewEgg if you hurry.
VoIP Deal of the Year: $15 Pogoplug with Incredible PBX
If there’s one thing all of us have in common, it’s a burning desire to find the best bargain on the planet. In the VoIP marketplace, look no further than here. Repurposing a PogoPlug for less than $20 (and some of them went for $5), is the perfect way to learn about VoIP without breaking the bank. Our tutorial on the VoIP Deal of the Year will tell you everything you need to know to get started.
Must-Have Product of the Year: Amazon Echo
The Amazon Echo is still an invitation-only device, but you need to get in line NOW. During the introduction, Amazon is selling them for $99. Or you can get one on eBay for about triple that amount. It’s money well spent. Think of it as a desktop version of Siri. But it’s so much more. With Amazon Prime and Prime Music accounts plus a free iHeartRadio account, you get access to a collection of over a million songs just by saying the name of the artist or song or playlist or radio station of interest. You also can upload 250 of your own songs not purchased through Amazon Music at no charge. Or, for $25 a year, you can upload up to 250,000 tracks much like iTunes Match. The sound quality of the device is nothing short of spectacular. My teenage daughter and I spent over two hours playing with it the first night it arrived. And the excitement hasn’t waned. It’s the go-to device for all of our visitors to explore new and old music. And, yes, Amazon Echo knows the weather, the time, and just about anything else you care to ask about. You’ll have it in your living room in no time. Not only will it speak the results while playing your favorite song, it’ll send the results and to-do list to your smartphone.
2014: Cloud Computing Reinvented
Over the past few years, we’ve seen a gradual migration of server platforms to the cloud thanks in large part to ever falling prices on the Amazon EC2 platform. But 2014 saw some new cloud strategies. First came the pay-once-use-it-forever platform of CloudAtCost.com. Wait for the next sale and save half on almost any of their server platforms. If you follow us on Twitter, we’ll let you know when it happens. We’ve had several servers for almost a year with no hiccups. In fact, we now keep backup images of the Nerd Vittles, PBX in a Flash, and Incredible PBX web sites running 24/7 on these Canadian servers. Check out the performance for yourself.
Then there was Digital Ocean with its pay-by-the-hour pricing coupled with the ability to create virtual machines for almost any platform in under a minute. It truly is a developer’s dream come true. Frankly, it’s our platform of choice for development of all the great software you read about here. Use our signup link and get a $10 credit to try things out. The beauty of the technology is you can create a server with 512MB of RAM and a 20GB drive, work for a half a day, take a snapshot of your project, and then delete the server until you feel like working again. Total cost for use of the platform and storage of your snapshot: about 2¢.
With any great new technology, of course, competition is not far behind. Meet Vultr, the Digital Ocean knock-off promising more memory, more server locations, and more features for less money. Is Vultr really better? We’ll let you know after we’ve had more time to play. Our first look uncovered a few wrinkles. First, you had to request enabling of port 25 for outbound SMTP mail support. Not a big deal if it were documented that you had to request it, but it isn’t mentioned anywhere on the site. Second, virtual machines take a bit longer to create and much longer to become fully functional on Vultr. We got spoiled by the one-minute spin up at Digital Ocean. But, the good news is a penny-an-hour server gets you a gig of RAM, 20 gigs of storage, and 2 terabytes of data transfer a month for $7. And it is fast! So stay tuned for a full review and…
Merry Christmas!
Originally published: Monday, December 22, 2014
Need help with Asterisk? Visit the PBX in a Flash Forum.
Special Thanks to Our Generous Sponsors
FULL DISCLOSURE: ClearlyIP, Skyetel, Vitelity, DigitalOcean, Vultr, VoIP.ms, 3CX, Sangoma, TelecomsXchange and VitalPBX have provided financial support to Nerd Vittles and our open source projects through advertising, referral revenue, and/or merchandise. As an Amazon Associate and Best Buy Affiliate, we also earn from qualifying purchases. We’ve chosen these providers not the other way around. Our decisions are based upon their corporate reputation and the quality of their offerings and pricing. Our recommendations regarding technology are reached without regard to financial compensation except in situations in which comparable products at comparable pricing are available from multiple sources. In this limited case, we support our sponsors because our sponsors support us.
BOGO Bonaza: Enjoy state-of-the-art VoIP service with a $10 credit and half-price SIP service on up to $500 of Skyetel trunking with free number porting when you fund your Skyetel account. No limits on number of simultaneous calls. Quadruple data center redundancy. $25 monthly minimum spend required. Tutorial and sign up details are here.
The lynchpin of Incredible PBX 2020 and beyond is ClearlyIP components which bring management of FreePBX modules and SIP phone integration to a level never before available with any other Asterisk distribution. And now you can configure and reconfigure your new Incredible PBX phones from the convenience of the Incredible PBX GUI.
VitalPBX is perhaps the fastest-growing PBX offering based upon Asterisk with an installed presence in more than 100 countries worldwide. VitalPBX has generously provided a customized White Label version of Incredible PBX tailored for use with all Incredible PBX and VitalPBX custom applications. Follow this link for a free test drive!
Special Thanks to Vitelity. Vitelity is now Voyant Communications and has halted new registrations for the time being. Our special thanks to Vitelity for their unwavering financial support over many years and to the many Nerd Vittles readers who continue to enjoy the benefits of their service offerings. We will keep everyone posted on further developments.
Some Recent Nerd Vittles Articles of Interest…
- Some of our purchase links refer users to Amazon and other sites when we find their prices are competitive for the recommended products. Nerd Vittles receives a small referral fee from merchants to help cover the costs of our blog. We never recommend particular products solely to generate commissions. However, when pricing is comparable or availability is favorable, we support Amazon and other merchants because they support us. [↩]
Incredible PBX on Steroids: The Asterisk-GUI Project Rolls On (Chapter 3)
We’re big fans of the new hybrid vehicles especially the Cadillac ELR. It combines an electric motor with a gas generator to give you the best of both worlds. For in-town driving, you get terrific performance at 1.5¢/mile using pure electric power. But you’re not hamstrung from venturing out to anywhere you choose using a traditional gas engine that can be refueled quickly at any time. In a nutshell, that’s the design philosophy that’s inspired development of Incredible PBX for the Asterisk-GUI.
This is the third installment in our series. You can catch up with the Overview as well as Chapter 1 and Chapter 2 here.
With Incredible PBX for the Asterisk-GUI, you get a terrific GUI to manage Asterisk® while taking advantage of all the neat features that Incredible PBX brings to the table using traditional dialplan design. Stated another way, you’re not being forced to always use a GUI to manage your Asterisk server when command-line utilities are more functional or efficient. Previous approaches to GUI-only management of Asterisk forced you to always jump through the GUI hoops to do much of anything. Unfortunately, what you lost in that scenario was a lot of the native functionality of Asterisk.
That’s not to say there wasn’t a lot to like about our GUI heritage with Asterisk. These open source projects brought a wealth of features to the table for beginners without having to learn much about the way Asterisk actually worked. The downside was you didn’t learn much about the way Asterisk actually worked. On the one hand, it kept folks from making serious programming errors that could result in major phone bills when security issues crept into a dialplan. The drawback was you never learned why. When something came unglued and things do come unglued, you were up the proverbial creek without a paddle. In fact, many never knew they had a paddle much less what it looked like.
I wish I had a nickel for every user that’s complained over the years that Asterisk won’t start. The last time we checked Google was showing 963,000 of them. It turns out that many of these weren’t failures with Asterisk at all but rather shortcomings in the interaction of one particular graphical user interface with MySQL. If you don’t believe it, shut down MySQL on your existing Asterisk server and then try to restart Asterisk. You’ll never see this with Incredible PBX for Asterisk-GUI. Why? Because the reliability of Asterisk isn’t tied to the reliability of MySQL, Apache, Perl, Asterisk-GUI, or any other foreign application.
**** WARNING: ERROR IN CONFIGURATION **** astrundir in '/etc/asterisk' is set to but the directory does not exists. Attempting to create it with: 'mkdir -p ' mkdir: missing operand Try 'mkdir --help' for more information. **** ERROR: COULD NOT CREATE **** Attempt to execute 'mkdir -p ' failed with an exit code of 1 You must create this directory and the try again.
In the new Incredible PBX design, we haven’t forgotten about security either. In this day and age, it’s the single most important feature of any PBX that is connected to the Internet. We always recommend running your server behind a hardware-based firewall with no Internet port exposure, but we appreciate that’s not always possible particularly with Cloud-based servers. Incredible PBX is delivered with the Linux IPtables firewall preconfigured. It allows access from your server’s IP address, from the IP address used to install Incredible PBX, from private IP addresses on your local area network, and from a very limited set of trusted providers so that you can connect your trunks to make and receive phone calls. The tools to add and delete whitelist entries on your firewall are also included. In addition, we’ve included the PortKnocker utility which lets remote users with the three port knock codes gain access until their IP addresses can be whitelisted by an administrator. In addition to IPtables security, there’s another layer of protection for web-based applications. Asterisk-GUI, of course, has its own security system that’s tied to the Asterisk manager.conf setup. All of the remaining web applications require Apache authentication. For Reminders and AsteriDex, you can create multiple Apache passwords for individual users or groups of users. For administrator applications, you set an admin password that’s only known by administrators.
We couldn’t help chuckling recently when one of the security sites found a vulnerability in one of the Incredible PBX applications but noted that administrator access was required to get to the application to launch the attack. That’s akin to saying your system is vulnerable if you hand out your root user credentials AND whitelist the IP addresses of the bad guys. Literally, what was documented was true, but finding security issues in software that requires root permissions for access is getting a little desperate, wouldn’t you say? Of course, one of our "competitors" wasted little time splashing it all over their web site. The vulnerability was fixed the same day it was disclosed, by the way. And it was automatically pushed out to every Incredible PBX server, all of which run industry-standard Linux operating systems. That’s the approach to system design and support our users have come to expect. Feel free to compare it to the offerings you’ll find elsewhere, commercial or otherwise. That, my friends, is what freedom of choice is all about.
The Lean, Mean (Pure) Asterisk Machine
The roadmap for the future direction of Incredible PBX continues to evolve, but let us take a moment and share our current thinking. We’ve previously mentioned that the target audience for Incredible PBX for Asterisk-GUI is hobbyists. That’s not a dirty word in our book. Nor does it mean the platform won’t be as robust and reliable as previous releases of Incredible PBX. It just has a smaller memory footprint and much faster performance. Yes, we’re using Asterisk-GUI which Digium no longer supports. But that was a marketing decision that had nothing to do with the quality of the product. It was written by some of the best brains in the Asterisk business so we’re comfortable using it as a platform. We’ve found only two bugs in beating on the software relentlessly. Outbound Caller ID on a per extension basis can be quirky. Trunk-based CallerID whether assigned at the provider end or on Incredible PBX works just fine including CallerID spoofing where permitted by the provider. The other wrinkle was Asterisk-GUI’s failure to support the [context](+) feature of Asterisk. We’ve found an easy workaround for that one as well. We just won’t use it.
The plan is to roll this out first on the CentOS 6.5 (now 6.6) platform because we view it as the most stable. Scientific Linux 6.6 works equally well. Once we get any kinks out of the code, we’ll turn our attention to Ubuntu 14 and then on to the small hardware: Raspberry Pi, BeagleBone Black, CuBox, and PogoPlug. There’s also been interest in a more internationally-friendly version, and that’s on the drawing board as well. During the rollout, we hope to complete work on moving a few MySQL-based utilities to SQLite3. We will leave MySQL in the installation mix but will turn it off to further reduce the memory overhead of the install. We also will scale back the number of simultaneous Apache sessions running since the purpose of Apache is primarily to support administrator utilities on the server. Actually, you can run Asterisk-GUI using either the native Asterisk http server or with Apache. Thanks to Bill Simon of Simon Telephonics, you’ll have both options. With simple modifications, we think we can improve the performance on memory-constrained platforms dramatically while providing a robust, high performance platform if you have the hardware to support it. We’ve also initiated discussions with Amazon to roll out a phone service using this platform for the new Amazon Echo product. So 2015 is shaping up to be another banner year in the VoIP world. We hope you’ll come join us.
This week we continue the march. We want to review some of the open source features being incorporated into Incredible PBX from the open source code base minus some of the superfluous GUI modules. For example, you can manage blacklisting of callers using nothing more than your telephone. The same is true for SMS messaging. If you can dictate an SMS message, then why type it? Bash scripts are a well-tested feature of Incredible PBX, and you’ll still find a healthy collection of them in the /root folder of your server after you complete the install. But today’s focus is what can be accomplished with Incredible PBX using nothing more than your telephone.
Blacklisting Callers with Incredible PBX
One of our old PBX favorites dating back to the Asterisk@Home days was blacklisting. This means that old girlfriends and telemarketers get routed to Zapateller with a message that your number is not in service. By default, Incredible PBX for Asterisk-GUI will automatically blacklist incoming calls without a CallerID number. You can modify this behavior if desired:
asterisk -rx "database del blacklist blocked"
If you change your mind and want to turn anonymous call blocking back on, use this command:
asterisk -rx "database put blacklist blocked 1"
We’ve retained the same feature codes to manage blacklisting of specific numbers from any phone on your system:
- *30 – Add a number to Blacklist
- *31 – Remove number from Blacklist
- *32 – Blacklist last number that called
Blacklisting was all smoke and mirrors in the old GUI days. But we want you to understand how this actually works so that you can change it if you’d like. For example, instead of the Zapateller tone, you might prefer to route callers on your blacklist to Lenny (53669 on your phone) so that you waste some of the caller’s time instead of the other way around.
In the extensions_additional.conf file, find the [app-blacklist-check] context. The last four lines in that context look like this:
;exten => s,n,Goto(DLPN_DialPlanMain,53669,1) exten => s,n,Zapateller() exten => s,n,Playback(ss-noservice) exten => s,n,Hangup
To route blacklisted callers to Lenny, just uncomment the top line shown and add semicolons to the next two lines:
exten => s,n,Goto(DLPN_DialPlanMain,53669,1) ;exten => s,n,Zapateller() ;exten => s,n,Playback(ss-noservice) exten => s,n,Hangup
Wasn’t that easy? Now just save your changes and reload your dialplan: asterisk -rx "dialplan reload"
You may prefer to manually add numbers to your blacklist. You can do this from the Linux command prompt like this. Don’t forget the 1.
asterisk -rx "database put blacklist 8005551212 1"
From the Asterisk CLI (asterisk -rvvvvvvvvvv), do it like this:
database put blacklist 8005551212 1
To display all of your blacklist entries, try this:
database show blacklist
To remove an entry from the blacklist, use this syntax:
database del blacklist 8005551212
MP3 Voicemail Messaging for Cellphone Playback
One of the most requested features on our forums has been the ability to forward voicemails in MP3 format so that they play back correctly on cellphones and desktop mail clients. As with many of the Incredible PBX features, we wouldn’t know where to start to thank all of the folks that helped make this happen. You can review the thread on the PIAF Forum for background. This is yet another great example of how the open source community should work. Thanks to everyone that participated in bringing this development to fruition. On the new Incredible PBX for Asterisk-GUI platform it’s automatic. All you have to do is assign an email address to any voice mailbox on your server in the Users setup, and incoming voicemail messages will be delivered by email in the proper format for playback. The message thread explains how for those with an interest.
Accessing Voicemail Messages with Incredible PBX
Speaking of voicemail, we’ve tried to maintain the same feature codes that many have become accustomed to over the years. Here’s a recap of the codes in case you ever forget:
- *98 – Check Voicemail Messages from Any Phone
- *extension – Leave a Voicemail for Dialed Extension
- * after voicemail connect – Access Voicemail Retrieval
Migrating the Google Speech Feature Set to Incredible PBX for Asterisk-GUI
We previously mentioned that Google Voice wasn’t around when Asterisk-GUI was developed. Not to worry. We’ve added it. And that’s just the beginning. All of the Google features that have made Incredible PBX so popular will be included in the Asterisk-GUI edition. That includes text-to-speech and speech recognition thanks to Lefteris Zafiris. It also includes SMS messaging with your same Google Voice credentials. Pick up a phone and dial S-M-S to dictate and send an SMS message to any recipient in the U.S. or Canada. Pick up a phone and dial 949 to listen to a weather forecast for any major city in the world. Just say the name of the city and state or country. Pick up a phone and dial 951 to listen to the latest News Headlines. Or dial T-O-D-A-Y to listen to Today in History. Sign up for a free Wolfram Alpha key, dial 4747, and you’ve got a voice-enabled encyclopedia at your fingertips. Eat your heart out, Siri. Our extra special thanks to Google for still supporting the open source community. Did we mention… It’s all still free.
Google has changed the rules a bit on using their speech recognition engine. So you now need an API Key to use the Speech Recognition AGI script for Asterisk. Assuming you’ll be using the functionality for “personal and development use,” here’s how to obtain your API key:
1. IMPORTANT FIRST STEP: Use an existing Google/Gmail account to join the Chrome-Dev Group.
2. Using the same account, create a new Speech Recognition Project.
3. Click on your newly created project and choose APIs & auth.
4. Turn ON Speech API by clicking on its Status button in the far right margin.
5. Click on Credentials in APIs & auth and choose Create New Key -> Server key. Leave the IP address restriction blank!
6. Write down your new API key or copy it to the clipboard.
7. Once you’ve installed Incredible PBX, log into your server as root and edit speech-recog.agi in /var/lib/asterisk/agi-bin.
8. Go to line 70 of speech-recog.agi: my $key = ""
. Insert your API key from Step #6 above between the quotation marks and save the file: Ctrl-X, Y, then Enter.
This will activate all of the Speech Recognition applications in Incredible PBX as described above.
Activating Wolfram Alpha with Speech Recognition in Incredible PBX
If you’re not familiar with Wolfram Alpha, it’s an encyclopedia and almanac on steroids. It’s driven by a supercomputer. There’s not much it doesn’t know. We’ve written an exhaustive article on Wolfram Alpha for Asterisk so start there. With Incredible PBX, everything is preconfigured for you. All you need to do is obtain a (free) API key.
To get started, sign up for a free Wolfram Alpha API account. Just provide your email address and set up a password. It takes less than a minute. Log into your account and click on Get An App ID. Make up a name for your application and write down (and keep secret) your APP-ID code. That’s all there is to getting set up with Wolfram Alpha. If you want to explore costs for commercial use, there are links to let you get more information.
Now you’ll need to insert your API key into /var/lib/asterisk/agi-bin/4747. The first line of the file looks like this: APPID="Wolfram-Alpha-API-Key-Goes-Here"
. Insert your API key between the quotation marks and save the file: Ctrl-X, Y, then Enter.
You’re ready to try out Wolfram Alpha by dialing 4-7-4-7 from any phone connected to your server. Here are some sample queries to get you started:
Weather in Charleston South Carolina
Weather forecast for Washington D.C.
Next solar eclipse
Otis Redding
Define politician
Who won the 1969 Superbowl? (Broadway Joe)
What planes are overhead? (flying over your server’s location)
Ham and cheese sandwich (nutritional information)
Holidays 2015 (summary of all holidays for 2015 with dates and DOW)
Medical University of South Carolina (history of MUSC)
Star Trek (show history, air dates, number of episodes, and more)
Apollo 11 (everything you ever wanted to know)
Cheapest Toaster (brand and price)
Battle of Gettysburg (sad day 🙂 )
Daylight Savings Time 2015 Charleston South Carolina (date ranges and how to set your clocks)
iPads by Apple (pricing, models, and specs from Best Buy)
Doughnut (you don’t wanna know)
Snickers bar (ditto)
Weather (local weather at your server’s location)
Yahoo! Weather by ZIP Code Is Moving to SQLite 3
One of the more popular features of Incredible PBX has always been the ability to retrieve a Yahoo weather forecast by dialing Z-I-P and plugging in a 5-digit ZIP code for the weather report you wished to hear. This always required a MySQL zip code database to translate the zip code into a city and state for presentation to the various weather services. As part of our move to reduce the memory footprint of Incredible PBX, we are gradually removing our dependence on MySQL. In its place we’re deploying SQLite3 databases, and Weather by ZIP Code was our first successful migration. Moving the MySQL zip code database to SQLite was a snap using a terrific open source script that we highly recommend to developers. It lets you convert any MySQL database (with indexes) to SQLite 3 in seconds. Here’s the link if you ever have the need. About 5 lines of PHP code had to be modified to complete the migration from MySQL to SQLite. Not bad. For our purposes, you’ll never know the difference when you dial in for your next weather forecast.
Originally published: Monday, December 15, 2014
Need help with Asterisk? Visit the PBX in a Flash Forum.
Special Thanks to Our Generous Sponsors
FULL DISCLOSURE: ClearlyIP, Skyetel, Vitelity, DigitalOcean, Vultr, VoIP.ms, 3CX, Sangoma, TelecomsXchange and VitalPBX have provided financial support to Nerd Vittles and our open source projects through advertising, referral revenue, and/or merchandise. As an Amazon Associate and Best Buy Affiliate, we also earn from qualifying purchases. We’ve chosen these providers not the other way around. Our decisions are based upon their corporate reputation and the quality of their offerings and pricing. Our recommendations regarding technology are reached without regard to financial compensation except in situations in which comparable products at comparable pricing are available from multiple sources. In this limited case, we support our sponsors because our sponsors support us.
BOGO Bonaza: Enjoy state-of-the-art VoIP service with a $10 credit and half-price SIP service on up to $500 of Skyetel trunking with free number porting when you fund your Skyetel account. No limits on number of simultaneous calls. Quadruple data center redundancy. $25 monthly minimum spend required. Tutorial and sign up details are here.
The lynchpin of Incredible PBX 2020 and beyond is ClearlyIP components which bring management of FreePBX modules and SIP phone integration to a level never before available with any other Asterisk distribution. And now you can configure and reconfigure your new Incredible PBX phones from the convenience of the Incredible PBX GUI.
VitalPBX is perhaps the fastest-growing PBX offering based upon Asterisk with an installed presence in more than 100 countries worldwide. VitalPBX has generously provided a customized White Label version of Incredible PBX tailored for use with all Incredible PBX and VitalPBX custom applications. Follow this link for a free test drive!
Special Thanks to Vitelity. Vitelity is now Voyant Communications and has halted new registrations for the time being. Our special thanks to Vitelity for their unwavering financial support over many years and to the many Nerd Vittles readers who continue to enjoy the benefits of their service offerings. We will keep everyone posted on further developments.
Some Recent Nerd Vittles Articles of Interest…
Incredible PBX on Steroids: The Asterisk-GUI Dial Plan Basics (Chapter 2)
We’re making steady progress on the Incredible PBX for Asterisk-GUI project. If you didn’t read last week’s introductory article, start there. This week we’ve had to wrestle with one of the stark realities of taking someone else’s turnkey code and attempting to bolt on enhancements. As previously noted, Asterisk-GUI works all of its magic by manipulating Asterisk® config files directly with no outside storage of settings in either MySQL or the Asterisk DB. This is a good thing… at least until you try to add new features while leaving the basic Asterisk-GUI code intact. That was one of our primary objectives.
This is the second installment in our series. You can catch up with the Overview as well as Chapter 1 and Chapter 3 here.
Simplifying Credentials Management with Incredible PBX
Here’s the problem. We wanted to separate out the credentials for various providers so it would be easy for first-time users to set up a server without having to master Asterisk or the Asterisk-GUI. As we mentioned, this has been the number #1 complaint with the FreePBX® way of doing things. You almost needed to go back to college for another degree before you could make your first phone call. To get a functional VoIP server with one extension and one outbound trunk, it required creation of an extension, registration of a trunk with obscure settings that are different for almost every provider, creation of an inbound and outbound route with settings for how to actually route the calls in and out. And then there was configuration of some less-than-intuitive SIP settings. That’s before you ever start thinking about security and a firewall. Life’s too short!
But we encountered some stumbling blocks with Asterisk-GUI as well. It was rewriting our credentials_sip.conf file whenever Asterisk-GUI was actually used to add a new user (extension) or trunk. Worse yet, it was rewriting the entries incorrectly because the developers forgot about a special syntax in Asterisk that we’ll get to in a minute.
We first thought we could solve the rewriting of our config files by limiting write permissions on our new credentials files to the root user. Asterisk and Asterisk-GUI both run as the asterisk user so this would have been an easy fix. Well, no cigar. Asterisk-GUI outsmarted us by quietly aborting the update when it didn’t have ownership of our .conf files. This meant you never could use the Asterisk-GUI for much of anything, not exactly what we had in mind.
Lucky for us, one of the developers forgot about our favorite Linux utility, chattr. This lets you set the immutable bit to prevent all users (including root) from changing the contents of a file. Since Asterisk-GUI sometimes skips error checking after it’s sure it owns the .conf files, it was perfect. We could "hide" settings in our own credentials_sip.conf file without worrying that they’d be overwritten by Asterisk-GUI. The only trick is remembering to turn the immutable bit off when we want to make updates and, of course, turning it back on once we’re finished so that Asterisk-GUI doesn’t mangle the settings when you use Asterisk-GUI for other things. Of course, it also means you’ll need to log in as root to set up credentials for the "Incredible 9″ trunks, but that’s a walk in the park. In fact, that’s the beauty of using chattr in the first place.
For those that love to wade into the weeds of Asterisk design, there is another feature which permits storage of additional settings for any [context]. You simply create [context](+) in a separate file using the same name as the original context. When you reload Asterisk, it blends all of the entries from the two contexts. That’s exactly what we needed in order to simplify storage of credentials for providers using our own config files. Unfortunately, the Asterisk-GUI developers forgot about this syntax and removed our [context](+) entries presumably thinking they were bad code. This left the credentials themselves sitting in a config file with no context, and that wreaked all sorts of havoc in Asterisk-GUI. So now you know why we needed write protection for our credentials_sip.conf file.
Speaking of credentials, here’s how the default credentials_sip.conf file actually looks. To edit the file, you start by removing the immutable bit: chattr -i credentials_sip.conf. Never comment out the host entries or Asterisk dies! Host names may need to be changed depending upon the server on which your provider sets up your individual account. Everything else is simple enough for anyone to master without a tutorial. Plug in your ACCTNAME and ACCTPASS and uncomment the affected lines by removing the semicolons for any trunk you wish to use. Save your settings. Don’t forget to reprotect the file when you’re finished: chattr +i credentials_sip.conf. Finally, restart Asterisk: service asterisk restart. We plan to add scripts to automatically manage these trunk settings, but we wanted you to know how everything actually worked so you can do it yourself should you ever feel the urge.
[voipms](+) ; VoIP.ms trunk Prefix: Dial 9 ;username = ACCTNAME ;secret = ACCTPASS host = atlanta.voip.ms [Vitelity](+) ; Vitelity trunk Prefix: Dial 8 ;username = ACCTNAME ;secret = ACCTPASS host = inbound1.vitelity.net [lesnet_peer](+) ; Les.net trunk Prefix: Dial 7 ;username = ACCTNAME ;secret = ACCTPASS host = did.voip.les.net [ipcomms](+) ; IPcomms trunk Prefix: Dial 6 ;username = ACCTNUM ;fromuser = ACCTNUM ;secret = ACCTPASS host = 2way.ipcomms.net [didlogic](+) ; DIDlogic trunk Prefix: Dial 5 ;username = ACCTNUM ;secret = ACCTPASS host = sip.didlogic.net [CallCentric](+) ; CallCentric trunk Prefix: Dial 4 ;username = ACCTNUM ;fromuser = ACCTNUM ;authuser = ACCTNUM ;secret = ACCTPASS host = callcentric.com [FutureNine](+) ; FutureNine trunk Prefix: Dial 3 ;username = ACCTNUM ;secret = ACCTPASS host = incoming.future-nine.com
I hear some of you squawking, "Why do you call it ‘Incredible 9’ when there are only 7 providers?" The answer is that Google Voice is managed separately in credentials_googlevoice.conf because it operates differently in Asterisk. Anveo Direct also has a different way of handling outbound SIP calls. A PIN is required as part of the dial string. That PIN is managed separately in credentials_extensions.conf. So… 7 + 2 = 9.
Linux Application Framework for Incredible PBX
We also wanted to simplify the process of adding new Linux utilities to our Incredible PBX setup for Asterisk-GUI. You may know that Asterisk-GUI runs under a lean, mean web server that’s actually part of Asterisk. By default, it operates on port 8088. We wanted to leave it that way to simplify the procedure for compiling Asterisk to run as the asterisk user as opposed to the root user. The Asterisk web server never was intended to compete with Apache, and there is no support for PHP much less MySQL. In order to use the dozens of Incredible PBX utilities and databases as well as all of the text-to-speech and speech recognition tools, we needed Apache, PHP, and MySQL. So our design decision was to run Apache on port 80 with full PHP support and then run MySQL in the same way it has been installed on LAMP servers since Day One.
That design meant we still needed a separate web site to support Incredible PBX utilities. Luckily, our friends at Kennon Software built a beautiful user interface for PBX in a Flash many years ago. With some minor tweaking to account for newer releases of PHP, it was a perfect fit for Incredible PBX as you can see at the top of this article. It has all the things we were looking for including an RSS Feed to provide emergency announcements. It also provides developers unlimited flexibility to add local applications and make other modifications as desired for both end-users and administrators. So our tip of the hat again goes to Kennon Software for their terrific open source contribution to our projects.
Choosing a Linux Platform for Incredible PBX
Speaking of Linux, we’re often asked what’s the best Linux platform on which to run Incredible PBX. Our stock answer is ALL OF THE ABOVE. Incredible PBX has been and is being engineered to run well on almost any Linux platform. We plan to initially release Incredible PBX for Asterisk-GUI on the CentOS/Scientific Linux 6.5 platform, but we’ll add Ubuntu 14.04 and Debian in coming weeks. In this way, we can support all of our favorite low-cost hardware platforms including the Raspberry Pi, BeagleBone Black, CuBox, PogoPlug, and anything else we can get our hands on.
Adding Inbound & Outbound Dialplan Code to Incredible PBX
This week we also tackled some of the other items on the Wish List. We’ve heard from a number of folks that wanted a simple way to add customized dialplan code whenever a call was made or received. That was an easy one. In extensions_custom.conf, you’ll now find the following contexts which can be enhanced in any way you choose. Just plug your additional code into each context between the two default entries.
[incoming-sub] exten => incoming-sub_1,1,Noop(*** Incoming: ${CALLERID(all)} on ${CHANNEL} ***) exten => incoming-sub_1,n,Return() [outgoing-sub] exten => outgoing-sub_1,1,Noop(*** Calling: ${CALLERID(dnid)} from ${CALLERID(all)} ***) exten => outgoing-sub_1,n,Return()
Managing Incoming Calls to "Incredible 9″ Trunks
We haven’t (yet) come up with a really simple way to adjust how inbound calls to our preconfigured trunks are processed because of the basic Asterisk-GUI design. In a nutshell, incoming calls come into your PBX on a phone number, aka DID. That DID is associated with a trunk that you’ve registered to a specific provider. Once the call hits Incredible PBX, we need to tell the PBX where to route the call. Typical choices include an extension, a group of extensions (i.e. a ring group), an IVR, or an AutoAttendant. There are others. In extensions.conf, you will find the dialplan code to manage incoming calls to the "Incredible 9″ trunks. The setup for each of the 9 trunks looks like this:
[DID_Vitelity] include = DID_Vitelity_default [DID_Vitelity_default] exten = _.,1,Set(CALLERID(name)=${CALLERID(number)}) exten = _.,n,Set(CALLERID(number)=${CALLERID(number):0:10}) exten = _.,n,Gosub(cidlookup,cidlookup_1,1()) exten = _.,n,ExecIf($[ "${CALLERID(name)}" = "" ] ?Set(CALLERID(name)=${CALLERID(num)})) exten = _.,n,Gosub(incoming-sub,incoming-sub_1,1()) ;exten = _.,n,Goto(default,6001,1) ;exten = _.,n,Goto(ringroups-custom-1,s,1) ;exten = _.,n,Goto(voicemenu-custom-2,s,1) exten = _.,n,Goto(voicemenu-custom-1,s,1) [CallingRule_OutVitelity] exten = _8NXXNXXXXXX,1,Macro(trunkdial-failover-0.4,${Vitelity}/${EXTEN:1},,Vitelity,) exten = _81NXXNXXXXXX,1,Macro(trunkdial-failover-0.4,${Vitelity}/${EXTEN:2},,Vitelity,)
In the Asterisk-GUI world, a [DID_provider] context manages incoming calls FROM a provider’s DID or trunk. And a [CallingRule_provider] context manages outbound calls TO your provider’s trunk. In the default Vitelity setup, incoming Vitelity calls get routed to voicemenu-custom-1, and outbound calls with an 8 prefix get routed out through your Vitelity trunk. As noted, all of these contexts can be found in extensions.conf.
Toward the end of the default context you will see two voicemenu-custom entries as well as a ringroups-custom-1 entry and a default entry with an extension number. All but one of these is commented out. As you have probably guessed, the uncommented entry determines where the incoming call is routed. When you create IVRs or ring groups in Asterisk-GUI, each new creation gets assigned a sequential number starting with 1. ringroups-custom-1 is a preconfigured Ring Group that currently sends calls to extensions 6001 and 6002, the two extensions created in the Incredible PBX default setup. If you add additional extensions and then add those new numbers to this preconfigured ring group, then those phones will ring as well. It does NOT change the sequential number originally assigned to this ring group. Adding a new ring group does that.
In Asterisk-GUI, IVRs and AutoAttendants are called Voice Menus. Incredible PBX ships with two. Voice Menu #1 is the Nerd Vittles’ Stealth AutoAttendant. It greets the caller with a cheery message from Allison while providing a couple seconds for someone (like you) to press a button to reroute the call to an undisclosed destination. If no key is pressed, the incoming call is routed to Ring Group #1.
Voice Menu #2 is a Demo IVR that showcases many of the Nerd Vittles applications. By default, all "Incredible 9″ trunks are configured to route incoming callers through the Stealth AutoAttendant to Ring Group #1. If you’d prefer to route incoming calls to a ring group or a particular extension or the demo IVR, the commented out entries will let you do that.
But suppose you wanted to route an incoming call to a custom extension defined in extensions_custom.conf? Well, it’s easy. Just change the context to CallingRule_extensions_custom and route the call to line 1 of the extension context desired. For example, to send an incoming call to the AsteriDex Voice Dialer (411) which lets callers say the name of the party they wish to reach, you’d insert a call destination entry that looked like this:
exten = _.,n,Goto(CallingRule_extensions_custom,411,1)
Better yet, you can use the generic dialplan context, DLPN_DialPlanMain, to reach any extension on your server:
exten = _.,n,Goto(DLPN_DialPlanMain,411,1)
As you add new ring groups, extensions, and voice menus with Asterisk-GUI, you can adjust these settings accordingly now that you know how all of this works. After making changes in extensions.conf, be sure you’ve only enabled ONE destination per trunk by commenting out the rest of them. Then reload your dialplan: asterisk -rx "dialplan reload"
Free Worldwide Calling Support with Incredible PBX
We mentioned last week that iNum support will be included through two SIP providers to let you make free phone calls worldwide to anyone with a registered iNum. SIP URIs are equally important for the same reason. You can make a free call to anyone, anywhere in the world if the recipient happens to have a SIP URI, and sip2sip.info will provide a free one to anybody. To support SIP URIs, Incredible PBX for Asterisk-GUI includes a new context that will let you link a SIP URI to an extension on your PBX. We’ve included an entry for L-E-N-N-Y to get you started. You can add as many more as you like:
[CallingRule_SIP_URI] exten = 53669,1,Dial(SIP/2233435945@sip2sip.info)
CallerID Name Lookups with Incredible PBX
On the CallerID Name front, we’re still exploring alternatives including incorporation of CallerID Superfecta which originally was a Nerd Vittles creation. It now is maintained by the POSSA Development Team. In the interim, we’ve provided code for one of the best CNAM sources in the business, OpenCNAM. It gets you 10 free lookups an hour from cached entries. If you need more, you can sign up for an account. For completed calls, there is a charge of $.004. Just adjust the CURL entry below to plug in your credentials:
[cidlookup] exten => cidlookup_1,1,Set(CURLOPT(httptimeout)=7) exten => cidlookup_1,n,Set(CALLERID(name)=${CURL(https://account_sid:auth_token@api.opencnam.com/v2/phone/${CALLERID(num)}?format=pbx&ref=incrediblepbx)}) exten => cidlookup_1,n,Set(current_hour=${STRFTIME(,,%Y-%m-%d %H)}) exten => cidlookup_1,n,Set(last_query_hour=${DB(cidlookup/opencnam_last_query_hour)}) exten => cidlookup_1,n,Set(total_hourly_queries=${DB(cidlookup/opencnam_total_hourly_queries)}) exten => cidlookup_1,n,ExecIf($["${last_query_hour}" != "${current_hour}"]?Set(DB(cidlookup/opencnam_total_hourly_queries)=0)) exten => cidlookup_1,n,ExecIf($["${total_hourly_queries}" = ""]?Set(DB(cidlookup/opencnam_total_hourly_queries)=0)) exten => cidlookup_1,n,Set(DB(cidlookup/opencnam_total_hourly_queries)=${MATH(${DB(cidlookup/opencnam_total_hourly_queries)}+1,i)}) exten => cidlookup_1,n,ExecIf($[${DB(cidlookup/opencnam_total_hourly_queries)} >= 60]?System(${ASTVARLIBDIR}/bin/opencnam-alert.php)) exten => cidlookup_1,n,Set(DB(cidlookup/opencnam_last_query_hour)=${current_hour}) exten => cidlookup_1,n,Return() exten => cidlookup_return,1,ExecIf($["${DB(cidname/${CALLERID(num)})}" != ""]?Set(CALLERID(name)=${DB(cidname/${CALLERID(num)})})) exten => cidlookup_return,n,Return() ;--== end of [cidlookup] ==--;;end of Incredible PBX original build file
Managing Outbound CallerID & PINs with Incredible PBX
There appear to be a few leftover CallerID bugs in the original Asterisk-GUI code. As a workaround, we’ve added support for setting CallerID numbers in credentials_extensions.conf. This lets you set outbound CallerID numbers on a per trunk basis for providers that allow spoofing of CallerID numbers.
Here’s what the complete credentials_extension.conf file actually looks like. The AnveoPIN is the code used to authorize outbound calls through Anveo Direct. Anveo handles outbound calling differently than most providers so the setting had to go here instead of in the more traditional credentials_sip.conf file. Sorry. The other entries are self-explanatory. This config file can be edited using your favorite text editor. Then service asterisk restart and you’re done.
AnveoPIN = 024680 ; Conference Bridge PINs CONF_USER_PIN = 1234 CONF_ADMIN_PIN = 4321 ; DISA password DISA_PW = 9876 ; CallerID numbers CID_allroutes = 8005551212 CID_CallCentric = 8005551212 CID_ipcomms = 8005551212 CID_voipms = 8005551212 CID_anveodirect = 8005551212
Outbound Call Processing with Incredible PBX
With apologies to our international friends, we’ve included a template to handle processing of all outbound U.S. calls using the "Incredible 9″ trunks. Basically, you can dial a 10-digit number or 1+ the 10-digit number, and the [outbound-allroutes] context will walk the call through all of the trunks for which you’ve registered including Google Voice. If a trunk isn’t registered, it’s skipped. The arrangement of the trunks can be adjusted to meet your own needs. As delivered, calls are processed in the following order: Google Voice, VoIP.ms, Vitelity, les.net, IPcomms, DIDlogic, CallCentric, FutureNine, and Anveo Direct. You obviously can add as many additional providers as desired or rearrange the ones that already are included. And international calling can be added easily using the existing entries as a model. Cut-and-paste is your friend!
[outbound-allroutes] exten => _NXXNXXXXXX,1,Set(CALLERID(num)=${CID_allroutes}) exten => _NXXNXXXXXX,n,Dial(Motif/GoogleVoice/1${EXTEN}@voice.google.com) exten => _NXXNXXXXXX,n,Dial(${voipms}/${EXTEN}) exten => _NXXNXXXXXX,n,Dial(${Vitelity}/${EXTEN}) exten => _NXXNXXXXXX,n,Dial(${lesnet_peer}/1${EXTEN}) exten => _NXXNXXXXXX,n,Dial(${ipcomms}/${EXTEN}) exten => _NXXNXXXXXX,n,Dial(${didlogic}/1${EXTEN}) exten => _NXXNXXXXXX,n,Dial(${CallCentric}/1${EXTEN}) exten => _NXXNXXXXXX,n,Dial(${FutureNine}/1${EXTEN}) exten => _NXXNXXXXXX,n,Dial(SIP/${AnveoPIN}1${EXTEN}@sbc.anveo.com) exten => _NXXNXXXXXX,n,Hangup exten => _1NXXNXXXXXX,1,Set(CALLERID(num)=${CID_allroutes}) exten => _1NXXNXXXXXX,n,Dial(Motif/GoogleVoice/${EXTEN}@voice.google.com) exten => _1NXXNXXXXXX,n,Dial(${voipms}/${EXTEN:1}) exten => _1NXXNXXXXXX,n,Dial(${Vitelity}/${EXTEN:1}) exten => _1NXXNXXXXXX,n,Dial(${lesnet_peer}/${EXTEN}) exten => _1NXXNXXXXXX,n,Dial(${ipcomms}/${EXTEN:1}) exten => _1NXXNXXXXXX,n,Dial(${didlogic}/${EXTEN}) exten => _1NXXNXXXXXX,n,Dial(${CallCentric}/${EXTEN}) exten => _1NXXNXXXXXX,n,Dial(${FutureNine}/${EXTEN}) exten => _1NXXNXXXXXX,n,Dial(SIP/${AnveoPIN}${EXTEN}@sbc.anveo.com) exten => _1NXXNXXXXXX,n,Hangup
DISA Support for Incredible PBX
Unless we missed it, Asterisk-GUI was missing DISA support, the ability to call your PBX and receive dialtone to make an outbound call through the PBX. Because of costs associated with outbound calls, this can make a real difference in some countries. We’ve added DISA support through the D-I-S-A (3472) extension. The DISA password can be set in credentials_extensions.conf. The DISA extension can be added to an IVR for one or more trunks to provide password-protected DISA call access to incoming callers. The dialplan code can be adjusted to meet your own requirements. As delivered, only 10-digit calls are permitted. Just change the 10 on line 10 if you want to enable international dialing. Calls are limited to 150 minutes by default. Just change the 9000 (seconds) entry as desired.
[custom-disa] exten => s,1,Answer exten => s,n,Wait(1) exten => s,n,Set(TIMEOUT(digit)=7) exten => s,n,Set(TIMEOUT(response)=10) exten => s,n,Background(enter-password) exten => s,n,Read(MYCODE,beep,7) exten => s,n,Noop(DISA_PW: ${DISA_PW}) exten => s,n,GotoIf($["${MYCODE}" = "${DISA_PW}"]?disago:bad,1) exten => s,n(disago),Set(TIMEOUT(absolute)=9000) exten => s,n,Read(NUM2CALL,pls-entr-num-uwish2-call,10) exten => s,n,Background(calling) exten => s,n,SayDigits("${NUM2CALL}") exten => s,n,Goto(outbound-allroutes,${NUM2CALL},1) exten => s,n,Hangup exten => t,1,Hangup exten => i,1,Hangup exten => h,1,Hangup exten => bad,1,Hangup
Call Forwarding Support with Incredible PBX
We have restored the call forwarding functionality that originally was missing in Asterisk-GUI. The same feature codes found in FreePBX are supported. By dialing *72, you can set forwarding for any extension to either a local number or any other number supported by your dial plan. By dialing *72NXXNXXXXXX or *726XXX (local extensions typically are in the 6000-6299 range with Asterisk-GUI), you can set call forwarding in a single step. *73 can be used to disable call forwarding for the extension from which you dialed, or *74 can be used to disable call forwarding for any extension on your server. A list of currently forwarded extensions can be retrieved using the Asterisk CLI: asterisk -rx "database show CF"
Conference Bridge Support in Incredible PBX
As previously mentioned, Conference Bridge support wasn’t available when Asterisk-GUI was released so we’ve added it. Just dial C-O-N-F (2663) to join the conference bridge. User and admin PINs are set in the credentials_extensions.conf file. You can create as many of these as you need by cloning the code below with different extension numbers:
[conf_bridge] exten => 2663,1,Macro(user-callerid,) exten => 2663,n,Set(MEETME_ROOMNUM=2663) exten => 2663,n,Set(MAX_PARTICIPANTS=0) exten => 2663,n,Set(MEETME_MUSIC=default) exten => 2663,n,GotoIf($["${DIALSTATUS}" = "ANSWER"]?READTHEPIN) exten => 2663,n,Answer exten => 2663,n,Wait(1) exten => 2663,n,Set(PINTRIES=0) exten => 2663,n,Noop(${CONF_USER_PIN}) exten => 2663,n(READTHEPIN),Read(PIN,enter-conf-pin-number,,,,) exten => 2663,n,GotoIf($[${PIN} = ${CONF_USER_PIN}]?ENDUSER) exten => 2663,n,GotoIf($[${PIN} = ${CONF_ADMIN_PIN}]?ADMINISTRATOR) exten => 2663,n,Set(PINTRIES=$[${PINTRIES}+1]) exten => 2663,n,GotoIf($[${PINTRIES}>3]?h,1) exten => 2663,n,Playback(conf-invalidpin) exten => 2663,n,Goto(READTHEPIN) exten => 2663,n(ADMINISTRATOR),Set(CONFBRIDGE(user,admin)=yes) exten => 2663,n,Set(CONFBRIDGE(user,marked)=yes) exten => 2663,n,Set(CONFBRIDGE(user,dsp_drop_silence)=yes) exten => 2663,n,Set(CONFBRIDGE(user,talk_detection_events)=yes) exten => 2663,n,Set(CONFBRIDGE(user,announce_user_count)=yes) exten => 2663,n,Set(CONFBRIDGE(user,announce_join_leave)=yes) exten => 2663,n,Set(CONFBRIDGE(user,music_on_hold_when_empty)=yes) exten => 2663,n,Goto(ext-meetme,STARTMEETME,1) exten => 2663,n(ENDUSER),Noop(User Options:) exten => 2663,n,Set(CONFBRIDGE(user,dsp_drop_silence)=yes) exten => 2663,n,Set(CONFBRIDGE(user,talk_detection_events)=yes) exten => 2663,n,Set(CONFBRIDGE(user,announce_user_count)=yes) exten => 2663,n,Set(CONFBRIDGE(user,announce_join_leave)=yes) exten => 2663,n,Set(CONFBRIDGE(user,music_on_hold_when_empty)=yes) exten => 2663,n,Goto(ext-meetme,STARTMEETME,1) exten => 2663,hint,confbridge:2663
Google Voice Support in Incredible PBX
Google Voice is another little goodie that wasn’t available when Asterisk-GUI came along. Because we’re now running everything on the Asterisk 11 platform, it seemed silly not to include Google Voice support. And we’ve made it about as easy to set up as tying your shoes. Plug in your Google email address and password using the new web interface, and you’re done. By default, all 10-digit and 11-digit outbound calls are first attempted through your Google Voice trunk. You can’t beat free!
If you’ve used the same account elsewhere, Google may block access from your new IP address. In this case, just follow the steps outlined in this Google Reset Procedure to get things going.
Managing Call Detail Records (CDR) in Incredible PBX
The gorgeous CDR Viewer found under the Options -> Advanced Options -> Enable tab in Asterisk-GUI is incredibly flexible. In addition to being lightening fast, you can reorder the CDR listing by simply clicking on any column heading. Clicking twice will sort the list in the opposite order. You also can expand the detail in two ways. Either click on an individual entry (as shown) to display the complete CDR entry or check the Show All Fields checkbox to get the full picture for every CDR entry. The complete CDR database in CSV format can be retrieved from /var/log/asterisk/cdr-csv/Master.csv.
Getting Up to Speed on Asterisk-GUI Basics
We’ve covered a lot of territory this week. You don’t have to master it all at once. Incredible PBX is being engineered to give you the best of both worlds rather than one size fits all. By setting things up this way, you can add your own features and share them with the community as you move up the learning curve. That’s what open source is all about!
The other goal was to leave Asterisk-GUI intact to the greatest extent possible. This has several advantages. First, for previous users of Asterisk-GUI, they’ll feel right at home. Second, we don’t have to write extensive documentation for Asterisk-GUI because many others have already done the heavy lifting. One obvious word of caution. Don’t delete, rename, or otherwise modify the default trunks, users, calling rules, ring groups, and dialplans that already have been created to support Incredible PBX. If you do, you will break things. But feel free to add as many new pieces to your setup as desired and, of course, the extension passwords can be changed in any way you like. Trunk credentials for the "Incredible 9″ preconfigured trunks should be managed using the credentials files documented above.
Here are a few resources that will guide you through mastering the Asterisk-GUI:
- The Asterisk Appliance 50 Admin Manual (Chapter 3)
- AsteriskNOW Lab Tutorial
- MyPBX SOHO User’s Manual
- ATCOM User’s Manual
Remember the Objective of Incredible PBX for Asterisk-GUI
We’ll close for today by reiterating why we’re introducing a new VoIP alternative with Incredible PBX for Asterisk-GUI. From the ground up, this project is designed as an open source, hobbyist platform so that you can actually LEARN how Asterisk works and become self-sufficient in designing AND managing your own VoIP communications platform. Is it "Pure GUI"? Nope. Here’s why. One of the major reasons that so many folks have had their VoIP systems hacked over the past few years is because those users never quite understood how their "Pure GUI" stuff was working (or not) under the hood.
Does "hobbyist platform" mean it’s a Crappy Purple Scion? Nope. In fact, the Asterisk-GUI tools and Asterisk code in Incredible PBX were designed and written by some of the best Asterisk experts in the business including Mark Spencer, the creator of Asterisk. When the nay-sayers snicker at your "hobbyist platform," just smile and enjoy your independence. 🙂
Originally published: Monday, December 8, 2014
Need help with Asterisk? Visit the PBX in a Flash Forum.
Special Thanks to Our Generous Sponsors
FULL DISCLOSURE: ClearlyIP, Skyetel, Vitelity, DigitalOcean, Vultr, VoIP.ms, 3CX, Sangoma, TelecomsXchange and VitalPBX have provided financial support to Nerd Vittles and our open source projects through advertising, referral revenue, and/or merchandise. As an Amazon Associate and Best Buy Affiliate, we also earn from qualifying purchases. We’ve chosen these providers not the other way around. Our decisions are based upon their corporate reputation and the quality of their offerings and pricing. Our recommendations regarding technology are reached without regard to financial compensation except in situations in which comparable products at comparable pricing are available from multiple sources. In this limited case, we support our sponsors because our sponsors support us.
BOGO Bonaza: Enjoy state-of-the-art VoIP service with a $10 credit and half-price SIP service on up to $500 of Skyetel trunking with free number porting when you fund your Skyetel account. No limits on number of simultaneous calls. Quadruple data center redundancy. $25 monthly minimum spend required. Tutorial and sign up details are here.
The lynchpin of Incredible PBX 2020 and beyond is ClearlyIP components which bring management of FreePBX modules and SIP phone integration to a level never before available with any other Asterisk distribution. And now you can configure and reconfigure your new Incredible PBX phones from the convenience of the Incredible PBX GUI.
VitalPBX is perhaps the fastest-growing PBX offering based upon Asterisk with an installed presence in more than 100 countries worldwide. VitalPBX has generously provided a customized White Label version of Incredible PBX tailored for use with all Incredible PBX and VitalPBX custom applications. Follow this link for a free test drive!
Special Thanks to Vitelity. Vitelity is now Voyant Communications and has halted new registrations for the time being. Our special thanks to Vitelity for their unwavering financial support over many years and to the many Nerd Vittles readers who continue to enjoy the benefits of their service offerings. We will keep everyone posted on further developments.
Some Recent Nerd Vittles Articles of Interest…