

With the advent of cloud-based computing and desktop virtual machine platforms like VirtualBox, we haven’t played with dedicated hardware for Asterisk® in a couple of years. WOW! It’s just amazing the quantum leaps in miniaturization, price, and performance that have transpired during our absence. Last week, we introduced a dedicated server platform for under $200 that could serve as a small business PBX for almost any 20-30 person organization. Today, meet Big Brother. You’re looking at all the components that make up the $500 Intel® NUC D54250WYK with a Core i5 dual-core processor, a 250GB mSATA drive, and 16GB of RAM. While you install the RAM and disk drive yourself, if you can unscrew 5 screws and have 5 minutes to spare, you can handle this. With the addition of the just released (free) Proxmox 4 virtualization platform, it can run a half dozen powerful stand-alone applications without ever breaking a sweat. Little wonder that Digital Ocean and CloudAtCost are all but giving away server resources. They almost have to given the developments in stand-alone hardware.
Buying Your Hardware

So here’s how we started. Of course, you can adjust the components and the merchant to meet your own requirements. For us, Amazon1 works great, and the prices are competitive. Who else delivers on Sunday? Despite the notice that the computer would be here on Monday, we knew better. And sure enough it was in the box with the other Sunday goodies. Remove the four screws from the bottom feet of the computer, and the case opens easily. Next, unscrew the screw from the bottom of the motherboard that holds the SSD drive in place securely. Snap in the mSATA drive and the two memory sticks, replace the screws, and you’re in business.
Initial Setup of the Intel NUC Platform
Our unit actually came with the latest BIOS preinstalled, but you’ll want to always upgrade the BIOS on any Intel motherboard. Everything generally gets better with each new upgrade. The rest of the firmware is fine as is unless you plan to use the computer as a Windows machine. You’ll find all the downloads here. The firmware you want is version 0041, and the file you want is WY0041.BIO. Copy it to the top level directory of a DOS-formatted USB flash drive using any desktop computer. On the Intel NUC, plug in a USB keyboard and mouse as well as the USB flash drive and a USB CD/DVD drive. Then connect a network cable. Finally, connect a monitor using a microHDMI to HDMI cable, and you’re all set. Once we’re finished configuring the Intel NUC, you can stick it on a shelf that has power and a network connection. No other peripherals are necessary as everything can be managed through SSH or a web browser.
To upgrade the BIOS, boot the computer by plugging it in and pressing the power button on top. Press F7 during the initial POST, choose the USB flash drive, select the .BIO file, and press ENTER. Once the BIOS is loaded, the machine will reboot.
Introducing Proxmox 4.0 Virtual Environment
When it comes to virtualization, we’ve been big fans of Proxmox for a very long time. We introduced Proxmox for VoIP virtualization over six years ago. Things have come a long way since then. And Proxmox VE 4.0 is the culmination of years of hard work by a very talented development team. You can read all about the new feature set and support for KVM and Linux Containers here. Our own take on virtualization is that OpenVZ templates were appealing because they installed and loaded quickly. The downside was they shared a single (proprietary) kernel which often led to security issues and made firewall implementation at the virtual machine level difficult. Of course, any applications such as DAHDI that required kernel implementation were extremely complex to implement and use. Now that almost all of Intel’s and AMD’s processors support virtualization extensions (Intel VT or AMD-V), we were not one to shed tears when Proxmox dropped support for OpenVZ and replaced it with Linux Containers. In fact, for our purposes, they could have left out Linux Containers as well. They suffer from some of the same quirks that made OpenVZ implementations problematic. The platform we’ve chosen for VoIP implementation has full support for virtualization extensions which means you can load and run complex applications such as Windows and Incredible PBX just as if you were using standalone hardware. The only real difference is we’re going to provide a template for building KVM-based Incredible PBX virtual machines in under 30 seconds. So you’ll get the best of both worlds, standalone computer functionality coupled with jaw-dropping implementation speed. For those that train or support multiple independent organizations as well as those that love to tinker and experiment, our solution has no equal.
To begin, download the Proxmox VE 4.0 ISO and burn it to a CD or DVD.
As we mentioned last week, if you don’t happen to have one, LG’s tiny USB-powered DVD Writer is the best $25 you will ever spend. And they keep getting cheaper!

Installing Proxmox VE 4.0 on the Intel NUC
Now we’re ready to get started. Insert the Proxmox VE 4.0 CD into the drive connected to your Intel NUC and boot the machine. Press F10 during POST and choose the CD/DVD drive to start the Proxmox install. Accept the license agreement and fill in the blanks. The important piece is to give your server a hostname. Just be sure it starts with proxmox4, e.g. proxmox4.incrediblepbx.com or use your own domain: proxmox4.yourdomain.com. The actual domain becomes important only if your server will be directly connected to the Internet in which case the FQDN obviously matters. Otherwise, Proxmox needs the hostname to manage things internally. Assign a permanent IP address for your server or use DHCP to obtain an IP address and then reserve that IP address for use by Proxmox in your router’s settings. Either way works fine, but you don’t want the IP address changing down the road.
BIOS Adjustments to Support Proxmox VE 4.0
Once the Proxmox install completes, it’s time to reboot. During the POST, press F2 to access Intel’s Visual BIOS. If you followed along last week, you’ll recall that we made some changes to accommodate Legacy booting of the server in lieu of UEFI. This week we need a different approach because of some quirks in the Proxmox server implementation procedure. We pulled our hair out (what little is left) for a couple days wrestling with this because the server wouldn’t automatically boot in either Legacy boot mode OR UEFI mode. The reason is because Proxmox puts a GPT label on the drive signifying that it’s a UEFI-compatible device whether UEFI is disabled in the BIOS or not. This confuses the Intel NUC bootloader. So you end up with a boot failure and the cryptic message "No boot device found." Proxmox blames Intel for a buggy BIOS even though Intel developed the GPT specification. If you enjoy food fights, break out the popcorn and enjoy the dialog on the Proxmox Forum. Suffice it to say, there’s a difference of opinion about who should fix this. Here’s the easy way to resolve the impasse.
In Visual BIOS, click Advanced tab. Click Boot tab. Click Boot Priority. Make it look like this:
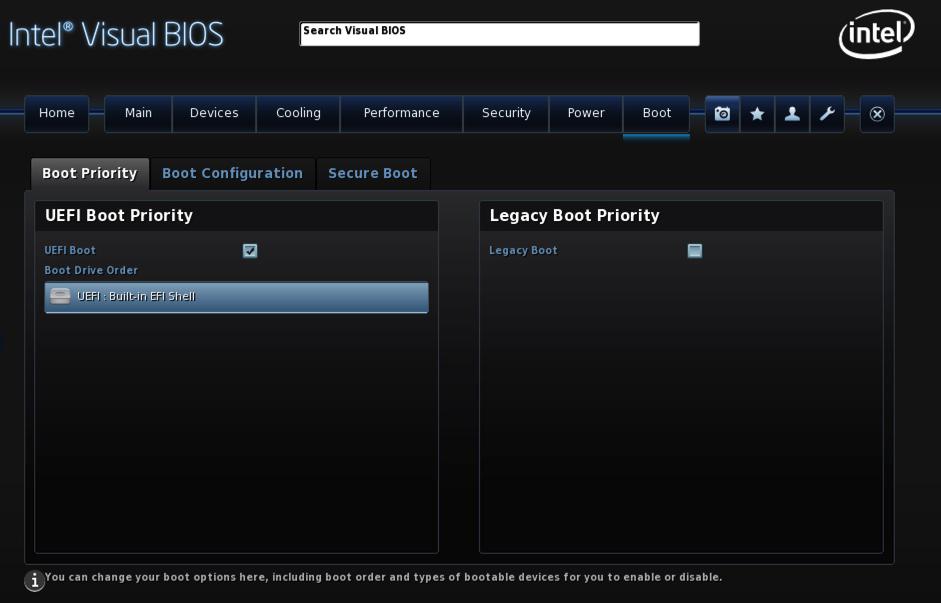
If the BuiltIn EFI Shell option doesn’t appear, don’t worry about it. Just press F10 to save your changes anyway. When your server reboots, it will drop into the EFI shell. Type the following commands pressing ENTER after each entry:
fs0:

echo "fs0:\EFI\proxmox\grubx64.efi" > fs0:\startup.nsh

startup.nsh
At this point, your server should boot into Proxmox. On reboot, the EFI shell will appear momentarily followed by an automatic boot into Proxmox. Solved!
Using Incredible PBX with Proxmox 4.0
You now have a functioning Proxmox server. When you reboot and login as root, the server will tell you how to access the Proxmox GUI with your browser. Before we put the necessary pieces in place to support Incredible PBX, we want to provide a very brief technical overview of how best to use Proxmox virtualization based upon our testing. Using a methodology similar to that demonstrated by AVOXI using Docker at this year’s AstriCon meeting, we use a backup image to instantiate "KVM containers." We hear some of you saying, "There’s no such animal." And right you are. The nomenclature is different, but the concept is similar. In fact, our simulated KVM Containers work exactly like OpenVZ and Linux Containers with none of the drawbacks of a shared kernel. And the good news is Proxmox 4 implements this perfectly through its backup and restore mechanisms. New kernel-based virtual machines can be created in under 30 seconds. Following initial login to a new KVM as root from the console, we individualize the KVM by randomizing passwords, creating new SSH credentials, and setting up a custom whitelist for the Incredible PBX IPtables firewall. The initialization procedure takes less than a minute and is only run the first time you log into your new KVM as root. The bash init script is here: /etc/profile.d/helloworld.sh.
Preliminary Setup Steps with Proxmox 4.0
The most important setup step is to put your Proxmox server behind a hardware-based firewall or configure the built-in firewall to keep out the bad guys. Proxmox has had their share of security vulnerabilities over the years so this is really critical. It’s beyond the scope of this article to walk through the entire firewall setup process, but you’ll find plenty of literature on the Proxmox Wiki and Forum as well as on the Internet. Each of your KVMs will have its own preconfigured whitelist using the IPtables firewall, and any of the Incredible PBX tutorials can walk you through adding and changing entries in those whitelists.
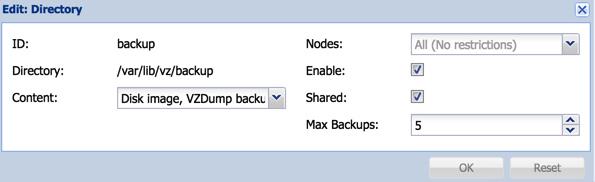
To use the backup and restore functionality of Proxmox, you’ll need to create a backup storage directory in the Proxmox GUI. After logging in as root, click Datacenter in the Server View, click the Storage tab, click the Add button, and choose Directory from the pulldown list. Fill in the blanks like this using VZDump Backup File for the Content type:
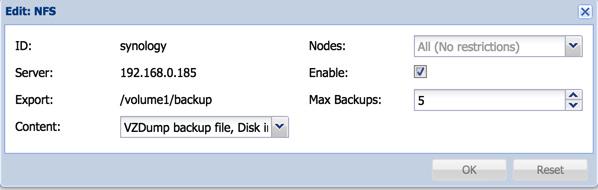
If you have access to a Cloud-based or local NFS device, it’s just as easy to create an additional backup directory on your NFS server. Follow the same steps and choose NFS from the Storage pulldown. With NFS, you must first set up a storage directory with NFS permissions for the IP address of your Proxmox server.
Last, but not least, you need to learn your way around in the GUI. proxmox4 is the name of your server if you followed our recommended setup for your hostname. Under the server, you will find entries for each of your KVM, Linux Containers (LXC), and other drives, e.g. local, backup, and synology.
To add a new LXC image to your server, choose local -> Content -> Templates, pick the desired LXC image, and click Download.
To add new ISO images to your server for building KVMs, choose local -> Content -> Upload, pick ISO Image as the Content type, choose the ISO from your desktop by pressing Select File, then click Upload button.
To start up Virtual Machines once you have created them, click on the VM number under proxmox and click Start. To access the virtual machine once it has begun booting, click Console.
To shutdown a KVM, click on the VM number under proxmox and click Shutdown. Or you can type halt after logging into the KVM as root from the KVM’s Console.
For a list of all available content, choose proxmox4 -> local -> Content.
Loading the Incredible PBX 13 Components into Proxmox 4.0
We need to put two pieces into place to get things rolling with Incredible PBX 13. There are two ways to create Incredible PBX 13 KVMs. You can do it manually from the IncrediblePBX13.iso just as you would on a stand-alone machine. Or you can restore from the IncrediblePBX13 KVM backup image to create a new KVM. The first method takes about 30 minutes. The second method takes less than 30 seconds. The choice is all yours. The results are exactly the same.
Before you can create KVMs, we need to put the Incredible PBX 13 backup image and the Incredible PBX 13 ISO in their proper places. To save some time and steps, we’re going to load the backup image by logging into the Proxmox server as root. For the ISO image, we’ll use the GUI.
To install the Incredible PBX 13 backup image, log into your server as root using SSH and issue these commands:
cd /
wget 'http://downloads.sourceforge.net/project/pbxinaflash/IncrediblePBX13-12 with Incredible PBX GUI/IncrediblePBX13-KVM.tar.gz'
tar zxvf IncrediblePBX13-KVM.tar.gz
rm IncrediblePBX13-KVM.tar.gz
To install the Incredible PBX 13 ISO image, first use a web browser to download IncrediblePBX13.iso to your desktop from SourceForge. Next, login to your Proxmox GUI and choose proxmox4 -> local -> Content -> Upload, pick ISO Image as the Content type, choose IncrediblePBX13.iso from your desktop by pressing Select File, then click the Upload button.
Your Incredible PBX 13 backup image should now appear under proxmox4 -> backup -> Content.
Your Incredible PBX 13 ISO image should now appear under proxmox4 -> local -> Content.
Building Your First Incredible PBX 13 Virtual Machine
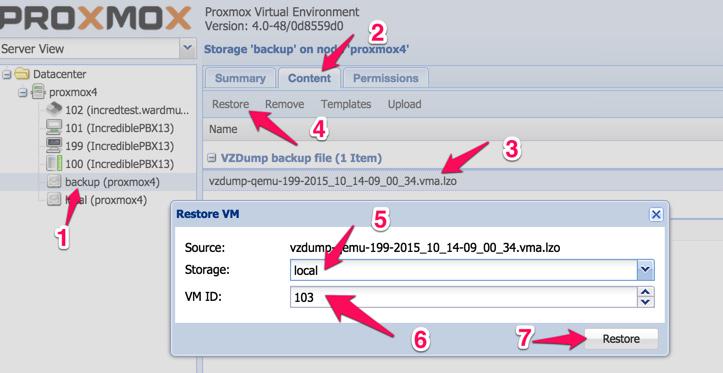
To create a new Incredible PBX Virtual Machine, click the options in the order shown on the image above. Use any VM number desired. In less than 30 seconds, you’ll have your first 10GB Incredible PBX 13 Virtual Machine in place:
Initializing KVM Network Device MAC Address. If you ever create more than one KVM from the same backup image, you must initialize the network device’s MAC address before starting the KVM. Otherwise, you will get a conflicting network connection and a mess. Best practice: ALWAYS initialize the network device MAC address when you first create a new KVM from a backup. Click on the VM number in the left column under proxmox4. Then click the Hardware tab, click Network Device, and Edit. Erase the existing MAC address and click OK. Now it’s safe to start the KVM. The telltale sign that you forgot to do this will be a flaky network connection on one or more of your KVMs. If it happens, just delete the offending KVM and create a new one. You won’t forget but once. 😉
To start your new Incredible PBX Virtual Machine, click on the VM number in the left column under proxmox4. Then click the Start button on the right side of the Proxmox GUI header. The Tasks list at the bottom of the GUI will show it loading. Now click on the Console button at the top of the GUI to open a QEMU console session with your virtual machine. At the login prompt, login in as root with the default password: password. The startup script will complete the customization of your server in less than a minute. Then you’re ready to go. Complete the same configuration steps that you would on any new Incredible PBX server:
Change your root password and make it very secure: passwd
Create admin PW to access Incredible GUI and FreePBX® GPL modules: /root/admin-pw-change
Set your correct time zone: /root/timezone-setup
Create admin PW for web apps: htpasswd /etc/pbx/wwwpasswd admin
Make a copy of your Knock codes: cat /root/knock.FAQ
Decipher IP address and other info about your server: status
Now it’s time to pick up the Incredible PBX 13 tutorial for CentOS and continue on with your adventure if you’ve never done this before. Then take a good look at the Incredible PBX Application User’s Guide to get the most out of your new server.
Building a second, third, and fourth KVM is just as easy as building the first one.
Backing Up Incredible PBX 13 Virtual Machines
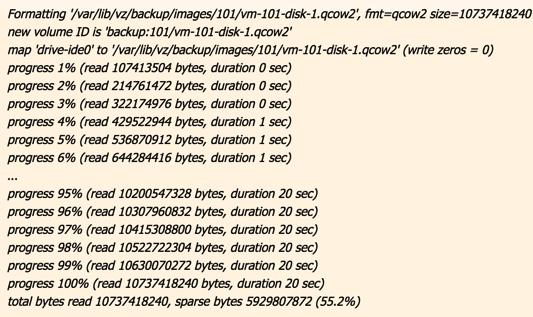
The real beauty of virtualization and Proxmox in particular is that you can make instantaneous backups of your virtual machine at any time whether the virtual machine is running or not. Those backups can be copied to off-site storage for safe keeping. The critical component of any server is the reliability of and ease with which you can recover from a catastrophic failure. It doesn’t get any easier than this.
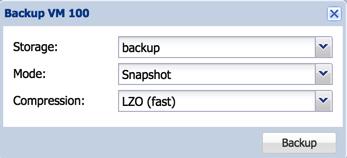
To make a backup of your virtual machine to your backup directory, click on the VM ID number in the left column. Then click Backup -> Backup Now. Fill in the blanks of the backup template.
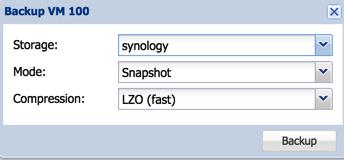
To make a backup of your virtual machine to a local or off-site NFS device, it’s just as easy. Click on the VM ID number in the left column. Then click Backup -> Backup Now. Fill in the blanks of the backup template. Makes you want to run right out and buy a Synology NAS/NFS device, doesn’t it?
Restoring a virtual machine from a backup is just as easy as it was to create the virtual machine image from our backup above. Just choose your backup image instead of the one we provided.
Backing up your virtual machines is only half the story, of course. It also is important to get a backup of the whole enchilada, i.e. the entire Proxmox server. Luckily, the latest version of Clonezilla works perfectly after you have applied the UEFI BIOS patch as documented above. Enjoy!
Originally published: Monday, October 19, 2015
9 Countries Have Never Visited Nerd Vittles. Got a Friend in Any of Them https://t.co/wMfmlhiQ9y #asterisk #freepbx pic.twitter.com/TPFGZbqWB6
— Ward Mundy (@NerdUno) April 22, 2016

Need help with Asterisk? Visit the PBX in a Flash Forum.
Special Thanks to Our Generous Sponsors
FULL DISCLOSURE: ClearlyIP, Skyetel, Vitelity, DigitalOcean, Vultr, VoIP.ms, 3CX, Sangoma, TelecomsXchange and VitalPBX have provided financial support to Nerd Vittles and our open source projects through advertising, referral revenue, and/or merchandise. As an Amazon Associate and Best Buy Affiliate, we also earn from qualifying purchases. We’ve chosen these providers not the other way around. Our decisions are based upon their corporate reputation and the quality of their offerings and pricing. Our recommendations regarding technology are reached without regard to financial compensation except in situations in which comparable products at comparable pricing are available from multiple sources. In this limited case, we support our sponsors because our sponsors support us.
 BOGO Bonaza: Enjoy state-of-the-art VoIP service with a $10 credit and half-price SIP service on up to $500 of Skyetel trunking with free number porting when you fund your Skyetel account. No limits on number of simultaneous calls. Quadruple data center redundancy. $25 monthly minimum spend required. Tutorial and sign up details are here.
![]() The lynchpin of Incredible PBX 2020 and beyond is ClearlyIP components which bring management of FreePBX modules and SIP phone integration to a level never before available with any other Asterisk distribution. And now you can configure and reconfigure your new Incredible PBX phones from the convenience of the Incredible PBX GUI.
The lynchpin of Incredible PBX 2020 and beyond is ClearlyIP components which bring management of FreePBX modules and SIP phone integration to a level never before available with any other Asterisk distribution. And now you can configure and reconfigure your new Incredible PBX phones from the convenience of the Incredible PBX GUI.
 VitalPBX is perhaps the fastest-growing PBX offering based upon Asterisk with an installed presence in more than 100 countries worldwide. VitalPBX has generously provided a customized White Label version of Incredible PBX tailored for use with all Incredible PBX and VitalPBX custom applications. Follow this link for a free test drive!
 Special Thanks to Vitelity. Vitelity is now Voyant Communications and has halted new registrations for the time being. Our special thanks to Vitelity for their unwavering financial support over many years and to the many Nerd Vittles readers who continue to enjoy the benefits of their service offerings. We will keep everyone posted on further developments.
Some Recent Nerd Vittles Articles of Interest…
- Some of our purchase links refer users to Amazon and other sites when we find their prices are competitive for the recommended products. Nerd Vittles receives a small referral fee from merchants to help cover the costs of our blog. We never recommend particular products solely to generate commissions. However, when pricing is comparable or availability is favorable, we support Amazon and other merchants because they support us. [↩]


The idea of making Linux KVM images available is very nice. The fact that you didn’t bother to create an image usable with any KVM platform other than Promox is short sighted.
[WM: That’s what open source and the GPL are all about. Please have at it and share your results.]