

[iframe-popup id="5″]
The Incredible PBX 13 ISO was getting long in the tooth. It’s been on the street almost two months. So we’re pleased to accept the Sangoma challenge and introduce the second-generation Incredible PBX 13.2 ISO. Like its predecessor, it’s 100% open source and GPL code. Perhaps now Sangoma will follow suit with their closed source ISO.
The new Incredible PBX 13.2 ISO can be burned to either a DVD-ROM or a 1GB or larger USB flash drive using a Mac, a Windows PC, or almost any Linux machine. And, unlike the FreePBX Distro, you’re more than welcome to share our code and the ISO with all of your friends and business associates. In fact, next week we’re releasing the entire Incredible PBX build platform for those of you that want to roll your own ISO. Share your enhancements and tweaks or make a customized ISO for just your company and pass it around. We’d be delighted. And our previous tutorial will even show you how to set up and maintain your own Cloud Repository for Incredible PBX. FREEDOM: THAT’S WHAT OPEN SOURCE IS ALL ABOUT!
NEWS FLASH: Check out the new Incredible PBX 13-13 ISO. Complete tutorial available here.
Introducing the Incredible PBX 13.2 ISO
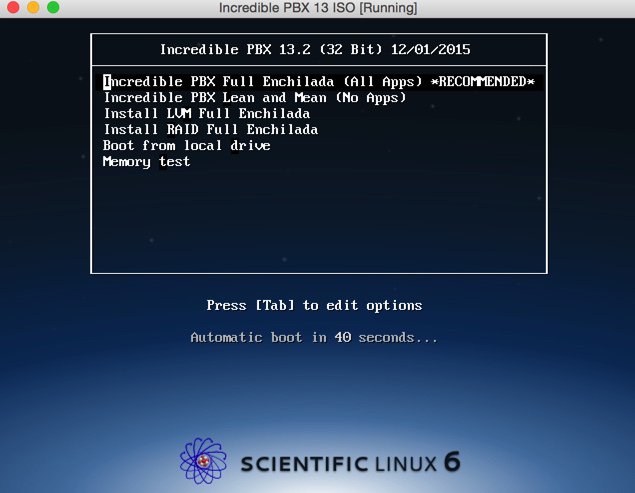
Overview. The Incredible PBX installation process couldn’t be easier. Download IncrediblePBX13.2.iso from SourceForge. Burn the ISO to a DVD-ROM or USB thumb drive. Four different methods are outlined below. Need some great hardware for under $200? Read our tutorial. Or, if you have an old PC lying around, that’ll work, too. Boot up the dedicated machine on which you want to install Incredible PBX. Choose whether you prefer the Incredible PBX Whole Enchilada with 30+ applications for Asterisk or the Lean & Mean version which has its own separate tutorial here. Press the ENTER key. Choose your time zone, create a really secure root password, and have a coffee break. When Scientific Linux 6.7 has been installed, your server will reboot. Accept the Incredible PBX license agreement and press the ENTER key. Go to lunch and, when you return, you should be good to go. Finish reading this tutorial to add the finishing touches and secure your server. Then read the Incredible PBX Application Users Guide to learn all about the three dozen FREE applications for Asterisk® that are included in the build. DONE!
Let us take a moment to explain the Incredible PBX installation process using this ISO. We don’t hide stuff in our ISO or play games with your security. We don’t give ourselves or our application any secret permissions. There are just two steps to an Incredible PBX ISO install. When the install begins, it loads pure Scientific Linux onto your server,1 not some homegrown concoction using proprietary repositories. Your server then reboots. After restarting, the very latest copy of the Incredible PBX 13-12 installer is downloaded and run (see the actual source code of the script below). You’ll find the source code for the Incredible PBX installer in your /root directory after the install is completed: IncrediblePBX13-12R.sh. You’ll also find some other helpful scripts in /root including the optional (free) Incredible Fax installer. If you ever have a question about what was installed on your server, feel free to examine the source code of our installers or post a note on the PIAF Forum. It’s unencrypted GPL2 code. You’re free to use it, enhance it, and share it. Try that with Sangoma. It’s your choice!
%post
###############################################################
#
# Post Script - this script runs on Incredible PBX server
# immediately after Scientific Linux 6.7 install finishes
#
###############################################################
/usr/sbin/ntpdate -su pool.ntp.org
rpm -e readahead
/bin/sed -i 's|rhgb quiet||' /boot/grub/grub.conf
/bin/echo "/tmp/firstboot" >> /etc/rc.d/rc.local
/bin/echo "#!/bin/bash" > /tmp/firstboot
/bin/echo " " >> /tmp/firstboot
/bin/echo "NETDN=\`/bin/ping -c 1 incrediblepbx.com | /bin/grep incrediblepbx.com\`" >> /tmp/firstboot
/bin/echo "if [[ -z \$NETDN ]]; then" >> /tmp/firstboot
/bin/echo " read -p 'Network is down. Please fix. Then press RETURN to reboot and retry.'" >> /tmp/firstboot
/bin/echo " /sbin/reboot" >> /tmp/firstboot
/bin/echo " exit" >> /tmp/firstboot
/bin/echo "fi" >> /tmp/firstboot
/bin/echo "sed -i '/firstboot/d' /etc/rc.d/rc.local" >> /tmp/firstboot
/bin/echo "sed -i 's|NO_DM |NO_DM rhgb quiet|' /boot/grub/grub.conf" >> /tmp/firstboot
/bin/echo "cd /root" >> /tmp/firstboot
/bin/echo "wget http://incrediblepbx.com/incrediblepbx13-12.2-centos.tar.gz" >> /tmp/firstboot
/bin/echo "tar zxvf incrediblepbx13-12.2-centos.tar.gz" >> /tmp/firstboot
/bin/echo "rm -f incrediblepbx13-12.2-centos.tar.gz" >> /tmp/firstboot
/bin/echo "./Inc*" >> /tmp/firstboot
/bin/chmod +x /tmp/firstboot
eject
%end
Incredible PBX 13.2 ISO Installation Guide
Downloading the Incredible PBX 13.2 ISO. On the machine you’ll be using to create your installation media, download IncrediblePBX13.2.iso from SourceForge. Update: The 11/29/2015 version of the ISO had a bug that prevented proper installation of Incredible PBX Full Enchilada. The 12/01/2015 release fixed the problem.
Burning a DVD-ROM from the ISO. If your server platform doesn’t have USB support, then burn the ISO to a DVD using a Mac or Windows machine.
Creating a USB Flash Drive Installer. If your server platform has USB ports, you have three ways to move the Incredible PBX 13.2 ISO to a 1GB or larger flash drive. You can use a Windows PC, a Mac, or a Linux machine to create the USB thumb drive installer.
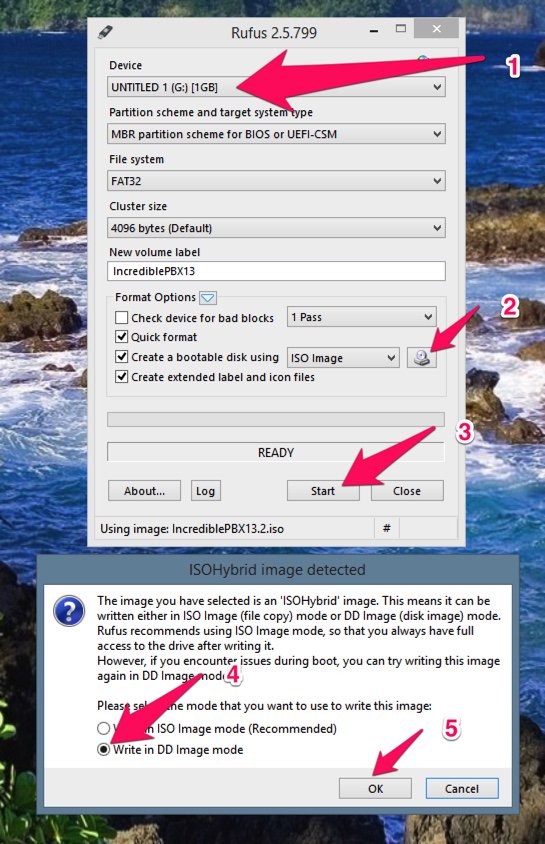
Creating a USB Flash Drive Installer with a Windows PC. In order to create a USB thumb drive using an ISO image, you’ll first need to install Rufus. It’s free. Once you’ve installed it, insert a blank USB thumb drive and run Rufus. Make your settings look like what’s shown above. Be very careful in choosing your Device. You don’t want to accidentally erase the wrong drive on your Windows machine. The correct choice is the USB thumb drive you just inserted. Don’t guess!! Step 2 is choosing the IncrediblePBX13.2.iso file that you downloaded from SourceForge. Step 3 is clicking Start. The ISOHybrid Window will be presented. Step 4 is changing the default setting to "Write in DD image mode." Step 5 is pressing OK. In a few minutes, your ISO image transfer to the USB flash drive will be finished. Give it 15 seconds just to be safe. Then remove the USB thumb drive and you’re ready to begin the install on your dedicated Incredible PBX server.
Creating a USB Flash Drive Installer with a Mac. To create a USB thumb drive using an ISO image on a Mac, first insert the USB thumb drive and partition it with a single MS-DOS partition using Disk Utility. Next, open a Terminal window and issue the command: diskutil list. Review the device names and find the one that matches the size of your thumb drive. It will be something like /dev/disk9. Again, be careful. You don’t want to accidentally erase the wrong drive on your Mac! Next, change to the directory into which you downloaded IncrediblePBX13.2.iso, e.g. cd Desktop. Now issue the following commands substituting the actual device name for /dev/disk9 below:
diskutil unmountDisk /dev/disk9
sudo dd if=IncrediblePBX13.2.iso bs=1m of=/dev/disk9
sudo sync
diskutil eject /dev/disk9
When the install completes, remove the USB thumb drive and you’re ready to begin the install on your dedicated Incredible PBX server. NOTE: There will be no feedback during the dd step above. It can take 15 minutes or more depending upon the horsepower of your Mac. Be patient!
Creating a USB Flash Drive Installer on a Linux machine. To create a USB thumb drive using an ISO image on a Linux machine, first log into your server as root. Insert a blank USB thumb drive. From the CLI, decipher the device name of your thumb drive: fdisk -l. The device name will be something like /dev/sdb. Be careful. You don’t want to accidentally erase the wrong drive on your Linux server! Change to the directory into which you downloaded IncrediblePBX13.2.iso, e.g. cd /root. To transfer the ISO to your thumb drive, issue the following commands replacing /dev/sdb with the actual device name for your thumb drive in lines 1 and 3 below:
dd if=IncrediblePBX13.2.iso bs=4M of=/dev/sdb
sync
udisks --detach /dev/sdb
When the install completes, remove the USB thumb drive and you’re ready to begin the install on your dedicated Incredible PBX server. NOTE: There will be no feedback during the dd step above. It can take 5 to 15 minutes depending upon the horsepower of your Linux machine.
Kicking Off the Incredible PBX 13 Install. Now we’re ready to install Incredible PBX 13 on your dedicated server platform. Simply insert the DVD-ROM or USB thumb drive in your server-to-be and boot. During the POST boot process, press the function key that displays a Boot Device Menu and choose your DVD-ROM drive or USB device. When the Incredible PBX 13 installation menu displays, choose Basic Install and press ENTER. Choose your time zone, create a really secure root password, and have a coffee break. When Scientific Linux 6.7 has been installed, your server will reboot. Accept the Incredible PBX license agreement and press the ENTER key. Go to lunch and, when you return, you should be good to go. When the installation finishes, reboot your server and log in as root to apply the last minute updates for Incredible PBX.
To complete the install, perform the following from the Linux CLI while logged in as root:
- Change your root password if it’s insecure: passwd
- Set your Incredible GUI admin password: /root/admin-pw-change
- Set your web apps admin password: htpasswd /etc/pbx/wwwpasswd admin
- Set your correct time zone: /root/timezone-setup
- Add WhiteList entries to firewall if needed: /root/add-ip or /root/add-fqdn
- Store PortKnocker credentials in a safe place: cat /root/knock.FAQ
- *** THE REMAINING FEATURES ARE OPTIONAL ADDITIONS ***
- Login to your NeoRouter VPN server: /root/nrclientcmd
- Download latest Incredible Fax installer: http://nerd.bz/2nSeHKs
- To enable free faxing: /root/incrediblefax11.sh
- Set admin password for AvantFax: /root/avantfax-pw-change
- To enable PPTP VPN: /root/pptp-install
- To enable Google Voice OAUTH authentication: http://nerd.bz/1JaO4ij (1b.)
- To remove GPL Module Signature Checking in GUI: http://nerd.bz/1fpwZJL
- To install FCC RoboCall BlackList: https://nerdvittles.com/?p=15412
- To upgrade Asterisk to current release2: /root/upgrade-asterisk-to-current
- To upgrade all FreePBX GPL Modules: /var/lib/asterisk/bin/module_admin upgradeall && rm -f /tmp/* && amportal a r
Managing Your Server with Incredible PBX Web-Based Tools
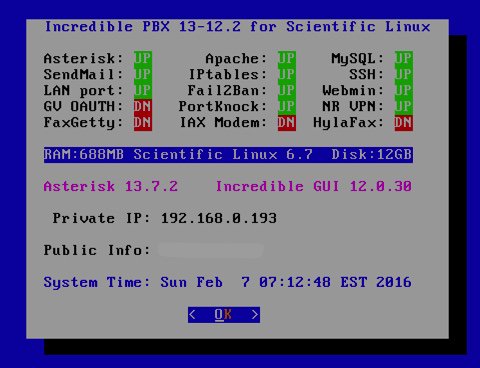
Most of your time initially configuring and managing your server will be spent using the web-based tools provided with Incredible PBX. Using any modern browser, go to the IP address of your server as shown in the status display above. This will bring up the Kennonsoft GUI that provides access to all of the web-based applications. Toggle between User and Admin apps by clicking on the blue tab in the lower left section of the display. This GUI also displays the latest security alerts and bug fixes from the PIAF RSS Feed. We recommend you check it at least once a week.

The other GUI to configure the FreePBX® GPL modules is accessed from the Admin menu in the Kennonsoft menus. Choose Incredible GUI Administration. The default username is admin and the password is what you set during the final installation steps above. Once the Incredible PBX GUI appears, edit extension 701 so you can figure out (or change) the randomized passwords that were set up for your 701 extension and voicemail account: Applications -> Extensions -> 701. If you’re behind a hardware-based firewall, verify the NAT setting is set to YES.
Setting Up a Soft Phone to Use with Incredible PBX
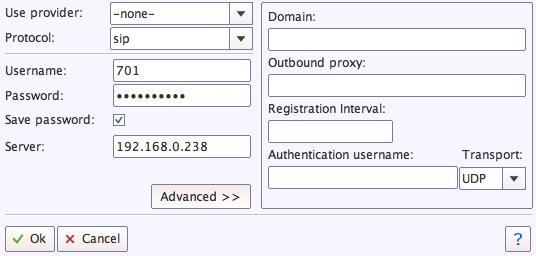
Now you’re ready to set up a telephone so that you can play with Incredible PBX. We recommend YateClient which is free. Download it from here. Run YateClient once you’ve installed it and enter the credentials for the 701 extension on Incredible PBX. You’ll need the IP address of your server plus your extension 701 password. Choose Settings -> Accounts and click the New button. Fill in the blanks using the IP address of your server, 701 for your account name, and whatever password you created for the extension. Click OK.
Once you are registered to extension 701, close the Account window. Then click on YATE’s Telephony Tab and place some test calls to the numerous apps that are preconfigured on Incredible PBX. Dial a few of these to get started:
DEMO - Allison's IVR Demo

947 - Weather by ZIP Code

951 - Yahoo News

*61 - Time of Day

*68 - Wakeup Call

TODAY - Today in History
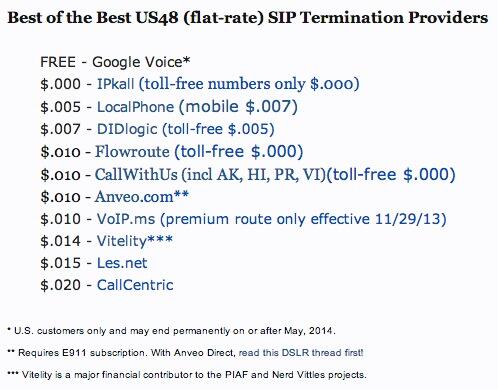
Now you’re ready to connect to the telephones in the rest of the world. If you live in the U.S., the easiest way (at least for now) is to set up a free Google Voice account. Google has threatened to shut this down but as this is written, it still works. Upgrading your server for OAUTH authentication is covered here. Start at step #1b. The safer long-term solution is to choose several SIP providers and set up redundant trunks for your incoming and outbound calls. The PIAF Forum includes dozens of recommendations to get you started.
Configuring Google Voice
If you want to use Google Voice, you’ll need a dedicated Google Voice account to support Incredible PBX. If you want to use the inbound fax capabilities of Incredible Fax, then you’ll need an additional Google Voice line that can be routed to the FAX custom destination using the GUI. The more obscure the username (with some embedded numbers), the better off you will be. This will keep folks from bombarding you with unsolicited Gtalk chat messages, and who knows what nefarious scheme will be discovered using Google messaging six months from now. So keep this account a secret!
We’ve tested this extensively using an existing Gmail account, and inbound calling is just not reliable. The reason seems to be that Google always chooses Gmail chat as the inbound call destination if there are multiple registrations from the same IP address. So, be reasonable. Do it our way! Set up a dedicated Gmail and Google Voice account, and use it exclusively with Incredible PBX. It’s free at least through 2013. Google Voice no longer is by invitation only so, if you’re in the U.S. or have a friend that is, head over to the Google Voice site and register.
You must choose a telephone number (aka DID) for your new account, or Google Voice calling will not work… in either direction. Google used to permit outbound Gtalk calls using a fake CallerID, but that obviously led to abuse so it’s over! You also have to tie your Google Voice account to at least one working phone number as part of the initial setup process. Your cellphone number will work just fine. Don’t skip this step either. Just enter the provided 2-digit confirmation code when you tell Google to place the test call to the phone number you entered. Once the number is registered, you can disable it if you’d like in Settings, Voice Setting, Phones. But…
IMPORTANT: Be sure to enable the Google Chat option as one of your phone destinations in Settings, Voice Setting, Phones. That’s the destination we need for The Incredible PBX to work its magic! Otherwise, all inbound and outbound calls will fail. If you don’t see this option, you may need to call up Gmail and enable Google Chat there first. Then go back to the Google Voice Settings.
While you’re still in Google Voice Settings, click on the Calls tab. Make sure your settings match these:
- Call Screening – OFF
- Call Presentation – OFF
- Caller ID (In) – Display Caller’s Number
- Caller ID (Out) – Don’t Change Anything
- Do Not Disturb – OFF
- Call Options (Enable Recording) – OFF
- Global Spam Filtering – ON
Click Save Changes once you adjust your settings. Under the Voicemail tab, plug in your email address so you get notified of new voicemails. Down the road, receipt of a Google Voice voicemail will be a big hint that something has come unglued on your PBX.
UPDATE: Google has improved things… again. You may not see the options documented above at all. Instead, you may be presented with the new Google Voice interface which does not include the Google Chat option. But fear not. At least for now there’s still a way to get there. After you have set up your new phone number, click on (1) Settings -> Phone Numbers and then click (2) Transfer (as shown below). That returned the old UI. Make sure the Google Chat option is selected and disable forwarding calls to default phone number.

One final word of caution is in order regardless of your choice of providers: Do NOT use special characters in any provider passwords, or nothing will work!
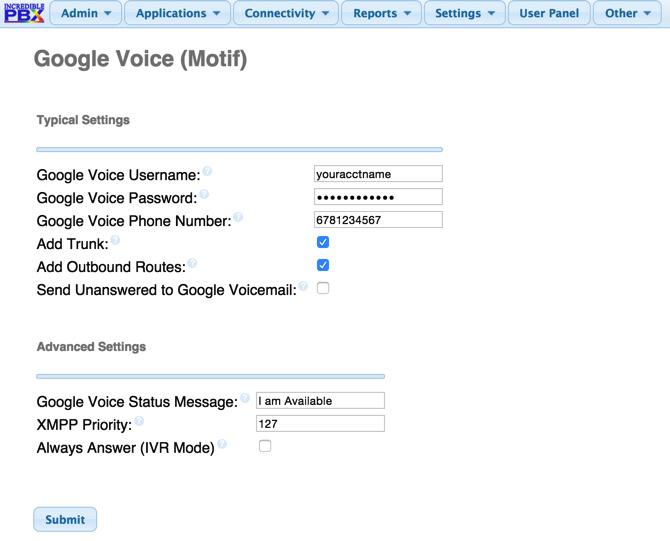
Now you’re ready to set up your Google Voice trunk in the GUI. After logging in with your browser, click the Connectivity tab and choose Google Voice/Motif. To Add a new Google Voice account, just fill out the form. Do NOT check the third box or incoming calls will never ring!
IMPORTANT LAST STEP: Google Voice will not work unless you restart Asterisk from the Linux command line at this juncture. Using SSH, log into your server as root and issue the following command: amportal restart.
If you have trouble getting Google Voice to work (especially if you have previously used your Google Voice account from a different IP address), try this Google Voice Reset Procedure. It usually fixes connectivity problems. If it still doesn’t work, enable Less Secure Apps using this Google tool.
Troubleshooting Audio and DTMF Problems
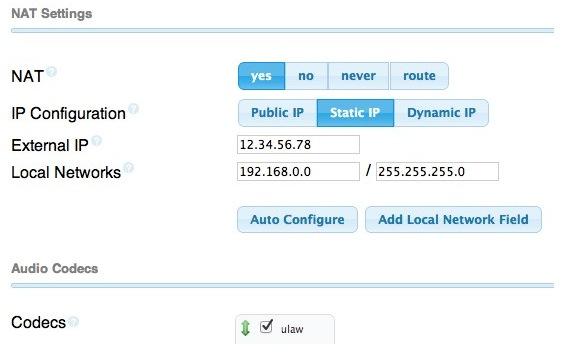
You can avoid one-way audio on calls and touchtones that don’t work with these simple settings in the GUI: Settings -> Asterisk SIP Settings. Just plug in your public IP address and your private IP subnet. Then set ULAW as the only Audio Codec.
A Few Words About Our Security Model
Incredible PBX for Scientific Linux joins our previous builds as our most secure turnkey PBX implementation. As configured, it is protected by both Fail2Ban and a hardened configuration of the IPtables Linux firewall. The latest release also includes Port Knocker for simple, secure access from any remote computer or smartphone. You can get up to speed on how the technology works by reading the Nerd Vittles tutorial. Your Port Knocker credentials are stored in /root/knock.FAQ together with activation instructions for your server and mobile devices. The NeoRouter VPN client also is included for rock-solid, secure connectivity to remote users. Read our previous tutorial for setup instructions. As configured, nobody can access your PBX without  your credentials AND
  an IP address that is either on your private network or that matches the IP address of your server or the PC from which you installed Incredible PBX. You can whitelist additional IP addresses by running the command-line utility /root/add-ip. You can remove whitelisted IP addresses by running /root/del-acct. Incredible PBX is preconfigured to let you connect to many of the leading SIP hosting providers without additional firewall tweaking. We always recommend you also add an extra layer of protection by running your server behind a hardware-based firewall with no Internet port exposure, but that’s your call. And it’s your phone bill. 😉
The IPtables firewall is a complex piece of software. If you need assistance with configuring it, visit the PIAF Forum for some friendly assistance.
Incredible Backup and Restore
We’re pleased to introduce our latest backup and restore utilities for Incredible PBX. Running /root/incrediblebackup will create a backup image of your server in /tmp. This backup image then can be copied to any other medium desired for storage. To restore it to another Incredible PBX server, simply copy the image to a server running Asterisk 13 and the same version of the Incredible PBX GUI. Then run /root/incrediblerestore. Doesn’t get much simpler than that.
Incredible PBX Automatic Update Utility
Every time you log into your server as root, Incredible PBX will ping the IncrediblePBX.com web site to determine whether one or more updates are available to bring your server up to current specs. We recommend you log in at least once a week just in case some new security vulnerability should come along. We originally had planned to make our fortune off update fees, but we changed our mind. So… contrary to the language in some of our builds, contributions to our projects are PURELY VOLUNTARY. You’ll get every update as it’s released whether you financially support our projects or not. Why haven’t we fixed the language? Good question. The short answer is it’s buried deep in the GUI image that would have to be regenerated from scratch. We’ll get to it one of these days. In the meantime, sleep soundly. No one will be breaking down your door for a donation.
We also encourage you to sign up for an account on the PIAF Forum and join the discussion. In addition to providing first-class, free support, we think you’ll enjoy the camaraderie.
Incredible PBX Application Users Guide
Your next stop ought to be learning about the three dozen applications included in Incredible PBX. We’ve put together this tutorial to get you started. Enjoy!
Originally published: Sunday, November 22, 2015
 Support Issues. With any application as sophisticated as this one, you’re bound to have questions. Blog comments are a terrible place to handle support issues although we welcome general comments about our articles and software. If you have particular support issues, we encourage you to get actively involved in the PBX in a Flash Forums. It’s the best Asterisk tech support site in the business, and it’s all free! Please have a look and post your support questions there. Unlike some forums, ours is extremely friendly and is supported by literally hundreds of Asterisk gurus and thousands of users just like you. You won’t have to wait long for an answer to your question.
VULTR VPS $20 Free Trial: Perfect Platform for #Asterisk & #IncrediblePBX https://t.co/Nwg2nFN99B #XiVO pic.twitter.com/xO0VpROUq8
— Ward Mundy (@NerdUno) July 20, 2016
Special Thanks to Our Generous Sponsors
FULL DISCLOSURE: ClearlyIP, Skyetel, Vitelity, DigitalOcean, Vultr, VoIP.ms, 3CX, Sangoma, TelecomsXchange and VitalPBX have provided financial support to Nerd Vittles and our open source projects through advertising, referral revenue, and/or merchandise. As an Amazon Associate and Best Buy Affiliate, we also earn from qualifying purchases. We’ve chosen these providers not the other way around. Our decisions are based upon their corporate reputation and the quality of their offerings and pricing. Our recommendations regarding technology are reached without regard to financial compensation except in situations in which comparable products at comparable pricing are available from multiple sources. In this limited case, we support our sponsors because our sponsors support us.
 BOGO Bonaza: Enjoy state-of-the-art VoIP service with a $10 credit and half-price SIP service on up to $500 of Skyetel trunking with free number porting when you fund your Skyetel account. No limits on number of simultaneous calls. Quadruple data center redundancy. $25 monthly minimum spend required. Tutorial and sign up details are here.
![]() The lynchpin of Incredible PBX 2020 and beyond is ClearlyIP components which bring management of FreePBX modules and SIP phone integration to a level never before available with any other Asterisk distribution. And now you can configure and reconfigure your new Incredible PBX phones from the convenience of the Incredible PBX GUI.
The lynchpin of Incredible PBX 2020 and beyond is ClearlyIP components which bring management of FreePBX modules and SIP phone integration to a level never before available with any other Asterisk distribution. And now you can configure and reconfigure your new Incredible PBX phones from the convenience of the Incredible PBX GUI.
 VitalPBX is perhaps the fastest-growing PBX offering based upon Asterisk with an installed presence in more than 100 countries worldwide. VitalPBX has generously provided a customized White Label version of Incredible PBX tailored for use with all Incredible PBX and VitalPBX custom applications. Follow this link for a free test drive!
 Special Thanks to Vitelity. Vitelity is now Voyant Communications and has halted new registrations for the time being. Our special thanks to Vitelity for their unwavering financial support over many years and to the many Nerd Vittles readers who continue to enjoy the benefits of their service offerings. We will keep everyone posted on further developments.
Some Recent Nerd Vittles Articles of Interest…
- If you’re wondering what packages are installed with Scientific Linux, come back next week and download the entire Incredible PBX ISO build environment. All of the packages installed on your server are included in the build platform itself. Feel free to add to them or change them to your heart’s content. We don’t have a million dollar staff. That’s why we depend upon folks like you to offer suggestions and enhancements. In short, we treat Incredible PBX like a real open source project. Come join the fun! [↩]
- This is unnecessary when you first install Incredible PBX because it automatically installs the latest version of Asterisk 13. [↩]


A networking quirk on the Intel NUC platform prompted us to make a small adjustment in the ISO and to add the NetworkManager package to the base SL 6.7 install. Prior releases on SF have been renamed to beta1 and beta2. The latest build will always be named IncrediblePBX13.2.iso.