

SIP URIs make the VoIP World go ’round. They’re the email-like addresses that carry VoIP calls between SIP servers to reach their destination. But there’s gold in them hills if you know how to use SIP URIs because SIP URI calls are free even if the calls travel all the way around the world. We previously documented how to deploy SIP URI calling with PIAF5 and 3CX, and today we’ll show you how to make SIP URI calls from and to your Issabel™ server using Incredible PBX®. More importantly, we’ll show you how to do it safely without opening up the anonymous calling floodgates and compromising your Asterisk® server.
Now that we’ve gotten the price of cloud-based servers down to a respectable $1.50 to $2.50 per month, it’s time to cut the cord and kiss your home-grown server goodbye. The babysitting headaches and maintenance costs of running your own server and paying for electricity simply aren’t worth it. There’s another reason. NAT-based routers and firewalls complicate things when it comes to VoIP. Not only do you have to wrestle with SIP headers and ALG, but you also have to troubleshoot thorny one-way audio issues with VoIP calling. So bite the bullet and play along today. Skip that Starbucks coffee this week and you’ve all but paid for a full year’s worth of VoIP server hosting in the Cloud.
Getting Started with Vultr
If you just want to experiment in a cloud-based sandbox, then there’s no better option than Vultr. For less than a penny an hour, you can build a VoIP platform, tear it down, and build another one for less than the cost of a nickel candy bar. You remember those, don’t you? I actually tried to think of something that still costs a nickel, but that was the best I could do… and that was 50+ years ago.
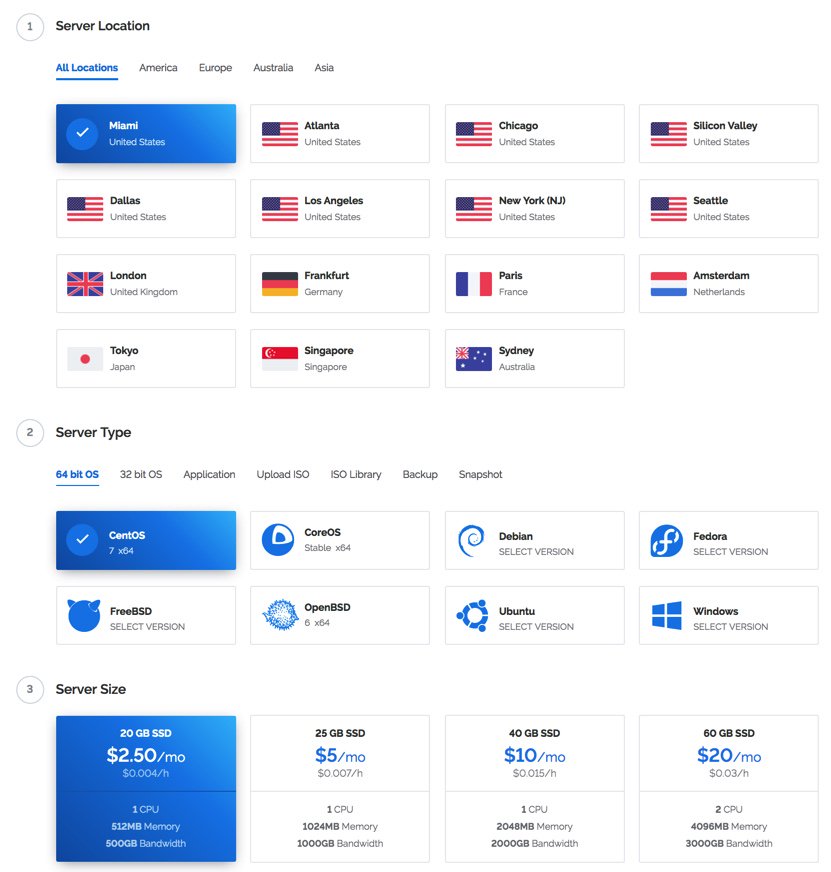
After you’ve created an account on Vultr with our referral link, the first step is to create your new cloud instance. Choose New York or Miami as your desired hosting site (they both have $2.50/month availability) and select 64-bit CentOS 7 as your server platform. An additional 50¢ a month buys you automatic daily, weekly, or monthly backups to a separate, fault tolerant storage system in the same data center. HINT!
(1) Once you’ve built and started your new virtual machine, log into your server as root using SSH/Putty and immediately change your root password: passwd.
(2) With the $2.50 size VULTR virtual machine, you must create a swapfile before beginning the Issabel installation. Here are the commands:
dd if=/dev/zero of=/swapfile bs=1024 count=1024k
chown root:root /swapfile
chmod 0600 /swapfile
mkswap /swapfile
swapon /swapfile
echo "/swapfile swap swap defaults 0 0">>/etc/fstab
sysctl vm.swappiness=10
echo vm.swappiness=10>>/etc/sysctl.conf
free -h
cat /proc/sys/vm/swappiness
(3) Now skip down to the Issabel installation section to continue.
Getting Started with WootHosting
If $2.50 a month is too rich for your blood, there actually are two $1.50 a month options at WootHosting if you sign up for a year. With the New York special, you get a single VPS platform. With the twofer special, you actually get two VPS platforms in your choice of cities. WootHosting also offers considerably more horsepower with quadruple the RAM and more storage space. You can read our review of WootHosting here.
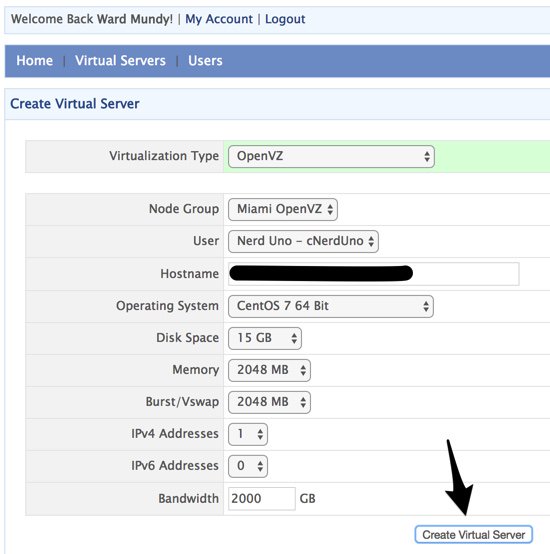
(1) Start by creating a CentOS 7 Minimal VPS platform in New York, Miami, or Los Angeles. If you opted for the WootHosting twofer special, then you’ll need to create a user and then a virtual server platform that looks something like this:
(2) Set a root password in the Root/Admin Password tab and enable TUN/TAP (needed for NeoRouter) in the Settings tab.
(3) Login to your server as root using SSH Terminal or Putty.
(4) Now continue with the Issabel installation as documented below.
Installing Issabel on Your VPS Platform
Issue the following commands to install Issabel. When prompted for a MariaDB (MySQL) and admin password, make certain to use passw0rd (with a zero) for your MariaDB password and a very secure password for your admin password, the one you’ll use to login as admin to Issabel’s web interface.
yum -y update
yum -y install wget nano
wget -O - http://repo.issabel.org/issabel4-netinstall.sh | bash
When the Issabel install is complete, your server will automatically reboot.
Installing Incredible PBX for Issabel on Your VPS
After the reboot, log back into your server as root and issue the following commands to install Incredible PBX for Issabel. You will again be prompted for MariaDB and admin passwords. Do exactly as you did above using passw0rd as your MariaDB password. At the conclusion of the install, you will again be prompted for the same admin password you used above. This is actually used for Apache web security and will be the first prompt you see when you attempt to login to any web application including Issabel, AsteriDex, and Reminders.
wget http://incrediblepbx.com/IncrediblePBX11-Issabel4.sh
chmod +x IncrediblePBX11-Issabel4.sh
./IncrediblePBX11-Issabel4.sh
When the installation finishes, reboot your server once again and then log back in as root. The Automatic Update Utility will load current patches and then display pbxstatus.
Using a browser, login to the Issabel web client at the IP address shown in pbxstatus. You’ll be prompted twice (http and https) for your Apache admin credentials which should be the same as your Issabel GUI admin credentials. Save your Apache credentials in your browser when prompted to do so. Then you won’t have to provide Apache credentials again. Next, login to the Issabel GUI with admin and your admin password.
That completes the basic install of Incredible PBX and Issabel. Our previous tutorial will walk you through the basics of setting up your trunks, extensions, and routes in Issabel.
Overview of SIP URI Implementation with Issabel
There are any number of ways to implement incoming SIP URI support on Asterisk-based servers. Most are terribly insecure and provide an easy target for the bad guys to make free calls using your paid VoIP provider accounts. The traditional method to permit SIP URI access to your server would require poking a hole in your firewall to allow unrestricted access to the SIP port of your server, UDP 5060. In addition, it would require enabling unrestricted anonymous calling access to Asterisk via FreePBX®. After all, that’s similar to the way the Ma Bell telephone system operated. Anyone in the world could call you provided they had your number. The major deterrent was that most of the calls incurred costs to the caller with no monetary benefits being derived. VoIP changed all of that. Using a SIP client and SIP URIs, anonymous individuals now can place unlimited calls to unlimited VoIP servers at no cost. And, if they get lucky, they can decipher a way to call into your PBX via SIP URI and then call out using phone trunks that you actually have to pay for. Bad idea!
We have a better way that’s entirely secure and won’t incur calling charges for incoming anonymous SIP URI calls. The solution is to set up a trunk with a hosting provider that supports anonymous SIP URI access and then leave it to the VoIP provider to manage the thorny SIP security problems which is not Asterisk’s strong suit. Once we’ve set up the SIP URI with the provider, we will register a trunk with that provider on our Issabel server. Then all of the anonymous SIP URI calls will come into the SIP provider and be rerouted to Issabel through our registered trunk with that provider. No firewall puncturing is required because we will be using a registered trunk and tunnel between our server and the provider.
Implementing SIP URI Support with VoIP.ms
Our favorite VoIP provider to implement this is VoIP.ms in Canada. They have POP servers throughout the world so you can pick a server that is close to your cloud-based Issabel server. VoIP.ms POPs are available in Tampa, New York, and Los Angeles among others worldwide. Step one is to set up an account at VoIP.ms if you don’t already have one. Step two is to set up a SubAccount with a difficult-to-guess VoIP.ms Internal Extension Number. Be sure to jot down the Username and Password you set up for your SubAccount. You’ll need them in a minute. In our example today, we’re using 4772235642 as the internal extension number. This means other VoIP.ms account holders can reach this account by dialing 10+ 4772235642. And anyone on the Internet can reach this account by dialing your VoIP.ms account number + 4772235642 at the POP to which you are registering a VoIP.ms DID associated with this SubAccount. Clear as mud? Hang in there a bit longer.
Step three is to sign up for a VoIP.ms DID. This could be a free iNUM DID or a commercial DID (traditional 10-digit NANPA number) that your PBX could actually use to receive traditional calls. Commercial DIDs range in price from under $1 a month with incoming calls costing under a penny a minute to $4.25 a month with unlimited incoming (residential) calls. For our purposes today, the type of DID and its commercial cost really don’t matter. When any of these DIDs are connected to a SubAccount with an associated Internal Extension Number, SIP URI calls to that DID’s internal extension number are free! So… the cheaper, the better.
The final step on the VoIP.ms side of things is to associate your DID with a SubAccount and choose a POP server to process the calls coming to you. This is done under the Manage DIDs tab in the VoIP.ms web interface.
So let’s review what we’ve done. We set up a VoIP.ms account. We created a SubAccount in their web interface and created an internal extension number for that subaccount. Next, we ordered a DID. And finally, we associated that DID with the subaccount we created and chose a POP server to deliver the inbound calls to our server.
Now we’re ready to set up a VoIP.ms trunk on our Issabel server and test things out.
Implementing SIP URI Support with Issabel
Incredible PBX makes setting up a VoIP.ms trunk easy. The template is already in place in the Issabel GUI. All you’ll need are your VoIP.ms credentials (SubAccount Username and Password), your DID number that you ordered from VoIP.ms, and the name of the VoIP.ms POP server (from Manage DIDs) that will be delivering the incoming calls. You’ll also want to jot down your Internal Extension Number (without leading 10) that you set up in your VoIP.ms SubAccount. You’ll need that and the FQDN of the VoIP.ms POP in order to decipher the SIP URI (phone number) to reach your server.
While logged into the Issabel GUI, navigate to PBX:PBX Config:Trunks:VoIPms. Insert your DID in the Outbound CallerID field. Uncheck the Disable Trunk box. Under PEER Details, insert your VoIP.ms username in the username and fromuser fields. Insert your VoIP.ms password in the password field. Insert the FQDN of the VoIP.ms POP server in the host field. Under Register String, insert your username, followed by a colon, your password, followed by @, your POP FQDN, followed by /DID, e.g. johndoe:secret@tampa.voip.ms/8005551212.
Next, we need to create an Inbound Route to process the incoming calls from VoIP.ms. Navigate to PBX:PBX Config:Inbound Routes. Click Add Incoming Route. In the Description field, enter VoIPms-Incoming. In the DID Number field, insert your DID number. In the Source field, choose OpenCNAM. In the Set Destination dialog, choose a destination for the incoming calls, e.g. an extension, ring group, or IVR. Then click Submit and reload dialplan.
Finally, we need to adjust a SIP setting to support SIP URI calls from VoIP.ms. Navigate to Security:Advanced Settings. Set Enable Direct Access ON. Set Allow Anonymous Calls OFF. Enter your admin password twice. Click SAVE.
Next, navigate to PBX:PBX Config:Unembedded IssabelPBX. When the new window opens, navigate to Settings:Asterisk SIP Settings. In the External IP field, insert the IP address of your Issabel server. Click Auto Configure button immediately below that. Scroll to the bottom and, in Other SIP Settings, insert match_auth_username = yes in the two fields provided. Click Submit Changes and reload dialplan. Click Logout: Admin at the top of the browser window and then close the browser tab to return to the main Issabel GUI.
Deciphering the SIP URI for Your Issabel PBX
From the information you wrote down above, here’s how to assemble the SIP URI for your Issabel PBX. Start with your VoIP.ms account number, e.g. 101595. Add your Internal Extension Number, e.g. 4772235642. Add the @ symbol followed by the VoIP.ms POP routing calls to Issabel, e.g. tampa.voip.ms. You can give ours a try if you’d like to interact with Allison’s Demo IVR: 1015954772235642@tampa.voip.ms. Most SIP clients support SIP URI calling including Zoiper (PCs) and Telephone (Macs).
Placing Outbound SIP URI Calls from Issabel PBX
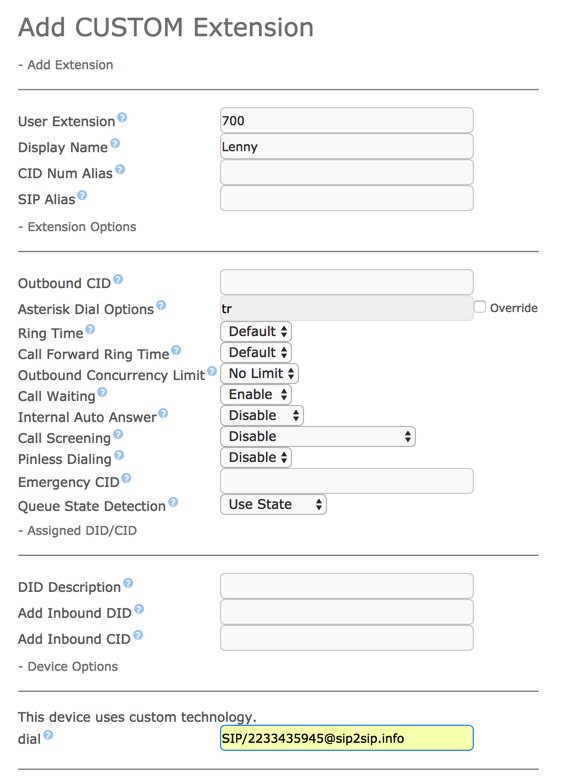
The easiest way to place outbound SIP URI calls from your Issabel PBX is to set up Custom Extensions for the destinations you wish to reach.
Navigate to PBX:PBX Config:Extensions:Other (Custom) Device. Assign an extension number and display name to the extension and insert the SIP URI in the dial field using the syntax shown below. Then click Submit and reload your dialplan.

We’ve barely scratched the surface of what you can do with Incredible PBX for Issabel. Head over to our introductory article where we’ve documented dozens of Asterisk® applications that await your exploration. Enjoy!
Published: Thursday, August 24, 2017

Need help with Asterisk? Visit the PBX in a Flash Forum.
Special Thanks to Our Generous Sponsors
FULL DISCLOSURE: ClearlyIP, Skyetel, Vitelity, DigitalOcean, Vultr, VoIP.ms, 3CX, Sangoma, TelecomsXchange and VitalPBX have provided financial support to Nerd Vittles and our open source projects through advertising, referral revenue, and/or merchandise. As an Amazon Associate and Best Buy Affiliate, we also earn from qualifying purchases. We’ve chosen these providers not the other way around. Our decisions are based upon their corporate reputation and the quality of their offerings and pricing. Our recommendations regarding technology are reached without regard to financial compensation except in situations in which comparable products at comparable pricing are available from multiple sources. In this limited case, we support our sponsors because our sponsors support us.
 BOGO Bonaza: Enjoy state-of-the-art VoIP service with a $10 credit and half-price SIP service on up to $500 of Skyetel trunking with free number porting when you fund your Skyetel account. No limits on number of simultaneous calls. Quadruple data center redundancy. $25 monthly minimum spend required. Tutorial and sign up details are here.
![]() The lynchpin of Incredible PBX 2020 and beyond is ClearlyIP components which bring management of FreePBX modules and SIP phone integration to a level never before available with any other Asterisk distribution. And now you can configure and reconfigure your new Incredible PBX phones from the convenience of the Incredible PBX GUI.
The lynchpin of Incredible PBX 2020 and beyond is ClearlyIP components which bring management of FreePBX modules and SIP phone integration to a level never before available with any other Asterisk distribution. And now you can configure and reconfigure your new Incredible PBX phones from the convenience of the Incredible PBX GUI.
 VitalPBX is perhaps the fastest-growing PBX offering based upon Asterisk with an installed presence in more than 100 countries worldwide. VitalPBX has generously provided a customized White Label version of Incredible PBX tailored for use with all Incredible PBX and VitalPBX custom applications. Follow this link for a free test drive!
 Special Thanks to Vitelity. Vitelity is now Voyant Communications and has halted new registrations for the time being. Our special thanks to Vitelity for their unwavering financial support over many years and to the many Nerd Vittles readers who continue to enjoy the benefits of their service offerings. We will keep everyone posted on further developments.
Some Recent Nerd Vittles Articles of Interest…


