
 Dell finally kissed its SC440 server goodbye last week so we've been scrambling for a replacement VoIP candidate for Asterisk® that has performance sufficient to serve as a 50 to 100-user small business PBX without breaking the bank. It turns out Dell's PowerEdge T100 introduced in September is strikingly similar to the SC440 both in performance, design, and even price, but it scales a bit better. If it walks like a duck, quacks like a duck, and is priced like chicken feed, that's good enough for us.
In early December, we got our first new T100: a Dual Core Intel® Pentium®E2180, 2.0GHz processor with 1MB Cache, an 800MHz FSB, two 80GB 7.2K RPM Serial ATA 3Gbps 3.5-in Cabled Hard Drives connected to the onboard SATA controller, 512MB of 667MHz DDR2 RAM, a DVD-ROM Drive, and an On-Board Single Gigabit Network Adapter for $299. Sound familiar? It should. The T100 special pricing was virtually identical to the $299 special on the SC440 except Dell now has thrown in a DVD-ROM drive in lieu of the SC440's CD-ROM drive. For $19 more, you can bring the system up to 2GB of RAM which is an excellent idea. If you missed out, don't fret. There will be another deal in a week or two. Even the regular pricing on this unit with a Celeron 1.8GHz processor, 2 gigs of RAM, and two 80GB drives is only $339. And international pricing is equally competitive. We haven't yet seen the $199 single-drive U.S. price that appeared regularly with the SC440, but it shouldn't be too long given the current economy.
As for scaling, if you're interested in a growth path, you'll love the T100 compared to the SC440. It supports numerous processors up to the Quad Core Xeon 2.83GHz with 2x6M Cache and 1333MHz FSB as well as two one-terabyte SATA drives (just don't buy them from Dell 😯 ). And, unlike the SC440, the T100 accepts up to 8GB of RAM. So the remaining question: "Will the SC440 Orgasmatron II build work with the T100?" And the answer is "sort of." But have no fear, we've put Humpty back together again and have added even more bells and whistles to the new Orgasmatron III custom-designed for the T100 today. It now includes your own, free and private Hamachi VPN cloud for up to 16 computers.
To get email alerts when the T100 again goes on sale, go to techbargains.com. Then click on Send Email Deal Alert and fill out the form entering T100 as your search term. Be sure to confirm the alert by replying to the email.
If you want a cash rebate on your Dell purchase, use our eBates link to Dell or click on the coupon image in the right column of this article. It takes less than 30 seconds to sign up, and you get $5 (and so do we!) plus you receive 2% cash back on your Dell small business purchases which can be deposited directly into your PayPal account.
We expect these units will follow in the footsteps of their SC440 cousin and go on sale roughly every two weeks... so be ready! The T100 also is good news for our international friends because Dell now markets this machine virtually everywhere in the world at very competitive prices. It's selling for 40% off in the U.K. and 299€ in many European countries as we speak.
For long-time readers, you already know that we've identified what we believe to be the perfect Asterisk SIP phone, the Aastra 57i. But both of our previously anointed small business/home servers on which to run a production Asterisk system for 50-100 employees, the Everex gPC2 (aka "The WalMart Special") and the Dell SC440, are no more. So this build brings us current with Dell's very latest offering in the low-cost, high-performance server category and builds on the SC440 tradition of providing a quantum leap in performance and reliability compared with traditional home PCs. The ISO images you'll be downloading were captured as a backup on the flash drive of our new T100 lab machine. You can expect at least twice the performance on the PowerEdge T100 compared to the WalMart Special. Today's Orgasmatron III Build provides a preconfigured T100 installation on a 2-disk ISO image backup of the whole system using Mondo. And, NO, it won't work with any other hardware! Once you download the ISO images and burn your CDs, it's a 15-minute No-Brainer to install the entire image onto your own T100. Wait to install any add-on cards until after you complete the Orgasmatron install. You must have a T100 configured as above, or this Mondo restore may not work. So accept no substitutes, or you may end up with an Electronic Brick instead of an Orgasmatron.

We've preconfigured some extensions on your new system as well as outbound and incoming trunks from some terrific providers including our second homegrown entry for VoIP terminations. Joe Roper and his business partner in Spain now offer a terrific IAX VoIP termination service. You can choose penny a minute service in the U.S. and most of Canada, or you can opt for premium VoIP service at about 2¢ a minute in the U.S. International rates also are VERY reasonable! You literally can sign up for service, plug in your phones, and have a system in full operation in under an hour.
 If you've missed our previous Orgasmatron articles, suffice it to say this is the Ultimate Kitchen Sink for Asterisk. From the time you insert the CD 'til you have a functioning Asterisk PBX with all the bells and whistles imaginable... just 15 minutes! In fact, it will take less time to create your new system than it will take you to finish reading this article. Please do BOTH! The Orgasmatron III includes PBX in a Flash 1.3 in all its glory including Asterisk 1.4.21.2 running under CentOS 5.2 with a version of Zaptel that actually works with legacy cards, plus the newly released FreePBX 2.5, a full-function fax server, a full-disk backup and restore solution (that actually works!), the latest Hamachi VPN software, every imaginable Nerd Vittles text-to-speech application for Asterisk, and so much more. Complete documentation for the TTS apps is available here.
- Inbound and Outbound VoIP Faxing Using nvFax... finally!
- FONmail for Asterisk to send voice messages to any email address on the planet
- AsteriDex RoboDialer and Telephone Directory
- Telephone Reminders with Support for Recurring Reminders and Web-based TTS Reminder Messages
- NewsClips for Asterisk featuring Dozens of Yahoo News Feeds (TTS)
- Weather Reports by Airport Code (TTS)
- Weather Reports by ZIP Code (TTS)
- Worldwide Weather Forecasts (TTS)
- xTide for Asterisk (TTS)
- MailCall for Asterisk: Get Your Email By Telephone (TTS)
- TeleYapper 4.0 Message Broadcasting System
- CallWho for Phone Lookup and Dialing of Entries in the AsteriDex Database (TTS)
- TFTP Server with preconfigured setups for 10 Aastra 57i SIP telephones
In addition, you get dozens of preconfigured telephony applications and functions that would take even an expert the better part of a year or two to build independently. And, unlike all of the other distributions, we build Asterisk from source so it's simple to modify and upgrade whenever you feel the need. Here's a short list of what you have to look forward to:
- Stealth AutoAttendant with Welcome and Application IVRs
- Key Telephone Support Using Park and Parking Lot
- Intercom/Paging Support
- Bluetooth Proximity Detection with Automatic Call Forwarding to Cell Phone
- DISA
- Blacklisting with Web and Telephony Interfaces
- CallerID Name Lookups from Numerous Providers
- Weekly Automated System Backups to a Flash Drive
- One Touch Day/Night Service
- Music on Hold
- Voicemail with Email Delivery of Messages and Pager Notification
- Voicemail Blasting
- Cell Phone Direct Dial
- Call Forward: All, Busy, No Answer
- Call Waiting
- Call Pickup
- Zap Barge
- Call Transfer: Attended and Blind
- Dictation Service with Email Delivery
- Do Not Disturb
- Gabcast
- Phonebook Dial by Name
- Speed Dial
- Flite Text to Speech (TTS)
- Windows Networking with SAMBA
- Linux Firewall and Fail2Ban with SSH, HTTP, and SIP/IAX login protection
- PBX in a Flash Software Update Service To Keep Your System Current
- One-Click Cepstral TTS Install with Allison... Just Type install-cepstral
Prerequisites. As mentioned, you'll need a T100 configured with the specs outlined above including the 2GB RAM upgrade. We also recommend an 8GB USB flash drive on which to store automatic weekly backups of your new system. Just plug it into your new machine, and follow the simple steps below to activate Mondo. Every Sunday night, you'll get a new backup in ISO format on your flash drive. If something goes wrong on your system, copy the ISOs to CDs and reboot with Disk 1. It doesn't get any easier than that. And you can always check on the latest backup by issuing the command: usbcheck
 Pay to Play. Greed has finally set in at Nerd Vittles. After all, Christmas is just around the corner! The download of this two-disk ISO image will set you back a whopping $10. In addition to covering the bandwidth and storage costs for the builds themselves, it also seems only fair that those using the builds help cover the hardware costs associated with these technology refreshes. When you compare our pricing to the Lime Green PBX offering from Dell... well, you don't really wanna know! There's one other little difference. Once you download our image from DreamHost, you are more than welcome to pass it along to as many of your friends and business acquaintances as you like. You can even do it electronically through the DreamHost Files Forever program. And, if you're inclined to host this image for your fellow man at no cost, be our guest... and thank you!
Bottom line: With a little patience waiting on Dell's next special, for about $300 and some lunch money, you'll have the slickest, newest, fastest, most reliable PBX and fax machine on the planet with rock-solid weekly backups and, of course, the availability of our one-of-a-kind PBX in a Flash Software Update Service! In fact, this may very well be The PerfectPBX™ even if we do say so.
Getting Started. Once you have your T100 in hand, take it out of the box, plug it into your LAN with DHCP and DNS support and Internet connectivity. You'll need a USB keyboard for typing temporarily. We also strongly recommend that you always keep your system running behind a NAT-based firewall/router. We strongly recommend the dirt-cheap dLink WBR-2310 WiFi router which handles NAT issues with VoIP masterfully. Don't redirect any ports to the machine and don't turn the PC on just yet.
Download the two ISO images for the T100 from here. Unzip the file and create two CDs from the ISO images. If you don't know how to create a CD from an ISO image, read that section from our previous article. In fact, read the whole article. It'll help you immensely down the road.
Once you've created your two CDs, turn on the T100 and quickly insert Disk 1 into the DVD drive and close the drive. When prompted, press F11 to choose the boot device and select the DVD-ROM drive. You'll note that the default T100 setup now apparently looks for a network boot device so you'll need to do a little BIOS reconfiguring, but you can do that at your convenience. F2 gets you into the T100 BIOS setup. Then choose Integrated Devices and, using the space bar, change Embedded Gb NIC from Enabled with PXE to simply Enabled. Press the escape key twice and then choose Save and Exit.
For now, choose the DVD-ROM drive as the boot device and proceed with the Mondo restore. If you don't see a Mondo Rescue screen within a minute or less, turn the machine off and then back on again. At the Mondo Rescue main screen, type nuke and press the Enter key. This will erase, repartition, and reformat your hard disk in case you didn't know. This is normal. If you get any kind of errors about incorrect drive or partition names and you really do have a T100, ignore them. Otherwise, halt the install by pressing CTL-ALT-DEL and remove the CD. You'll need to install PBX in a Flash using our standard ISO which is available here. Otherwise, go have a cup of coffee and come back in about 10 minutes. You'll be prompted to insert Disk 2 and press Enter to finish the install. When the second CD finishes, eject it and wait for the prompt. Then type "exit" and press Enter. Your T100 will reboot, and you're ready to go.
After the reboot finishes, type root at the login prompt for your username and password for your password. The IP address assigned by your DHCP server should appear on the status screen. Write it down. If there is no IP address, your machine does not have network connectivity or access to a DHCP server with an available IP address. Correct the problem and reboot.
Securing Passwords. We're going to change five passwords now. For the time being (until you've done some reading), think up one really difficult password (that you won't forget) and use it for all five passwords. At the root@pbx:~ $ command prompt, type the following commands and type in your new password when prompted. Don't forget your password or you'll get to put in your two CDs and start over.
passwd

passwd-maint

passwd-wwwadmin

passwd-meetme

/usr/libexec/webmin/changepass.pl /etc/webmin root yournewpasswordhere
Now, using a web browser, go to the IP address of your new PBX in a Flash server. Click the Admin tab, the password is password. Then choose the FreePBX Administration button. Log in as maint with your new maint password. Before you do anything else, change ALL of the 10 extension passwords to something very secure... as if your phone bill depended upon it! Click Setup, Extensions and then choose each extension, modify BOTH the device secret and Voicemail Password, and click Submit. When you finish all the extensions, then reload the dialplan to save your changes. Finally, change your DISA password to something very, very secure: Setup, DISA, DISAmain, PIN. Reload your dialplan once again to save your changes.
Regardless of what you may read elsewhere, the Orgasmatron III has all the very latest security patches as of today. If you want more security, take our advice and add a hardware-based firewall/router between your Internet connection and your new Orgasmatron III and don't expose port 80 (the web interface) to the Internet!
Permanently Setting the IP Address. There are different schools of thought on whether to use a fixed or dynamic IP address. Most hardware-based routers support DHCP IP address reservations. The simplest way to permanently secure the existing IP address for your server is to reserve it on your router. If you'd prefer to assign your own IP address, we have included the deprecated netconfig utility which can be run after logging into your server as root. Sometimes you will need to run it once, enter your settings, reboot, and then repeat the drill. Then you should be all set. Either way, you need a permanent IP address for your machine when all is said and done. Once you have a permanent IP address, hop on over to dyndns.org and sign up for your own fully-qualified domain name (FQDN), e.g. mypbx.dyndns.org. You're going to need it for a whole host of things with your new PBX, and dyndns.org is about the easiest way to do it. Once you have your FQDN and DynDNS username and password, log in as root and edit: /etc/ddclient/ddclient.conf. Search (Ctl-W) for ***. Fill in your username and password and uncomment those two lines. Then search for *** again, uncomment the next three lines and fill in your fully-qualified domain name. Save the file and service ddclient restart. To make sure everything worked, issue the following command: ddclient -force. Assuming there are no errors, issue the following command to start ddclient each time your server reboots: /sbin/chkconfig --add ddclient. Now the IP address of your Asterisk server will always resolve to your FQDN from DynDNS. And anyone can call you via SIP for free using the following SIP URI: mothership@yourFQDN.dyndns.org. You can take this a step further and sign up for a free incoming phone number at ipkall.com. For your account type, choose SIP. For your SIP phone number, enter: mothership. For your SIP proxy, enter the fully-qualified domain name (FQDN) for your server, e.g. mypbx.dyndns.org. Choose a password and enter your real email address, and they will beam you a Washington state phone number within a day or so. You can't beat the price!
Getting Phones to Work Reliably. If you or the the person at the other end of your calls only hears half the conversation or if your calls get abruptly disconnected after a few minutes, it's probably because you forgot to add IP addresses to tell SIP how to communicate with your Asterisk server sitting behind a firewall. Edit /etc/asterisk/sip_custom.conf and add an entry for your external IP address and also for your local (internal) subnet where Asterisk resides. Then restart Asterisk: amportal restart.
externip=68.28.142.83

localnet=192.168.0.0/255.255.255.0
If you have a dynamic IP address and you set up ddclient above with your fully-qualified domain name, we've created a little script to keep these entries up to date automatically. Just edit the following file:
/var/lib/asterisk/agi-bin/ip.sh
Fill in the correct entries for your fqdn and localnet. Then uncomment the last line in /etc/crontab which runs ip.sh once every 5 minutes.
Adding Plain Old Phones. Before your new PBX will be of much use, you're going to need something to make and receive calls, i.e. a telephone. For today, you've got several choices: a POTS phone, a softphone, or a SIP phone (highly recommended). Option #1 and the best home solution is to use a Plain Old Telephone or your favorite cordless phone set (with 8-10 extensions) if you purchase a little device (the size of a pack of cigs) known as an SPA-2102. It's under $70. Be sure you specify that you want an unlocked device, meaning it doesn't force you to use a particular service provider. Once you get it, plug the device into your LAN, and then plug your phone instrument into the SPA-2102. Note that this adapter supports two-line cordless phones! Your router will hand out a private IP address for the SPA-2102 to talk on your network. You'll need the IP address of the SPA-2102 in order to configure it to work with Asterisk. After you connect the device to your network and a phone to the device, pick up the phone and dial ****. At the voice prompt, dial 110#. The device will tell you its DHCP-assigned IP address. Write it down and then access the configuration utility by pointing your web browser to that IP address.
Once the configuration utility displays in your web browser, click Admin Login and then Advanced in the upper right corner of the web page. When the page reloads, click the Line1 tab and then repeat this drill for the Line2 tab if you want to connect the device to two extensions on your Asterisk system. Scroll down the screen to the Proxy field in the Proxy and Registration section of the form. Type in the private IP address of your Asterisk system which you wrote down previously. Be sure the Register field is set to Yes and then move to the Subscriber Information section of the form. Assuming you're using the preconfigured extensions starting with 701, do the following. Enter House Phone as the Display Name. Enter 701 as the User ID. Enter your actual password for this extension in the Password field, and set Use Auth ID to No. Click the Submit All Changes button and wait for your Sipura to reset. In the Line 1 Status section of the Info tab, your device should show that it's Registered. You're done. Now repeat the drill for Line2 using extension 702. Pick up a phone and dial 1234# to test out BOTH extensions.
Downloading a Free Softphone. Unless you already have an IP phone, the easiest way to get started and make sure everything is working is to install an IP softphone. You can download a softphone for Windows, Mac, or Linux from CounterPath. Or download the pulver.Communicator. Here's another great SIP/IAX softphone for all platforms that's great, too, and it requires no installation: Zoiper 2.0 (formerly IDEfisk). All are free! Just install and then configure with the IP address of your PBX in a Flash server. For username and password, use one of the extension numbers and passwords which you set up with FreePBX. Once you make a few test calls, don't waste any more time. Buy a decent SIP telephone. We think the best phone out there is the Aastra 57i for under $200. Another $100 buys you the Aastra 57i CT with a cordless DECT phone.
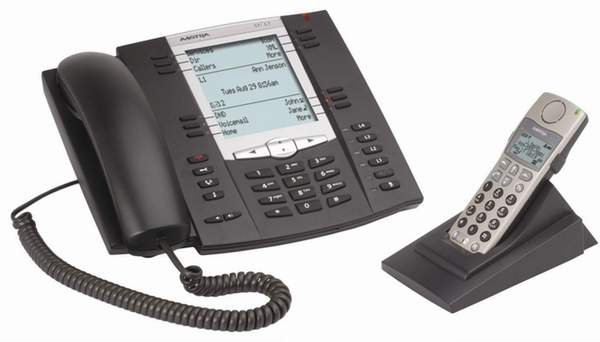
Configuring Aastra 57i SIP Phones. Your new system comes preconfigured to automatically configure up to 15 Aastra 57i phones. Plug each phone into your network and wait for it to boot. Once it boots, press the Option button, then Phone Status (3), then IP & MAC Address (1). Write down each phone's IP address and MAC address. Then press Done to exit from the menus.
Next, we need to tell your phone to use your new Asterisk server as the TFTP server to obtain its setup. Press the Option button again, then Admin Menu (5). Type 22222 for the admin password and press Enter. Then choose Config Server (1), then TFTP Settings (2), then Primary TFTP (1), enter the IP address of your new server, and press Done a half dozen times.
Log back into your server as root. Switch to the TFTP directory: cd /tftpboot. You'll notice that there are config files for up to 15 phones. Simply choose the extension number you wish to use for each phone AND rename each file (filenames are 701.cfg to 715.cfg) to the MAC address of each phone.cfg. Do NOT use hyphens or colons in the MAC address. Edit each of the .cfg files and replace the SIP line1 password with the new password you created for the extension using FreePBX. One final step and you'll be ready to load up your phones. We need to set the correct IP address to tell each phone where your server is located. So... issue the following command using the IP address of your new server instead of 192.168.0.123. Leave the rest of the command as it is!
sed -i 's|192.168.0.0|192.168.0.123|g' /tftpboot/aastra.cfg
Now restart each phone by pressing the Option button and then Restart Phone (6) and then the Restart button. Once the phone reboots, you can make a test call by dialing 1-2-3-4. You can get the latest news by dialing 5-1-1. Or get a weather forecast by airport code (6-1-1) or zip code (Z-I-P).
A Word About Ports. For the techies out there that want to configure remote telephones or link to a server in another town, you'll need to know the ports to remap to your new server from your firewall. Here's a list of the ports available and used by PBX in a Flash. We don't recommend exposing UDP 5038 which is used to communicate with Asterisk via the Asterisk Manager.
TCP 80 - HTTP (needed to access the web sites on your server from the Net)

TCP 22 - SSH (needed if you want remote SSH access)

TCP 9001 - WebMin (needed if you want remote WebMin access... not recommended!!!)

UDP 10000-62000 - RTP (needed for SIP communications)

UDP 5004-5037 - SIP (ditto)

UDP 5039-5082 - SIP (ditto)

UDP 4569 - IAX2 (needed for IAX connection between Asterisk servers)
 Setting Up Trunks for Outgoing and Incoming Calls. If you want to communicate with the rest of the telephones in the world, then you'll need a way to route outbound calls (terminations) to their destination. And you'll need a phone number (DIDs) so that folks can call you. Unlike the Ma Bell world, you need not rely upon the same provider for both. And nothing prevents you from having multiple outbound and incoming trunks to your new PBX. At a minimum, however, you do need one outbound trunk and one inbound phone number unless you're merely planning to talk to other extensions set up on your system. We've actually put all the hooks in place to make it easy for you to interconnect to other Asterisk servers, but we'll save that for another day. For today, we want to get you a functioning system so that you can place outbound calls to anywhere in the world and can receive incoming calls from anywhere in the world.
For outbound calling, we recommend you establish accounts with several providers. We've included the necessary setups for Joe Roper's new service for PBX in a Flash as well as Vitelity and AOL. To register for the service, just visit the web site and register. To sign up to the service in the USA and be charged in US Dollars, please sign up here. To sign up for the European Service and be charged in Euros, sign up here.
In addition to being one of the least expensive providers, there's also the premium service option. You can prefix any number with 000 to try it out. Give it a try. We think you'll be pleased with the service AND the pricing. DIDs for inbound service are not yet available, but Vitelity has lots of them, and there's a link below to get you started.
 Vitelity: One of the Best Providers on the Planet. If you're seeking the best flexibility in choosing an area code and phone number plus reasonable entry level pricing plus high quality calls, then Vitelity is a winner. Vitelity provides Tier A DID inbound service in over 3,000 rate centers throughout the US and Canada. And, when you use our special link to sign up, the Nerd Vittles and PBX in a Flash projects get a few shekels down the road while you get an incredible signup deal as well. The going rate for Vitelity's DID service is $7.95 a month which includes up to 4,000 incoming minutes on two simultaneous channels with terminations priced at 1.45¢ per minute. For PBX in a Flash users, sign up now, and you can purchase a Tier A DID with unlimited incoming calls for just $3.99 a month and you get a free hour of outbound calling to test out their call quality. To check availability of local numbers and tiers of service from Vitelity, click here. Do not use this link to order your DIDs, or you won't get the special pricing! After the free hour of outbound calling, Vitelity's rate is just 1.44¢ per minute for outbound calls in the U.S. You can't beat the price (except with us) and the call quality is excellent as well. We've tried just about everybody.
To sweeten the pot a bit more, we've preconfigured both inbound and outbound Vitelity trunks for you. For the vitel-inbound trunk, all you'll need to do is plug in your username, password, and host assigned by Vitelity and adjust the registration string to match your assigned username and password. In FreePBX, click Setup, Trunks, SIP/vitel-inbound and make the changes. Then adjust the vitel-outbound trunk to reflect your actual username in the fromuser and username entries, your real password in the secret entry, and the correct host provided by Vitelity for your outbound calls, and you're all set. In FreePBX, click Setup, Trunks, SIP/vitel-outbound and make the changes. The same setup drill will get you going the the PIAF VoIP service as well.
To test things out, pick up a phone configured on your system and dial an area code and number of someone in the United States or Canada. Now get someone to call you using your new number. Presto! You have inbound and outbound phone service. And, if you'd like to see just how good SIP service can be, pick up a phone on your system and dial D-E-M-O. This will connect you to the PBX in a Flash hosted demo applications server at Aretta Communications.
An Alternate Outbound Calling Solution. As we said, it costs you almost nothing to add an alternate outbound calling solution to your new system. As luck would have it, adding a third outbound calling provider is now a breeze because AOL just entered the SIP terminations market with a product called AIM Call Out. We wrote about it recently, and you can read the article here. All you need is an AOL or AIM account name and $5 to get you started. The system you've just installed is preconfigured to use AIM Call Out. All you have to do is plug in your username and password, and you can immediately make calls to anywhere in the United States for under 2¢ per minute. Adding international calling is as easy as inserting the correct dial string. If you never use it, it doesn't cost you a dime. So $5 is mighty cheap insurance in our book.
First things first. Sign up for the service at this link. Your username will look something like this: johndoe@aim.com. You also will be assigned a password. Using your web browser, open FreePBX by pointing to the IP address of your new server and choosing Administration, then FreePBX. Type in admin as your username and the password you assigned to your system. From the main FreePBX menu, choose Setup, Trunks, and click on SIP/AIM in the far right column. Scroll down to the Peer Details section of the form and replace yourAIMpassword with your new password. Then replace yourAIMaccountname with your actual AIM account name. Now click the Submit Changes button and then Apply Configuration Changes and Continue with Reload.
Setting Up an Alternate DID for Incoming Calls. You also may want to consider a second phone number where people can call you. For example, if Grandma and Grandpa happen to be in another state and still have an old fashioned telephone, you might consider adding an additional DID to your system in their area code. They then can make a local call to reach you by dialing the local DID. On the les.net pay-as-you-go plan, it costs less than a dollar a month plus a penny a minute for the calls. Money well spent if we do say so... and you'll sleep better.
If this setup looks a bit complicated, don't be intimidated. Remember, we're connecting your PBX to the rest of the world so people can call you! With les.net, you have a choice of rate plans for most DIDs. You either can pay $3.99 a month for unlimited inbound calls with two concurrent channels or 99¢ per month and 1.1¢ per minute with four concurrent channels. Just visit their site and click Signup to register. Once you are registered, click Login and then Order DIDs. Pick a phone number. Then click Peers/Trunks and Create New Peer. Write down the Peer Name as you will need it in a minute to set up your connection. Choose SIP for Peer Technology, RFC2833 for DTMF Mode, G.711 for Codecs, Registration for Peer Type, enter the public IP address of your server for Peer Address, make up a secure password and write it down also, specify an Outbound CallerID for your calls, and check the 10-digit dialing box. Leave voicemail unchecked since you'll handle this on your end. Save your changes.
Now choose Your DIDs and click on the one you just ordered. We now need to tie the phone number to the Peer setup you just created above. Click on the DID and select the Route to Peer which you just created. Check the Send DID Prefix box and leave everything else blank. Click Save Changes and you're finished at the les.net end. Now let's set up your inbound DID trunk in Asterisk using FreePBX.
Log into FreePBX using a web browser. Click Setup, Trunks and then Add SIP Trunk. Fill in the CallerID and then drop down to the Outgoing Settings section of the form. For Trunk Name, use the Peer Name that you created above and wrote down. It ought to look something like this: 1092832198. For Peer Details, enter the following using the Peer Name and Password you assigned at les.net:
canreinvite=no

context=from-trunk

fromuser=1092832198

host=did.voip.les.net

insecure=port,invite

nat=yes

secret=yourpassword

type=peer

username=1092832198
For Incoming Settings, use from-pstn for the User Context and enter the following User Details:
canreinvite=no

context=from-pstn

dtmfmode=rfc2833

insecure=port,invite

nat=yes

type=user
For the registration string, enter a string like the following using your Peer Name and Password:
1092832198:yourpassword@did.voip.les.net/1092832198
Now click the Submit Changes button and then Apply Configuration Changes and Continue with Reload.
 Choosing a VoIP Provider That Supports Faxing. We've included a reliable fax solution in this build. You can review the details in this Nerd Vittles article. To test your machine, you can connect a real fax machine to one of the extensions using an SPA-2102. Then send a fax to extension 329 (F-A-X). But first you must configure your email address in two places using FreePBX: Setup, General Settings, Email address to have faxes emailed to AND Setup, Inbound Routes, any DID / any CID, fax Email. Once you've saved your settings, send the fax and see if it's delivered to your email address. If it works reliably, then the fax and email applications on your machine are configured correctly. Unfortunately, that's only half the battle. To receive faxes from outside your system, you'll also need a DID from a provider that supports faxing. And then it's still only about a 90% proposition... on a good day. We've tested this with many, many VoIP providers. Some work. Many don't. Some, such as Vitelity, offer a faxing service for a fee. Guess what? Their regular VoIP setup doesn't support faxing. Our old friends at Telasip.com still support faxing. We've also had good luck with Future-Nine and Teliax. You can read our fax dissertation here for more details. With the exception of the trunk setup covered in the article, all of the remaining setup steps already have been completed on your new server!
Interconnecting Two Asterisk Servers. We've preconfigured this build to support an IAX interconnect to a second PBX in a Flash system. The trunk setup for the second machine to match the setup on this build can be printed out. The filename is /root/MainPeerTrunkSetup.gif.
Choosing a Preferred Provider. Finally, you'll need to decide whether to use PIAF-USA or AOL or Vitelity as your primary terminations provider. HINT: Joe's new service is the cheapest! So we've set things up this way. This is handled in FreePBX in the Outbound Routes tab under the Default entry. You can adjust easily these in any way you like by adding trunks or moving entries up and down the list to change their priority. Just be sure to leave ENUM at the top of the list since ENUM calls are always free. If a free call isn't possible, your server will automatically drop down to the next trunk in the priority list. Don't add Vitelity to the list unless you have actually created a Vitelity account since they handle unsuccessful connections in a non-standard way which will cause FreePBX not to drop down to the next trunk to attempt a connection.
Activating the Stealth AutoAttendant for Inbound Calls. By default, all incoming calls are routed to the Day/Night Code 1 context which allows you to toggle calls between a Day setting and a Night setting by pressing *281. The Day setting for Code 1 is set to our Stealth Autoattendant which plays a brief greeting during which you can choose other options or direct dial extensions on your system before the call is passed to Ring Group 700. To change the options, edit MainIVR.
Activating Mondo Backups. We would be remiss if we didn't mention what a fantastic open source product Mondo Rescue is. It's the sole reason that today's build was possible. Our special thanks go to the development team: Bruno Cornec, Andree Leidenfrost, and Hugo Rabson. It is the first (and only) backup software for Linux builds that actually works reliably. The best way to prove that for yourself is to download the Orgasmatron III and try it for yourself. It has much more flexibility than what you will experience, but that would take another dozen pages to explain. We'll save that for another day. In the meantime, if you'd like more information, visit the Mondo Rescue web site.
WARNINGS: If you update the version of Mondo shipped with this distribution to the current version using either yum or a standalone RPM, you will break your backup system. The advantage of the newer version is that it can create bootable flash drives with your backup image. The disadvantage is that the restore process croaks and locks up your machine. So don't update for the time being. We'll let you know when it's safe to upgrade.
Particularly if you have more than one drive in your system, be aware that the device name for your USB flash drive may differ from the setting of /dev/sdb1 that is preconfigured in this backup. This depends upon the number of internal hard disks and the Dude that built your Dell.
To safely activate backups on a stock T100 configured as we've outlined above, here are the mandatory steps:
1. Format every USB stick you plan to use for backups. Insert the USB flash drive into the right USB slot on the front of your Dell T100. Log into your server as root and type: /root/usbformat.sh. Your USB flash drive is now formatted. Repeat the process for any additional USB flash drives. WARNING: Do not use this script if you have added additional drives on your system as it may inadvertently reformat the wrong drive! The script assumes you have one or two internal SATA drives and one USB stick inserted in the right USB slot on the front of your Dell T100.
2. Assign the proper device name to Mondo and activate it: With a formatted USB flash drive in place, log into your server as root and type: /root/usbdevice.sh. You're all set. A backup will be made each Sunday night. If no flash drive is present, the backup will be saved in /etc/usbmondo.
3. Run a test backup: With a USB flash drive in place, log in as root, and type: /etc/cron.weekly/disk-backup.cron. To be sure it worked, see #4.
4. Check the contents of your USB stick regularly! Plug it into the front right USB port, log in as root, and type usbcheck. It's a good practice to check this on Mondays to be sure you got a fresh backup on Sunday night!!
Other Backup Options. Of course, there are some other backup options. FreePBX is preconfigured to make an automatic backup of your FreePBX data once a week. This is controlled by the settings in Tools, Backup and Restore, WeeklyBackup. It currently is set to make a backup every Wednesday morning. You also may want to consider off-site backups. Amazon's S3 service is preconfigured including all necessary software and scripts. All you need is an account and password. For detailed instructions, see this Nerd Vittles' article.

Installing Cepstral on Your New Server. If you want real text-to-speech with Allison's familiar voice, then you'll need to buy Cepstral. It's dirt cheap for single, non-commercial use. To install it, run install-cepstral from the command prompt while logged in as root. At one point you'll be asked whether to create a missing directory for the Cepstral installation. Be sure to type y at the prompt rather than just pressing the Enter key. Instructions for registering your copy of Cepstral are displayed when the install completes. For complete documentation, read our previous tutorial.

Creating Your Own Hamachi VPN Network. We've saved the best for last today. This latest Orgasmatron III build includes the Hamachi VPN network software. All you have to do is initialize it. Once configured, you can add as many as 16 computers (including Windows, Mac, and Linux machines) to your own private virtual private network. Communications between all of your systems then will be encrypted by simply connecting to the other systems using their VPN network addresses (5.x.x.x). For complete setup instructions, take a look at our VPN in a Flash knol on Google. The entire setup takes less than 5 minutes.
 News Flash: As we put this article to bed last night, we tried one final experiment. We took the bootable USB flash drive from our VPN in a Flash build for the Aspire One NetBook that was featured last week and plugged it into the Dell T100. Guess what, Dude? Twelve minutes later we had a perfect clone of the Aspire One build on our new Dell T100. So, if you're looking for a state-of-the-art operating system with a fantastic GUI interface to pair up with Asterisk and PBX in a Flash, we may have another surprise for you to ring in the new year with your new T100. And it should work splendidly on the older SC440 as well as other machines with any industry-standard SATA drive. For 2009, PBX in a Flash perhaps should be renamed PBX on a Flash. Imagine carrying a full-featured, preconfigured PBX around on your keychain. Now that should impress even your nerdiest friends. There still are a few kinks with the latest version of Mondo which have forced us to build our own custom patches to get a successful restore, but we're oh so close... Stay tuned!

Special Thanks. As another year comes to a close, we want to take a moment to thank all of you for reading Nerd Vittles. About 50,000 folks from 137 countries around the globe read Nerd Vittles every week. The Nerd Vittles Official Flag above shows all of your home towns. Incidentally, the countries are ordered by the number of actual visitors from each country.
Where To Go From Here. We've covered a good bit of territory today. When you're ready, move on to the second part of this article at the link below. In the meantime, you have a new phone system that works. And there are a number of PDF documents in the /root folder on your new system which are worth a read. Better yet, you can browse through all of the documentation which is available for PBX in a Flash by going here. You also can dial D-E-M-O on your new system and see just how powerful direct SIP connections can be to other Asterisk hosts (in this case, ours!)... at no cost. Finally, you can log into your server and type help-pbx for access to a treasure trove of additional features. Enjoy and have a Merry Christmas!
Special Thanks to Our Generous Sponsors
FULL DISCLOSURE: ClearlyIP, Skyetel, Vitelity, DigitalOcean, Vultr, VoIP.ms, 3CX, Sangoma, TelecomsXchange and VitalPBX have provided financial support to Nerd Vittles and our open source projects through advertising, referral revenue, and/or merchandise. As an Amazon Associate and Best Buy Affiliate, we also earn from qualifying purchases. We’ve chosen these providers not the other way around. Our decisions are based upon their corporate reputation and the quality of their offerings and pricing. Our recommendations regarding technology are reached without regard to financial compensation except in situations in which comparable products at comparable pricing are available from multiple sources. In this limited case, we support our sponsors because our sponsors support us.
 BOGO Bonaza: Enjoy state-of-the-art VoIP service with a $10 credit and half-price SIP service on up to $500 of Skyetel trunking with free number porting when you fund your Skyetel account. No limits on number of simultaneous calls. Quadruple data center redundancy. $25 monthly minimum spend required. Tutorial and sign up details are here.
![]() The lynchpin of Incredible PBX 2020 and beyond is ClearlyIP components which bring management of FreePBX modules and SIP phone integration to a level never before available with any other Asterisk distribution. And now you can configure and reconfigure your new Incredible PBX phones from the convenience of the Incredible PBX GUI.
The lynchpin of Incredible PBX 2020 and beyond is ClearlyIP components which bring management of FreePBX modules and SIP phone integration to a level never before available with any other Asterisk distribution. And now you can configure and reconfigure your new Incredible PBX phones from the convenience of the Incredible PBX GUI.
 VitalPBX is perhaps the fastest-growing PBX offering based upon Asterisk with an installed presence in more than 100 countries worldwide. VitalPBX has generously provided a customized White Label version of Incredible PBX tailored for use with all Incredible PBX and VitalPBX custom applications. Follow this link for a free test drive!
 Special Thanks to Vitelity. Vitelity is now Voyant Communications and has halted new registrations for the time being. Our special thanks to Vitelity for their unwavering financial support over many years and to the many Nerd Vittles readers who continue to enjoy the benefits of their service offerings. We will keep everyone posted on further developments.
Some Recent Nerd Vittles Articles of Interest...


Ward,
I purchased the Walmart special and the SC440. Will these be of no value or will you be offering additional releases that will work on either or both of these machines?
What are the problems with using the same backup for both the Dell sc440 and the t100?
Will the only use for them be to build from scratch a machine with all the features.
Would it be possible to create an upgrade script that takes a standard build of PiaF and have it install all of the items included in the III build?
This would allow anyone to create a similar system at any time – it would just take longer to build and install the system.
Thanks for all you hard work!
TomS
[WM: Let me try to answer your questions. As to the earlier builds, they still will work on the machines for which they were designed. New features can be added to those systems using our traditional scripts which are provided both at Nerd Vittles, Best of Nerd Vittles, and pbxinaflash.org. This is not a difficult process. Most of the installs can be completed in under a minute.
Keep in mind that these are snapshot images. So there is really no way to keep them current although SUSHI has been designed to keep them secure and patched. You raise an interesting idea which is whether SUSHI could be expanded to provide software refreshes and new software as well. We have been reluctant to do this because some people frankly don’t want all the bells and whistles.
There are some items in the Orgasmatron II build for the SC440 that could lead to issues on the T100. I’m being vague about it intentionally. Suffice it to say that, on the T100, you’re much better off using the Orgasmatron III build.]
Sigh. I join the parade too early again. Just got the SC440 from Dell and as I am busy with work, I haven’t even pulled it out of the box yet. I have downloaded the software but don’t have the Aastra phone or a POTS card as of yet and I’m already "obsolete." I was going to try to get this thing up and running between Christmas and New Years.
.
Oh well. Thanks for the answer to Tom’s questions above. I’m hopeful that SUSHI will keep the SC440 up to date and be able to add any needed features in the future. I don’t want to buy another box at present.
.
Couple questions though:
1) For connecting multiple POTS lines (4 lines min, perhaps 6 lines), is it better to go for a plug-in card or to get multiple SPA devices?
.
2) Can PIAF handle incoming fax calls through POTS lines? Most everything I’ve read looks at fax receiving through VOIP.
.
I’m looking at PIAF replacing an aging Key system box that only has a couple working phones left. I’d just as soon not buy extra old stuff to keep the key system going. I may keep it around for emergency use, just power it down and disconnect the phones.
.
Sorry if this should be in the forums. Just haven’t gotten over there yet to post.
.
Reginald W
[WM: Not to worry. The new Orgasmatron III build should be fine on the SC440… just not the other way around (with Orgasmo II on the T100). Faxing should be fine, if not better, with POTS lines. With 4-6 lines, I’d probably go with an internal card.]
Ok. So I can "buy" O-III and install it instead of O-II and it should work? Cool. I’ll probably install O-II first since I have it and maybe wait until I am ready to go into production with PIAF and then do the O-III or whatever is the latest version at that time.
.
I’ve looked on Cepstral’s web site and I didn’t see anything regarding commercial use of Alison’s voice. You keep mentioning non-commercial use. So what is the difference? Or is it only in the dollar amount of licencing/concurrancy (number of lines that the voice can be used on at one time)?
.
Since I would be using this for business purposes, I would need to know whether it is cost effective to have Alison (or another voice) to use or just use the regular Flite or other voices for the system. Or my own voice if required.
.
Thanks.
.
Reginald W
One caveat for the T100 is to verify that it has the right kind of expansion slots for any PRI or other cards you may want to use. I noted that the T100 only has one of the older PCI slots, if you have need to use more than one PCI card you will be out of luck. Fortunately I have 4 PRIs on one card so no worries for me!
Here’s the Canadian Dell for $532 CDN. (2Gig, DVD)
Hi,
I’m interested to install PiaF in my virtual machine (OpenVZ) running CentOS, is there any better way short of doing what this page mentioned: http://chrisschuld.com/2008/11/installing-pbx-in-a-flash-piaf-on-an-openvz-vps/
Given that all your install instructions uses the ISO method, is there any easier way, like a tarball, or rpm as I’m using CentOS already…
[WM: See this post.]
In europe hp sells an hp prolaint ml 110 g5 for 200€, it would be great for the orgasmatron IV
I tried to use the T100 disk set on the SC440 but is did not complete sucessfully. I am still running Org II on the SC440 for now.
Has anyone else been successful at this?
Thanks
TomS
Apologies if this is a stupid question …I’m not very technically knowledgeable (!)
Dell in the UK don’t seem to be selling the exact spec of the T100 specified for the O-III. Only Xeon processors, for example. Does this mean the O-III is not a goer on this hardware?
Also – and I suspect I am asking a doubly dumb question here – do I need the "SAS 6iR Internal RAID Controller Card" if I want RAID 1 to work, or will the operating system take care of that for me?
thanks
[WM: Not stupid questions at all. The processor shouldn’t pose a problem but a RAID controller would unless you know a lot about Mondo. This restore expects your drive partitions to be named sda1, sda2, and sda3.]
doh! – I think I just found the answer:
http://pbxinaflash.com/forum/showthread.php?t=2895&highlight=raid
Perhaps "RTFF" will be added to the lexicon ;o)
Would you be interested in adding "Untangle" to the mix so the device need not hide behind NAT, but be attached to switch
inet – switch – NAT – stuff
inet – switch – O_III
Isn’t Dual Core Pentium a space heater and power sink?
(I’m not concerned about the environment, only the power bill)
Will O_III work on the everex or does it take advantage of the considerable greater power of this dell making it unsuitable for lesser machines?
Is there anything in O_III requiring this system in particular or could it be loaded on a spare Core2Duo 3Ghz/2gigs?
[WM: Great questions, but they’re better suited for the PBX in a Flash Forums. Come join the fun!]
lastly (for now probably)
What’s the ‘best’ way to set this up to simulate YouMail.com ‘s ability to set a custom voicemail greeting based on caller-id-number?
[WM: Sounds like a good project. We’ll take a look.]
Can I install O_III into VMware? merely to fiddle with it until hardware comes back on sale.
[WM: Haven’t look at VMware in a while but, unless you can set it up with a SATA drive, the short answer is "no" without a lot of MondoRestore tweaking.]
I am surprised we have not seen a build of Orgasmatron for VMWare. That way it would be hardware independent. Sure you can’t use any cards but I am using Piaf in a VM right now and it seems to run fine. VMWare ESX3i is free now so this would be a great solution.
[WM: We’re workin’ on it. Stay tuned. 🙂 ]
Will the Orgasmatron III work with the Dell PowerEdge T105 w/ Dual Core 1216 Processor 2x1MB Cache, 2.4GHz Opteron?
[WM: So long as it has a SATA drive configurable as /dev/sda, it should work fine.]
I have a 5V analogue PCI card which will not work on a Dell T100 or T105 server which only support 3.3V PCI slots. Will the Orgasmatron III work with a Dell PE840 server with an E4600 2.4GHz processor, 800MHz FSB, two 250GB cabled hard drives connected to the onboard SATA controller, and 2GB of 667MHz DDR2 RAM?
[WM: Sorry I don’t have a PE840 to test. You might want to post this question on the PBX in a Flash forum.]
Would I be able to get a Rhino R24FXX-EC Modular PCI card in the T100/105 ? http://www.rhinoequipment.com/R24FXXcard.html
[WM: I don’t know. Check the forums or check with Rhino.]